We’re already learned the basics of adding page numbers to a Word document, and now we’re going to look at some more things you can do with page numbers, including:
- how to stop your first page displaying a page number
- how to have page numbers in different formats in your document
This will be particularly useful if you’re formatting the page numbers on a PhD or other thesis or dissertation – many of my student clients don’t know how to do this, which is what inspired me to write this series of articles.
How can I have different page number formats in different parts of my document?
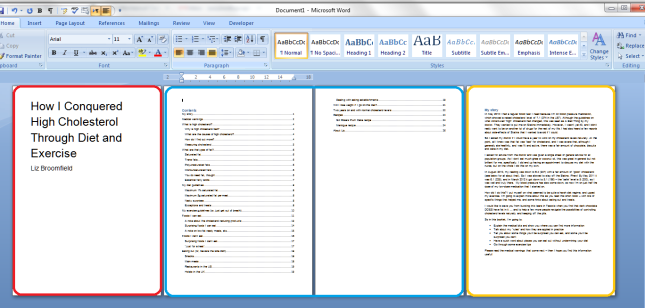
Imagine that you’ve written a thesis or a book – something that has a title page (red), a contents list (blue) and then the main body of the text (yellow). It’ll look something like this …
Now imagine that you’d like to have different page numbering for different parts of the document – for example, no page numbering on the title page, Roman numerals for the contents pages, and then the numbering continuing in Arabic numerals for the main body of the text. Look at a non-fction book or someone else’s thesis and you’ll see that this is how they’re often laid out.
How do you do this? First of all, you need to divide your document into discrete sections, using section breaks. Let’s learn how to do that …
How do I see what formatting I have in my document?
If you plan to insert section or other breaks in a document, it’s useful to be able to see what breaks you have in there already. In the document I’m using an example, I would suspect that the aurhor has added some sort of breaks to make the contents page and then main text start on new pages.
How do we check this? Make sure you’re on the Home tab and then press the Paragraph button in the Paragraph section …
Once you’ve pressed the button, you’ll find all sorts of strange marks appear. You can also see that the new page has been started by inserting a Page Break (and not using the Enter key – hooray. If you want to know the reason for the “hooray”, read this article.
The paragraph mark indicates a return, and the Page Break label shows that a page break has been inserted here. That’s great if you just want to start the next chunk of text on the next page, but we want to format each section differently, and this requires a section break rather than just a page break.
How do I insert a section break?
In order to insert a Section Break, we need to delete the page break first. Highlight the page break and press the Delete key or place the cursor just to the right of it and press the Backspace button. As soon as you do that, you’ll notice that the text which sat neatly at the top of the next page has jumped up onto this page. Don’t worry, it will disappear again …
To insert the Section Break, you need to be in the Page Layout tab (not the Insert tab, confusingly). There you will find an area called Page Setup which includes a Breaks menu:
When you press the Breaks button, you’ll see a menu offering several different options for the break you wish to insert – including our old friend the page break and our new friend the section break.
The one we want is Section Break – Next Page. As the text explains, this will insert a Section Break and start the next chunk of text on the next page – exactly what we want to do. Choose that option and hey presto …
… a Section Break (Next Page) appears on your page. And the Contents page has moved back to Page 2.
Note that in this example, we’re dividing the document into three sections, using two section breaks, so we need to add one at the end of the contents list, too …
So now our document is divided into three sections – 1, the title page, 2, the contents list and 3. the main body of the text:
How do I add different formats of numbers to different sections of my document?
Now it’s time to add those page numbers, remembering that we want no page numbers at all on the title page, the Roman numerals on the conents pages followed by Arabic numerals for the rest of the document.
We’ve seen how to add page numbers before, using the Headers and Footers on the document. We’ll do that in a moment. But this time we need to do something else first: we need to remove the association between each section and make tat sure each one is independent. This will allow us to assign different page number formats to each section (and other formatting – I’ll write about this another time, but it’s the way you get your document to let you have certain pages in landscape rather than portrait orientation, etc.
How do I stop my footer having the same format as the previous section?
The trick here is to make sure that the footers do not simply copy the previous section of the document. if they do, you will have trouble making each section different. We now need to go into the second section of the document and disconnect its footers from those of the first section.
So, first of all, go into the Design tab or just left click on the bottom part of your page, below the text. In both cases, the Design tab will display and you need to look at the Navigation area. You will see that the footer automatically decides to be Same as Previous – we need to disconnect this footer from the previous one. Up in the Ribbon, Link to Previous is highlighted, reminding us that this section’s footer is linked to the previous one and providing a handy hint as to how to stop that.
If you press the Link to Previous button it will turn from yellow back to white, you’ll notice that the Link to Previous note in fhe footer has disappeared. This means that you can format Section 2 independently of whatever’s going on in Section 1,
Note that the Header has its own ability to Link to Previous, which is separate from that of the Footer, which means that you can keep any header text you’ve added to the document working throughout the document without needing to re-insert it into each section.
Before we start getting excited about adding those page numbers, make sure you’ve done the same to Section 3, disconnecting it from Section 2. Changing Same as previous in one section won’t have any effect on the next section:
Remind me how to add page numbers …
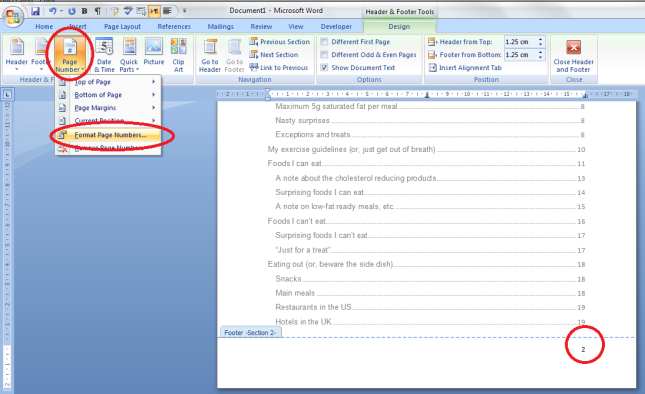
Now we’re ready to add the page numbers to the document. Ignoring Section 1, which doesn’t need a page number, we can go into the page number add part of Section 2. Just to remind you, that’s on the Page Number area of the Design tab, and in this case we want to add a page number at the bottom of hte page, so we select Page Number then Bottom of Page and the particular position we require, so as to set up the page number position before formatting the actual numbers.
Now it’s time to format the page numbers. So its back to the Page Number button but we choose Format Page Numbers …
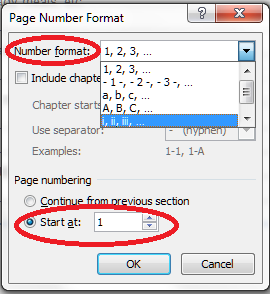
You will see on this example that the page number has automatically inserted itself on the first page of the contents (Page 2 of the document), but it has defaulted to being in Arabic numbers and to helpfully inform us that we’re on page 2 of the document. However, we want Roman numerals, AND we want it to start with Page 1. So, into that Page Number format menu, and there we can …
… choose Roman numerals (top) and start at page 2, not page 2. Press OK to set those …
And look – as if by magic, the page number is now i instead of 2.
Now, for section 3, the main body of the text, we want Arabic numerals which continue from the last number in Section 2. So in this case we choose the Number Format to be the default, Arabic, opion, and tick Continue from previous section. In this screenshot, I’ve already pressed OK, so look at the bottom of the page …
and there’s a lovely figure three.
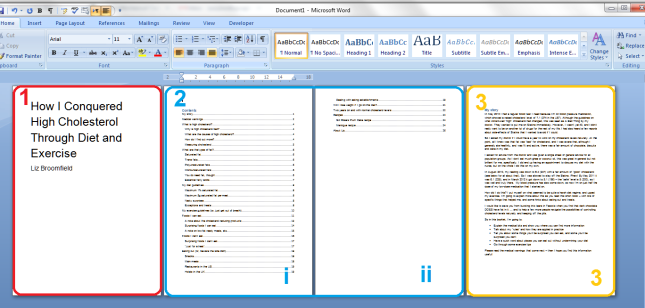
So, to you what weve done in a colourful and dramatic way which is a bit more over the top than what we would actually want our document to look like, we’ve done this:
And while individual institutions’ formatting rules still take precedence, this is what most of my PhD students like their thesis page numbering to look like.
In this article we’ve learned how to add different kinds of page number to different parts of the document, and more complicated formats for page numbers. If you need more of a recap on the basics of page numbering, see the article on that topic.
If you have found this article useful, please share it using the buttons below, and leave me a comment!
If you’re at all interested in my anti-cholesterol diet book which I used as an example in this document, find out more here.
This is part of my series on how to avoid time-consuming “short cuts” and use Word in the right way to maximise your time and improve the look of your documents.
Please note, these hints work with versions of Microsoft Word currently in use – Word 2003, Word 2007 and Word 2010, all for PC. Mac compatible versions of Word should have similar options. Always save a copy of your document before manipulating it. I bear no responsibility for any pickles you might get yourself into!
Find all the short cuts here …


Owen
March 12, 2013 at 12:13 pm
Your exposition is a model of clarity and is really helping me tidy up the hideous mess that is my PhD thesis. Thank you 🙂
LikeLike
Liz at Libro
March 12, 2013 at 12:14 pm
Thanks for your comment, Owen, and I’m very glad that I’m able to help. I hope more students find out about this post as it’s a tricky one to have to deal with, especially close to your submission date!
LikeLike
Robert
August 20, 2014 at 10:29 am
I need to insert page no x of y, how do I stop it adding up the pages in both sections of my document eg section 1 finishes at page 36 section 2 at page 44 but all my pages in section 1 say page 10 of 44 not 36
LikeLike
Beverly
October 2, 2014 at 6:57 pm
Thank you.The best explanation and help for formatting page numbers.
LikeLike
vicky
March 9, 2015 at 3:33 pm
Hiya,
I cant alter the page numbers at the start to roman numerals as the “same as previous” tab does not appear when i edit the footer. any suggestions please. many thanks
LikeLike
Liz Dexter
March 9, 2015 at 5:45 pm
Thanks for your question. You should be able to go to format page numbers and sort matters out from there … let me know if that doesn’t work, including a note of which version of Word you’re using and whether you’re on Mac or PC.
LikeLike
Mike Day
April 1, 2016 at 3:57 pm
I left a comment a coupe months ago and likely missed your response. I have a lot of documents that i just moved into a new Word document. While the page numbers print correctly when the document is initially opened the footer on page one always indicates page 1 of 2. As soon as i double clink the footer it updates to the correct number of pages.
LikeLike
Liz Dexter
April 1, 2016 at 4:00 pm
Odd, I don’t seem to have seen that comment. Does it stay OK once it’s updated? I would pick up the whole document and paste it into a whole new one or do Save As and give it a new name, in case it’s some sort of weird artefact from the first of the documents you combined.
LikeLike