 In response to a request for information*, today I’m going to be talking about Storify: what is it, why would you use it, and how do you use it? I wasn’t already a user, so this post takes you through the stages of logging in and creating your first story through screenshots created as I did it for the first time myself!
What is Storify?
Storify is a social media tool that lets you create stories or timelines from a variety of social media resources like Facebook and Twitter, as well as other web resources. You can use it to pull together information on whatever you want, and can customise it how you want, then share your story on the site with your friends on those social media sites.
Why use Storify?
I’ve mainly come into contact with Storify in relation to events. For example, Karen Strunks pulls together a Storify after every Social Media Cafe in Birmingham. She gathers any Tweets and Facebook posts which have used the hashtag #bsms and creates a storyline showing the event through its before, during and after stages, and what people were saying about it. Here’s an example of one of her Storify stories.
So you can see that it’s a great way to pull together information and images and make a story that you can share with others. It’s useful for events, news on particular topics, or fundraising and awareness raising campaigns. You don’t have to base it around hashtags (a hashtag is a short code with a # in front of it that creates a searchable link in Twitter and Facebook, etc., which allows you to find all of the tweets on a particular topic. For example, even if you’re not a member of Twitter, searching for the hashtag #amwriting, used by authors, will give you these results, all containing the hashtag (example)).
How do I join Storify?
If you’re not already a member, you need to go to www.storify.com and sign up. If you don’t already have an account, you need to click the Login button at the top right:
You will be given the option to log in using Twitter or Facebook. Actually, you will still need to create a password and account with Storify: what this does is associate your Storify account with your social media account. You can also just create a username and password.
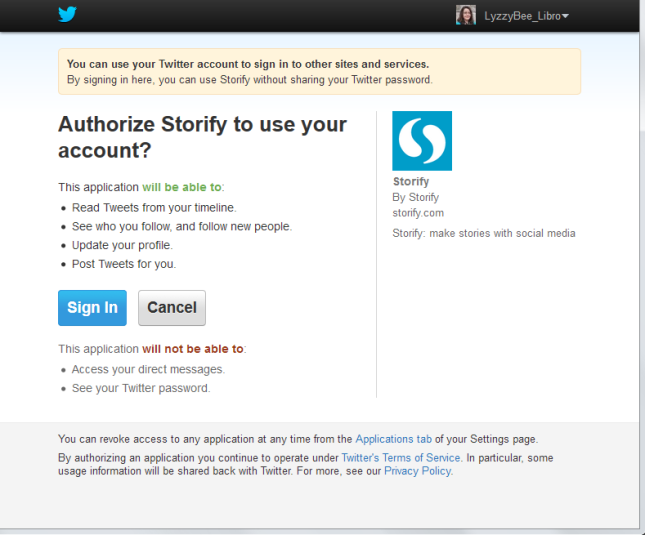
I chose to sign up using my Twitter account, as that’s what I use most for business and sharing. As it says, it only connects to your Twitter account and uses its authentication, it doesn’t see your password etc. And when it says it will Tweet for you, that’s only when you create a story, not randomly!
So I told it my Twitter username then added my email address and a password:
And that was it, I was ready to create my first story!
How do you create a Storify story?
Once you’ve created your account, you’re ready to create a story. There’s a big green button on the top row of the website, Create Story. Click that …
… and you’re taken to a slightly alarming page – alarming because it manages to look both blank and complicated! But look: little tips come up the first time you use it which guide you through what to do!
Basically you’ve got an area where you create your story on the left and a place to search for content on the right.
The first thing to do is create a name for your story. You can also press the Save Now button at this stage, which will prompt it to autosave as you go along.
I’ve given my story the edifying title “Test CBSMS story” and now I’m ready to add content, or Search for elements, as Storify calls it:
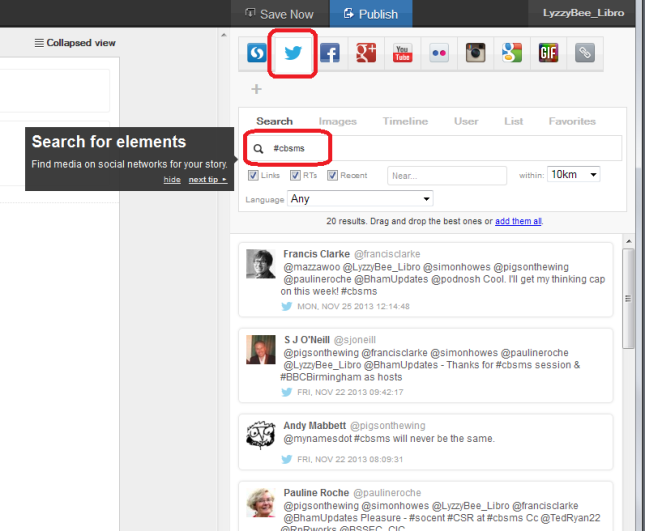
There’s a row of tabs along the top – I clicked on Twitter and then searched for #cbsms [Central Birmingham Social Media Surgery], because I knew that that was the hashtag used around the event. But you can search for anything here:
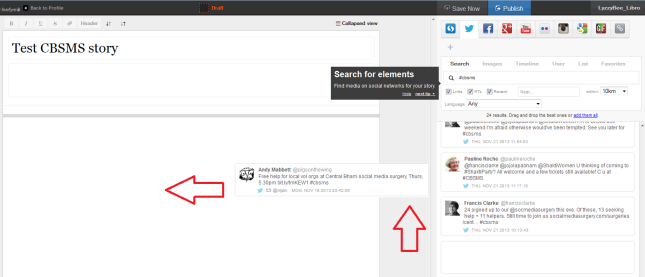
You can see that a set of Twitter results has come up, and all of them contain the hashtag. Storify now handily told me what to do: drag and drop the tweets I wanted into the story area:
This means that you can pick up particular results but not all of them – useful if some of them are repeated or just ‘chatter’ that you don’t want to include. It also means that you can put them into whatever order you want, rather than the order imposed by the standard Twitter view (I made this one like Twitter, with the newest tweets at the top, but if you look again at Karen’s example, she switched it round to read from top to bottom).
Click on the tweet you want to include and drag it across into your story area:
Once I’d popped a couple of items in, I was told that I could add text:
You click on the space between your items and type whatever text you want to add:
So I added a note explaining the last two entries in the story, where I checked it was OK to use the hashtag to create this worked example.
I then hit the Save Now button – which I mentioned earlier and should have done at the point at which I mentioned it! Just in case!
Adding more sources to your Storify
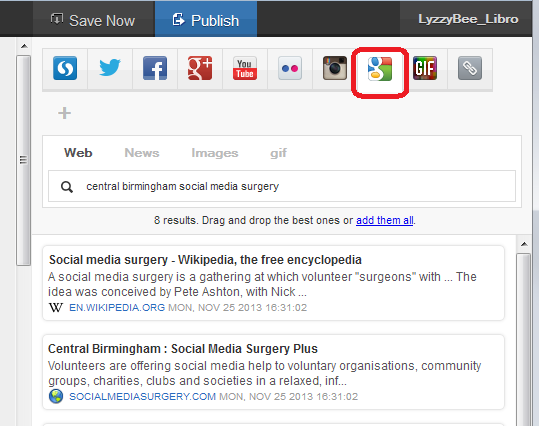
You’re not limited to creating a Storify from only one source. Along the top of the search area you can see loads of different options, including Facebook, Google+, YouTube, Google, and your own photos and links.
Note that if you choose Facebook, you will need to log in and link it to your own Facebook account (again, this won’t do anything nasty, it just appears to need to use your own Facebook timeline. Of course, you can search for anything on Facebook once you’re logged in). You don’t seem to need to do that with Google+, though.
This time, I didn’t bother with any Facebook items, but I did pop into Google search and picked up some explanatory information about the Social Media Surgery to add to my story:
How do I publish my Storify story?
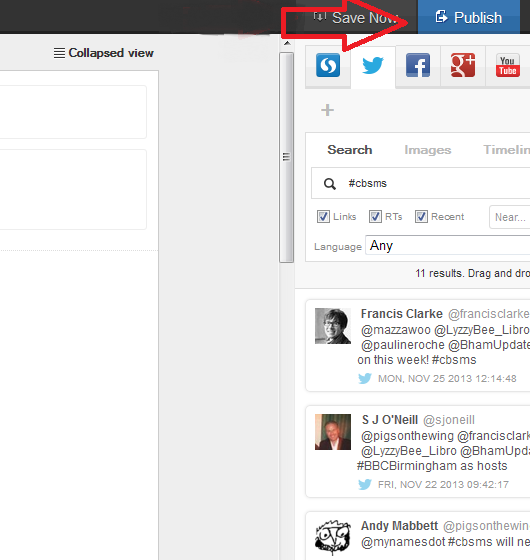
The first step is to hit the Publish button at the top right:
Just in case I had pressed it too soon, I was shown a confirmation box:
I was ready to publish, so I clicked on Publish story.
The next step was Share & notify. Sharing creates an automated Tweet with a link to your story. I imagine that if you’ve signed in to Facebook, etc., you will also be given the option to post an automated status update.
Notify lets you autotweet anyone who’s a friend on Twitter and is mentioned in your story to tell them that their tweet has been included in your story. I really like receiving these notifications, so I left these ticked, but you can untick them if you don’t want to do this.
This process creates my story in Storify. At this point, the story gets assigned a URL that I can quote in emails or add to my blog. In the case of this story, it’s http://storify.com/LyzzyBee_Libro/test-cbsms-story, and this stays with the story on my profile for ever more.
What does my Storify look like on my Twitter account?
Finally, I popped over to my Twitter account to see what my story looked like on there. The top tweet is the automatic tweet with the link to my story, and the ones underneath are those ones that automatically tell people that they’ve been included. Exactly what it said it would do.
What else can I do with Storify?
When you’re searching, you can refine your search to exclude retweets, etc.
You can get a paid account which is useful for large businesses or organisations. This seems to allow a lot more customisation and also real-time updates – however, I like the editable nature of the free version and I’m not sure if that would get lost if real-time updates were running. Maybe someone who has a paid account will come along to share the uses of that. But I think most people will be OK with the free version.
* I was helping the Chinese Community Centre in Birmingham at the November 2013 Social Media Surgery and they wanted to use Storify to pull together stories from their Oral History Project. We ended up talking about their blog rather than Storify, but I promised to put together some instructions for them. This one’s for you! Note: This is not a sponsored post, but an exploration of a potentially useful tool.
———————
This post has taught you – through my own learning process – about using Storify. You can find more posts about using social media in the relevant part of my resource guide.
If you would like more detail about how to use Storify for your content marketing, have a look at this article by Fiona Cullinan.
If you’ve found this article useful and/or interesting, please do post a comment and share using the buttons below! Thank you!










Cosmic Frog Jo
November 28, 2013 at 9:43 am
Thanks for a really easy to understand piece explaining Storify. A fantastic resource. I will be sharing this with my networks.
LikeLike
Liz at Libro
November 28, 2013 at 9:44 am
Thank you for your comment. I wasn’t sure how many people knew about it and it’s really handy!
LikeLike
wyldetwo
November 28, 2013 at 5:06 pm
This looks really interesting Liz – will suggest it to my fellow @secfellowship people as a way of creating a bit more buzz around our meetings! Thanks for writing this post.
LikeLike
Liz at Libro
November 28, 2013 at 5:33 pm
Glad you found it useful, Jen – it’s a good way to pull stuff together from various places and you can be followed and make friends on the site itself, too.
LikeLike
ryan seenanan
April 13, 2015 at 9:38 pm
How do I edit a story that is already published?
LikeLike
Liz Dexter
April 15, 2015 at 8:17 am
Hi Ryan, thanks for your question, have you tried clicking on your story in your own editor? You should be able to edit it if you’re logged in and viewing it as an administrator.
LikeLike
Brat Sco
March 1, 2016 at 2:26 pm
Thanks for elaborating so deeply. Much appreciated.
LikeLike
slwaller
September 18, 2016 at 11:19 pm
Thanks for the great tutorial! I learned all I needed to start using Storify. Thanks!
LikeLike
Liz Dexter
September 19, 2016 at 7:21 am
You’re welcome, glad I could help!
LikeLike
Joanne Keeling
March 2, 2017 at 8:29 am
Great article giving me just the info I needed…thank you!
LikeLike
Liz Dexter
March 2, 2017 at 8:34 am
Glad I could help!
LikeLike
Igor Kholkin
September 10, 2017 at 9:34 am
Great resource – thanks for putting it together Liz!
LikeLike
Liz Dexter
September 11, 2017 at 8:39 am
Thank you!
LikeLike