It’s Word Tips time again and today we’re going to talk about customising your contents page.
Why do people customise their contents page?
Sometimes you have lots and lots of sub-headings in a document but you only want to show the main or main and sub-headings on the contents page, not every tiny sub-sub-heading.
In addition, you might want to change the style of your contents page or its individual font and layout. Here’s how to do it, with a worked example of changing the levels that are shown.
Reminder: how do I insert a contents page?
Here’s our document, with headings at H1, H2 and H3 level. I’ve marked these up with their heading levels already (see here for how to assign heading levels).

If we just follow the usual process for inserting a table of contents, we will create a blank page before this one, then go to the References tab and choose Table of Contents, then click on one of the automatic options that come up.

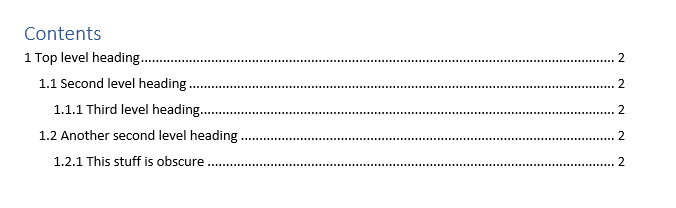
This is the result: a table of contents that includes all the headings in our original text:
How do I select which heading levels appear in my Table of Contents?
If you want to ignore all headings below level 2 (1.1, 1.2) then you need to customise the table of contents.
As before, select the References tab and the Table of Contents button. However, now click on Custom Table of Contents

This will give you this dialogue box:

There are lots of different things you can do here. For example, you can choose to show or not show the page numbers in the table of contents, and whether or not to align them. The preview panes at the top will show you the results before you click OK.
Options allows you to choose the style for the table of contents from a set of heading styles, and Modify then Modify again allows you to completely customise the appearance of the table of contents text permanently, with underlining, different fonts, etc.
At the moment, we’re concerned with eliminating the level 3 headings from the table of contents.Click on the arrows by Show levels to adjust how many levels are displayed:

And click OK. Here we have changed the number of levels to 2, and the result is this:

Even though the text still has the same headings and levels it had before, the table of contents now just includes those headings down to Level 2
This is part of my series on how to avoid time-consuming “short cuts” and use Word in the right way to maximise your time and improve the look of your documents. Find all the short cuts here … Please note that these tips are for Word 2010 and later for Microsoft. I can’t guarantee or check they will work in Mac versions of Word.
Do let me know if this has helped you – and do share with the buttons at the bottom of this article.
Related articles on this website
How to use headings styles – make your headings clear and consistent
How to set up numbered headings – ones that automatically update themselves!
How to create a Table of Contents – read the posts on Headings first
Table of Figures and Table of Tables – how to create these tricky ones
How do I add or remove auto-captions?
Two-line caption, one-line entry in the Table of Figures: how?
How to update Tables of Contents, Figures and Tables
Tables of Contents for editors – helping the editing process run smoothly


Don Massenzio
March 28, 2019 at 5:15 pm
Reblogged this on Author Don Massenzio and commented:
Check out this helpful post from the Libro Editing blog with How to customize your contents page in Word
LikeLike