RSS

Monthly Archives: October 2014

My work is being proofread – why do I need to use Spell Check?

Spell check buttonI recently posted a how-to article about using Spell Check (well, one for Word 2007/2010 and one for Word 2013, actually). Today I want to talk about why you should use Spell Check, even if you’re using an editor or proofreader of the human variety to check your work.

Using Spell Check before you send your work to your editor

So, you’re using an editor to check your work: why on earth should you need to run a spell check first?

I’m not talking about going through your document with a big pile of style guides and dictionaries by your side. I’m talking about taking maybe half an hour to press the spell check button and go through your manuscript removing the obvious errors. You know, the ones where you spell it obvis errrors.

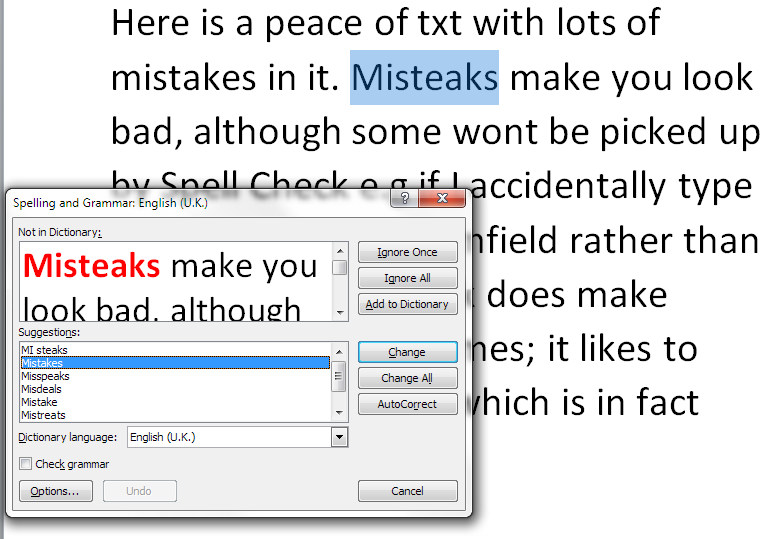
As an editor, it can get a bit frustrating when you’re picking away at typos (form for from, fried for friend) which are composed of ‘real’ words (which obviously a spell checker program won’t notice) and then you find a load of fromms or frends which a spell check would have eliminated. And here’s the thing: we’re human. If we’re concentrating on picking up your incorrect spellings and non-existent words, we’re less likely to be able to concentrate in detail on what we’re supposed to be doing: making your language express your thoughts and meaning as clearly as possible.

Yes, we can run a spell check for you, and if I spot more than the odd error that this would eliminate, I will do that myself. But it’s time-consuming. And that’s another thing: time-consuming. Some editors charge by the time spent, some by the word. I’m a charge-by-the-word woman myself, but if you’re paying for someone’s time, why pay them to do something you can do yourself?

So, there are two points to bear in mind here:

  1. If your work isn’t spell checked, your editor will be concentrating on those issues and less able to go deeper into their work
  2. If you’re paying by the hour, you’ll be paying extra needlessly

I have to add here that it can seem a little impolite, too, to not run a spell check before you send the manuscript in to your editor. A little bit as if you’re the creative person with the big ideas and you’re sending it off to the paid help who will sort out things you’re too important to do. I’m pretty sure that this is NOT the case for the majority of authors, but it’s always best to avoid that impression if at all possible. See the caveats below …

What if I don’t know whether spell check is correct?

That’s fine. We’re the experts, you’re the creative one. If you’re not sure of your spelling and which word is correct, you can always either leave a note in the margin or let us know you ran a spell check but you’re not sure of a few things. In fact, spell check itself isn’t always correct (see below). All I’m saying here is that the fewer avoidable mistakes there are in your manuscript, the better the job that I’m able to do for you.

Times when pre-spell-checking isn’t appropriate

I’m not a monster and I’m not inflexible – nor are the other editors I know. We’re a kind and helpful bunch. If you have issues with your spelling, dyslexia or any other special situations, of course we’re not going to reprimand you over issues in the spelling in your document. Also, if you’re using voice recognition software, I’m not actually sure how the spell-checker works in that situation (if someone who uses such software wants to comment, that will be very so useful and I’ll include your notes in an update).

However, it is important to let your editor know if you have any special issues like these. It will help us to do a better job for you, and perhaps even to explain our choices and changes in a way that’s easiest for you. Also, we can look out for particular artefacts that might arise in your manuscript because of the way in which you’ve written it (voice recognition software is notorious for inserting homophones into the texts it produces). As I said, we’re an understanding and helpful bunch, and we want to help you in the best way possible.

Using Spell Check when you’ve received your work back from your editor

No – I don’t mean right away! Well, if you find a load of legitimate errors  you might want to speak to your editor (although nobody’s perfect and no editor I know can do 100% perfect work: we’re human). But, most of the time, your manuscript is going to come back to you either in Word with Track Changes turned on or in an annotated PDF which you then need to update. In both of those cases, you doing the corrections can allow errors to creep in. It’s nobody’s fault, it’s just what happens.

I learned this the hard way when I received my last manuscript back from my editor. I accepted changed as I went along and did one final Accept all changes once I’d reviewed the document, but some oddities had crept in, especially in the spacing around punctuation. Luckily, I noticed in time, ran a quick spell check and got it all sorted out – but if someone who’s an editor herself can manage to introduce errors when dealing with her editor’s edits (sorry!), I’m going to assume that anyone can manage to do that!

Beware: Spell Check is not always right (gasp!)

There is a caveat here.

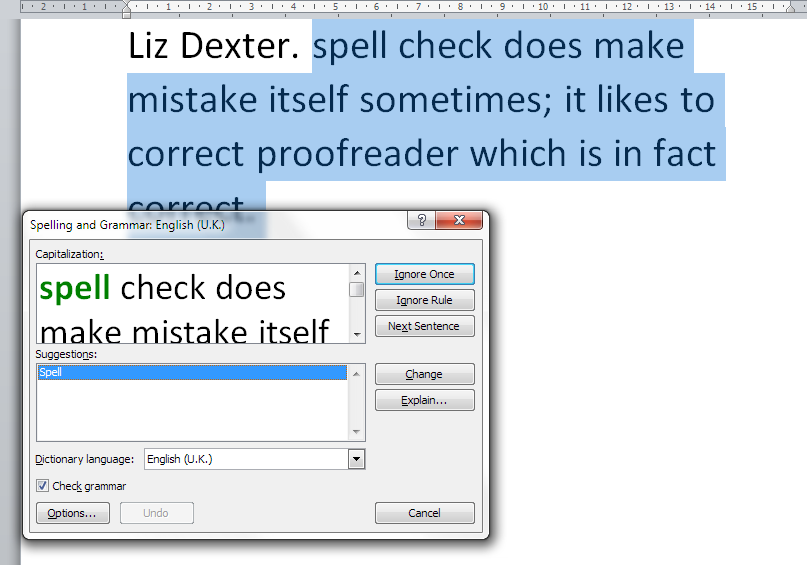
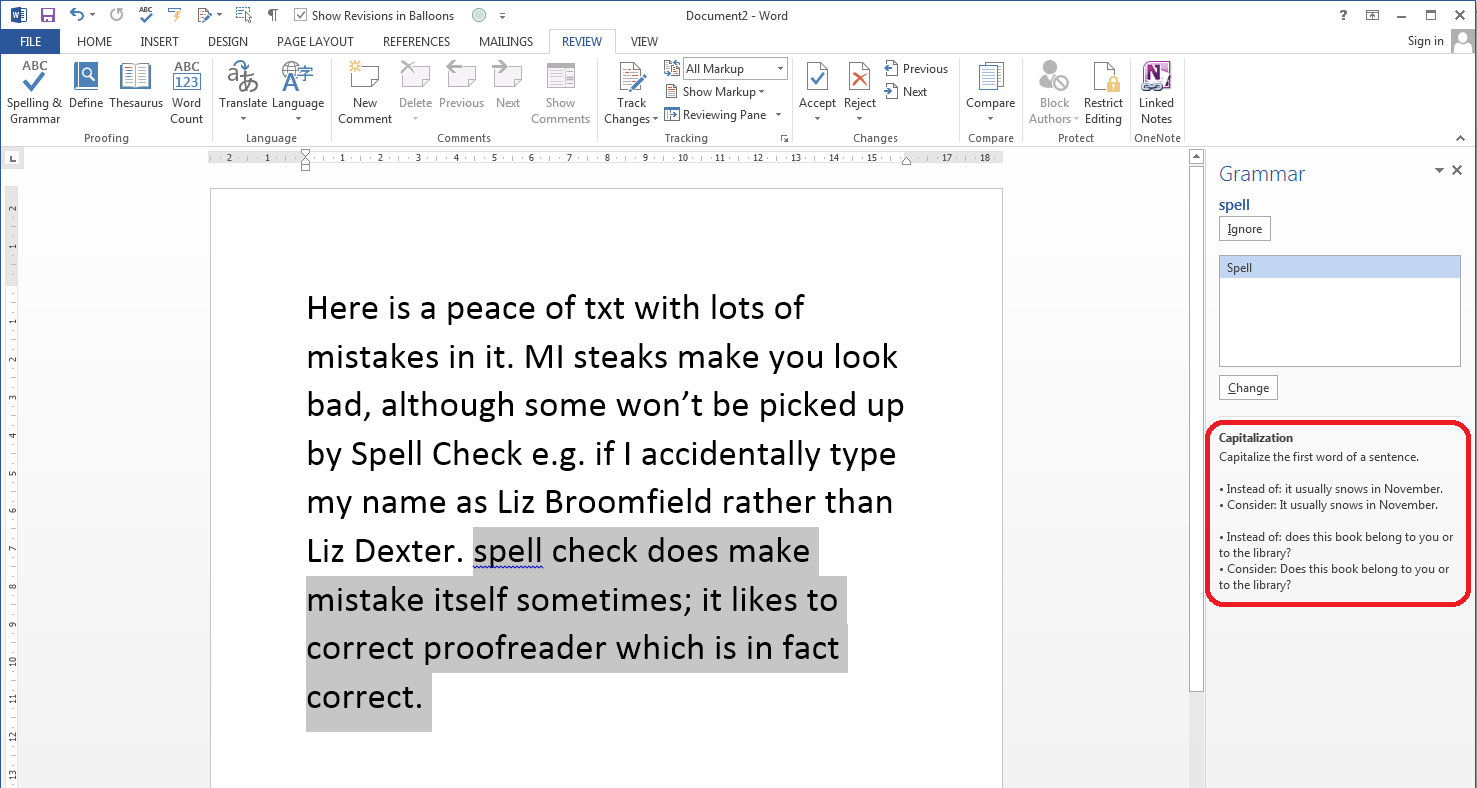
Much of English grammar is not totally prescriptive. There are often two ways of going about doing something, especially when you look at hyphenation and capitalisation. This means that when you’re spell-checking after the edit, you should bear in mind the style sheet that your editor’s sent you. If they’ve chosen a particular word form to make things consistent in your manuscript, I’d consider keeping it even if the automated spell check says it’s wrong (in its opinion). Microsoft software appears to use something called the “Microsoft Manual of Style“, but obviously if you’re working to a particular style guide such as Oxford or Chicago Manual of Style, they will over-ride Microsoft if there’s a clash. A classic example of this is “proofreader” – that’s the accepted way of writing the word in most of the major style guides, but Word Spell Check does like to change it to proof-reader. I’d kind of assume your editor knows how to (not) hyphenate that one, but do bear this in mind when you’re doing that final check.

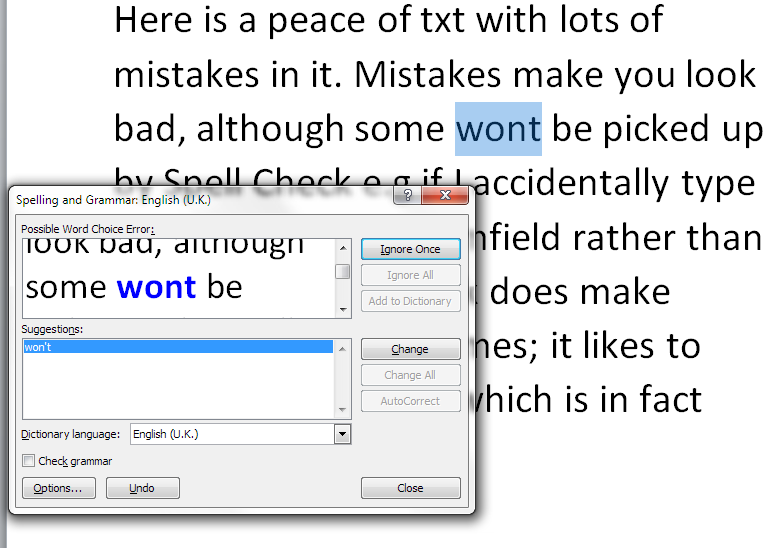
Also, if you’re writing creatively, your editor might have left something in which is correct, but creative, while spell check (even without grammar check) might take issue with it. A classic example I find is spell check trying to change they’re to their, irrespective of the actual correct use of the word. So beware on grammar or word form choice issues like that – you can always check back with your editor or consult a style guide if you’re not sure.

This article has talked about why writers should use spell check even if they have an editor. If you’ve got an opinion on this, or a good reason NOT to use spell check, do please post a comment below! And if you’ve enjoyed this post or found it useful, please do share it using the share buttons!

Related posts on this blog:

Using Spell Check in Word 2007 and 2010

Using Spell Check in Word 2013


Tags: , , , , , , ,

Google+ for business

In this article I’m going to go through how to set up a business page on Google+

Because I don’t want to show my home address in public on Google, or give it to Google, most of the examples here are drawn from setting up a Brand. However, I understand that the principles are the same if you’re setting up a local business with an address. Do get in touch if you’d like to share screen prints from setting up an account with an address and I’ll be happy to include them (but not tell everyone where you live!)

Why should I set up a Google+ account and page?

This is a good question, as Google+ is known to be one of the rather less active social media platforms. However, the clue is in the word “Google”. Basically, stuff you post on Google+ and your Google+ page will be indexed more quickly by Google and will appear as more relevant in a Google search. There are active communities in Google+ and Hangouts and other social discussions and groupings – I have to admit that what I personally do is auto-post to Google from this blog and my others, so invest minimal effort, but it is worth doing for the indexing and SEO side alone.

How do I set up a Google+ account?

If you have a Google email address, you will automatically have a Google+ account. Look at the top of your email and you’ll see a +[your name] icon …

Google+ icon

You do need to have a Google account to have a Google+ account, although of course you don’t need to use it for anything else. Notifications about Google+ interactions come to your Gmail, but you could set up an autoforward to send that to another email account. Anyway, enough about options for escaping being taken over by Google – click on the +[name] icon and you’ll be taken to your Google+ account:

Google+ account

You can see that this looks quite a lot like other social media platforms such as Facebook, with posts by friends, recommended contacts (names deleted for privacy purposes) and a place to post an update at the top.

We’re not going to explore personal G+ at the moment, but instead look at the business application.

How do I set up a Google+ page for my business?

To access the Google+ pages creator and editor, click on the Home button at top left and choose Pages:

Pages on Google+

This will lead you to an option to choose a business type:

Google+ pages business type

Clicking on Storefront or Service Area (which is what I chose when I first did this) will first give you an option to search for a business. This gets a bit confusing, but we’ll work our way through it. If you choose Create New Page, as you would expect to do, after clicking Not a Local Business …

Google+ pages create new page

you will get the option to add a business with a street address. This is great if you have a shop or trading address, for example if you welcome people into a high street shop, have a gym in an out-of-town location or have customers visit your home to collect products, have therapeutic sessions, etc., and if this is the case, you can fill in all the details and have a listing for your business appear on Google maps for prospective customers to see.

Google+ pages add your business

Here’s what a business with a local page looks like on Google Maps. Here, I’ve searched in Google Maps for the business name, but it will also appear if you are viewing the map of the area at a certain level of zoom:

Google+ pages on Google Maps(thanks to Alison from Silicon Bullet for letting me use her business as an example!)

But what if I don’t want to list my address and have a pin on Google Maps?

I don’t want to list my address on Google Maps because I work from home, but I don’t see any clients here and I don’t really want the world to know my address! So this is how to set up a Google+ page without your address. Note, you can’t cheat the section above and put in spaces or dots – it really does want to pinpoint your address with a little label.

When you’re at the point of choosing your business type, choose Brand if you don’t want to have to add your address:

Google+ pages business type brand

This will take you to a screen where you start to add your details:

Google+ pages add brand details

You can now start filling in your details:

Google+ page set up brand

You can add in your URL and select the type of thing you’re talking about – so this is how you set up a community or other non-business entity, too.

Do note that you need to tick the box to agree to the Pages Terms (and do click through to have a look and check you DO agree) and to confirm that you’re authorised to create the page.Then click Create Page to create your page:

Google+ page setting up brand page

Once you’ve created your page, Google+ will give you a tour or you can just get started customising your page.

Google+ pages page created

This is all pretty self-explanatory. For example, you will be asked to complete your profile and given options to share updates. There’s also a section where you can see Insights – how people are interacting with your new page.

Google+ page complete profile

You can update your cover with your own image as well as adding your own picture to the place on the left:

Google+ page change background

Once you’ve clicked Change cover, you can choose one of the gallery or upload your own photo (if you have already put up several cover photos, you can click on that link to choose one you’ve used earlier).

Google+ page change cover

Upload takes you into your own folders so you can choose your own image. Here I’ve added my own image and I can now explore, add updates and add contact information and links.

Google+ page complete profile

How do I edit my Google+ business page(s)?

You can access your business pages at any time by clicking the Home button and choosing Pages. If you’ve created more than one Page, you will be shown all the ones you have active, with a link to edit them:

Google+ page edit pages

The Golden Rules of Google+

The rules here are the same as everywhere on social media …

  • Be professional
  • Reciprocate and share

In this post, we’ve learned about Google+ pages and how and why to create them. To learn about more aspects of social media for business, take a look at the resource guide.

if you’ve enjoyed reading this article and have found it useful, please take a moment to click on the buttons below to share it! Thank you!

Other relevant posts on this blog:

Facebook for business

How to delete posts and block users from your Facebook page

How to add a moderator or admin to your Facebook page

How to find a job using Twitter

Using Twitter for your business

Using LinkedIn for your business

Additional resource:

Garrett and Mike from Techfunction Magazine have got in touch to let me know about their resource guide to Google Business – read the first article here.

 
1 Comment

Posted by on October 22, 2014 in Business, Social media


Tags: , ,

How to use spell check in Word 2007 and Word 2010

In this article we’re going to talk about using the spell checker function in Word, including how to find it, how to use it, and when not to believe it. This article works with Word 2007 and Word 2010 – screen shots are taken from Word 2010. I have written about Word 2013 separately as it’s a bit different.

What is Spell Check?

Spell check is a function in Word that will check both the spelling and appropriate word use in your document. It’s not perfect, but it will pick up all sorts of errors and typos that you might not realise you’ve made.

Spell Check will go through your document and highlight any words that it thinks are spelled incorrectly. If it can, it will offer alternative spellings for you to choose from. You can then choose to change the word to one of its suggestions, change all instances of that word to the suggestion, or ignore the “error” once or always.

We usually run a spell check after writing a document, although you can ask Word to check spellings as you go along (I personally find this distracting). It’s worth running it even if you think your writing is perfect and you’ve read through the document finding no mistakes – there’s always something, and that’s why, even though I’m an editor, I use spell check on my own posts and as a final check on documents I’ve edited, and why I have an editor for my books!

How do I start Spell Check?

We run Spell Check from the Review tab in Word:

How to start spell check

The eagle-eyed among you will have spotted the same icon in the Quick Access Toolbar at the very top of the document. I’ve added the Spell Check button there because I use it a lot. If you want to learn how to add buttons to the QAT, read this article.

With your cursor at the beginning of the document, click on the Spelling and Grammar button. Word will highlight each word that it thinks is incorrect, starting with the first one:

spell check in action

Here, I started at the beginning of the text, but you’ll notice that it’s missed out “peace of txt” even though that is clearly wrong. We’ll look at that in a minute, but let’s concentrate on what happens when it gets it right.

What options does Spell Check give you?

Spell Check has highlighted “misteaks” and you can see in the Suggestions box below that it’s suggested the closest word first, then a few other options. “Mistakes” is highlighted, but if I did mean “mistake” or “mistreats”, I can click on one of those.

To the right, we have some buttons – Ignore Once / Ignore All / Add to Dictionary are to be used when we know what we typed is correct and we want to keep it; Change / Change All / AutoCorrect will allow us to make that change:

  • Ignore Once will ignore just that instance of the word in question
  • Ignore All will ignore that exact word throughout the rest of the piece
  • Add to Dictionary will add that exact word to the Spell Check dictionary so it will never ask you ever again if you’ve miss-spelled it. I have used this for my name in the past, which is why this Spell Check process won’t pick up “Broomfield” or “Dexter”, and I also add in commonly used technical terms and jargon that comes up a lot in the texts I work with.
  • Change will change just that instance of “misteaks” to “mistakes”. Any other examples will stay as they are
  • Change All will change every instance of “misteaks” to “mistakes”.
  • AutoCorrect brings up the AutoCorrect screen (see this article for more on AutoCorrect) which allows you to set up an automatic correction for the future, so whenever you type “misteaks” it will change to “mistakes”. This is really useful if you notice that you’re mistyping a word regularly.

I’m going to click on Change All, and this will automatically change all examples of “misteaks” to “mistakes” in the text. Note, however, that it will not change “misteak” – it only looks for the exact same word. This includes capital letters, so it will now flag up “Misteaks” as a new error and make some new suggestions, the second of which is the correct one. I do tend to click on Change All, so that I save time and mouse clicks correcting the same form of the same word over and over again.

Now, let’s see what else Spell Check will look at.

It will notice if you’ve missed out an apostrophe, even if the word “wont” is a word in itself:

spell check apostrophe

And it will check incorrect punctuation, too:

spell check punctuation

Finally. you can ask Spell Check to check your grammar, too. Here, it’s picked up that I started a sentence with a lower-case letter:

spell check grammar check

There’s a caveat here, though: I find the grammar checker to be quite rigid and a bit odd. The eagle-eyed among you may have spotted that I have Check grammar ticked in the above image but not in the others – this is because I tend to turn off the grammar checker when I’m working on my own texts and other people’s. It’s up to you whether you do that, and instructions for tweaking the Spell Checker will appear in a later article.

What if I change my mind or make a mistake?

If you make a misteak, oops, sorry, mistake when you’re changing words in Spell Check, there’s a handy button that will take you back.

Here, I’ve clicked on the first suggestion for “Misteaks” which was “MI steaks”. Oops. I only see it when I’ve already hit Change All. But I can click the Undo button to take me back to that set of choices, and you can click the Undo button more than once.

undo spell check

Having pressed Undo, we’re back to looking at “Misteaks” instead:

spell check undone

Does Spell Check ever get it wrong?

In our example, Spell Check has missed the obviously incorrect phrase “peace of txt”:

spell check in action

It does sometimes notice when you use an incorrect but valid word (i.e. it is actually a word in itself), but not always. I’m guessing that it’s ignored “txt” because that’s a file extension (like .doc) which is used when saving documents. So Spell Check hasn’t picked that up, and you or your editor will have to notice it yourselves!

It also uses rules which don’t match standard common usage. Right up until Word 2013, it thinks that proofreader is two words, hyphenated:

Spell check getting it wrong

This makes it quite embarrassing when I’m checking a client’s acknowledgements, they thank me for proofreading, and then have spell-checked their work, so I have to change it back to proofreading.

Word is also not keen on swear words, and can give amusing alternatives if you try that …

Help – my Spell Check’s making everything go into American English!

Your Spell Checker will work with whatever variety of English (or any other language) that your text is set to. So if you have your text set to be in American English, that’s the language your Spell Check will use. Learn how to change the language of your document and your editing language  – and watch out, as your comment boxes might appear in another language, too, which will upset your Spell Checker – use this article to make sure your comment language matches the rest of the document.

Can I use spell check in other applications as well as Word?

Many applications have spell check functions. For example, the WordPress editor that I’m using to write this has a spell check button. so does my MailChimp newsletter editor, my email editor and Excel and PowerPoint. Wherever you see a button like this, you should find a spell check option:

spell check icon

In this article we’ve looked at what Spell Check is, how to access it, how to ignore and change words, and some things to watch out for. In future articles I’ll be sharing how to tweak your Spell Check settings, how to tell Spell Check NOT to look at particular text, and when to use Spell Check when you’re working with an editor. Oh, and there will be a parallel post on Spell Check in Word 2013, too!

———————

This is part of my series on how to avoid time-consuming “short cuts” and use Word in the right way to maximise your time and improve the look of your documents. If you’ve enjoyed the post or found it useful, please use the sharing buttons below to share it via your social media networks – thank you!

Please note, these hints work with versions of Microsoft Word currently in use – Word 2007 and Word 2010 for PC. Mac compatible versions of Word should have similar options. Always save a copy of your document before manipulating it. I bear no responsibility for any pickles you might get yourself into!

Other useful posts on this blog

Using Spell Check in Word 2013

How to change the language of your Word document

How to change your editing language

How to change the language of your comment boxes

How to use AutoCorrect

How to add buttons to the Quick Access Toolbar

Find all the short cuts here … and see the full resource guide here.

 
6 Comments

Posted by on October 15, 2014 in Errors, New skills, Short cuts, Word, Writing


Tags: , , , , , , , ,

How to use spell check in Word 2013

Because Spell Check looks different in Word 2013, here is a special article just on that version of Word. It should be read alongside the more detailed post on Spell Check for Word 2007 and Word 2010 which you can find here.

What is Spell Check?

Spell Check in Word checks  the spelling and grammar in your document, highlighting any words that it thinks are spelled incorrectly and offering alternatives.

It’s always worth using Spell Check, even if you’re an accomplished writer or feel you can edit your own work – we all make mistakes, and this will catch many of them.

How do I start Spell Check?

We run Spell Check from the Review tab in Word:

Word 2013 spell check

Note: I’ve added the Spell Check button there because I use it a lot. If you want to learn how to add buttons to the QAT, read this article.

With your cursor at the beginning of the document, click on the Spelling and Grammar button. Word will highlight each word that it thinks is incorrect, starting with the first one:

Word 2013 spell check

Here, I started at the beginning of the text, but you’ll notice that it’s missed out “peace of txt” – see more detail in the main article on this.

What options does Spell Check give you?

  • Ignore Once ignores that instance of the word in question
  • Ignore All ignores that exact word throughout the rest of the piece
  • If you own a copy of Word 2013 outright or have a subscription and are logged in, Add to Dictionary will add that exact word to the Spell Check dictionary so it will never ask you ever again if you’ve miss-spelled it. I have used this for my name in the past, which is why this Spell Check process won’t pick up “Broomfield” or “Dexter”, and I also add in commonly used technical terms and jargon that comes up a lot in the texts I work with.
  • Change changes that instance of “misteaks” to “mistakes”. Any other examples will stay as they are
  • Change All changes every instance of “misteaks” to “mistakes”.
  • If you own a copy of Word 2013 outright or have a subscription and are logged into your Microsoft Office account, AutoCorrect is available and brings up the AutoCorrect screen (see this article for more on AutoCorrect) which allows you to set up an automatic correction for the future, so whenever you type “misteaks” it will change to “mistakes”. This is really useful if you notice that you’re mistyping a word regularly.

Grammar check in Word 2013

Grammar check not only highlights where you’ve gone wrong, but gives you a little lesson in the Spell Check panel, too:

Word 2013 spell check grammar check

I find the grammar checker to be quite rigid and a bit odd. It’s up to you whether you allow grammar checking, and instructions for tweaking the Spell Checker will appear in a later article.

What if I change my mind or make a mistake?

In Word 2007 and 2010 there was a handy button in the Spell Check dialogue box that allowed you to undo previous changes. This has gone in Word 2013, so if you realise you’ve made a mistake, you will need to use the Undo button (or press Control-Z) to go back to correct your mistake.

Does Spell Check ever get it wrong?

In short – yes. See the main article for more explanation and examples.

Help – my Spell Check’s making everything go into American English!

Your Spell Checker will work with whatever variety of English (or any other language) that your text is set to. So if you have your text set to be in American English, that’s the language your Spell Check will use. Learn how to change the language of your document and your editing language  – and watch out, as your comment boxes might appear in another language, too, which will upset your Spell Checker – use this article to make sure your comment language matches the rest of the document.

Can I use spell check in other applications ?

Wherever you see a button like this, you should find a spell check option:

spell check icon

In this article we’ve looked at Spell Check in Word 2013 and how it differs from previous versions. In future articles I’ll be sharing how to tweak your Spell Check settings, how to tell Spell Check NOT to look at particular text, and when to use Spell Check when you’re working with an editor. Oh, and there will be a parallel post on Spell Check in Word 2013, too!

———————

This is part of my series on how to avoid time-consuming “short cuts” and use Word in the right way to maximise your time and improve the look of your documents. If you’ve enjoyed the post or found it useful, please use the sharing buttons below to share it via your social media networks – thank you!

Please note, these hints work with versions of Microsoft Word currently in use – Word 2007 and Word 2010 for PC. Mac compatible versions of Word should have similar options. Always save a copy of your document before manipulating it. I bear no responsibility for any pickles you might get yourself into!

Other useful posts on this blog

Spell Check in Word 2007 and Word 2010

How to change the language of your Word document

How to change your editing language

How to change the language of your comment boxes

How to use AutoCorrect

How to add buttons to the Quick Access Toolbar

Find all the short cuts here … and see the full resource guide here.

 
3 Comments

Posted by on October 15, 2014 in Errors, New skills, Short cuts, Word, Writing


Tags: , , , , , , ,

How do I delete a post or ban a user on a Facebook page?

This post follows on from my one about the basics of Facebook for business and covers two really common concerns for people with a business Facebook page:

  • How do I delete a post or comment that someone has put on my Facebook page?
  • How do I ban or block someone from commenting on my Facebook page?

In fact, the way to do the second leads on from the first … so let’s look at how to delete a comment first.

Where can I see other people’s comments on my Facebook page?

Comments move around a bit on Facebook, but if you’ve enabled people to be able to comment, you can see their comments under the heading Posts to Page:

Posts to page on Facebook page

To look at all of these posts in detail or delete some, click on the arrow at the top right. You will then see just your comments:

Posts to page view Facebook

To delete this post OR to block or ban the user, click on the down arrow at the top right. You will now be presented with three options:

Delete post to Facebook page

  • Hide from Page will hide the post but not delete it – no one will be able to see it. This would be useful if you suspected someone of posting inappropriately but wanted to get in touch with them to check what they meant or give them another chance / ask them to edit their post. You also have the option to ban the user at this point:

Facebook page hide post

(use Undo to backtrack from here, the x button to hide and close the dialogue box, or Ban User to ban the user from the page)

  • Delete from Page will delete the post and give you the option to ban the person who wrote the post

Delete post from Facebook pageYou can Delete the post and ban the user, Cancel if you clicked this option by mistake, or just Delete the post (you could use this option if the user had made a mistake or posted something you didn’t want on the page but you don’t actually want to ban that person from posting on your page in future.

  • Embed Post will generate some HTML code that will allow you to include an image of the post on Facebook in other places such as your website or blog – useful if you have a great post from a fan or celebrity:

Facebook embed post

Copy the code that’s highlighted and use it anywhere that you can place HTML – in a blog post, on a website, in a discussion forum, etc.

How do I block someone from posting on my business’s Facebook page?

As we’ve seen above, you can use two methods: both need you to look at the post itself first. You can then …

  • Hide the post and ban the user
  • Delete the post and ban the user

How do I stop people posting on my Facebook page at all?

If you want to suppress all posts from people who are not the Facebook page’s administrators / moderators, go to Settings / General / Posting Ability. When you go to the General area, under Posting Ability you will see your current settings. If you want to change these, click Edit:

Facebook settings allowing posts

Clicking Edit will allow you to choose whether and what people can post on your business page:

Edit posting ability Facebook

Use the round buttons to choose whether you Allow other people to post to my Page timeline or Disable posts by other people on my Page timeline. The tick boxes allow you to choose whether to let people add videos or photos (useful to untick if people have been posting inappropriate photos but you still want to allow comments) and allow you to ask Facebook to send you posts by other people that you then have to approve (you’ll receive an email alerting you to the new post and allowing you to approve or reject it).

Click Save Changes to save your changes or Cancel if you want to keep your settings as they are.

Important information about allowing posting and deleting posts

I personally think it’s a good idea to allow other people to post on your business Facebook page. After all, you want to encourage interaction and conversations, not just pump out sales information, right? I get a bit frustrated if I go onto the Facebook page for a business and find I can’t place a comment about how much I loved their veggie sausages or enjoy wearing my new shoes. So, unless you are bombarded with spam and abuse, try not to use the Disable posts by other people on my timeline option if it all possible.

And a word on deleting posts. Be careful what you delete.

Posts it’s OK to delete or hide

  • Unfounded or personal abuse
  • Spam that has nothing to do with your own page (e.g. on this Empedia page for an IT consultant, a post about buying homes in West Texas)
  • Spam from rival companies in your business area who are not supporting and cooperating with you, but merely trying to get your followers to move over to them instead (for example, on my own editing page, posts from student proofreading companies just saying “For the best proofreading click here”)
  • Pornographic or other inappropriate images, text or video

Posts it’s best not to delete or hide

  • Genuine complaints and negative feedback – OK, so your first reaction will be to hide that post where someone complains the shoe they bought from your range has fallen apart. But if they’ve taken the time to find your Facebook page and complain, then they’re going to know they did that, and they’re going to notice if you delete it. What will they do then? At very least, post it again, but be assured that they will have told their friends and family, shared your page on their Facebook timeline with a note about what you’ve done, and been very unhappy altogether.

If someone posts a complaint or negative feedback on your Facebook page …

  • Think what you’d do if you encountered them in person. You wouldn’t stick a bit of tape over their mouth or turn your back on them, would you? Yet that’s what you’re doing when you hide or delete their post.
  • Address the issue at least partly in public – for example, you could post a reply along the lines of, “Sorry to read you’re experiencing problems. Please contact me at vvv@vvvvv.com or via my Contact Page [with link] so we can resolve your problem”.
  • You could go further and say something like, “I’m sorry you appear to be having a problem – you can of course return your shoes to use for a full refund” and give them information on how to do this.
  • Once the problem is resolved, pop another reply on – “I’m glad we were able to replace your shoes and hope you’re happy with the new pair – do let us  know how you’re getting on.
  • Be polite – if someone posts a little aggressively – “I’ve heard you supply slip-on shoes with fancy chains and blood diamonds on them to arms dealers: what do you say about that?” then take the polite route, and address their question in public as far as you can.
  • Don’t get into a fight in public – if it gets messy, take it offline with an offer to call them or whatever’s appropriate.
  • If the poster strays into the inappropriate, follow the steps above for deleting or hiding posts, but maybe consider putting a note on the page to explain (calmly) why you did this.

This article has hopefully helped you to deal with negative or inappropriate comments and commentators on your Facebook page. You now know how to hide or delete comments and block or ban users from your Facebook business page, and how to use the Settings to control who can post what.

Other useful posts on this blog

Facebook for business – the basics

How to add an admin or moderator to your Facebook page

Thank you to my husband, Matthew, for allowing me to set up a Facebook page on his behalf to harvest screenshots! And of course, Laura Ripper is a good friend and colleague and never posts inappropriate content on people’s Facebook pages!

If you’ve enjoyed this post or found it useful, please click one of the sharing buttons below! Thank you!

 
8 Comments

Posted by on October 13, 2014 in Business, Facebook, Social media


Tags: , , ,

Facebook for business – starting out

This post takes you through the basics of setting up a Facebook page. You may have found this page from a link in one of my e-books, if so, welcome to this extra free resource!

You can set up a page for your business on Facebook as long as you’ve got a personal page.

The slight issue with Facebook business pages is that Facebook wants you to pay for adverts and to have your posts and page promoted to other people. So do be prepared to receive lots of suggestions to pay for ads and promotion, and not a lot of interaction from other users.

How to set up a Facebook business page

You will need to be logged in to Facebook

Go to www.facebook/pages/create or click on Create a page when you’re in any other Facebook page …

Facebook create a page button

and choose a category of page to create:

Facebook type of page

If, for example, you choose Local Business of Place or Company, Organization or Institution, you then need to choose your category, and it’s worth noting that you get different categories for Local Businesses …

Facebook create local business page

… and Companies:

Facebook create company page

and give your page a name. If you choose local business or place, you’re given space to enter your address – good if you have a shop or need people to find you, not really recommended if you operate from your home office and don’t want all and sundry to know your address. I’m choosing Company, Organization or Institution:

Create business page

Whatever type of page you set up, you will be asked to tick that you accept Facebook’s Page terms and conditions. These include a host of stipulations about promotions, advertising, tagging and other issues. Note that Facebook can remove admin rights and shut down your page if you don’t abide by these rules. This is why I would never suggest limiting your web presence to only a Facebook page – make sure that you have your own website, too.

Now it’s time to set up the basic details of your page – Facebook walks you through this:

Facebook set up pageNote here that you used to have to have a certain number of Likes before you could choose a unique Facebook web address; now you can do it right away. Here’s this first screen with the info filled in. Note that once you’ve said that it’s a real organisation, you’ll get a second option to confirm that you represent the company:

Facebook page set up filled in

This is the point at which Facebook checks that the URL you’ve chosen is available. In our case, it isn’t (I checked, and the URL belongs to an individual with the surname Empedia), so I’ve added to the URL to try again:

Facebook url not availableOnce you’ve saved this information, you can add a profile photo:

Facebook page add profile photoIf you choose Upload From Computer, you’ll be taken to your computer’s folders to find the photo you want:

Facebook page add profile pictureYou will also be prompted to add the page to your favourites – this means that you’ll see when you (or someone else) posts to it and you will also see it in your left-hand side panel:

Facebook page add to favouritesThen you get a bit of hard sell with the Reach More People section:

Facebook page reach more people I would certainly advise pressing the Skip button at this point, as anyone directed by an ad to Like a page that has no Likes or activity is not going to be compelled to do so!

And now you have your page!

Facebook page

Once you’ve set up your basic page, you can set up a cover image for your page. There are all sorts of rules about what you can have here, but they change frequently, so refer to the current terms and conditions.

Facebook page add a cover

You can choose a photo from your albums or upload one from your own folders on your computer:

Facebook add cover

Once you have uploaded the photo, you can move it around until it’s in the right place, then Save Changes:

Facebook page cover

You can change these two pictures by hovering over them, at which point a button will appear offering you the opportunity to do so.

Facebook page change profile pic

When you’ve created your basic page, you can also add information and details as you wish. Use the Settings button to access these options:

Facebook page settings

The Settings pages allow you to describe your business and add hours of operation, etc. You don’t have to fill in everything, but it is useful to add your website’s URL, for example. You can change this information at any time.

Facebook Page Info settings

General also allow you to set out who can post on the page and other features. This is useful if you have people putting spam comments, etc., on the page – you can set it so that only you can post. However, I do like to let people post and comment to foster a sense of community.  It’s worth looking at this area frequently, as what you can and can’t do does change over time.

Page roles allows you to add other people who can administrate the page – useful if you’ve set up the page but you have someone in your company who’s a social media expert. I’ve already written about this here.

You’ll see a Page button at the top of the screen which allows you to return to the page at any time.

The Activity tab lets you know how often your posts have been seen and the viewing figures. Note that these are likely to be distressingly small – see the section on paying for promotion below.

Interacting with people on your page

You can post updates on your page, including photos and notes, just like you can on your personal Facebook timeline. I send my blog post notifications to this page – but then I share them to my personal timeline, too, where they have more chance of being seen.

When you Like a page belonging to someone else, you can click on the down-arrow by Message and Like as your page – this will appear in their timeline and can lead to some nice, friendly interaction.

If you have set your page up to accept comments by others, do pop by the page to respond to these – a) it’s polite to reply to comments and b) you need to watch out for spam and complaints, and address them accordingly.

Stopping spam and dealing with complaints

It is possible to delete comments that other people make on your Facebook page. Just be aware that if you delete complaints, the complainer is liable to share the fact that you’ve done that – a bit of polite damage limitation on the page itself is often more appropriate.

If someone spams my page, I usually reply politely the first time, in case they’ve made a mistake, if someone’s just posted a link to their page and it’s vaguely relevant, otherwise they get deleted.

I will be writing a longer article about dealing with spam and blocking users – watch this space!

If you’re considering paying for promotion on Facebook …

Whenever I get tempted to advertise on Facebook, which they do promise can be targeted to your selected audience, I think about the random / odd / offensive / inappropriate adverts that I see on my Facebook timeline, and that makes me think that it’s perhaps not worth it.

If you do decide to pay for advertising, go for one of the pay per click options where you can limit how much you pay out per day. Observe how it goes very carefully, and try to assess how much business you’re actually getting for what you pay for (have a look at the articles in the Investing in Your Business section above).

The golden rule of Facebook business pages

There’s a golden rule that applies to all social media and that’s Be Yourself. Allow your own personal self to appear on those pages. Have a picture of you on the profile, and comment and respond as appropriate.

It’s also worth noting that your friends do not want to feel spammed by your business. I share my business page posts once at most onto my personal timeline. I don’t leap in to every personal conversation with “Oh, I can proofread that” or “need some transcription, just call me”. It isn’t appropriate, none of us like having that done to us, and it’s a good way to annoy those very people who might otherwise be spreading the word about your business. By all means, mix business with pleasure, but make your business page pleasurable to read and keep your personal page personal as well as businesslike.

Other useful posts on this blog

How to add an admin or moderator to your Facebook page

How to delete posts and block users from your Facebook page

Thank you to my husband, Matthew, for allowing me to set up a Facebook page on his behalf to harvest screenshots!

If you’ve enjoyed this post or found it useful, please click one of the sharing buttons below! Thank you!

 
12 Comments

Posted by on October 8, 2014 in Business, Social media


Tags: , , ,

How Video Can Help Your Blog or Website

Today we have a guest blog post from Markus Wilson of Phink Video Productions, who talks about the added value that video can bring to your blog or website. A lot of people do have video content on their blogs now, and it’s something I’ve been considering doing myself for a while – maybe this will be the impetus that I need to look at it in a bit more detail …

This article is about how you can use video content to help your website or blog as part of a digital marketing strategy. No matter how big or small your websites audience maybe, video is a powerful tool to up your profile and reach a wider fanbase.

It’s a fact that our brains respond more effectively to communication that combines visual and audio stimuli. Therefore improving the retention of information we are trying to divulge. While it’s interesting to know that YouTube is the world’s second largest search engine online. It has been found that 60% of online users prefer video than text, and having video content on your website or blog increases the likelihood of first page Google ranking by 53%. Not only that, but people that reach your site are likely to spend at least two minutes longer browsing a site with video on it.

As we know today more and more people are using online video to learn about products, services, and tutorials. What’s great about online videos is that so many people are creating and watching them nowadays. Whether they are evaluating products, showing us how Coca-Cola can clean the rust off your car or just checking out the best supplier for a job. Video really is a great way to engage your audience. Another great feature about online video is that it can help you stand out in the search results! As long as your video listed is marked up with the appropriate title, tags and descriptions Google will always value video content over written.

One of the best ways to utilise online video for your website or blog is to create an explainer video. Explainer videos are great if you have something very complicated to get across, as you always have to fight for every second of your web users attention.

Another great use of video for businesses or service providers is to incorporate Testimonials from your former or current clients. Testimonials direct from the horse’s mouth and not just a quotation at the bottom of a webpage are a great way to gain that much needed social proof about you and your service.

A third good use of video for your website or blog is to create a ‘Frequently Asked Questions’ piece. This can be yourself presenting to camera or just something simple involving text and music. If you always come up against the same questions from your potential customers, by you anticipating the question, its an efficient and easy way for them to be reassured that your are the right person for the job!

Online video use continues to grow with 81% of marketers using video in their digital marketing activity and 76% planning to increase online video spend. At the current rate 69% of all internet traffic will be purely video by 2017.

So what will your story be?

Markus Wilson is Co-Founder of London-based video production company Phink TV. Markus has been in marketing for the past 8 years, first with data processing company Pumasource and starting up Phink TV in 2009. Since then he has produced video content for the likes of Coca-Cola, Unilever and Sony Music.

 
1 Comment

Posted by on October 1, 2014 in Business, Guest posts, Skillset


Tags: , ,