RSS

Monthly Archives: November 2014

How do I tell Word not to spell-check certain paragraphs?

This topic came up after someone commented on one of my other Word-related posts: he had a document that included programming code and he wanted to exclude that from the spell check because a) it wasted time and b) when displaying spelling errors, the red wiggly lines distracted him. He had used an easy method to exclude these in Word 2003 (highlight, click spell check, tick “do not check spelling and grammar”) but had got stuck with Word 2010.

This article will tell you …

  • How to exclude text in your document from being spell checked
  • How to only spell check a particular section of your document

How do I tell Spell Check not to check particular paragraphs in Word 2003?

So, in Word 2003, Spell Check is on the toolbar and you can highlight the text you don’t want to check, click spell check and tick “do not check spelling and grammar”. it’s actually very similar in Word 2007, 2010 and 2013 – here’s my hint for the easiest and quickest way to do this.

How do I tell Spell Check not to check particular paragraphs in Word 2007, 2010 and 2013?

First of all, highlight the paragraph (or paragraphs, holding down the control key) that you want to exclude from Spell Check.

Then you have two ways of telling Word not to spell check these sections:

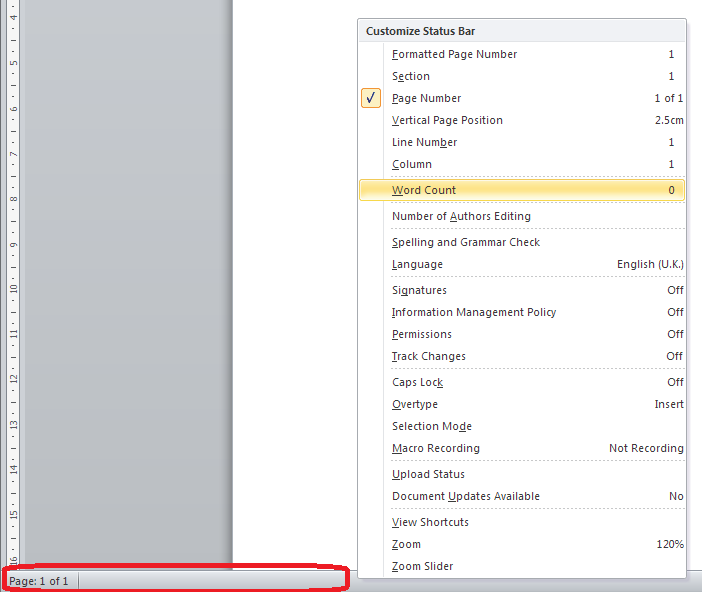
1. The quick way: click on the language at the bottom of your screen:

Select text to exclude from spell check

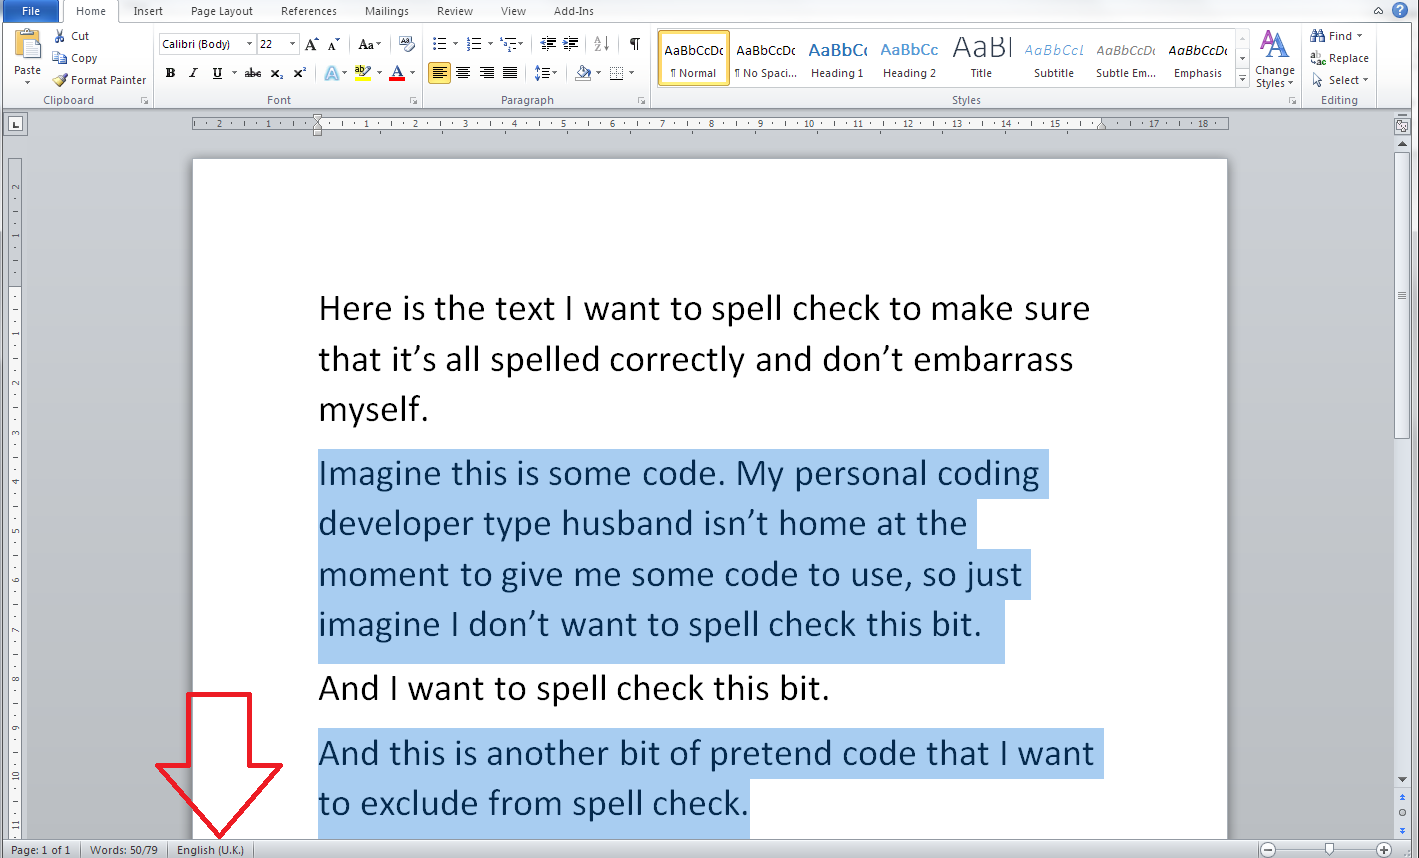
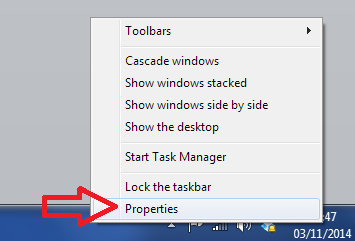
If the editing language is not showing at the bottom of the screen, left-click on the bottom tool bar and choose to display language. If that doesn’t work, see this post).

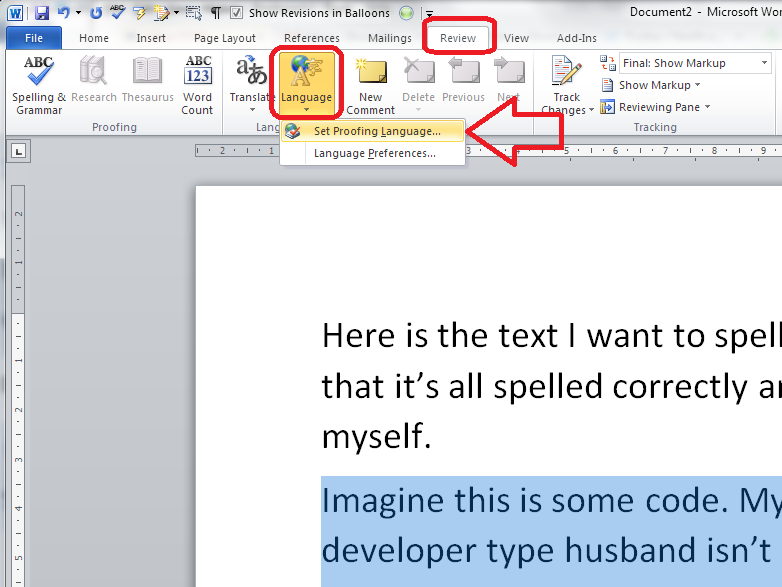
2. The official way: on the Review tab, select Language and then Set Proofing Language (note: don’t click on Spelling and Grammar, as that will spell check the highlighted text, exactly opposite to what you want to happen):

Word language setting

Both of these options will display the Language Selection dialogue box:

Language selection dialogue box

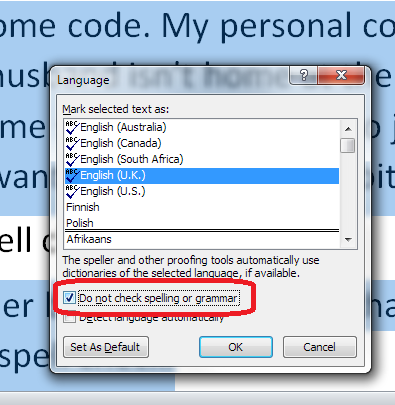
Once you have the language choices displaying, tick your language and tick “Do not check grammar and spelling“. That should mark all of the text you highlighted such that the spell checker avoids it. I hope that works for you and takes less than 5 minutes – do let me know!

How do I just spell check one paragraph or section of my document in Word?

Allied to this is the question of how you just check a particular part of your text. Here’s how:

Highlight the text you want to check.

Press the Spell Check button, which you can find in the Review tab:

Spell check one section of a document

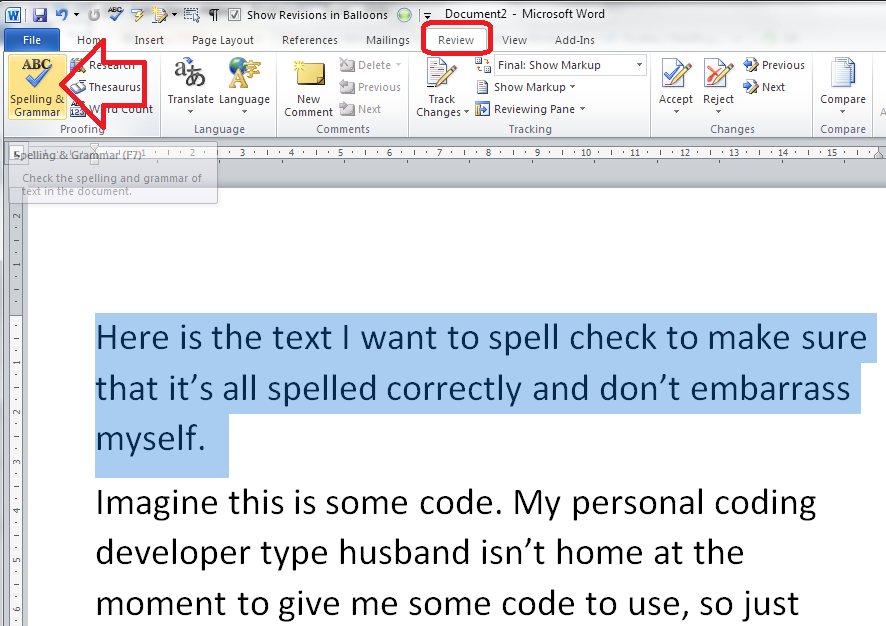
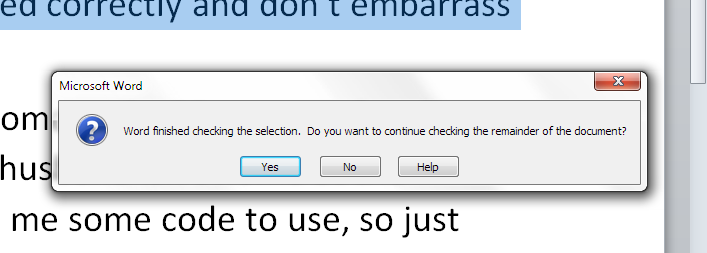
Word will spell check only that highlighted paragraph (or word, if you so choose) and will helpfully ask you if you’d like to continue checking everything else:

Continue spell check?

I hope you’ve found these hints helpful! Do share or pop a comment on this post if I’ve helped you learn something new or solved a tricky problem for you, and do explore the rest of my blog if this is your first visit!

Please note, these hints work with versions of Microsoft Word currently in use – Word 2007, Word 2010 and Word 2013 all for PC. Mac compatible versions of Word should have similar options. Always save a copy of your document before manipulating it. I bear no responsibility for any pickles you might get yourself into!

This is part of my series on how to avoid time-consuming “short cuts” and use Word in the right way to maximise your time and improve the look of your documents. Find all the short cuts here

Related posts on this blog:

How do I use Spell Check in Word 2007 and 2010?

How do I use Spell Check in Word 2013?

How do I change the editing language of my document?

Why do I need to use Spell Check if my work is being edited?

 
2 Comments

Posted by on November 19, 2014 in proofreading, Short cuts, Word


Tags: , , , , , ,

How do I insert clip art in Word 2007, 2010 and 2013 and other Microsoft Office applications?

I have to admit to being a little surprised when I was asked to post about clip art. I hadn’t used it for years, and I was taken back to the old days, when you used to buy a computer magazine with a free floppy disk full of clip art pictures …

However, the very useful point about clip art is that it’s copyright free and so simple to use: you can pop a MS Office clip art image into your presentation or document and know that you’ve not stolen someone’s work of art (although there are copyright rules about using them in commercial publications).

They’re also not as ‘cartoony’ as they used to be, including photographs as well as drawings, and there are some really good images: I found this great one when I searched for “editor”, for example!

clip art of editor holding book

From MS Word Clip Art

This article applies to Microsoft Office applications such as Word, Excel and PowerPoint. Examples are taken from Word, but the process works in the same way in all applications.

Of course, choosing and inserting your clip art varies between Word (Excel and PowerPoint) 2007/2010 and Word (Excel and PowerPoint) 2013, so if you want the latter, please scroll down a bit to the relevant heading!

How do I use clip art in Word 2007 and Word 2010 and other Microsoft Office software?

Clip art is found in the Insert tab, in the Illustrations area (this is an image from Word 2010; the button in Word 2007 has a slightly different, but recognisable, icon and is in the same place):

Word 2010 insert clip art

Making sure that your cursor is at the point where you want the clip art image to appear, click the Clip Art button:

word choosing clip art

A clip art search area will appear in the right-hand margin. It’s pretty simple: you can enter a search term, and you can also choose which kind of media you are searching for (useful for PowerPoint presentations, for example, or if you only want photographs to illustrate your document):

Word clip art choose format

Leaving this on all media, let’s search for “teapot” – pop the word in the search box and click the Go button:

Word clip art search

You should then see a grid of clip art images:

clip art search results

Stop press – you might only find you have the option to search online now – as Microsoft have withdrawn the copyright-free clip art they had offered for so many years. I believe that if you have a standalone version of Word that doesn’t receive updates, the clip art will stay, otherwise you’ll just now have an option to search Bing. Very annoying!

clip art find more

Anyway, back to our 57 teapots (which is surely enough for anyone!). When you’ve found an image you want to insert, double-click on it and it will move into your document:

clip art insert image

You will also notice here that the image is selected and can be enlarged and reduced using the little blocks around the image outline. It can also be moved, if you hover inside the box until an arrow appears.

For more on placing images in text, please see this article.

How do I use clip art in Word 2013 and other Microsoft Office software?

For Office 2013, Microsoft went all online-based, and as a result, the way in which you access clip art changed. Note that these instructions work for both the standalone version of Word 2013 (and other software) if you bought it once, and the subscription version through Office 365 which downloads updates periodically.

You access clip art from the same menu, on the Insert tab, in the Illustrations area, but it’s now called Online Pictures:

clip art office 2013

Making sure your cursor is in the place where you want your picture to be, click on Online Pictures:

Word 2013 clip art search

You now have the option to search royalty-free illustrations on the office.com clip art website or do a Bing Image search for general images.

Note Unless you have a completely standalone and isolated version of Word 2013, you will not now have the option to use clip art based within Word itself – you will probably just see Bing search. If you don’t get updates on your version of Word, it’s likely you will still have them, because Word can’t update itself to make them go away. Grrr, frankly.

Because I’m not logged in at the moment, I have the option to sign in with my Microsoft office account. If you are logged in, or do subsequently log in, you will get these additional options – OneDrive, Facebook and Flickr:

Word 2013 image search options if logged in(thanks to Laura Ripper for this screen shot)

To search in clip art, enter the search term “teapot” into the first text box and click on the magnifying glass icon:

Word 2013 clip art search

This will bring up the same results as for Word 2007 and 2010 (interestingly, you can’t differentiate at this stage between different kinds of file to insert, as you can with earlier versions):

Word 2013 clip art resultsDouble-click on the image you want to insert, or single click and click on the Insert button

Word 2013 clip art inserted

Note that in Word 2013, not only do you get the frame which allows you to change the image size, but the Layout Options dialogue box also pops out, allowing you to choose where the image sits in any text you might have.

For more on placing images in text, please see this article.

Related posts on this blog

How do I make pictures go where I want them to in Word?

How do I stop the pictures jumping around when I edit a Word document?

———————

This is part of my series on how to avoid time-consuming “short cuts” and use Word in the right way to maximise your time and improve the look of your documents. If you’ve enjoyed the post or found it useful, please use the sharing buttons below to share it via your social media networks – thank you!

Please note, these hints work with versions of Microsoft Word currently in use – Word 2007, Word 2010 and Word 2013 and other Office software for PC. Mac compatible versions of Word should have similar options. Always save a copy of your document before manipulating it. I bear no responsibility for any pickles you might get yourself into!

Find all the short cuts here … and see the full resource guide here.

 
31 Comments

Posted by on November 12, 2014 in Errors, New skills, Short cuts, Word, Writing


Tags: , , , , , , , ,

How do I hide the toolbars and taskbars in Word 2007, 2010 and 2013 and other MS Office applications?

In this article we’re going to learn how to (temporarily) hide the toolbars, taskbars, rulers and whatnot in Word.  Note that these processes will also work for other Microsoft Office applications such as Excel, PowerPoint, etc.

Why would I want to hide the taskbars in Word?

There are various reasons why you might want to have just a blank white screen in front of you when using Word. If you’re trying to write, write, write, you might want to remove all distractions. If you’re displaying Word on a large screen using a projector, there are many reasons why a plain screen with no additional information might be useful.

In fact, the second reason, wishing to display just some text and images via an overhead projector, is why I was asked to write this article in the first place.

How to hide taskbars and toolbars in Word

This works for Word 2007, 2010 and 2013: I’ve used Word 2010 in the example because it’s what I use most of the time, but the principles remain the same.

How to minimise the ribbon in Word

You might just want to minimise the ribbon. If this is the case, first right-click anywhere on the actual ribbon, then select Minimize the Ribbon from the menu that displays:

Word minimise ribbon

How do I reverse minimize ribbon?

To reverse the minimize ribbon action, you can either …

1. Right-click anywhere on the small ribbon headings that will appear and click again on Minimize the Ribbon: the tick will disappear and the ribbon will reappear:

un-minimize ribbon2. Click on the small down arrow that appears at the top right of the screen when the ribbon is minimised:

reverse ribbon minimise

How do I remove wording and symbols from the lower task bar

If you’re fed up of seeing your word count or document language in the lower task bar, you can right-click on the taskbar, at which point a list of all items you can display pops up, and you can untick the ones you don’t want:

remove items from lower task bar

You will see the displayed items at the bottom start to disappear until you’re left with just one:

remove from lower task bar

How do I reverse clearing the lower task bar?

To add items back on to the task bar, right-click on the taskbar and click on the features you want to see – the tick will reappear next to the items you select, and the information will display in the lower task bar.

How do I hide the rulers?

For instructions on hiding the rulers in Word, please see this article.

How do I hide all of the toolbars in Word and other Office applications?

If you want to go further and just have a blank screen, you can use the shortcut Alt+V, U

Note that you must follow this process to do this:

  • Press down the Alt key and keep it pressed down
  • Press the V key and release it (keeping Alt pressed down)
  • Press the U key and release it (you can then release the Alt key)

Pressing both letters together does not have the same effect. Once you’ve pressed this key combination, you will have just the document, no toolbars, taskbars, menus, etc. However, you are still likely to have the Windows taskbar showing.

Just a document, no toolbars

So you’re not quite there, but first …

How do I reverse Alt+VU?

The first time I did this, I got a bit panicky because I assumed that you needed to press AltVU again to get back to the menus, but that’s not what you do.

To reverse Alt+VU and get back to seeing your taskbars, hit the Escape key on your keyboard. Phew!

How do I hide the Windows taskbar?

You’ve got your lovely clean document showing but you want to get rid of that Windows taskbar at the bottom of the screen. Here’s what you do:

First, unlock the taskbar (if it is locked) by right-clicking on the lower task bar and seeing if Lock the taskbar is ticked. If it is, click on it to untick it.

unlock task bar windows

This dialogue box will disappear, so right-click on the taskbar again and this time choose Properties:

Windows taskbar properties

This will give you a new dialogue box:

Windows taskbar properties

Making sure that you’re in the Taskbar tab, click on the tickbox to Auto-hide thie taskbar.

The taskbar will now disappear, leaving you with a lovely clear screen containing only your document.

How do I reverse hiding the Windows taskbar?

To show the Windows taskbar, move the mouse to the bottom of the screen (assuming your Windows task bar is usually there), at which point it should appear. Then right-click at the bottom of the screen and select Properties, then untick Auto-hide the taskbar.

———————

This is part of my series on how to avoid time-consuming “short cuts” and use Word in the right way to maximise your time and improve the look of your documents. If you’ve enjoyed the post or found it useful, please use the sharing buttons below to share it via your social media networks – thank you!

Please note, these hints work with versions of Microsoft Word currently in use – Word 2007, Word 2010 and Word 2013 for PC. Mac compatible versions of Word should have similar options. Always save a copy of your document before manipulating it. I bear no responsibility for any pickles you might get yourself into!

Other useful posts on this blog

How to display and hide rulers in Word

How to add buttons to the Quick Access Toolbar

Find all the short cuts here … and see the full resource guide here.

 
8 Comments

Posted by on November 5, 2014 in Errors, New skills, Short cuts, Word, Writing


Tags: , , , , , , , ,

New book on networking, social media and social capital

Quick guide to networking, social media and social capitalI’m delighted to be able to announce that my new book, “Quick Guide to Networking, social Media and Social Capital” is out now and available to buy on Amazon and Smashwords as an e-book in all formats (for Kindle, Kobo, as a pdf …). Like my popular “Quick Guide to your Career in Transcription“, this contains the specific information – no filler, where there’s jargon, it’s explained – that you need to venture into networking, whether that’s face to face or through online services such as Twitter and Facebook. It pulls together material I’ve written and thought about on social media etiquette and building social capital … to help others as well as ourselves, and where I go into detail on particular topics, I provide links back to this blog for all of those screen shots and details that regular readers will be used to.

You can visit the book’s web page which lists all of the places you can buy it, and I have shared the first great reviews today, too.

I hope you enjoy reading about my new book and if you find it helpful or think one of your colleagues or friends would benefit from reading it, please let them know by sharing this post or the web page for “Quick Guide to Networking, Social Media and Social Capital“.

 
Leave a comment

Posted by on November 4, 2014 in Business, Ebooks, Social media, Writing


Tags: , ,