RSS

Monthly Archives: September 2013

How to turn a new customer into a regular customer

handshakeWhatever field you’re working in, having a stable of good, reliable regular clients who send you work, are good communicators and pay decent rates in good time is a good place to be. The kind of client you want as a regular is the kind of client who follows all of these rules. You may have chosen to work with them based on these criteria. And, in fact, if you follow these rules for freelancers yourself, you should have no trouble in attracting regulars.

I’ve written about how to decide which companies to work with. Here are some ways to help you turn a good first-time client into a trusted regular. If you have other suggestions, do add a comment to this post!

Do a good job the first time

This one’s a bit obvious, but it’s worth saying. Do a good job the first time, and you’re likely to create a regular client just like that!

Be memorable for your good customer service

Leave the client with a good final impression. I’m always sure to say thank you for their payment and to wish them well with the publication / website / new service / novel / whatever it is that you’ve done for them this time.

Make sure that your client knows you’d like to work with them again

When I send my thank you for their payment, I make sure that I make it clear that I’d like to work with them again. Something along the lines of “I’m looking forward to working with you on future projects” will set a good note.

Remind the client that you’re available

When you’re establishing a relationship with a client, the odd little email reminder of your availability is fine (obviously don’t hassle them). If you have a newsletter, asking them if they’d like to be added to your mailing list and sending them a monthly newsletter can keep you in their mind.

Make sure that clients know about all of your services

If, like me, you offer more than one service, make sure that your clients know this, too. I’ve got several long-term customers who use me for more than one service – one has moved from using my transcription services to using me as an editor (I also still transcribe for them) and a few use me for editing and localisation. Even if they only do one thing themselves, it’s useful for people to know your range, in case they recommend you to their colleagues.

Offer an incentive

Once I have completed a job for a new customer and they’ve paid me successfully, I offer then an incentive. No, not money off! But I will usually offer to invoice them for all of the jobs I do for them in a month, at the end of the month. Win for them: they are given longer to pay and will receive one invoice for several jobs. Win for me: I only have to produce one invoice and record one payment, and I can add them to my monthly invoice run.

Note: make sure you are clear that this is an offer and they don’t have to take it up. If they don’t want to do this, make a note and invoice them how they like it to be done, for example.

Thank them for their repeated custom and treat regulars well

I regularly tell my regulars how much I appreciate their regular custom and I treat them well in as many other ways as I can, too:

  • I make it clear that at busy times, I will prioritise their work over new work (and I tell new prospects this, too – I think it gives a good impression to let everyone know that I treat my regulars well).
  • I will also go above and beyond, doing a super-fast turnaround or working late to fit a job in – not to the detriment of other clients or my own health and sanity, but I treat them as well as I can.
  • If I’m booking holiday or other time off, I will email my regulars in advance to warn them, so they don’t just find out when they get my out of office reply.
  • I will offer regulars a named holiday cover contact who they can work with when I’m not available, and introduce them to a trusted colleague if they wish me to.

————-

This is how I have converted one-off customers into regulars, and have built a group of regulars who bring me regular work and income and peace of mind in knowing I’ve got a stable business. And how I keep them!

If you have any more tips and tricks do share them in the comments. And do please click on the buttons below to share this post!

Find more articles about careers and freelancing in this resource guide. Related articles:

How to decide who to work with.

What’s the best mix of customers to have?

 
9 Comments

Posted by on September 30, 2013 in Business, Ethics, Jobs, Organisation


Tags: , ,

How do I add footnotes to a Word document?

Academic and non-fiction writers use footnotes to refer to additional text which doesn’t fit into the flow of your paragraph but does need to be included. It might be used to provide a reference for a quotation or statement you’ve made, or might contain a digression or discussion of something you’ve just written about. It might also contain a translation of a non-native quotation you’ve placed in the text, or the non-native original quotation whose translation you’ve just given.

What do footnotes look like?

Footnotes can take two forms. Either there’s a raised number after the bit of text that they refer to, like this,1 or a symbol like an asterisk or paragraph mark is used (pleasingly, there is an order for these: *, , , §, ‖, ). In timetables and other tables, superscript (up high) letters and other symbols may be used.

In relation to this marker, a note will appear at the bottom of the page with the same marker at the beginning, which includes the additional / explanatory text:

0 footnotes

How do I create a footnote in Word 2007 and Word 2010?

The Footnote section is found in the References tab of the ribbon (not Insert, as you might expect):

2 menu

We need some example text first. Here’s some text after which we want to place footnotes:

1 before footnotes

Position the cursor in the position in which you want the footnote to appear (note, I am putting the footnotes AFTER the punctuation. This is common but not universal. The important thing is to be consistent) and press the Insert Footnote button:

3 button

A footnote number will now appear where your cursor is, and a note number under a line at the bottom of the page, ready for you to insert your footnote text:

3.1 insert footnote

Note that this has automatically pushed down the next paragraph onto the next page of the document. This is one of the reasons why you should automate this process and not do it manually.

You can type text into your footnote field – you can also change the paragraph style, font, size etc. as you would a normal bit of text; however, the way it defaults, with notes smaller than the main text, is the standard way to do it, so try not to mess around with it too much.

3.2 insert footnote

When you want to insert the next footnote, position your cursor in the next place and hit the Insert footnote button again. The next footnote will automatically number itself with the next number (or letter, or symbol: see below under Footnote options) and position itself under the first one:

3.3 insert footnote 2

If a footnote gets particularly long, Word will automatically shift the text and footnotes around so that they are on the same page and fit in correctly.

How do I delete a footnote?

Another benefit of using the automated footnote system is that you can delete and move footnotes and the numbering will adjust itself to stay correct.

How NOT to delete a footnote: Don’t highlight the footnote itself and delete it. This will have no effect on the numbering.

Instead, highlight the number in the text or position your cursor at the point just after it:

3.4 delete footnote

Delete that little number …

3.5 delete footnote

and the number will disappear from after “print,”, plus the one after “days.” will change to a 1 and footnote 1 will disappear, to be replaced by footnote 2, which has now become footnote 1. Magic!

What are the footnote options?

If you click on the little arrow at the bottom right of the Footnotes section, you will be given a range of Footnote and Endnote options that can be customised to suit your needs:

4 footnote options

You can choose between having footnotes and endnotes here (endnotes appear at the end of a chapter or the whole text, and will also be discussed in a different post). Then, you can choose the number format (drop down the arrow in each case):

5 footnote options

including those famous symbols (and you can also add your own symbol if you really have to). Select and hit Apply.

You can choose whether the numbering remains continuous throughout your document or restarts on every page (useful for tables) or in every section:

6 footnote options

And you can highlight a section of text and apply these changes only to the highlighted text (this changes to being the default when you highlight the text):

7 footnote options

How to add footnotes in Word 2003

In Word 2003, you add footnotes using the Insert – Reference menus. The footnote options are then the same as above.

How not to add footnotes to Word documents

It is possible, but NOT RECOMMENDED, to add footnotes manually by inserting a superscript number and typing the note at the bottom of the page. But this will NOT do what the automated footnoting system does:

  • automatically add sequential numbers
  • format the page so the text and footnote stay together
  • automatically renumber the footnotes if you move or delete or add one

So, don’t do that, now you know the correct way to do it!

————-

In this article we’ve learnt what a footnote is, what they look like, why you might use them, how to insert and delete them and the options available.

Related posts:

Some great notes on avid footnoters from the history of literature here.

On this blog:

How do I add endnotes to a Word document?

Changing footnotes to endnotes

How do I change the format of my endnotes and footnotes?

Please note, these hints work with versions of Microsoft Word currently in use – Word 2003, Word 2007 and Word 2010, all for PC. Mac compatible versions of Word should have similar options. Always save a copy of your document before manipulating it. I bear no responsibility for any pickles you might get yourself into!

Find all the short cuts here

 
11 Comments

Posted by on September 25, 2013 in Errors, New skills, Short cuts, Word, Writing


Tags: , , , , , , , ,

How do I decide who to work with?

dictionary coins watchWhen you’re new to your editing career – or any other freelance career for that matter, it’s tempting to rush around picking up every job you can. But it’s really worth evaluating the companies with whom you choose to work, from the very beginning. At the very least, you can avoid making yourself uncomfortable or making a small amount of money for a large amount of time. At the most extreme, you can avoid losing money, or even breaking the law! Read on for my hints and tips, and do add a comment if you can add any more!

Do conduct background checks

When a company contacts you to book your for a job, it’s easy to say yes without thinking. But it’s always good to do a few basic background checks.

  • If the company has found you through a professional organisation or website that has discussion boards or feedback mechanisms, check what other people have said about the company
  • Run a Google search for [company name] and phrases such as “bad payer”, “didn’t pay”, “don’t work with]
  • Ask your peers or any networks you’re in (on and offline) about whether they’ve worked with them before

I love it when a company approaches me via Proz, a jobs website I belong to, because members can see peer reviews of companies that are also members. The only time I’ve had a problem with a company that booked me through Proz was when I forgot to look at the “Blue board” and assumed they’d be OK.

Do check what they say on their website

This can tell you a lot about the company that wishes to book you. Is their website professional? Does it have terms and conditions? If it’s a middle man itself, does it seem to offer fair terms to its clients (and what’s the difference between what it charges its clients and what it’s offering to pay you – always interesting!).

You can also find massive red flags by doing this. This article was inspired by a friend, new to the editing business, who told me that they were doing tests for a company that offered student proofreading. When we had a look at their website, they were boasting that their rewriting service was able to bypass plagiarism-detecting software! Now, of course, it’s not ethical to rewrite student work – so we could see immediately that this was NOT a good company to work for. Which brings me nicely onto the next point …

(If you’re considering going into student editing / student proofreading via middlemen, it’s worth reading my Choosing a Proofreader: Student Edition article and using that to help you decide who to work with.)

Don’t do something that goes against your ethics – or the law!

Is it worth undermining your own ethics to make a bit of cash? I don’t think so, personally. One, you’re going to feel uncomfortable about what you’re doing, and two, it might come back and bite you later. I certainly wouldn’t want to work with the company I talk about in the above point, and I also wouldn’t want my name to be associated with any company I wouldn’t be proud to be associated with!

I’ve turned down jobs for companies that operate in areas I’m not personally comfortable with (someone writing a website in order to attract people in the sex industry to his professional services springs to mind), and I have certainly turned down work for SEO and linking farms, which I don’t agree with as a concept. I’ve never been asked by a company to write an essay for a client, but I know that I’d say no if I was asked. You can find articles by people who work for content farms, or write fake reviews of products for money, or write essays for people and feel they can justify it*, so it’s not black and white, but do stick with your own boundaries and don’t upset yourself by crossing them,

I have written text for marketing websites that I find to be a bit cheesy and I am not exactly hugely proud of. But they don’t tell any lies (and it was “white label” work, i.e. my name is not on it. Doesn’t mean I’d go against my ethics if my name wasn’t on something, though!).

Do go to the edge of your comfort zone; don’t cross out of it

I took on my first transcription job as a “why not?” kind of test – but I did have audio typing training, so I knew that the skills involved would be close to ones I already had (read more here about what happened next). I also once took on a job doing some audio recording for a website that needed an English accent. I didn’t really have the experience or equipment to do this, and although I did a decent job, I turned down further requests to do this kind of work. The return on investment and the professionalism of the job I was able to do didn’t match my expectations or requirements, so I ditched that idea.

So do push yourself a bit and move into new areas by all means, but don’t jump too far in one go.

Don’t do (too much) work for free

I will do a test for a company for free, but I won’t do more than one, small job for them for free. And I don’t do anything for free for a commercial company (I do do the odd bit for other start-ups or local small businesses, to help them out) nowadays.

Even if you do end up doing something “for free” for a company while you’re building your client base and establishing your reputation, make sure up front that they will supply you with a testimonial / reference with their name and company name that you can publish on your website if you do a good job for them. This does give you some sort of return for the work.

It’s also OK to do work for a ‘skills exchange’ – I wrote some marketing materials for someone who designed some graphics to use on this site. Don’t do too much of that, though, as the tax man can get quite interested in that sort of thing …

The main point is, you don’t want to end up labouring away at unpaid work and – heaven forbid- turning away paid work because you’ve got to get the project finished!

Do ask for recommendations

Hopefully you’ll have been building networks and contacts in your area of work. I have lots of colleagues who I can turn to for advice, and I have a few colleagues who are just starting out in full-time editing businesses. I’m happy to turn to them for holiday, sickness and I’m-too-busy-help cover, and I’ve also passed on some of my clients to them – as my client base has matured, I’ve had to move away from some of my clients who needed me to be able to drop everything to do work for them on a tight deadline, regularly, whereas someone starting out who might be a little less fully booked is ideal to take them on.

It’s always worth asking colleagues if they would like some holiday or sickness cover, or just establish mentoring kinds of relationships that will promote this kind of thing. Hopefully, the clients who your colleague passes to you will be decent payers and good clients (otherwise you might want to look at your choice of colleagues!) so you’re likely not to get burnt.

Do check your return on investment

When you’ve done some work for a new client, and they’ve (hopefully … eventually) paid you, then do take the time to monitor the project and check for return on investment. For example, I always think that a client who sends you several small jobs a month and always pays on time is better than one who sends you a few big jobs but always needs chasing for payment. How much time are you wasting on chasing for payment? Here’s how I tell if a client is worth working with again:

  • Were they decent and easy to deal with?
  • Did they communicate effectively with you?
  • Did they pay me on time? (the payment schedule might be a long one, but did they match it?)
  • Was the work interesting? (this can matter, although at the start and through your career, you will need to accept that sometimes it just isn’t!)
  • Am I proud to be associated with this work / client?

If you can answer yes, then they’re good at working with freelancers (see this article for more detail) and hopefully you’ve got yourself a regular client – try to keep hold of them and make sure you say thank you for their payment and express interest in working with them again.

If they …

  • Didn’t resolve any project teething problems in good time
  • Made you feel uncomfortable with what they asked you to do
  • Didn’t communicate with you and answer questions
  • Didn’t pay / paid late

… those are red flags and, even if you’re just starting out and you feel you’re desperate for clients, I’d have a good think about whether to work with them again.

Do listen to your gut feeling

On most of the occasions when I’ve had trouble with clients and have made a bad decision about working with one, I’ve found that I had a gut feeling that it wasn’t a good idea. If you get a gut feeling, by all means back it up with some of the ideas above, but do listen to it, and save yourself hassle and possibly heartbreak!

———–

When it comes down to it, we all want clients who:

  • Pay well and on time
  • Have interesting and regular work to do
  • Are likely to become regular clients

These tips and hints will hopefully help you to end up making good choices about the companies with which you work.

* Thanks to Linda Bates for alerting me to this article and this more recent one about why people work for essay writing companies. I wouldn’t do this, but it’s worth acknowledging that these things are a matter of personal preference. I do NOT recommend doing this, however!

Do share this article using the buttons below if you’ve found it interesting and useful, and do post a comment if you’ve got something to add!

More articles on careers can be found here.

Here are tips for how to turn that new customer into a regular customer.

What’s the best mix of customers to end up with?

How to make more money in your freelance business

When should I say no?


Tags: , ,

Choosing a proofreader – student edition

track changesIf you’re starting an undergraduate, Master’s or PhD course and you think your writing in English might need some help, it’s a good idea to look for a reputable proofreader to help you. You might be using English as a second or other language, or have a different issue to deal with such as dyslexia or needing to use voice-recognition software. Your tutor or personal tutor might have recommended that you find someone to help you, or you might choose to try to improve things yourself. But how do you choose a reputable, genuine proofreader when there are so many companies and people out there? Here are some tips.

Be careful

The first thing I will say here is be careful. Obviously, all proofreading companies want to make money. But some of them do profit from students, in particular, not knowing what to look out for. I have heard a lot of horror stories in my time: students having their work “checked” when it’s just been run through a spell-checker, companies that don’t care about plagiarism, companies that will sell you an essay to use. Just like any other service or product, there are good and bad companies out there. Be just as careful as if you were buying a designer handbag or a car. After all, your academic mark and reputation might be at risk here.

Check with your tutor / university

Some tutors ask their students to get their work proofread, sometimes before they see it, sometimes afterwards. Universities often have policies on proofreading. For example, one university I work with has a form I must complete and sign each time I work with a PhD where I promise that I have only suggested changes in spelling, grammar, etc., and have not rewritten or otherwise changed the content of the work.

If a student comes to me and says their tutor has asked for their work to be substantially rewritten, I will ask for a scanned, signed letter on headed paper from the tutor to confirm that. So, if your tutor wants more than usual to be changed, get something in writing from them first.

Check the proofreader’s credentials

Any company or individual should state what their training and background is. A company should have a page about the kind of proofreaders that they use. An individual proofreader should have a page detailing their experience, qualifications and background.

It’s good for your proofreader to …

  • Have a degree
  • Have experience in your subject area
  • If you have a particular aspect of your language which needs to be addressed, e.g. working with voice-activated software or dyslexia, to  have experience with similar requirements
  • Be a native speaker of the language in which you are writing
  • Have a qualification from an official body (the Society for Editors and Proofreaders or the Publishing Training Centre in the UK) OR have extensive and documented experience

Check what service the proofreader offers

Check what the proofreader says that they will do – exactly.

Good things to look for:

  • Do they mention using Track Changes to mark up your work?
  • Do they mention making a note of any unclear areas?
  • Do they mention coaching students through a degree or Master’s?

Bad things to look out for:

  • Do they mention helping you to avoid getting caught for plagiarism (see section below)?
  • Do they say that they will rewrite your essay for you?
  • Do they say that you can buy an essay that someone else has written from them?
  • Do they mention compiling your bibliography for you?

These are all red flags: red for danger. If a company is offering to help you to plagiarise, avoid them. This will contravene your university’s regulations.

Ask for references and testimonials

A good proofreader / company will offer references and testimonials on their website.

Things to look out for:

  • References from people who are doing the same sort of thing as you (Master’s Dissertation, PhD, etc.)
  • References including full names rather than Mr D and Ms Y (note that not all of them will have the full name, but at least some should)
  • References should not all be identical. They should look like they were written by real people.

Check your proofreader’s policy on plagiarism

Plagiarism is a serious offence. If you plagiarise and get caught, you could get kicked off your course. At the very least, if you get caught, you will lose marks. Even if you don’t get caught, plagiarism – passing off someone else’s work as your own – is unethical and wrong. If you plagiarise, you are also not learning what you should be learning from your course.

I found a student proofreading company the other day that boasted of rewriting students’ work so that they will not get caught by plagiarism software. This is a bad thing to do. I would advise you never to go near a company that offers such services.

Another student proofreading company, and the only one I work with myself, has FAQs on their website. These strictly state that you cannot expect them to write your essay for you or to paraphrase sections of your work that you have taken from other books or essays. This is a good thing to do and I would advise you to look for this kind of statement.

I have a statement on plagiarism in my Terms and Conditions. Other places you might find it are in the FAQs or Services or Notes. If you can’t find something on a proofreader’s website, ask them. If they don’t have a plagiarism policy, or they can’t tell you what their policy is, avoid using them.

Regarding bibliographies – your proofreader should not compile your bibliography for you. Putting together a bibliography is one of the central academic skills that you are being tested on when writing your dissertation or thesis. A proofreader will check that all of the relevant entries are there (if you ask them to) and will certainly check for commas out of place and the odd mistake, but they should not write or format it for you from scratch (see more on bibliographies here).

Check that the proofreader is asking a fair price

Many proofreading companies seem to ask for a very high price for their work. I’ve checked and this year prices from proofreading companies for working on a standard student essay, dissertation or thesis in the UK is around £6-£10 per 1,000 words. This increases if the work is urgent.

Individuals often charge a little less – say about £5-£10 per 1,000 words. They may charge by the hour instead.

This is a rough estimate based on searching across websites and should not be taken as anything except a loose guideline. Fees vary according to the location of the proofreader.

If someone is charging a lot less than this, do check their credentials very carefully. It is likely that the work is being outsourced to people who might not be skilled or have English as their first language.

If someone is charging a lot more than this, check what extras they are offering and whether this is worth the extra money.

Check who will be doing your work

This is very important if you’re planning on submitting more than one piece of work to the proofreader. Although the English language does have rules, personal preferences do also come in, and one proofreader may work on a text slightly differently from the next. Therefore, if you’re going to be submitting all of your Master’s coursework or your whole PhD but in separate chapters, it makes sense for the same person to deal with all of your documents.

This is more common with individual proofreaders. But a company will work with many proofreaders and may be able to offer this for you.

It can be very useful and rewarding to work with one proofreader throughout your course. They might be able to pick out certain mistakes you make and help you to work on those for the next essay. This may help you to write well and clearly in English independently of your proofreader in the end.

Book in good time

You should know at the beginning of an undergraduate or Master’s academic year when your main deadlines for the year are. If you’re doing a PhD, you should know soon when you will need to submit reports and updates, and you should schedule time for writing up.

Especially if you’ve been working with someone all year on your Master’s course, book in to have them proofread your dissertation as soon as you know the date. No proofreader minds being booked in advance – and most of us don’t mind if things slip a bit, as long as you keep us informed. But we’re all humans, and sometimes, if you leave it too late to book, we won’t be able to fit you in. That’s when panic sets in, and you might make a bad choice.

Note: If your favourite proofreader can’t book you in, they should be able to recommend other people to try. I always offer a list of alternatives out of courtesy if I can’t fit an enquirer in.

Individual proofreader or proofreading company?

You can use an individual proofreader or a proofreading company. They both have pros and cons:

An individual proofreader:

  • You can talk to them direct
  • They can guarantee to work on more than one document for you
  • They might get busy or ill and not be able to do your work or book you in

A company:

  • Should have enough proofreaders to ensure availability even at busy times
  • Might not be able to guarantee the same person to do every job for you
  • You are unlikely to be able to talk to the proofreader direct

I think you are more likely to find an ethical person among the individuals, but it’s always worth checking all of the points above.

My recommendations

As I’m fully booked at the time of writing this post (and heavily booked most of the time), you can see that I’ve written this post for you, the students, and not to get more work for myself!

I do offer a small list of personal recommendations. I cannot guarantee their availability, price or service, of course. You enter into a discussion with them at your own risk, and you can find them on my Links page. You can also use the SfEP directory to find someone to help you.

————–

In this article I have shared some tips on how students can choose a good and reputable proofreader.

If you’re a student, you might be interested in more posts for students on this website. Do click through and have a look. And best of luck with your studies!

 
10 Comments

Posted by on September 18, 2013 in Ethics, proofreading, Students, Word, Writing


Tags: , , , , ,

Guest posts 2: How to be the perfect guest

handshake

Getting guest posts published on other people’s blogs is generally considered to be A Good Thing. It can bring you new clicks, followers and even customers. But even if you’re being commissioned to write a blog post for someone else, there are some fairly unwritten rules that will help you to make it a success on both sides.

In this article, I share what makes a good guest blogger, from initial contact to thank yous and shares in ten top tips for being the perfect guest blog poster. I talk about being a good host here, by the way).

1. Do your homework

You’ve got a post you want to share and you think it’s a good guest post. Before you even contact the host to ask them to post it, do your homework. Check whether they have a guest post policy (I have one, and you can find a link to it on my main blog and in more detail on the Libro Full Time blog). Many busy bloggers will not even reply to you if you haven’t looked and noted any guidelines. I will give people a second chance if I have time – but not always!

Presumably you know the blog because you’ve been reading it already. Have a think about who the audience is. What sort of posts does this person publish? How does your prospective guest post fit in with them?

2. Pick your hosts wisely

Have a think about whether this person welcomes guest posts. Are they on your topic or are they specific interviews or on other subjects? Is this someone you’ve engaged with on a long-term basis? Have you liked, shared, commented on their posts for a few months already? If they know your name and where your expertise lies, they are more likely to welcome your guest post.

Note that common advice is to only guest post on blogs that are more popular than your own. You can look at their Alexa score and yours, for example, to see which is more popular. BUT, because part of my mission is to help other small businesses and colleagues, I’m happy to guest on smaller, newer blogs, like I did here and here, to help to promote them as well as myself.

3. Show that you’ve done your homework

When pitching to place a blog post cold, or when replying to a commission, make sure that the host knows that you’ve had a look at their blog, that you’re familiar with their style and content, that you have an idea who their readers are. Nothing annoys a blogger more than having a random person contact them saying “I have read your blog [on football] and I think this post [on nuclear physics] would fit really well, please post it and all my links as soon as possible”. Even super-polite old me doesn’t always reply to those ones!

4. Follow the guidelines

If a blog has guidelines for guest posts, like The Creative Penn does, for example, then do follow them! (These ones are very detailed because it’s a very popular blog with lots of guest posts, but as I said above, most people have them). In fact, if you can’t find any published guidelines, ask the blogger if they have any specifications as to the ideal length, angle, etc. Make your piece match these as closely as possible.

5. Don’t duplicate content

Google and other search engines do not like duplicated content. So make sure that any blog post you tout around is fresh, new content, not something that has appeared elsewhere or been pitched elsewhere. It’s fine to pitch the same post to several potential hosts as long as you do it in series not in parallel, i.e. you wait for the first rejection, then try the next blogger. Also see section 9 to avoid doing this on your own blog.

6. Help the host with the formatting

As we learnt in the last post on hosting guest posts, formatting text sent in by someone else can be a nightmare. If you really want to help your host, by all means write your post in Word so you can spell check it, etc., but then “save as” a plain text file with a .txt file (drop down the “save as” box when you’re saving and choose “plain text .txt”). Your host can then open the file in a text editor and paste it into their blog editor.

You can always send a Word version as well, so they can see any bold or italics or special formatting.

It goes without saying that you’ll spell check your post and – if necessary – have it checked by your proofreader first, doesn’t it?

7. Provide an author bio and links

To make it easy for your host, do provide a short author bio about yourself, and links to whatever it is you want to promote. I usually put together a few sentences on what I do and what I care about (this guest post by me has a good example which the host has altered slightly to fit her style and context) and then give the full URLs for the links, with an explanation of what they’re linking to. Some hosts will put the links under the text, some will put them next to the text, all should make them live.

8. Accept feedback and give feedback

Many bloggers who accept guest posts will want to tweak your article a little to make sure it fits their guidelines, style and readership. Please do accept this graciously – you’re playing round someone else’s house, so you do need to play by their rules.

I submitted one piece to a blog as a guest post, but it wasn’t what they were looking for. They came back to me with ideas for tweaks, but in the end I thought it was better to abandon that idea and do a whole new post for the other blogger. That was accepted immediately and proved popular with their readers. Not being one to waste some good text (and proving that it was fine as a blog post, just not as a guest post on that particular blog, I tweaked it to remove references to the original blogger and published it on my own blog!).

Once the piece has been published, have a look at it, and if there are any errors, do let the host know. Typical things to look for include spelling your name incorrectly and not putting live links on. If you spot anything like this, let them know right away and give them an opportunity to put it right. No one’s perfect, and I would certainly prefer my guests to let me know if there was a problem.

Related to this, though: don’t push. If you’ve submitted a request to guest and haven’t heard back, by all means drop one reminder or question a week or so later, but that’s it. For many bloggers, blogging isn’t their only job. Sometimes my blog has to come second to my paid work (I pre-write and auto-post, so even if it looks like I’m spending time on the blog every few days, I might not be!) and I’m sure other people are in that situation, too. Hassling will probably lead to a refusal!

9. Promote and share

Your guest post will build hits for and interest in both your host’s blog and products/services and yours. So get promoting and sharing on their behalf, since a hit on your guest post is likely to generate a click-through to your blog or other resource. I get a lot more hits on those posts that both my guests and I promote – AND because there are more hits, the click-throughs go up, too (this is particularly noticeable on my small business chats, when it can make a big difference). So you have a vested interest in promoting the blog on which you’re guesting.

One important point: don’t paste the whole of your guest post into your own blog. By all means write about it and link back to the original (this is a good example by one of my guests) but duplicating content over two different blog posts will make your content disappear down the search engine rankings very fast, as the search engines are suspicious of anything that looks like automated activity and will ignore two blocks of identical text.

10. Say thank you

It’s always nice to say thank you. So email the blogger who has hosted you and also put a public thank you out there on the social media. I’ve got a page on my blog where I list my own guest post requirements but also list all the guest posts I’ve placed – and that sends a few people over to my hosts every day.

———–

This post has talked about how to be a good guest blogger. If you enjoyed this post, please click some of the share buttons below or post a comment yourself – all are welcome! And if you have an idea for a guest post for this blog … do get in touch!

Related posts:

Guest posts 1: How to be the host(ess) with the most(est)

10 reasons to start a blog

10 reasons NOT to write a blog

Reciprocity and Social Media

Top 10 blogging sins

Scheduling blog posts and keeping going

 
9 Comments

Posted by on September 16, 2013 in Blogging, Business, Social media, Writing


Tags: , , , , ,

Using tables in Word 1 – Menus and options

This is the first in a series of articles about Tables in Word. It covers Word 2007 and Word 2010, and will include Word 2013 in time. The following articles will cover all of the different types of table and option in detail, as well as useful features such as how to retain your table heading line on every page of your document.

Why use tables in Word?

Tables can be a very useful way to show information in an easy-to-read form, and are essential if you have a lot of data – in words or numbers – to share with your readers. There are many different ways to construct tables in Word, so this post will show you the basics, then further posts will elaborate on each method.

How do I insert tables in Word?

To put a table into a Word document, you need to choose the Insert tab and then look for the (very small) Tables section. There you will find a Tables button

1 menu

Press the Tables button and you’ll be shown a grid followed by a list of other options:

2 menu

We will now take a quick look at all of these options in turn.

Insert table

The first option gives you a grid which you can highlight to create the table you want. The squares represent the number of rows and columns you want, although on the page, the columns will fit to the width of your page and the rows will be one line deep.

Move your mouse over the grid and the table will appear on the document behind the menu:

3 grid

Let go, and there’s your table (we’ll learn about adding and deleting rows and columns in another post).

Insert table (2)

The first text option on the list below the grid is, rather confusingly, also called Insert table. But if you choose this option, you’ll find a rather more familiar and in some ways simpler menu.

4 insert table

The Insert Table menu allows you to choose the number of columns and rows by moving the up and down arrows for each. We’ll look at the other options later. For now, these choices will give you a table five columns across and two rows down when you click OK:

5 insert table

Draw table

The Draw table option allows you to hand draw the cells of your new table.

6 draw table

The Table tab will open up and Draw Table will be highlighted. You get a cursor that looks like a pencil and you have to draw each cell with that (there’s an eraser next to the draw button).

7 draw table

I personally find this really fiddly to use: you do have to play with it a bit to work out what to do with it. But I suppose it must be useful!

Convert text to table

This is particularly useful if you’ve imported text or figures from another program. Highlight your text and choose this option …

8 convert

… and you can specify whether you want the columns to separate at each comma, full stop or other character. Apparently, Mr Libro always uses this option when he creates a table, creating the text first and then the table!

Insert Excel spreadsheet

This option allows you to have a mini Excel spreadsheet, with all its normal functionality, inside your Word document:

9 spreadsheet

Note: this inserts a blank, empty spreadsheet into your document:

10 excel

Once you’ve created your data and clicked away from the spreadsheet, you will have a table made out of your spreadsheet (click on it to amend):

11 excel

If you want to insert an Excel spreadsheet that you’ve already created into your Word document, you need to choose Object from the far right-hand side of the Insert tab

Insert Quick Tables

The last option in the list will allow you to choose from a ready-made set of sample tables …

12 quick tables

As you can see, this is particularly useful if you want to print out or insert a calendar!

——————–

This post has gone through the Table menu and the options it offers for inserting tables. In other posts, I will go into more detail about how to edit tables, add and delete rows and columns, etc. If you want to know more, subscribe to this blog (see links at the top left or add to your RSS reader) or keep your eye on the resource guide.

If you have enjoyed this post, please share the link!

Please note, these hints work with versions of Microsoft Word currently in use – Word 2007 and Word 2010, for PC. Mac compatible versions of Word should have similar options. Always save a copy of your document before manipulating it. I bear no responsibility for any pickles you might get yourself into!

Find all the short cuts here

 
1 Comment

Posted by on September 11, 2013 in Errors, New skills, Short cuts, Word, Writing


Tags: , , , , , , , ,

Guest posts 1: How to be the host(ess) with the most(est)

handshake

We know that placing your guest posts on other people’s blogs and hosting other people’s guest posts on your blog is A Good Thing. It increases traffic to both of your websites, gains you social capital, and gives you new, fresh and different content for your blog.

But how do you make sure that you do it right – for both you and your guest? Here are ten top tips to help you get the most out of hosting guest blog posts. If you only read and apply two of these, please make them numbers 7 and 8!

1. Know what you want

It’s all very well deciding to welcome guest posts onto your blog, but what do you want to achieve? Do you want to show different angles on your line of business? Allow so-called competitors space to talk? Give your clients some publicity? Help other people in your geographical area? Start to formulate a policy rather than having a scattershot and random approach. This will help your readers to understand why you’re hosting guest blog posts, and will help potential guests match their posts to your blog.

I accept guest posts on writing, especially on editors as writers and writers as editors. The more random ones I’ve posted up in the early days didn’t get many hits, because they didn’t really mesh with what I write about. The most popular – ones that chime with my experiences, and the odd Troublesome Pair or Be Careful post that someone has written from the heart.

2. Know what you don’t want

Once your blog has a certain reach, you’ll find that people get in touch regularly wanting to place guest posts. Many of these seem almost completely random, with almost no (or absolutely no) relevance to my blog. I might give these people a second chance, but not often. I realised early on that there wasn’t room on my blogs for random links to unconnected companies, or links to companies doing things that I didn’t quite approve of – I get a lot of requests for “guest posts” which are just ways for a company to place their client’s URLs in popular places and build their SEO, and a good number for links to student proofreading companies that I wasn’t entirely sure about.

3. Be clear on what you will and will not accept

Once you know what you want and don’t want, you can narrow this down to what you will and will not accept. Most of the guest blog posts you publish will probably be suggested to you rather than commissioned, and it’s up to you to say yes or no to these ideas. Personally, I will accept trial copies of relevant software or hardware but I’ll say if that means my review is effectively a sponsored post, but I won’t accept requests to place blatant ads. I might in future accept ads for products that I have reviewed, found good and am happy to recommend. I have got a few links that earn me an affiliate fee on my Links page, but I make it clear that I earn a fee from purchases coming from those clicks. Some people won’t take any ads, some will take anything that pays. I don’t mind what you do but it’s best to be clear about it.

So, once you know what will and won’t accept, get clear about it. I have a Guest Post Guidelines page on my other blog (linked to from this one) – I put it there because it linked in with my policy on reviewing books I’m sent. I refer enquirers there when they want to place a guest post with me.

4. Commission guest posts

I get a lot of requests for guest posts, but I’ve also commissioned them (and been commissioned to write them too – I was asked to write this one after chatting about exercise with a fellow attendee at a networking event). Commissioning doesn’t mean paying: it means asking someone if they’d like to contribute.

I have done this recently with a fellow editor who is less far along her business path than I am. She’s got a specialism in which I’m interested, and fits with what I do, but isn’t something I do, personally. So I’ve asked her to contribute a guest post on it, which will be interesting for my readers and get a link to her website on mine, too.

Another aspect of this is reciprocal posting. I did this recently with Tammy Salyer. I asked her to write a post on being an editor/writer, and she then commissioned me to write about 10 top tips for fiction writing. I’ve noticed a good flow of hits and referrals between the two posts – win-win for the two of us!

5. Don’t be afraid to give feedback

Once the post has been written and sent to you, rather than just publishing it as is or rejecting it wholesale, if there are aspects that I think could be changed, or I think the post needs major work, I will feed that information back to the poster. If there are minor spelling and grammar errors in Small Business Chats, I tend to change them silently (my initial instructions should make it clear that I’m likely to do that), but if there’s a more major content change, I will send a note to the poster before I publish (or reject)

6. Help people out

I try not to use guest posts just to give me me me more content, more hits, more interest. If I can give someone an opportunity to promote their book, service or specialism, AND it fits in with my blog and its readers, I’ll offer them a guest post or accept their proposal. I do care about hits, but I also care about helping people and promoting things that are of value. That’s why I’ve turned my own posts over to topics like Kiva and the Soberistas, and am happy to work in guest posts on topics that I feel are valuable.
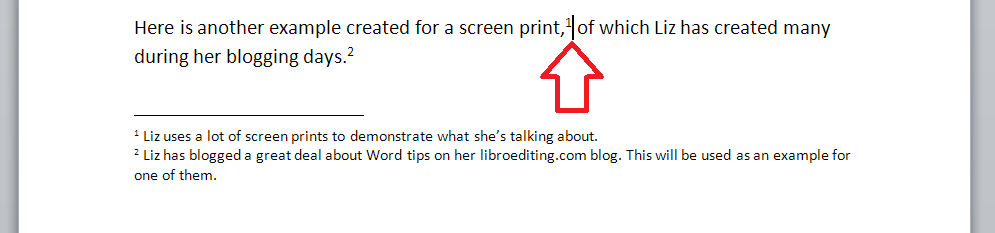
7. Format the post

Most people will send their guest post to you in one of two ways: text in an email, or a Word document attached to that email.

Probably, like me, you usually write your own blog posts straight into the blogging interface you use – you hit “new post” and start typing. Fine, that’s all new text and it should format OK. If you copy text straight from an email or Word document and dump it into your blog interface in a “new post”, you are likely to end up with a mess.

This is because most emailing programs and definitely Word documents contain all sorts of invisible formatting commands that will carry over into your blog post and run paragraphs together, put it all in unfeasibly tiny print, and all sorts of other sins.

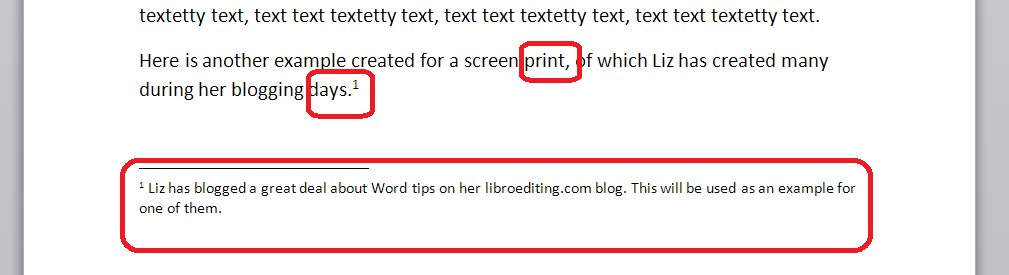
It’s easy to avoid this. Copy the text that will form your blog post and paste it into a text-only editor – most PCs will have Notepad installed as standard, for example. Paste it in there and then copy it and paste into your blog editor. Job done. You may have to reformat any links that the guest blogger has given you, but see the next point for how to work that one out.

8. Include links and an author biography

In my opinion, this is the most important one of the lot – and something that sadly I see going wrong quite a lot of the time.

If someone is decent enough to provide you with a guest blog post for your blog, be decent enough to tell your readers about them, and put links to their product / service / book / cat pictures / whatever they want to promote – and that’s LIVE LINKS, not just URLs that you can’t click through with – on the post.

This is a good example (I won’t share a bad one to save people’s blushes, but I’ve come up against this with my own blog posts). It includes an author bio with proper links that make sense and are in a different colour, so readers can find me and the book I wanted to promote easily.

It’s great to reciprocate, but the effort someone has put in to writing a guest post for you will be simply thrown away if you don’t provide links so that people can click through to them and their websites.

So make sure you ask your guest blogger for a quick biography and links to the things they want to promote (don’t assume!), and then place the links in the article.

If you don’t know how to create live links in your blog posts, read this article. Now.

9. Share and promote

Once you’ve published your guest post, make sure that you share and promote it just like you do your own ones. It’s nice to include the author’s name and link in any posting you do on Facebook, Twitter, LinkedIn and Google+ etc.

This extends to telling the author that you’ve published the article and where they can find it – send them a link to the URL. And ask them to promote it, too. That way, you can leverage the social capital of both of you – or in simple terms, get more people to look and click. And that’s really what guest posts are about!

10. Say thank you and feed back again

Once someone has been kind enough to provide you with a guest post, do say thank you publicly and privately. It’s also nice to let them know how many hits the post has had – say in the first week. You look at your stats for your posts, right? You can also let them know how many click-throughs they got to their website or other resource. Also let them know if there are comments on the post that you think they should see or even reply to – not every guest will bookmark it and check obsessively for comments. But don’t leave them to do all the responding – take part yourself, too. Again, this one is a good example – look at the comments, where both I and the guest poster respond to them in turn.

———–

This post has talked about how to be a good host to guest bloggers. Next week I’ll look at how to be a good guest. In the meantime, if you enjoyed this post, please click some of the share buttons below or post a comment yourself – all are welcome!

Related posts:

Guest posts 2 – how to be the perfect guest

10 reasons to start a blog

10 reasons NOT to write a blog

Reciprocity and Social Media

Top 10 blogging sins

Scheduling blog posts and keeping going

 
8 Comments

Posted by on September 9, 2013 in Blogging, Business, Social media, Writing


Tags: , , , , ,

What to do if your paragraph spacing won’t work in Word

This article tells you what to do if you think you’ve set your paragraph line spacing for the whole document but individual paragraphs refuse to behave. This is valid for Word 2007 and Word 2010, with Word 2013 to follow soon.

My spaces between paragraphs are uneven – help!

This just happened to me, which is why I’ve written up this article.

I was working on a bibliography for a client.

I set the paragraph and line spacing as I normally do: highlight the whole document, go to the Home tab, Paragraph section, and click the down arrow on the Spacing button:

1 paragraph and line space menu

This gives you the Spacing menu:

2 menu options

from which you choose your line spacing and lines after paragraphs options (I will write up a main post about this soon).

But it didn’t work!

Individual paragraphs still had no automatic spaces between then, even if I removed the line feed and pressed Enter again.

How to solve the problem of inconsistent paragraph spacing

Here’s how I did it.

I highlighted all of the text.

I right-clicked on the highlighted text and chose Paragraph from the options:

3 para

I then stayed on the Indents and Spacing tab and set my After spacing to 12pt and my line spacing to 2 (just in case). I also unticked Don’t add space between paragraphs of the same style (it was filled in with blue rather than ticked so I clicked twice to get a tick and then no tick):

highlight all

I pressed OK and the paragraphs all behaved beautifully.

I’m not entirely sure why this method works over the previous one, to be honest, but it worked for me and it was hard for me to find an easy, quick answer, so hopefully this will help a few people!

————————–

If you have enjoyed this post or found it useful, please share the link!

Please note, these hints work with versions of Microsoft Word currently in use – Word 2007 and Word 2010, for PC. Mac compatible versions of Word should have similar options. Always save a copy of your document before manipulating it. I bear no responsibility for any pickles you might get yourself into!

Find all the short cuts here

 
59 Comments

Posted by on September 4, 2013 in Errors, New skills, Short cuts, Word, Writing


Tags: , , , , , , , ,

How to maintain a good online reputation

a man's hands typingYou are your brand. I know that that sounds a bit marketing-speaky, but it’s true. If you run a business, people are going to look for you online as well as your business name. I can vouch for that, because I get loads of searches coming through to this blog for the people I feature in my Small Business Chat. Far more of them are looking for the person’s name than for their business name (if it’s different). Today I’m going to talk about my personal methods for maintaining a good and positive online image, with some tips which should be useful for you, too.

These tips mostly relate to social media, but you can extend them to anywhere where people see you, and your business, in operation, such as networking events, trade fairs, etc.

What do you mean by “You are your brand”?

This is particularly important if you run a small business or are a sole trader. However, even if you look at a  multinational, the person at the head of the company and the reputation they personally have has an effect on the perception of the company.

Think about Richard Branson. What about Theo Paphitis and Duncan Bannatyne? Remember Gerald Ratner and how he ruined his business with one sentence?

In the same way, when you go out networking, or you do stuff online, and you run a business (or even if you don’t), people are getting an impression of you which extends to the perception they have of your business.

My personal dos and don’ts

This is of course a personal list. Maybe you disagree? I know that I’m ultra-careful about my brand and company reputation, but I’d rather be ultra-careful than too relaxed. Reputations can be destroyed in an instant!

This is not about manipulating your image to sell more of your product or service; it’s about making sure that you’re representing your company in a positive light and making sure you match in your behaviour the message that you want your business to get across.

DO be yourself

It’s no good trying to hide who you are. Yes, if you’re shy, you can project more of an image of self-assurance, but also kindness, respect and care often come with shyness, and they’re good things for your clients to see. Personally, I’m very open and honest, and I try to give something back through charity donations and helping people. Therefore I have made small business loans to celebrate Libro’s anniversary and help out other small businesses with my weekly features, etc. I also keep my blog posts linked to what I do and my own practices – someone mentioned to me just the other day that my posts are very personal and friendly – which is how I hope my business comes across, too.

DO stay true to your morals and ideals

As an addition to this, I try to make sure that what I do with Libro mirrors my own personal morals and ideas. This is why I won’t put ads on my blogs unless it’s a testimonial for someone’s work that I know is good, and why I am very careful about the guest blog posts I publish (I recently turned down a fair amount of money offered to me to mention a blog hosting company on a blog post, because I was asked not to disclose that it was a sponsored post. Not my thing). I have also turned down work through my personal ideals.

DO be human

If you have a personal presence on social media, and even if you only have a business presence, make sure that the person behind the business shows through. This applies especially if you’re sharing your business posts on your personal account. I have a Libro Facebook page (where I make sure you can see photos of me and ask for feedback as well as sharing my blog posts) and a personal page, and I try to make sure I post more personal than business stuff on the personal page. People want to know the person behind the business, and they particularly don’t want the friend they’ve followed to turn into a corporate mouthpiece all of a sudden.

DON’T bombard friends with your business message

It’s very tempting to repost all of your business blog postings, etc. on to your personal Facebook and Twitter streams. It’s even more tempting to shoehorn a mention of your business into every comment you make to your friends. We all know at least one person who does this (I’ve been accused of it myself by one person, but I do try hard to keep the balance), and what does it do? It puts you off buying their goods or service. Sorry, but it does. Do share your business stuff with your friends, but not at the expense of the normal friend stuff!

DON’T moan about your customers

This one is oh-so-tempting, too. Especially if you work alone, sometimes you have to MOAN. Here’s the thing: moan, but don’t do it in public. Really, don’t. If you only follow one of these tips, follow this one. If you moan about a customer, even “just” on your personal Facebook timeline, how many of your friends might have been going to recommend your services to a friend, and might now not be inclined to. It’s unprofessional.

Of course, we do all need to moan, but this is what you do: do it in private. I set up a local homeworkers’ support group and an “Editors’ Rah and Argh” group on Facebook – as private, invitation-only groups. If we want to roar, sob or moan, we do it there, or in an email to a friend, or in a cafe, not in public!

DON’T talk about your customers at all, actually

Not only the moaning, but be careful what you say about your clients in public. I have Non-Disclosure Agreements with some of mine, which means no talking, ever, but even with the others, I do not identify them by name, when talking in public or writing about them in my book. I don’t Tweet to my music journalist clients, outing myself as their transcriber, unless they specifically mention it in public first. I don’t put their comments on my references page and CV before asking first. It’s just good practice.

DON’T let people see the frantic paddling, just the serene swan

Cash flow problems or upset by something? I might mention in the most general terms that I’m feeling a bit stressed, but I usually won’t. Although it’s good to talk things out, if you run a business, you don’t know who is watching. If you would be worried if a customer or prospect saw what you were writing, do it privately – create a filter or a private group on Facebook. If in doubt, don’t talk about it in public.

DO be appropriate

If you manage rock bands and hang out at heavy metal festivals, by all means swear a bit on your public tweets. If you earn your living editing, try not to have spelling mistakes and typos all over your blog (this is really hard to do – I know. Collect a group of friendly people who will let you know privately if such a thing occurs). I lead a pretty quiet life, but I do try not to swear or have inappropriate pictures of me all over social media. Obviously that’s easier the older you are and the less of your adult life has been lived in the full glare of social media, but you can always politely ask people to untag you from that hen party pic or horrendous shot from your younger days. If you explain politely that your business is linked to your name, and you’re worried about affecting it, most people will surely comply with that! You can also untag yourself from Facebook posts and pictures and set up your profile so that you have to approve all tags, if you’re at all worried (thanks to Linda for that tip!)

My golden rule for maintaining a good online reputation

This is my golden rule. I’ve stuck by it ever since I started having an online presence:

Never say anything in public online that you wouldn’t be happy shouting out loud in the middle of Birmingham.

What if your reputation is already less than stellar? I think that’s a post for another day, don’t you?

Related posts:

10 reasons to start a blog

10 reasons NOT to write a blog

Reciprocity and Social Media

Top 10 blogging sins

Scheduling blog posts and keeping going

 
22 Comments

Posted by on September 2, 2013 in Blogging, Business, Social media, Writing


Tags: , , , , ,