RSS

Monthly Archives: July 2014

ASCII codes for common non-standard characters

In last week’s post I explained how to insert non-traditional characters into your Word or other text-based document. I promised to share a list of commonly used ASCII keyboard shortcut Alt+ codes, and here they are. If you have a favourite non-standard character that is not represented here, please let me know in the comments below, and I’ll consider adding it.

Where did I get these codes from? As explained previously, you can pick them up in Word when inserting a character (Insert – Symbol – drop down From to ASCII) or in the Character Map (click on a symbol, look bottom right for the code). There are also various online resources that list them, and this is a list of my favourites. I hope you find it useful!

à  Alt-0224 lower case a grave

á  Alt-0225 lower case a acute

â  Alt-0226 lower case a circumflex

ä  Alt-0228 lower case a diaeresis

æ  Alt-0230 lower case ae

ç  Alt-0231 lower case c cedilla

è  Alt-0232 lower case e grave

é  Alt-0233 lower case e acute

É  Alt-0201 upper case e acute

ê  Alt-0234 lower case e circumflex

í  Alt-0237 lower case i acute

ñ  Alt-0241 lower case n tilde

ô  Alt-0244 lower case o circumflex

õ Alt-0245 lower case o tilde

ö Alt-0246 lower case o diaeresis

ø  Alt-0248 lower case o stroke

ð  Alt-0240 lower case eth

Р Alt-0208 upper case eth

þ  Alt-0254 lower case thorn

Þ  Alt-0222 upper case thorn

ß  Alt-0223 lower case sharp

× Alt-158 multiplication symbol

÷ Alt-246 division symbol

Note: there is no ASCII code for a tick / check mark – you need to use Wingdings2 and a P in Word, not sure how people manage it elsewhere (add a comment if you know how to do this).

If you would like to suggest additions or would like to comment on this post in general, please do – also do consider sharing it via the buttons below.

Related posts on this blog:

how to insert non-traditional characters

 
12 Comments

Posted by on July 30, 2014 in Language use, Short cuts, Word, Writing


Tags: , , ,

How to insert non-standard English characters into almost any text

text including eth and thorn in wordToday we’re going to learn how to insert non-standard English characters into Word and pretty well anywhere else where you might want to type some text.

What do I mean by non-standard English characters? I mean those characters that do not appear in a standard English alphabet, i.e. diacritics (letters with accents that you find in most European accents) and additional letters you don’t find in English, such as the eth and thorn found in Icelandic.

I’ll show you how to insert these in Word in a couple of different ways, and then share the best and most simple universal way to create these characters, as well as the special codes for some of my favourites.

Why would I want to type non-standard characters?

There are many reasons why you might want to type non-standard characters in your English documents / text / fields / whatever. Here are some of the reasons why I’ve done this myself:

  • As a cataloguer (and this is where I learnt about them and memorised some of the codes), I was required to catalogue in different languages, or enter people’s names which had accents on various letters into author fields.
  • I have a client called Jörg. He has to spell it Joerg in his email address and email signature. I prefer to be polite and spell it in the correct way when I email him and say “Hello Jörg”.
  • I’ve just been to Iceland. If I’m talking about places I’ve been or things I’ve read, I want to be able to use the full range of Icelandic letters – and they have two extra ones that we don’t use (nowadays) in English.
  • I work with bibliographies which might include non-English words with accents, etc. – if I need to add something or make a correction, it’s handy to know how to add the correct characters.

In many of these cases, I’m typing in a Tweet, a special piece of software or an email, as well as using Word for some of them. Many people know how to insert special characters in Word, but not everyone knows about the codes that you can use to pepper all of your communications with nice non-standard characters.

I’ll talk about Word first, and then broaden things out.

How do I insert special characters into my Word document?

There are two ways to insert special characters into a Word document. If you know the Alt-code for the letter, you can just hit Alt and a special four-figure number. More about that later on.

The official way is to Insert Character. This is how you do it (this works for all versions of Word for PC).

When you get to the place where you want to insert your special character, in this case an é at the end of café, go to the Insert tab (or menu in Word 2003) and choose Symbol from the Symbols area on the right:

Insert symbol word

When you press the Symbol button, a selection of commonly used symbols will appear (this will give you symbols that you’ve recently used; however, it will carefully offer you a range of popular ones if you’ve not used this method to insert very many symbols in the past). The one I want isn’t there:inserting symbols


You can now click on More Symbols to bring up the whole range:

More symbols in wordAt this point, a box including lots of symbols and special characters will pop up:

choice of symbols in word

You can now scroll down to find your symbol. Most of the common ones are on this default list. Here’s my acute e …

Selecting a symbol in word

And once I’ve pressed the Insert button, it will appear in my text.

It’s worth noting at this stage that a list of your recently viewed symbols is displayed in this window, and you can click on any of those and insert them in the same way. Word populates this with common symbols if you haven’t used this method to insert many symbols before (I personally use a different method), but as you use different ones, they will appear here and on that pop-up that appears when you initially click on Symbol (see above):

recently viewed symbols

One more thing to note before we press Insert: this screen also displays character codes. These are codes that you can use in conjunction with other codes and keys, including the Alt key method that I mentioned above. Drop down the arrow by From to get to ASCII and you will find a very useful four-figure code that you can use with Alt to insert non-standard characters into anywhere, not just Word.

Symbol codes

So, that’s how you insert a non-standard character in Word. What if you want to put one in Facebook, Twitter, etc?

How to use the character map on your computer to insert special characters

There is a character map on your computer that you can use to insert special, non-standard characters into any typing that you’re doing that will support these. Note that this works for a PC.

How do you access the character map? Hit the Start button in the bottom left-hand corner of your screen (in Windows 95 onwards and Windows 8.1, Windows 8 doesn’t have one but you can use the Win-R shortcut below), then choose Accessories / System Tools / Character Map:

Character map

You can also use this handy shortcut: Hit the Windows button on your keyboard and R together

windows key

or the Start button and Run and type Charmap into the box that appears:

Run charmap

However you get to it, you should see the character map, which looks like this:

character map

This looks a lot like the map in Word, and works in a similar but not identical way. Find the character you want, scrolling down or changing font if necessary. Click on it until it is highlighted (pops out of the box as below). Press Select and it will appear in the Characters to copy box below the grid.

character map select character

Once it’s been Selected, you will need to Copy it by pressing the Copy button (note: this means that you can select several characters in a row, if you have two non-traditional characters next to each other, for example). Copy will copy everything in the Characters to copy box.

character map copy

Note also here that in the bottom right you are given the keystroke or ASCII code Alt+0233 which you can use as a keyboard shortcut (more on that again later).

Once you’ve copied your character, you can paste it into pretty much any text box you want to, here in Twitter:

Inserting character into Twitter

 Using ASCII codes / keyboard shortcuts / Alt+ to insert special characters

The way I insert special and non-standard characters is to use these Alt+ ASCII keyboard shortcut codes that I’ve been mentioning all the way through this post. Hit Alt-0233 and you’ll get an é without having to click all over the screen, copy and paste. There’s a code for almost every character you could think of.

How do I know a load of these off by heart? Because I used to be a cataloguer at a library, and one of the things I did was catalogue foreign language publications, which were full of diacritics and non-standard characters. So, every day I would end up needing to insert many of these characfers into the cataloguing program we used. I, and everyone else, had little handwritten notes of the ones we used regularly. Here’s mine (yes, when I left the library in December 2011 to do this Libro stuff and blogging full time, I took my little bit of paper with me):

Alt+ codes notes

So there’s a little bit of Liz history you weren’t expecting (ignore the MARC codes at the bottom unless you’re a librarian, too). You, too, can have a bit of paper like this if you use non-traditional characters a lot – or you’ll commit them to memory, as I ended up doing.

How can I find out the ASCII codes for special characters?

You can use one of the two methods I describe above:

  • In Word: Insert – Symbol, drop down From to change it to ASCII and note the Character code
  • In Character Map: click on the symbol and look at the bottom right of the dialog box

or you can search for it online …

In this post, we’ve learned why we might use special characters and how to insert special characters in Word, Twitter, Facebook and any other places that you might want to insert text. If you liked this or found it useful, do please comment below and/or use the sharing buttons to share it! Thank you!

Related posts on this blog:

ASCII codes for common special characters

Other posts of interest:

This blog post was referenced in this one on using the correct degree sign in scientific writing, which is a great resource!

 
7 Comments

Posted by on July 23, 2014 in Short cuts, Word, Writing


Tags: , , , , ,

Using Twitter for your business

Using Twitter for your business

Twitter is an absolutely brilliant tool for business owners – if you use it in the right way. If you use in the wrong way, it can be a nightmare, as bad (or embarrassing) news travels very fast in the Twitter universe!

I personally got a lot out of Twitter in the early days, actually securing clients through using it – and long-term clients who recommended me on to more clients, too. I’d go as far as to say that it’s my number four source of work, after repeat business, personal recommendations and the Proz website. My clients still recommend me to other clients via Twitter, even several years on (the other month, a music journalist tweeted that she was looking for a transcriber. FIVE of my current clients tweeted her with my name!).

Benefits of Twitter: it’s quick and easy to use. Disadvantage: it can be a time-sink. Most important thing to remember: People only tend to see a snapshot of their tweets every day. I only know one person who reads ALL of the tweets in his timeline. This means that your tweeting strategy should be a bit different from your other social media posting strategies.

Setting up your Twitter profile

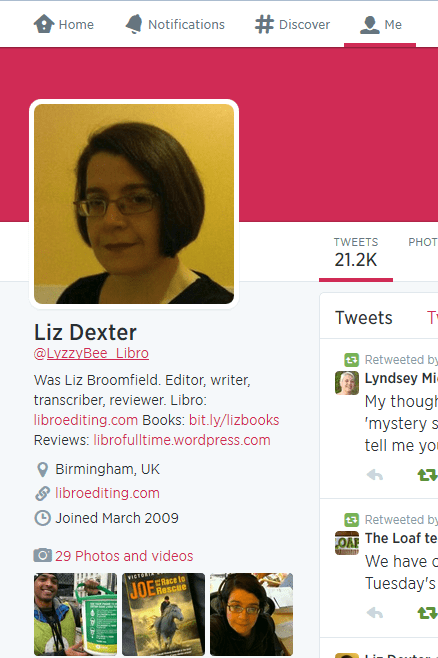
When you join Twitter, it’s very quick and easy to set up your profile. Your profile is a quick guide to who you are. Anyone clicking on it or searching for it needs to know that they’ve found the right Liz Broomfield / Libro (or whatever) and to see easily what you do.

Twitter profile

I would recommend including the following on your profile, and I’ve seen plenty of other people recommend this, too:

  • Your real name when you log in, as well as your company name for your Twitter ID
  • Your photograph on your profile, rather than your company logo (you can add that to your background)
  • Your company URL in the field where you can provide that
  • Use your 140 letters of profile to the max, including what you do and any extra URLs

As with any profile, you can change it at any point; just click on your image and choose Settings,  Edit profile of in the Home Screen, click on your Twitter ID and the Edit Profile button.

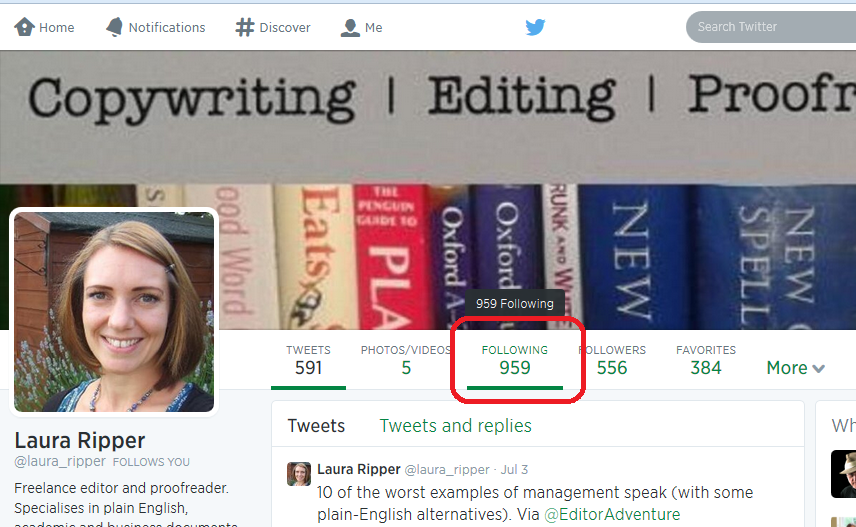
Following and followers

Once you’ve set up your Twitter account, you can start following a few people. Twitter will suggest ones that you don’t really want, based on who’s popular, but you can find interesting people to follow in a variety of ways:

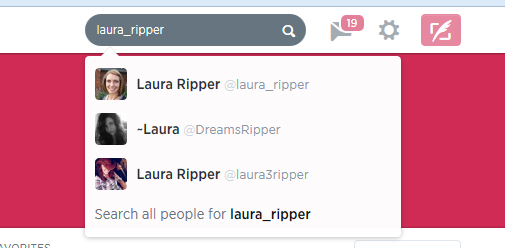
Ask someone for their Twitter ID when you meet them or glean it from their business card or website. Then enter that ID in the search field on Twitter. Or you can search for the person’s name or company name in the search field on Twitter.

Twitter search

Or you can go to http://www.twitter.com/%5BID without an @ sign]:

search using Twitter url

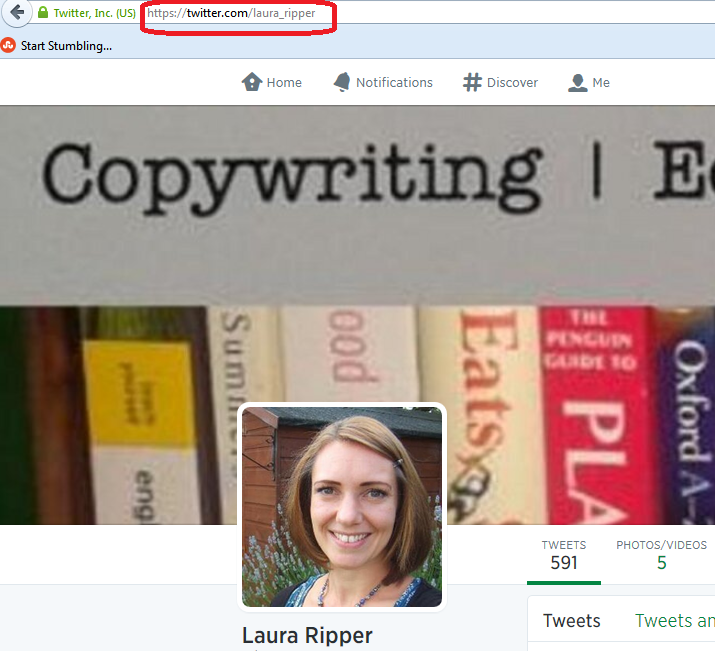
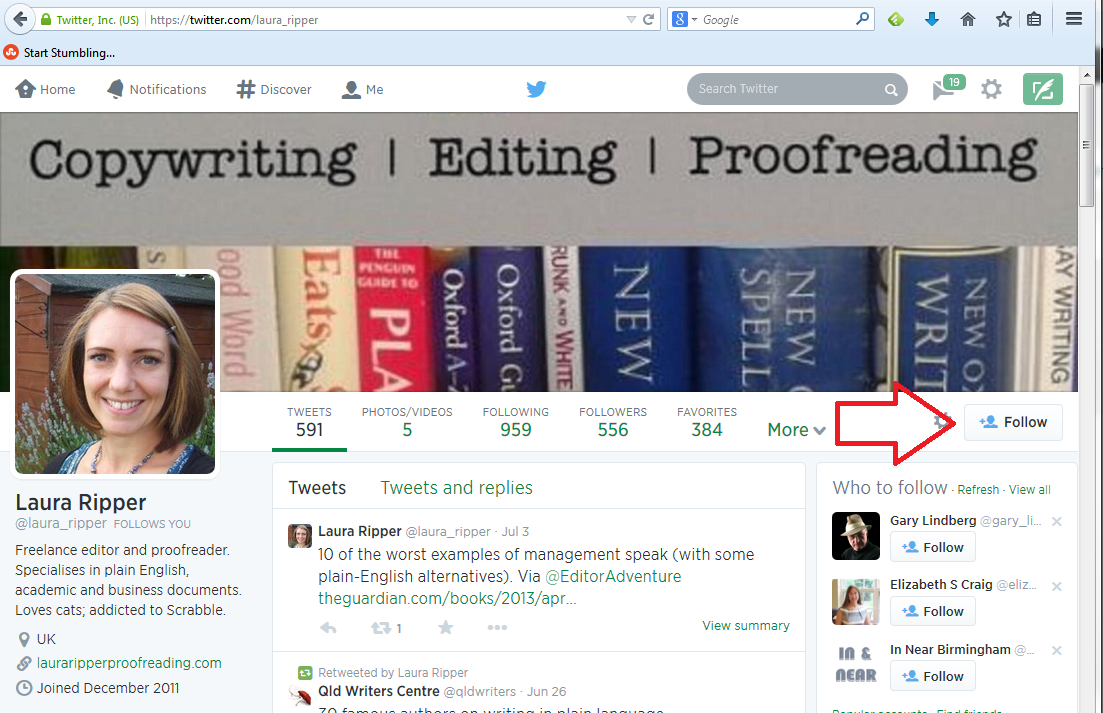
Have a look at their profile to check it’s the correct person, then press the Follow button if it is:

follow on Twitter

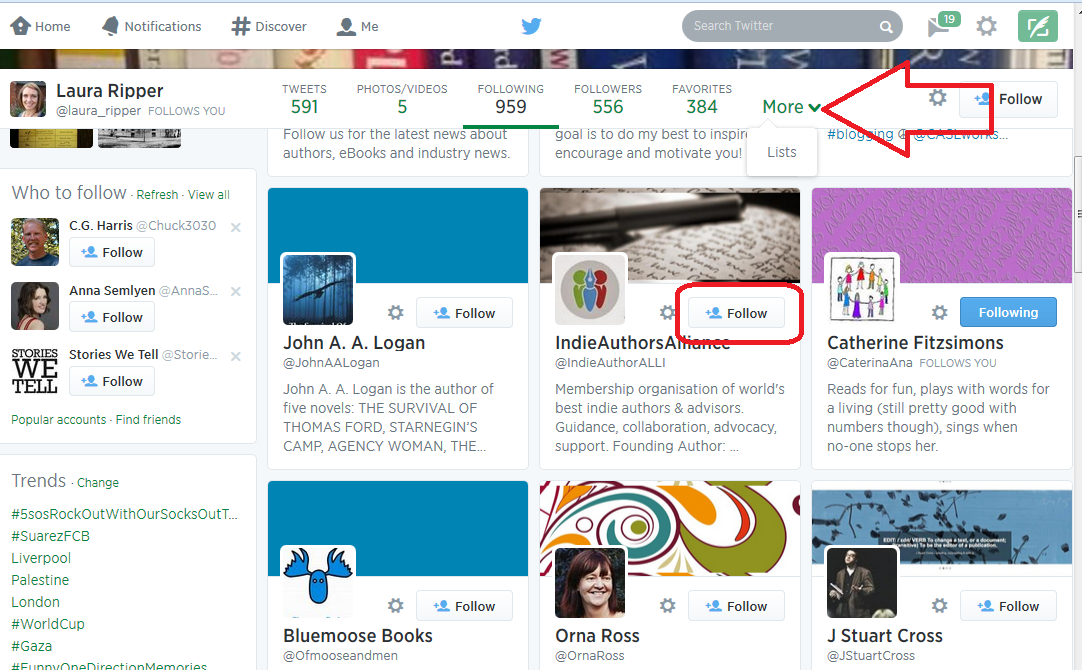
If you’re following someone in an interesting field, have a look at who they’re following. If you click on their profile, you will see links to Tweets, Following and Followers. Click on Following

Following button

and have a look – there will be a handy Follow button by each name so you can simply follow from there (if you’re already following someone, it will be marked as such). Once you’re viewing who someone is following, you will see a dropdown button marked More which will take you to their Lists.

Who someone is following on Twitter

See more about Lists later on, but you can follow either  an entire list or members of one by clicking on the list, and this is another good way to glean people to follow in a particular area of interest.

How do I choose who to follow?

It’s entirely up to you how many people you follow and whether you organise them in any way. When I’m deciding whether to follow people who I’ve found, or who have followed me (you don’t HAVE to follow everyone who’s followed you, but it’s polite to have a look at least), this is what I do:

  • Check their profile to see whether they’re interesting to me
  • Check their list of tweets to see if they tweet interesting information
  • Check their tweets for the same tweet repeated over and over again – this means a lack of imagination, something akin to spamming or an automated response
  • Check their tweets for regularity and date of tweeting – if someone tweets once a week or hasn’t tweeted for a number of months, unless they’re hugely important to me, I won’t bother to follow them because their tweets will get lost in the general melee

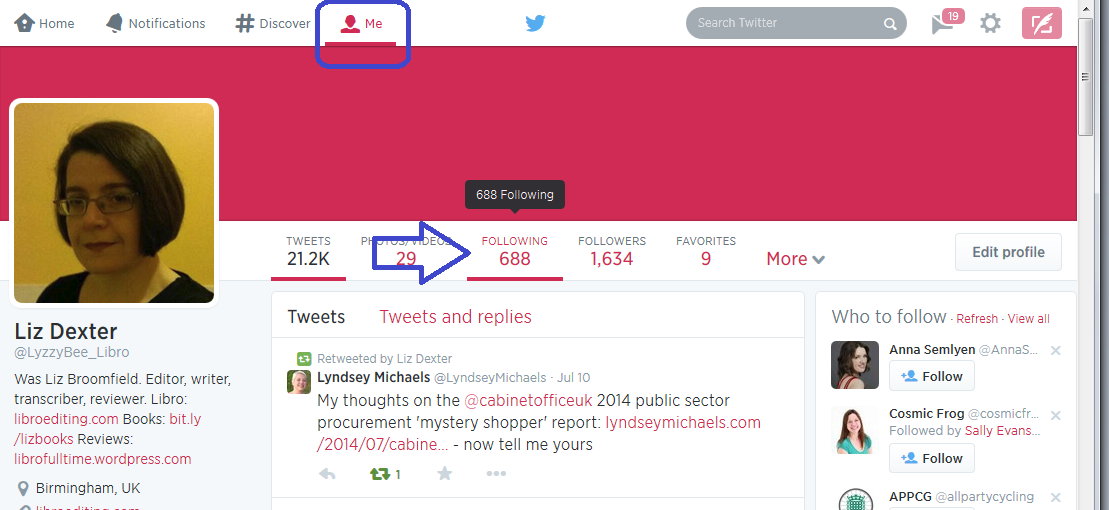
I do also regularly run a check over the people I’m following (click on Home, your own Twitter ID and Following) to make sure they’re still active. If not, I tend to cull. Sorry!

Who am I following?

Lists

Lists are a great way to put the people who you follow into categories or filters that you can look at independently. For example, I have a “Must know” list which includes all of the real-life friends plus some news feeds that I follow, so that if I only have time for a quick dip into Twitter, I can see what’s really important. I also have a “Journos” one so that I can see what my music journalist clients and a few others are up to, for some entertainment.

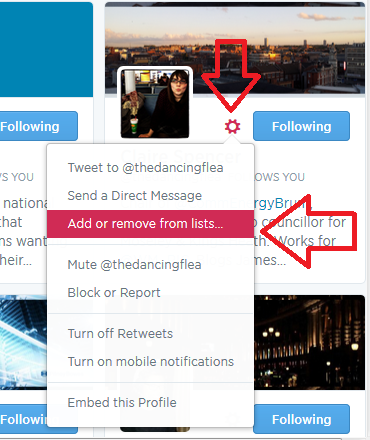
To add someone to a list …

Click on their name in your timeline to view their profile …

Add to list from profile

… or go to your list of accounts followed (Me – Following)

add to list from me - following

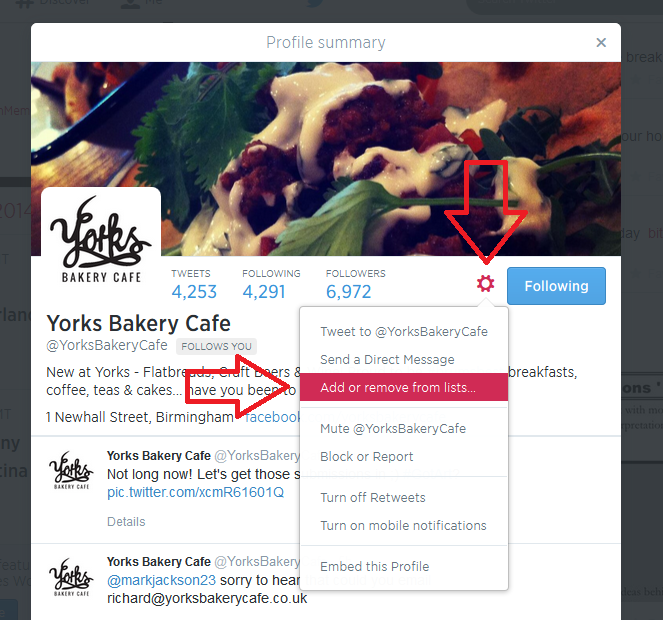
Click the User Options button (next to Following, it looks like a cog)

Click on Add or Remove From Lists

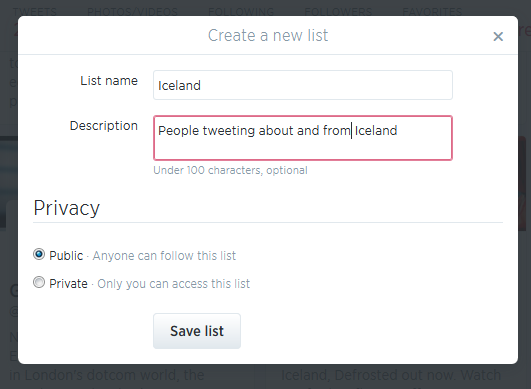
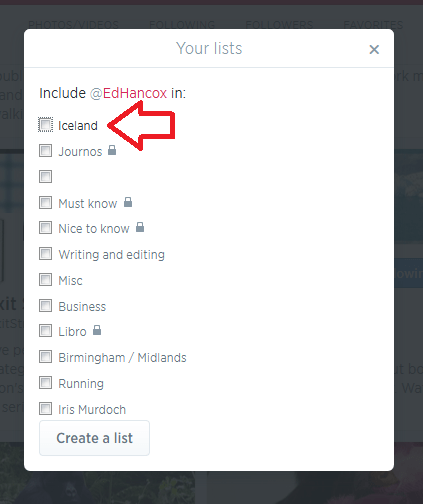
You’ll see a list of all of the lists you’ve already set up (if you have set any up) plus a button, Create a List

Either click on a list name to add that person then press the X in the top right corner to close the dialogue box:

Add to twitter list

or click on Create a List

create a twitter list

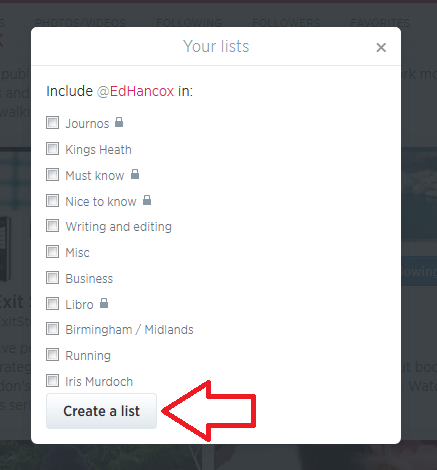
and make up a new list name to add this person to:

create new list

(if you make a list private, only you can see it – you’ll know when a list is private because it will have a padlock symbol next to the list name). Once you hit Save list, you will need to tick the particular list you want to add this person to:

add person to new list

Once you have some lists, you’ll see a Lists entry under More when you click on Me. Ideas for lists include friends, particular interests, your business sector, news feeds, sport – anything you want.

You can follow other people’s lists or mine them for good accounts to follow – just click on a particular person’s Twitter ID and you’ll get their following, followers and lists.

Note – this doesn’t work exactly the same on mobile devices or third-party Twitter management dashboards as it does on the basic web-based Twitter interface. These instructions are for the latter.

How Twitter works – @ and #

One thing that you’ll see a lot of on Twitter is the symbols @ and #

@ is used in front of a Twitter ID to notify the person that you’re talking to them or to point someone else to their account. For example, someone might recommend an account for me to follow:

Megmac: @lyzzybee_libro have a look at @thecreativepenn for a good feed for writers

This makes the message appear in my Connect list (see below) and TheCreativePenn’s Connect list, so I will see the recommendation and she will see that she’s been recommended to me. If she wants, she can then reach out to me, and say thank you to the recommender.

# is used to create clickable links that will pull information on a particular topic together in one view. It’s often used at events and conferences – so, for example, #cbsms is used by people tweeting about the Central Birmingham Social Media Surgery. When you see a hashtag (as this is called) in a tweet, it will be a clickable link. Click on the hashtag and you will see all of the recent tweets with that hashtag, giving you a view of what’s going on and who’s talking about it.

Lyzzbee_libro: Off to the social media surgery to help a few people today #cbsms

It is also used to link tweets on a wider topic, e.g. #amwriting, which writers use to talk about the writing process. You can pop a hashtag on a tweet when you want it to come up in such searches, for example I might tweet about my book on transcription and add #transcription at the end, so that anyone looking at that hashtag will see my tweet.

Your Twitterstream and mentions

Whether you’re viewing Twitter online on a computer or via a phone or a third party dashboard, you will have a twitterstream and then various other views.

Your Home will show you your twitterstream: all the most recent tweets by people / companies / whatever that you’re following.

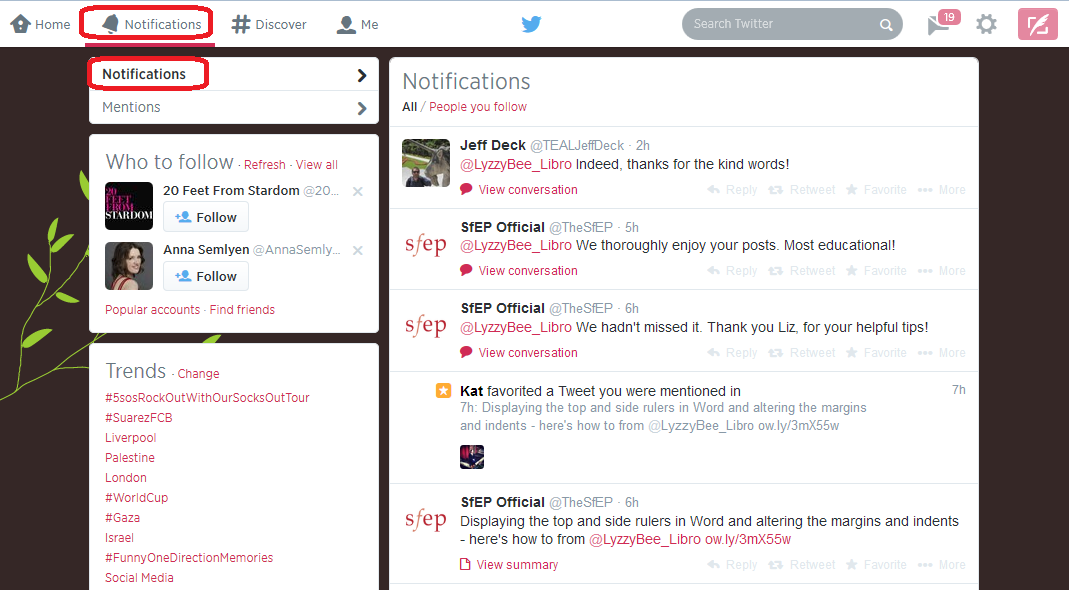
Your Notifications list will show you anything directly concerning your own Twitter account – so messages that have been sent to you with an @[your Twitter ID] as well as people who have followed you. It’s good practice to keep an eye on this so that you can reply to any messages sent to you and say thank you for recommendations and follows. Note here that Notifications gives you information on who’s followed you and favourited your messages, and any messages that start with your name:

Twitter notifications

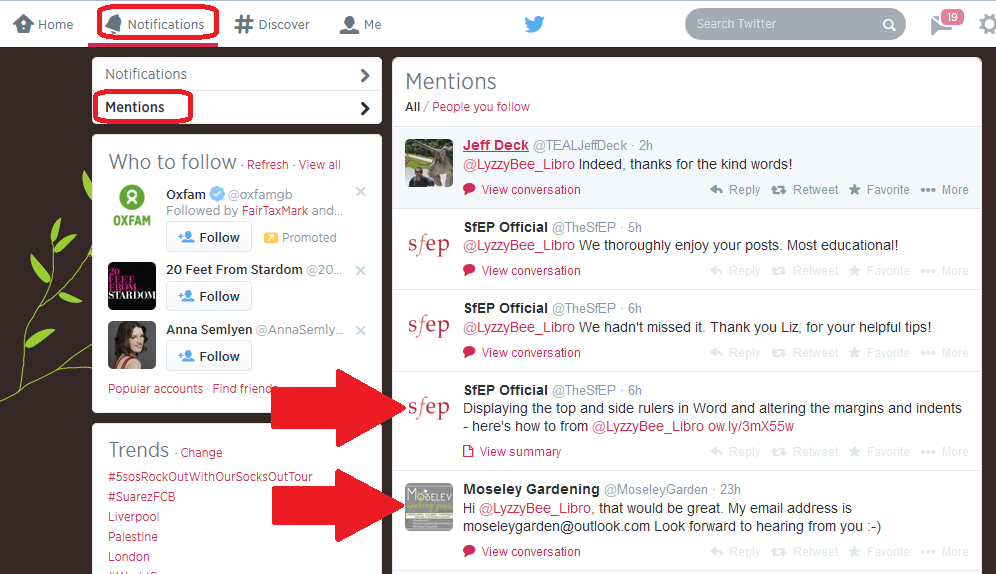
while Mentions will also show you when you’ve been @ mentioned by someone else:

Twitter mentions

Getting rid of spammers

Everyone gets spammed by Twitter accounts, dodgy or otherwise, that are usually either looking for random followers to boost their numbers or clicks to their undesirable links. The ones with links often only have a link in the text – this is a real red flag and you should never click on a link in a tweet, even from a friend, if there’s only a link and no text (your friend could have had their account hacked).

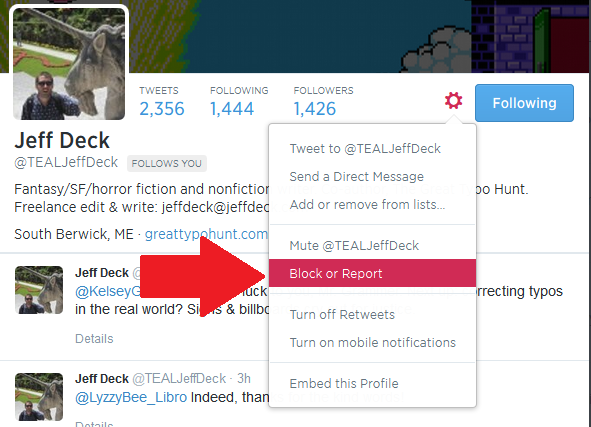
If you receive an odd tweet or one with just a link, click on the photo or name of the sender. You will typically see that they’ve sent the same short message or no message and link to multiple people. Click on the User Actions button on their profile and you have options to Block or Report: [Note: I’m just using this chap as an example, he’s a good guy really!]

Block on twitter

Once you’ve clicked on Block or Report you will see this screen, which allows you to tell Twitter why exactly you are blocking or reporting the person:

Block and report on Twitter

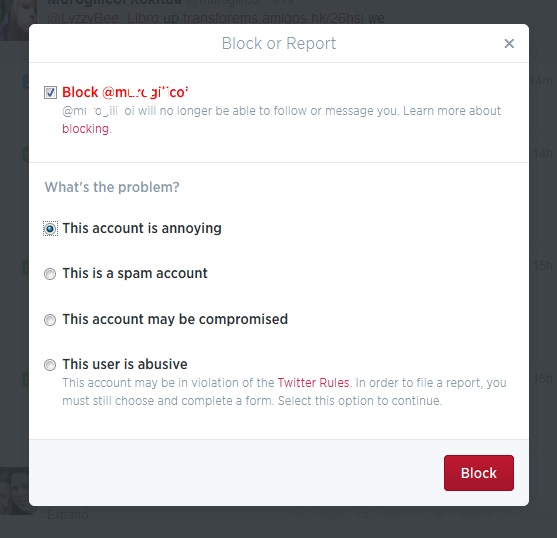
This alerts Twitter that the person is spamming, and will help to save someone not as savvy as you from clicking on a dodgy link and going who knows where in cyberspace!

If you’re just getting annoyed or bored by a Twitter account that you follow, you can click on their photo or name and press the button marked Following – this will change to Unfollow as you hover over it; click it and you’ll unfollow them and no longer see them in your Twitterstream.

Rules for using Twitter effectively

Using Twitter effectively is a matter of knowing how it works and how people view it, and being sensible and polite.

Posting multiple times

The main point about tweeting is that very few people read every single tweet on their timeline. People typically check Twitter on the way to work, at lunchtime, on the way home, and some time in the evening. Once you’re following more than about fifty people, there’s no way that you’re going to see all of their tweets – so think of people as viewing a snapshot of their Twitterstream rather than everything.

This means that it’s fine to tweet a message multiple times, where it would be seen as rude and intrustive to post a Facebook status multiple times in one day.

You also need to be aware of your markets and their time zones – if you have a lot of Australian clients, and you’re in the UK, you will need to tailor your tweets to their time zone, maybe investing in a Twitter dashboard that will allow you to pre-schedule your tweets.

Using a dashboard

It can be very useful to use a dashboard such as Tweetdeck to manage your Twitter accounts. You can view multiple accounts at a time and post as them (handy if you have, say, a personal and a work account) and view your lists in their own feeds. Some of them will also allow you to schedule your tweets to be published at a certain time or on a certain date, which can be very useful (although watch out that you still keep an eye on when these go out, as there have been numerous examples of an auto-tweet posting when it’s really not appropriate, such as after a disaster).

Sharing other people’s material

The other main rule is to be polite and reciprocate and say thank you.

If you retweet other people’s tweets, they are more likely to share your tweets with their network. To retweet, click on the word retweet underneath the tweet, or look for that ‘arrows-in-a-square’ icon which has the same effect. Some people reckon that you should share five other tweets to every one of your own that you post. I’m not that scientific, but I do try to share as much as I post.

Saying thank you and being proactive

If other people retweet or otherwise share your tweets, which you will find out about by reviewing your Connect feed, do drop them a message to say thank you.

If someone recommends your Twitter account or your services to someone else, contact the person to whom you’re being recommended with a polite “how can I help you” and a way to contact you, and say thank you to the recommender.

Not automating too much and not spamming

I’m not a big fan of the automated message when I follow someone’s Twitter account, and many other people find this annoying, too. I like to know that there’s a person behind the account. Similarly, all sales and no sharing, or all automated tweeting and no replying to @ messages will probably get people irritated.

Other useful posts

On this blog: Using Twitter to find jobs

Using LinkedIn for your business

Social media resource guide for this blog

My friend Sandy’s post on Twitter for professional development

 
9 Comments

Posted by on July 16, 2014 in Business, Skillset, Social media


Tags: , ,

How do I display the top and side rulers in Word?

The top and side rulers in Word are used to set your margins, and also any Indents you might require for your paragraphs. They should display by default. If they don’t, here are instructions on how to make them display.

If you can’t see the rulers, click on the View Ruler button at the top of your right-hand scroll bar:

view ruler in word

This will display both of your rulers, and you can use the sliders to adjust your margins:

Rulers display in word

To turn off the rulers, simply press that button again, and they will disappear!

Other relevant articles on this blog:

Indents and Margins.

I hope you’ve found these hints helpful! Do share or pop a comment on this post if I’ve helped you learn something new or solved a tricky problem for you, and do explore the rest of my blog if this is your first visit!

Please note, these hints work with versions of Microsoft Word currently in use – Word 2007, Word 2010 and Word 2013 all for PC. Mac compatible versions of Word should have similar options. Always save a copy of your document before manipulating it. I bear no responsibility for any pickles you might get yourself into!

This is part of my series on how to avoid time-consuming “short cuts” and use Word in the right way to maximise your time and improve the look of your documents. Find all the short cuts here


Tags: , , , ,

How do I change from having a gap between paragraphs to indenting them?

I’ve written this post because one of my clients just asked me how to do exactly this. She had a document where the paragraphs had an automatic line space between them, and no indent (because I’d produced the document and that’s how I like to lay out paragraphs), and she wanted to change it to have no line space between paragraphs, and the first line of the paragraph indented.

This article draws on two that I’ve already published, so for more detail, you might want to look at my posts on The Line Space Button and Indents and Margins. But what you’ll find here is a quick guide to changing your paragraph format from spaces between paragraphs to indented paragraphs (and vice versa). Note that although they all look a little different, this works for Word 2007, Word 2010 and Word 2013 for PC.

How to remove automatic spacing between paragraphs

There are many reasons to remove automatic spacing between paragraphs. To mention a rather obscure reason, I produce transcriptions to accompany a client’s YouTube videos. The formatting for these requires that a manual line space is added between paragraphs, but my version of Word adds these automatic spaces as a default, so I have to take them out.

Here’s what a document with automatic line spacing between paragraphs looks like:

Paragraphs with automatic spacing

To remove the spaces, first of all you need to highlight all of the text where you’re going to change the format. This is best done by going to the Home tab, then going to the Edit area on the right and clicking on Select:

select all text in word

Once you’ve clicked on Select, you will get a choice of options which includes Select All. Click on this and your whole text will be highlighted:

option for select allOnce the text is all highlighted, making sure you don’t click on the text (which will deselect it), staying in the Home tab, go to the Paragraph section in the middle of the ribbon and click on the Line Spacing button, which looks like this:

line space button

remove space after paragraph

If you have automatic spaces between paragraphs, one of the two bottom options will read Remove Space Before/After Paragraph. In this case it’s after. Click on that option (and it will change to Add Space After Paragraph).

This will have the effect of removing the line spaces between your paragraphs:

paragraphs with no line space in between

How do I indent my paragraphs?

Keeping the text highlighted (or re-selecting All if you’ve accidentally clicked and lost the selection), move below the Ribbon to look at the rulers in your top margin.

(If you can’t see the rulers, click on the View Ruler button at the top of your right-hand scroll bar:)

view ruler in word

Once you can see your rulers, move only the top half of the left-hand margin marker rightwards across the page until you reach the indent position that you want:

setting indent in word

This will give you indented paragraphs with no line spaces between them!

indented paragraphs

Done! To get from indented paragraphs to paragraphs with gaps between them, you just need to reverse this process …

Other relevant articles on this blog:

The Line Space Button

Indents and Margins.

I hope you’ve found these hints helpful! Do share or pop a comment on this post if I’ve helped you learn something new or solved a tricky problem for you, and do explore the rest of my blog if this is your first visit!

Please note, these hints work with versions of Microsoft Word currently in use – Word 2007, Word 2010 and Word 2013 all for PC. Mac compatible versions of Word should have similar options. Always save a copy of your document before manipulating it. I bear no responsibility for any pickles you might get yourself into!

This is part of my series on how to avoid time-consuming “short cuts” and use Word in the right way to maximise your time and improve the look of your documents. Find all the short cuts here


Tags: , , , ,