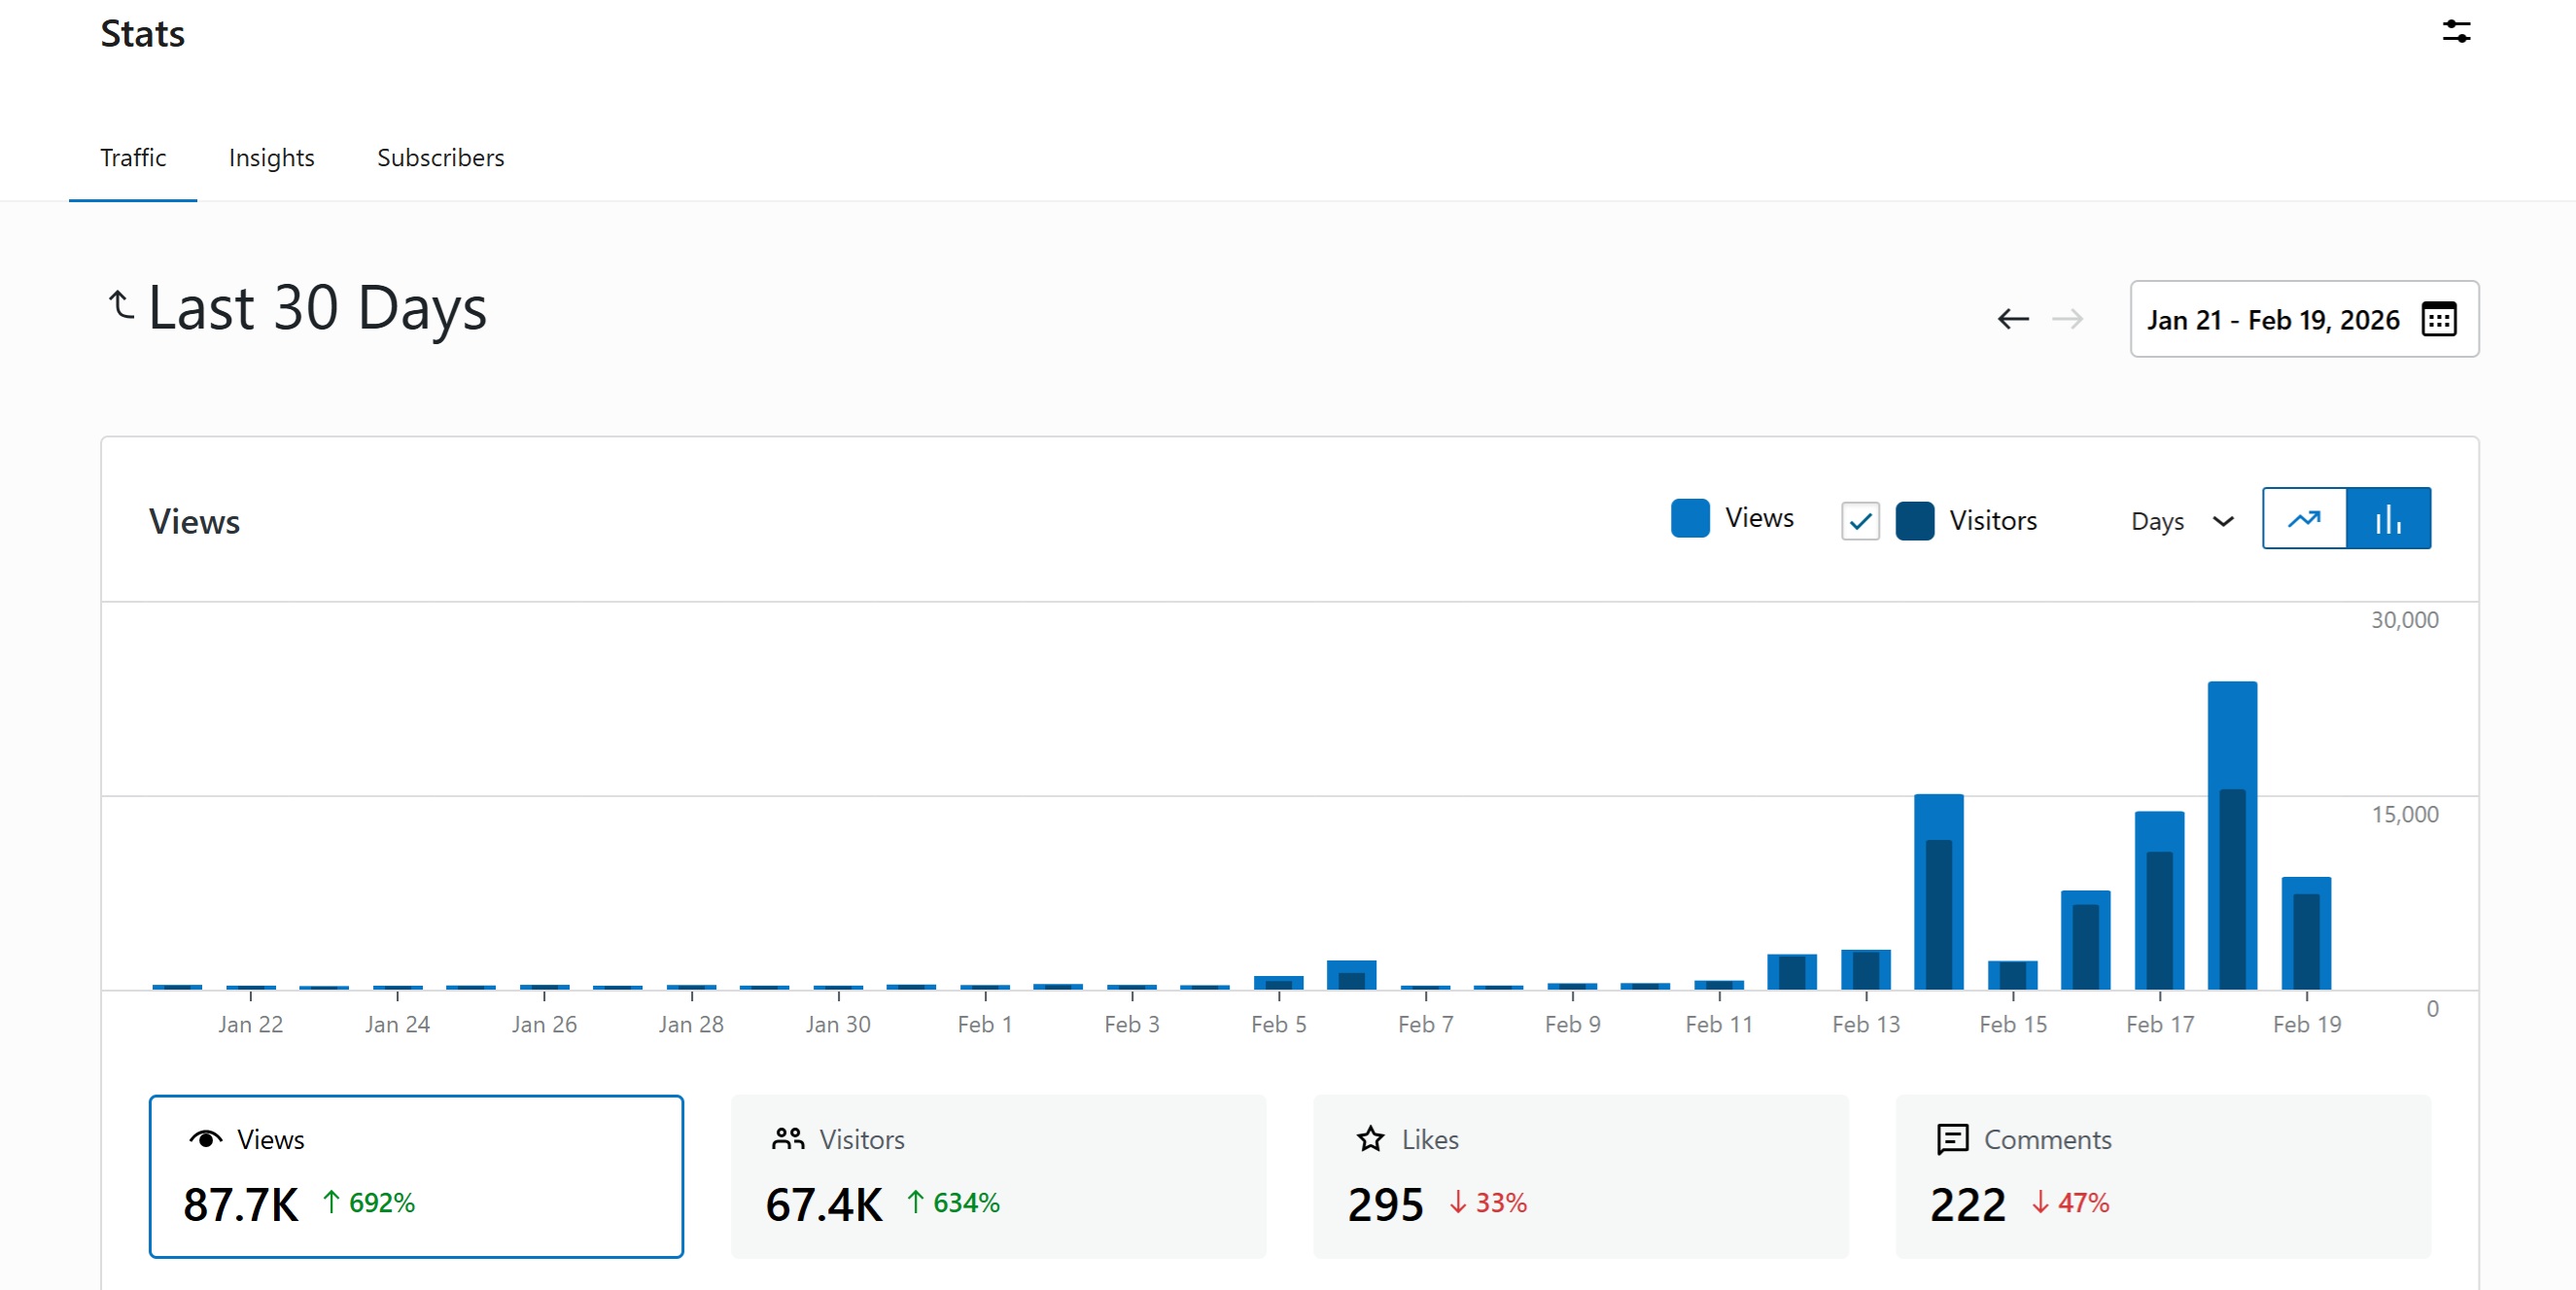
RSS

Category Archives: WordPress

Why are my blog statistics so low? Who’s reading this thing anyway?

Why are my blog statistics so low? Who’s reading this thing anyway?

We all know by now that it takes time to build a blog audience and that you need to keep plugging away, writing interesting stuff and engaging with your readers.

But sometimes it just feels like no one is listening, like no one is looking at your carefully crafted posts. Why is this?

Why are my blog statistics lower than I would expect?

I use WordPress for my blogs, so I’m familiar with the statistics it offers (read more here), however, I know it doesn’t record all of the views of my posts, which can be very frustrating. This is how that happens.

People read your blog via email

Hopefully you’ve set things up so people can subscribe to your blog via email. Every blogging platform will have a plugin or menu item that will set this up for you so there’s a “Subscribe by email” button on your blog.

People who have subscribed to receive your articles via email will receive the text of the post in an email with a link to view the post on your website. They can open the email and read all of your article, but WordPress won’t know they have done that unless they click through to your website, at which point it will record the click. If they just read the article in the email and don’t click through to like, comment, etc., you won’t know that they’ve read your material.

People read your blog via a blog aggregator

People can also subscribe to the blog using a blog reader, either through WordPress itself, for example, or another service such as Feedly (which I use).

A blog reader uses what’s called an RSS feed to gather articles someone has said they want to read and display them all in one place (the RSS feed works in a similar way to the emails going out to people who’ve subscribed via email; instead of sending a person an email, it sends a blog reader the text to display in the reader). The text of the post will display in the person’s blog reader software with a link to view the post actually on your website.

Again, someone can read your post in their blog reader, but unless they click through to view it on your site, your blogging platform can’t know they’ve read it and won’t record that they have done so.

So what are my statistics showing, then?

Your blog statistics will record visits from …

  • People who subscribe to your blog via email and have clicked the link in their email to visit your blog
  • People who subscribe to your blog via a blog aggregator and have clicked the article in their aggregator to visit your blog
  • People who have seen your article shared on social media and have clicked through to read it on your blog
  • People who have done a search, found a link to your article in their search engine (Google, etc.) and clicked through to read it on your blog

In other words, there are fewer people recorded as having read your blog post than have actually read your blog post.

Note: If you want to experiment with only offering blog aggregator (Feedly, WordPress Reader, etc.) and email subscribers the first few lines of your blog post with a link to click through, hopefully encouraging them to visit your website to read the whole article, this article (third-party content recommended by a fellow blogger) explains how to do that.


I hope this has reassured you that those dismal stats are not as dismal as you thought they were! Please share and/or comment if this article has been useful for you.

Other related articles on this blog

Keep an eye on your stats

Scheduling blog posts and keeping going – scheduling the posts and the writing of them

Five ways to drive and increase engagement with your blog

How to keep people engaged with your blog

Six things you can do to increase your SEO


20 Comments

Posted by on March 14, 2018 in Blogging, WordPress


Tags: , ,

Seven top tips for the newbie blogger

Seven top tips for the newbie blogger

New to blogging? Asking “How do I set up a blog?” Not sure where to start? Here are my top seven tips for the newbie blogger.

I’ve assume here that you have something to blog about and you know you want to do it in the first place …

Under each heading, I’ve linked to more articles on this blog that will help you get more into the topic. I wanted to gather the basics in one place!

1. Sign up to a blog platform

Blogger, WordPress, it’s up to you. But you need to sign up to a specific blog platform in order to write a blog.

Bonus hint: Don’t pay for anything much at the start. WordPress has lots of free “themes” (setting the look of the blog and where all the menus go) and you might want to have your own domain name (think http://www.libroediting.com as opposed to http://www.libroediting.wordpress.com) but I don’t think that matters for a personal blog that’s not a business brand.

Find out more about starting out on WordPress here.

2. Write your first blog post

What’s a blog post? Think of it like a diary entry. Your blog will be updated regularly with new content appearing, which is not the same as a website which tends to have static pages full of information.

Bonus hint: There may be a blog post already set up with some sample text: WordPress does this. Overwrite the text, hit “Publish” and you’re off!

Find out more about writing blog posts here.

3. Set up an About Me page

You don’t need too much fancy stuff (like on this blog, I know) but it’s very useful to have an About Me page – this is a static page which can appear in your menu and tells your readers a bit about you.

Bonus hint: You don’t need to disclose your inside leg measurement or even your photo if you don’t want to. But a bit about who you are and where you’re from is more welcoming.

Find out more about setting up a page here, and, for advanced users, a landing page here.

4. Go no-ads

I get really put off when I’m reading a blog and adverts appear all over the place. Yes, people do manage to monetise their blogs with paid advertising – no, truthfully, you won’t be doing this for a while. WordPress has a no-ads package I renew every year. Use it to avoid annoying your readers.

5. Moderate comments

You will want to encourage readers to make comments on your blog, but you need to set up some form of moderation to avoid your blog comments being taken over by spammers. There will be a way to do this in your blogging software.

Bonus hint 1: Check your spam folder in your blogging software regularly as sometimes it will carefully send legitimate comments there

Bonus hint 2: I choose to moderate just the first comment a particular person makes, as I find a spammer will show their colours right away.

Find out more about moderating comments here and why we should do this here.

6. Engage with your readers

Build social capital … no, scrub that. Enjoy engaging with your readers. If they’ve taken the trouble to comment on your blog, take the time to respond to their comment!

Bonus hint: You’ll find more readers for your blog by commenting on other people’s and including your URL. Do this wisely, sensibly and without spamming, of course!

Find out more about engaging with your readers here and reciprocity across social media here.

7. Enjoy yourself!

Blogging shouldn’t equal slogging! There are various techniques to get your blog posts written, and obviously it can be more important to keep a business blog going than a purely personal one, but if you’re not enjoying it, it’s not worth it!

Bonus hint: If you find pumping out long articles a drag, try writing shorter, snappier pieces instead. There’s no word limit!

Find out more about why you should blog here, and why you shouldn’t here.


This has been a whistle-stop tour through my top seven tips for new bloggers, inspired by someone who wants to start a book review blog. I hope they – and you – have found it useful: do comment or share if you have!

 
9 Comments

Posted by on December 6, 2017 in Blogging, WordPress


Tags: , ,

Five ways to drive and increase engagement with your blog

Five ways to drive and increase engagement with your blog

My viewing figures have gone down. No one is buying my books at the moment. Who wants to start a new business at a time like this? Well, here are five pointers to driving and increasing (or maybe, at the moment, maintaining) engagement with your blog. And here I am doing number five right now …

5. Publish more blog posts

The search engines like you to have regularly updated content, to make sure they’re not sending people to an out-of-date source of information. I find the sweet spot comes at around three posts per week. They don’t have to be long. Try mixing things up with different subjects or types of article.

4. Share useful information

One of the most-viewed of my blog posts is still one I wrote as a note for myself in 2011 on how to sort out a problem with Word. Still gets those hits, even now – and thank you comments.

3. Seek engagement

Ask questions. Put those share buttons on your blog (here’s how to do that in WordPress) and ask people to share if they found it useful.

2. Add Like buttons to comments on your posts

I love this feature of WordPress (and here’s how to do it) – if you Like as well as reply to comments, your reader will be alerted and should get a good feeling about you. If you don’t have time to reply right away, a Like will let them know you’ve read and appreciated their comment.

1. Reply to comments on your blog posts

I read a lot of blogs. If I put a comment on a blog post and the original commentator doesn’t respond to it, I feel ignored. I’ve talked about this at length on posts about reciprocity in social media (including blogs). I really try to reply to comments on my blogs within 24 hours; if I can’t do it quickly, at least I’ll “Like” the comment. Personally, if I read and comment on a blog and never get any acknowledgement, first I’ll stop commenting, then I’ll be less likely to read it. So I assume other people are like me and will do the same. Of course there are reasons why people can’t reply to blog comments temporarily, or don’t see some of them, but if it’s a constant feature, lots of comments with no replies, I’ll tend to lose interest.

I hope these ideas have been useful to you and help you to drive more engagement on your own blogs!

 
13 Comments

Posted by on June 29, 2016 in Blogging, WordPress


Tags: , , ,

WordPress tip: How do I allow Likes on comments?

I noticed that lots of other people’s blogs allow you to “Like” comments on a post (as well as Liking the post itself). Because I had to have a little look for it, I thought it would be a useful thing to blog about. So, how do you allow Likes on comments in WordPress?

Note, this applies to WordPress.com blogs, self-hosted WordPress.org blogs may need all or part of a widget to do this.

Why enable “likes” on blog comments?

We’re all used to Liking posts on Facebook and now Twitter. It’s a good way to let the poster know that you’ve seen and approved of what they’ve said, even if you don’t comment.

We can also allow Likes on our WordPress blog posts (for info on how to do that, see this article).

Being able to Like a comment on a blog post means that you can acknowledge it without continuing the conversation infinitely. Other people can also show their appreciation of a particular comment. It adds another thread to the links between you and your commenter.

How do I enable liking on blog comments?

Go to the WordPress dashboard (the original one) and locate the Settings area.

Go to the Sharing menu.

Scroll down until you see the Comment Likes are … section at the very bottom:

Turn on likes on comments in WordPress

Click on On for all comments and Likes will now be available on all comments.

What does Liking look like on blog comments?

Here’s a screenshot from a blog post on my book review blog, showing various nested comments. People can click on the little star to Like the comment:

Likes on blog comments visible

If you’ve enjoyed this post and found it useful, do please comment and/or use the sharing buttons below this post to share it with other potential readers who might find it useful. Thank you!

Related posts on this blog

How to set up a WordPress blog

How to add pages to make your WordPress blog into a website

How to add images to your WordPress blog posts and pages

How to add slideshows and galleries to your WordPress blog posts and pages

Using the Publicize feature in WordPress

WordPress 7 – adding an avatar picture

WordPress 8 – setting a static landing page

WordPress 9 – setting up a Posts page

Adding links to blog posts – how to do it on the major blogging platforms (and email)

How video can help your blog or website

How to get back to the old WordPress dashboard in WordPress.com

 
12 Comments

Posted by on April 14, 2016 in Blogging, WordPress


Tags: ,

How do I get back to the full dashboard on WordPress.com?


I’ve been asked this question a few times recently, as WordPress has sought to make it easier for users to post a quick blog post or create a page. People who are familiar with the old, more detailed dashboard want to find it again. So here’s how.

How do I find the old dashboard on WordPress?

When you log on to WordPress, you will find a button marked My Sites. Click on that and you’ll get the new, simplified dashboard:

WordPress new admin page

Now click on WP Admin, circled on the above image.

This will take you to the old familiar interface:

Old WordPress dashboard

If this doesn’t work there is another tip, which is to add /wp-admin to the end of your page’s URL.

Note: this works for WordPress.com, the free version – self-hosted WordPress.org is a little different. If you’ve found this post useful, please do share it using the sharing buttons below.

Other useful posts on this site

Is it worth having a website for my business?

WordPress 1 – the basics – joining and setting up a blog (links to all the other WordPress tutorials)

Resource guide – blogging and social media

 
47 Comments

Posted by on November 18, 2015 in Blogging, Business, SEO, Social media, WordPress


Tags: , , , , , ,

Six things that you can do to increase your website or blog’s SEO (search engine optimisation)

Graphic showing an increasing numberSEO or Search Engine Optimisation is one of those mysterious areas of knowledge – like setting up a website – that people like to keep to themselves. If you’ve been involved at all with a website or blog, you will know that people tend to almost prey on newbies, offering to increase their SEO if they work with this or that company.

The impetus for this post came from offering some help to a community organisation I’m helping out with. They don’t have the money to spend on expensive consultancy, so I’ve put together this guide for them – and you – to help clarify the myths and provide you with some advice to help you build good SEO.

What is SEO / search engine optimisation?

SEO means making sure that search engines like Google and Bing find your content and present it to people who are searching near the top of the results (just below the adverts).

Although they obviously work for a profit and want to make people advertise with them, the search engines do want to get reliable, decent and useful information to their users – otherwise those users will go elsewhere. They go to a lot of trouble to weed out spammy and dodgy sites that will put users off and don’t provide useful and relevant information (if every search you did on Google only gave you results on how to improve your SEO, when you wanted to know about Halloween outfits for dogs, you’d soon get bored and use a different search engine).

Therefore, we need to make sure our blogs and websites have the right information and content that will prove to Google that we’re legitimate sites full of useful content that it’s good to show their users.

There are various technical and writing related ways to do this and I’m going to cover the simple ones that you can do with, for example, a free WordPress.com website or blog and no coding skills.

I’ll note here that there are more detailed and technical things that you can do, to do with the coding of the actual site – this will however give you some simple tools that I’ve used to get good viewing figures and good SEO.

My blog post referrersWhy do I need SEO?

You want people to read your stuff, right? Well, although many people will find your content, services, products, etc. through social media, recommendations, blog readers, etc., the majority will find you through search engines.

Have a look at the statistics pictured. This was on a day when I published an article that was shared quite a lot on social media. Where did I get all my hits from? Search engines. So it’s really important to make sure that when people search for keywords to do with my blogs in the search engines, they find my blogs and find their way to me, so they can buy my services / be helped by my informative posts / buy my books.

How do I improve and maintain my SEO?

1. Publish useful, relevant, original and “natural” content

This is my number one top tip. The search engines are always looking for ways to stop people gaming the system and this is a clear example – we’ve all found websites which just have lists of keywords, etc.

I’ve got good results from the fact that the text on this site is useful, it’s relevant, as in it fits in to various categories and has information on those categories (Word, business, social media, etc.), it’s original (all written by me) and it’s written in natural language that looks like it’s been written by a human, not a robot or machine translator or spammer. This will always outweigh everything else.

2. Publish content regularly

Search engines like material that’s updated regularly, as it’s indicative that the site is still live and up to date. Try to post at least once, if not twice a week – it doesn’t have to be massive long articles, but something twice a week is better than five posts in one week then none for a month.

3. Use keywords wisely

There are some “rules” about the keywords that you want to use to attract readers. Here are the ones that have worked well for me, as far as I can tell:

  • Place the keyword / phrase in the title of the piece – so, here I have used “Increase your blog or website’s SEO” in the title.This automatically adds is to the “metadata”, in this case the URL of the piece. There is more you can do with metadata which is outside the range of this article.
  • Place it in an H1 or H2 level heading – here, I’ve used it in top-level headings.
  • Use it in the description of an image – the image above has the words “increase SEO” in the description field.
  • Use it early on in the text and in the final paragraph.
  • Scatter it throughout the text – but NATURALLY. A good aim is to have the keyword / phrase represent no more or less than 5% of the whole of the text (so if your text is 100 words long, you need the keyword to appear around five times.

4. Use questions in the title and headings

Many people search using questions these days – have a look at your statistics if you can and see how many question phrases appear.

So, use questions in your title (this one doesn’t have a question, but many of my blog posts do), and in your headings. These may well echo the exact phrases that people use to search, boosting you higher in the results.

5. Use categories and tags or whatever your blogging platform offers

Categories, tags, whatever your blogging platform calls them, will be searched by search engines, increase the validity of your site and improve your SEO. Use them wisely, using general (reading, writing) and specific (WordPress, copyediting) ones to help your visibility and to help your readers navigate around your site and stay on the site for a longer time.

6. Make judicious and careful use of backlinks

Search engines like to know that a site is reputable and well-respected by peers. Therefore, they put a high premium on the sites that link into your website or blog (i.e. they include your URL / website address on their own site). Of course, a good way to build these is to reference other well-known and well-respected blogs and websites on yours.

However, this is a tricky area that is used very heavily by spammers, too. So here are some dos and don’ts:

Do:

  • Place guest posts on other people’s blogs that are relevant and useful to both your audiences. You should be given the opportunity to include a link back to your website.
  • Offer people in your industry guest posts on your blog (or run interviews with them, etc.) and ask them to link back to the piece on their social media and website.
  • Get yourself in well-renowned and useful / appropriate listings – for example I’m in a Find a Proofreader listing and one for a professional discussion list I belong to.
  • Carefully comment on relevant articles and blog posts, with a relevant and useful comment. As an example of another blog, I comment on book bloggers’ review posts if I’ve read the book or have something to say about the book they’ve read, and include the URL of my own book review blog in the URL field. That way, a network of links builds up.
  • Use whatever reblogging facility you have on your platform (WordPress has a reblog button) to share interesting and relevant content on your blog (I don’t do this myself, but I’ve been reblogged a lot). This will publish a snippet of your blog and a link on the reblogger’s own page and direct readers to you and reassure the search engines that your content is useful.
  • Publicise your blog posts on social media (you can do this automatically) to increase the number of places your web address will appear.

Don’t:

  • Randomly ask to place guest posts on unconnected blogs – you might well get accepted but it’s not going to do you much good long-term.
  • Accept random and unconnected pieces to place on your blog, even if they say they’ll pay you – it’s not worth it long-term, as your readership will suspect it and anyone visiting your website for Dallas real estate and finding the rest of your articles are about crocheting will not stick around.
  • Put random comments full of your own links on people’s blogs that are not in any way connected with yours. Again, some might let these through (I delete any comments like this on my blogs) but it’s not going to look great, as many people will spot what you’re doing and it’s artificial, not natural, so may well harm you in the future.
  • Copy other people’s blog posts wholesale and paste them onto your site – search engines take a dim view of exactly duplicated content and will tend to push both examples right down the results screen. If you want to share something, share a snippet and a link to the rest of the content on the site where it was originally posted
  • Sign up with a company that offers to increase your SEO without checking very carefully whether they do this kind of thing – many of the rogue random comments and links I get on here obviously come from third parties unscrupulously throwing their customer’s URL all over the Internet

These dos and don’ts are to do with being decent, honourable and ethical. I’ve done it this way, and my blog is pretty successful. I will probably write about this in greater depth, but this should help as a handy guide.

————————–

OK, that’s six things that you can do with your next blog post to help improve your website or blog’s SEO or search engine optimisation. This article itself has been optimised following my rules, and I hope you can pick out what I’ve done now. Do let me know if you have questions or comments using the comments option below, and please share using the share buttons if you’ve found this post useful.

Other useful posts on this site

Reciprocity and Social Media – how to negotiate social media kindly and politely

10 reasons to start a blog – why you should do it now!

Is it worth having a website for my business?

WordPress 1 – the basics – joining and setting up a blog (links to all the other WordPress tutorials)

Resource guide – blogging and social media

 
7 Comments

Posted by on October 29, 2015 in Blogging, Business, SEO, Social media, WordPress


Tags: , , , , , ,

WordPress 9 – setting up a Posts page

This post and the one on setting a static home page will walk you through helping your readers to navigate your blog/website by creating a Menu item to allow people to access your blog posts and a static home page so that they understand what you’re all about.

Why would I want to set up a Posts page?

If you’ve set up a static page for viewers to land on when they visit your blog (which is recommended for any set of pages and posts where you’re promoting a service, company or product, whether that’s your crafts, plumbing services or travel or writing blog), then your readers will need a place to visit your blog posts.

WordPress will set up a “Recent posts” area somewhere on your theme (depending on the theme you chose when you set up the blog), but it’s nice to have something to click on in the main menu:

WordPress blog default

You can see that there’s only one page on the menu at the top of the page (menu location will vary depending on your theme; menu items will vary depending on how many pages you have set up) and then a list of recent posts. Clicking on the blog title will bring you to this “About” page again, which is fine, because that’s the first page you want your readers to see. But it’s not helping them to see your blog.

How do I set a Posts page?

In order to set up a Posts page for your readers to navigate to, you need to create a new page to link to your blog, and then tell WordPress to display it. Here’s how to do just that:

First of all, you need to set up a page for the posts to be associated with. Why? Because a page is a static, unchanging lump of text on a screen, and WordPress likes to add pages, and not posts (which are constantly renewed and have dates on them) to menus. So we need to set up an empty page called, for example, “Blog” first (another popular choice is “News”).

To set up a new page, in the Dashboard, select Pages then All Pages:

Pages menu in WordPress

You can view here what pages you have set up – in this case, just the About page:

Viewing all pages

To add a new page, click on Add New under the Pages menu in the sidebar. You will now see a new, blank page:

Adding  a page

Give the page a title – Blog, or News, or however you want people to find your blog posts / diary entries / news bulletins, but don’t add any text to the main part of the page, and then press the Publish button:

Adding a new page called Blog

Now you have a lovely page called Blog, which you can see if you navigate back to All Pages:

Page added to WordPress

And if you view your blog (I keep a separate tab open in my browser in which I display the reader’s view of the page, refreshing it when I’ve changed something on the site), you have an automatic menu item on the screen called Blog …

Page added - Blog appears on menu

… but when you click on that, all you see is an empty page with the title Blog:

Page added for Blog but not linked to the Posts

Oh no! But don’t worry, you just need to tell WordPress what you want your readers to see when they navigate to this page.

To set the Blog page to display your blog posts, go into Dashboard, then Settings and Reading:


Setting home screen

Once in the Reading Settings screen, you can choose what the Posts page (or blog / news page) displays. Here, the default is currently set to nothing (“– Select –“), meaning that no page has been selected to display any blog posts. Click on the down arrow and choose Blog from the list of pages that you have set up (if you have more than two pages, all of them will display here):

Setting the posts page

Click on the page you wish to select. You can now see that, after following these two sets of instructions, you have set a home or landing page (static page) and a page on which to display your blog (or news, constantly changing and updating):

Both bome pages set

Click on the Save Changes button at the bottom of the screen. When viewing the website and clicking on Blog, you now have a menu item and page that your readers can navigate to in order to read your blog.

Blog page set up

Yes, this is a bit convoluted, but it’s how to make a posts page that’s easily findable by your readers. If you look at the top of this blog post, if you’re viewing it on my website rather than in an email or via an aggregator, you will see Home and Blog among the menu items at the top, and most good sites will have something of the sort.

I hope you’ve found this post useful. Please do share it using the buttons below so that other people can find it and benefit from the instructions! Thank you!

Related posts on this website

You can find all of the social media and blogging posts, including WordPress, in my Resource Guide

Adding pages to WordPress blogs

 
6 Comments

Posted by on May 8, 2014 in Blogging, WordPress


Tags: , ,

WordPress 8 – setting a static Home page

This post and the next one will walk you through setting a static Home page for your WordPress blog or website, and then creating a Menu item to allow people to access your blog posts.

Why would I want to set a static Home or landing page?

If you’re writing a blog, the content will update regularly, and the first page that any viewer will come across by default will be your latest blog post. This may not necessarily get across who you are and what the blog / website is for – especially if you’re using it to publicise a company, books, products or whatever else, rather than just using it as a private diary.

We’ve already learned how to add pages to a blog, It’s generally considered a good idea to have a single “static” (i.e. unchanging) page for people to “land on” when they type in your URL or search for your website. For example, the Home page for this website is the one you will reach if you type http://www.libroediting.com into your address line or search for Libroediting.

How do I set a static page to be my landing page?

As I mentioned above, by default, WordPress will show visitors to your page your latest blog post. For example, if I enter the URL http://www.lyzzybee.wordpress.com, the first thing that I will encounter is the latest blog post on my blog. It’s particularly important in this case NOT to have this showing first, as I only post test and illustrative messages on this blog!

default WordPress view - blog posts

Instead of this long list of blog posts, I want to display a static page when people visit the site (remember – pages are static, unchanging pages like you find on any website; posts are constantly updating, dated diary entries).

Let’s remind ourselves of how to view what pages we have set up. In the Dashboard, select Pages then All Pages:

Pages menu in WordPress

Now you will be able to have a look at what pages you have set up. In this case, I’ve just got one page, called “About”. I might want to set up a Home page in the future, as I have on the blog you’re reading right now, but for now, I know I’ve got at least one page I can use as a landing page.

List of pages

To set one of these pages as the landing or Home page, go into Dashboard, then Settings and Reading:


Setting home screen

Once in the Reading Settings screen, you can choose what the Front page (or landing / home page) displays. Here, the default is currently set, so “Your latest posts” is selected, meaning that the first page your viewers see will be those blog posts.

Setting home screen

Select “A static page”, then drop down the list of pages. In this case, we only have one, but if you have more than one page, a list of all of them will appear here:

Choose a static page

Click on the page you wish to select and then the Save Changes button at the bottom of the screen. When viewing my website now, people will see my About page first of all.

Public view of landing page

But how do people find my blog posts now?

Read my next post for instructions on how to make your blog posts more visible … Don’t panic, though – as you can see on the screenshot above, WordPress defaults to showing your recent posts in the sidebar, so your readers can click there to navigate to your blog.

I hope you’ve found this post useful. Please do share it using the buttons below so that other people can find it and benefit from the instructions! Thank you!

Related posts on this website

You can find all of the social media and blogging posts, including WordPress, in my Resource Guide

Adding pages to WordPress blogs

 
4 Comments

Posted by on April 30, 2014 in Blogging, WordPress


Tags: , ,

How to Set up a WordPress blog 7: Adding your profile picture or avatar

In this post about WordPress I’m going to tell you how to add your image to your blog, so that it appears on your comments and replies to comments. This gives a human face to your blog (if you choose to use an image of a human face, of course!) and makes it nice and tidy and complete.

To add or change your user image, go to the Dashboard and choose Settings then General:

12 setup

The General Settings are where you do things like changing the title and tagline for your blog – and over to the right, you can change your blog picture or icon. Click on Choose File:

14 setup

This will take you into your standard File Explorer, where you can navigate to find the picture file you want to use. Once you’ve clicked on the image and OK, you need to click Upload Image:

15 setup

Once the image has uploaded, you’ll have the opportunity to crop it. The image will be quite small on the page, so it’s important to have your face (or the main part of whatever image you use) filling the little square. Move the dotted lines around the square until you’re happy that you have a big, central image:

16 setup

Then click Crop image and you will return to the main screen. Once there, click on Save Changes:

14.5 setup

You will be shown what your image will look like in various places on your blog. Go Back to blog options anyway, but you can always go back around the loop and change or upload a new picture.

17 setup

This article has told you how to add and update your image on WordPress. If you found it useful, please add a comment and share using the sharing buttons below. Thank you!

Related posts on this blog:

WordPress 1 – the basics

WordPress 2 – adding pages to create a website

WordPress 3 – adding images to your post or page

WordPress 4 – adding slideshows and galleries of images

WordPress 5 – linking your blog to your social media

WordPress 6 – sharing buttons


12 Comments

Posted by on April 24, 2014 in Blogging, WordPress


Tags: , ,

How to allow comments on your WordPress blog posts

I recently had a cry for help from a friend: she’d posted her first blog post but it wasn’t letting anyone post comments. I told her about the standard way to allow / disallow commenting on blog posts, but that wasn’t helping, and I ended up rolling up my sleeves and ferreting around in her blog Dashboard myself before discovering the answer to our dilemma. So here I’m going to share the correct way to allow comments, and then the way to change your preferences on individual posts – which I have to say is not obvious.

Please note that this works for WordPress.com blogs and not for self-hosted blggs and their themes – you will need to look at the widgets you can download for that.

How do I allow comments to be made on blog posts?

We all want people to be able to interact and make comments on our blog posts (well, most of us). The way to set this up is in the Dashboard, Settings, Discussion. I’ve talked about this at length in another post, so have a look here if you want all the details, but basically you can choose to allow comments on blog posts here:

18 setup

As I said above, have a look at my basic WordPress article for all of the information about how this page works: for now, just make sure that Allow people to post comments on new articles is ticked.

allow comments

How do I allow / disallow comments to be made on individual blog posts?

So now we know how to allow comments in general. But what if you’ve created a post and people can’t comment on it? Here we have a post with no place to add a reply or a comment:

no comments

I want to encourage people to post comments – so how do I do that? You might think that this is done in the Edit screen for your post. But it isn’t.

To enable or disable comments on an individual post, you need to go to Dashboard, then Posts, then All Posts, until you get this view of all of your posts in a table:

all posts

Now, hover with the cursor over the post that you want to edit – in this case the top one, and a list of options will appear. Click on Quick Edit:

quick edit

Now you will see the Quick Edit screen, where you can change things like tags and categories, the blog title and … the comments. Here the Allow comments box is unticked:

allow comments option

Tick Allow Comments:

allow comments option ticked

Press the Update button. When we view the page, now anyone can add a comment:

comments

This post has sorted out the problem of how to enable comments on an individual blog post. If you found it useful, please do let me know in a comment, and click on the sharing buttons below. You might want to explore the related WordPress articles on this blog, too.

Related posts on this blog:

WordPress 1 – the basics

WordPress 2 – adding pages to create a website

WordPress 3 – adding images to your post or page

WordPress 4 – adding slideshows and galleries of images

WordPress 5 – linking your blog to your social media

WordPress 6 – sharing buttons

 
48 Comments

Posted by on April 16, 2014 in Blogging, WordPress


Tags: , ,