RSS

Tag Archives: marketing

What happens to your website statistics when you drop the ball with your blogging?

When you have a professional website with a blog attached, what happens to your reader stats if you stop blogging? I did not do this experiment solely for this blog, but I thought it would be interesting to have a look at what happened when I had a blogging hiatus.

I haven’t updated this blog for six months. How did that happen? I’ll explain below. What am I going to do about it? Start blogging again, I hope …

Why did I stop writing blog posts?

Back in the summer, I made the decision to stop working at weekends. Working in this case included both paid editing, proofreading, localisation and transcription work and the additional marketing tasks like blogging, writing articles, responding to blog comments, etc. I did have to make the odd exception when work levels were high or I’d taken time off during the week (or had a holiday) but by and large I’ve stuck to this and am happier, less tired and more balanced as a result. OK, I took up a new hobby as an Endurance (cross-country and road relays) running official and lately a Track and Field official, which has involved weekend training courses and time standing around in muddy fields or boiling hot infields, but that’s a healthy, outdoors hobby.

However, the anticipated drop in paid hours didn’t happen. In fact, in 2018 I have brought in around 12% more revenue than in each of the two previous years, on average, I’ve worked the same number of hours per week, and I’ve in fact had fewer low-paid-hours weeks this year. So what had to give? Blogging.

This was exacerbated by the fact that, while my blog still obviously displays my knowledge of Word, language, business, etc., and channels people to buy my business books (still going just as strong as ever), I have been fortunate enough to have sustained my customer base through a lovely set of regular clients and through their recommendations to others. Added to this, over the nine years I’ve been self-employed, I’ve moved from a model of working with lots and lots of small jobs, editing Master’s thesis for overseas students, etc., to longer-term projects working with regular translator clients and writers / ghost-writers, so work has been more predictable, and I haven’t really needed my blog to funnel customers to me like I once did.

So it slipped. Should I just let it go?

What happens when you stop writing new posts on your blog?

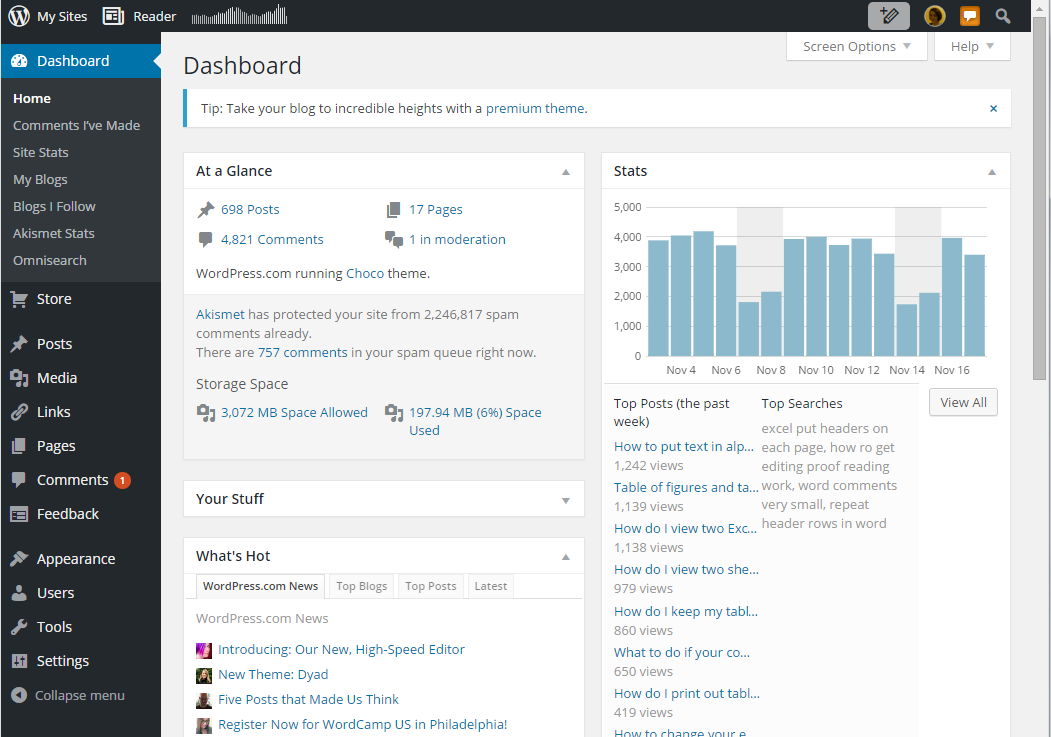
Because December is always a low-traffic month anyway, I’m sharing stats from July 2016 through to the end of October 2018. Although there are peaks and troughs always, with March always being busy with those students and their Master’s dissertations searching how to put bibliographies in alphabetical order, you can see the drop-off in the latter few months of the cycle. That’s when I stopped blogging.

It’s pretty well-known that Google and other search engines like regularly updated content to index. That’s why I and others tell people to keep blogging and/or updating their website regularly. So I knew this, and the stats show it.

What am I going to do with my blog? Should I give up blogging?

Although I don’t feel at the moment that I NEED to write and publish lots of blog posts, I’m going to get back into it. How, I will share below. There are a couple of reasons WHY:

  • Although I have sufficient clients now, especially with lots of them being in Europe and the threat of Brexit looming, I can’t assume that will continue to be the case (small independent sole traders like me have had no advice from the government or HMRC). So it’s good to keep marketing yourself even when you’re busy. I am fortunate enough to have lots of lovely colleagues I can pass work to that I can’t take on at the moment.
  • I enjoy helping people. I get a buzz when I receive a comment saying I sorted out someone’s problem, or one of my Small Business Chats interviewees thanks me for a referral they received from my site. I do my job because I like helping people, and the blog allows me to help more of them while I’m doing other things!
  • I loved finding out what my Small Business Chat interviewees were up to and how they were getting on, and learning from their journeys. I don’t want to lose those connections.

What’s the plan?

I’m going to use my time wisely. Over the festive break, I’m going to add the flesh to the bones of a load of ideas I’ve put in my blog post drafts and get them all ready to schedule through the year (the plan there is to see how many I can get written and then distribute them evenly through the next year, keeping an eye on what’s about to publish as I go through the year in case there’s some awful clash between a light-hearted Troublesome Pair and a horrible news item).

I’m going to get in touch with my January 2018 Small Business Chat people as normal for their updates, but I’m also going to contact all the June-December 2017 ones I never got back to, see if they want to continue to take part and slot them in until I can spread them evenly through the year again. I will point them here and hope they appreciate my honesty and openness and continue to take part.

Over to you …

Have you paused your blog (especially a professional one) and started up again? What did you learn or change? Are you one of my abandoned Small Business Chat folk? Would you like me to continue featuring you again or has that series run its course? Have you enjoyed reading those posts? Have you, well, missed me?

 
21 Comments

Posted by on December 27, 2018 in Blogging, Business, Marketing, Writing


Tags: , , , , , ,

How do I get back to the full dashboard on WordPress.com?


I’ve been asked this question a few times recently, as WordPress has sought to make it easier for users to post a quick blog post or create a page. People who are familiar with the old, more detailed dashboard want to find it again. So here’s how.

How do I find the old dashboard on WordPress?

When you log on to WordPress, you will find a button marked My Sites. Click on that and you’ll get the new, simplified dashboard:

WordPress new admin page

Now click on WP Admin, circled on the above image.

This will take you to the old familiar interface:

Old WordPress dashboard

If this doesn’t work there is another tip, which is to add /wp-admin to the end of your page’s URL.

Note: this works for WordPress.com, the free version – self-hosted WordPress.org is a little different. If you’ve found this post useful, please do share it using the sharing buttons below.

Other useful posts on this site

Is it worth having a website for my business?

WordPress 1 – the basics – joining and setting up a blog (links to all the other WordPress tutorials)

Resource guide – blogging and social media

 
47 Comments

Posted by on November 18, 2015 in Blogging, Business, SEO, Social media, WordPress


Tags: , , , , , ,

Six things that you can do to increase your website or blog’s SEO (search engine optimisation)

Graphic showing an increasing numberSEO or Search Engine Optimisation is one of those mysterious areas of knowledge – like setting up a website – that people like to keep to themselves. If you’ve been involved at all with a website or blog, you will know that people tend to almost prey on newbies, offering to increase their SEO if they work with this or that company.

The impetus for this post came from offering some help to a community organisation I’m helping out with. They don’t have the money to spend on expensive consultancy, so I’ve put together this guide for them – and you – to help clarify the myths and provide you with some advice to help you build good SEO.

What is SEO / search engine optimisation?

SEO means making sure that search engines like Google and Bing find your content and present it to people who are searching near the top of the results (just below the adverts).

Although they obviously work for a profit and want to make people advertise with them, the search engines do want to get reliable, decent and useful information to their users – otherwise those users will go elsewhere. They go to a lot of trouble to weed out spammy and dodgy sites that will put users off and don’t provide useful and relevant information (if every search you did on Google only gave you results on how to improve your SEO, when you wanted to know about Halloween outfits for dogs, you’d soon get bored and use a different search engine).

Therefore, we need to make sure our blogs and websites have the right information and content that will prove to Google that we’re legitimate sites full of useful content that it’s good to show their users.

There are various technical and writing related ways to do this and I’m going to cover the simple ones that you can do with, for example, a free WordPress.com website or blog and no coding skills.

I’ll note here that there are more detailed and technical things that you can do, to do with the coding of the actual site – this will however give you some simple tools that I’ve used to get good viewing figures and good SEO.

My blog post referrersWhy do I need SEO?

You want people to read your stuff, right? Well, although many people will find your content, services, products, etc. through social media, recommendations, blog readers, etc., the majority will find you through search engines.

Have a look at the statistics pictured. This was on a day when I published an article that was shared quite a lot on social media. Where did I get all my hits from? Search engines. So it’s really important to make sure that when people search for keywords to do with my blogs in the search engines, they find my blogs and find their way to me, so they can buy my services / be helped by my informative posts / buy my books.

How do I improve and maintain my SEO?

1. Publish useful, relevant, original and “natural” content

This is my number one top tip. The search engines are always looking for ways to stop people gaming the system and this is a clear example – we’ve all found websites which just have lists of keywords, etc.

I’ve got good results from the fact that the text on this site is useful, it’s relevant, as in it fits in to various categories and has information on those categories (Word, business, social media, etc.), it’s original (all written by me) and it’s written in natural language that looks like it’s been written by a human, not a robot or machine translator or spammer. This will always outweigh everything else.

2. Publish content regularly

Search engines like material that’s updated regularly, as it’s indicative that the site is still live and up to date. Try to post at least once, if not twice a week – it doesn’t have to be massive long articles, but something twice a week is better than five posts in one week then none for a month.

3. Use keywords wisely

There are some “rules” about the keywords that you want to use to attract readers. Here are the ones that have worked well for me, as far as I can tell:

  • Place the keyword / phrase in the title of the piece – so, here I have used “Increase your blog or website’s SEO” in the title.This automatically adds is to the “metadata”, in this case the URL of the piece. There is more you can do with metadata which is outside the range of this article.
  • Place it in an H1 or H2 level heading – here, I’ve used it in top-level headings.
  • Use it in the description of an image – the image above has the words “increase SEO” in the description field.
  • Use it early on in the text and in the final paragraph.
  • Scatter it throughout the text – but NATURALLY. A good aim is to have the keyword / phrase represent no more or less than 5% of the whole of the text (so if your text is 100 words long, you need the keyword to appear around five times.

4. Use questions in the title and headings

Many people search using questions these days – have a look at your statistics if you can and see how many question phrases appear.

So, use questions in your title (this one doesn’t have a question, but many of my blog posts do), and in your headings. These may well echo the exact phrases that people use to search, boosting you higher in the results.

5. Use categories and tags or whatever your blogging platform offers

Categories, tags, whatever your blogging platform calls them, will be searched by search engines, increase the validity of your site and improve your SEO. Use them wisely, using general (reading, writing) and specific (WordPress, copyediting) ones to help your visibility and to help your readers navigate around your site and stay on the site for a longer time.

6. Make judicious and careful use of backlinks

Search engines like to know that a site is reputable and well-respected by peers. Therefore, they put a high premium on the sites that link into your website or blog (i.e. they include your URL / website address on their own site). Of course, a good way to build these is to reference other well-known and well-respected blogs and websites on yours.

However, this is a tricky area that is used very heavily by spammers, too. So here are some dos and don’ts:

Do:

  • Place guest posts on other people’s blogs that are relevant and useful to both your audiences. You should be given the opportunity to include a link back to your website.
  • Offer people in your industry guest posts on your blog (or run interviews with them, etc.) and ask them to link back to the piece on their social media and website.
  • Get yourself in well-renowned and useful / appropriate listings – for example I’m in a Find a Proofreader listing and one for a professional discussion list I belong to.
  • Carefully comment on relevant articles and blog posts, with a relevant and useful comment. As an example of another blog, I comment on book bloggers’ review posts if I’ve read the book or have something to say about the book they’ve read, and include the URL of my own book review blog in the URL field. That way, a network of links builds up.
  • Use whatever reblogging facility you have on your platform (WordPress has a reblog button) to share interesting and relevant content on your blog (I don’t do this myself, but I’ve been reblogged a lot). This will publish a snippet of your blog and a link on the reblogger’s own page and direct readers to you and reassure the search engines that your content is useful.
  • Publicise your blog posts on social media (you can do this automatically) to increase the number of places your web address will appear.

Don’t:

  • Randomly ask to place guest posts on unconnected blogs – you might well get accepted but it’s not going to do you much good long-term.
  • Accept random and unconnected pieces to place on your blog, even if they say they’ll pay you – it’s not worth it long-term, as your readership will suspect it and anyone visiting your website for Dallas real estate and finding the rest of your articles are about crocheting will not stick around.
  • Put random comments full of your own links on people’s blogs that are not in any way connected with yours. Again, some might let these through (I delete any comments like this on my blogs) but it’s not going to look great, as many people will spot what you’re doing and it’s artificial, not natural, so may well harm you in the future.
  • Copy other people’s blog posts wholesale and paste them onto your site – search engines take a dim view of exactly duplicated content and will tend to push both examples right down the results screen. If you want to share something, share a snippet and a link to the rest of the content on the site where it was originally posted
  • Sign up with a company that offers to increase your SEO without checking very carefully whether they do this kind of thing – many of the rogue random comments and links I get on here obviously come from third parties unscrupulously throwing their customer’s URL all over the Internet

These dos and don’ts are to do with being decent, honourable and ethical. I’ve done it this way, and my blog is pretty successful. I will probably write about this in greater depth, but this should help as a handy guide.

————————–

OK, that’s six things that you can do with your next blog post to help improve your website or blog’s SEO or search engine optimisation. This article itself has been optimised following my rules, and I hope you can pick out what I’ve done now. Do let me know if you have questions or comments using the comments option below, and please share using the share buttons if you’ve found this post useful.

Other useful posts on this site

Reciprocity and Social Media – how to negotiate social media kindly and politely

10 reasons to start a blog – why you should do it now!

Is it worth having a website for my business?

WordPress 1 – the basics – joining and setting up a blog (links to all the other WordPress tutorials)

Resource guide – blogging and social media

 
7 Comments

Posted by on October 29, 2015 in Blogging, Business, SEO, Social media, WordPress


Tags: , , , , , ,

MailChimp 5 – linking to your sign-up form on Facebook and your website

After publishing my article on how to create a sign-up form, I had a query about how to publicise it. This article tells you how to find the URL for your sign-up form in order to promote and link to the sign-up form in various places on the Web, including your own website, Facebook, etc.

Why would I want to publicise my MailChimp sign-up form?

You can have the best form in the world, but if you don’t share it, no one will sign up. Places to promote and share your sign-up form include …

  • Your website and / or blog
  • Your email signature
  • Your company Facebook page
  • Posts on your company Facebook page
  • Twitter
  • Your LinkedIn profile or updates

How do I find the URL of my MailChimp sign-up form?

The key to all of this is to find the URL or web address of your sign-up form. Every one has it, but it’s hard to find. Here’s how you do it.

From the first page of MailChimp, when you’ve signed in, click Lists:

Go into MailChimp list

Then, choose the list whose sign-up form you want to promote (like me, you probably only have one) by clicking on the link:

Mailchimp choose list

Now click on Signup forms:

Mailchimp signup forms

Now you will find a list of ways to create a form which does not look like the right place. It IS the right place.

Incidentally, if you scroll down to the bottom of this page, you will find ways to create a sign-up form embedded in a Facebook page or on a tablet, where people can enter their details directly. Both of these options walk you through the process.

Mailchimp special forms

For the moment, we’re looking for that URL, so scroll back up and click on General Forms (which is where you created your sign-up form in the first place):

Mailchimp general forms

Although it really doesn’t look like this is the place to go, I know, here you will find your URL!

Mailchimp signup URL

You can copy and paste this URL and put it anywhere on the Web.

In addition, this page also has little icons for Facebook, Twitter and QR. These will just generate a link for you (if you’ve linked your MailChimp account to Facebook and Twitter for sharing purposes). Clicking on the Facebook icon will give you this post ready to pop on your Facebook page:

Mailchimp auto facebook post

How do I share my MailChimp newsletter sign-up form on social media and my website?

Now you have the URL which links to your sign-up form, you can add that link anywhere you want.

  • On your website, you might do as I have (look right!) and add a link to the sign-up form to your menu. In WordPress.com, you can choose Appearance – Widgets and create a Text widget. Then use HTML coding to add a link, for example <a href=”YOURURL”>Sign up for my email newsletter! </a>
  • In your email signature, use your email service to add a line to every email you send, again, you will probably need the coding above.
  • On Facebook, use the embedded form mentioned above, or do a post including the URL and “pin” it to the top of your Facebook page
  • Everywhere else – share the URL and get people flocking (maybe) to your sign-up form.

In this article, we’ve learned how to find the URL or web address of your MailChimp newsletter sign-up form in order to share it on the Internet, and talked about how and where you can share it. You can find a growing set of articles on blogging, social media MailChimp etc. in my resource guide.

Do click on the share buttons below or comment if you found this article interesting or useful!

Other relevant posts on this blog:

MailChimp 1 – Signing up

MailChimp 2 – Setting up your list and importing contacts

MailChimp 3 – Creating a sign-up form

MailChimp 4 – Designing your newsletter template

How to avoid two common mistakes when using MailChimp

 
5 Comments

Posted by on August 12, 2015 in Business, Marketing, New skills, Newsletters


Tags: , , ,

MailChimp 4 – how to create a template for your newsletter

Welcome to Lesson 4 in my MailChimp series. Following on from MailChimp 1 – Signing up, MailChimp 2 – Setting up your list and importing contacts, and MailChimp 3 – Creating a sign-up form, this time we’re going to learn how to create a simple template for a newsletter.

Why do I need a template for my newsletter?

Setting up a template means that you save a lot of time each time you send out your newsletter. You can spend all the time creating a lovely template once, then just pop the text in each time you want to send a newsletter out.  It also means that you can import a branded template created for you by a designer which includes your specific brand, colours and messages.

How do I create a MailChimp newsletter template?

You can find the Templates area in the top menu on MailChimp:

MailChimp templates menu

If you haven’t already created any templates, you will find a message that You have no saved Templates and a handy arrow pointing to the Create Template button. You can always use this Create Template button even if you have previously created a template; it just won’t have an arrow pointing to it.

MailChimp create template

Starting off – choosing a style for your template

Once you’ve clicked Create Template you will be walked through choosing a design.

You can see here that you can choose Basic, Themes or Code Your Own.

Basic, seen here, gives you a range of layouts for your newsletter. You can have one or two columns,  or a combination of any number of columns and layouts. We’re going to use one of these eventually, but let’s have a look at the other options. If you click on Themes

MailChimp choose template

Themes gives you colourful backgrounds that might inspire you or might be a bit much – it’s all down to personal choice. The default view will be the Featured themes, which is presumably those that are new, but you can navigate the whole set of themes in different ways.

MailChimp choose template

For example, click on All and you can see particular themes, for example if you wanted to create a birthday or wedding newsletter, and various other categories. You can also use Search themes to search for particular colours, etc.

MailChimp choose template

To take a quick look at the Code Your Own tab, this is where you can drop in a template that someone else has coded and designed for you (there are a few companies out there offering this service) or one that you’ve designed yourself. Select the appropriate option, paste in or upload your design, and there’s your template, ready to use! (in this case, now skip to How to save your MailChimp template.

MailChimp choose template

How to create a basic template in MailChimp

OK, having had a look around the options, we’re now going to set up a basic template.

We’re back at the Basic tab, and I’m choosing the third option on the top row, as that’s how I’d like my newsletter to look. Click on the Select button to choose that layout:

MailChimp choose template

And once you’ve selected your layout, you can get on with customising it.

Customising your MailChimp template

Once you’ve chosen a layout, now it’s time to customise it. Luckily, MailChimp will walk you through the process.

You can see from this screenshot that you have the template on the left-hand side and a set of options that you can drop into that template on the right. Each block can contain anything you want it to, but you’ll see that the layout is the same as the one I chose in the previous stage.

MailChimp customise template

To add a section of text to your newsletter template, click on Text on the right, hold the mouse button down, drag it to where you want the text to be, then let to go to drop it in. Simple! (hopefully). But what if you want to add images?

How to add an image to your MailChimp template

If you want to add an image to a block of your MailChimp template, you can click the Browse button in the middle of the template (or drag an image there if you have a folder of images open at the same time – most people do it this way).

MailChimp customise template

Browse will take you to the folders in your own computer, so you can navigate to your chosen image and double click it to add it to the block:

MailChimp customise template add image

If you want to edit or replace the image, hover over it and you’ll see an Edit icon. In the right-hand part of the screen, you will have the option to Replace Edit Link Alt. Too many screen shots spoil the post, so I’ll leave you to explore these options with a guide:

  • Replace will allow you to replace this image with another one
  • Edit will allow you to resize the image or edit its metadata
  • Link will allow you to apply a link to the image, meaning that when your reader clicks on the image, they will be taken to another website – you might use this with an image of your logo (taking them through to your website) or a product you sell (taking them through to a buying page)
  • Alt will allow you to add Alt(ernative) text to the image. This is text that you can provide explaining what the image is. This is useful both for readers who have opted to receive plain-text newsletters (if they can choose this option on your sign-up form) and will see text rather than a broken link, and for readers who might have a visual impairment and be using a text-reading program – they will have this description read to them

MailChimp customise template add image

Once you’ve used images in your template once, they will be available to use in the File Manager, so if you’ve clicked Replace, you can pop there to choose a different image and Upload it.

MailChip amend customise template

How to add social media buttons to your MailChimp template

Another popular option for newsletters, and you’ve probably seen this on ones you read, is to have social media buttons on the newsletter which take readers through to your Facebook and Twitter streams or website.

To add social media buttons to your template, find the Social Follow section in the Content options (Social Share, by the way, allows readers to share your newsletter on their social media platforms – if you want people to click through to your Facebook etc. page, use Social Follow):

MailChimp template social follow

Click, hold the mouse button down, drag and drop it where you want to place it in your template:

MailChip  template social follow

When your buttons are in your template, the right-hand section will change to allow you to personalise these links. Add your own Facebook page, Twitter stream and website URLs to this section and press Save & Close. This will make sure that the buttons click through to your own presence on the social media platforms:

MailChip  template social follow

Now continue to add sections to your template until you’re happy with how it looks.

How to save your MailChimp template

Once you’ve finished designing your template, hit Save and Exit in the bottom right-hand corner of the screen:

MailChimp template save

You will be prompted to give your template a name at this point. Make sure it’s clear and easy to identify – maybe you’re going to create one newsletter about the fairy pictures you paint and one about the steampunk watches you make, in which case you’d label them accordingly. Then hit Save.

MailChimp template save

Now we’re back in that Templates area, but now you’ve got your new template saved in the list (note that the Create Template button is still there for next time you want to create a new template).

MailChimp template list of templates

What are those other files? MailChimp handily autosaves your templates in the background as you’re going along, so you can pick up where you left off if everything goes wrong. You can see it saved at 4.09 and 4.12. These should disappear next time you go into the Templates area – if not, you can use Edit then delete to remove them.

How do I edit a MailChimp template?

If you want to edit your template, hit the Edit button to the right of the template name and you’ll be taken back into the Template Editor screen.

——

In this article, we’ve learned how to set up a simple MailChimp newsletter template that you can choose when it’s time to send out your first newsletter. The other MailChimp articles will be listed below as I add them to the blog. You can find a growing set of articles on blogging, social media MailChimp etc. in my resource guide. Do click on the share buttons below or comment if you found this article interesting or useful!

Other relevant posts on this blog:

MailChimp 1 – Signing up

MailChimp 2 – Setting up your list and importing contacts

MailChimp 3 – Creating a sign-up form

How to avoid two common mistakes when using MailChimp

 
4 Comments

Posted by on March 4, 2015 in Business, Marketing, New skills, Newsletters


Tags: , , ,

MailChimp 3 – setting a sign-up form for your newsletter subscriber list

Welcome to Lesson 3 in my MailChimp series. Following on from MailChimp 1 – Signing up, and MailChimp 2 – Setting up your list and importing contacts, this time we’re going to learn how to create a sign-up form to allow people to consciously and willingly sign up to receive your email newsletter.

Remember, once you set up a subscriber list, there are two ways to populate it:

1. Import members from a previous mailing list (ensuring that you have their explicit permission to send them marketing communications)

2. Offer people a sign-up form via which they can choose to sign up for your newsletter.

I prefer Option 2, and we’re going to find out how to do that now.

How do access the MailChimp contacts list area?

As a quick reminder (full details are in this previous article), when you sign in to MailChimp, you will find Create a List on your front screen, but at any time, you can click on Lists at the top to get into the Lists area:

MailChimp lists area

Once you’re in the Lists area, if you have any lists set up, they will show here, and if you are going in to do this for the first time, you will see that You have no Lists, and be pointed to the Create List button:

MailChimp create list

Once there, you have an option to click on setup a signup form (or set up a sign-up form, even), so click there:

MailChimp sign-up form

You will now find a few options on forms to create – all of them are designed in the same basic way, but some can be embedded into your website. For now, we’re going to create a General Form which will come complete with its own URL to which you can direct people from social media, your website, etc. (see top right in the top of the sidebar for what that looks like in real life).

MailChimp create sign-up form

Once you’re in the Create Forms page, you can see at the top that you have a URL or web address. That will never change, and you can use that to direct people to your sign-up form. You can generate a QR code if you want to, by clicking on the button.

You can also see two options at the top: Let subscribers pick email format and Protect your signup form with reCAPCHA – I would recommend ticking both of these.

Let subscribers pick email format will give your subscribers the option to have emails delivered in plain text or HTML format. This means that if they’re using a slow Internet connection or don’t have much bandwidth, your newsletter will be sent to them in a text-only form, without the pretty pictures (this means you’ll need to make sure to add description and alt-text to any pictures in your newsletter), and just gives them more options.

Protect your signup form with reCAPTCHA means that subscribers will have to manually click and tick a box to prove that they’re a real person. It protects you from automated signing up bots filling in your form and giving you false subscriber numbers. It’s all very accessible and offers alternatives, so I’d go for it. It shows people signing up that you’re serious and are protecting your list, too.

MailChimp sign-up form

Once you’ve filled in those details, you can go on to creating your sign-up form: let’s scroll down to have a look:

MailChiimp basic sign-up form

Now, in fact, you can just go with this form, as a very basic example. The subscriber will be able to enter their email address, first and last name and click to Subscribe to list. Simple. So you can actually leave it there.

But you might want to add more flourishes, text and options to your sign-up form – if you do, read on; if you don’t, then skip to the “What does my form look like in real life?” section near to the end.

How can I add more fields and text to my MailChimp sign-up form?

We’ve created a basic sign-up form but you might want more.

For a start, see that space where you can Click to add a message at the top? Here you can personalise the form and be a bit more friendly. Once you click in the text box, a text editor will come up – you can add all sorts of things in here, including links, images, etc. (this is the same text editor you will use when you’re creating your actual newsletter).

I’ve just typed some straightforward text in here – once you’ve added what you want, hit the Save & Close button

MailChimp add text to sign-up form

You will be returned to your Build It area, and you can see that the text has now appeared in that top section.

To add more options, such as collecting birthday dates (great if you’re a restaurant and want to collect that info to send out a special birthday meal offer) or full address if people are also signing up to have an item sent to them. Here we’re going to look at Radio Buttons, which gives you the option to give your subscribers choices about things …

MailChimp add text to sign-up form

What things do you want your subscribers to choose, you may ask. Well, although we’re not going to go into the ins and outs of getting people to sign up for your newsletter right here and now, it is common to offer subscribers a little freebie in return for their joining your newsletter (which is really a favour to you). For example, I offer subscribers a free pdf of a sample chapter from one of my books (as you’ll see in the final screenshot in this article).

So, click on Radio Buttons and drag it across to between Last Name and Subscribe to List. There is is, in your sign-up form.

Now click on the field settings tab to personalise those choices:

MailChimp sign up form add fields

As you can see below, field settings allows you to give the radio buttons a name and to add text to those buttons, add and remove them, and generally personalise everything. Here I’ve  …

  • added help text to appear when the subscriber hovers over the buttons
  • added two choices as to whether they want to receive something
  • clicked on the minus button by the third choice, because I only want to offer two

MailChimp add fields to sign-up form

As you do this and press Save Field, there you can see just two choices, each with my text by it.

MailChimp add fields to sign-up form

You can see plus and minus buttons under this area – this allows you to delete it if you decide not to have it (note, when you press the minus, MailChimp demands that you type the word DELETE in a box – make sure you do that or you’ll get stuck in a loop of endless error messages. It’s trying to help you not to delete your careful design by mistake …).

And there we have it – it’s fine to play around a bit with the form, you can see how to drag different fields across and then delete them if you want to, so have a play around with it.

How do I get back to my MailChimp sign-up form to check the URL or edit it?

If you want to return to your sign-up form, choose Lists from the top menu, then click the drop-down arrow next to Stats and click on Signup forms:

MailChimp edit sign-up form

Once there, you can check your URL and amend your form if you want to.

What does my MailChimp sign-up form look like in real life?

You’ve created your form – what does it look like to a new subscriber? Remember that URL at the top of the page? You can find that at any time by going to the signup forms page (see above section). Pop the URL in your browser address bar and you can see what your subscribers will see:

MailChimp sign-up form subscriber view

You can see the message we added and the options for receiving a free copy of something, receiving the newsletter in Text format, and a reCAPTCHA section which asks for a tick in a box, and a Subscribe to list button.

And what happens when you get a new subscriber?

You will receive an email in your inbox which includes all of the information you asked for – this is one of my own, so the question is a little different, but you get the idea. Now I can email that person their sample chapter and they will receive my email newsletter until they unsubscribe.

MailChimp new subscriber email

If you’re not sure how to publicise your sign-up form, read this article!

In this article, we’ve learned how to access the Lists part of MailChimp and set up a sign-up form. The other MailChimp articles will be listed below as I add them to the blog. You can find a growing set of articles on blogging, social media MailChimp etc. in my resource guide. Do click on the share buttons below or comment if you found this article interesting or useful!

Other relevant posts on this blog:

MailChimp 1 – Signing up

MailChimp 2 – Setting up your list and importing contacts

MailChimp 4 – setting up your newsletter template

MailChimp 5 – Linking to your sign-up form

How to avoid two common mistakes when using MailChimp

 
6 Comments

Posted by on February 19, 2015 in Business, Marketing, New skills, Newsletters


Tags: , , ,

MailChimp 2 – setting up your list and importing contacts

Welcome to Lesson 2 in my MailChimp series. Following on from MailChimp 1 – Signing up, this time we’re going to learn how to set up the list of people to send your newsletter to.

There are two ways to populate your list:

1. Import members from a previous mailing list (making sure that you have their explicit approval and permission to send out marketing materials to them)

2. Offer people a sign-up form via which they can choose to sign up for your newsletter.

I prefer Option 2, but I’m going to go through option 1 with you in this article then write about setting up a sign-up form next time (if you’re reading this day by day, you will only have to wait two days, don’t worry!).

Why do I need to create a list in my MailChimp account?

Put simply, you need to give MailChimp a list of people to send your newsletters to. It’s as simple as that, and is the second stage in signing up for an account.

Don’t worry if you don’t have an email list to import – you can start off with an empty “list” and a sign-up form that will fill it for you.

How do I create my MailChimp contacts list?

When you sign in to MailChimp, you will find Create a List on your front screen, but at any time, you can click on Lists at the top to get into the Lists area:

MailChimp lists area

Once you’re in the Lists area, if you have any lists set up, they will show here, and if you are going in to do this for the first time, you will see that You have no Lists, and be handily pointed to the Create List button:

MailChimp create list

Once you’ve pressed Create List, you will find yourself in a screen that allows you to create a list. Note here that you can create more than one list, for example, maybe one for customer newsletters and one for general or prospect ones, or I might create one for my social media tips readers and one about my books. For now, we’ll just create one called “My Company Newsletter”.

You can fill in the list title and your email address to show in the “from” section of your readers’ email clients, and you will want to pop a name in to show who it comes from – I always advise using a real, human name, not just a company name.

Remind people how they got on your list gives you a place in which to reassure people that they have signed up for this newsletter and they are not being spammed (you’ll see that I’ve filled this in on the final screenshot – it won’t let you proceed if you don’t).

MailChimp list details

Then we reach the Contact information area. MailChimp is gratifyingly careful to stop you spamming, and this is an important area. If you click on Why is this necessary, you will see this explanatory screen all about spam laws:

4 why they need address

Note here that I haven’t put in a home address, because this is an example, but you should include your full business address here. A disclaimer for anyone who’s on my own list – I haven’t got my exact, pinpointed address on here, because I work from home. But if you’re running a business with a business address, you should include your full address. MailChimp pulls this information from your sign-up information, so you can see there’s an Edit button to allow you to change this if you need to.

Scrolling down to the bottom of the screen. We have an opportunity here to choose how we see our sign-up notifications. I’ve ticked one-by-one because I want to be notified of sign-ups and unsubscribes as they happen, but as your list gets busier and more active, and especially if you don’t have an action you need to perform when someone signs up, you might want to go onto a daily summary.

MailChimp list details

Time to press the Save button – and now you’re returned to the List screen for your list “My Company Newsletter”, which now usefully tells you that you have no subscribers:

MailChimp list subscribers

You can see that under the You have no subscribers message there are two links to click: import subscribers or setup a signup form (or as I prefer to say it, set up a sign-up form). We’re going to learn how to import subscribers now, so we’ll click on that link:

MailChimp import subscribers

The Import Subscribers function allows you to import from a huge range of sources, including all sorts of programs that exist to capture subscriber lists. You can create a list in Excel or export a sub-section of your email list into a .csv or .txt file, or just connect to your email program.

I’m not going to go into detail on all of those options here, that’s something that’s separate from MailChimp (Google or YouTube is your friend if you want to know how to do these things) and I’m really advising newbies to create a sign-up form here. We’ll take a quick look at what happens when you import your email contacts, then next time we’ll do it the sign-up form way.

Here, I’m going to choose Import from Google Contacts:

MailChimp import subscribers

Note here the message from MailChimp – people who you add in this way are not going to receive confirmation emails that you’ve signed them up for your newsletter. When you use a sign-up form, they will receive a confirmation and an extra step to confirm they want to receive the newsletter, which is another reason I prefer that method.

MailChimp also warns you that you must already have permission from all people on your email list to send them newsletters. Do you have their explicit permission? If not, it’s best not to use this method.

9 import subscribers

You can see from the above screenshot that clicking on Authorize Connection will take you through to the service in question, in this case your Gmail, and will ask you to log in in order to populate the list. This will also happen if you click on any of the other buttons with service names on them (if you click on excel or .csv, it will just ask you to go and find the file). I didn’t go through with this because I didn’t want to import people who hadn’t given permission into MailChimp, but it will walk you through the steps to import the contacts and end up with a list.

What you really want to do is create a sign-up form, right? If you’re reading this when it’s published, you’ll need to wait two days for that (if you’re a new visitor, do add this blog to your RSS reader or click for email subscriptions). If you’re reading this after 19 February, you’ll be able to click here to find out how to create a sign-up form.

So, in this article, we’ve learned how to access the Lists part of MailChimp and how to import contacts. The other MailChimp articles will be listed below as I add them to the blog. You can find a growing set of articles on blogging, social media MailChimp etc. in my resource guide. Do click on the share buttons below or comment if you found this article interesting or useful!

Other relevant posts on this blog:

MailChimp 1 – Signing up

MailChimp 3 – setting up a sign-up form

MailChimp 4 – setting up your newsletter template

How to avoid two common MailChimp errors

 
13 Comments

Posted by on February 17, 2015 in Business, Marketing, New skills, Newsletters


Tags: , , ,