RSS

Monthly Archives: October 2012

Keeping it formal – your academic writing

I’ve worked with many different academic texts, written by native and non-native speakers alike. Many issues are the same all over the world and crop up in anything from an undergraduate essay to a journal article. One of the major ones is making sure the language and style used is appropriate to the academic environment.

Here are my top tips for keeping your academic writing formal and appropriate.

No contractions

Contractions are not suitable for academic writing. That’s right, don’t do what you wouldn’t see in a textbook.

  • Change don’t to do not
  • Change there’s to there is
  • Change isn’t to is not

The only exception to this (and to all of these rules, actually) is if you’re quoting, either the literature or the direct speech of your interview participants / writing in entries to your questionnaires. Then, go ahead and use what someone else has said (but see the section on tidiness below).

Colloquialisms and slang – not cool, man

It’s very easy to be tempted to write as you speak. This includes those contractions that we’ve just talked about, of course. The classic one I see here is “lots of”; you just need to upgrade that one a little, and the same happens with “really”.

  • Instead of “Lots of researchers say this is wrong”, try “Many researchers say this is wrong”.
  • Instead of “This happened in lots of places”, try “This happened in a large number of cases”
  • Instead of “Interviewee A appeared to be really upset about this”, try “Interviewee A appeared to be very upset about this”

If you’re tempted further into slang, then think twice. Is there a way to make this sound less informal? What word would you use if you were talking in a seminar, or to your grandparents?

There is no place for the exclamation mark!

This one is more about objectivity than anything else. If you’re writing an academic text, you need not to appear partisan (even if you are) and your language needs to be very cool, calm, collected and academically rigorous. An exclamation mark is a surefire way to allow your own personal feelings to creep in.

Contrast these two examples:

  • When they were claiming expenses, senior managers would often claim for an extra meal that they did not order or eat!
  • When they were claiming expenses, senior managers would often claim for an extra meal they did not order or eat.

In the first one, we can’t help reading a value judgement – this is a bad thing, right? Well, it might be, but your job is to report the facts and then draw conclusions from them, backed up with the theory from your literature review.

Me, me, me (I)

It can be quite hard to work your own practice into the text in an appropriately formal way. It’s not usually acceptable to use the word “I” and you will need to find a way to work around this. It’s a good idea to check local practice here – some institutions favour “we”, some go for “the researcher”, and some won’t let anything personal through at all, and you’ll have to do some rather acrobatic writing to twist it all round into the passive tense.

Please note that this one can change depending on the academic discipline within which you’re working, and the agreed common practice of your institution. So check this one with your supervisor or the style guide you may have been given at the start of your course or contract, and adhere to the rules you’re given there above my rules. If you are not given any guidance, then use my suggestions to keep it as formal as possible. It’s worse to be under dressed than to be over dressed!

Here are some examples of the options:

  • I found that not all of the respondents answered every question
  • We found that not all of the respondents answered every question
  • The researcher found that not all of the respondents answered every question
  • It was found that not all of the respondents answered every question
  • Or, keeping it simple: Not all of the respondents answered every question

Eliminate sloppiness

It’s oh-so-easy to let sloppiness and inconsistency creep in, especially when you’re writing a long document with lots of sections. These are a few of the major culprits

  • Not checking the spelling of names in your references. Spell-checker won’t notice this and if you go too far wrong, your proofreader might think you’re talking about two different authors.
  • Not being consistent in your headings styles and numbering (read this article and the ones it’s linked to if you need help setting this up to be automatic)
  • Not being consistent with how you lay out new paragraphs and indented quotations (those big ones that you put in a special paragraph all on their own)
  • Not being consistent with your -ise- and -ize- spellings (organisation vs. organization)
  • Not being consistent with your capitalisation – there are rules for this which I’ll treat on the blog at some stage, but there are often choices to be made, too
  • Not being consistent with hyphenation – similar to capitalisation
  • Using abbreviations without spelling them out the first time

The editor’s solution for this? Use a style sheet. If there’s something you need to use consistently, note down your preferred way of doing it on a separate Word document, and keep it open to refer to as you need.

With abbreviations, note down each one and when you first use it (chapter and section will be enough), Keep this updated if you’re working on the chapters in an unusual order, and make sure the first instance is the one that has the words spelled out.

Keep it tidy

This is related to sloppiness, but a bit more specific. This is all about keeping the document looking nice, so how it looks doesn’t distract from what it says. I find two main culprits here:

  • Putting everything into direct quotations from interview respondents. I often find a quotation like this: “… and um the thing the thing is that, it’s not going to … work … at … all”. A much neater way to put this, which is going to get across the meaning a lot more clearly, would be “And the thing is, that it’s not going to [pause] work at all”.
  • Emphasis overload. If you’re indenting a quotation and putting it in italics, you don’t need to put quotation marks around it, too – it’s pretty obvious that it’s a quotation. If it’s a quotation in the text, just quotation marks, no need for italics except for emphasis. If you’ve got a heading, bold, underline and italics plus a colon at the end might just be too much

As a basic rule, keep it simple, keep it neat and tidy: don’t distract from the reader’s experience of the content of your writing.

Reference, reference, reference

I cover this in detail in another article, but it’s worth reminding you of these rules …

  • If you state an opinion that hasn’t come directly from your brain as an original thought, reference it: “Many people think the sky is green (Jones, 2010; Smith, 2012)”
  • If you talk about something that’s come out of your research, reference it and make sure you label your respondents: “One teacher thought this was rubbish and said so (Interviewee A2)”
  • If you state your own opinion, still back it up: “When reading the responses from the students, it struck the researcher that this needed looking into”; “As we have seen from the teacher respondents, not everyone agreed”. “We found that, contrary to Green (2011) our results suggest pupils do respect their teachers”

——-

I hope you’ve found these pointers useful. If you’re a student or a supervisor and you can suggest any more hints and tips, do please use the comments below to share them! And you might find my other resources for students and resources for Word users helpful – do take a look.

 
10 Comments

Posted by on October 31, 2012 in New skills, proofreading, Students, Word, Writing


Tags: , , , ,

Waste or waist?

Another troublesome pair that I’ve seen a few times recently: another of these homonyms, or words that sound the same, which I suppose is where the problem arises. Because we all know the difference, don’t we?

A waste occurs when you have something left over that has to be thrown away, or you don’t use something and it goes off, or you spend too much – it’s all about using something carelessly or extravagantly, or not accounting for what you need. So you can waste a bag of apples if you don’t eat them in time and they go rotten and have to be thrown away, or you waste money if you pay for a gym membership and don’t ever go to the gym.

A waist is the middle of something, where it’s nipped in, particularly in the human body, where it’s the big between the ribs and the hips, but also in other creatures, and inanimate objects, like a violin.

“I wasted a lot of satin making her wedding dress, because I didn’t measure the size of her waist so I had to trim lots of pieces off the original pattern.”

You can find more troublesome pairs here and the index to them all so far is here.


Tags: , , ,

My short cuts – the line space button

Today we’re finding out all about the wonder that is the Line Space button. Do you know what it does? Did you know it was even there? And did you know how many ways there are to get to the Paragraph menu …? All this and more in today’s Short Cuts!

What is line spacing and why do I need to know about it?

Line spacing defines a large portion of what your document looks like on the page. It’s all about the gaps between the lines you type. Too close together, and your document can be hard to read. Too far apart, and there aren’t enough words on the page, with all that white space glaring at you. Of course, sometimes you’re told that your work must be presented in a particular way – double line spaced is popular for both academic work and fiction being submitted to a publisher or magazine.

It’s also really useful to be able to insert a gap between paragraphs automatically, to save you having to insert one manually – and if you find you’re working on a document that has odd spacing (or, worse, inconsistent spacing!) between lines and paragraphs, this is how you sort it out.

How do I alter the spaces between lines in my document?

We’re in Word 2007 or Word 2010 now, with that handy “ribbon” containing hundreds of little square buttons. Make sure you’re in the Home tab and have a look at the Paragraph section. You should find a button with up and down arrows to the side and lines of text in the middle: the Line Space button. There’s a big version at the top of this post, and you can find it here:

When using this button, or indeed anything that changes the word, line, paragraph, page or whole document that you are working on, make sure you’ve highlighted the text to which you want the change to apply first. Then click on the button and see what choices you are presented with:

The first thing you’ll notice is that one of the line spacing options (in the top half of the box) is already ticked, and you have an option to Remove Space After Paragraph (in the bottom part of the box) which, you can see by comparing it to the line above it, implies that there is a space set to appear after each paragraph at the moment. So one useful feature here is that clicking on the paragraph and then the line space button will tell you what is already set up for that part of the document. In this case, the spacing is 1.15 (just a little bigger than single line spacing) and there’s an extra line space after each paragraph.

Let’s try changing something …

Here, we’ve changed the line spacing to 1 and clicked on Remove Space After Paragraph, so it’s flipped to saying Add Space After Paragraph (red arrows). And look what’s happened (immediately) to our highlighted text. All of the lines are closer together, and the space between the paragraphs has disappeared (blue arrow).

We can change it back and go the other way, too …

This image is at the same scale as all of the other ones, but you can see that changing the line spacing to 1.5 and adding spaces before and after the paragraphs has really spaced it out, and moved it further down the page to start off with.

Now, there’s one line in the dialogue box we haven’t looked at yet: Line Spacing Options… What does that do?

How do I use Line Spacing Options?

The Line Spacing Options … erm, option can be found between the line spacing and paragraph spacing choices:

When you click it, you’ll be given a new dialogue box, which is actually the standard Paragraph options box. It has two tabs, and the first one is Indents and Spacing:

If you want to customise your document completely, this is where you come to set the paragraph indent, and the actual distance between paragraphs. There’s a handy Preview pane at the bottom which will show you the effect of any changes you make on some sample text (circled in blue). You can also work with Tabs from here – we talked about Tabs in another session. And, if you wish, you can change everything on here and then set it as being your default setting for paragraphs for this documents, or all documents based on this template that you ever work on:

The other tab on this dialogue box is all about Line and Page Breaks:

These are topics in themselves, so I’ll write about them in another session (if I forget to come back and put a link in here, use the Search box in the right hand column of this blog, or look it up in my index).

When you’ve finished with all of these options, just press the OK or Cancel buttons to accept your changes or go back to the document.

How do I access the Paragraph menu?

This being Word, you will find the same Paragraph menu we’ve just been looking at popping up on other routes through the software. If you just need the Paragraph menu and not the Line Spacing options in particular, you can access it from any Word document by highlighting your text, clicking with the rightĀ mouse button and selecting Paragraph from the selection that appears:

Or you can access it by clicking on the little tiny arrow at the bottom of the Paragraph title bar (if that’s what it’s called!) on the ribbon (I talk about these little arrows elsewhere, too):

I hope you’ve found these hints helpful! Do pop a comment on this post if I’ve helped you learn something new or solved a tricky problem for you, and do explore the rest of my blog if this is your first visit!

Please note, these hints work with versions of Microsoft Word currently in use – Word 2007 and Word 2010, all for PC. Mac compatible versions of Word should have similar options. Always save a copy of your document before manipulating it. I bear no responsibility for any pickles you might get yourself into!

This is part of my series on how to avoid time-consuming “short cuts” and use Word in the right way to maximise your time and improve the look of your documents. Find all the short cuts here

 
2 Comments

Posted by on October 24, 2012 in Copyediting, Errors, New skills, Short cuts, Word, Writing


Tags: , , , ,

Customising comment boxes in Word

A lot of people find this blog when they’re trying to sort out specific problems with their comment boxes (comment boxes suddenly going tiny, or comment box text running in the wrong direction, changing the language in your comment balloons). Here are general instructions on customising your comment boxes (or balloons, as they are officially called) in Word.

Why would I want to customise my comment balloons?

To be honest, the main reason for doing this is if something goes wrong. But the standard, default text size and layout may not be suitable for your purposes, and you might want to change it to make it more readable for someone with limited vision, etc.

You might also have preferences about which margin your comment balloons appear in, and how big they are.

The principles we are going to learn about here also apply when you want to customise the general styles in your document, which we will look in particular another time.

If you take a look at a document with standard comment boxes, you will see they look something like this:

Annoyingly, you will need to go to three different places to make these changes. I provide a recap at the end, but a summary might be useful here:

  • To change the location and size of balloons: Track Changes – Track Changes Options
  • To change the size, font, colour etc.of the heading (Comment M2 etc) AND/OR the size of all text in the comment balloon: Styles – Balloon text
  • To change the font and colour of the actual paragraph of text in the balloon AND/OR the size of all of the text in the comment balloon: Styles – Comment text

Note: my article on customising Track Changes will tell you how to change the colours in which the comments and corrections by different reviewers appear.

How to change where your balloons appear and their size

If you want to change which margin your balloons appear in, their size, and whether they are linked to the text by a line, you must go into the Track Changes Options menu. In the Review tab, click on the little arrow at the bottom of the Track Changes button and bring up Track Changes Options. There, at the bottom, is your balloons section:

I think this is fairly self-explanatory.

How to find the menu for customising comment balloon text

There are two ways to reach the menu you need:

  • Press Control + Alt + Shift + s all at the same time
  • Make sure you’re in the Home tab and click on the little tiny arrow at the bottom right of the Styles menu

Either of these options will bring up the full Styles dialogue box.

Using either of these methods, you will bring up the Styles dialogue box.

Now, ignore all of it except the three buttons at the bottom. Click on the rightmost button: Manage Styles to bring up the next box: Manage Styles. When you first open this window, the sort order is in what Word thinks is a useful order: As Recommendedclick on the down arrow to change it to Alphabetical:

Once you’ve got the list into alphabetical order, it’s relatively easy to find Balloon Text (note: not Comment text) and you will see that it then confirms how you have your text set up (blue circle).

Click the Modify button … Now you can change your font and font size. You’ll notice lots of other options (blue circle) to change the spacing, etc.

I’m going to change the font size, font, orientation and colour of the comment box heading, and the size of the text:

Note: As we will see, the changes in colour, font and italics etc. only apply themselves to the heading of the comment text, where it says “Comment: L1”. Why? Because it’s Word, and we are changing, very specifically, information about the Comment Balloon itself. See below for how to change the text in the comment balloon. EXCEPT, and here we may tear our hair out a little, this IS where we change the text size in the comment box .

Note, however, (blue arrow) that this does not change the size of the text itself – that is controlled from Balloon Text, and you’re just going to have to remember that, or look at the Recap I’ve written at the bottom!

At this point in either menu option, you can also click on the Format button and change all sorts of aspects:

Now, you probably won’t want to go to this level of fancy detail with the comments balloons, but, of course, this dialogue box is not only for changing the style of comment balloons: it’s also where you set up all of the styles in your document if you want to change and customise them.

You can also choose whether this change applies only to this document, or to all documents based on this template, and add it to your Quick Styles list if you want:

Press the OK button, and carry on pressing OK buttons until you get back to your document. Now, your comment will appear in the style you have chosen. If you’ve only chosen to amend the Comment Balloon text size, only the header will have changed:

If you’ve chosen to customise the Comment Text as well, you will have made all of these changes:

Now your comment boxes have large, easy-to-read text in a useful colour. and a very fancy heading. We’ve customised your comment boxes or, as you now know to call them, your comment balloons, and the comment text

A quick recap

  • To change where the balloons appear, and their size, use the Track Changes Options section in the Review tab
  • To change the size and orientation of the comment balloon header text, and/or the size of all of the text, use the Comment Balloon option in the Manage Styles list
  • To change the colour and font of the comment balloon text, and/or the size of all of the text in the balloon, use the Comment Text option in the Manage Styles list

Why not take a look at these related topics, which should help you further?

What to do if your comment boxes go tiny in Word

What to do if your comment boxes start running from right to left

Changing the language in your comment balloons

Customising Track Changes

This is part of my series on how to avoid time-consuming “short cuts” and use Word in the right way to maximise your time and improve the look of your documents. Find all the short cuts here

Do let me know if this has helped you, saved your bacon, etc. – and do share with the buttons at the bottom of this article.

 
131 Comments

Posted by on October 19, 2012 in Copyediting, New skills, Students, Word, Writing


Tags: , , , ,

A quick note …

New subscribers to / readers of this blog might be interested in my more personal reflections on being a full-time self-employed person over on my personal blog, Libro Full Time. If you just want the business stuff, select the self-employment category from the cloud, or if you want everything (business stuff and book reviews), just take a look at the blog or the About page. Thank you!

 
Leave a comment

Posted by on October 12, 2012 in Business


Tags:

Working with Track Changes in a document

Here’s the last part of my series on working with Track Changes. We’ve already learned what Track Changes is, why we use it and where to find it, and how to customise Track Changes to suit our own preferences. Now it’s time to learn how to work with a document that has Tracked Changes – i.e. how to get rid of all those marks and comment boxes and be left with a clean document with no errors.

Why do I need to work with Track Changes in a document?

These instructions will be useful to anyone who has their work edited, critiqued or otherwise commented on by other people. For example, I work in Track Changes with all of my student customers, because they need to see what I’m suggesting they should change so they can make the decisions and retain their understanding and authorship of their own texts.

If a text has Track Changes on it and you want to submit it for your Master’s or PhD, a journal, a magazine that publishes creative writing … you need to remove those Tracked Changes so they don’t show up when someone else reads your document.

(Note: in the last article we looked at how the different views of track changes don’t actually delete the changes – review this article for more information in the section “How can I change which changes I can see?”)

How do I remove the Track Changes markup from my document?

To get back to basics, you’ll find all the buttons and drop-downs you need in the Review tab in Word 2007 or 2010 (or the Tools dropdown in Word 2003):

Review section

We’re looking at the Accept / Reject area to the right of this section, and then the New Comment / Delete area to the left.

And let’s just remind ourselves what a document with Track Changes looks like: here’s the one we’ve been working on for a little while now. Additions show up in red underlined, deletions disappear and pop into a comment box, and comments and corrections appear in different colours depending on who entered them:

Document with tracked changes

So, first of all you will need to look at each of the changes that are showing in your document and decide whether to accept or reject them. Then you need to review all the comments, make the necessary amendments, and delete the comment. Finally, you need to check that all the markup has actually disappeared, and you’re left with a nice clean document.

How do I accept changes in a document?

The area you need to look at for accepting (and rejecting) changes is that section in the middle of the Review tab that looks like this.

Accept changes button

You will notice that there’s a little arrow on the Accept button; if you drop that down you get a range of choices. Let’s see what happens if you position the cursor by the change you want to accept and hit Accept Change:

Change accepted

You can see that the word “text” has stopped being underlined and changed from red to black. You have accepted the change, and the additional text has basically become part of the actual, final version of the document now.

You can Accept and Move to Next if you want to skip through all of the changes one by one – a good option to take that ensures you don’t miss one. Or you can do this manually using those blue arrows to the right of the Accept and Reject buttons. Or, you can choose Accept All Changes:

Accept all changes

If you do this, as you can see, all of the tracked changes (but not the comment boxes) disappear.

Note: I don’t encourage student clients to do this, as I prefer them to look at every change and accept or reject it individually. However, I use this option if I have been asked to provide two versions of a document for a client: one with changes marked and one “clean” copy. It’s a quick way of accepting all the changes I’ve made and seeing what I’m left with.

You can undo any individual Accept Change or Accept All Changes, immediately after you’ve done it, by hitting the Undo button:

undo button

How do I reject changes in a document?

Rejecting changes is done in exactly the same way as Accepting changes. Obviously, if your editor has suggested a change for you, they are the expert and it’s worth seriously considering accepting it. But there could be a choice involved (with a comment box nearby explaining it) or you could be working collaboratively with a colleague and deciding to reject a change one of you has made.

Anyway, there’s a Reject button with a dropdown arrow, and the choices are the same, when you place the cursor by a marked change, allowing you to reject just that change or reject it and move on to the next one …

Reject change

When you reject this change, you will see that the text will revert back to what it said originally, with a word missing. The insertion has been deleted, and again there is nothing there in red or underlined, but that’s because it has been removed from the document.

reject change - text altered

And again, you can decide to Reject All Changes (not if I’ve made them for you, though!), in which case …

reject all changes

all of the changes (but not the comments) will disappear and you’ll be left with your original textt, just as it started out. Of course, you won’t want to do this if you’ve asked an editor to offer their suggestions, but you need to know what this does and how to use it.

How do I remove the comments in a document?

OK, so we’ve gone through all of the changes in the text and accepted or rejected them. Now how do we get rid of all those comments in the margin?

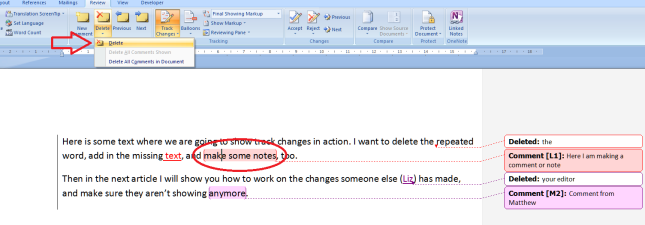
The area for doing this is on the left of the Review section. You will see a series of buttons for handling comments:

comments buttons

The important thing to remember here is that, like with the accept or reject changes functions, you need to have the cursor on the affected text when you choose to delete the comment.

deleting a comment

When you press the Delete Comment button, both the highlight in the text and the comment box in the margin will disappear:

comment deleted

You can choose to Delete all Comments: I suppose this would be useful if you’ve reviewed all the comments and done what they say, although personally I like to review a comment, do what it instructs, then delete the comment individually, and that’s how I would always recommend you work through them.

Anyway, once you have accepted or rejected all the changes, and deleted all the comment boxes, you should be left with a clean, amended text with no coloured or underlined text, no lines in the left hand margin, and no comment boxes:

clean copy

Why can’t I make all the Tracked Changes disappear?

You may sometimes find that there are some sneaky bits of markup left in your text once you’ve done all the above. This usually shows up as lines in the margin where a small change has been made.

The other culprit is thinking that you can use the Final Showing Markup menu to hide the track changes. You can’t. Any method you use to customise track changes will only appear in your own version on your own computer. Several of my clients have reported that they have turned off Track Changes, then all the changes have “reappeared” when they re-opened the document. That’s because they had chosen the Show Final option, thinking they had removed the markup but really only hiding it on their version of the document.

As I mentioned at the beginning of this article, review this paragraph under the heading “How can I change which changes I can see?” for more information on this aspect of customising track changes..

In summary: the only way to remove Track Changes markup is to:

  • Go through each change
  • Decide whether you accept it
  • Accept or reject it
  • Move on to the next item
  • Review the comments and do whatever you are instructed to do
  • Remove the comments once you have reviewed them

If any last vertical lines then remain in the left hand margin, it’s fine to hit Accept all Changes, which will get rid of them once and for all.

———-

This article has taught you how to work with a document that has been marked up using Track Changes. You can read more about what Track Changes is and why we use it, and learn how to customise Track Changes.

If you have found this article useful, please share or “like” it using the buttons below, or leave me a comment to tell me what you think. Thank you!

This is part of my series on how to avoid time-consuming “short cuts” and use Word in the right way to maximise your time and improve the look of your documents.

Please note, these hints work with versions of Microsoft Word currently in use – Word 2003, Word 2007 and Word 2010, all for PC. Mac compatible versions of Word should have similar options. Always save a copy of your document before manipulating it. I bear no responsibility for any pickles you might get yourself into!

Find all the short cuts here

 
35 Comments

Posted by on October 10, 2012 in Copyediting, Errors, New skills, Short cuts, Word, Writing


Tags: , , , ,

Gunnel or gunwale?

I’ve seen a few blog posts and articles mentioning something being “packed to the gunnels” and I’ve been getting all steamed up about the mistake, knowing it should be “packed to the gunwales”. So, I decided to write up one of my Troublesome Pairs to differentiate them.

A gunwale is the upper edge or planking of the side of a boat. By extension, we tend to use “packed to the gunwales” as a metaphor for something being full up, as if a boat is literally packed to its gunwales, it will be completely full up to the brim.

A gunnel is … an alternative spelling for gunwale. So I apologise to the writers against whom I have fulminated. Luckily, I didn’t mention it to anyone before I checked! And I still prefer gunwales, myself.

Note: they are pronounced the same: “gunnel(s)”.

You can find more troublesome pairs here and the index to them all so far is here.

 
23 Comments

Posted by on October 8, 2012 in Errors, Language use, Troublesome pairs, Writing


Tags: , , ,

More resources to read and share

Just a quick not for new readers of this blog: if you’ve enjoyed my post on Customising Track Changes, there are many more articles and series to read.

On this blog, which is my professional language and small business area, you can find all sorts of posts about using Word, as well as posts to help other small businesses and some resources for students.

Do take a look at the category cloud in the right-hand column for more.

Over on the Libro full time blog, you’ll find more personalĀ  reflections on my journey towards full time self-employment and my experiences in my first year of working completely for myself; the most recent post on there is about being self-employed and getting ill, and you’ll also find book reviews, Iris Murdoch stuff and information about my e-book. This page explains the connection between all these disparate elements.

I post at most once a day on one or other of the blogs, and most of my articles are fairly short, so you can subscribe with confidence if you’re not signed up already!

Do enjoy – and don’t forget to use the share buttons if you particularly enjoy a post, so others can read it too. Thank you for your interest in my pages and posts!

Contact me via email or via my contact form.

Libro on Facebook

Libro on Twitter

 
Leave a comment

Posted by on October 5, 2012 in Blogging, What Do I Do?


Tags: ,

Customising Track Changes

So how do I customise Track Changes (and why would I want to?). Previously, we learned about why you might want to use Track Changes and how to find and use it to delete and add text and make comments. Now we’re going to go one step further and customise it all (and you can also find out how to work with a text that contains tracked changes).

So, here’s our original text with some changes tracked that we created last time:

Why customise Track Changes?

Customising Track Changes basically makes things more comfortable for you and means you can work in a way that suits you. For example, some people like to cross out text in a document, like if you were editing a written manuscript, while others like to remove the deleted text altogether and place it to one side.

Please note: This is customising your view of the document. It’s personal to you, your computer and your document. When someone else opens the document, they will not necessarily see what you see, especially if you’ve customised it away from the defaults. Note this, because it becomes ever so important later on …

How do I customise Track Changes?

Your key area for this is the Review tab, then the section marked Tracking. You can change three things:

  • Tracking Options themselves (the colours and fonts that mark the changes)
  • Balloons (whether changes are marked within the text or to the side of it)
  • Final showing markup (which changes show in your version of the text)

We’ll look at these in turn, and also at what happens when more than one person makes changes to the document.

How do I change the tracking options?

To change the tracking options you need to click on the little arrow at the bottom right of the Track Changes button. This gives you another way to turn Track Changes on and off, a menu item to click to access the tracking options, and a final item we’ll look at later on.

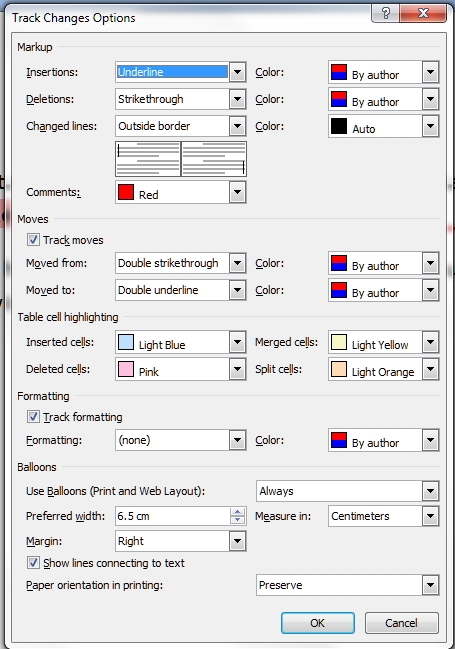
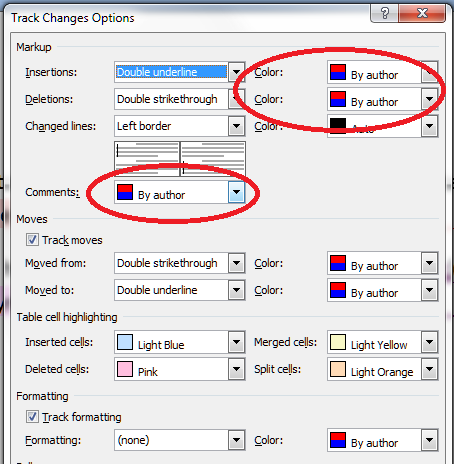
For now, let’s click on that middle menu item. Up pops a great big dialogue box with all sorts of things to change:

I think this is fairly self-explanatory. On the left hand side, you can change how the text appears when you do something to it (underline, double underline, etc.) and on the right hand side you can change the colour.

Let’s change some things …

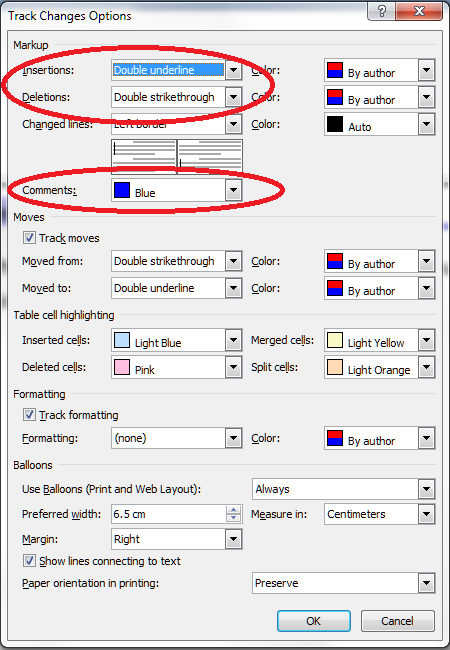
So here we’ve changed insertions and deletions to double underlines and double crossings-out and the comments to blue. Watch what happens to our text (actually, the crossing-out won’t show up until the next section … )

Because the crossings-out are shown in balloons, not in the text, we can’t see them. But that will all change …

How do I customise the balloons?

Now we’re moving on to talk about what appears in balloons and what appears “inline” or in the text itself.

Important note: This is not how you change what comments themselves look like. For that, you will need to see my posts on comment boxes.

The menu we need here is the next one to the right of the Track Changes button, called, inventively, Balloons:

At the moment, Show Revisions in Balloons is ticked. Note that to change between the options, you need to tick the one you want – no unticking allowed! Try ticking Show All Revisions Inline:

and watch what happens to the document. Gone is the right hand margin, gone are all the balloons, and instead you can see what has been crossed out, and you can only read comments by hovering the mouse over the note indicating there is a comment:

Now, personally I don’t like it looking like this, but some people do.

For more information than you would ever want on how to further customise your balloons, please see my article on customising comment text.

How do I change which changes I can see?

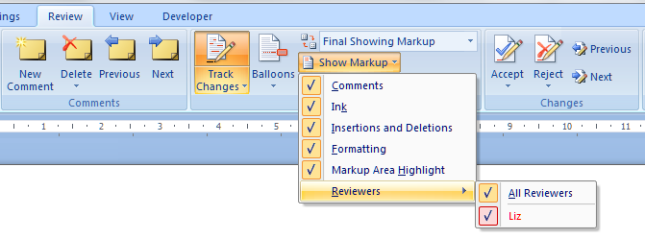
You can review particular changes individually using the next button along: Show Markup. Drop it down and you can see that you can choose to see various kinds of correction, and also only changes made by a particular person:

I don’t think I need to show you examples of all of these – have a play with them and you can see what’s what.

Above this menu item is Final Showing Markup. Now: this is important. Yes, you can choose how you view the document …

For example, you can choose Final and you’ll see the document in its final form with no changes showing:

But: REMEMBER – this is all about what YOU can see. The Tracked Changes have not gone away: they’re still on the document, just hidden. So if you send the document to someone else, they can change their view and see all your changes and comments! Eeps!

You can only “get rid” of changes and comments by accepting or rejecting them, individually or en masse, and that’s a job for next week’s post.

How can I tell which reviewer has made which comments?

If more than one of you is reviewing the document, Track ChangesĀ  makes it easy to see who said what. All you need to do is make sure that the “by author” option is chosen in Tracking Options …

… and your comments and alterations will appear in different colours:

Again, avoid telling the other person, “Oh, my comments will appear in blue”, as it’s up to the individual and their own computer as to what colours will appear.

How do I change my initials in comments?

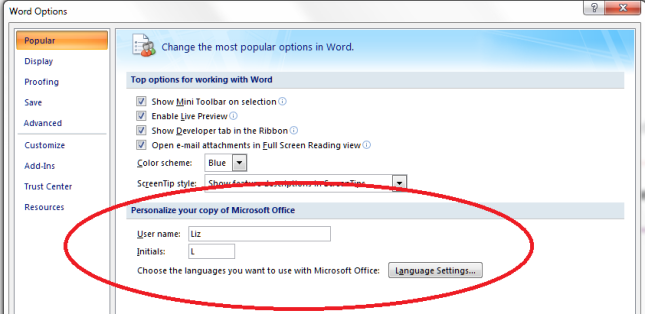
If you want to change your initials in the comments, perhaps because there are two reviewers with the same first initial, you need to go back to Tracking Options and choose Change User Name. This will bring up the Word Options dialogue box, and at the bottom you can change the initials that appear in the comments balloon:

Next time I make a comment, my initials have changed!

However, please note that when I change L to LB here, the change takes effect from that moment, and is not applied retrospectively. Well, you can’t have everything!

A final note

You may want to pin some of your most common choices to the Quick Access Toolbar – read this article to find out how.

So, we already knew how to find Track Changes, today we’ve learned how to customise Track Changes so it works just as we want it to. Next time, we’ll be talking about how to work with the Track Changes you, or someone else, has applied to the document, leaving it nice and tidy and clean! And there will be a separate article on formatting comment balloons, coming soon. In the meantime, if you want to customise the text in your comment balloons or it goes all small or runs from right to left, click on the appropriate links to find out what to do.

This is part of my series on how to avoid time-consuming “short cuts” and use Word in the right way to maximise your time and improve the look of your documents.

Please note, these hints work with versions of Microsoft Word currently in use – Word 2003, Word 2007 and Word 2010, all for PC. Mac compatible versions of Word should have similar options. Always save a copy of your document before manipulating it. I bear no responsibility for any pickles you might get yourself into!

Find all the short cuts here

 
74 Comments

Posted by on October 3, 2012 in Copyediting, Errors, New skills, Short cuts, Word, Writing


Tags: , , , ,

Alternative, alternate or alternating?

These three words are very close in form and have related but not identical meanings. There is also a British English / American English aspect, something I don’t often cover in these Troublesome Pairs, but one that needs addressing here.

Alternative means available as another possibility, or mutually exclusive, said of one of more things (originally, it could only be used of two entities, but matters have freed up and more than two alternatives are now allowed). So you could use the services of one typist or an alternative typist if the first one is busy, or you could choose between the alternative answers “yes” or “no” when answering a question. Alternatives are the two or more available possibilities.

Alternative can also mean activities that depart from and/or challenge traditional norms – like alternative health and alternative lifestyles – the same meaning is there, in that they are offering an available possibility other than the “main” one.

The adjective alternate (with the stress on the middle syllable: alTERnate) means every other – “We hold the event in alternate months” means the event is held in, for example, January, March, May, etc. In biology, leaves alternating on a stem will appear on each side in turn, rather than being in matched pairs, two leaves together. But it’s worth noting that the American English usage of alternate carries the same meaning as the British English alternative defined above. To alternate, the verb (with the stress on the first syllable: ALternate) means to swap between two contrasting options repeatedly – “I alternated between watching the diving and hiding behind a cushion”. If two things are alternating then they are doing the swapping – “Mary and Sue were alternating as the front runners in the race”.

You can find more troublesome pairs here and the index to them all so far is here.


Tags: , , ,