RSS

Monthly Archives: December 2013

Searching for jobs on Twitter

I had planned a post on exactly how I would go about searching for freelance (or otherwise) jobs on Twitter, then ended up discussing the topic with another editor, who’s keep on working on cookery books. So, here comes a worked example of how to search for jobs on Twitter.

Why search for jobs on Twitter?

People talk a LOT on Twitter, and they also use it for information seeking purposes. How many times have you seen a friend or just someone you follow ask a question, or look for a recommendation? Especially if you’re a freelancer, people will throw a question out: “Does anyone know a good transcriber?” and other people will answer them. It’s brilliant if one of your own clients does this and gives your name (this happens quite regularly to me, so I promise that happens), but if not, as long as you’re not over pushy about it, there is no harm in tweeting to that person to tell them about your services.

Does searching for jobs on Twitter really work?

Yes. Yes it does. I can say that with certainty, because I know it does from experience. Here are just a couple of examples:

1. I ran my regular search (see below for how to do this) on “looking for proofreader”. I found a Tweet by a woman working in PR. I contacted her, she became a client, she took me with her when she joined a big agency, and when she left that agency, I ended up with them and her as clients.

2. A journalist I followed on Twitter posted the tweet “Can anyone help me with some transcription?” At the time, I didn’t offer transcription as a service, but I was a trained audio-typist. I got in touch, again, it went to email for the negotiations, and I ended up with that journalist as a long-term client. Plus, she recommended me (via Twitter and email) to other people, who also recommended me, and I ended up with a regular client base of music journalists.

So yes, it does work. Here’s how to do it.

First, make sure your profile represents you accurately

When you tweet to someone, the first thing they’re going to do is look at your profile. So make sure it includes:

  • Your photo
  • Your full name
  • Your company name
  • Your url
  • What you do

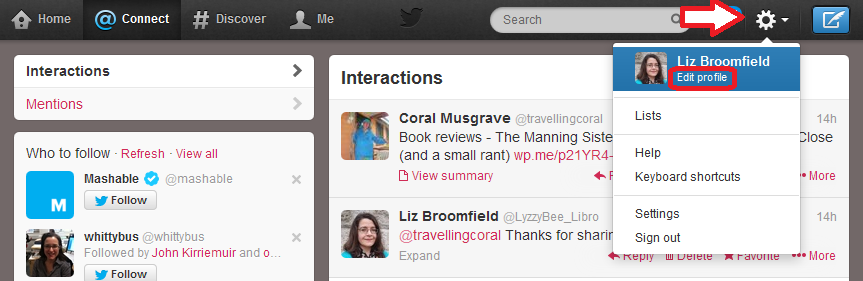
How do you change your Twitter profile? On the standard Twitter website, click on the Tools icon (the little cog) in the top right and drop it down to get Edit profile:

edit profile 1

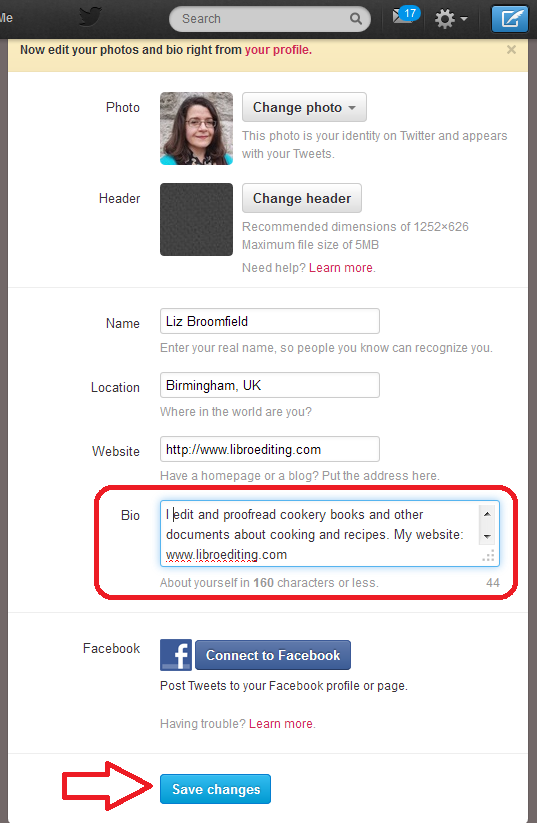
Now you have the option to change all of your details and your Bio(graphy). Make sure that you get all of your keywords in, press Save Changes at the bottom, and you’re reading to go and encourage people to look at it!

edit profile 2

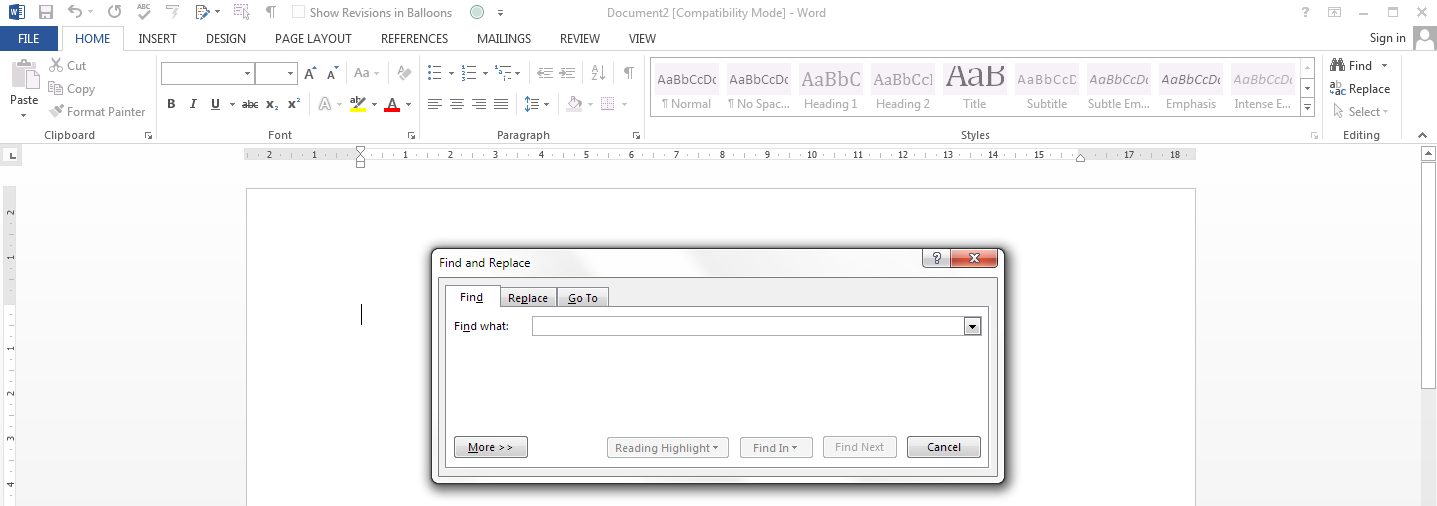
How do I search in Twitter?

At the top of the screen, you will find a grey box with a magnifying glass icon in the right-hand end. You can type any words you want to search for in here and hit Return to run your search.

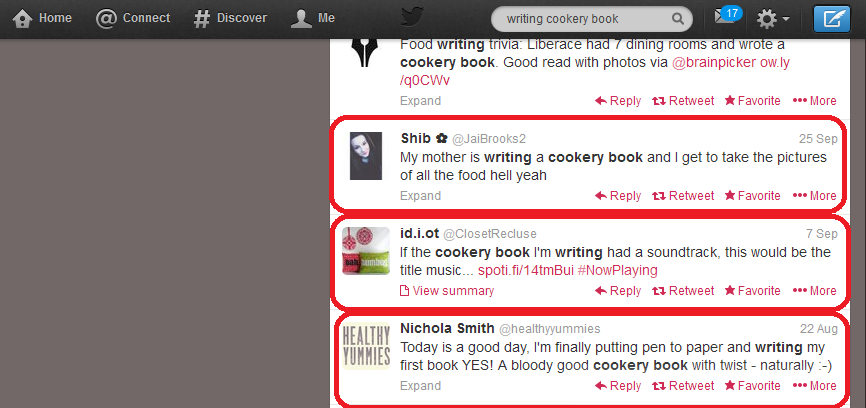
You do need to think about your search terms and what you think people who might be searching for a cookery book proofreader might need. Here, I’ve gone for “writing cookery book”, on the grounds that if someone is writing one, they are going to need editing help at some stage. So I input that, hit Return, and when the results come up, I choose All rather than Top or People you follow – to make the results list as wide as possible.

1 search

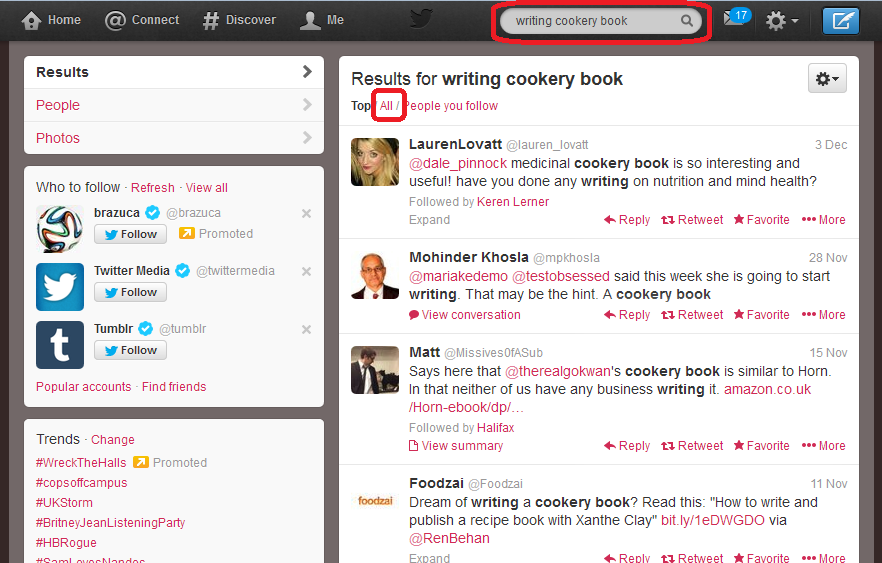
How do I interpret the Twitter search results?

Bear in mind what you’re looking for: people who are writing cookery books and might need your help. Scan down the results list, and you’ll soon see some hopeful ones. I would send a quick note to all of the people I’ve circled, but not the one above, which just mentions a cookery book, not really associated with someone writing one right now:

2 results search

Advanced search in Twitter

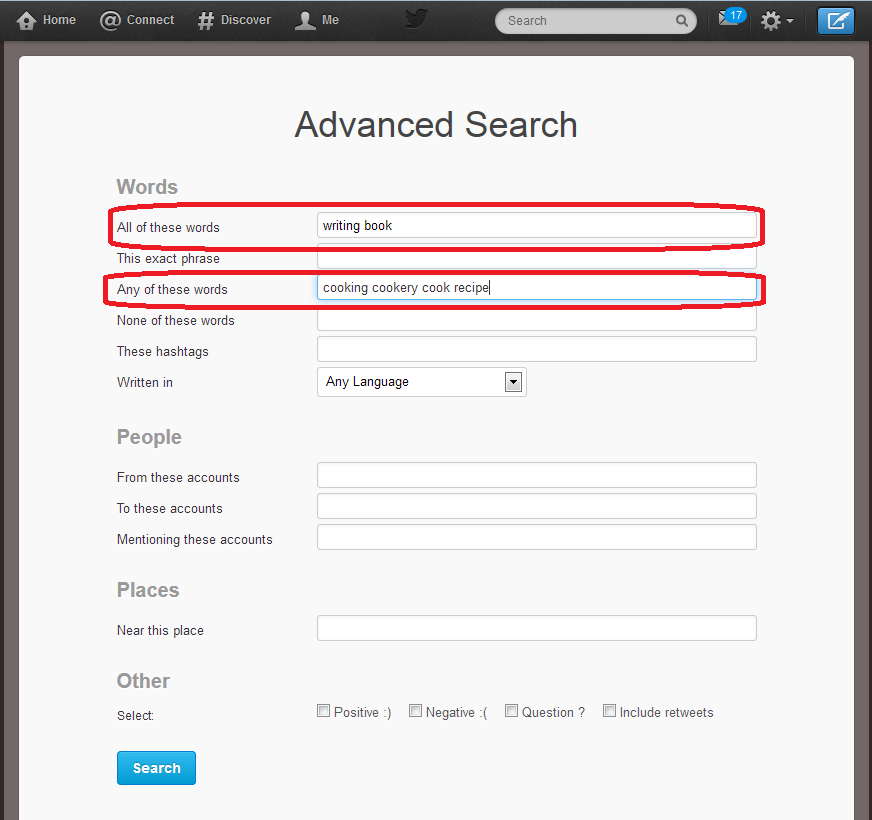
Twitter searching doesn’t use wild cards, which means you can’t input cook* book and get it to search for cookery book, cook book, cooking book, etc. Once upon a time, you’d have to run searches for all the different words you wanted. But now you can run Advanced Search and search for lots of different things at the same time.

Click on the cog to the top right of your search results and drop it down. You’ll have an option to Save search (we’ll look at that later) and Advanced search will appear in the sidebar. Pick Advanced search and you’ll be taken to the Advanced Search input screen. Here you can handily choose words that must be included in the results, and words that could be included. So, here, I’m saying that all tweets that Twitter finds must include the words “writing book”, but they can also include any of “cooking”, “cookery”, “cook” and “recipe”. This means that it will look for “writing book” plus any one or more of the other words.

4 advanced search

What effect does this have on the results? Well, we can see a few that aren’t really any use, but two from people writing cook books (circled). Result, and we’ll have more results doing this than for each of lots of different individual searches, all in one place.

5 advanced search results

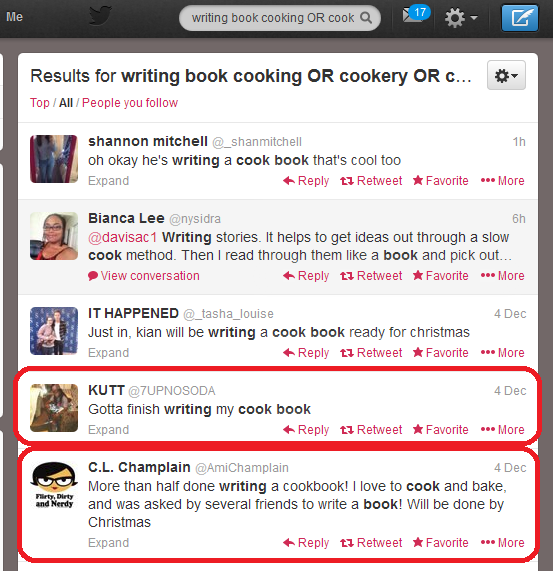
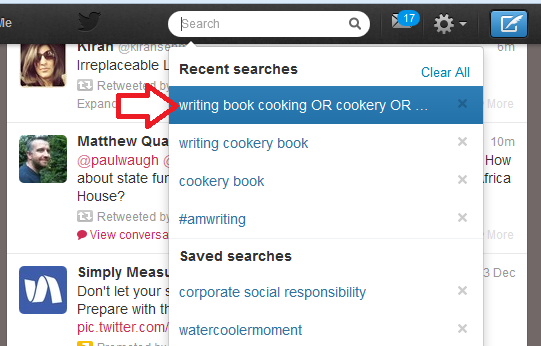
(You can see that at the top of the search screen it’s written out your search as “Results for writing book cooking OR cookery OR cook…” and this means that it’s using the Boolean operators AND, OR (and NOT, if you want), so if you’re familiar with online searching, that’s what it’s doing.)

How do I save a Twitter search?

When you’ve found a good search that has a lot of useful results (no search will have ALL useful results, but this seems a good one), you can save the search. Click on the cog, drop it down and choose Save search:

6 save search results

When you next click in the search field, you will get a list of Recent searches and Saved searches. Our search is in Recent searches at the moment, but will stay in Saved searches, now you’ve saved it.

7 saved search

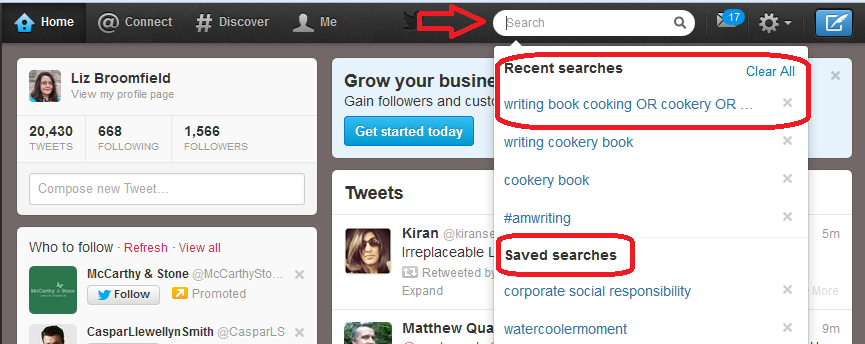
This means that you can just click on that search query rather than typing it all in again.

8 run saved search

How often should I re-run my Twitter job searches?

I recommend running each of your searches every 24 hours. This gives you only a few extra results each time, it’s easy to note where the ones that you’ve already seen start, and if you want to reply to a tweet, it’s not too long since the person tweeted it.

It might be worth running them more frequently at first, but keep an eye on how many new results come up during 24 hours and you’ll get an idea of the schedule to use. I wouldn’t leave it longer than 24 hours, for fear of missing out, as Twitter is a very immediate medium.

How do I pitch for a job on Twitter?

You might feel a bit uneasy about this. But I can promise you that no one minds one short, friendly and non-pushy contact in reply to a tweet they’ve sent out. I’ve sent loads, I’ve had a certain amount of success; some people have ignored me, but no one has ever complained.

Here’s a worked example of how I’d approach this situation as a proofreader looking for work on cookery books:

9 reply

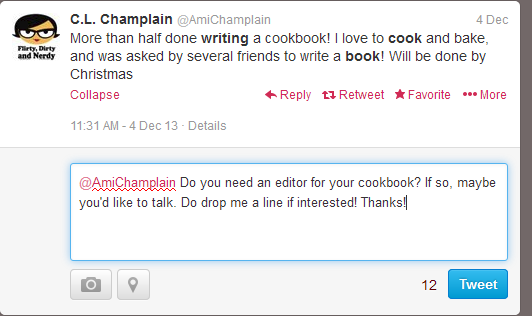
So, a very non-pushy, friendly and polite tweet inviting them to respond. If they did respond positively, I’d very quickly move to giving them my website URL (even though it’s on my profile, I’d put it in a tweet) and initiate email contact so we could discuss the project in more detail.

———

So there we go: that’s how I searched for jobs on Twitter – and won them. My use of this network was a while ago now, but you know what? I still have both of those original clients who I talked about above!

If you enjoyed this post or found it useful, please do use the sharing buttons below and leave me a comment!

Related posts:

How do I get freelance work?

Reciprocity and social media

Karen Strunks on using Twitter in your business

 
16 Comments

Posted by on December 23, 2013 in Business, Jobs, New skills, proofreading, Social media


Tags: ,

How to record, transfer and send audio files – for journalists and researchers

keyboard, headphones and penOver the years that I’ve been providing transcription services to journalists and researchers, I’ve found that my clients haven’t always been as au fait as you would expect with recording, downloading and sending audio files of their interviews.

Here are some handy hints that I’ve developed to help my clients – any journalists or researchers who have to record and transcribe interviews should find this information useful.

Recording your interviews

You might be using a dedicated dictation machine or your Smartphone to record your interviews. Whichever you are using, here are some hints to get the best out of your recording:

Set and test the recording levels. You will  probably be able to alter the volume, at very least, and maybe the graphic equaliser. If you’re going to be doing a lot of interviews, it’s worth doing a test session with a friend, and checking the quality of the recording. Then leave the levels set at that point.

  • If the levels are too loud, when it’s played back, it will be distorted, even if the level is turned down on the machine that’s playing it back.
  • If the levels are too quiet, when it’s played back it will be really quiet still. Your transcriber will strain to hear it. Even if they up the volume at your end,  there’s only a certain amount they can do
  • If the bass or treble are set too high, the recording will pick up and amplify all bass or treble noises, such as cars going past or cutlery rattling

You may have some pre-set recording levels in the menus on your recording device. Oddly enough, you need to choose one that reads something like “interview” or “one to one”, rather than “meeting” or “concert” or “outdoors”. This will ensure that the device picks up you and the interviewee, rather than the conversation at the next table or the inexorable whoosh of the cappuccino machine.

  • If an inappropriate pre-set recording level is chosen, your transcriber may be bombarded with cutlery and glassware sounds and other people’s conversations, or just hear voices booming around like they’re in the bottom of a bucket.

Check each time that the recording level is correct – it is not unknown for the buttons on the recording device to get pressed in the journalist’s bag on the way to an interview, leading to a transcriber with ear-strain and a transcription full of gaps!

Transferring your audio files to your computer

Once you’ve saved your interview files, you’re going to need to get them off your recording device and onto your computer.

There are usually two ways to do this:

Option 1 – connect your recording device to your computer using a USB cable

Option 2 – send the file from your recording device to your computer via email

Option 1 is the easiest. If your recording device comes with a USB connection, plug it in to your computer. You will find that the computer treats it as an extra drive, like the C or D drive. Use the file navigator to find the file and copy it across to your computer, ready to send to your transcriber.

Option 2 is more tricky, as most phones will have a limit as to how long a file you can send. You may need to break it up into chunks, or zip the file on your phone / dictation machine first.

There is an Option 3 which you can use if your dictation machine is an analogue one, i.e. uses those little tiny tapes (or big ones!). Go into a silent room. Set a microphone up connected to your computer. SET THE RECORDING LEVELS very carefully and test them. Play the tape and record it digitally. Note: please don’t do this if you can help it. The tape quality will always be affected (think what the tapes were like that you recorded off the radio as a teenager. Exactly). Your Smartphone will have a voice memo app pre-loaded onto it, or you can download one. Do that: go digital. Your transcriber will thank you!

What to do when your iPhone voice memo is too big to email …

This is a topic in itself and one I’ve been asked about time and again.

If you need to transfer an iPhone voice memo to your computer to send to your transcriber, and you try to email it to yourself or them, you will probably get a message telling you that it’s too long to email. Don’t break it up into chunks, do this instead …

Turn on your phone, connect it via USB cable to your computer and open iTunes.

iTunes should have a tab called My iPhone.  Click on the Sync button in this tab if it doesn’t do it automatically. It will then record it into your computer’s memory.

Under Playlists, click on Voice Memos. Find your recording (it will be labelled with its date, which should help you to find it), right-click and choose Get Info. This will tell you where the memo is saved on your computer. Copy it into the file where you want to keep it, and send it to your transcriber.

For other phones, I always recommend connecting the phone to the computer rather than trying to email it.

Sending your audio file to your transcriber

Most audio files are really big and won’t send easily as an email attachment.

The first thing to try is zipping it. Go to the file in your computer’s folders, and right-click. You should be given some kind of option to Zip the file. This makes it smaller, like putting a duvet in one of those vacuum pack bags. Your transcriber will unzip it at their end to work with it.

If this is still too big, there are lots of services online that will transfer your file for you. My two favourites are YouSendIt, now called Hightail, and Wetransfer.  Both of these have free versions – you pay more to get more feedback and send larger files.

You can also use Dropbox, which acts as an extra, secure drive for your computer, living out there in the ‘Cloud’. Sign up (again, free) and copy your files into this folder. Then share it with your transcriber, or send the file so they can download it.

This article has hopefully helped to make technical matters clearer for journalists and researchers who want to record interviews and transcribe them themselves, or have them transcribed by a professional transcriber.

Related posts:

More on transcription and careers in transcription starting here.

Why you need a human being to do your transcription

My book: A Quick Guide to Transcription as a Career – buy from Amazon UK or visit the book’s web page for worldwide links and news.

Found this useful? Do share using the buttons below, and/or send me a message via the comments box below!

 
19 Comments

Posted by on December 18, 2013 in Transcription


Tags:

How do I get freelance work?

This article shares some ways that I’ve found successful in getting proofreading, editing, localising and transcribing work. It’s applicable to all forms of freelance work but doesn’t look at getting a full-time employed job in publishing or for another large organisation.

It’s also worth noting here, in response to some of the early comments on here, that this is a suite of options and you wouldn’t expect to do them all at the same time. Once you’ve built up 1 and 2, you can pick and choose depending on what your career path is – and it’s important to indulge in some planning from the start. Thank you to my commenters for helping this to be a better and more useful post!

1. Make sure that you say what you do on your website

Many of your clients will come to you after doing a Google search. Remember: people will take the easy option. Why bother to search on lists and in directories if you can just stick a search in Google.

So it’s worth making sure that your website …

  • Includes a clear list of all of the services you offer
  • Includes a blog which is updated regularly – this really helps your position on the search results
  • Is Search Engine Optimised in general (there is an art to this, but make sure you include your keywords regularly, write lots of natural reading text and include keywords in page / post titles and headings)
  • Includes a picture of you and ways to contact you – a contact form is always good for this

Oh yes – do make sure that you HAVE a website. Even if it’s just one page, I really do think that in all industries, from carpentry to computer programming, people expect you to have some kind of web presence, and may well give up the search there and then if you don’t, even if you’ve been recommended by name by someone. I know that I do that when I’m looking for services …

2. Make sure that people know what you do

An awful lot of my early clients came through friends of friends and social networks. Obviously, don’t bombard your friends by begging them to refer you, but make sure the following are covered:

  • If you have a company Facebook page, include a list of your services
  • Include your services on your Twitter profile
  • Mention what you do on social networks every now and again (a good way to do this is to mention what you’ve BEEN doing “This month I’ve edited this, transcribed that and localised the other”.
  • Make sure peers in one area know you cover other areas, too (if you do), e.g. I make sure that my editing chums know that I transcribe as well
  • Consider setting up a newsletter and making sure you mention all of your services
  • Update your clients with any new services you’re offering

3. Join industry groups and publicise yourself through their directories

I gained early clients through being in a member directory associated with a copyeditors’ email list. Friends do well by being listed on the Society for Editors and Proofreaders’ website. My roofers are listed on a government-accredited tradespeople’s website. All of these are places where people will look for accredited and proved suppliers.

4. Advertise on general directories and websites

A hint: don’t bother with paid ones when there are so many free directories and websites!

Ask around your peers as to what they find useful. I am on Freeindex and get a few enquiries a month. Join as many as you want, but do make sure to update your profile if you change your services, fees, etc.

If you’re in a trade like roofing or plumbing, it’s worth looking at council and government approved listings and the paid directories, as people do search these first, but beware putting too much money in at first.

Again, for trades, local print directories and especially business association directories can be good. I have a free listing in our local business association one, which has never brought me any work, but I always try to find local tradespeople who are members, and other people will do this, too.

5. Use industry-specific freelancer sites

I’ve had a look at general websites like freelancer.com, elance.com and oDesk and personally, I don’t think they’re worth it. A lot of people on those will undercut and take any job at the lowest price possible. Many of the sites have “tests” which are actually a test of your understanding of the site itself, not your ability as a writer, editor or whatever.

*Edited to add: while I don’t find these useful, a couple of people have mentioned Elance to me as a good one to try that has got them decent jobs, so it’s worth looking at that.

However, there are industry-specific freelancer sites which are worth it. Again, ask your peers for recommendations. The one that’s got me the most work is proz.com, which is a site for translators where you can put up a profile and, if you pay for membership, that profile will be sent to people looking for freelancers, and they will contact you direct. This has paid back the membership fee for me tens of times over, because I work with translators into English, and offer localisation, which is related to translation.

You can also look for people looking for particular skills and freelancers and then pitch to them.

Take note, though: with anything you pay for, do assess each year whether you’ve got that fee back, and more. Only continue paying if you’re getting a good return on your investment!

6. Advertise (selectively)

I’m not a big fan of paying out for adverts. Most of the other methods I talk about here are free. But there might be specific advertising channels that will work for you.

When I was starting out, working as a proofreader on theses and dissertations, I put up some posters around the university where I worked, recruiting colleagues who were also students to put them up in common rooms, etc. (free, except for printing costs and a few coffees!) and I advertised in the university staff newsletter, which went to tutors and supervisors. The costs were low, even to non-staff, and I did get the money back.

As with using websites that you pay for, do check your return on investment and keep an eye on the outgoings.

7. Use social media proactively

This one particularly applies to Twitter, although LinkedIn can be used in this way, too. Search for people looking for your services on Twitter. Reach out to potential clients directly. I have got paid work using this method and, even better (see below), I’ve got clients who have gone on to be big recommenders this way, too.

No one minds one, polite Tweet if they’ve asked for recommendations for a good plasterer or translator and you fit the bill. Don’t hassle people and don’t blanket-tweet; do tailor your response to the person you’re contacting.

I’ve written a separate article on searching for freelance jobs on Twitter, with a worked example.

8. Seek recommendations and referrals from clients

The best way to get new clients is through word of mouth. The two main advantages?

  • It’s free!
  • If person A recommends you to person B, and person B gets in touch with you, they are far more likely to convert into a paying customer than someone who’s randomly got in touch with you through an ad or Google search.

You do need to be a bit proactive about this, though …

  • Make sure that your clients know you’re looking for more clients just like them
  • Say thank you whenever you find out someone’s recommended you
  • Ask clients for references to put on a reference page on your website (this makes enquirers more likely to use you as you come recommended by lots of people)

I have several clients who act as “nodes” for me, recommending me either individually or via blog posts and pages on their websites.

9. Seek recommendations from your peers

Your peers fall into two groups:

  • People who freelance or run small businesses like you, who you might meet in online groups or at networking events
  • People in the same industry as you, who you might meet in the same ways

It’s important not to see people in the same industry as you as competitors – you’re much better off considering one another as colleagues. When I was starting out, I was passed what turned out to be a major client by a proofreader friend who wanted to stop working at weekends and in the evenings. So I did evening and weekend cover for them. Now I’m established, I much prefer to be able to recommend potential clients who I can’t take on to another qualified person who I know will do a good job.

When you’re starting out, it’s worth forging (genuine) relationships with people in your industry who are more established. They may well have the odd customer they want to pass on, or have too much business and be looking for people to recommend on to. Nowadays, I pass quite a few people who I can’t accommodate on to a core set of five or so recommended proofreaders, writers and transcribers. I also keep a note of people in allied industries such as book design, graphic design in general and indexing, so I can pass people to them with a relevant recommendation, rather than just leaving them hanging.

You can also profit from either teaming up with peers in different industries – for example, I’ve worked with web designers on projects where they’ve written the website and I’ve provided the content, and I’ve done proofreading work for virtual assistants who don’t offer that service themselves.

I haven’t got many clients directly through networking, but I met an author at an event who went on to recommend my transcription services to a fellow author, who now uses me for transcription and editing, AND recommends me on her website!

10. Go cold calling and door-knocking

Some people do cold calling and door-knocking, where they literally call people on the phone or walk up their front paths and ask them for work. For a start, I don’t think that works in the service industry. I know some editors cold call publishing companies, and I’d love to know how that works out for them.

Personally, I feel this takes a LOT of investment. Cold calling requires a list, which takes time and research or money to get, and taking time out to walk up a lot of paths is a fairly hefty investment, too. It might be more worth looking at trade directories or local directories before you take this path – but do share your stories if you’ve had other experiences!

Edited to add: as people have kindly shared their experiences, I’m adding a note here to say that cold calling can be useful if you’re targeting a specific and maybe narrow group of clients. Fellow editors, for example, have gained work for publishing houses or journal publishers by taking this route. As my client base is more individuals and other small businesses and freelancers, this approach wouldn’t work for me. But if there’s a group of companies that you can identify as a good fit, by all means approach them with a call or letter, cold, as it were.

———————

How do you get freelance clients? Can you recommend any other ways, or do you use any of these? Do let me know whether you try any of these successfully as a result of reading this article!

Related posts of interest on this blog:

Thinking of going freelance (1) – some initial points to think about

Thinking of going freelance (2) – how to organise yourself once you’ve got going

How do I decide to who work with? – choosing companies to associate yourself with

How to turn a new customer into a regular customer

What’s the best mix of customers to have?

How to make more money in your freelance business

Searching for jobs on Twitter

When should I say no?

 
17 Comments

Posted by on December 16, 2013 in Business, Jobs, Organisation, Social media


Tags: , , ,

Happy Christmas 2013

Christmas 2013

Well, here I am with books, chocolate, dinner and friends – all that’s missing is Matthew and the cat … Happy Holidays to all of Libro’s lovely clients and all of the various Friends of Libro. Hope you have a good rest and catch up with the things that you like to do.

(Photo taken by Catherine Fitzsimons and reproduced with permission)

 
2 Comments

Posted by on December 13, 2013 in Celebration


Tags:

How to use find and replace in Word 1: simple search and replace

This is the first of three articles about the useful Find and Replace functions in Word. It covers Word 2007, Word 2010 and Word 2013 in detail, although once you’ve got past the first hurdle, they all work in exactly the same way. This article tells you why you might want to use Find and Replace, how to locate them, and basics of how to use them. Subsequent articles look in more detail at how to find specific words and phrases, and even symbols and formatting.

Why would I use Find and Replace?

The Find function in Word is very useful if you need to locate all of the places where you’ve used a particular word or phrase. I use it to check that I’ve kept things consistent. I might look for every instance of the word “Find” in an article on Find and Replace, for example, to check …

  • Have I always used it with a capital letter or sometimes with a lower-case initial letter?
  • Have I always typed Find and Replace, or sometimes Find & Replace?
  • Have I used find, finding, etc. too many times around the word Find, making the piece look clumsy?

I also use Find and Replace if I have decided that I want to change something throughout the text, for example:

  • I’ve used “low fat” and “low-fat” inconsistently and want to change all instances to low-fat
  • A client wants me to eliminate double spaces after full stops. I Find ”  ” and replace it with ” “
  • I’ve misheard an album title in a transcription and want to go back and find the incorrect version and replace it with the correct one

So, that’s why we use it – how do we use Find and Replace?

How do I access Find and Replace in Word 2007?

You can access the Find and Replace dialogue box in Word 2007 by going to the Home tab and clicking on the arrow to the right of Find at the right-hand end of the menu bar:

1a Word 2007

Word 2007 also uses the simple Ctrl-F keyboard shortcut to bring up the Find and Replace dialogue box (this also works in Word 2003).

1 Word 2007

Once you’ve brought up the dialogue box, type in the text you want to search for and press Enter or the Find Next button.

How do I access Find and Replace in Word 2010?

In Word 2010, you can access find and replace using the Home tab and the Find option at the right (note Advanced Find option):

2a Word 2010

If you just choose Find, you’ll get the sidebar shown below, if you choose Advanced Find, you’ll jump straight to the dialogue box.

Pressing Ctrl-F will bring up a sidebar with a simple search option. This seems very odd if you’re used to Word 2003 and Word 2007, as you are left wondering where the familiar dialogue box is, but it’s actually very useful, as you can see at a glance how many times your word is used and where in the text it can be found, and the word searched for (in this case localisation) is highlighted in the text:

2 Word 2010

If you want to access the more advanced Find and Replace dialogue box that you’re used to from Word 2007, you need to either choose Advanced Find from the Home tab Find area, or click on the arrow to the right of the magnifying glass in the side panel. If you do that, you’ll get a drop-down menu which includes Advanced Find.

3 Word 2010

Whichever option you choose, you will then be confronted with the familiar Find and Replace dialogue box:

3a Word 2010

Once you’ve brought up the dialogue box, type in the text you want to search for and press Enter or the Find Next button.

How do I access Find and Replace in Word 2013?

This works pretty well exactly the same as in Word 2010, just with fewer colours and less handy yellow highlighting (I’m sure you can add that back in and I’ll write about that when I find out  how to do it). So, you can either access Find and Replace using the Home tab, Find area, and dropping down the arrow at the right to choose Find or Advanced Find:

3a Word 2013

If you just choose Find, you’ll get the sidebar shown below, if you choose Advanced Find, you’ll jump straight to the dialogue box.

Or press Ctrl-F to access that useful sidebar that will surprise you if you’re accustomed to Word 2003/2007 … which will show you all instances of any word you search for in the whole document and highlight them (in yellow!):

4 Word 2013

Then, to reach the dialogue box, click the arrow to the right of the magnifying glass and choose Advanced Find:

5 Word 2013

And there’s your familiar dialogue box:

5b Word 2013

Once you’ve brought up the dialogue box, type in the text you want to search for and press Enter or the Find Next button.

Are there more options for Find?

You can access more options for Finding specific text by pressing the More button in the dialogue box:

5.5 more options 2010

This will give you lots more options for refining your search. Some are quite obvious, but I’m going to write about all of them in depth in another post.

Advanced find options

How do I replace text in Word 2007 / Word 2010 / Word 2013

(Note: all screenshots are from Word 2010, however this works exactly the same for all versions of Word back to Word 2003 and up to Word 2013 (at least)).

To Replace text, you need to go to the second tab along in the Find and Replace dialogue box, marked Replace. You will then be given an extra space to fill in the text you want to replace your found text with. In this case, I’m finding “localisation” and replacing it with “localization”:

6 replace

At this point you have a choice: hitting Find Next (to find the next instance of the word) and then Replace (to replace it with your new word) for each individual occurrence, or going wild and pressing Replace All (which will automatically replace every occurrence of the word you’ve found with the one you’re replacing it with),

7 replace what

I would always recommend using Find Next – Replace unless you absolutely know that you are not going to be replacing something you don’t mean to replace. Even replacing a double space with a single might play havoc if the person who wrote the document has used spaces to format tables (even if they shouldn’t do that, some still do). And consider this:

“John” means “toilet” in American English. So I might do a search and replace to Find John and replace it with toilet. But what if there’s a character or just someone mentioned called John Bloggs. Or, soon to be, Toilet Bloggs. It’s so easy for this to happen …

So, be careful with your Find and Replace and you’ll be fine!

———-

This article has covered the basics of Find and Replace. Next time, we have a look at the options you can use and using wildcards, and I will also look at finding and replacing formatting  …

If you’ve enjoyed this article or found it useful, please comment, or hit one of the share buttons you can see below this article. Thank you!

This is part of my series on how to avoid time-consuming “short cuts” and use Word in the right way to maximise your time and improve the look of your documents.

Please note, these hints work with versions of Microsoft Word currently in use – Word 2007, Word 2010 and Word 2013 all for PC. Mac compatible versions of Word should have similar options. Always save a copy of your document before manipulating it. I bear no responsibility for any pickles you might get yourself into!

Find all the short cuts here

Related posts on this blog:

Advanced Find and Wildcards

 
4 Comments

Posted by on December 11, 2013 in Errors, New skills, Short cuts, Word, Writing


Tags: , , , , , , , ,

Growing your business – going full time (case study)

Sneak preview of the image from my new bookWhen you decide to grow your business, one of the first things you can do, if you’re not doing this already, is go full time. Sometimes this can feel a bit scary, but I can vouch for the fact that working on one job is always easier than trying to commit to two, and it can be a very liberating experience.

My fellow-proofreader/editor/transcriber, Laura Ripper, has kindly put together this guest post about her recent experience of going full time. Although we’re both in the same line of work, Laura’s experiences can be extended into other freelance careers very easily. Here she shares the process and her experiences as she went through it – a very useful piece indeed!

Why did I do it?

My main reason for going full time with my part-time business was that I knew that working for myself, and the work itself, would make me happy.

Working for myself part time was always a step towards doing the same thing full time, but that seemed a long way off when I first set up my editing and proofreading business in 2012. I’d worked as an editor at Plain English Campaign in the past, so I was confident in my ability to do the work. But I’d never worked for myself, and barely knew anyone who did, so going full time straight away was too frightening.

Once I got started, I enjoyed my two days a week on the business so much that I knew this was what I wanted to do. It was just a matter of when.

When did I do it (i.e. what stage was your business at?)

I had been working on the business part time for a year when I made the decision to go full time with it. Although I had the skills for the job when I went part time, I had no idea about what was involved in running a business. I spent that first year developing a strategy, building up a good network of colleagues, learning from others, setting up business processes and building up clients. I built a website, marketed myself, and joined professional groups and organisations like the Society for Editors and Proofreaders and ProZ. I read business books specific to my profession, like Louise Harnby’s Business Planning for Editorial Freelancers and Liz’s Going it Alone at 40. The advantage was that I could do this while still having a regular (lower) income.

By the time I went full time, the business was at the stage when I had started getting referrals through word of mouth and I had a few regular clients. I was beginning to have to turn down work because I couldn’t fit it around my other job, and I seemed to be working most weekends, too! I had quite a nice mix of clients, and also had built up good relationships with other freelancers who would pass me work when they were too busy. I had saved up enough money to bolster my income during the first few months of going full time, when I thought that I might need it most. I had the confidence that the work was out there and that my clients were happy with the service they were getting, and I had seen how work volumes changed over the course of a year.

How did you do it?

Making the decision to go full time was probably the most difficult part of the process – once I had done that, I just got on with it and did it!

I made a list of pros and cons, talked about it with people who had been there before me, spoke to my family and friends, and carefully worked out my finances to make sure that I was being realistic about whether I was ready to go full time. There is so much help out there to set up a full-time business successfully, from books and courses to forums and informal networks. I learned the most from other editors and proofreaders who were further along in their freelance careers – not only about client management and business processes, but how to deal with things when they do go wrong. This really built my confidence, and continues to do so.

I was worried about losing my regular monthly income, albeit a part-time one. I overcame this by saving everything that I earned from the business in my first year and living off my part-time income only. This gave me a ‘buffer’ that I could tap into if necessary, and made me and my partner feel more sure about the whole thing. My business planning wasn’t perfect, and gut feeling played a part in my decision to go full time, too, but I did make sure I would be able to support myself if things didn’t go the way I hoped.

Once I had decided, I told all my clients that I would soon be available to take on more work, and during my last month of employment I worked almost every day to give myself as much of a head-start as I could. I had all the processes and equipment ready, so I focused on doing more work for more clients, and made sure that I planned and organised the work well and closely monitored how much I was earning each week.
When I look back at the ‘pros and cons’ list I made just before making the leap, I can already see there are some things I got wrong (I thought I’d have more time for training – not likely!) and some that turned out not to be issues at all (I worried my first month or two would be very quiet).

Benefits gained Pitfalls / disadvantages you experienced or saw coming and managed to avoid

Benefits

The main benefit for me is that I am happier and feel more fulfilled in my life. I love my work and most of my clients, and I enjoy a lot of the business aspects I was worried about, too. I find it really satisfying to work for myself and to feel that my life and work are not such separate parts of my identity. I know this doesn’t suit everyone, but it works well for me.

I expected going full time to be more stressful, at least at first, but in some ways it’s actually less stressful than being part time in two jobs. I’m now better able to juggle several pieces of work within a particular timeframe, so I can take on more work in total and can fit in urgent bits and pieces for regular clients. I’ve also been able to take on jobs that I couldn’t have said yes to when I was part time – for example, PhD theses that need proofreading in a couple of weeks. Taking on longer jobs also means less admin time per day.

I can be more flexible about fitting in networking now, and am able to attend events that I wouldn’t have been able to when working part-time.

Pitfalls

One pitfall I saw coming was the start-up costs – time as well as money. I managed to buy most of the equipment for the business during my part-time year, and I got time-consuming things like setting up my website and templates out of the way before going full time, too.

Working for yourself full time means less financial security – at the moment, I earn less than I did when I was employed, and I work longer hours to earn it. My target for my first year is fairly low (although on the up side I am meeting it every week!), and I do want to increase my earnings in the years to come. It’s probably best not to go full time just as the mortgage is coming up for renewal, or when you know you’ll be particularly hard pushed!

Time management can sometimes be difficult, particularly fitting in work that doesn’t result in a direct payment, like admin, training and marketing. I do make time for these things, but it is easy to prioritise paid work over everything else and that isn’t always best for the future of the business. I also do end up working some evenings and weekends to fit in with clients, which means I miss out on spending as much time with my family and friends. I hope that as I develop the business further, this will happen less and less often, and I have seen others move away from this as their businesses develop.

Would you recommend it to other businesses? Why / why not?

Yes. Going full-time assumes that you are part time already, and if you’re enjoying the part-time work, it follows that at some point you’ll want to go full time.

Moving from part time to full time is a big step if you are a fairly cautious person, as suddenly what was a part-time business has to provide all your income and pay the bills, but if you can manage to save some money to cover the first few months this is a huge help. There are pitfalls to avoid, but the wealth of advice out there can help you avoid them. For me, those that I can’t avoid are worth it in exchange for the satisfaction of building up my business and doing what I love.

Thank you for this honest and detailed set of answers, Laura! It’s always a hard decision to make when you enjoy your day job and don’t have to give it up because of redundancy, moving or being needed for family duties, as many of my Saturday Business Chat contributors have done. But there comes a point when you can’t split your commitment any more and something has to give.

The questions are based on those I asked in my call for contributors to this series. Don’t worry, you don’t have to answer in such detail: if you’ve got experiences to share with your fellow small business owners about going VAT registered, getting premises, taking on staff, etc., you can give me a few notes up to a whole article, and I’ll work with your answers from there.

Laura RipperLaura Ripper is a proofreader, editor, transcriber and Plain English writer/editor based in the North of England. She went full time with her freelance career during 2013 and is loving it. Find Laura online at www.lauraripperproofreading.com or on Facebook.

———-

This post is part of my series on growing your business. Read more here and read about my own business journey in my book, How I Survived My First Year of Full-Time Self-Employment.

 
2 Comments

Posted by on December 9, 2013 in Business, Guest posts, Organisation


Tags: ,

How do I count the words in a PowerPoint 2013 presentation?

Some time ago, I published what has turned into a pretty popular post on how to count the words in your PowerPoint 2007 document. This is something that is a little tricky to find, so perfect for one of these how-to posts.

All was well and good, then I had some editing to do on a PowerPoint document and my PC automatically opened it in PowerPoint 2013. Where on earth did I find out how to count the words now? Here’s how …

Why would I want to count the words in a presentation?

You might have a word limit imposed by a course tutor, or, more likely, you’re an editor with a per-word rate who needs to check how many words you’ve actually edited.

How do I count the number of words in a PowerPoint 2013 presentation?

To do this, with your document open, you need to go into the FILE tab at the extreme left of the tab list … (one day I’ll work out how to get those tab titles out of capitals and let you know!)

menu

Once in the File tab, stay in the Info area where you land, and click on the arrow next to Properties in the right hand column. Once clicked, you will have a choice between Show Document Panel and Advanced Properties. Click on Advanced Properties:

1 properties

This is, dare I say it, a little easier than in PowerPoint 2007. Once you’ve clicked on Advanced Properties, you’re given a list of properties. Click on the Statistics tab at the top and you’ll find your Word Count, among other information.

2 properties

To return to your document, click OK and then back to the Home tab in your document.

How do I count the number of words in a PowerPoint 2010 presentation?

Please see the post on PowerPoint 2010.

Related posts:

How do I count the number of words in a PowerPoint 2007 presentation? (this is a little different).

How do I count the number of words in a PowerPoint 2010 presentation? (different again!)

If you’ve enjoyed this post or found it useful, please do comment, or share using the buttons below! Thank you!

Please note, these hints work with versions of Microsoft Office currently in use – Office 2007, Office 2010 and Office 2013, all for PC. Mac compatible versions of Word should have similar options. Always save a copy of your document before manipulating it. I bear no responsibility for any pickles you might get yourself into!

Find all the short cuts here

 
10 Comments

Posted by on December 4, 2013 in Errors, New skills, PowerPoint, Short cuts, Writing


Tags: , , , , , ,

How do I count the words in a PowerPoint 2010 presentation?

Some time ago, I published what has turned into a pretty popular post on how to count the words in your PowerPoint 2007 document. This is something that is a little tricky to find, so perfect for one of these how-to posts.

How do I count the words in a PowerPoint 2010 presentation?

It’s all a bit different in a PowerPoint 2010 document if you’re used to PowerPoint 2007, because they’ve got rid of the Office button and replaced it with a File tab.

So: open the document and click on the File tab to the left of the Home tab.

This will bring you up a screen where you can open previous documents, save as, etc. Click on Info on the left and your properties will come up on the extreme right.

But of course, yet again, the thing you want to see isn’t immediately visible. Go right to the bottom of the screen and click Show All Properties.

And there’s your word count.

Related posts:

How do I count the number of words in a PowerPoint 2007 presentation? (this is a little different).

How do I count the number of words in a PowerPoint 2013 presentation? (different again!)

If you’ve enjoyed this post or found it useful, please do comment, or share using the buttons below! Thank you!

Please note, these hints work with versions of Microsoft Office currently in use – Office 2007, Office 2010 and Office 2013, all for PC. Mac compatible versions of Word should have similar options. Always save a copy of your document before manipulating it. I bear no responsibility for any pickles you might get yourself into!

Find all the short cuts here

 
5 Comments

Posted by on December 4, 2013 in Errors, New skills, PowerPoint, Short cuts, Writing


Tags: , , , , ,

Growing your business – employing staff

Sneak preview of the image from my new bookWhen you decide to grow your business, one popular way to do this is to employ staff. You can either take on people to do your admin, reception duties, sales, etc., or to do the actual work that you do. In this article, I’m going to talk a little about the advantages and disadvantages of taking on staff, and then we’ll hear from Duncan Brown, an expert on employment, who will talk us through the things we need to think about from a legal perspective when employing staff.

Advantages of employing people

  • Someone else can cover the admin while you concentrate on doing the job that makes the money
  • You can bring people in who have different skills to yours – in sales, for example
  • You’re not on your own; you will have an office full of people to bounce your ideas off
  • If you’re an extrovert, you can recharge by having people around you
  • Skills and positions can be covered and you might even get to take a holiday yourself!

Disadvantages of employing people

  • Someone has to manage them – will that be you?
  • You need to be aware of the rules and regulations – even if you employ an HR firm to deal with that side of things
  • You’re responsible for looking after these people physically, psychologically and financially
  • Related to the above, if things get tight, you can always not pay yourself – but if you’ve got staff, you need to make sure that you can pay them. I have seen firms founder and have to lay people off on this issue.

Key tips on employing staff

by Duncan Brown

When a person accepts a job offer from a potential employer, a contract of employment is created between the parties. An offer of employment does not have to be in writing to be valid.  However, it is best practice for offers of employment to be in writing and swiftly followed up with full written terms of the contract.

Irrespective of what form of legal entity an employer takes, i.e. Sole Trader, Partnership or Company, an employer must provide each employee with a “written statement of employment particulars” if the employee’s employment contract lasts at least a month or more. The “written statement” is not the employment contract, but is must include the main conditions of employment.  An employer must provide a “written statement” within 2 months of employment commencing.

Businesses must be aware that an employment contract places a set of obligations upon each party.  If an individual trades as a “sole trader”, that individual is the employer.  If the business is a partnership each partner is legally the “employer” of each employee, and each partner owes a duty under the contract to each employee. If the business is a Limited Company, the owners of that Company, i.e. the shareholders ultimately owe obligations to the employee.

Even if an employment contract is created verbally between the parties, the employer must still provide the employee with the “written statement”, which must include as a minimum:

  1. The name of the employer.
  2. The employee’s name, job title or a description of work, and start date.
  3. If a previous job counts towards a period of continuous employment, the date that period started.
  4. How much and how often the employee will be paid.
  5. Hours of work (and if the employee will have to work Sundays, nights or overtime).
  6. Holiday entitlement (and if that includes Public Holidays).
  7. Where the employee will be working and whether they might have to relocate.
  8. If the employee works in different places, where these will be and what the employer’s address is.

Items 1 to 8 are known as the “principal statement”.  The “written statement” must also contain information about:

  • How long a temporary job is expected to last.
  • The end date of a fixed term contract.
  • Notice periods.
  • Collective agreements.
  • Pensions.
  • Who to go to with a grievance.
  • How to complain about how a grievance is handled.
  • How to complain about a disciplinary or dismissal decision.

The “written statement” doesn’t need to contain the following information, but it must state where that information can be found, e.g. in a staff handbook:

  1. Sick pay procedures.
  2. Disciplinary/dismissal procedures.
  3. Grievance procedures.

If an employer doesn’t provide a “written statement” to an employee within 2 months of their employment commencing, that employee can commence a claim against the employer in an Employment Tribunal.  Employment Tribunals are usually expensive, time-consuming and stressful for employers (and also a potential PR ‘disaster’ because most local newspapers cover hearings at their local Tribunal!).

The Law implies certain terms into employment contracts, e.g. employees must not steal from their employer, each employee has a legal requirement to be paid at least the national minimum wage, etc.

An employment contract will be illegal if it is for an immoral or illegal act, e.g. prostitution, or if the employer pays part or all of the wages cash in hand and tax/NI contributions are not paid on the wages when they should have been, and the employee knew they were being paid cash in hand to avoid paying tax/NI contributions.

Solicitors can provide employment contracts and staff handbooks, often for fixed fees.  They can also provide employment law documentation, e.g. annual appraisal forms.

Competently drafted staff handbooks contain sufficient details on the terms and conditions of employment, to cover most eventualities.  They can also explain individual employer policies, e.g. email, fax & internet policies. Competent handbooks should contain the employer’s drugs and alcohol policy, and an equality policy.
The more detail in the written terms of the employment contract the more certainty there is for both employee and employer, hopefully resulting in fewer disputes (and thereby reducing costs, complications and possible employment tribunal claims for all parties concerned).

Businesses must bear in mind that employing staff is an onerous duty, especially for sole traders and partnerships, because sole traders and partners are personally liable for claims brought by their employee, e.g. for breaches of contract, for discrimination (e.g. sex discrimination), etc.

Duncan BrownDuncan Brown prides himself on being an approachable solicitor, who believes in providing clients with succinct, practical and commercially focused advice. His ethos is to take over the management of a dispute from clients, enabling them to concentrate on running their organisations.  He specialises in commercial disputes including employment law, landlord & tenant and building defect claims. He possesses niche experience of the Technology & Construction Court, Employment Tribunal, Property Chamber & Alternative Dispute Resolution.

Duncan works for Oliver Legal. Oliver Legal have a LinkedIn page, too, and Duncan can also be found on LinkedIn.

Thank you, Duncan, for those handy pointers on UK employment practices.

Have you taken on staff to expand your business? I’d love to hear your stories and your advice to add to a linked post on this important subject. Drop me a line via the comments below, or click on my Contact page: I look forward to hearing from you!

———-

This post is part of my series on growing your business. Read more here and read about my own business journey in my book, Going It Alone At 40.

 
4 Comments

Posted by on December 2, 2013 in Business, Guest posts, Organisation


Tags: ,