RSS

Tag Archives: Word2007

Can I print a Word document to PDF and retain the tracked changes?

If you want to print or save a Word document to change it into a PDF, and you have Tracked Changes showing in the Word document, will those tracked changes still show up in the PDF?

I needed to check this myself this morning, so now I’ve confirmed what happens, I thought I’d write a quick article about it, on the grounds that if I’ve had to check, someone else will need to, too (bloggers: this is a good way to inspire blog posts if you’re lacking ideas!).

So here is the definitive answer to the question Can I save a Word document as a PDF and keep the tracked changes showing.

Why save a Word document with tracked changes into a PDF?

This came about because I was discussing plagiarism with a colleague and explaining what I do if I need to confirm from a client’s supervisor that it’s OK to make as many changes as I’m making to their text. I mentioned that sometimes I will send over a copy of the work so far, and sometimes I’ll go as far as to turn the Word document into a PDF so it can’t be altered between me and the supervisor. But will the tracked changes still show up?

Proof that tracked changes still show on the PDF

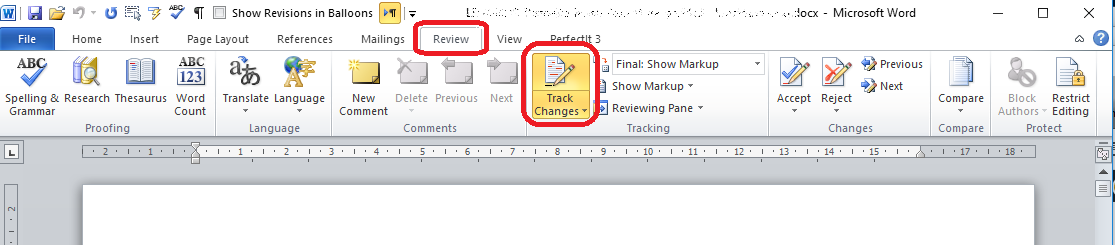
So here’s my Word document, complete with tracked changes (make sure these are showing):

A word document with tracked changes

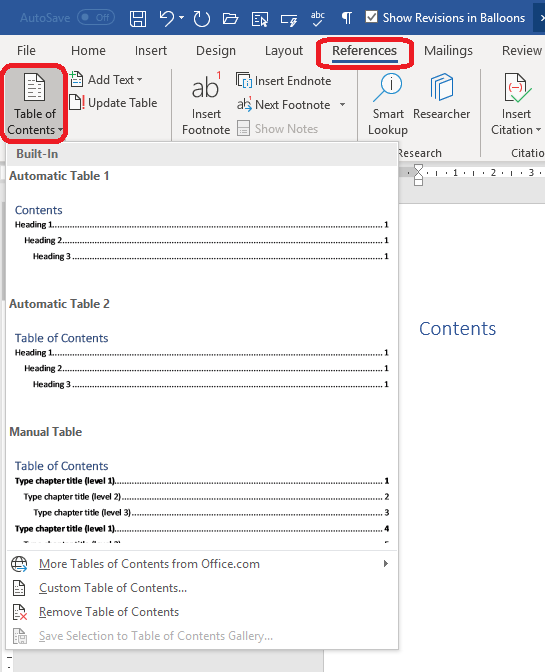
Just a reminder that in the newer versions of Word you can save to a PDF automatically without having to go through third-party software. Choose File – Save As then drop the file type down to choose PDF:

Save Word as PDF

Then when you open it in your PDF reader (I use PDF-XChange Viewer), there are all the tracked changes!

Tracked changes showing in PDF

So, if you want to preserve your tracked changes so they can’t be, um, well, changed, printing to PDF will give you an image of them you can share.

I hope you’ve found this useful – do click the Like or Share buttons or comment if I’ve helped you out!

Please note: these tips work for Microsoft Word version 2007 and upwards. They are not guaranteed or tested for Word for Mac.

Other track changes articles on this website

Track changes 1 – why use it, where can you find it, what can you do with it?

Track changes 2 – customising Track Changes

Track changes 3 – working with a document with tracked changes

How do I accept one reviewer’s changes?

Why are my tracked changes changing colour?

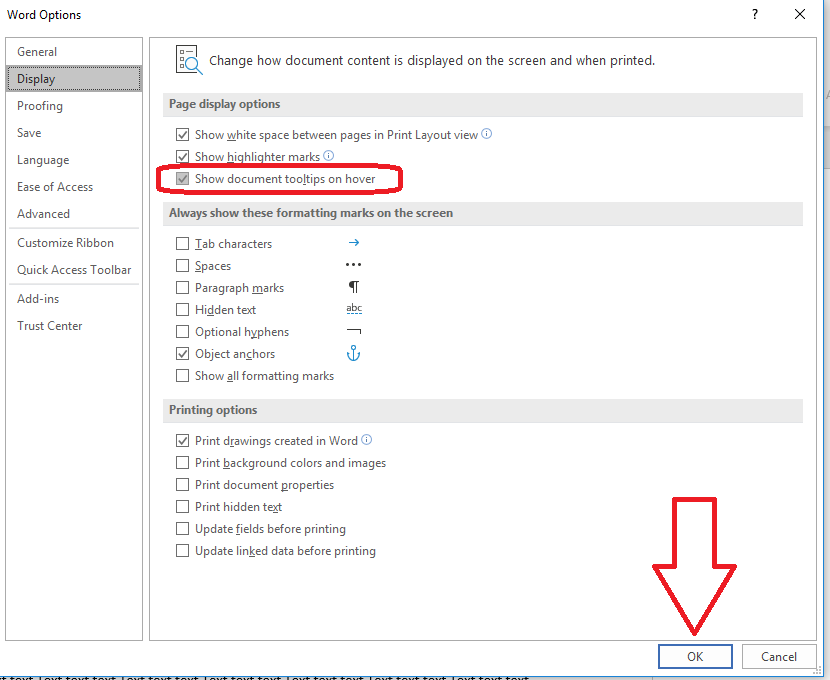
How do I get rid of tool tips on tracked changes?

 
Leave a comment

Posted by on July 24, 2019 in Copyediting, proofreading, Skillset, Word


Tags: , , , , , , ,

How to customise your contents page in Word

It’s Word Tips time again and today we’re going to talk about customising your contents page.

Why do people customise their contents page?

Sometimes you have lots and lots of sub-headings in a document but you only want to show the main or main and sub-headings on the contents page, not every tiny sub-sub-heading.

In addition, you might want to change the style of your contents page or its individual font and layout. Here’s how to do it, with a worked example of changing the levels that are shown.

Reminder: how do I insert a contents page?

Here’s our document, with headings at H1, H2 and H3 level. I’ve marked these up with their heading levels already (see here for how to assign heading levels).

If we just follow the usual process for inserting a table of contents, we will create a blank page before this one, then go to the References tab and choose Table of Contents, then click on one of the automatic options that come up.

This is the result: a table of contents that includes all the headings in our original text:

How do I select which heading levels appear in my Table of Contents?

If you want to ignore all headings below level 2 (1.1, 1.2) then you need to customise the table of contents.

As before, select the References tab and the Table of Contents button. However, now click on Custom Table of Contents

This will give you this dialogue box:

There are lots of different things you can do here. For example, you can choose to show or not show the page numbers in the table of contents, and whether or not to align them. The preview panes at the top will show you the results before you click OK.

Options allows you to choose the style for the table of contents from a set of heading styles, and Modify then Modify again allows you to completely customise the appearance of the table of contents text permanently, with underlining, different fonts, etc.

At the moment, we’re concerned with eliminating the level 3 headings from the table of contents.Click on the arrows by Show levels to adjust how many levels are displayed:

And click OK. Here we have changed the number of levels to 2, and the result is this:

Even though the text still has the same headings and levels it had before, the table of contents now just includes those headings down to Level 2

This is part of my series on how to avoid time-consuming “short cuts” and use Word in the right way to maximise your time and improve the look of your documents. Find all the short cuts here … Please note that these tips are for Word 2010 and later for Microsoft. I can’t guarantee or check they will work in Mac versions of Word.

Do let me know if this has helped you – and do share with the buttons at the bottom of this article.

Related articles on this website

How to use headings styles – make your headings clear and consistent

How to set up numbered headings – ones that automatically update themselves!

How to create a Table of Contents – read the posts on Headings first

Table of Figures and Table of Tables – how to create these tricky ones

How do I add or remove auto-captions?

Two-line caption, one-line entry in the Table of Figures: how?

How to update Tables of Contents, Figures and Tables

Tables of Contents for editors – helping the editing process run smoothly


Tags: , , , ,

Track changes – how do I get rid of the text box that appears when I hover over words in a Word document?

How do you get rid of document tooltips? How do you stop the little text boxes appearing when you hover over deleted or added words in Word. I had a query about this in a comment and thought that it warranted some screen shots and instructions.

What’s the problem here? What do you mean by these text boxes?

When you’ve worked with Track Changes enabled in Word, as well as showing you what your editor or collaborator has deleted or inserted into the text in red and with bubbles in the margin, you also get text boxes when you hover over the change. Here’s what that looks like:

Some people get annoyed by this, so here’s how to turn it off.

How do I turn off document tooltips aka those little text boxes that show me what I’ve deleted?

This process works for Word 2010 and later versions:

Click File on the far left of the tabs and then Options:

Once in Options, choose Display:

The Display dialogue box has an option to Show document tooltips on hover. Untick this by clicking in the square, then choose OK.

Now you won’t see those boxes in the document.

However, it does NOT turn off the useful tooltips in the rest of Word – so if you hover over any of the items on the Ribbon, you will still see the usual tooltips there.

If you’re using Word 2007, click the round button in the top left corner, choose Word Options at the very bottom of the dialogue box, then as above, select Display and untick Show document tooptips on hover.

Please note: these tips work for Microsoft Word version 2007 and upwards. They are not guaranteed or tested for Word for Mac.

Other track changes articles on this website

Track changes 1 – why use it, where can you find it, what can you do with it?

Track changes 2 – customising Track Changes

Track changes 3 – working with a document with tracked changes

How do I accept one reviewer’s changes?

Why are my tracked changes changing colour?

 
3 Comments

Posted by on February 13, 2019 in Copyediting, proofreading, Skillset, Word


Tags: , , , , , ,

How do I know when Track Changes is turned on? Word 2007, 2010, 2013 and 2016

This article quickly explains how you know when track changes is turned on.

Do also read these articles to find out more about track changes: what Track Changes is, why we use it and where to find it, and how to customise Track Changes to suit our own preferences and learned how to work with a document that has Tracked Changes.

We turn on track changes to make sure that whoever else is using the document can see what changes (additions, deletions, moving text) we have made in the text. If you are working with an editor, they will typically turn track changes on so you can see what they have suggested. When my clients send me back amendments to a text they’re working on, I ask them to turn track changes on so I can see easily what they have done to the document.

How do I know when track changes is turned on in Word 2007 and Word 2010?

Word 2007 and Word 2010 look a bit different from later versions.

When track changes is turned on, you will see the button highlighted in orange:

This means that every change you make will be displayed in Word and other people will be able to see them if they have the correct view in their version of Word.

If the button is white, like the rest of the area, track changes it not turned on.

How do I know when track changes is turned on in Word 2013 and Word 2016?

Word 2013 and Word 2017 look different and the highlighting is more difficult to see, in my opinion.

When track changes is turned on, you will see the button highlighted in blue-grey:

This means that every change you make to the document will be displayed in Word and other people will be able to see them if they have the correct view in their version of Word.

When track changes is off, the button will be white, like the rest of the area.

If you want highlighting to be in a different colour, you will need to change the theme, and that’s for another article!


This article has taught you how to check whether you have track changes turned on in your Word document. See the links below for more track changes articles.

If you have found this article useful, please share or “like” it using the buttons below, or leave me a comment to tell me what you think. Thank you!

This is part of my series on how to avoid time-consuming “short cuts” and use Word in the right way to maximise your time and improve the look of your documents.

Please note, these hints work with versions of Microsoft Word currently in use – Word 2007, 2010, 2013 and 2016 all for PC. Mac compatible versions of Word should have similar options. Always save a copy of your document before manipulating it. I bear no responsibility for any pickles you might get yourself into!

Relevant articles on this website

Track changes 1 – why use it, where can you find it, what can you do with it?

Track changes 2 – customising Track Changes

Track changes 3 – working with a document with tracked changes

How do I accept one reviewer’s changes?

Why are my tracked changes changing colour?


Tags: , , , , , , ,

How do I move text using my Navigation pane in Word? How do I reorder the headings?

If you have set up Headings styles in your Word document, you can use the Navigation pane to move sections around the document without having to use cut-and-paste and endless scrolling. This article tells you how.


Note that this only works if you have applied headings styles to your document, i.e. marked your headings as Heading 1, Heading 2, etc. (see information on how to do this here).

How do I access the Navigation pane?

Please see this article with screen shots if you need help viewing the Navigation pane:

Press Control-F

or

View tab, tick the box next to Navigation Pane Show

How do I use the Navigation pane to move text?

You can use the Navigation pane to move all of the text under one heading. If you choose a heading with sub-headings, all of the text in the sub-headed sections will also move.

First, click on the heading for the text you want to move:

You can see that you will navigate to that heading in the document itself.

Then keep left mouse button clicked down and drag the heading up or down the list of headings (it will scroll automatically if you reach the top or bottom). A black line will appear at the insertion point:

When you’ve got the heading where you want it, let go of the mouse button to drop it into position. The whole of the text under that heading (including the text under any sub-headings) will have now moved:


This article has taught you how to move text under headings using the Navigation pane in Word. I hope you’ve found this article useful. Do please add a comment or use the sharing buttons below if you have found it useful or interesting. Thank you!

Other useful articles on this blog

Applying Heading Styles

How to Access the Navigation Pane

 
Leave a comment

Posted by on January 31, 2018 in Word, Writing


Tags: , , , ,

How do I view my Navigation pane in Word? How do I see the headings in a list?

If you have set Headings Styles in your Word document, you can view the headings in your document using the Navigation pane. This article tells you how.

Why do I need to look at the Navigation pane?

If you have a long document with lots of headings, it’s really useful to get a view, a bit like a Contents page, showing all your headings and sub-headings.

The Navigation pane also gives you a handy way to move sections of your document around without too much copy-pasting and scrolling. Watch out for instructions on that, coming soon!

Note that this only works if you have applied headings styles to your document, i.e. marked your headings as Heading 1, Heading 2, etc. (see information on how to do this here). If you haven’t applied headings styles, Word can’t know what’s a heading and what’s normal text, so won’t be able to display your headings in the Navigation pane.

How do I access the Navigation pane?

Initially, your document will look like this: just the text on a page:

There are two ways to access the Navigation pane:

1. Press the Control and F keys at the same time.

2. Go to the View tab and tick the box next to Navigation Pane Show

In both cases, if you have headings set up in your document, you will now see the Navigation pane on the left-hand side of your screen:

You can see here that you have the top-level headings and sub-headings showing in your Navigation pane.

Make sure you are in headings view by checking the tabs at the top. You should be on the left-hand one:

How do I use the Navigation pane?

You can click on any heading in the Navigation pane to move directly to that heading in the document. For example, clicking on the “All about Twitter” heading in my Navigation pane will take me to that heading:

You can also use the Navigation pane to move chunks of text around, but I’ll talk about that in another article.

How do I close the Navigation pane?

You can close the Navigation pane using the x in the top right corner of the pane, or by unticking Navigation pane show.


This article has explained what the Navigation pane is, why you might find it useful and how to use it to view your document headings.

I hope you’ve found this article useful. Do please add a comment or use the sharing buttons below if you have found it useful or interesting. Thank you!

Other useful articles on this blog

Applying Heading Styles

 
5 Comments

Posted by on January 17, 2018 in Word, Writing


Tags: , , , ,

More Control Key keyboard shortcuts Ctrl-J and more

hands typing I have previously written about the wonders of Control-F and how this keyboard shortcut  finds text in almost everything (Word, Excel, PowerPoint, web pages, WordPress back-end, etc., etc., etc). Then I discussed other Control- or Ctrl+ keyboard shortcuts that you can use to copy and paste, embolden, italicise and underline, find, goto and replace, undo, redo and open, new, print and save. But I’ve recently had some questions about the remaining Control Key commands, so let’s round up what they do.

Why do we use keyboard shortcuts?

Keyboard shortcuts are used to save wear and tear on the wrists, to interact with a computer in other ways than just using two hands and a mouse, to save time, and, maybe, to show off your amazing computer skills.

What are the rest of the keyboard shortcuts using the Control key, then?

Ctrl-D – open the Font dialogue box using Control Key + D

Ctrl-E – centres the text in which the cursor is situated (this acts a toggle, so will un-centre centred text)

Ctrl-J – makes the text in which the cursor is situated become fully justified (again, this is a toggle, so the text will return to left justification (in a left-to-right alphabet document) if it’s already fully justified)

Ctrl-K – opens the Hyperlink dialogue box – make sure you have the text that you want to create a link for highlighted before pressing Control + k

Ctrl-L – makes the text in which the cursor in situated become left-justified (a toggle, so if it’s already only left-justified, pressing this will return the text to its full justification)

Ctrl-M – increases the indent on the left (much like the Tab key)

Ctrl-Q – removes indenting, so if you haven’t got any, it will seem this doesn’t do anything

Ctrl-R – makes the text in which the cursor is located become right-justified (a toggle, so pressing this in text that is already right-justified will change it to left-justified)

Ctrl-T – moves just the bottom indent slider across one tab at a time to create a hanging indent

Ctrl-W – closes the document, giving you the option to save

———————

Did you know ALL of these shortcuts? They’ll save you some mouse clicks and some are a lot quicker and more useful than the other methods you can use to get the same results. Which are your favourites?

Related posts on this blog:

How to find text almost anywhere

Changing from lower case to upper case

Using the Control key shortcuts (the ones that aren’t here)

Find all of the short cuts here

 
5 Comments

Posted by on September 27, 2017 in Errors, New skills, Short cuts, Word, Writing


Tags: , , , , , , , ,

How to start a new line, paragraph or page or indent a paragraph in Word 2007, 2010, 2013 or 2016

How to start a new line, paragraph or page or indent a paragraph in Word 2007, 2010, 2013 or 2016

This is a quick reference round-up how to and how not to covering how to stat a new line, how to start a new paragraph, how to start a new page and how to indent a paragraph in Word for Windows.

I have covered all of these in detail in various longer articles which I’ll link to as we go along.

Why all the fuss? Why can’t I do it my way?

If you are formatting a document to be used by someone else, edited and changed or, especially, printed, it’s vital that you use the standard ways to lay out your document to prevent it getting into a mess or someone else having to reformat it (which could be expensive if you’re paying them). In addition, certain methods, especially using Enter to start a new line, can make your document messy as soon as you enter extra text before that line break (see the relevant article for details and examples).

How to start a new line in Word

Don’t use the space bar to move the cursor along until it finally gets to the next line

Do use a soft line return or a hard paragraph return:

  • Pressing the shift key and enter key at the same time at the end of your line will move the cursor to the next line without any paragraph breaks, spaces between the lines, etc. (this is very useful if you’re creating two-line captions)
  • Pressing the enter key at the end of your line will move the cursor to the start of the new line (this will give you a space between the two lines if you have your paragraphs set up like that

How to start a new paragraph in Word

Don’t use the space bar to move the cursor to a new line, then create a new line of spaces

Do use a hard paragraph return: hit the Enter key on your keyboard

How to put a space between paragraphs in Word

Don’t use the Enter key to add a line of white space

Do use the Line Space icon in your Home tab or the Paragraph menu to add a space after each paragraph

How to indent a paragraph in Word

Really don’t use the space key to line up the paragraphs

Don’t use the Tab key to indent the paragraph

Do either highlight the whole text and set the rulers at the top of the page OR set the Normal style to have an indent at the start of a paragraph

How to start a new page in Word

Don’t use the Enter key to move the cursor down to the next page

Do use the Enter and Control keys at the same time to force a page break


This article has summarised how to start a new line, paragraph and page and indent a paragraph correctly in Word.

Related articles in this blog

Line space icon

Paragraph menu

Indenting paragraphs

Page breaks


2 Comments

Posted by on April 19, 2017 in Errors, Word, Writing


Tags: , , , , , ,

Why are my tracked changes altering their colour when I save in Word 2010, 2013 and 2016

We’ve already learned what Track Changes is, why we use it and where to find it, and how to customise Track Changes to suit our own preferences and learned how to work with a document that has Tracked Changes.

This article explains what to do when your tracked changes alter their colour when you press the Save button. It’s weird, it can be annoying, and your initials might disappear, too, which can be confusing if more than one person is commenting on the text.

Screen shots are from Word 2013.

Has your track changes markup ever changed colour?

This has only happened to me when working with a document that has originated from someone else.

You have made lots of changes in a document, and they show up in red, as normal (or whatever colour you have set for your corrections), but when you save, yours go into blue and your initials disappear. This might also happen if you’re working on a document which already includes someone else’s tracked changes: yours show in a different colour to theirs until you press Save. Then they’re all blue (or whatever colour the first person’s were).

What is happening here?

The original owner of the document has specified that the personal information of whoever is working on the document will be removed when they Save the document.

How to check whether your personal information is being removed upon Saving the document

To check whether this is the reason for your tracked changes changing colour, follow these steps.

Go to File (the extreme left tab in Word) and Options:

word options for checking trust center

Clicking on Options will give you this Word Options menu; choose Trust Center:

accessing the trust center in word

Click on Trust Center and then go into Trust Center Settings by clicking the button at the bottom right:

Trust Center in word

Once in the Trust Center Settings, you need to go into Privacy Options (it will default to Macro Settings):

Privacy settings in trust center in word

…. and once you have accessed Privacy Options, you will see that Remove personal information from file properties on save is ticked, which means that when you save, all references to your name are removed from both track changes and the properties of the file itself:

remove personal identification on save in word

Now, at this point, this can be “unticked” so that your changes stay in your colour (in your own view, only, of course) and with your initials (everywhere). But do stop to think: did the person who created the document do this on purpose? It’s quite a lot of clicks to make by accident, so I do tend to check this, see why it’s happening and then leave it as it is. I might change it so I can see my own changes then make a note to change it back before my final save, but in general, I leave it.

Why might someone choose to remove personal information in a document?

I’m not entirely sure that I have an answer to this. Maybe they have edited the document and don’t want their end client to be confused by lots of different names on the file. Maybe they’re a student who wants to make sure no one else’s name is on the file. I do tend to assume they have a reason, and respect that.

But this is how and why the tracked changes colour sometimes changes when you save your document.


This article has taught you how to work with a document that has been marked up using Track Changes where the colour of the track changes alters. You can read more about what Track Changes is and why we use it, how to work with a document including tracked changes and how to customise Track Changes.

If you have found this article useful, please share or “like” it using the buttons below, or leave me a comment to tell me what you think. Thank you!

This is part of my series on how to avoid time-consuming “short cuts” and use Word in the right way to maximise your time and improve the look of your documents.

Please note, these hints work with versions of Microsoft Word currently in use – Word 2010, 2013 and 2016 all for PC. Mac compatible versions of Word should have similar options. Always save a copy of your document before manipulating it. I bear no responsibility for any pickles you might get yourself into!

Relevant articles on this website

Track changes 1 – why use it, where can you find it, what can you do with it?

Track changes 2 – customising Track Changes

Track changes 3 – working with a document with tracked changes

How do I accept one reviewer’s changes?


9 Comments

Posted by on October 5, 2016 in Copyediting, Errors, New skills, Short cuts, Word, Writing


Tags: , , , ,

Checking your grammar and writing style using Word 2007, 2010, 2013, 2016

As well as checking your spelling, Word can check your grammar. This is an automated option, so it’s not for everyone, and can be a bit of a blunt instrument, but if you know you have a weakness in a particular area, it can be really helpful.

Why does Word check grammar?

One of the options Word offers is to check your spelling for you, and lots of people are familiar with that option. However, you can also ask Word to check your grammar. Here’s how.

How do I tell Word what grammar options to check?

We can set up different options for the Grammar checker to check in the Options menu:

1 options

Once you are in the Options menus, choose Proofing:

2 proofing

The Proofing menu is quite long, so look half-way down to the section When correcting spelling and grammar in Word and then, to get the options, click the Settings button:

3 style settings

What grammar and style issues can Word check for me?

And now you can see the whole range of options that Word can check for you:

At the top of the list, you can ask Word to make sure that you include or don’t allow Oxford Commas, put the punctuation inside or outside quotations (American or British style, vaguely) or make sure there are one (now preferred) or two (now not preferred) spaces after a full stop:

word grammar checker

Each of those don’t check dropdowns offers the relevant options, for example, for the punctuation one:

word grammar punctuation quotes

Moving down the list, we then have the Grammar options that you can ask Word to check. Do remember that this is a program and thus it will highlight every instance, even if you know the rules and you’re trying to be creative, but it can be useful for catching things:

word grammar check

If you have Grammar only clicked, these will all automatically be ticked, and you can untick individual ones if you want to (note that it won’t check anything until you ask it to – see the next section).

Word will also check style issues; you can ask it to check everything in your Grammar & Style automatically by changing the top box to using the drop-down arrow to the right, or you can leave it on Grammar Only and tick just the areas you want Word to check:

word check grammar and style

In terms of style, here are the options Word can look out for and alert you to (again, remembering that this is only what it’s been told are clichés, etc.):

4-style-1… and scrolling down:

word check grammar and style

Once you’ve decided what you want Word to check in your grammar and style, press the OK button.

How do I ask Word to check my grammar (and style)?

In order for Word to check which areas you have asked it to check, make sure that Check grammar with spelling is ticked:

5.5 checkingClick OK until you are back at the original screen.

Back in your Word document, Word will highlight in GREEN (as opposed to the red that it uses for spelling issues) any grammar mistakes it thinks you’ve made. Here’s an example where it has checked for gender-related language:

6 checking

This article has described how to ask Word 2007, 2010, 2013 or 2016 to check the grammar and style in your documents.

If you have found this article useful, please share using one of the buttons below. I always welcome comments, too!

Related posts on this blog

Medalling, podiuming and singular they

Asking Word to check for gender-specific language

Using Spell Check in Word 2013

 
8 Comments

Posted by on September 14, 2016 in Word, Writing


Tags: , , , ,