RSS

Monthly Archives: August 2014

How do I stop pictures jumping around when I edit a Word document? Combining words and pictures 2

More from my own editor, Catherine Fitzsimons, creator of educational materials and community magazines, on the tricky task of controlling how images behave in Word documents …

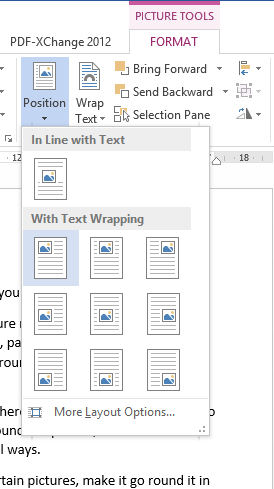
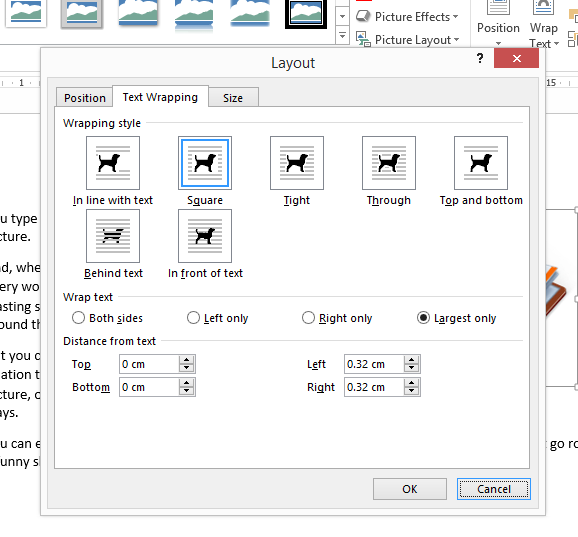
Last week, we looked at the ways in which Word can wrap text around pictures. To control how close the text is to the edge of a picture we opened the More Layout Options window from the right click menu. You may have noticed there are two other tabs in this:

Diagram 9One lets you control the size of your picture, but there are easier ways to do that (see How do I change the size of pictures in Word? on my website). The other, Position, provides some detailed options for controlling where your pictures go and is the key to stopping them from jumping around. It looks complicated, but I don’t think I’ve ever, in years of creating worksheets and doing magazine layout, had to resort to changing anything in the sections labelled ‘Horizontal’ and ‘Vertical’ – I’ve just used the ‘Options’ section.

Diagram 11
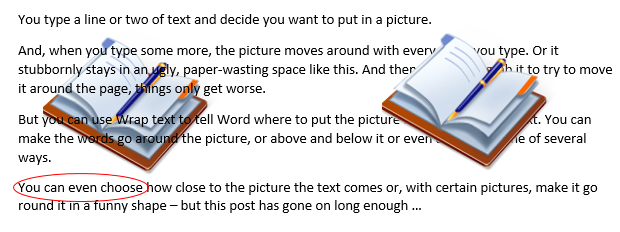
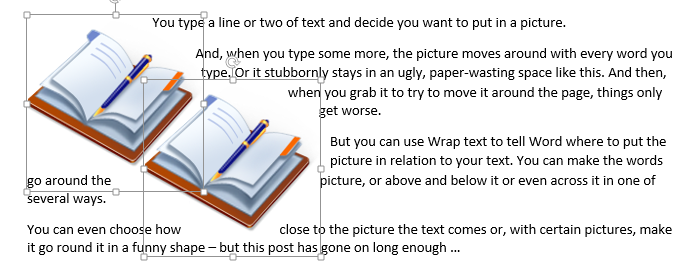
Before we go on to that though have a look at the ‘Allow overlap’ button. This is useful if you want to get two pictures closer together than their boundary boxes would otherwise allow. For example, here you can see that although the books themselves don’t overlap, the boxes round them do. Notice also how the Tight-wrapped text goes inside the boxes because these images have a transparent background.

Diagram 12

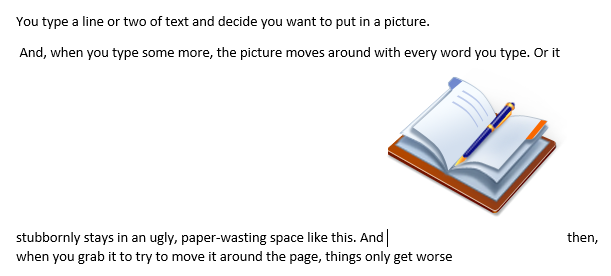
Why do pictures move? How do I stop pictures moving?

Basically, pictures can either be locked in position on the page or moved around with the text.

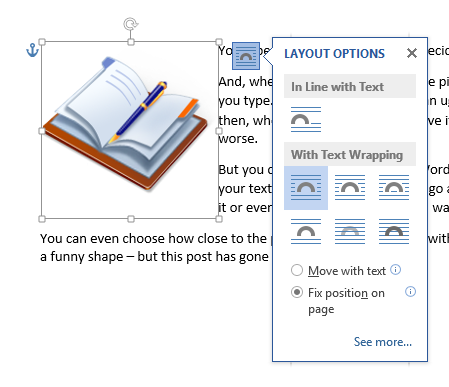
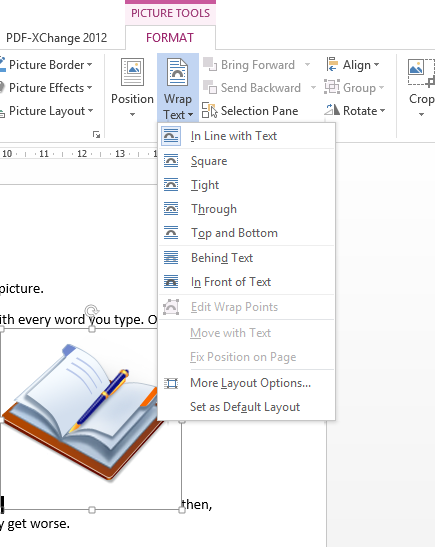
In Word 2013 ‘Move with text’ and ‘Fix position on page’ appear as options on the Wrap Text menu and on the little pop out Layout Options menu (so long as your picture isn’t in line with the text).

Diagram 5Diagram 4bIn earlier versions you have to go into More Layout Options|Position and check or uncheck ‘Move object with text’ – it’s checked as default. If you have a picture exactly where you want it on a page, all you have to do is uncheck the box (or make the appropriate selection from one of the menus in Word 2013). That picture will then stay exactly where it is when you edit or add to the text or insert another picture – it will move only if you grab it and place it somewhere else yourself (or play with the numbers in the ‘Position’ tab of More Layout Options).

Allowing pictures to move with text is a little more complicated and depends on understanding the idea of anchors.

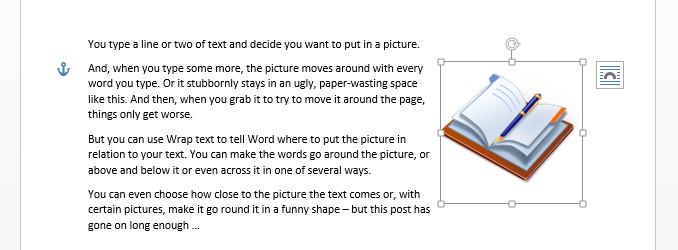
When you whizz a picture around the page, Word makes a decision about what text to tie it to: it generates an ‘anchor’, usually at the beginning of the paragraph nearest to the top left corner of the figure (working up). If you then move or delete that bit of text, the image will move or be deleted with it — that’s why pictures sometimes vanish unexpectedly. They usually jump because an anchor and its picture have to be on the same page. That means that if you type an extra paragraph and the anchor moves to a new page, the picture will jump to that new page too. It’s Word trying to be helpful, aiming to keep pictures and the writing about them together, but it does feel pretty random if you don’t know the logic.

Word 2013 helpfully shows you the anchors whenever you’re clicked on a picture, but it is possible to see them in earlier versions: since they are formatting marks, they will show up if you click the symbol that looks like a backwards P in the Paragraph group on the Home ribbon. If you can see them, they can help you work out why a picture won’t go where you want it or keeps disappearing altogether.

Diagram 13

In Word 2010 or 2007 you can also get the anchor marks to show all the time (without the other formatting marks) by going to File (Office button in 2007)|Options|Display|Always show these formatting marks on the screen, then ticking ‘Object anchors’ and OK.

Once you get the hang of how the wrapping styles and the anchors affect where the pictures go, it becomes much easier to put a picture in the right place and make it stay there. Here’s the order I suggest for creating a document that has words and pictures:

  • Write and type all the text first (or work a page or two at a time).
  • If possible, get the pictures as close as you can to how you want them (size, resolution, cropping, colours) before you add them to your text – either use image editing software or get it right in a blank document then copy and paste into the one you’re working on.
  • Once you have a picture where you want it, with the right sort of size and wrapping, consider locking it in place.
  • If a picture that has to stay with the text appears to be misbehaving, go in search of its anchor to track down the problem.

Still can’t get the pictures where you want?

If you’re creating something with a lot of images, or need more complex layout — such as for a brochure or worksheet — then there are alternatives to putting the text and pictures straight into the document. I explain how to use a table to combine text and pictures in How do I organise a lot of pictures on a page? over on my own blog where, in future posts, I will look at alternative solutions, and other issues to do with using pictures.

Other useful posts

On this blog:

How do I make pictures go where I want them to in Word?

On Catherine’s blog:

How do I organise a lot of pictures on a page?

How do I change the size of a picture in Word?

 
14 Comments

Posted by on August 27, 2014 in Short cuts, Word


Tags: , , , ,

How do I make pictures go where I want them to in Word? Combining Words and Pictures 1

Today and next week we have guest posts from Catherine Fitzsimons on placing images in Word documents. This is a tricky topic and one I’ve been wanting to write about for ages: Catherine does a lot of work with newsletters and other complex documents, which makes her the ideal person to write these posts for me!

How do I combine text and pictures?

Have you ever tried to put a picture in Word and found your text, which started at the top of the page, suddenly moves down? And then, as you type more, or change the size of the picture* to make it fit better, things move to unexpected places? Or the picture stays where it is, but leaves you lots of blank space on the page? Then, when you try to move it around, things only get worse and you end up with something like this:

Diagram 4

This is because Word assumes two things:

  • That you want the picture (or, to be precise, the bottom left of it) to be placed where the cursor is. That means it goes immediately after the last thing you typed before choosing Insert|Picture and, when you try to move it, you can see a vertical line where it believes you want it to go.
  • That you would like the text to run right up to the picture and carry on straight after it.

In other words Word treats your picture like an outsize character and refers to this option as having the picture ‘In Line with Text’.

However, you can change your picture to what is known as a ‘floating figure’ so you can put it where you like but, before we delve into all that, have a look at a handy shortcut in the ribbon versions of Word. If you select your picture, go to the Picture Tools|Format ribbon that appears and click the down arrow by Position, you will get a choice of nine places to place your picture without any fiddling around at all.

Diagram 4a

In fact, in Word 2013 some of these appear in a little pop-up menu that you can call up by clicking the thing that looks like a rainbow drawn on lined paper which hovers at the top right of a picture when you select it.

Diagram 4b

All wonderful, but what if you need more flexibility? Read on.

Once again, select the picture and go to the Picture Tools|Format ribbon but this time click the down arrow by Wrap Text. (Alternatively, or in older versions of Word, right click on the picture and choose Wrap Text from the menu that appears.)

Diagram 5

Doing that brings up another menu which lets you choose the relationship between your text and picture. The icons helpfully explain the options:

Square means that the text will wrap all the way around your picture (strictly speaking around the ‘bounding box’ – the rectangle that appears when you select it). When you move the picture around the page the text flows above, below and to the sides – or one side if you put your picture up against a margin. Notice, though, that it doesn’t make text down the sides into columns – it reads across the picture. (If you want your picture in the middle of a page like this, it’s probably best to make your text into two columns first.)

Diagram 6

Top and Bottom does exactly that. It looks just the same as if you had typed Enter before and after inserting your picture but with the important difference that the picture moves as an object, not a character, so it’s easy to place it somewhere new.

Tight only works with images which are not rectangular or, like some clip-art, have a transparent background. It wraps the text around the edges of the image (assuming these ‘wrap points’ have been defined) rather than around the bounding box.

Diagram 7Through is a complicated one and I don’t know anyone who has used it. It works the same way as Tight except that it will also put words right down into any transparent sections of the picture that are linked to the background, again, providing that the wrap points have been set up properly.

Behind Text makes the words go over the top of your picture (which can work well so long as the image isn’t too detailed or too similar in colour to the font), whereas In Front of Text means that non-transparent parts of your image obliterate the words. Why might you want to do that? If you insert a an ellipse that has Shape Fill as ‘No Fill’ and Shape Outline red, and float it in front of text then you have a useful little shape for circling things you want to highlight.

Diagram 8You can refine Square, Tight and Through further in Picture Tools|Format|Wrap Text|More Layout Options. As you can see, you can tell Word to put text on one side of the picture only – Left, Right or whichever has the most space for text. This is also the window you use if you want to make your text squish up closer to your picture — if it already has a lot of white space around it for example — or back off a bit if the words run right to the edge of your picture. Unsurprisingly, you can also adjust the spacing above and below for Top and Bottom wrapping.

Diagram 9This version has text wrapped Tight to largest side only and the Distance from text adjusted to 0cm on Left and Right as well as top and bottom.

Diagram 10So, that’s the official way to put the pictures into the correct place in your document. And, more often than not, it works. However if you are adding more than one image, or later add a text box or table (anything that Word calls an ‘object’), or if you revise what you have written then pictures you’ve put in sometimes jump around or even disappear. You can minimise the chances of that happening by typing all your text before thinking about layout and images but, even then, it still sometimes happens. I’ll explain why, and suggest how to stop it next week.

*But how do I change the size of a picture? See How do I change the size of a picture in Word? on my own blog.

Catherine Fitzsimons has the unenviable job of being my own editor for my books on business and other careers topics. Ever since she first started using Word she has been finding ways of getting pictures and text to sit together exactly the way she wants: first as a teacher making worksheets then doing layout for community magazines.

Other useful posts

On this blog:

How do I stop pictures jumping around in a Word document?

On Catherine’s blog:

How do I organise a lot of pictures on a page?

How do I change the size of a picture in Word?

 
8 Comments

Posted by on August 20, 2014 in Short cuts, Word


Tags: , , , ,

Infographic – social media etiquette

Today I have a guest post with a difference – an infographic, for the first time on this blog. It’s from writer and infographic specialist Ivan Serrano, and talks about many different kinds of social media and how to interact with them. It acts as a complement to my more detailed social media posts.

What do you think? Should I have more infographics on this blog? Do comment below with any thoughts …

——————————————————————————-

“Have you seen what (insert important person or business here) posted on (insert social network here)?” seems to be a question that people hear quite often nowadays. Depending on how you word your message and conduct yourself on social media, it can go viral and your business can get brand recognition, or, on the flip side, it can go viral for all the wrong reasons.

That’s why it’s important for businesses to conduct themselves properly on social media. In addition to following general social media etiquette, certain social media networks have their own rules of etiquette as well. Businesses must remember that they have a reputation to consider—one inappropriate tweet or post could leave your reputation reeling, and that may take quite a while to recover from depending on how well you handle it. The infographic below gives you a guide on how to present yourself on the numerous social media networks.

social media etiquette infographic

Ivan Serrano is a writer and infographic specialist from Northern California. Ivan covers topics ranging from global business to tech and social media. He is an avid “Bay Area” sports fan and tries to attend as many games as possible.

 
7 Comments

Posted by on August 13, 2014 in Business, Social media


Tags: , , , , , , ,

How to leverage your social capital

handshakeHow to leverage your social capital, eh? What a lot of jargon! I thought you didn’t like jargon, Liz? – Well, I don’t, and that’s why I’m going to take a few minutes to explain what this little chunk of jargon means.

Social capital is a fancy term for the people you know and, to be blunt, the favours they owe you. You build it up through networking, doing things for other people, being a linking person, an information provider, a helpful person. You build it through knowing people, through having worked with people, through keeping in touch with people. Then, when you need it, something like karma springs into action, and the work you’ve put in comes back to you in bucketloads.

Now I’m sounding cynical as well as jargon-filled! Goodness me! Let’s break it down with some heavily disguised but based-on-reality examples, to show you that leveraging your social capital isn’t really the cynical and shallow procedure you might imagine, but a new way for an old process that is made easier to build and use through social media and our networked society.

Social capital gets leveraged, everyone goes away happy

Here are some examples of people leveraging their social capital to gain freelance jobs and repeat clients. Note that in NONE of these cases does Person A directly ask for something. Instead, the connections they’ve built up do it all for them.

Example 1: Person A, Bob, ‘meets’ Person B, John, online via a mutual interest group that’s applicable to the industry they’re both in. Bob is about to go full-time with his freelance career but doesn’t have many clients. John is a full-time freelancer of a few more years’ experience. He’s looking for people to recommend enquirers on to when he can’t fit them in. He’s also keen to get some holiday cover set up so he can go and play golf without worrying about his graphic design clients. They make friends and build trust – they even start to meet up to play golf together. When John gets yet another enquiry about leaflet design, it’s easy for him to recommend Bob. Bob worries sometimes that all of his jobs come through John’s recommendations, but soon he has his own string of client referrals because he does a good job. And when Bob goes on holiday, he passes John a big project that he hasn’t got time for – from a client originally recommended by John!

Who benefits: both of them. Bob gets new clients and builds his customer base. John has people he can refer clients on to and that all-important holiday cover.

Bonus social capital leverage: When Bob, now nice and busy himself, finds out that a friend he’s made at a networking event is looking for clients, not only can he recommend his own overflow to Tony, but he can advise John to, as well!

Example 2: Person A, Millie, used to work with Jeremy before they both left and went their separate ways. But they’ve kept in touch via Facebook and chat online every month or so. Jeremy moves between jobs and continents, so knows lots of people. When he hears from Simon, an ex-colleague in Australia that they’re looking for someone with the skillset Millie possesses, and that they don’t need someone on the spot, Jeremy puts Millie in touch with Simon, and they work on the project together.

Who benefits: both of them. Millie gets a job out of it, and Jeremy maintains contact with an ex-colleague and does them a favour, which could well be repaid in the future.

Example 3: Person A, Tim, meets person B, Shona, at a local networking event. They’re not in the same line of work at all, but they have a good chat and get on well. They say hello at a few other monthly events. One day, Tim is contacted by Sean, who wants to use him for a major new contract; he’s been recommended by Shona, even though she has no direct experience of his work (of course, Sean has checked out Tim’s website and references before contacting him). Not only does Tim get the job, but Sean recommends him on his website and to other clients of his.

Who benefits: In this case, it looks like it’s mainly Tim, however, he is so grateful to Shona that he goes out of his way to retweet and share messages Shona sends out on social media, and to introduce her to useful people at the networking events they attend.

How to build social capital

So, how do you build this social capital? Note that it’s not social MEDIA capital, although social media makes it easier to do. But you can build social capital through networking and more old-fashioned face-to-face contact, too. In both Examples 2 and 3, the initial contact was in person, and social media only comes into play to make the contacts between the people who want the work doing and lucky old Person A.

Building social capital shouldn’t be a cynical process, but a natural one that involves making a bit of effort. Ways you can increase your social capital include:

  • Getting out there – the more people you meet, the more people can help you
  • Telling people what you’re looking for – whether it’s announcing to your Facebook friends that your violin-making business is looking for commissions or joining a networking group and explaining what services or products you’re promoting
  • Making yourself memorable – whether you’re the “good hair lady” (true example) or the person who always brings cakes to the meetup, make yourself memorable in a good way
  • Making yourself easy to explain – this comes down to your elevator pitch. Do people know you as “the man who makes violins on commission” or “that music chap”? The more precise your description, the more likely you are to have people sent your way who you can actually work with
  • Being gracious – if someone is introduced to you who you can’t help (or with whom you’re not interested in working), see if you can recommend them on, or have a chat anyway. You need to leave a positive impression on everyone you meet if you possibly can
  • Do things for other people – this should go without saying, but I’m going to say it. More below on this one

It’s cynical to say that someone “owes you one”, and it can be far more complex than that, but it can’t be ignored: the more you help other people, the more they will help you in return. How can you do things for other people?

  • If they’re in the same business as you, see if you can pass overflow work to them
  • If they’re in a closely related business to you, mention them to your clients as someone who can help them – e.g. the violin maker might know a musicians’ agent who they can recommend to their clients
  • If they’re in a fairly different business to you, bear them in mind and mention them – e.g. the violin maker might be chatting to a musician and mention that he knows an event organiser who’s looking for entertainment for a summer party
  • If they’re in a completely different business to you, still bear them in mind and suggest them – e.g. the violin maker is chatting to a musician whose wife needs a web page to be designed
  • You could create a Links page on your website with links to known and trusted contacts in your field and others
  • You could put a poster for their event in your shop window or volunteer at an event they run
  • You could introduce a friend with a different kind of business to one of the networking events you go to
  • You could share tweets and Facebook posts by your contacts with your audience (you should be doing this anyway)
  • You could cross-guest-post on each other’s blogs

 What has worked for you?

Knowing and trusting people + getting out and about and meeting them face to face or online x helping people out yourself = increased social capital

Have you got good examples of your contacts creating opportunities for you with third parties? I’d love to hear about your successes and how they came about …

Further reading on this blog:

Reciprocity and social media

Networking and social media marketing

Networking for newbies

If you’ve enjoyed this post and found it useful, please comment below or use the sharing buttons to share it with your network. If you’re considering setting up a new business or have recently done so, why not take a look at my books, all available now, in print and e-book formats, from a variety of sources.


Leave a comment

Posted by on August 6, 2014 in Business, Social media


Tags: , ,

Happy fifth birthday, Libro!

Libro birthday cartoonI started working for myself (very much part time) in August 2009 – so now it’s Libro’s fifth birthday!

What am I doing to celebrate? Well …

I’m having a little party today over on the Libro Facebook page … including a draw to win a free Kiva loan

I’m making some loans to Kiva (see below) and donating one to someone else

I’m celebrating the relaunch of my two main business books, with their new titles and covers …

… And I’m launching my new website devoted entirely to the books I write, where people can find info, links, reviews and news in one place

I hope you’ll join me in celebrating Libro’s birthday by popping over to say hello on the Facebook page or by doing a Kiva loan yourselves.

Happy Birthday to me!

Quick update: the Kiva competition in now CLOSED. Alison Mead won the free loan and was sent a voucher. I started new loans to a man selling spare parts in Benin, a travelling salesman in Paraguay and a food stall in Bolivia. These were all people who friends of mine had already lent to.

Kiva is an organisation that facilitates loans to small businesses around the world, who traditionally find it hard to raise capital. You commit from $25 upwards, and you can choose by gender, country, industry sector and individuals within those areas. They then pay the loan back to you in small increments – you get an update email on repayments once a month and sometimes updates on the individual or group you’ve loaned to, if the organisation handling the loan provides them. Once the money’s paid back, you can reinvest it or withdraw it if you want to. I love helping people to help themselves in this way; it feels like I’m helping to make a difference to another small business somewhere far away from me.

 
19 Comments

Posted by on August 1, 2014 in Business, Celebration, Ebooks


Tags: , ,