RSS

Monthly Archives: November 2013

Register office or registry office?

If you have anything whatsoever to do with yourself or anyone else getting married in the standard, official, council-run place, you will have been driven mad by the register office / registry office thing. Right? “It’s register office!”, you may or may not have bellowed, several times.

Well, when putting this post together, I, naturally, consulted the dictionary. And the dictionary backed me up in terms of register office: A register office, in the UK, is the place where births, marriages and deaths are recorded and civil marriage ceremonies are conducted. Phew.

However, it does allow that registry office is the “form which dominates” in informal use. Nooo! A registry is also the place where registers are kept, and it’s the noun formed from registration. So if you have a gift register, it will be kept in the gift registry.

But I’m sticking to the formal, official usage. An example, of course: “We’re getting married at the register office in April 2014. We won’t be placing a wedding list in any gift registry, as we have all that we need for the house, having been together for 12 years”.

You can find more troublesome pairs here and the index to them all so far is here.

 
11 Comments

Posted by on November 29, 2013 in Errors, Language use, Troublesome pairs, Writing


Tags: , , ,

What is Storify and how do I use it?

Storify logoIn response to a request for information*, today I’m going to be talking about Storify: what is it, why would you use it, and how do you use it? I wasn’t already a user, so this post takes you through the stages of logging in and creating your first story through screenshots created as I did it for the first time myself!

What is Storify?

Storify is a social media tool that lets you create stories or timelines from a variety of social media resources like Facebook and Twitter, as well as other web resources. You can use it to pull together information on whatever you want, and can customise it how you want, then share your story on the site with your friends on those social media sites.

Why use Storify?

I’ve mainly come into contact with Storify in relation to events. For example, Karen Strunks pulls together a Storify after every Social Media Cafe in Birmingham. She gathers any Tweets and Facebook posts which have used the hashtag #bsms and creates a storyline showing the event through its before, during and after stages, and what people were saying about it. Here’s an example of one of her Storify stories.

So you can see that it’s a great way to pull together information and images and make a story that you can share with others. It’s useful for events, news on particular topics, or fundraising and awareness raising campaigns. You don’t have to base it around hashtags (a hashtag is a short code with a # in front of it that creates a searchable link in Twitter and Facebook, etc., which allows you to find all of the tweets on a particular topic. For example, even if you’re not a member of Twitter, searching for the hashtag #amwriting, used by authors, will give you these results, all containing the hashtag (example)).

How do I join Storify?

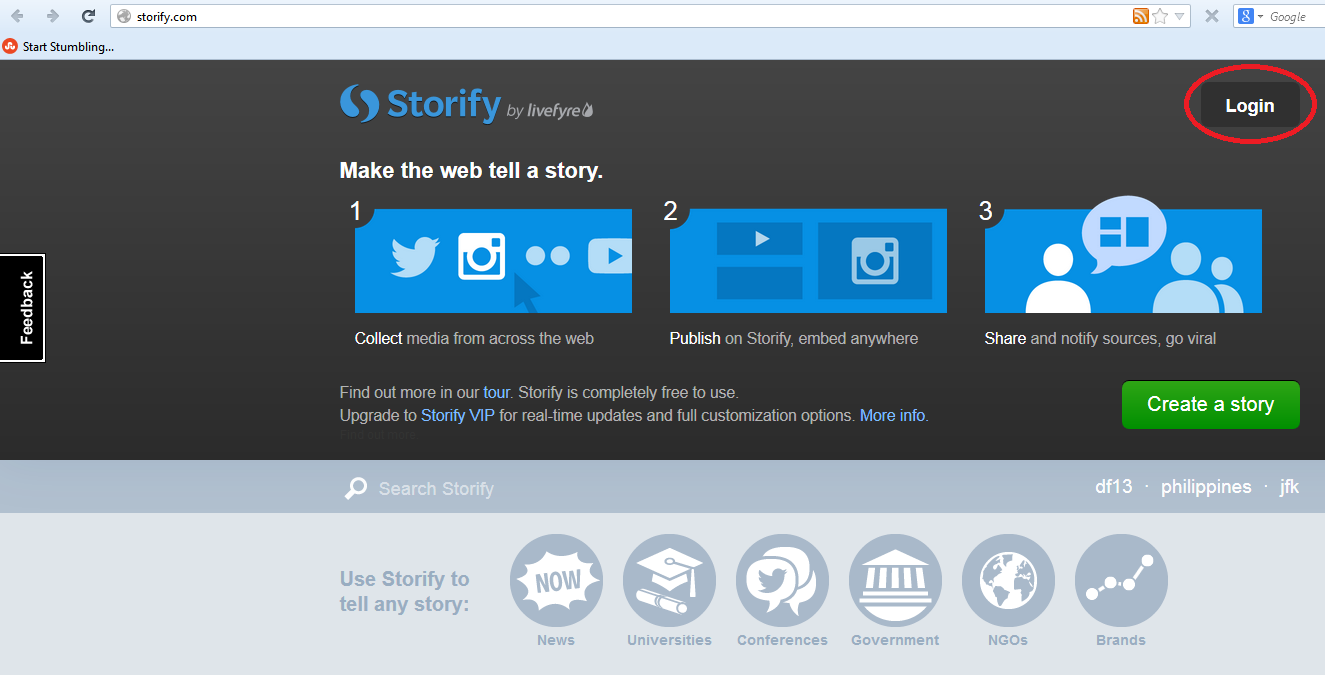
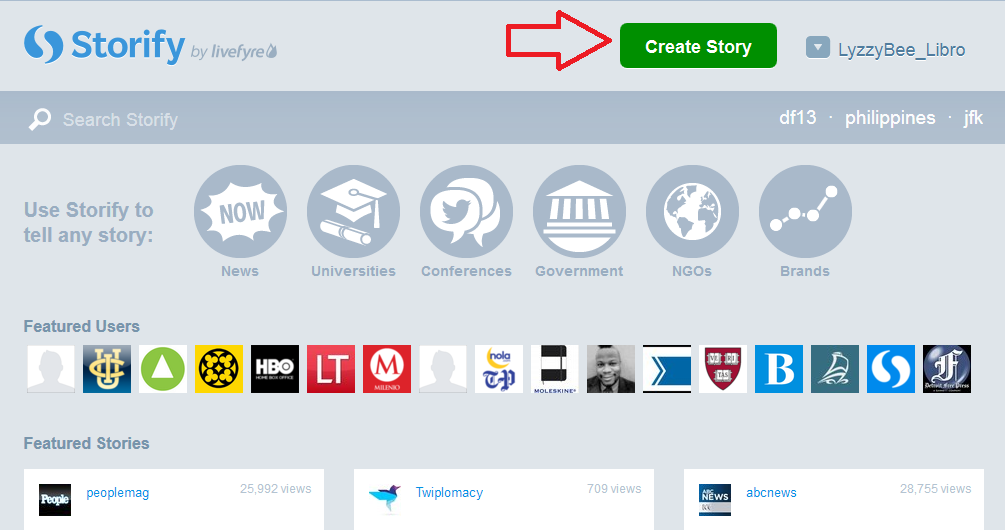
If you’re not already a member, you need to go to www.storify.com and sign up. If you don’t already have an account, you need to click the Login button at the top right:

Storify home page

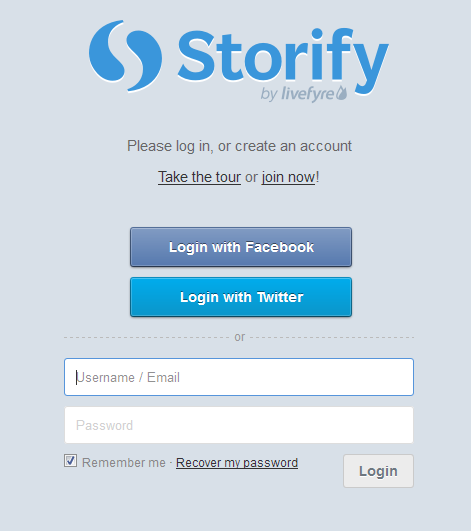
You will be given the option to log in using Twitter or Facebook. Actually, you will still need to create a password and account with Storify: what this does is associate your Storify account with your social media account. You can also just create a username and password.

2 login

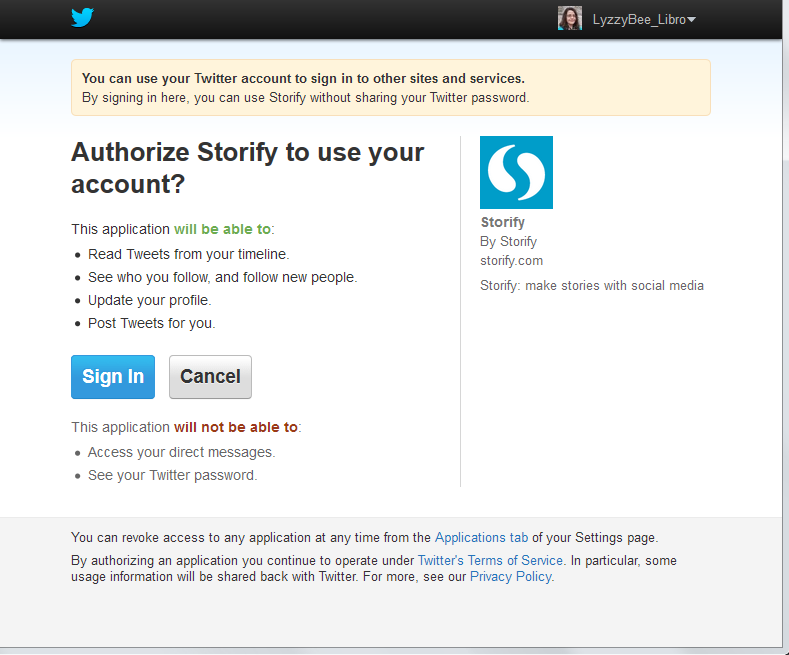
I chose to sign up using my Twitter account, as that’s what I use most for business and sharing. As it says, it only connects to your Twitter account and uses its authentication, it doesn’t see your password etc. And when it says it will Tweet for you, that’s only when you create a story, not randomly!

3 Twitter login

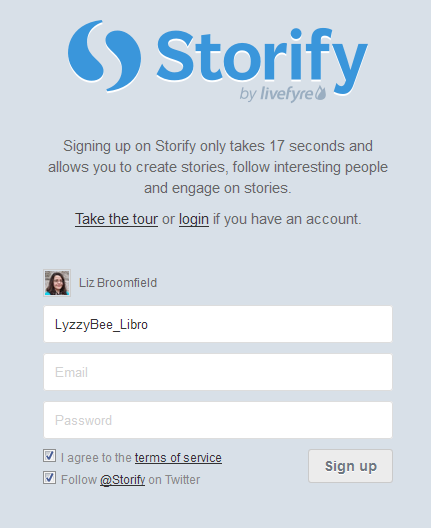
So I told it my Twitter username then added my email address and a password:

4 sign up

And that was it, I was ready to create my first story!

How do you create a Storify story?

Once you’ve created your account, you’re ready to create a story. There’s a big green button on the top row of the website, Create Story. Click that …

5 create

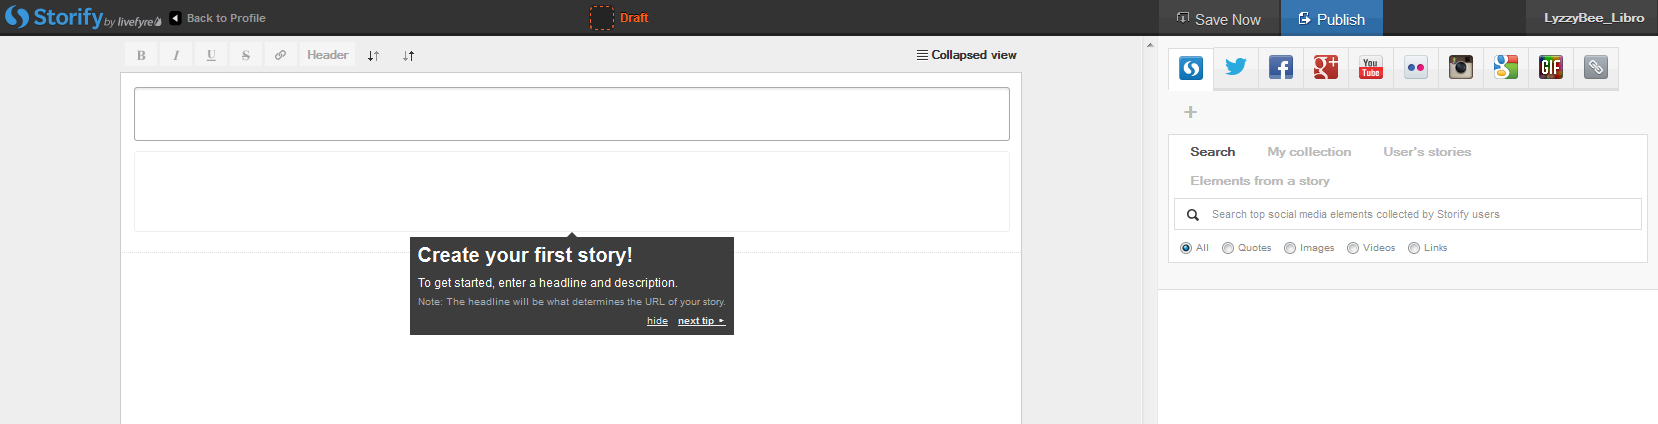
… and you’re taken to a slightly alarming page – alarming because it manages to look both blank and complicated! But look: little tips come up the first time you use it which guide you through what to do!

Basically you’ve got an area where you create your story on the left and a place to search for content on the right.

The first thing to do is create a name for your story. You can also press the Save Now button at this stage, which will prompt it to autosave as you go along.

6 create

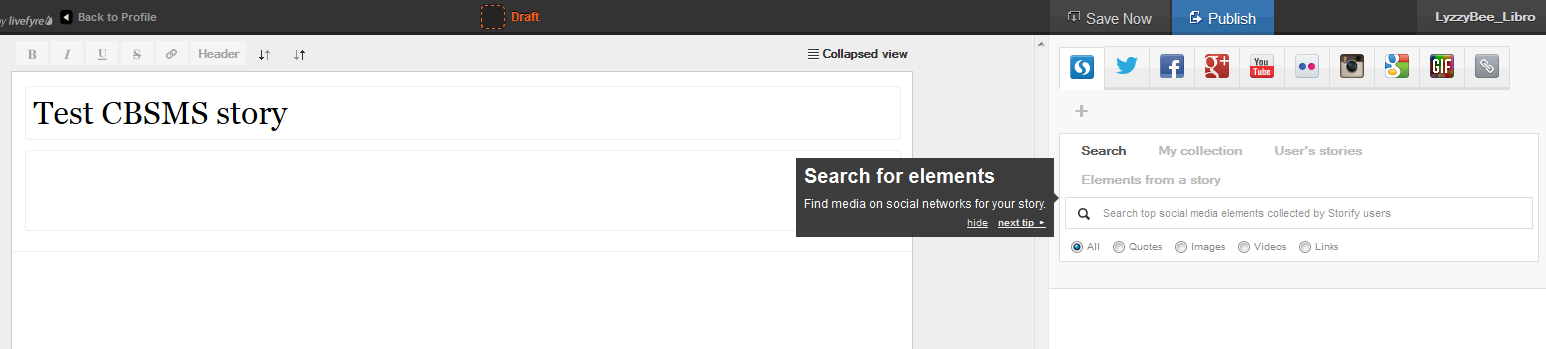
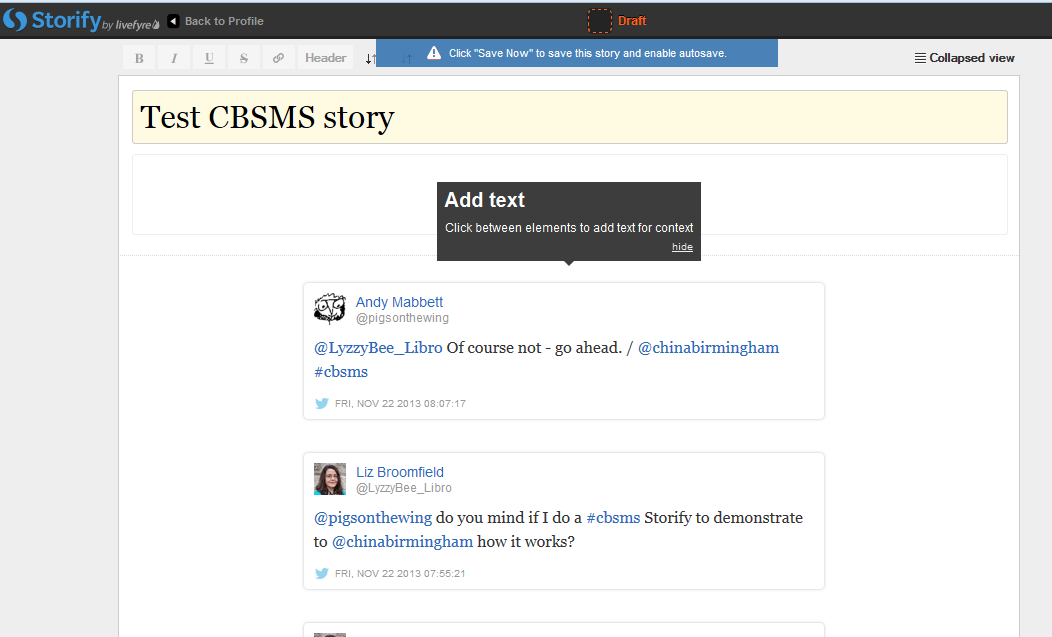
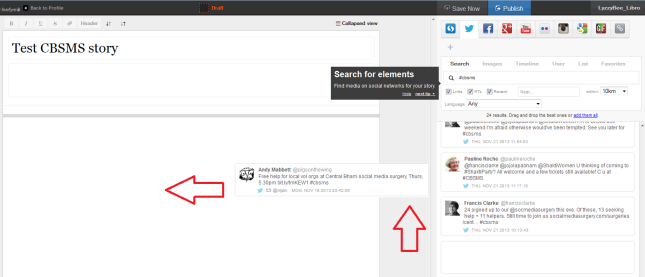
I’ve given my story the edifying title “Test CBSMS story” and now I’m ready to add content, or Search for elements, as Storify calls it:

7 create

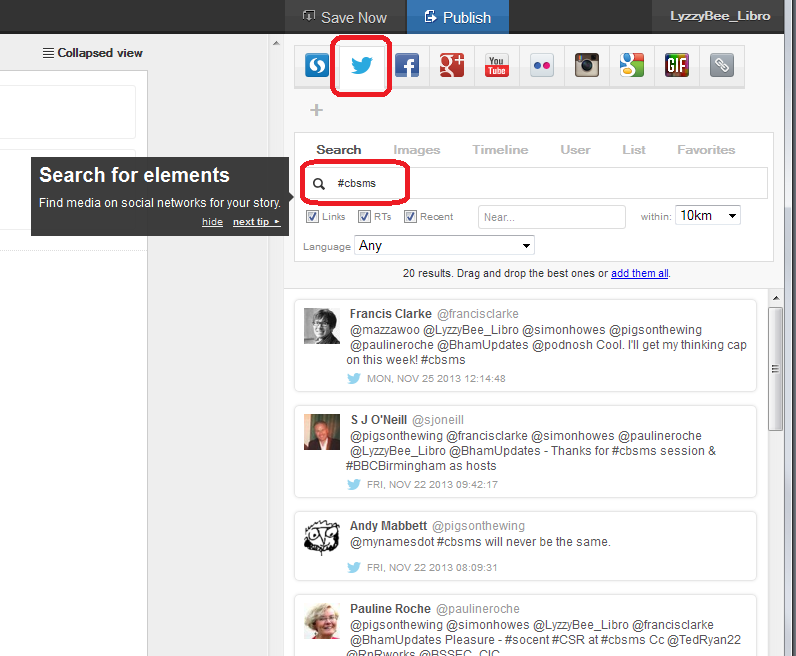
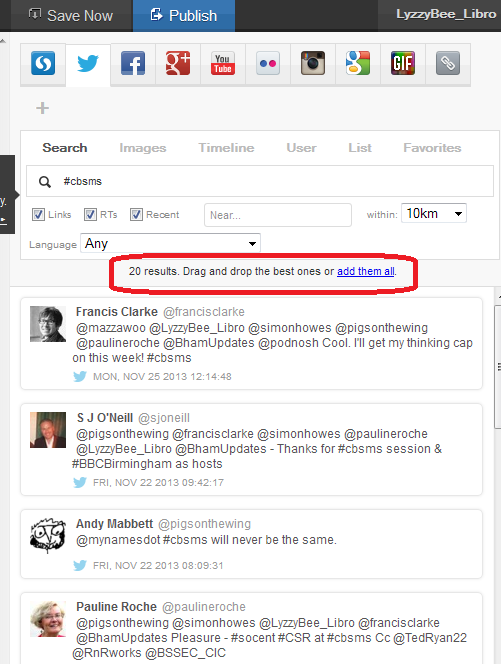
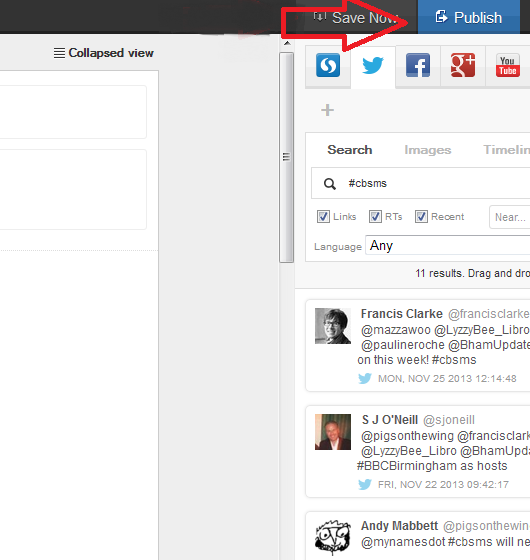
There’s a row of tabs along the top – I clicked on Twitter and then searched for #cbsms [Central Birmingham Social Media Surgery], because I knew that that was the hashtag used around the event. But you can search for anything here:

8 search

You can see that a set of Twitter results has come up, and all of them contain the hashtag. Storify now handily told me what to do: drag and drop the tweets I wanted into the story area:

9 choose

This means that you can pick up particular results but not all of them – useful if some of them are repeated or just ‘chatter’ that you don’t want to include. It also means that you can put them into whatever order you want, rather than the order imposed by the standard Twitter view (I made this one like Twitter, with the newest tweets at the top, but if you look again at Karen’s example, she switched it round to read from top to bottom).

Click on the tweet you want to include and drag it across into your story area:

10 choose

Once I’d popped a couple of items in, I was told that I could add text:

11 comment

You click on the space between your items and type whatever text you want to add:

12 comment

So I added a note explaining the last two entries in the story, where I checked it was OK to use the hashtag to create this worked example.

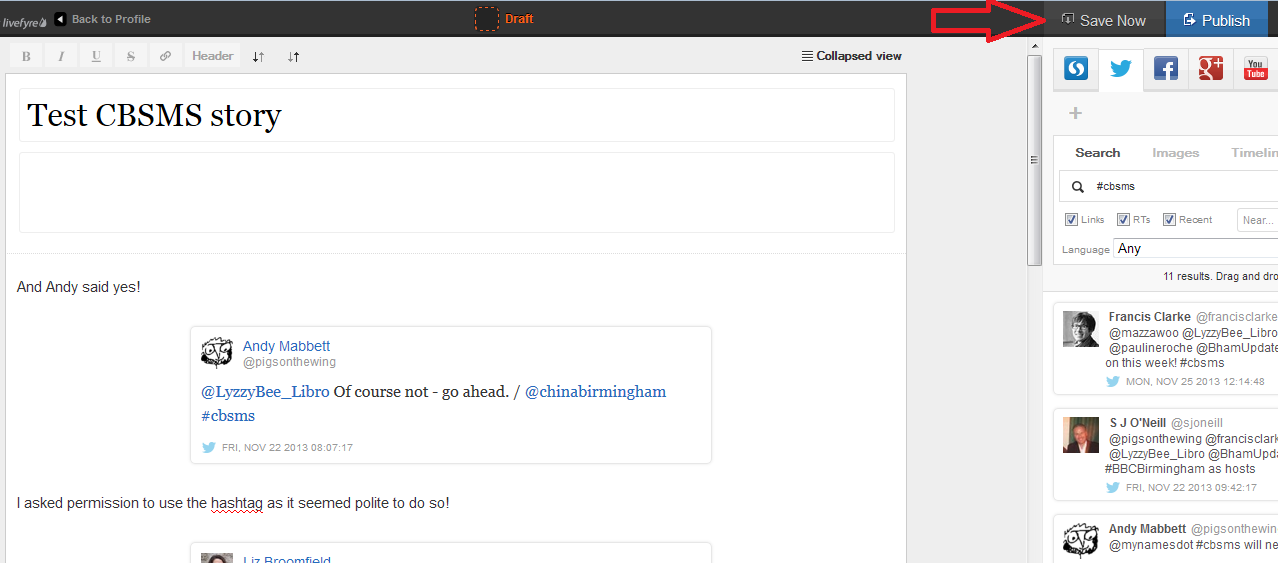
I then hit the Save Now button – which I mentioned earlier and should have done at the point at which I mentioned it! Just in case!

13 save

Adding more sources to your Storify

You’re not limited to creating a Storify from only one source. Along the top of the search area you can see loads of different options, including Facebook, Google+, YouTube, Google, and your own photos and links.

Note that if you choose Facebook, you will need to log in and link it to your own Facebook account (again, this won’t do anything nasty, it just appears to need to use your own Facebook timeline. Of course, you can search for anything on Facebook once you’re logged in). You don’t seem to need to do that with Google+, though.

14 connect other accounts

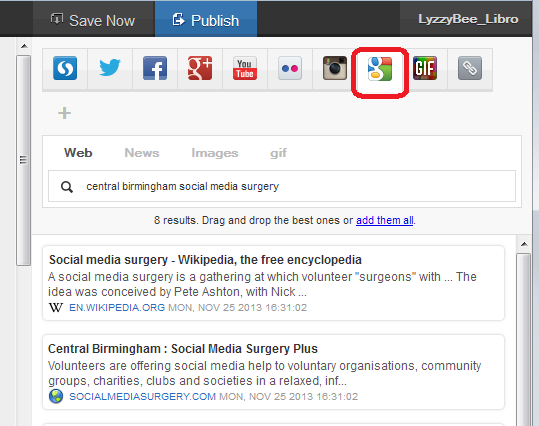
This time, I didn’t bother with any Facebook items, but I did pop into Google search and picked up some explanatory information about the Social Media Surgery to add to my story:

15 connect other accounts

How do I publish my Storify story?

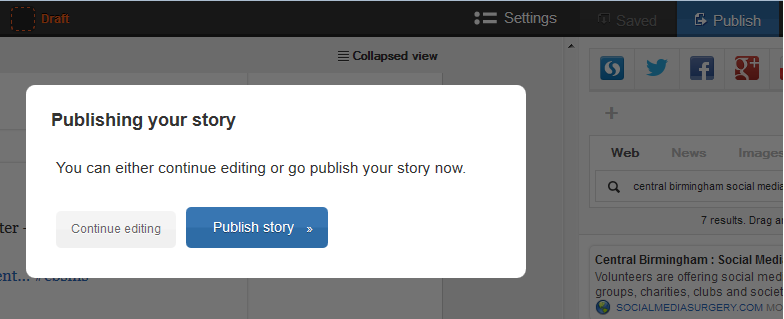
The first step is to hit the Publish button at the top right:

15.5 publish

Just in case I had pressed it too soon, I was shown a confirmation box:

16 publish

I was ready to publish, so I clicked on Publish story.

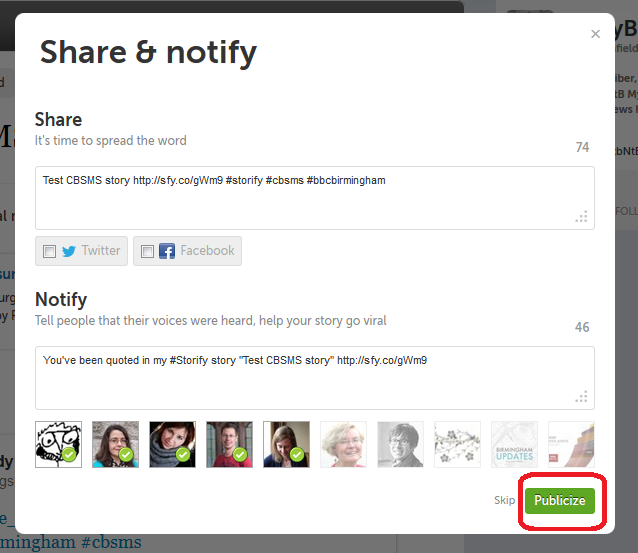
The next step was Share & notify. Sharing creates an automated Tweet with a link to your story. I imagine that if you’ve signed in to Facebook, etc., you will also be given the option to post an automated status update.

Notify lets you autotweet anyone who’s a friend on Twitter and is mentioned in your story to tell them that their tweet has been included in your story. I really like receiving these notifications, so I left these ticked, but you can untick them if you don’t want to do this.

17 share and notify

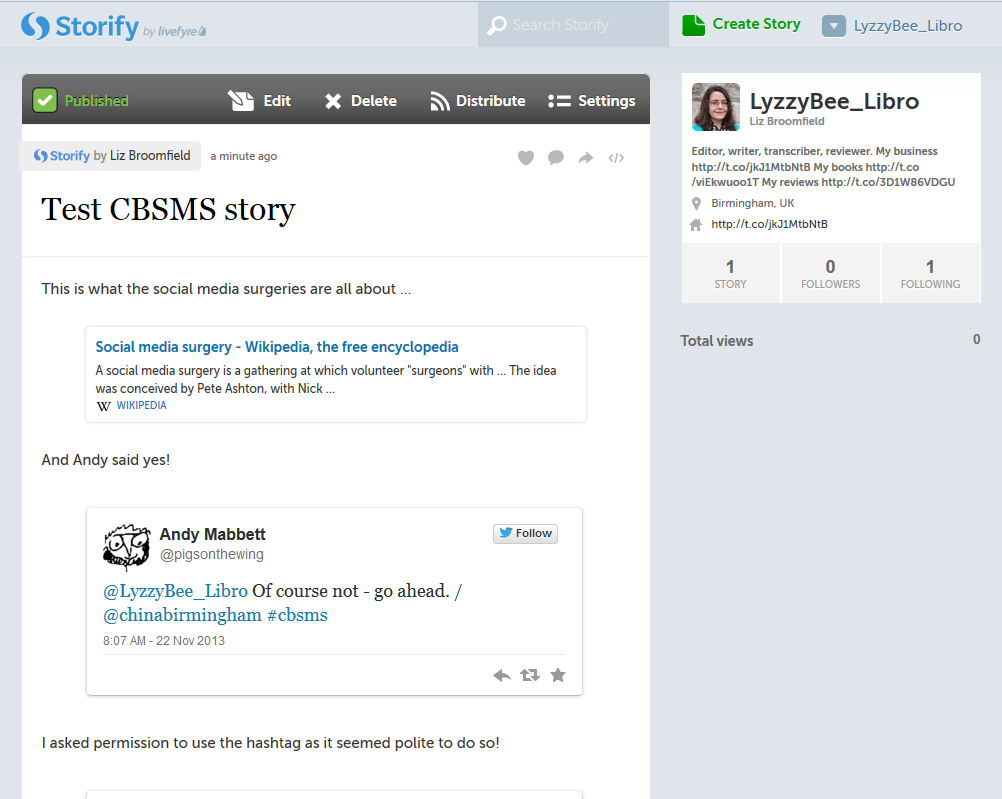
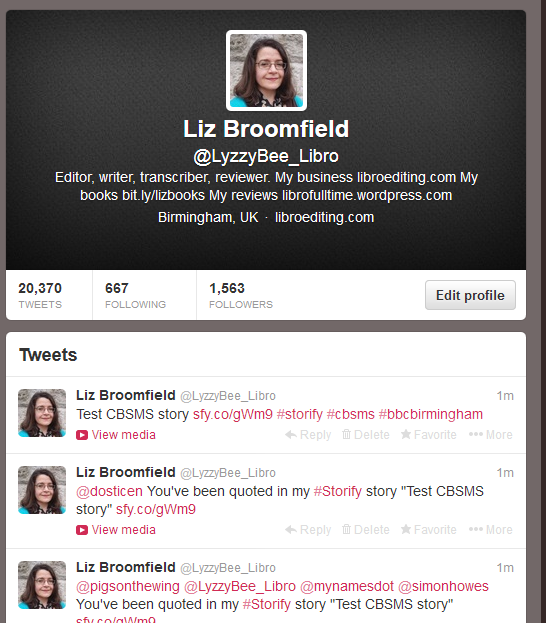
This process creates my story in Storify. At this point, the story gets assigned a URL that I can quote in emails or add to my blog. In the case of this story, it’s http://storify.com/LyzzyBee_Libro/test-cbsms-story, and this stays with the story on my profile for ever more.

18 live

What does my Storify look like on my Twitter account?

Finally, I popped over to my Twitter account to see what my story looked like on there. The top tweet is the automatic tweet with the link to my story, and the ones underneath are those ones that automatically tell people that they’ve been included. Exactly what it said it would do.

19 live on Twitter

What else can I do with Storify?

When you’re searching, you can refine your search to exclude retweets, etc.

You can get a paid account which is useful for large businesses or organisations. This seems to allow a lot more customisation and also real-time updates – however, I like the editable nature of the free version and I’m not sure if that would get lost if real-time updates were running. Maybe someone who has a paid account will come along to share the uses of that. But I think most people will be OK with the free version.

* I was helping the Chinese Community Centre in Birmingham at the November 2013 Social Media Surgery and they wanted to use Storify to pull together stories from their Oral History Project. We ended up talking about their blog rather than Storify, but I promised to put together some instructions for them. This one’s for you! Note: This is not a sponsored post, but an exploration of a potentially useful tool.

———————

This post has taught you – through my own learning process – about using Storify. You can find more posts about using social media in the relevant part of my resource guide.

If you would like more detail about how to use Storify for your content marketing, have a look at this article by Fiona Cullinan.

If you’ve found this article useful and/or interesting, please do post a comment and share using the buttons below! Thank you!

 
26 Comments

Posted by on November 27, 2013 in Blogging, New skills, Social media


Tags: , , , ,

Developing your business: what next?

Sneak preview of the image from my new bookSo, you’ve got through the start-up phase, you’ve got a decent business going, and you’re still getting enquiries from prospective new customers. You might be earning enough to be thinking about optimising your tax situation or even going VAT-registered. What do you do now?

You have various options: in this post I’m going to run through the main ones, then in the weeks to come, I’m going to be featuring some expert advice from solicitors and accountants, business consultants and the like, who will talk us through the options, AND real-life examples from people who’ve been there and done it and can share their experiences.

In summary, here’s what you can do:

  • Go full time if you’re not already
  • Outsource tasks to other companies
  • Turn yourself into a Limited Company
  • Get VAT-registered
  • Employ people
  • Contract out to other freelancers
  • Go into partnership with someone
  • Expand into premises – an office or workshop
  • Do nothing

Going full time with your business

If you’re not already full time, and you’re feeling pressured by having a day job and your own business, it can be very worthwhile going it alone. I’ve written a whole book on the subject, but I know lots of people who’ve done this: it can be hard to decide when to jump ship, but very rewarding when you do! Read Laura Ripper’s experiences of going full time here.

Outsourcing

Outsourcing means getting someone else to do tasks such as

  • Admin
  • Finance
  • HR
  • Sales
  • Telemarketing

Outsourcing the admin and sales effort allows you to devote your time to working at the actual tasks that form the core of your work. More billable hours should mean more money coming in, and you can accommodate more clients. You can find articles on the Libro blog about tasks that you can outsource and how to work out whether it’s worth it. And here’s an article that includes real-life experiences of the values of ousourcing.

Becoming a Limited Company or going VAT registered

Both of these options have reputation and tax implications. Some clients in some industries find that dealing with a Limited Company or someone with a VAT number represents solidity and safety (of course, sometimes, it can be a disadvantage, for example, to be VAT registered yourself if most of your clients aren’t and won’t be able to claim the VAT back that they pay to you). Becoming a Limited Company can protect you legally and save you some tax (legally and ethically).

Read the expert’s view on becoming a Limited Company.

Employing people, contracting out work or going into partnership

These all involve getting other people into your business to share the workload. Some companies will contract out to people who do the same thing – for example, I work for a company that deals in proofreading for students, They send the work to me and pay me when I invoice them, and they invoice the customer for a bit more. If you go down this route, it involves a lot of admin on both sides, but means that you can have multiple people working for you without going down the employment route and bringing in profit on their work without doing that work yourselves (there are laws about when someone’s an employee, though, so it can get tricky). You can read more about employing people here and a case study here.

Going into a partnership involves a legal setup but can be useful if you have complementary skills.You have to think carefully about who you do this with, though, and issues like where you’ll work and who is responsible for what.

Employing people involves a lot of legal stuff and means that you’re responsible for other people’s income and taxes, but there are freelance HR companies out there that can help.

Added examples of this kind of area including offering franchises in your business to people and taking on an apprentice. Franchising has a lot of rules and regulations but allows you to replicate your brand and success with managers in place to run the businesses, and apprentices are given external training as well as working with you.

Moving into business premises

If it feels like you’ve outgrown your home office and you want more room for making the goods you sell, or you want to separate home and work life a bit better, then moving into premises can be the next step. This does involve costs, although there are offers out there that give you secretarial and reception support which can be very useful. It can look more professional if people visit you, too. Beware the treadmill that leads to getting  more office space / employing more people / getting more space / employing more people, with your overheads going up and up, unless you have a steady head and a good accountant! But it does work very well for some people.

Here are some people’s stories of how and why they did this and how it all went. We also have an expert view on how, when and why to move into office space and one on expanding into regional offices.

Doing nothing

I have to admit that this is my approach. Why? Mainly because what I do is so linked to me, my style of editing, my relationship with my clients, and because I like being my own boss, beholden to no one and responsible for no one. I’ve also looked at what some peers in other businesses have done, and realised I’d rather keep my simple model (plus most editors work like this). But I have done this:

  • Contracted out my accounting to allow me to devote my time to work, not admin
  • Developed robust business routines for the same reason
  • Optimised my customer base to give me a good mix of work and a good income stream (read more)
  • Worked on developing passive income streams (read more)
  • Developed a network of people to whom I can refer new business or the occasional bit of overflow work from regular customers

———————

I’ve talked here about some ways to grow your business. I’ll be featuring tips from experts and case studies from people who’ve been down these paths over the coming weeks. I still have some slots free, and I’d love to have a range of opinions and experiences for each topic: if you’re an expert on these areas or a business person who’s gone down any of these routes, please have a look at this post on precisely what I’m looking for, and get in touch!

Have you enjoyed reading this post? I love to read your comments, and you might be interested in some more of the posts in the Careers and Business areas of this website …

Related posts:

Case study: going full time

Expert view: outsourcing

Case studies: outsourcing

Expert view: becoming a Limited Company

Expert view: employing people

Case studies: employing people

Expert view: moving into office space

Expert view: expanding into regional offices

 
13 Comments

Posted by on November 25, 2013 in Business, Organisation


Tags: , ,

Using the Control Key keyboard shortcuts

hands typingBack in June, I wrote about the wonders of Control-F and how you can use this keyboard shortcut to find text in almost everything you would do on a computer (Word, Excel, PowerPoint, web pages, WordPress back-end, etc., etc., etc). This post tells you about the other Control- or Ctrl+ keyboard shortcuts that you can use to …

  • save your mouse hand
  • do things quickly
  • impress your friends (maybe – depends what kind of friends you have …)

What keyboard shortcuts does the Control Key give you?

I’m going to categorise these into different areas for you. For each shortcut, you will typically need to highlight the text that you want to change if you’re doing something like changing its style or copying or cutting it, and pop the cursor in the right place if you want to paste. I’ll tell you what you need to do by each one. For each one, you need to press the Control key, usually marked Ctrl (and you might have more than on on your keyboard) then keep it pressed down while you press the second key on the keyboard).

Keyboard shortcuts for copying and pasting:

Ctrl-C – COPY Highlight the text you want to copy (leaving it where it is but making a copy you can paste elsewhere) and hit Control + c

Ctrl-X – CUT Highlight the text you want to cut out of your text (and maybe paste elsewhere) and hit Control + x

Ctrl-V – PASTE – pop the cursor where you want the text you’ve cut or copied to appear and hit Control + v

Ctrl-A – HIGHLIGHT ALL – if you want to highlight all of your text in Word, Excel, etc., you can use Control + a to do so

Bonus shortcut: if you want to switch between ALL CAPITALS, Title Capitals and Sentence capitals on a section of text, Shft-F3 is your friend. More detail here.

Keyboard shortcuts for bold, italics and underline

In each case, highlight the text you want to change, and press these keys:

Ctrl-B – to turn non-bold text into bold OR take the emboldening off a section of text, press Control + b

Ctrl-I – to turn non-italic text into italics OR take the italicisation off a section of text, press Control + i

Ctrl-U – to underline text OR take underlining away from a section of text, press Control + u

Keyboard shortcuts for Find, Goto and Replace

Ctrl-F – almost everywhere, pressing Control + f will open up a window to allow you to find a string of text (see this article for more detail)

Ctrl-H – in any document where you can replace text (i.e. Word, Excel, Powerpoint, etc.), pressing Control + h will open up the find and replace window which allows you to change a particular string of text into another particular string of text (I will be writing about this in more detail soon)

Ctrl-G – in documents with pages, pressing Control + g will allow you to navigate to a particular page

Keyboard shortcuts for undoing and redoing

Ctrl-Z – UNDO – if you want to undo what you’ve just done, hitting Control-Z has the same effect as hitting that little backwards arrow in your toolbar. It also works if you typed in a URL and the page is taking ages to load – Control-Z will cancel the operation

Ctrl-Y – REDO – lots of people know about Ctrl-Z, but did you know that you can redo an operation that you’ve undone by hitting Control-Y?

Keyboard shortcuts for open / new / print / save

Ctrl-N – if you want to open a new document in Word, Excel, etc., or a new browser window, pressing Control + n will do that for you

Ctrl-O – To open a document, wherever you are on your computer, pressing Control + o will open Windows Explorer so you can find and open your document

Ctrl-S – To open up Windows Explorer and save your document, pressing Control + s will save you clicking with your mouse

Ctrl-P – Want to print? Open up a printer dialogue box using Control + p

———————

Go on – admit it: did you really know ALL of these shortcuts? They’ll save you a few mouse clicks and I find some to be a lot quicker and more useful than the other methods you can use to get the same results. Which are your favourite keyboard shortcuts?

Related posts on this blog:

The control+ shortcuts I don’t cover here

How to find text almost anywhere

Changing from lower case to upper case

Find all of the short cuts here

 
23 Comments

Posted by on November 20, 2013 in Errors, New skills, Short cuts, Word, Writing


Tags: , , , , , , , ,

How do I change my initials in Word 2007, 2010 and 2013?

Your name and initials appear in the File Properties of your Word document, and also in any comments that you make on a document, plus in the text that appears when someone hovers over text that you’ve added or deleted. So it’s important that it’s right – usually Word pulls this over from your registration details, but you may wish to change it, for example if you want to add a general company or team name and initials rather than your own. Here’s how!

You will find the option to change your initials and name in Word Options. Word Options are accessed slightly differently in Word 2007, 2010 and 2013, so I will break this down by the version of Word that you’re using:

How do I change my initials in Word 2007?

Access Word Options by clicking the Office button at top left, then Word Options at the bottom:

1 word options 2007

Your Word Options box will open on the Popular tab and you can now change your name and initials:

1 2007

How do I change my initials in Office 2010?

Click on the File tab and select Options:

2 word options 2010

Click on Options, and you can change your name and initials:

2 2010

How do I change my initials in Word 2013?

First click on the File tab:

3a word options 2013

Select Options at the bottom of the list (use the arrow in a circle at the top left to get back to your document):

3b word options 2013

Click on Options and change your initials and name:

3 2013

This is part of my series on how to avoid time-consuming “short cuts” and use Word in the right way to maximise your time and improve the look of your documents. Find all the short cuts here

Do let me know if this has helped you – and do share with the buttons at the bottom of this article.

 
22 Comments

Posted by on November 13, 2013 in Copyediting, New skills, Students, Word, Writing


Tags: , , , , , , ,

When should I say no?

Say noWhen you work for yourself, especially when you’re starting out, it’s all too easy to say “Yes, please!” to every job that comes your way. But it’s a good idea to start saying “No, thank you” early on – not to everything, but to certain kinds of job. What you say no to depends on where you are in your career and what your schedule’s looking like, but here are my top jobs to turn down …

Note, with all of these, it’s often OK to say “yes” to one of the kind of job, just to see. But you’ll probably find yourself saying no later on!

What to say no to early in your career

  • Working for free. Caveat. If someone asks you to work for free AND they are an influencer who is likely to recommend you on AND they agree to give you a reference AND you’ve got time to do it without turning down paid work, then go for it.
  • Doing something you feel uncomfortable about. It’s good to push yourself into new areas. That’s not what I’m talking about here. I’m talking about content farms or writing essays for students, if you’re an editor (see this article for more on this kind of thing), or anything on the wrong side of your ethical line. Just because you’re just starting out and you’re a bit desperate for work doesn’t mean you should go against your own morals.
  • Doing something way outside your normal line of work. I think it’s a good idea to consolidate your reputation in one area and then branch out from there. By all means try something out, but if you don’t like doing it or it doesn’t fit, say no next time.
  • Working again with rude, pushy or unreliable clients. If someone’s rude to you on the first job you do for them, or they don’t pay when they say they will, it’s OK to say no next time. You are worth more than that, and a difficult client now will always be a difficult client. Demanding, fine; rude and pushy,  not fine. Don’t let your self-worth get undermined before you get started.

What to say no to at the mature stage of your business

  • Anything that will  overload you. If you find yourself saying, “Well, I could fit this in if I don’t sleep on Thursday night” or “Well, if person x doesn’t send me their chapter on time I could do this”, it’s probably time to say no and recommend someone else.
  • Small jobs that don’t look like they’ll turn into regular customers. Cruel but true – the smaller the job, the more noise to signal (admin to work) there will be. Pass the little ones on to your newer colleagues who need to build up their portfolio.
  • Discounts. You should be experienced enough to stand by your pricing. You will have discounts worked out for various sectors (I give them to students and individuals) but at this stage, you shouldn’t be in the business of buying work, and that’s what this is doing. If your prices are fair, don’t offer discounts except in exceptional circumstances.
  • Regular clients who don’t match your needs. Maybe they don’t pay well / on time or are difficult to deal with or have time scales that don’t match your own – sometimes it’s time to say goodbye and pass them on to another recommended practitioner.

What to say no to throughout your career

  • Any job with “danger” flags. To me, the main one here is “We’ve been through a lot of people and haven’t found the right partner yet” or “I’ve had problems with my previous editor / roofer / plumber”. By all means, check what the problem was. There are bad examples of every job out there, and you can be the one to fix the problem. However, if there’s an on-going pattern of problems, or they can’t be specific about what went wrong last time, my advice is to avoid.
  • Any job where you need to spend a lot of time learning a new system or skill UNLESS you really do have the time to do that and it’s going to be useful for lots of work in the future. I have had to turn down jobs that involve learning a new kind of translation software recently – I knew I had time to do the work, but not to learn the software. Best to tell the client up front!
  • Any job that goes against your moral code – however much of a dip or a bad patch you’re going through, however much it comes from a current client, if you feel uncomfortable doing it, don’t do it. (I had that situation a little while ago – I said no, I said why, they were fine with it and are still working with me.)
  • A client with unrealistic expectations. If someone expects me to write their book from their notes in a small space of time but call it (and charge for) proofreading services, or think you can transcribe 10 hours of tape in 12 hours, they are likely to be turned down. Setting and managing expectations is a whole nother post, of course …

——–

It’s great to say yes and it’s great to be busy – but it’s also vital to be able to say no and to be able to keep your busyness to a decent level. If you’re going through a dip in your mature business, go back to those early stage nos, and keep firm about them!

Oh, and although I do say no fairly regularly, I do almost always refer the prospect on to a recommended colleague who might have the time / capacity / skills to help them better. Which makes it a win-win-win – the client will come away with a great impression of you, your colleague will have a new prospect, and you will feel reassured that you’ve done the right thing and not left them without any support.

What do you say no to in your line of work? Have I missed any? What has been your experience of saying no to customers?

Related posts from Libro

Careers index

How do I decide who to work with?

What’s the best mix of customers?

How to make more money in your freelance business

 
14 Comments

Posted by on November 11, 2013 in Business, Copyediting, Ethics, Jobs, Organisation


Tags: , ,

How do I access Word Options in Word 2007, 2010 and 2013?

Word Options is the place where you customise the look of your Word document, how it corrects your words as you type away, the spell checker, your initials on any comments and the document properties, etc. It’s a great place to explore and enables you to customise Word and get it exactly how you want it.

However, it does work slightly differently in the three most commonly used versions of Word for PC: Word 2007, Word 2010 and Word 2013, so here’s a quick guide to how to access Word Options in these different versions of Word.

How to access the Word Options in Word 2007:

Click on the Office button in the top left of the screen, then click on Word Options at the bottom of the box:

1 word options 2007

Your Word Options box will now display:

1b word options 2007

How to access the Word Options in Office 2010:

In Word 2010, click on the File tab and then select Options, one up from the bottom of the list on the left hand side:

2 word options 2010

Once you’ve clicked on Options, your Word Options box will appear:

4 trust center

How to access Word Options in Word 2013:

In Word 2013, click on the File tab:

3a word options 2013

This has the effect of making your screen disappear, but you will get a list of things to do, out of which you select Options at the very bottom of the list (you can click that left-pointing arrow in a circle at the top left to get back to your document):

3b word options 2013

Clicking on Options will bring up the Options box:

3c word options 2013

This is part of my series on how to avoid time-consuming “short cuts” and use Word in the right way to maximise your time and improve the look of your documents. Find all the short cuts here

Do let me know if this has helped you – and do share with the buttons at the bottom of this article.

 
16 Comments

Posted by on November 6, 2013 in Copyediting, New skills, Students, Word, Writing


Tags: , , , , , , ,

How to make more money in your freelance business

dictionary coins watchSo, you’re running a freelance business – whether you’re a plumber, a roofer, an IT specialist, an editor … and you want to make more money. Of course you do. How do you do it? Short of putting all of your prices up (which is something you can often do), here’s what I see as the best ways to make more money in your freelance business.

Put your prices up!

Well, I don’t mean this quite as bluntly as that. But when we start a business, we often doubt ourselves, and don’t have the confidence to charge industry standard rates. “Oh, I’m new, this customer deserves a cheaper rate”. “I don’t know what I’m doing, so I’d better charge low”. “I might get the business if I quote lower than everyone else, I can always raise it later”. Sound familiar? Well …

  • If you really don’t know what you’re doing, you shouldn’t be charging people for your work. But if you’re just unsure of yourself, but you’ve had feedback that your work is OK, don’t put yourself down (I’m afraid that I have heard this more from women than men. Why, ladies, why?)
  • Check what the industry standard rates are (look at trade associations, other people’s websites, if you have a mentor in the business, ask them what they charge) and base your charges on those
  • If you do give a discount, give it for another reason than because you’re new – for example, I give discounts to students and individuals self-publishing their books
  • If you do give an introductory discount, make the customer pay in another way – the best is by giving you a reference to put on your website and marketing material

Get organised!

If you want to work more and make more money per hour, then you have to work smarter. This falls into two sections:

  • Organise your admin – streamline your admin processes, organise yourself so that your systems tell you what to do next and automate your invoicing, OR outsource your accounts, invoicing or all of your admin to someone expert in the task.
  • Organise your paid work – make sure that you’re using the latest software, aids, short cuts, materials, whatever it takes to make your work in your industry as speedy and efficient as possible

Specialise!

In every line of work, there’s general work (replacing roofs) and there’s specialised work (matching slates, doing repair work, conservation). Find what specialities match your skills, and you’ll find that the more specialised the work, the higher your rates can be.

  • You would expect to pay more for a carpenter who designs and makes you a bespoke kitchen than for one who puts together a flat pack you’ve bought from a DIY store (or you’d expect to pay the same carpenter more for the first task)
  • Lots of people do editing work – I specialise in non-native English speakers, and I can charge a premium for my experience in this area

Do be careful – make sure that you really are an expert before you go charging extra for expert services. Prospective clients will want to see evidence of your ability if they’re going to pay you more, so write down your experience on your marketing materials and collect some testimonials.

Diversify!

Isn’t this the opposite of specialising, I hear you ask. Well, to an extent. But consider this …

  • Having worked with overseas students’ dissertations and thesis, I diversified into working with translators who are translating from their native language into English. It’s still non-native English, and I’m still making it sound like native English, but I’m working for professional organisations, so the student discount need no longer apply.
  • I used my audio-typing training to diversify into transcription. Some of the work I do in this area is more lucrative than others, but I wouldn’t have this income stream at all if I hadn’t diversified (and I get a good return on investment for it, too)
  • I used my experience working for the UK office of an American company to branch out into localisation services – often done for large agencies and companies who reward this specialist area (see point above, too)
  • My handyman, Terry, extended his range of services when he made me some window screens and realised there are lots of people out there who need such things. Another string to his bow – and something he can do when it’s raining and he can’t paint the outsides of people’s houses.

Making more money in your freelance business

You can see that by matching the industry’s rates first of all, then streamlining your processes and simultaneously specialising and diversifying, you can up your rates of pay while working the same hours. Do you have any experiences to share about how you have made more money out of your business as it’s developed?

Related posts on this blog:

How to get the right mix of customers

Running a mature business

 
13 Comments

Posted by on November 4, 2013 in Business, Organisation


Tags: ,