RSS

Monthly Archives: March 2013

Working as a professional transcriber

In  previous posts I’ve talked about why it’s necessary for humans (rather than machines) to do transcription work and how to work out if this is a career for you. This article goes into more detail about the technology you can use to help you, and how to produce a professional transcription that will bring you repeat and recommended business.

Technology for transcription work

The first thing you need is a word-processing package, of course. I use Microsoft Word. Then you need some software to manage your recordings. I use NCH ExpressScribe. It’s also a good idea to sign up to (the free options of) services like Dropbox and YouSendIt, and to be aware of these services, as the audio files people will want to send you might well be very large – too large to send by email attachment.

Why do I need to use transcription software?

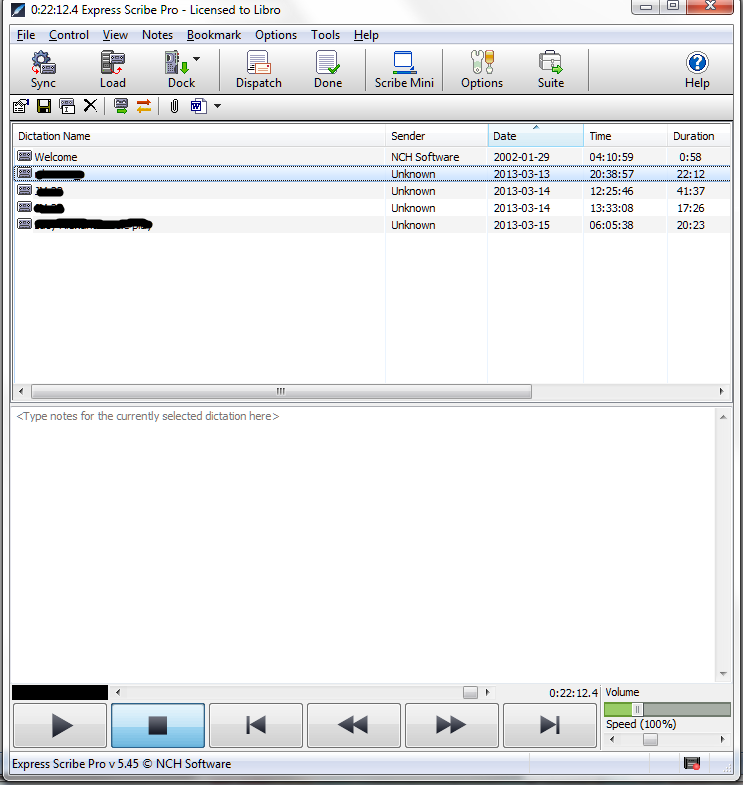
When I mention transcription software, some people think I sneakily use special software to do the actual transcription! Not at all! What ExpressScribe does is allow me to

a) manage my transcriptions – I load all the ones I have to do into the software and I can see how long they are and keep my place in them. As I complete them, I delete them from the software (they’ll still be in my files on my PC, though).

b) manage aspects of the tape like the loudness and speed of the tape (if people are talking really slowly, I can speed the tape up slightly and get through it more quickly)

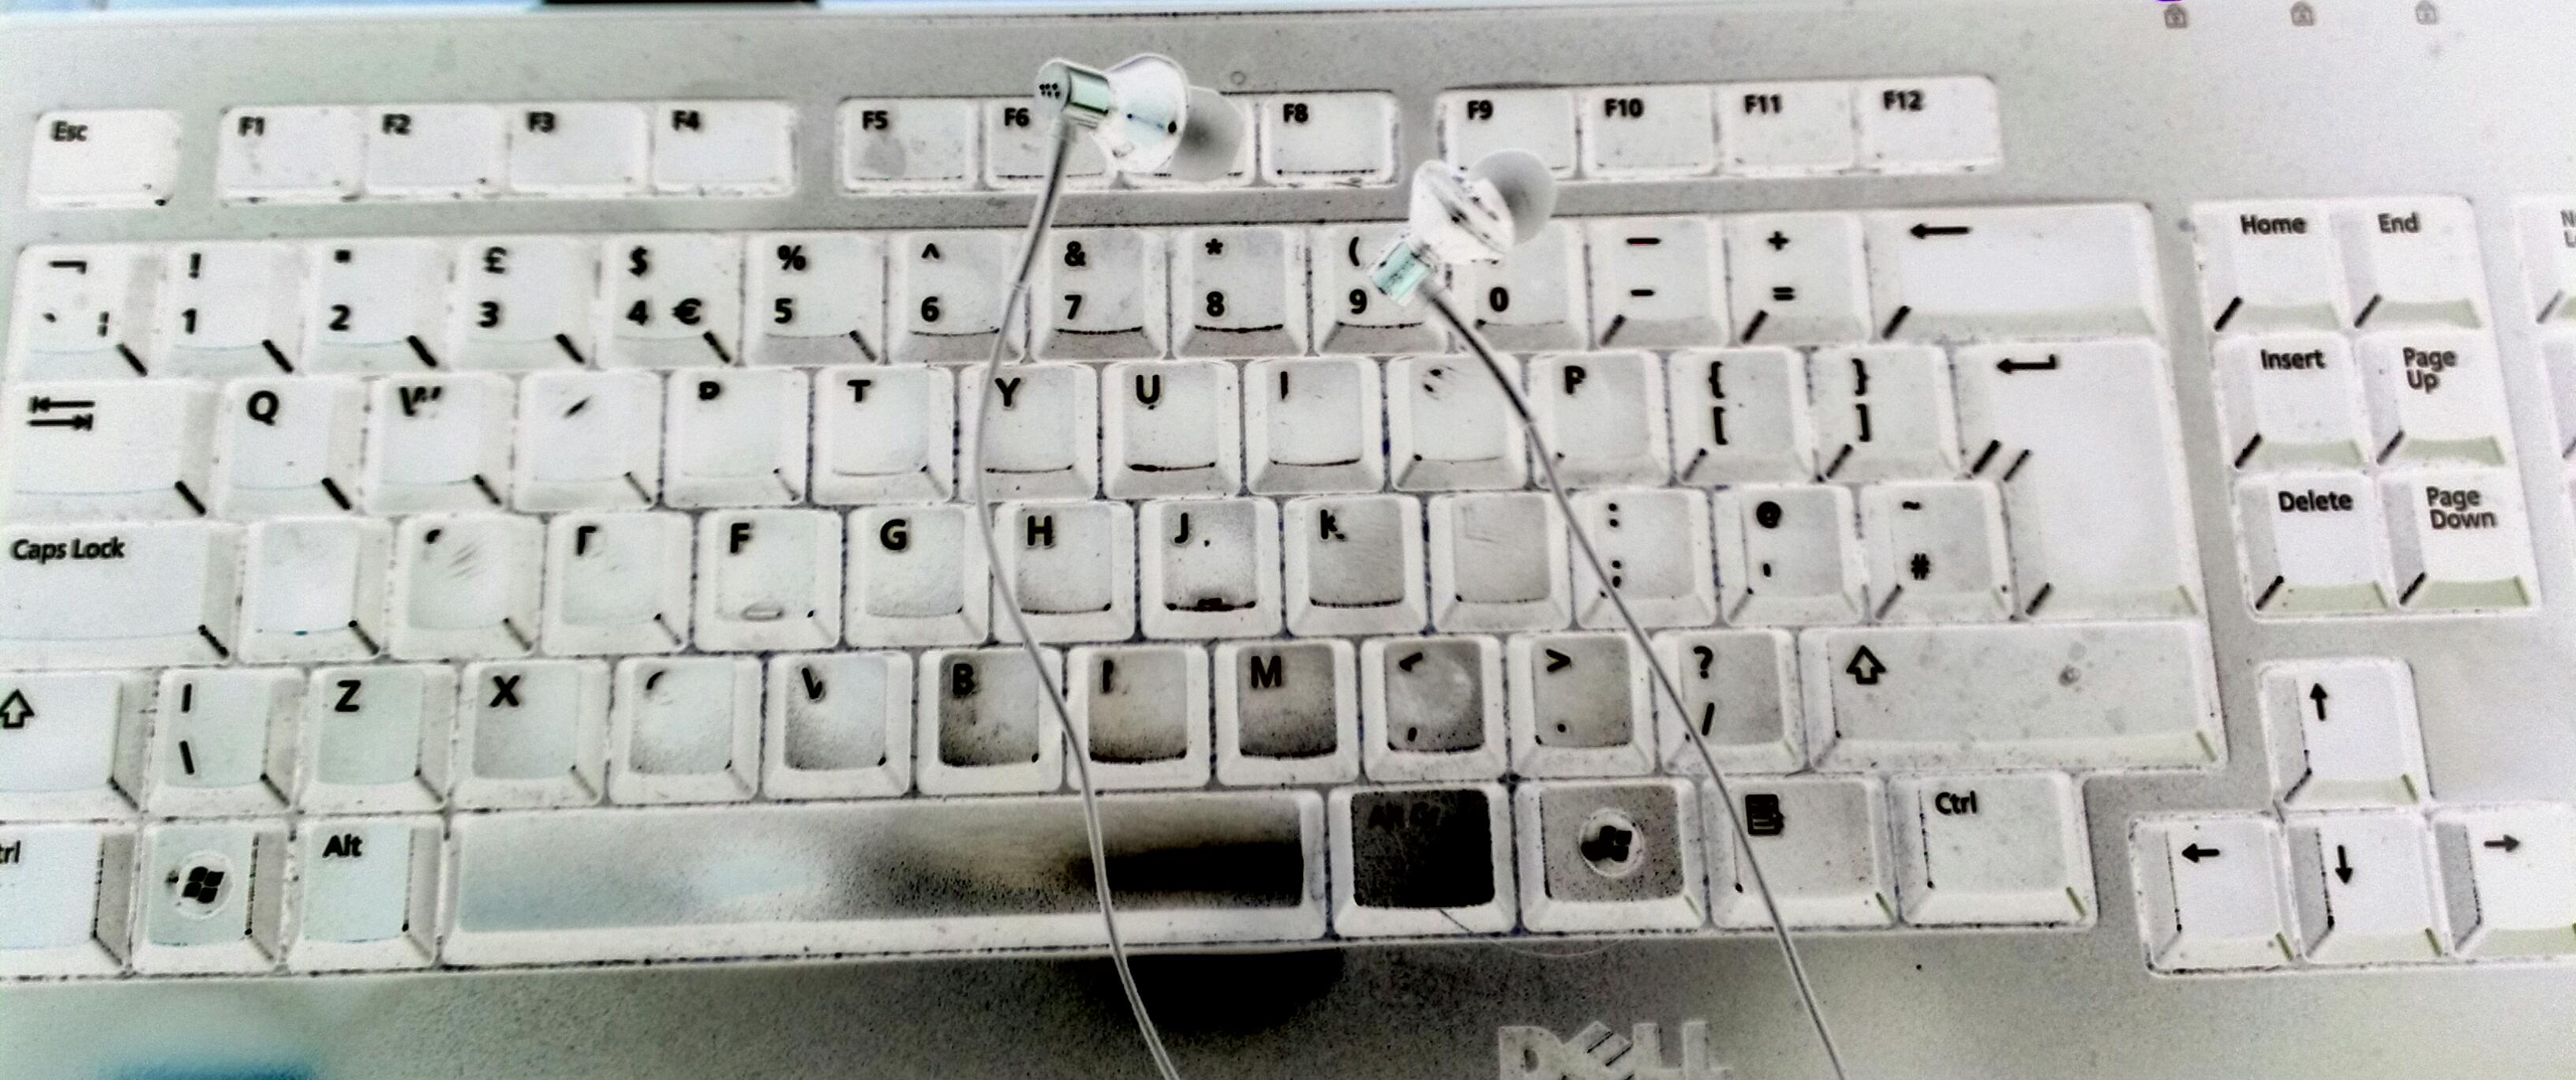
c) start, stop, rewind and fast forward the tapes using the function keys on my keyboard (or any other keys I choose to assign – I messed around with this a bit and did move one function key that I kept hitting by accident, causing the tape to slow to 50% speed!). You can connect the software to a USB foot pedal if you need to save keyboard movements and use your feet to stop and start the tape.

NCH express scribe

How can Word help me to transcribe faster?

The way Word can really help  you is through the use of shortcuts or AutoCorrects. I have written two articles about these previously (what it is and how to find it and how to use it to speed up your typing).

Basically, you need to get good at:

  • Identifying commonly used words or phrases, especially
    • longer sets of words or phrases
    • words that you stumble over typing, however short
  • Assigning keyboard shortcuts to them that you can remember when you’re typing

In this way, you can type something like:

v imp to give envl pons to all ppl in the group to save the env.

and have Word turn that into:

Very important to give environmental responsibility to people in the group to save the environment.

I’ve saved almost 50% of the keystrokes needed to type that sentence there, which does build up over the course of 20 pages of transcription!

How can people send me big audio files to transcribe?

Your clients have four options for sending you their audio files. You’ll just be sending nice, neat Word documents back, but their files might be enormous!

  1. An ftp server – this looks scary but is used by some of the larger corporates I work with. They will place the audio files on their own server. You will log in and download the file onto your own computer, then either upload the transcription or email it to your contact.
  2. Zipping – this will work for small files but a huge .wav file will still be too large for this method. Your client should be able to right click on the file in their own Windows Explorer (or Mac equivalent) and choose “Send to zip file”. This will make the file small enough to send. You will need to unzip it at your end – download the file, right click in Windows Explorer and choose “Extract”.
  3. File sharing – a file and folder sharing service like Dropbox will allow your client to save their file in a special folder that can be shared with your email address. Dropbox acts like another folder on your system, and means that you can access the file and save it into your transcription software from the shared folder. You need to have Dropbox installed yourself before you do this but you can get a free version.
  4. Download services – there are millions of these around, but I usually recommend http://www.yousendit.com as I’ve found that easy to use and reliable. Here, the client uploads their file to the service, enters your email address and the service emails you a link from which to download the document. Watch out, as many of these have a time limit, so get it downloaded as soon as you know it’s there! I have an account with YouSendIt for sending large files, but most of these do not require you to have an account, and the client should be able to send up to a certain file size for free.

All of these options have advantages and disadvantages. Many of my clients know what to use, but some need advising, so it’s worth being aware of the options. For options 1 and 4, it’s worth waiting a little while from when the client tells you they’re uploading the file, as it can take a while to get up onto the server and back to you, so if you’re too eager to download, you might end up with half a file!

Producing a professional transcription

I have many regular transcription clients and they recommend me on to their friends and colleagues at a remarkable rate, too. I’ve asked them what differentiates me from other transcribers, and it comes down to this:

  • I check the client’s requirements up front
  • I produce an extremely accurate transcription
  • I produce a transcription with time stamps and other features to make it easy for the client to work with the text

of course, I’m super-reliable and always set appropriate expectations, but that’s part of being a good freelancer, not specific to transcription.

Establishing client requirements

It’s important to establish what the client wants out of their transcription right from the start. I will always send my clients a list of questions. These include:

  • Do  you want time stamping every 5 or 10 minutes, or at all?
  • Do you want me to record every single word, pause, um and er / smooth out the worst bits / rewrite the text in clear English?
  • Do you want American or English spellings?
  • Do you need your questions written out in full or just in note form (for journalists and researchers)
  • Do you have any other requirements – questions in Italics, speakers’ names in a particular format (for conferences) etc.
  • Do you have a list of conference attendees and session / paper titles (for conferences)

Once I’ve established these, I will make a note of them and obey them!

Being accurate

Your client is paying you to take down what’s on the audio file for them. Often they won’t be able to check the whole thing. I believe it’s important to:

  • Listen carefully and take down the words as accurately as you can
  • Look up band names, place names, company names and other things they mention
  • If you can’t hear something, don’t guess – make a note (see below)
  • Read through the transcription when you’ve completed it
  • Run a spell check over the document when you’ve finished

I do also warn my clients that any company names, brands, album titles etc. may not be accurate and should be checked. You can’t check everything. But you can make sure you spell that village in Somerset or Kazakhstan correctly (if you can’t type Kazakhstan quickly, create a shortcut!).

Making your transcription as professional as possible

It’s relatively easy to provide a professional transcription that will please and impress your client.

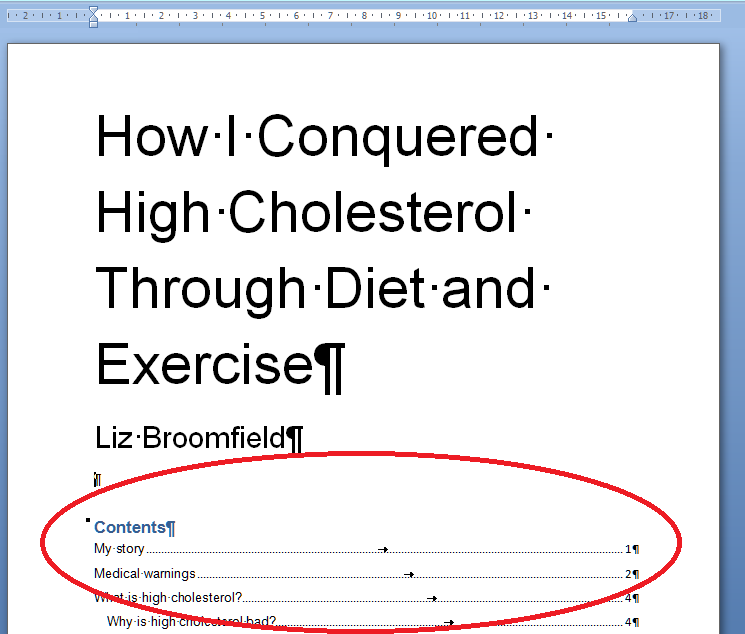
  • Give the transcription a sensible title and file name
  • Type it out clearly using a clear font and a fairly large size
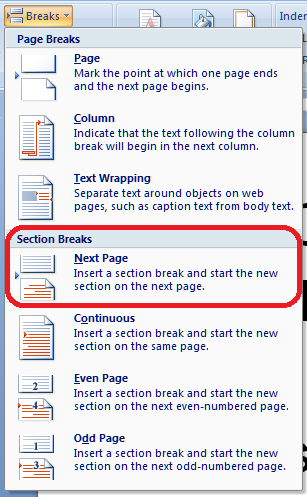
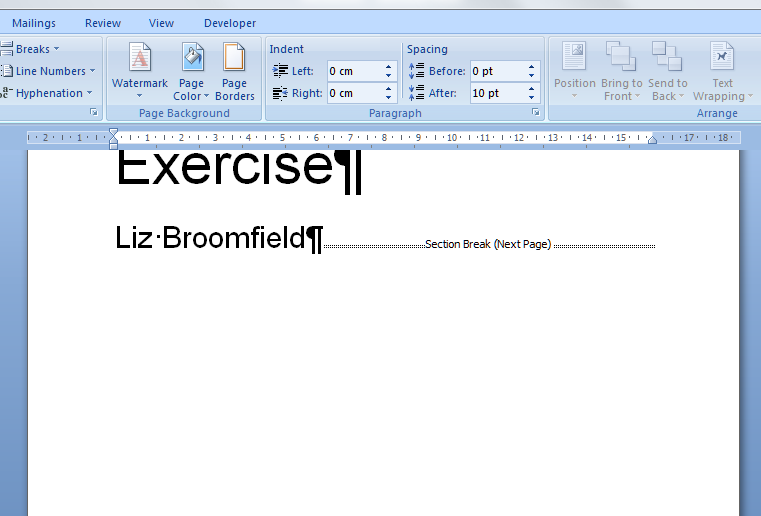
  • If people are talking in great slabs of text, divide it up into paragraphs at natural breaks
  • Mark time stamps at 5 or 10 minute intervals – new line, 05:00, new line, carry on the text (with no capital if it’s half way through a sentence)
  • Mark places you can’t hear like this: insert a note in square brackets with the time of the unclear section: [unclear 32:44] (unless the client requests a different format – I have one who prefers <unclear 32:44>
  • If the audio file is 50 minutes long and there’s a 5 minute gap while the interviewee goes off to answer the phone, or it finishes at 45:30 and then all you can hear is your journalist putting the phone down, sighing and typing, only charge for the audio you transcribed. It’s a nice and ethical touch.

In this post I’ve talked about the technology and details that will help  you to be a popular and professional transcriber. I hope this has been helpful – do let me know if it has, or if you have any other advice for a new transcriber!

If you want to learn more about Transcription as a career, buy my book: A Quick Guide to Transcription as a Career – buy from Amazon UK or visit the book’s web page for worldwide links and news.

Related posts on this blog:

Why transcribers need to be humans and not machines

So you want a career in transcription?

Ten top tips for transcribers

If you’ve enjoyed this post, please like and share, click the buttons below here, and tell your friends!

 
53 Comments

Posted by on March 27, 2013 in Business, Jobs, New skills, Transcription, Word


Tags: , ,

How do you start a career in transcription?

keyboard earphonesIn my article about why we still need humans to do transcription work, I promised to give you some insights into transcription as a career. Here are some pointers to give you an idea of what you need to know in advance, the skills and software you need, and ways to get work in this field – plus some pitfalls to avoid.

What is transcription?

I cover this in detail in another article, but basically transcription is what we used to call audio-typing – turning recordings of spoken words into documents containing those words written down. There is quite a lot of call for transcription work of various kinds as we’ll see in a moment. But the work basically involves putting on a headset or ear phones, and typing out what you can hear on a tape.

What kinds of transcription job are available?

Personally, I’ve worked on the following kinds of transcription job, which just shows how varied it can be:

  • Journalists interviewing musicians and actors
  • Someone interviewing their elderly parent in order to write a memoir for them
  • Academics and students interviewing subjects for their research
  • Students’ role-plays for learning how to provide phone counselling
  • Presentations at international conferences
  • Panels at conferences including questions
  • Discussion panels for market research companies
  • Podcasts by one person so they can provide transcriptions to their listeners
  • Podcasts of one person interviewing another
  • Free and paid-for telecasts (phone-in sessions where people listen to a speaker)
  • Free and paid-for teleseminars (as above but with questions and discussion)
  • Content for a book, dictated in the first instance before being edited

There are also specific roles that people can take on who have particular specialised skills such as legal proceedings or letters and medical transcription.

All of these clients have had different requirements in terms of the level of detail, time stamping, etc. but all have provided variety and interest!

Am I suited for transcription work?

In essence, the answer comes down to these three points:

  1. How fast do you type? You need to be able to type really fast to be able to make enough money (see below)
  2. How careful are you with your posture? (sounds odd, but sitting in one position typing like mad for hours is the highest risk part of my job for RSI)
  3. How good are you at using Word and its autocorrect features? (this makes a lot of difference to your speed – see the section on technology below)

The best way to find out if you’re suitable for this kind of work is to practise before you’re doing a paid job. Learn from me, here! I did train as an audio typist, with a foot pedal and a tape player back in the old days. So when a journalist I followed on Twitter asked if anyone offered transcription, I went for and got the job. Fine, I did lovely fast typing but I was using Windows Media Player to play the tape, switching windows to start, pause and rewind it. That first tape took me hours! I wish I’d known what I know now about technology and how to actually do it!

Technology for transcription work

There’s quite a lot to the technology for transcription, so I’ve written a separate article about working as a professional transcriber which includes loads of detail on this and other aspects.

In essence, you will need:

  • a word-processing package
  • software to manage your recordings
  • ways to receive large files – you need to know about dropbox, yousendit and other services

How do I work out if I’m suitable for transcription work?

If anyone asks me about how to find out if they’re suitable for transcription work I tell them to do this:

  1. Record an hour of general conversation, interviews, etc. from the radio
  2. Get the technology set up (see separate article) and transcribe it
  3. Work out how many minutes it takes you to transcribe one audio minute

I’d say you’re looking for at least a 1:3 relationship here. That’s 3 minutes to transcribe one minute of tape. Not long! you cry. But that means it will take 45 minutes to transcribe a 15-minute tape, or 3 hours to transcribe a 1-hour tape. Build in the fact that you need to take a break at least once an hour, and good old cash rears its ugly head.

Can I make money doing transcription?

Here’s the thing it all boils down to:

If you can’t type fast and use the technology to boost your speed, it’s not financially worthwhile to take on transcription work.

The standard industry rate for transcription is around £0.85 per audio minute. That’s £8.50 for a 10-minute file. If it takes you 1 hour to type out a 10-minute file, you’re going to make £8.50. Before tax. But if you can get two of those done in an hour, you’re getting £17.00 an hour – not so bad.

Some companies have standard rates and pay more. Personally, I stick to that rate for one to two speakers speaking clear English in a relatively quiet room, with a turnaround time that allows me some room for manoeuvre, and I add £0.10 per minute for urgent work, extra speakers, noisy tapes, etc. And if any of my music journalist clients are reading this, yes, I give fellow freelancers a discount (and other people a discount at my discretion, based on the quality of the tapes and the time it takes me to transcribe them).

There are internet job boards out there trying to hire transcribers for £0.10 per audio minute – honestly. The more people accept these prices, the more they will stay. I have more self-worth than that, and even when I was starting out, I’d rather do a transcription for free in return for a reference than do hack work for a corporation paying peanuts. Rant over!

How do I get transcription work?

There are loads of sources of transcription work. I have to say that my main one is personal recommendation – strings of journalists, etc. But it’s also worth trying the following:

  • Set up a saved Twitter search for “need transcriber” and contact people with an offer. This can work – it’s how I got my first transcription client!
  • If you are near a university that has a lot of research going on, ask to put up some posters offering your services. A lot of researchers conduct interviews and need them to be transcribed.
  • Tell your editing or other clients that you’re offering this new service – I’ve transitioned clients to and from transcription services.
  • Join reputable job sites like Proz which advertise transcription jobs at decent prices.
  • Use social media and tell all your contacts what you’re doing
  • Join transcribers’ groups on LinkedIn, etc. – there are often people looking to pass on overflow work

I would strongly suggest that you don’t just do transcription work full time. It’s very physically tiring, you can get RSI from all the typing and sore ears from the earphones (I’ve got a sore ear at the moment and I’ve been doing this for years!) so add it into the mix, and remember to take a break every hour of typing!

This article has helped you work out if you’re suited for transcription work and given you some hints and tips. Have you found it useful? Please comment if you have, and let me know how you get on!

If you want to learn more about Transcription as a career, buy my book: A Quick Guide to Transcription as a Career – buy from Amazon UK or visit the book’s web page for worldwide links and news.

Related posts in the series:

Why you need a human to do your transcription

Being a professional transcriber – software to use to help

Ten top tips for transcribers

 
119 Comments

Posted by on March 20, 2013 in Business, Jobs, New skills, Transcription, Word


Tags: ,

Why you need to be human to produce a good transcription

Suitably funereal transcription kitWhen I receive a recording for a new transcription client and tell them I’ve loaded it into my transcription management software, I’m sometimes asked if that does the transcribing for me. Um, no.

While there are of course software packages out there that are very good at working with a single voice dictating, even those can sometimes struggle. I know this, because I’ve edited work that has been dictated in this way – and it can often be rife with homophones.

Why use a human transcriber?

I’ve been providing transcription services for several years now. While a machine might be suitable for taking down the words of a single, non-accented speaker enunciating clearly into a good quality recording apparatus, with no background noise, no interruptions and no acronyms or jargon, the projects I’ve worked on have included some or all of these features:

  • High levels of background noise – interviews in cafes with espresso machines whooshing and spoons clinking in cups
  • People talking while they’re eating and eating while they’re talking
  • Interruptions from waiters / room service / other members of the band or group
  • High levels of tape noise leaving me straining to hear what anyone’s saying
  • Multiple speakers including many people with similar voices around a conference table
  • Overlapping speech
  • Non-native English accents or heavy regional accents
  • Very technical content – jargon and acronyms galore
  • Creative content – album names, track names, novel titles, band names, author names
  • Requests to provide the transcription missing out ums and ers through to smoothing the English to make it read as standard English

As a native English speaker specialising in working with music journalists and non-native speakers of English, I can cope with all of these, with some rewinding and checking. I doubt that the most sophisticated dictation software could do so, as yet. I might be wrong of course (let me know if I am!).

Understanding what’s being said on a transcription

The first issue is actually hearing and understanding what’s being said. I have a good ear and a native English speaker’s ability to predict what will come next in a sentence / how sentence structures work, plus my experience working with speakers of and texts in non-native English allows me to do this for native Arabic, Chinese, Eastern European language etc. speakers. My ear can filter out background noise where sophisticated software can only go so far. And I can hear around the clink of teaspoons or glasses chinking to grasp what’s being said.

Checking the content in a transcription

When one of my journalist clients sends me a tape, I check who the musician / band is and look them up (usually on Wikipedia for the general information, as their own websites are usually a bit harder to plumb for information). When I’m working on an international conference I will seek out or be given a conference schedule, list of attendees, etc. When I’m working with technical content I will look up information on that topic.

All this allows me to produce a transcription which the client will not have to check for themselves, or if they do check it (which I do recommend), there won’t be too much to change. And I won’t be embarrassed by too many mis-hearings. Just try popping a few names of country leaders, bands or albums into a Word document and running a spell checker and imagine what an automated dictation program would do with these terms!

Speech on a tape to words in a document

Very occasionally I’ll be asked to record exactly what the people on the tape say, including ums, ahs, repetitions and pauses. At the moment, I’m transcribing some roleplays for students learning how to operate a telephone helpline. Here it’s important to capture all the nuances of the conversation and I’m splitting the utterances into sections, numbering them, and including all the ums and ahs.

Normally, my clients will require some smoothing out.

  • Most of my journalists like to have an indication of when their subject slowed down or had to mull over something and ask me to include notes of those pauses.
  • Business people producing podcasts and telecasts often want a fairly accurate transcription, but smoothed out to eliminate ums, ahs, pauses and repetitions, so they have a good product to sell or include in packages for their clients.
  • Some international conferences want to avoid embarrassment for their delegates by having their English rewritten as I transcribe to appear as close as possible to native British (or American) English
  • I have worked with authors who start off with a tape and want it to turn into something they can publish as a book (this, unlike all of the other options, involves two processes: transcription and then heavy editing and rewriting).

Why should I use a human transcriber and not a software program?

2 topsI think I’ve answered that for you now. You should also consider using a human transcriber who’s a native speaker of the language you’re having transcribed: there are websites out there where you can find very cheap transcribers; they are often not going to be native English speakers and while they will get the gist of the tape down, I’d be unsure whether they could give you the service you needed.

I’ve written another article about how to get into transcribing as a job and how to prepare yourself for what is often a fun and rather creative area of work, and one about the technology transcribers use.

In the meantime, if you’re thinking of booking in a transcriber, do have a look at my page about my transcription services, and get in touch if you want to ask about what I can do for you. I hope you’ve enjoyed this insight into a transcriber’s work! Do leave a comment if you have …

If you want to learn more about Transcription as a career, buy my book: A Quick Guide to Transcription as a Career – buy from Amazon UK or visit the book’s web page for worldwide links and news.


Tags: , , , , ,

How to add page numbers to a Word document (2)

We’re already learned the basics of adding page numbers to a Word document, and now we’re going to look at some more things you can do with page numbers, including:

  • how to stop your first page displaying a page number
  • how to have page numbers in different formats in your document

This will be particularly useful if you’re formatting the page numbers on a PhD or other thesis or dissertation – many of my student clients don’t know how to do this, which is what inspired me to write this series of articles.

How can I have different page number formats in different parts of my document?

Imagine that you’ve written a thesis or a book – something that has a title page (red), a contents list (blue) and then the main body of the text (yellow). It’ll look something like this …

1 the document

Now imagine that you’d like to have different page numbering for different parts of the document – for example, no page numbering on the title page, Roman numerals for the contents pages, and then the numbering continuing in Arabic numerals for the main body of the text. Look at a non-fction book or someone else’s thesis and you’ll see that this is how they’re often laid out.

How do you do this? First of all, you need to divide your document into discrete sections, using section breaks. Let’s learn how to do that …

How do I see what formatting I have in my document?

If you plan to insert section or other breaks in a document, it’s useful to be able to see what breaks you have in there already. In the document I’m using an example, I would suspect that the aurhor has added some sort of breaks to make the contents page and then main text start on new pages.

How do we check this? Make sure you’re on the Home tab and then press the Paragraph button in the Paragraph section

2 show coding

Once you’ve pressed the button, you’ll find all sorts of strange marks appear. You can also see that the new page has been started by inserting a Page Break (and not using the Enter key – hooray. If you want to know the reason for the “hooray”, read this article.

3 page break

The paragraph mark indicates a return, and the Page Break label shows that a page break has been inserted here. That’s great if you just want to start the next chunk of text on the next page, but we want to format each section differently, and this requires a section break rather than just a page break.

How do I insert a section break?

In order to insert a Section Break, we need to delete the page break first. Highlight the page break and press the Delete key or place the cursor just to the right of it and press the Backspace button. As soon as you do that, you’ll notice that the text which sat neatly at the top of the next page has jumped up onto this page. Don’t worry, it will disappear again …

4 no page break

To insert the Section Break, you need to be in the Page Layout tab (not the Insert tab, confusingly). There you will find an area called Page Setup which includes a Breaks menu:

5 breaks

When you press the Breaks button, you’ll see a menu offering several different options for the break you wish to insert – including our old friend the page break and our new friend the section break.

6 section break next page

The one we want is Section Break – Next Page. As the text explains, this will insert a Section Break and start the next chunk of text on the next page – exactly what we want to do. Choose that option and hey presto …

7 section break done

… a Section Break (Next Page) appears on your page. And the Contents page has moved back to Page 2.

Note that in this example, we’re dividing the document into three sections, using two section breaks, so we need to add one at the end of the contents list, too …

8 section break done

So now our document is divided into three sections – 1, the title page, 2, the contents list and 3. the main body of the text:

9 the document sections

How do I add different formats of numbers to different sections of my document?

Now it’s time to add those page numbers, remembering that we want no page numbers at all on the title page, the Roman numerals on the conents pages followed by Arabic numerals for the rest of the document.

We’ve seen how to add page numbers before, using the Headers and Footers on the document. We’ll do that in a moment. But this time we need to do something else first: we need to remove the association between each section and make tat sure each one is independent. This will allow us to assign different page number formats to each section (and other formatting – I’ll write about this another time, but it’s the way you get your document to let you have certain pages in landscape rather than portrait orientation, etc.

How do I stop my footer having the same format as the previous section?

The trick here is to make sure that the footers do not simply copy the previous section of the document. if they do, you will have trouble making each section different. We now need to go into the second section of the document and disconnect its footers from those of the first section.

So, first of all, go into the Design tab or just left click on the bottom part of your page, below the text. In both cases, the Design tab will display and you need to look at the Navigation area. You will see that the footer automatically decides to be Same as Previous – we need to disconnect this footer from the previous one. Up in the Ribbon, Link to Previous is highlighted, reminding us that this section’s footer is linked to the previous one and providing a handy hint as to how to stop that.

10 not the same as previous

If you press the Link to Previous button it will turn from yellow back to white, you’ll notice that the Link to Previous note in fhe footer has disappeared. This means that you can format Section 2 independently of whatever’s going on in Section 1,

blog post

Note that the Header has its own ability to Link to Previous, which is separate from that of the Footer, which means that you can keep any header text you’ve added to the document working throughout the document without needing to re-insert it into each section.

Before we start getting excited about adding those page numbers, make sure you’ve done the same to Section 3, disconnecting it from Section 2. Changing Same as previous in one section won’t have any effect on the next section:

12 unlink these too

Remind me how to add page numbers …

Now we’re ready to add the page numbers to the document. Ignoring Section 1, which doesn’t need a page number, we can go into the page number add part of Section 2. Just to remind you, that’s on the Page Number area of the Design tab, and in this case we want to add a page number at the bottom of hte page, so we select Page Number then Bottom of Page and the particular position we require, so as to set up the page number position before formatting the actual numbers.

13 page numbers

Now it’s time to format the page numbers. So its back to the Page Number button but we choose Format Page Numbers

14 format page numbers

You will see on this example that the page number has automatically inserted itself on the first page of the contents (Page 2 of the document), but it has defaulted to being in Arabic numbers and to helpfully inform us that we’re on page 2 of the document. However, we want Roman numerals, AND we want it to start with Page 1. So, into that Page Number format menu, and there we can …

15 format page numbers

… choose Roman numerals (top) and start at page 2, not page 2. Press OK to set those …

16 roman numeral

And look – as if by magic, the page number is now i instead of 2.

Now, for section 3, the main body of the text, we want Arabic numerals which continue from the last number in Section 2. So in this case we choose the Number Format to be the default, Arabic, opion, and tick Continue from previous section. In this screenshot, I’ve already pressed OK, so look at the bottom of the page …

16 next section

and there’s a lovely figure three.

So, to you what weve done in a colourful and dramatic way which is a bit more over the top than what we would actually want our document to look like, we’ve done this:

17 all done

And while individual institutions’ formatting rules still take precedence, this is what most of my PhD students like their thesis page numbering to look like.

In this article we’ve learned how to add different kinds of page number to different parts of the document, and more complicated formats for page numbers. If you need more of a recap on the basics of page numbering, see the article on that topic.

If you have found this article useful, please share it using the buttons below, and leave me a comment!

If you’re at all interested in my anti-cholesterol diet book which I used as an example in this document, find out more here.

This is part of my series on how to avoid time-consuming “short cuts” and use Word in the right way to maximise your time and improve the look of your documents.

Please note, these hints work with versions of Microsoft Word currently in use – Word 2003, Word 2007 and Word 2010, all for PC. Mac compatible versions of Word should have similar options. Always save a copy of your document before manipulating it. I bear no responsibility for any pickles you might get yourself into!

Find all the short cuts here

 
11 Comments

Posted by on March 6, 2013 in Errors, New skills, Short cuts, Word, Writing


Tags: , , , , , , , ,