RSS

Category Archives: Students

Essay mills are to become illegal in the UK

The BBC has reported that “essay mills”, where companies sell pre-written complete essays to students, are to be outlawed as part of the Skills and Post-16 Education Bill. I welcome this, and hope it will drive this practice away from higher education. However, this does need to be accompanied by better essay-writing and pastoral care support for students, who are often tempted to cheat, not out of laziness, but because of high social and academic pressures.

What is an essay mill?

An essay mill is a company that exists to make money from providing pre-written essays and even dissertations on topics which students purchase and try to pass of as their own.

In my (of course entirely legitimate and very careful) dealings with student clients, I come across so many examples of organisations who prey on them and abuse them while extracting money from them. More times than I can count, a student has come to me having already had their essay “edited”, which has, at best, involved running a simple spell check over it. Particularly for students whose English is an additional language to the one or more languages they are already fluent in, this can be woefully insufficient for them. They pay money, often a lot of it, and are left with something not fit for purpose that needs re-editing. When I worked on a university campus, I would see stickers on lamp-posts offering editing or proofreading services for students, or, indeed, advertising essay mills.

Why are students tempted to use essay mills?

I firmly believe this is not all out of laziness and trying to buy your way through university. Of course, some examples may be that, but in my decade and more of dealing with students, especially overseas students who are not fluent writers in English, I have seen the huge pressure to perform that can sometimes overwhelm. Overseas students in particular pay huge fees to attend British universities, even higher than national students, and this money has been paid by families or sponsors. I am not sure that English language support is even across institutes of higher education and I have come across many students who clearly understand their topic but lack the skills to present it in English that is deemed acceptable by their authorities.

I need to emphasise here that I have huge respect for anyone pursuing higher education in their second, third, fourth, whatever language. My French is decent and my Spanish is getting there, my Icelandic can raise a wan smile and I can speak Italian only when in Italy: I would not wish to write a university-level essay in any of these languages. Also, it’s not only overseas students who use essay mills.

So you’re pressured to make good use of the money that’s been spent on you, you know your English skills are not brilliant, and you see an ad where you can buy an essay. What are you going to do?

What happens if a student submits an essay they’ve bought from an essay mill?

Universities and colleges are of course wise to the use of essay mills and the purchase of pre-written essays. Of course these essays aren’t individually written for each student, so they will crop up regularly. Plagiarism software will pick them up easily, and the tutor may also realise that the language used is very different from the student’s usual level of English.

I would hope that the university would offer support in English language skills and essay writing rather than simply censuring the student. I hope there’s more understanding for the people they have brought over and charged highly for this British education.

Dealing with plagiarism carefully

Of course this is all about plagiarism: passing someone else’s work off as your own. Legitimate and careful editors/proofreaders who work with students, like me, are very careful about plagiarism. I have a line I won’t cross in terms of how many corrections and suggestions I’ll make to a student’s work, and I have turned down work several times where it’s clear that too much help is needed from me, and advised the student to approach their tutor for support. I have some resources about plagiarism below.

If you’re a student looking for help and support with essays, I suggest you do the following:

  • Ask your tutor or the library support staff if there are any courses or classes available
  • If you need a proofreader for your essays, ask your tutor or classmates if they can recommend someone
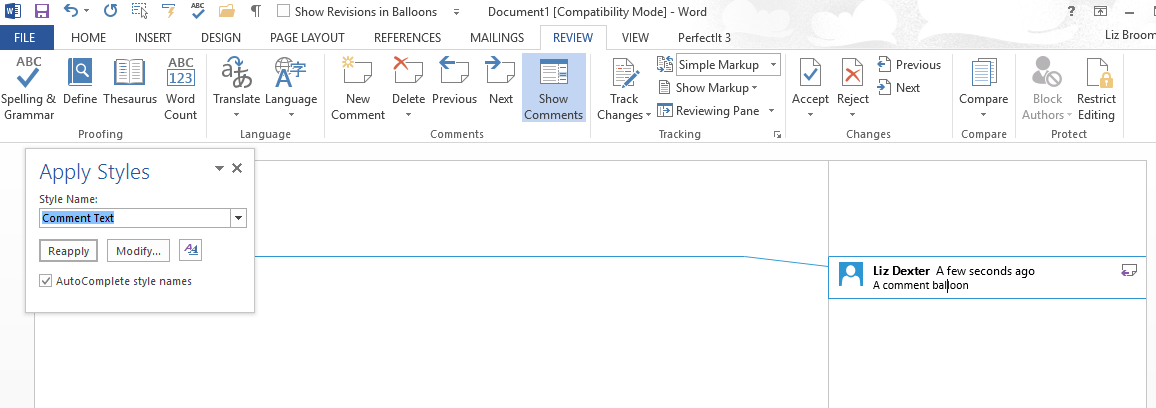
  • If you need to find a proofreader for your essays or dissertation yourself, look for a service provider who has a statement about plagiarism and terms and conditions on their website. Ask them how they do the work, and check that they leave Tracked Changes turned on so you can see and assess their changes and decide yourself if you want to accept them.

This article was triggered by the announcement that essay farms are going to be made illegal in the UK. I have explained what they are and why students might used them, pleaded for understanding and discussed how else students can find support, with a mention of how they might choose that support. There are some resources below on plagiarism which you might also find useful.

Other resources on this website

For students

Choosing a proofreader – student edition

My terms and conditions

Why has my proofreader not edited my bibliography?

Referencing – how to keep track and how to refer to your reference materials

How to quote sources without plagiarising – rewording and quoting appropriately

Essay tips for new students – handy for undergraduates

Top tips for dissertations and theses – from people who’ve been there

Top tips for writing up your PhD

Appropriate language in academic writing

For editors

On (not) crossing the line

Plagiarism – what it is and how a proofreader should work with student material (and my terms and conditions)

Student at risk of plagiarism 1: What do you do when a text isn’t referenced properly?

Student at risk of plagiarism 3: Sending feedback to your student client and their supervisor

 
6 Comments

Posted by on October 11, 2021 in Copyediting, Ethics, proofreading, Students, Writing


Tags: , ,

How do you create a two-line figure caption and a one-line entry in your Table of Figures? Word 2010, 2013, 2016

This one was suggested by a regular reader of this blog in a comment, and I promise to write about it quite a long time ago.

This is a very specific situation where the style guide for your organisation or publisher demands that you have Figure and Table captions set out over two lines, but you want the Table of Figures to have one line including both Figure label and caption, so it looks something like this:

caption with two lines table of figures with one

How not to create a two-line figure caption

The natural inclination is to use the Return key to split the Figure label and caption, either by entering it all in one line in Insert Caption then splitting it up or using Insert Caption to add the title, hitting Enter then adding the caption. However, when you create your Table of Figures, it either won’t pick up the second line at all or will create two entries in the Table of Figures:

incorrect two line caption and table of figures

How to create a two-line figure caption so the Table of Figures only has one line per figure

This is how you do it correctly. The key is to use the soft line return (Shift+Enter) rather than a hard, paragraph return (Enter).

Place the cursor where you want to insert your caption and go to the References tab, Insert Caption:

Insert caption

Make sure the figure label reads as you want it to (adjust the label to Table, etc.) and then hit OK

Insert caption word

Place the cursor at the end of the figure label and hit Shift+Enter to start a new line:

Adding a new line to your caption word

Type in your caption:

word second line of caption

ALTERNATIVELY

Type the whole caption into the Insert Caption box and press OK:

word insert whole caption before splitting

Place the cursor at the start of the caption and press Shift+Enter to move it down to the next line:

4b-split-whole-caption

Now create your Table of Figures using References, Insert Table of Figures and you should have one entry per Figure:

caption with two lines table of figures with one

This article has taught you how to create two-line figure captions which show on one line in your Table of Figures.

If you have found this useful, please comment using the comment box below and/or share using the social media sharing buttons. Thank you!

Other useful posts on this blog

How to create a Table of Contents

Table of Figures and Table of Tables

How to update your Table of Contents, Table of Tables or Table of Figures

Editing and the Table of Contents

 
12 Comments

Posted by on October 26, 2016 in Copyediting, Short cuts, Students, Word, Writing


Tags: , , ,

How do I include quotations in my document? Should I change their language and spelling?

How do I include quotations in my document? Should I change their language and spelling?

Thank you to Vedrana Vojkvić for suggesting this topic to me via Twitter. She asked me for my input on a question she was discussing: what do we do if we are following UK spelling conventions and there’s a direct quotation that follows US spelling conventions? She also introduced the idea of [sic], asking to clarify that that is used only for actual errors in quotations, not just to highlight use of a different variety of English.

How do I include quotations in American English in my British English document?

This, of course, works both ways. If you are following US spelling and grammar conventions in your document and you need to quote something from a British English source, or you’re writing UK English and want to quote from an American source, should you change the spelling in your quotation to match the standard you are using in your main text?

Short answer: no.

Quotations are quotations from the original text. They should be quoted as they are, in the original.

When can I change a quotation?

There are a few occasions when you can and should change a quotation.

Note: every change you make to a quotation should be placed in [square brackets] to make sure it is clear that you have made the change.

  1. To make the grammar match the sentence in which the quotation is included. For example, you might write this: “Smith (2013) instructs the runner to ‘[go] with the flow, not setting off too fast’ (33), which is good advice,” where the original quotation ran, “A good runner goes with the flow, not setting off too fast”.
  2. When you need to explain something: “Smith (2013: 43) further states, ‘Those people [the running club members] can be very supportive’ in her seminal work.”
  3. When you need to cut text from the original quotation: “In this long passage, Smith (2012: 33) tells us to, ‘Watch out for your own over-excitement […] you must rein things in’.”
  4. If the quotations are in very archaic English and you have updated them into modern English OR the person you are quoting had a very individual use of punctuation or spelling and you have regularised it – in this case, you MUST state that you have done this in your introduction or a “Note about the quotations” at the beginning of your document. I would prefer to add modern English versions after the original in the first example and leave the quotations in the original in the second example.
  5. If you have translated the quotations out of their original language yourself – in this case, make sure to make a note of this in your introduction or a “Note about the quotations,” and if you have only translated some of the quotations, put a note [translated by the researcher] after those you have translated.

If you choose to emphasise something in the quotation that was not emphasised in the original, you must say that you have done this: “Smith says, ‘Everyone can run at their own speed and should not be pushed too far’ [emphasis added by the researcher].” (If the emphasis appears in the original, it’s good practice to add [emphasis in the original] after the quotation instead, to make that clear.)

When can I use [sic] in a quotation?

Almost never! I think that’s one for another article … However, to answer the original question, you would not need to use [sic] when quoting in one language (variety) in a text that is in another language (variety).

The golden rule of including quotations in your text

Always, always, always reference them fully so the reader can go and find them in the original!

This article has discussed how to insert quotations into a text, including what to do if they are in a different variety of English, whether you should change the spellings of quotations and when it is acceptable to change a quotation.

If you have enjoyed this article and/or found it useful, please do add a comment and/or share using the buttons below. Thank you!


Tags: , , ,

How do I add comment balloon numbering in Word 2013 and Word 2016?

I have already published a range of posts on issues with comment boxes or comment balloons, including ones on comment boxes suddenly going tiny, or comment box text running in the wrong direction, changing the language in your comment balloons. This article covers what to do to add comment balloon numbering back in Word 2013 and 2016. Incidentally, this also signposts you to how to change the style of your comment balloon in general.

Where have the comment balloon numbers gone in Word?

In Word 2013 and 2016, the default setting is for comment balloons not to have numbers. Why? I honestly don’t know. Microsoft does have a habit of “simplifying” its Office interfaces, and the numbers do change with context (if you remove Comment 2, Comment 3 will be labelled Comment 2, etc.) but I have always found it useful to have numbers in my comment balloons.

Here’s what the default looks like:

comment balloon Word 2013 no number

and this is what I’m aiming for:

Word 2013 2016 comment balloon with number

How do I change the comment balloon style and numbering?

We need to change the style of the comment balloons in order to add a number.

Click inside a comment balloon and press Ctrl+Shift+S (all at the same time, in that order) to display the Apply Styles pane:

Word 2013 2016 balloon style

This should be context-specific, but just check the style name is “Comment Text”.

Click the Modify button  to access the Modify Style pane:

Word 2013 2016 modify style
Look at the bottom of the dialogue box and click the Format button, which will give you a dropdown menu:

Word 2013 2016 numbering comments boxes

Click Numbering, which will allow you to select a numbering scheme:

Word 2013 2016 choose numbering scheme for comments

Click on the numbering scheme you want to use so that it’s highlighted with a line, and then click OK.

If you want to use a numbering scheme that’s not on this screen, click on Define New Number Format instead:

Word 2013 2016 define new numbering format

Once you’ve clicked this, you will see some new options:

7-format-choose-new-numbering

Click on OK here, which will take you back to the previous screen, OR click OK on the number format screen, then choose if you want Word to update this document (Automatically update) and to apply this default to all new documents from now on (New documents based on this template):

Word 2013 2016 apply new style

Click OK and your comment boxes will have numbers!

Word 2013 2016 comment balloon with number

This article has shown you how to add numbers to your comment balloons / boxes / text in MS Word 2013 and 2016 for PC. You can use it to modify this setting in earlier versions of Word, but they will default to having numbers.

If you have found this article helpful, please add a comment and/or share it using the buttons below. Thank you!

Other related posts on this blog

What to do if your comment boxes go tiny in Word

What to do if your comment boxes start running from right to left

Changing the language in your comment balloons

Customising your comment boxes – everything you need to know

Customising Track Changes


33 Comments

Posted by on September 21, 2016 in Copyediting, New skills, Students, Word, Writing


Tags: , , , ,

What is a style sheet? For people using editors

DictionariesIf you work with a proofreader or editor on any project, either for a publisher or working independently or as a student, you might receive a Style Sheet from them with your corrected work. This article explains what a style sheet is, the purpose of a style sheet, and what might be included on it. I’ve also written this article to send to my clients so they understand what the document I’ve sent them is – so if you’re one of my clients, hello!

To make this article easier to read, I will refer to the person who has worked on your document as your “editor” – although I might refer to proofreaders in some places, too.

If you’re an editor or proofreader who wants to find out more about style sheets, I’ve written an article just for you, too.

What is a style sheet?

A style sheet is a list setting out the decisions that your editor has made on aspects of the layout and language of your document, in order to keep the document consistent.

It might include notes on what font is used, whether the text is left or fully justified, how particular words are capitalised or hyphenated, how much indent your indented quotations have, what is put in italics, etc. We’ll have a look at an example later on, but that’s a very short summary.

Why use a style sheet?

Especially if you’ve learned English as a second or other language, you will know that the English language is not consistent, and it doesn’t even have proper rules for some things! This can be really frustrating, as two people might do things in two different ways, BOTH of which are correct.

For example, in English …

  • we can use -s- spellings or -z- spellings in words like “organisation”
  • we can capitalise or not capitalise words like Chapter 1 or experiment 2
  • we can use orient or orientate
  • we can hyphenate or not hyphenate pairs of words like policy-maker

And that’s before you get to decisions like …

  • are you going to use 20%, 20 per cent or twenty per cent?
  • are you going to describe America as America, the United States, the US, the USA, the U.S. etc. etc.?
  • are you going to use double inverted commas for quotations and single inverted commas for concepts, or vice versa?
  • are you going to refer to other research as (Brown, 2003; Green and Jones, 2005, p. 23) or (Brown 2003, Green & Jones 2005:23) or any other variant

Now, the important thing with all of these is to keep it consistent.

Some of these rules might be set down in a style guide or referencing guide (see below). But whether you and your editor are working to a style guide or not, it’s useful to have these decisions written down in one place for you both to refer to.

What’s the difference between a style guide, a referencing guide and a style sheet?

A style guide is a specific guide to how to deal with things like the above decisions – famous ones include Oxford Style in the UK, APA Style and Chicago Manual of Style and AP Stylebook in the US.

A referencing guide is a specific way of writing out references to work you are talking about in your dissertation or book – an example is Harvard referencing.

Some universities and many publishers and marketing agencies etc. will have their own guides which documents published under their name or submitted to them will have to have.

In this case, I could do without a style sheet and just refer my client to … well, a massive website or a giant book. Maybe not. In that case, I’ll note which style guide or referencing system I’ve used and still write out any important points which will impact the document in question.

Please note that I (and I imagine most editors) have favourite style decisions – I prefer orientate to orient, for example, and where there is no clear preference in the text, I will go for my preferred option. If, however, the text itself has 33 orients and 2 orientates, I will go with the majority.

This also means that some parts of the following examples might jar with any editors reading this – they are only examples!

What does a style sheet look like?

Here’s an example style sheet with some of the decisions I might make …

style sheet 1

This is a standard style sheet – I tend to go from the general (the whole layout, all quotations, the tenses used) down to the particular …

style sheet 2

What should I do with the style sheet my editor has sent to me?

Good question – now you understand why your editor has sent you a style sheet and what it’s for … well, why does it matter and what should you do with it?

Here are some important uses of the style sheet:

  1. It will help you to understand some of the changes your editor has made.
  2. If your editor has just edited one chapter, they might send you the style sheet with that chapter and ask you to look through it and check you agree with everything on it. They might even send over some queries – if it’s not clear which option my client prefers, I will highlight the choice and ask them to look at it. If you don’t agree, let them know straight away, then they might change it if it’s not a rule of grammar that can’t be flexible.
  3. If your work is going to be edited by more than one person, they will share a style sheet to make sure it is edited consistently.
  4. If you are planning to add to the document, you can make sure that any additional text you write is consistent with the text that your editor has already checked.
  5. If you have been through edits and your document is going to be proofread, send the style sheet to your proofreader, then they will know what choices the editor has made, and will be able to look out for any errors much more easily.

——-

In this article, we’ve learned what a style sheet is, why it’s used, how a style sheet is different from a style guide and referencing guide, but backs them up, and what to do with a style sheet when you’ve been sent one, as well as seeing an example of one. I hope this helps you: do comment and/or share this article using the sharing buttons below if you’ve found it useful!

Other relevant posts on this blog

Style sheets for editors and proofreaders

 
24 Comments

Posted by on January 14, 2016 in Copyediting, proofreading, Students, Writing


Tags: , , , ,

How do I change my initials in Word 2007, 2010 and 2013?

Your name and initials appear in the File Properties of your Word document, and also in any comments that you make on a document, plus in the text that appears when someone hovers over text that you’ve added or deleted. So it’s important that it’s right – usually Word pulls this over from your registration details, but you may wish to change it, for example if you want to add a general company or team name and initials rather than your own. Here’s how!

You will find the option to change your initials and name in Word Options. Word Options are accessed slightly differently in Word 2007, 2010 and 2013, so I will break this down by the version of Word that you’re using:

How do I change my initials in Word 2007?

Access Word Options by clicking the Office button at top left, then Word Options at the bottom:

1 word options 2007

Your Word Options box will open on the Popular tab and you can now change your name and initials:

1 2007

How do I change my initials in Office 2010?

Click on the File tab and select Options:

2 word options 2010

Click on Options, and you can change your name and initials:

2 2010

How do I change my initials in Word 2013?

First click on the File tab:

3a word options 2013

Select Options at the bottom of the list (use the arrow in a circle at the top left to get back to your document):

3b word options 2013

Click on Options and change your initials and name:

3 2013

This is part of my series on how to avoid time-consuming “short cuts” and use Word in the right way to maximise your time and improve the look of your documents. Find all the short cuts here

Do let me know if this has helped you – and do share with the buttons at the bottom of this article.

 
22 Comments

Posted by on November 13, 2013 in Copyediting, New skills, Students, Word, Writing


Tags: , , , , , , ,

How do I access Word Options in Word 2007, 2010 and 2013?

Word Options is the place where you customise the look of your Word document, how it corrects your words as you type away, the spell checker, your initials on any comments and the document properties, etc. It’s a great place to explore and enables you to customise Word and get it exactly how you want it.

However, it does work slightly differently in the three most commonly used versions of Word for PC: Word 2007, Word 2010 and Word 2013, so here’s a quick guide to how to access Word Options in these different versions of Word.

How to access the Word Options in Word 2007:

Click on the Office button in the top left of the screen, then click on Word Options at the bottom of the box:

1 word options 2007

Your Word Options box will now display:

1b word options 2007

How to access the Word Options in Office 2010:

In Word 2010, click on the File tab and then select Options, one up from the bottom of the list on the left hand side:

2 word options 2010

Once you’ve clicked on Options, your Word Options box will appear:

4 trust center

How to access Word Options in Word 2013:

In Word 2013, click on the File tab:

3a word options 2013

This has the effect of making your screen disappear, but you will get a list of things to do, out of which you select Options at the very bottom of the list (you can click that left-pointing arrow in a circle at the top left to get back to your document):

3b word options 2013

Clicking on Options will bring up the Options box:

3c word options 2013

This is part of my series on how to avoid time-consuming “short cuts” and use Word in the right way to maximise your time and improve the look of your documents. Find all the short cuts here

Do let me know if this has helped you – and do share with the buttons at the bottom of this article.

 
16 Comments

Posted by on November 6, 2013 in Copyediting, New skills, Students, Word, Writing


Tags: , , , , , , ,

Help – my Word comment box initials keep changing

comment balloonI had a query about this issue the other day and found there were no blog posts about it. Now there are.

My correspondent was busy adding comments to a document. Each time he did so, his initials appeared in the comment box, as they do (I will post soon on how to change your initials in your comment boxes). But each time he pressed Save, the initials changed back to “A”. Why?

Well, I went to look and it took me and a friend searching to find a rather obscure help forum that explained what was happening! So here’s what you do to stop the initials in your comment balloons changing by themselves in Word 2007, Word 2010 and Word 2013.

Why do the initials in my comment balloons keep changing every time I press Save?

The reason for your own initials disappearing is that Word is carefully applying a rule called “Remove personal information from file properties on save”. The properties are details attached to your document about who created and edited the document. And how do you change this?

Go into Word Options.The way into this differs for Word 2007, Word 2010 and Word 2013, although fortunately all of these routes end up in pretty well the same place, so …

Accessing Word Options in Word 2007:

Click on the Office button in the top left of the screen, then click on Word Options at the bottom of the box:

1 word options 2007

Accessing Word Options in Office 2010:

In Word 2010, click on the File tab and then select Options, one up from the bottom of the list on the left hand side:

2 word options 2010

Accessing Word Options in Word 2013:

In Word 2013, click on the File tab:

3a word options 2013

This has the effect of making your screen disappear, but you will get a list of things to do, out of which you select Options at the very bottom of the list (you can click that left-pointing arrow in a circle at the top left to get back to your document):

3b word options 2013

Accessing the Trust Center

The Options screen that will now come up is very similar in Word 2007, 2010 and 2013, so I’m going to use screenshots from Word 2010 as a middle way from now on – the others differ slightly, but you will still see the same options to choose from.

4 trust center

From here, click on Trust Center and then Trust Center Settings:

5 trust center settings

Now select Privacy Options, and you should find an option “Remove personal information from file properties on save”. Note that if this is enabled, it will be ticked and you will be able to untick it. Here, it’s greyed out, but you can see where you can find it:

6 privacy options

Once you have unticked this box, your initials will remain on your comment boxes however many times you save or close and open your document!

————————-

Why not take a look at these related topics, which should help you with any other comment box issues?

What to do if your comment boxes go tiny in Word

What to do if your comment boxes start running from right to left

Changing the language in your comment balloons

Customising Track Changes

This is part of my series on how to avoid time-consuming “short cuts” and use Word in the right way to maximise your time and improve the look of your documents. Find all the short cuts here

Do let me know if this has helped you, saved your bacon, etc. – and do share with the buttons at the bottom of this article.

 
5 Comments

Posted by on October 23, 2013 in Copyediting, New skills, Students, Word, Writing


Tags: , , , , , , ,

Choosing a proofreader – student edition

track changesIf you’re starting an undergraduate, Master’s or PhD course and you think your writing in English might need some help, it’s a good idea to look for a reputable proofreader to help you. You might be using English as a second or other language, or have a different issue to deal with such as dyslexia or needing to use voice-recognition software. Your tutor or personal tutor might have recommended that you find someone to help you, or you might choose to try to improve things yourself. But how do you choose a reputable, genuine proofreader when there are so many companies and people out there? Here are some tips.

Be careful

The first thing I will say here is be careful. Obviously, all proofreading companies want to make money. But some of them do profit from students, in particular, not knowing what to look out for. I have heard a lot of horror stories in my time: students having their work “checked” when it’s just been run through a spell-checker, companies that don’t care about plagiarism, companies that will sell you an essay to use. Just like any other service or product, there are good and bad companies out there. Be just as careful as if you were buying a designer handbag or a car. After all, your academic mark and reputation might be at risk here.

Check with your tutor / university

Some tutors ask their students to get their work proofread, sometimes before they see it, sometimes afterwards. Universities often have policies on proofreading. For example, one university I work with has a form I must complete and sign each time I work with a PhD where I promise that I have only suggested changes in spelling, grammar, etc., and have not rewritten or otherwise changed the content of the work.

If a student comes to me and says their tutor has asked for their work to be substantially rewritten, I will ask for a scanned, signed letter on headed paper from the tutor to confirm that. So, if your tutor wants more than usual to be changed, get something in writing from them first.

Check the proofreader’s credentials

Any company or individual should state what their training and background is. A company should have a page about the kind of proofreaders that they use. An individual proofreader should have a page detailing their experience, qualifications and background.

It’s good for your proofreader to …

  • Have a degree
  • Have experience in your subject area
  • If you have a particular aspect of your language which needs to be addressed, e.g. working with voice-activated software or dyslexia, to  have experience with similar requirements
  • Be a native speaker of the language in which you are writing
  • Have a qualification from an official body (the Society for Editors and Proofreaders or the Publishing Training Centre in the UK) OR have extensive and documented experience

Check what service the proofreader offers

Check what the proofreader says that they will do – exactly.

Good things to look for:

  • Do they mention using Track Changes to mark up your work?
  • Do they mention making a note of any unclear areas?
  • Do they mention coaching students through a degree or Master’s?

Bad things to look out for:

  • Do they mention helping you to avoid getting caught for plagiarism (see section below)?
  • Do they say that they will rewrite your essay for you?
  • Do they say that you can buy an essay that someone else has written from them?
  • Do they mention compiling your bibliography for you?

These are all red flags: red for danger. If a company is offering to help you to plagiarise, avoid them. This will contravene your university’s regulations.

Ask for references and testimonials

A good proofreader / company will offer references and testimonials on their website.

Things to look out for:

  • References from people who are doing the same sort of thing as you (Master’s Dissertation, PhD, etc.)
  • References including full names rather than Mr D and Ms Y (note that not all of them will have the full name, but at least some should)
  • References should not all be identical. They should look like they were written by real people.

Check your proofreader’s policy on plagiarism

Plagiarism is a serious offence. If you plagiarise and get caught, you could get kicked off your course. At the very least, if you get caught, you will lose marks. Even if you don’t get caught, plagiarism – passing off someone else’s work as your own – is unethical and wrong. If you plagiarise, you are also not learning what you should be learning from your course.

I found a student proofreading company the other day that boasted of rewriting students’ work so that they will not get caught by plagiarism software. This is a bad thing to do. I would advise you never to go near a company that offers such services.

Another student proofreading company, and the only one I work with myself, has FAQs on their website. These strictly state that you cannot expect them to write your essay for you or to paraphrase sections of your work that you have taken from other books or essays. This is a good thing to do and I would advise you to look for this kind of statement.

I have a statement on plagiarism in my Terms and Conditions. Other places you might find it are in the FAQs or Services or Notes. If you can’t find something on a proofreader’s website, ask them. If they don’t have a plagiarism policy, or they can’t tell you what their policy is, avoid using them.

Regarding bibliographies – your proofreader should not compile your bibliography for you. Putting together a bibliography is one of the central academic skills that you are being tested on when writing your dissertation or thesis. A proofreader will check that all of the relevant entries are there (if you ask them to) and will certainly check for commas out of place and the odd mistake, but they should not write or format it for you from scratch (see more on bibliographies here).

Check that the proofreader is asking a fair price

Many proofreading companies seem to ask for a very high price for their work. I’ve checked and this year prices from proofreading companies for working on a standard student essay, dissertation or thesis in the UK is around £6-£10 per 1,000 words. This increases if the work is urgent.

Individuals often charge a little less – say about £5-£10 per 1,000 words. They may charge by the hour instead.

This is a rough estimate based on searching across websites and should not be taken as anything except a loose guideline. Fees vary according to the location of the proofreader.

If someone is charging a lot less than this, do check their credentials very carefully. It is likely that the work is being outsourced to people who might not be skilled or have English as their first language.

If someone is charging a lot more than this, check what extras they are offering and whether this is worth the extra money.

Check who will be doing your work

This is very important if you’re planning on submitting more than one piece of work to the proofreader. Although the English language does have rules, personal preferences do also come in, and one proofreader may work on a text slightly differently from the next. Therefore, if you’re going to be submitting all of your Master’s coursework or your whole PhD but in separate chapters, it makes sense for the same person to deal with all of your documents.

This is more common with individual proofreaders. But a company will work with many proofreaders and may be able to offer this for you.

It can be very useful and rewarding to work with one proofreader throughout your course. They might be able to pick out certain mistakes you make and help you to work on those for the next essay. This may help you to write well and clearly in English independently of your proofreader in the end.

Book in good time

You should know at the beginning of an undergraduate or Master’s academic year when your main deadlines for the year are. If you’re doing a PhD, you should know soon when you will need to submit reports and updates, and you should schedule time for writing up.

Especially if you’ve been working with someone all year on your Master’s course, book in to have them proofread your dissertation as soon as you know the date. No proofreader minds being booked in advance – and most of us don’t mind if things slip a bit, as long as you keep us informed. But we’re all humans, and sometimes, if you leave it too late to book, we won’t be able to fit you in. That’s when panic sets in, and you might make a bad choice.

Note: If your favourite proofreader can’t book you in, they should be able to recommend other people to try. I always offer a list of alternatives out of courtesy if I can’t fit an enquirer in.

Individual proofreader or proofreading company?

You can use an individual proofreader or a proofreading company. They both have pros and cons:

An individual proofreader:

  • You can talk to them direct
  • They can guarantee to work on more than one document for you
  • They might get busy or ill and not be able to do your work or book you in

A company:

  • Should have enough proofreaders to ensure availability even at busy times
  • Might not be able to guarantee the same person to do every job for you
  • You are unlikely to be able to talk to the proofreader direct

I think you are more likely to find an ethical person among the individuals, but it’s always worth checking all of the points above.

My recommendations

As I’m fully booked at the time of writing this post (and heavily booked most of the time), you can see that I’ve written this post for you, the students, and not to get more work for myself!

I do offer a small list of personal recommendations. I cannot guarantee their availability, price or service, of course. You enter into a discussion with them at your own risk, and you can find them on my Links page. You can also use the SfEP directory to find someone to help you.

————–

In this article I have shared some tips on how students can choose a good and reputable proofreader.

If you’re a student, you might be interested in more posts for students on this website. Do click through and have a look. And best of luck with your studies!

 
10 Comments

Posted by on September 18, 2013 in Ethics, proofreading, Students, Word, Writing


Tags: , , , , ,

What to do if your comment boxes are too big in Word

I have already published a range of posts on issues with comment boxes or comment balloons, including ones on comment boxes suddenly going tiny, or comment box text running in the wrong direction, changing the language in your comment balloons. Thanks to my colleague, Laura, I realised that I needed to post an article on what to do if your comment box size, or the general comment box area, is bigger than you want it to be.

Help! My comment box margin is too large!

This is the problem that my friend, Laura, had. Her comment box margin was somehow spreading across almost the whole page. Although it doesn’t encroach on the text area on the page, it makes your total page really wide. It looked something like this:

1 too wide

Even on my wide monitor, if the comment box margin is too wide, you get the choice of being able to see all of the text, as above, or all of the comment, as below – not very helpful!

2 too wide

How do you resolve this issue? You need to pop into Track Changes (in the Review tab) and click on the little arrow at the bottom to give you the Track Changes Options. Right at the bottom, you’ll find options for making the comment review pane / margin smaller (and moving it to the left or top if you so desire).

The default is 6.5 cm but if you like to have your page of text bigger but still see your comments, change this to a smaller size.

Note, that like everything in Track Changes, this only changes the view on your computer – whoever you are sending the document to will see it however they’ve set it up.

Help! My comment box text is too large!

Are you experiencing this problem:

3 too big

To change this to a normal size, we need to access the Styles dialogue box, by either

  • Pressing Control + Alt + Shift + s simultaneously
  • Going to the Home tab and clicking the little arrow at the bottom right of the Styles menu

This brings up the Styles dialogue box.

Click the right hand button at the bottom: Manage Styles. When you first open this next window, the sort order is As Recommendedclick on the down arrow to change it to Alphabetical:

Find Balloon Text (note: not Comment text) and it confirms how you have your text set up (blue circle).

Click the Modify button … to change your font and font size. You’ll notice lots of other options (blue circle) to change the spacing, etc.

The standard size for balloon text is 8 or 10 so choose that and you’ll have a nice tidy balloon again!

Press the OK button, and carry on pressing OK buttons until you get back to your document. Now, your comment will appear in the style you have chosen.

Again, these changes will only affect your computer.

These related topics should help you further:

What to do if your comment boxes go tiny in Word

What to do if your comment boxes start running from right to left

Changing the language in your comment balloons

Customising your comment boxes – everything you need to know

Customising Track Changes

This is part of my series on how to avoid time-consuming “short cuts” and use Word in the right way to maximise your time and improve the look of your documents. Find all the short cuts here

Do let me know if this has helped you, saved your bacon, etc. – and do share with the buttons at the bottom of this article.


Tags: , , , ,