RSS

Monthly Archives: January 2013

How to highlight text in a Word document

If you are amending a Word document or perhaps working on a document with someone else (a colleague or an editor), it is sometimes useful to be able to highlight some of the text in order to point it out to your collaborator.

Here are three useful ways to highlight text in Word … and one TERRIBLE way that you will never think of using once you’ve read and digested this article.

How to highlight text by changing its colour

This can be useful if you want to mark text you want to change, edit, delete, expand, etc.

Make sure you’re in the Home tab and the Font section. Highlight the text you want to change and click on the Change Text Colour button:

1 change text colour

Choose the colour you want your text to be, and click on it. Hey presto:

2 change text colour result

This can be useful but there is a limited range of colours that are a) legible on a white background and b) sufficiently distinguishable from black. This can be particularly problematic for a reader with a visual impairment or colour blindness.

So you might want to think about using the next option …

How to highlight text using the “highlighter pen”

Just like in real life, you can scribble all over your document using a highlighter pen!. Again, you will find the Highlighter Pen button in the Home tab, Font section, next to the Change Text Colour button. You can use this in two ways:

1. Highlight your text first, then click on the button and choose a colour:

3 highlighter pen

The text you had highlighted will now appear in black with the background colour you selected:

4 highlighter pen effect

2. Place your cursor anywhere on the page and click the Highlighter Pen button. Your mouse pointer (which usually looks like a capital I unless you’ve changed it) will change to look like a pen. (Unfortunately this does now show up on a screen print. If anyone can find me a copyright-free image of this cursor change, please let me know!)

5 highlighter pen

Left click where you want to start and run the mouse pointer/pen along the text you want to highlight:

6 highlighter pen effect

The text will become highlighted as you run the pen along. Note, though, that if you use this option, your mouse pointer will keep on acting like a highlighter pen until you click back on the Highlighter Pen button and choose Stop Highlighting:

7 stop highlighting

This is all great if you just want to mark, say, chunks of text that you’ve changed so your editor can see what they need to recheck. But if you need to make any comments on that text, pay very close attention to the two methods coming up and make sure you choose the correct one!

How to highlight and comment on text the CORRECT WAY

If you want to comment on some text, the correct way to do it is this. Highlight the text and in the Review tab, Comments area, click on New Comment:

8 comment

A comment balloon will appear, and you can type your comment inside the balloon. If your collaborator wants to comment back, they can just add a new comment in a new balloon, and so it goes on.

9 comment effect

The joys of using this method are twofold:

1. You can skip through the comments using the Next Comment button and you’ll never miss one.

2. You can delete the comments you’ve dealt with, the highlighting will automatically disappear, and you’ll be left with a nice tidy document.

If you’re working with someone on a document and you want to draw their attention to something and make a comment, this way we’ve just seen is the way to do it.

How to highlight and comment on text the WRONG way

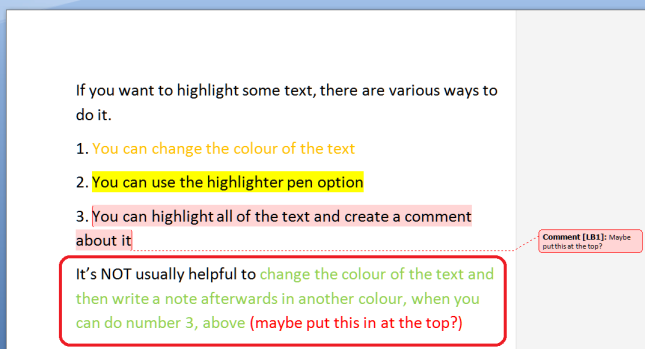
Please, don’t do this. If there’s a lovely, neat way to add comments to a document, which there is (see above), there is no need to write your comments within the text itself, like this:

10 don't do this

If you receive a document marked up like this, for each instance of a comment from your collaborator, you’re going to need to change the colour back to normal, delete the comment, or maybe add one of your own. No skipping lightly from comment to comment, but a grim stare at the document to spot the issues.

You can learn more about using Track Changes and Comments in other posts on this blog. Please don’t be tempted to try this method at home!

So, in this article we have learned how to highlight text in three good and one bad way. I hope you’ve found this useful.

If you have found this article useful, please share it using the buttons below, and leave me a comment!

This is part of my series on how to avoid time-consuming “short cuts” and use Word in the right way to maximise your time and improve the look of your documents.

Please note, these hints work with versions of Microsoft Word currently in use – Word 2003, Word 2007 and Word 2010, all for PC. Mac compatible versions of Word should have similar options. Always save a copy of your document before manipulating it. I bear no responsibility for any pickles you might get yourself into!

Find all the short cuts here

 
5 Comments

Posted by on January 23, 2013 in Errors, New skills, Short cuts, Word, Writing


Tags: , , , , , , , ,

Zeros or zeroes?

DictionariesI have to admit that I had never given this one any consideration until it came up in something I was working on yesterday, and I had to look it up to check. So: zeros or zero?

Zeros is a plural noun, and oddly enough it’s the plural of zero. No e when you have lots of zeros.

Zeroes is a form of the verb to zero (in), meaning either to set a measuring device back to zero (I have never heard or read this myself, but M confirms that he uses it with measurement devices in his scientific job!), or to home in on something: “She zeroed in on the fact that he had hidden the muddy boots in the shed”.

So the noun has no e – “there are too many zeros in this post” and the verb does have an e – “my reader zeroes in on the fact that I had to look it up and contacts me to ask me why I don’t know everything off the top of my head”.

You can find more troublesome pairs here and the index to them all so far is here.

 
9 Comments

Posted by on January 11, 2013 in Errors, Language use, Troublesome pairs, Writing


Tags: , , ,

Freezing rows and columns in Excel

It was time to create a new Gantt chart for myself to keep my various projects under control, and yet again I had forgotten how to freeze the columns and rows in the way I like. So I created this post to help myself – and you!

What is “freezing” rows and columns?

When you freeze a row or column in an Excel spreadsheet, you make sure that it’s on display however much you scroll down or across your document.

So, if you have a row of dates as a heading along the top or a column of customer names down the side, and your document becomes longer or wider than the screen on which you are viewing it, you can keep those columns and rows visible, instead of having to scroll up and down and backwards and forwards to find your headings.

For example, in the Gantt chart that records my work projects, I need to be able to see the dates and client names all the time, however large my document becomes:

Excel document

Where is the Freeze Panes button in Excel 2007 and Excel 2010?

To find the Freeze Panes button, you need to be in the View Tab, then the long Window area. Click on Freeze Panes and you’ll be given three options: Freeze Panes (note, this toggles between Freeze and Unfreeze, as we’ll discover later); Freeze Top Row; and Freeze First Column.

2 freeze top or side

How do I freeze the top row or first column of my spreadsheet?

In a shock move, something that Microsoft Office gives you as a short cut is actually useful! If you click on that Freeze Panes button and select Freeze Top Row or Freeze First Column, it will automatically freeze that row or column for you. This is because the first row and column on a given spreadsheet are likely to be the ones where you’ve inserted your headers.

Click on one of these buttons and you’ll freeze just that row or column. Freeze the top row, scroll down thousands of rows, and that top row will still be on show. Hooray!

BUT: this will only freeze one of those two areas. Want to freeze the spreadsheet so it shows more than just the first row or column? Read the next three sections.

BUT (2): this will only allow you to freeze the row or the column. If you, like me, want to freeze both a row and a column, scan down to the section titled Can I freeze a row and a column at the same time?

How do I freeze a particular row of my spreadsheet?

Say, for example, you’ve got a double row of headers, or you’ve inserted a graph at the top of your spreadsheet that you want to be able to see as you scroll down. This is where you need to be able to select the point at which the spreadsheet freezes.

Here’s where it gets a tiny bit tricky (but you’ll save this post so you remember).

Click on the row BELOW the point at which you want to freeze the spreadsheet. Not the row you want to freeze, the one below it. In this example, we’re highlighting Row 3 in order to freeze Rows 1 and 2.

Once you’ve highlighted the correct row, by clicking on the 3 in the left hand margin in this case (you can see that it’s become darker, with a line around it), click on the Freeze Panes button and select the Freeze Panes option.

3 freeze any row

Your spreadsheet is now frozen at the bottom of Row 2. If you scroll down the page, you will notice that Rows 3 and onwards start to disappear, and a horizontal black line appears at the point of freezing.

Now you can scroll down as far as you like, and Rows 1 and 2 will always be visible at the top of the screen:

Effect of freezing any row

How do I unfreeze a row or column?

Once you go to do something else with freezing, you will notice that the Freeze Panes option has changed to read Unfreeze Panes. This is because you can only do one Freezing action at a time. If you decide that you want to freeze a column instead, or want to practise doing that, you need to click the Freeze Panes button then select the Unfreeze Panes option first.

Note: you don’t need to have anything highlighted to click this. It will unfreeze anything you’ve previously frozen.

4 unfreeze panes

Oh, and you can freeze a column and row at the same time, as we’ll learn in a few moments.

How do I freeze a particular column of my spreadsheet?

If you want to freeze a particular column of your spreadsheet, you do it in the same way as you froze the particular row.

But in this case, you need to highlight the column one to the RIGHT of the column you wish to freeze. In the example below, we want to freeze at Column B, so we highlight Column C (by clicking on the C at the top of the column). Again, click the Freeze Panes button then select the Freeze Panes option.

5 freeze any rows

Now, if you scroll across the document, Columns A and B will remain visible, and a thick black line will mark where the freezing has taken place:

5 freeze any rows effect

Can I freeze a row AND a column at the same time?

Sometimes you might want to freeze both the top row and the first column of your spreadsheet. For example, I want to be able to see my list of clients, however many dates come across the page, and my dates in the top row, however long my list of clients becomes.

We’ve already learnt how to freeze just the top row or just the first column (see above), but as you might have realised,  you can’t do both – if you go back to the menu to do the second one, it just tells you to Unfreeze the panes first.

Here’s  how you do it:

Highlight the cell ONE DOWN and ONE TO THE RIGHT of the row and column you want to freeze. It’s just like freezing rows or columns. In this case, think of the cell nestling in the angle formed where the row and column you want to freeze meet. Here, we want to freeze Row 1 and Column A so that they are always visible. So we highlight the point at which Row 2 meets Column B.

6 freeze row and columnt

Using the same procedure to freeze the panes (Freeze Panes button, Freeze Panes option), we have now frozen Row 1 and Column A. If we scroll both down and across, Row 1 with the dates and Column A with the client names are still visible.

6 freeze row and column effect

Yes, Column A will scroll and the top will slide up and disappear temporarily, and yes, the dates in Row 1 will disappear as we scroll across, but the basic principle holds good:  we can see Row 1 and Column A, however much we move around the spreadsheet.

We’ve learned how to freeze rows, columns and rows plus columns today. I hope you’ve found this useful.

If you have found this article useful, please share it using the buttons below, and leave me a comment!

Related posts: How to print out the header row on every page

This is part of my series on how to avoid time-consuming “short cuts” and use Microsoft Office in the right way to maximise your time and improve the look of your documents.

Please note, these hints work with versions of Microsoft Excel currently in use – Excel 2003, Excel 2007 and Excel 2010, all for PC. Mac compatible versions of Word should have similar options. Always save a copy of your document before manipulating it. I bear no responsibility for any pickles you might get yourself into!

Find all the short cuts here

 
16 Comments

Posted by on January 9, 2013 in Errors, Excel, New skills, Short cuts, Writing


Tags: , , , , , , ,