RSS

Monthly Archives: June 2014

Spring cleaning your budget for the new financial year

spring clean your financesToday we have a guest post by Chinny Ogbuagu from Pitney Bowes, who’s going to share with us her tips for spring-cleaning your budget as you submit your tax return and move through the new financial year. It’s always good to get other people’s views on these matters, and it’s timely for me as I sort out my bank statements and records and get them all sent off to my accountant. You don’t leave it until January, do you? Read on for plenty of handy tips and hints … 

Many of us think of spring cleaning as dusting away those cobwebs, sorting out your clothes and tidying up your house. Many business owners don’t often think about the new financial year: here are some top tips on how you can start planning by streamlining your budget for the coming year.

Review Your Budget

Have you ever heard of the saying “in with the new and out with the old”? You may want to spend a day going over your expenditure during the past few months and work out if there is anything you aren’t putting enough money aside for or maybe areas where you are spending too much. Look at areas in which your company can save costs such as business phones or internet providers, and maybe even costs of office rent and stationery. It’s always a good idea to review this on a monthly basis, as it can save you time and money in the long run.

Sort out your paperwork

This is the perfect opportunity to look thorough all of your paperwork and files and shred any documents you no longer need, especially if they contain any personal information such as names, bank details, addresses or phone numbers. You might need to invest in an industrial shredder for this and there are a number of affordable options for you to choose from at a number of office suppliers such as Pitney Bowes. Do take advice from your accountant on what you are allowed to shred and what you must keep for a statutory number of years.

Create Your Own Financial Calendar

Create an online financial calendar. This will help you to set reminders throughout the year to do things such as review policies and outlines tasks you should complete every month. You can even set this up in Gmail and set reminders to your mobile phone, or alternatively invest in an online financial calendar so you don’t forget when something important needs to be paid for or relooked at.

Go Paperless

You know that you have made progress when you clean out your sock drawer and you can finally close it after years or months of storing items you no longer wear.
According to the HMRC, you are advised to hang onto tax records for a particular accounting period for normally six years from the end of that period. For example, if the accounting period ends on 31 December 2012, the records have to be kept until 31 December 2018.

It might be easiest to keep the hard copies of those. But things such as bank and credit card statements, as well as pay stubs, can be scanned and stored in a cloud-based filing provider, such as Dropbox or Google Drive.

An article on Learnvest claims that you should keep your documents for the following before shredding (again, do check with your accountant and note that this can be different for different regions of the world):
Destroy in a few days:
• ATM receipts, once you record the transaction
• Bank deposit slips, once the funds appear in your account

Destroy after 1 month:
• Receipts for things you bought on a credit card, once you get your statement, unless you need it for a return or a warranty
• Credit card statement, unless it has a tax-related expense on it

It’s important for businesses to keep on top of this so that you don’t spend more than you have to:: just like you would with your shopping or household expenses, look at the best value for money. This will help to you keep up with today’s rising costs.

This article was written by Chinny Ogbuagu who works for Pitney Bowes helping small businesses to save time and money with their range of equipment and services. She’s also an avid social media user, following and commenting on industry trends.

 
Leave a comment

Posted by on June 25, 2014 in Business, Guest posts, Organisation


Tags: ,

How to change your editing language in Word 2013, Word 2010 and Word 2007

This post is linked to my one on changing the language of your document in Word, however I’ve split them up to avoid screenprint overload.

Incidentally, this process also solves the problem of the language not appearing in the lower status bar of your Word document. This language note will only appear if you have more than one language set as the editing language in Word options.

Why would I want to change my editing language?

The main thing I’ve used this for is to force the language to appear, thus be changeable, in the lower status bar of my Word document. However, it’s also used if you are intending on loading alternative alphabets into your version of Word, if you want to use it for Chinese or Russian, for example.

How do I change my editing language in Word 2013?

This is done in Word Options. Find your Word Options by clicking the File tab:

Finding Word Options in Word 2013

Now choose Options:

Word Options Word 2013 2010

Within the Word Options window, choose Language:

Word Options Language

Look at the Choose Editing Languages section. You can see that only English (United Kingdom) is on the list at the moment. Click on the dropdown arrow by Add additional editing languages:

Choose editing language Word

Select your editing language from the list …

Choosing editing language Word

Once it’s selected, click the Add button:

Adding editing language Word

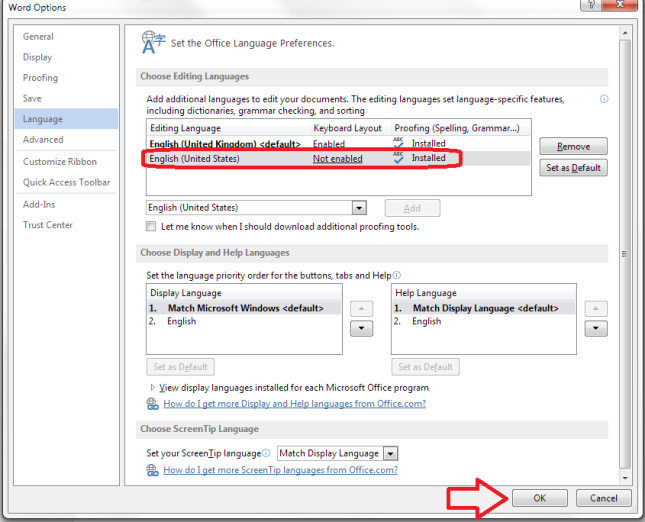
Now English (United States) has been added to the list – press the OK button at the bottom of the window:

Editing language added Word

What else can I change in the language section?

You will notice that you can also change the display and screentip languages on this screen, as well as asking Word to prompt you if you need to download any special proofing tools. This is useful if someone who only speaks a different language to the default is going to be using this copy of Word (of course, this is all changing this individual copy of Word and does not affect the document if it’s opened on different computers).

Making the changes take effect

You will now be prompted to Restart Word in order for the change to take effect. Press the OK button and close and re-open Word.

Restart Word

This process has the incidental effect of displaying the language of your document in the lower status bar in your copy of Word – and this is the way to make it display if it doesn’t do so initially.

Language displayed on lower status bar

How do I change the editing language in Word 2010?

Good news – the method of changing the editing language in Word 2010 is almost the same as in Word 2013 (above). The Word Options menu just appears slightly differently, in different colours and a slightly different layout.

Click on the File tab and then choose Options.

Word Options Word 2010

From now on, the process is exactly the same as for Word 2013 (above).

How do I change the editing language in Word 2007?

The process for changing the editing language is a bit different for Word 2007.

Access Word Options by clicking on the Office Button in the top left, then clicking on Word Options at the bottom of the window:

Word Options Word 2007

Stay on the Popular screen that comes up first, and click on Language Settings at the bottom of this screen:

Word 2007 change language

Now you have the option to enable and disable editing languages. Click on the language you want to add in the list on the left and press the Add button. Then click OK.

13 language Word 2007

In this article, we have learned how to change the editing language in Word 2013, Word 2010 and Word 2007. Do comment or use the buttons below to share if you’ve found this useful. Many thanks to Krys Williams for her help.

Related posts in this blog

How to change the language of your document in Word

How to change the language of comments

Please note, these hints work with versions of Microsoft Word currently in use – Word 2007, Word 2010 and Word 2013, all for PC. Mac compatible versions of Word should have similar options. Always save a copy of your document before manipulating it. I bear no responsibility for any pickles you might get yourself into!

Find all the short cuts here

 
13 Comments

Posted by on June 18, 2014 in Word


Tags: , , ,

Developing your Business: Expanding into Regional Offices

Sneak preview of the image from my new bookWelcome to another expert post in my series on growing your business. Today we’re going to take a look at why it makes sense to have a physical presence around the country (or beyond), written for us by Juliet Martin, representing Regus. Linked to this post, you can read about small business owners’ own experience moving out of the home office here, and Sam Barnes’ post about what to consider when planning to move outside the home here. Juliet’s going to share with us the value of renting offices in different places.

Advantages of Renting Corporate Settings around the Country

Today’s ever-growing business world is taking with it the ability for any one enterprise to be localised in a particular place. This means you should at least consider setting up new branches or virtual offices in multiple locations across the nation. Even though you will have to then manage a number of settings, you will gain plenty of benefits in the long run. Adapting to these modern, global times will provide you with the following five corporate advantages.

A commercial building

It pays to have more than one branch for your business Image

1. Access to Local Resources

If you produce any kind of goods, you may find that the various materials and components required are sourced from multiple areas around the country. For example, you may find the following are located in different regions:

• Mines
• Factories
• Ports
• Plantations
• Refineries

By opening up small branches near each of these facilities, you will then give your company greater access to a range of materials and services directly from the source. This means you won’t have to rely on a third party to bring these essentials to you.

2. Lowering Your Monthly Rent

Believe it or not, it may actually be more cost-effective to run a number of bare-bones offices around the country than a fully functional corporate setting in a single location. After you have negotiated to reduce the rent of your many branches, you can then look forward to even more savings thanks to the smaller and more compact premises that your company is now working from. If you can simplify how your work settings are planned out, eliminating excess features and only renting what is necessary, you can streamline your outgoing cash flow and still benefit from a number of corporate environments located around the country.

3. Honing Your Corporate Marketing

One difficulty that any localised business has is that its target audience is fairly limited, being restricted to a single geographical area. You can get around this by working from several different locations across the country. In general, people will wish to work with a business that has a presence in their neighbourhood because:

• It provides a local face to the company
• Contacting the enterprise is much easier
• Delivery times won’t be needlessly long
• Employees will be much more relatable

By branching out across the nation, you can tap into a wider consumer base than ever before, enabling you to find additional customers and boosting your sales to help cover the rental costs of your various corporate locations.

4. Added Convenience for Clients

Another advantage to the consumer is that it is far easier for them to come and visit your workplace if you are found scattered across the country. To cater to all your client’s needs, rent some office space at business centres around the nation. This will give them additional convenience as they can deal with your company in a number of ways thanks to your now local business setting. For example, they should be able to:

• Visit your office without driving for hours
• Post parcels and letters to you cheaply
• Phone without expensive long distance rates

There are times when your clients want some personal attention. In these cases, email won’t suffice. Video conferencing can be difficult to set up properly too. A better solution is just to have a local branch available so they can arrange for an appointment with you or a company representative without having to go through a lot of hassle to get there.

5. Broadening the Talent Pool

Lastly, by making the effort to rent corporate premises around the country, you will then have access to a greater range of skilled workers for your business. The truth is that having the right resources is crucial to helping you identify new talent. In this case, the resources in question are your local offices which can then tap into the growing number of potential candidates found in those local regions. People may not want to relocate to another city to work with your company so having multiple branches will give them a reason to sign on with you even though your main office is found halfway across the nation! In this way, you can increase the sheer talent within your organisation and grow your products and services accordingly.

As a brief recap, we can see that renting workplaces across the country can indeed provide many benefits to any enterprise. These advantages include the following:

1. Ease of access to national resources
2. More cost-effective rental payments
3. Effective locally targeted advertising
4. Increased consumer convenience
5. Wider talent pool for new employees

We would recommend that you get out there and expand your business operations as soon as possible to reap all of the above rewards. By occupying some of the best corporate spaces around the country, your company can grow and your customers will get even better service as a result! To make the process easier, get in touch with a provider such as Regus for assistance on renting suitable spaces at cities or regions you have interests in.

Author Bio: Juliet Martin is from Regus, a global office space solutions provider. Founded in 1989, Regus is a global organisation that aims to provide only the best office spaces and meeting venues to all kinds of businesses.

This post is part of my series on growing your business. Read more here and read about my own business journey in my books.

 
1 Comment

Posted by on June 11, 2014 in Business, Guest posts, Organisation


Tags: , , ,

How to add an admin or moderator to your Facebook business page

In this post we’re going to learn how to add someone as a moderator on your business or organisation’s Facebook page, and also what it looks like when you are added as a moderator of a page. For more basic information about setting up your Facebook page, see my article on Facebook for business.

How do I add someone as an administrator to my Facebook page?

To be added as an administrator of a page, you must Like that page first (or to be added as an administrator of a group, you must be a member of that group)

To add someone as an administrator of a page, they must Like that page first.

To add someone as a moderator, find See Likes on the Admin Panel of your page

1 likes button

You will see a list of people who have “Liked” your page, each with a little icon to the right.

2 list of likes

Find the person you want to add, click on the icon and choose Make Admin:

3 make admin

Once you’ve done that, you will get another screen which shows all of the people who are admins of that page:

4 make admin

This shows that you’ve added someone to have admin rights. Note the x top right – this can be used to remove them. Press Save … and you’ll be asked for your password (just as a safety measure):

5 make admin

Add your password and there they are, an admin.

How do I access the Page Roles area to change what my moderators can do?

If you want to change the roles that people have in moderating your page, go into the Page roles area by choosing Edit Page in the Admin Panel, then Manage Page Roles:

Facebook page moderator page roles

What are the different Facebook page moderator levels?

You can choose different levels of moderation to give to your admin people. If you want to change these at any time, go into the Page Roles area by choosing Edit Page then Manage Page Roles (see screenshot in the previous section.

Now, click on the arrow by the role name assigned to your moderator, and you will see a list of choices. The role that the administrator currently has will have a tick next to it. Click on a role to change the privileges that the administrator has.

Facebook page role optionsAn Admin can send messages, post as the page, create ads, see which person has created a post or comment, view insights (stats etc.) and assign page roles

An Editor can do everything that an Admin can do, plus they can edit the page itself.

A Moderator can do everything that an Admin can do, plus they can delete comments on the page

An Advertiser can see who created posts and comments, view insights (stats) and create adverts

An Analyst can see who created posts and comments and view insights

What does it look like when I’m added as an Admin of a Facebook page or group?

When the moderator of the page adds you as an admin, you will receive a notification. Depending on how you have notifications set up, you may receive an email – there will be a notification in your Facebook Notifications list. Here’s Laura’s which arrived after I’d added her, above:

facebook notification - added as moderator

On your own Facebook feed, you will see all of the Pages you administrate under the Pages heading. For groups, there is also a section called Groups You Admin under the Groups heading.

6 groups you admin

And here’s Laura’s Facebook menu, showing that she’s now administrator of her own page and mine:

List ofFacebook pages for which you are admin

To view the page or group for which you have admin rights, click on the page or group and your view will be that of the administrator, with the Admin panel at the top:

7 admin panel

What does having moderator status for a Facebook page actually mean?

Once you’re a moderator / admin, you can do any or all of the following (see list above for the different roles): see all of the statistics for the page, who likes that page and how the posts on the page are doing; comment under the name of the page (so in my case, Laura can post on the page as if she’s called Libro Proofreading and Copyediting Services) and delete other people’s comments as appropriate; create adverts.

So, if you are the owner of a page and add admins, be careful if you’ve associated a bank account or PayPal account with the page, or make sure you choose the appropriate role level for your moderators and make sure you trust any people to whom you’ve given full roles to not to go booking millions of adverts without your say-so!

To summarise – if someone asks you to be a page administrator / moderator for their or their business’s Facebook page:

  • Make sure you ‘Like’ their page first
  • Ask them to find you in the list of people who ‘Like the page’
  • Ask them to click and make you a moderator
  • You will receive a notification and the page will appear at the top of your page list in the left-hand margin
  • Click on the page name in the left-hand margin and you will have full administrator rights

In this post, we’ve learned how to add someone as a page administrator, and what happens to that person’s view of Facebook once this has been done. Thanks to Laura Ripper for providing screen shots and being a guinea pig page admin! Her Facebook page is here and the Libro one is here.

If you’ve enjoyed this post and found it useful, please share it using the buttons below! Thank you!

You can find more resources on social media in my blog resource guide (link takes you to the social media section) and read about using social media for your business in my book on growing your business.

Related posts on this blog:

Facebook for business

How to delete posts and block users from your Facebook page

 
27 Comments

Posted by on June 4, 2014 in Business, Social media


Tags: , ,