This article tells you how to view just one reviewer’s changes in Track Changes in Word (the screenshots are for Word 2010 and Word 2013 separately but this works for all version of Word, including Word 2003 and Word 2007). Once you can see the changes made by one editor or reviewer, you can delete the changes made by that one reviewer, leaving only the changes made by the other reviewers.
Why would I want to accept only one reviewer’s changes in Track Changes?
Recently, I worked on a document where I made all of my usual changes or comments, then the author responded and sent it back to me for re-checking. They hadn’t accepted my initial changes, but had told me in the email that they were OK. Because the document looked really messy and confusing, I wanted to accept all of my changes and just work with the author’s additions and amendments. Here’s how I did it.
Note, it looks slightly different in Word 2007/2010 and Word 2013, with subtly different terminology, so we’ll look at 2007-2010 first and then 2013
How do I see and accept one reviewer’s changes in Word 2007 and Word 2010?
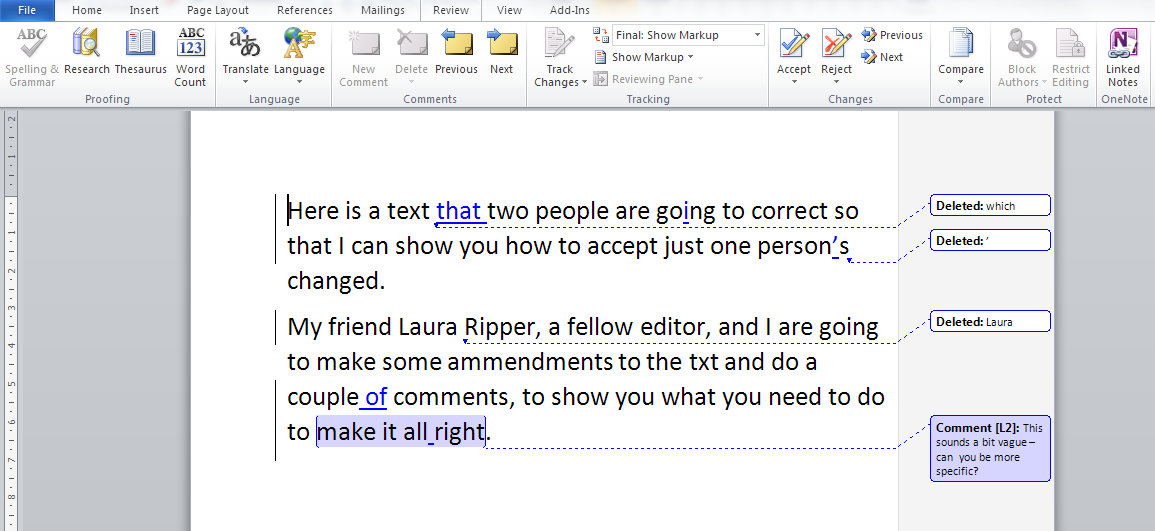
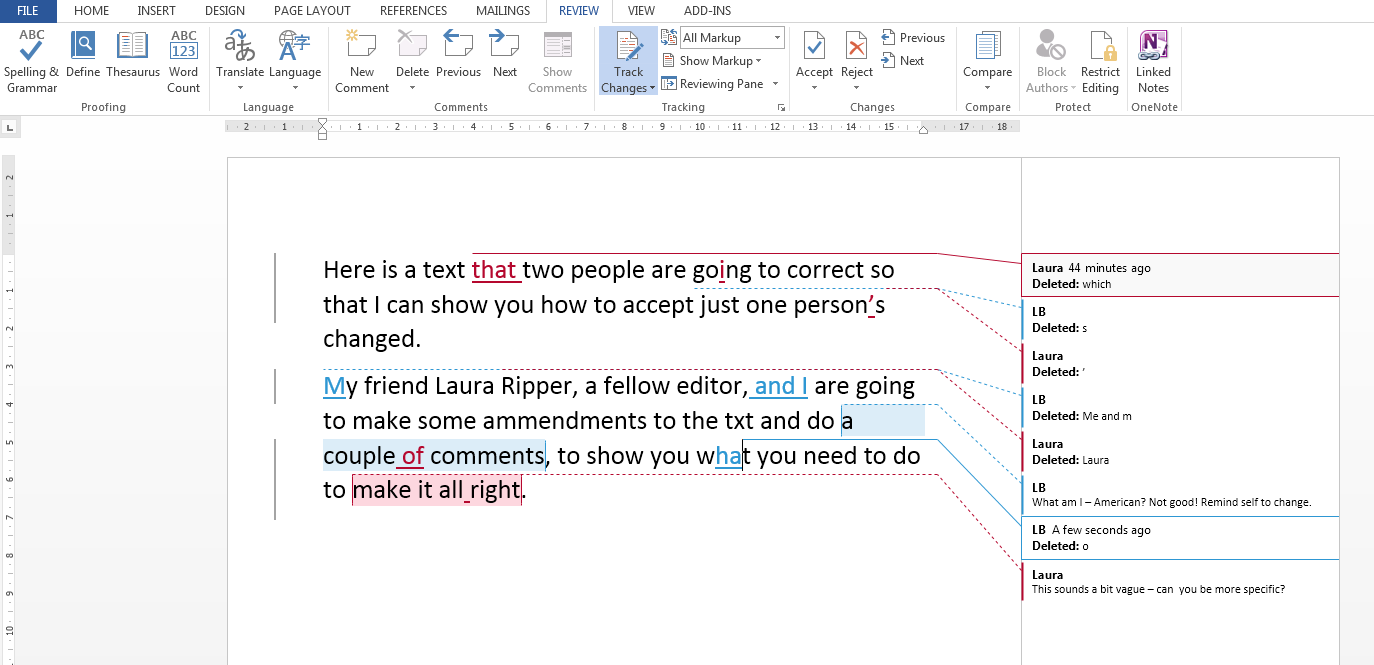
Here’s our text, with comments and corrections by two reviewers, shown in two colours. What I want to do is accept the changes made in blue and just end up with the ones in red to review.

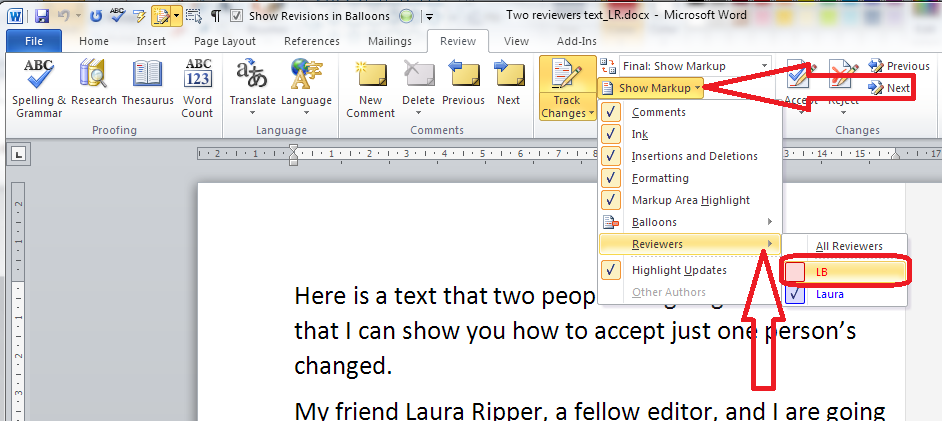
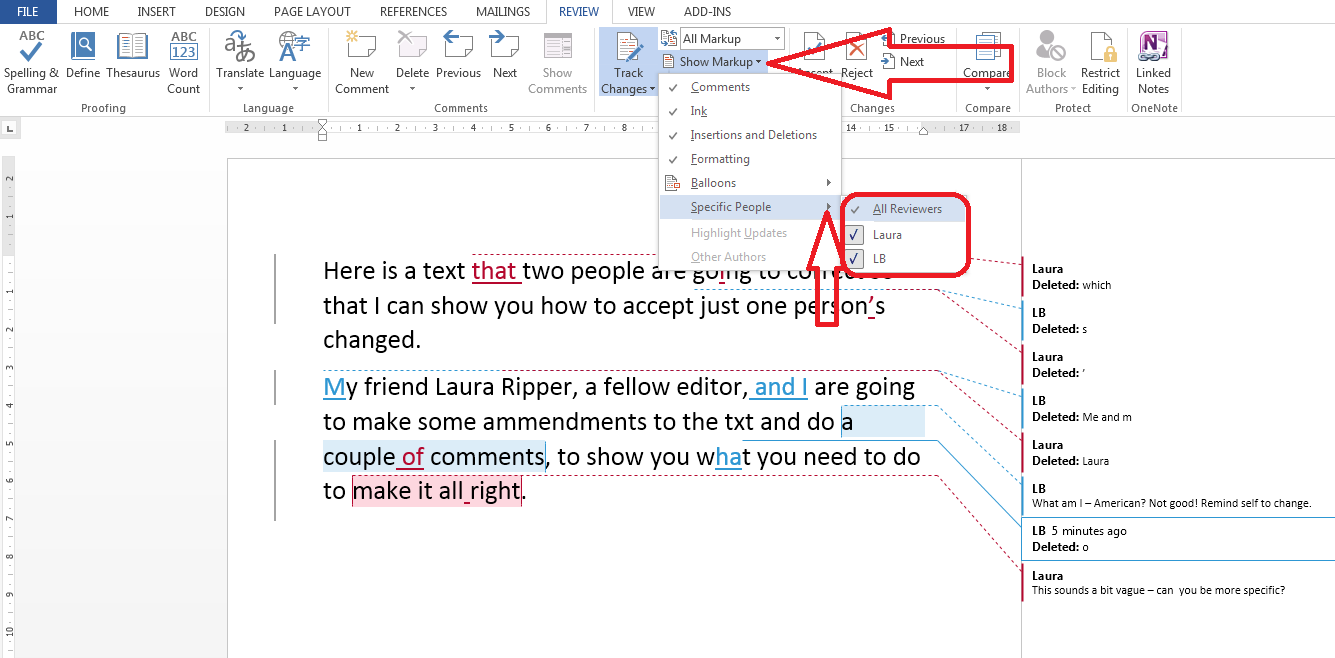
First of all, we need to show only one reviewer’s corrections. We do this in the Review tab, Track Changes area. Click on the arrow next to Show Markup and then Reviewers on the drop-down menu. This allows you to tick or un-tick by different names. IN this case, I want to interact with just the changes made in blue – the ones I want to accept. So I click on the tick box by the LB initials, to un-tick that box and only see Laura’s corrections:

Once I’ve done that, I can only see the blue corrections. Note that the red comment box has also disappeared. We only see comments and corrections by Laura, but the ones made by LB will still be there behind the scenes.
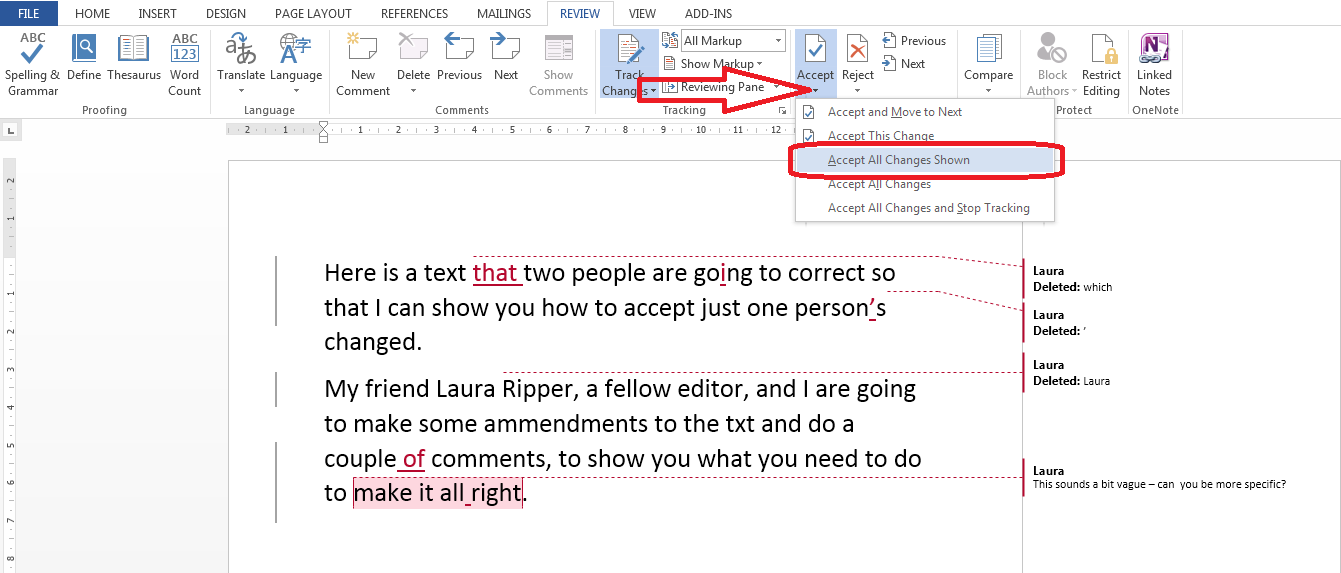
Now I want to accept these blue changes. In the Review tab, Track Changes, I click on the arrow at the bottom of the Accept button and click Accept All Changes Shown (it’s important to pick this one – if I chose Accept All Changes in Document, all of the changes, hidden and visible, would be accepted).

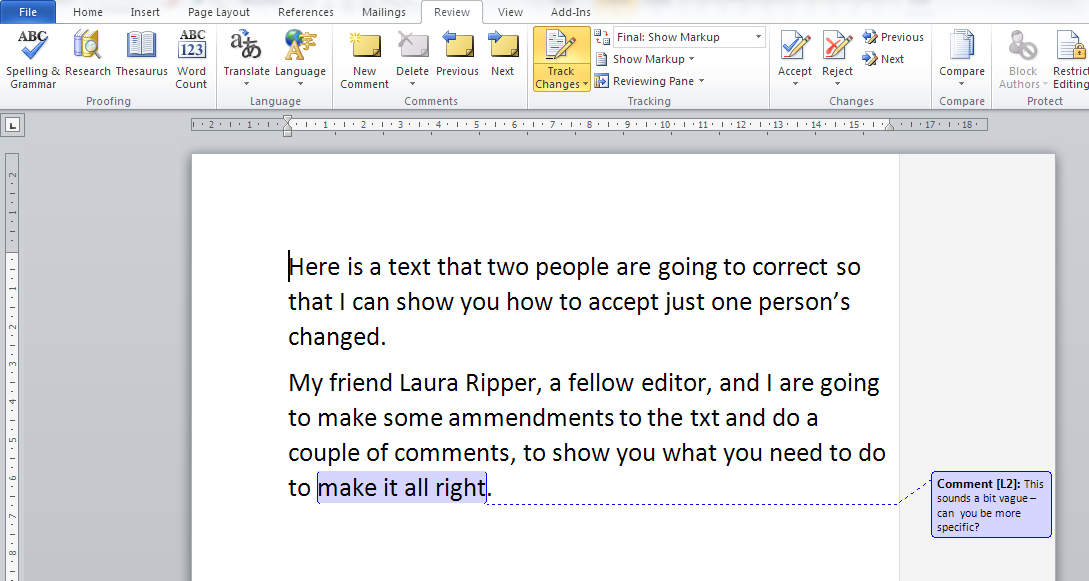
Now all of the blue changes have been accepted and only the comment by L[aura] is visible.
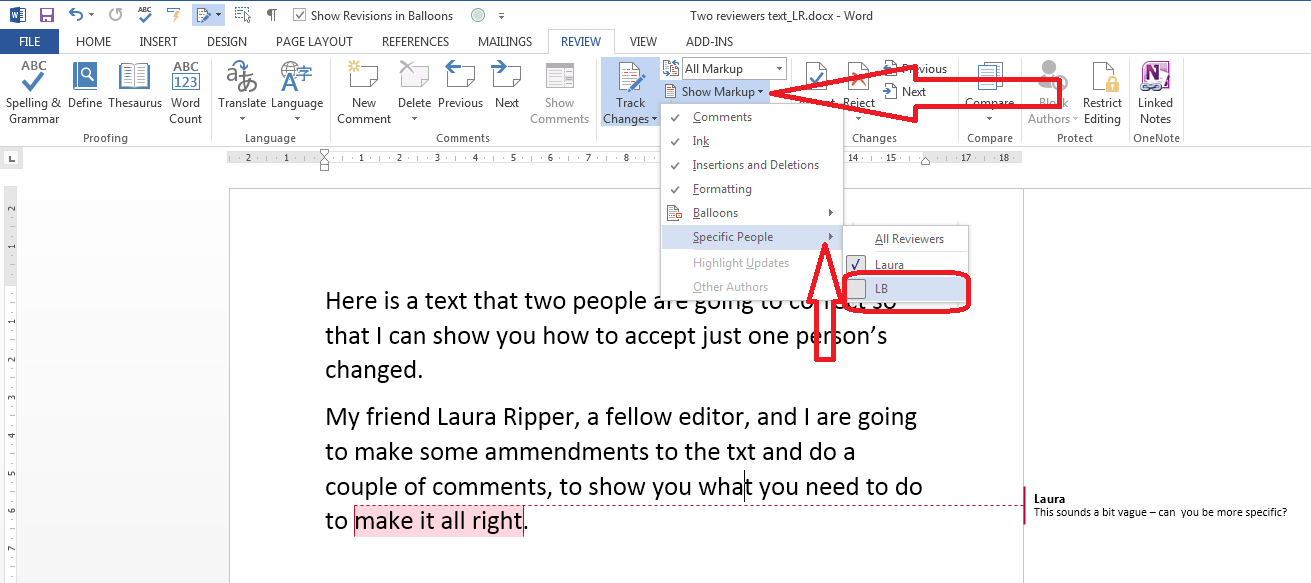
Just to prove that my corrections are still there, and in case I want to review those, we can view all reviewers by going back to Review – Track Changes – Show Markup – Reviewers and clicking in the box to tick LB:
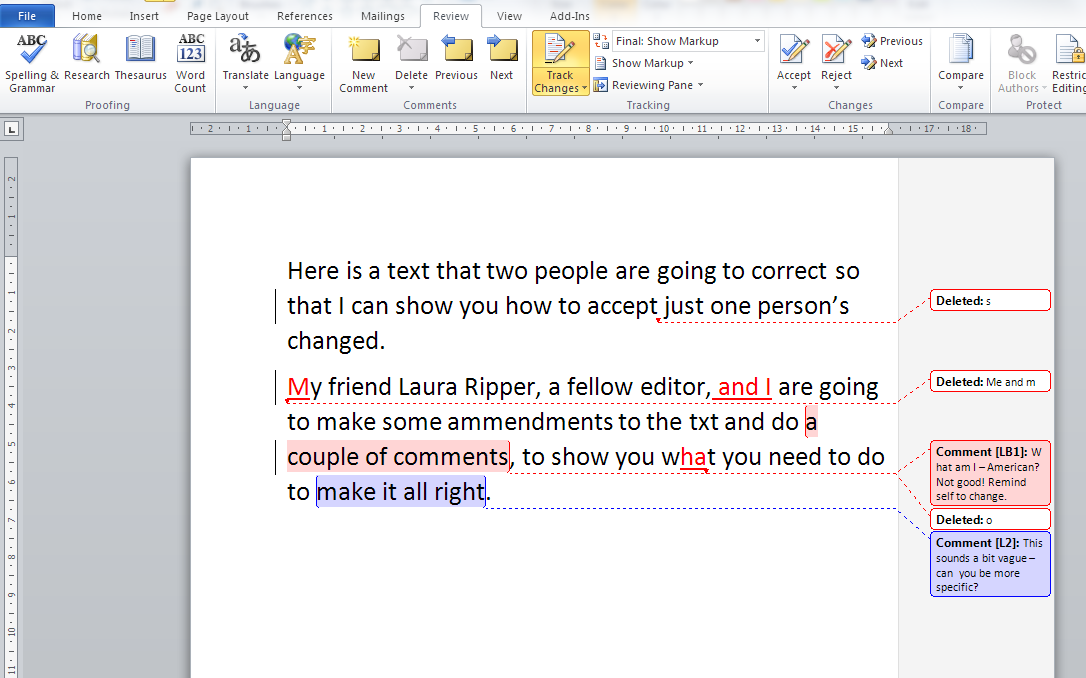
Now I can see the corrections in red and all of the comment boxes, and review them happily.
How do I see and accept one reviewer’s changes in Word 2013?
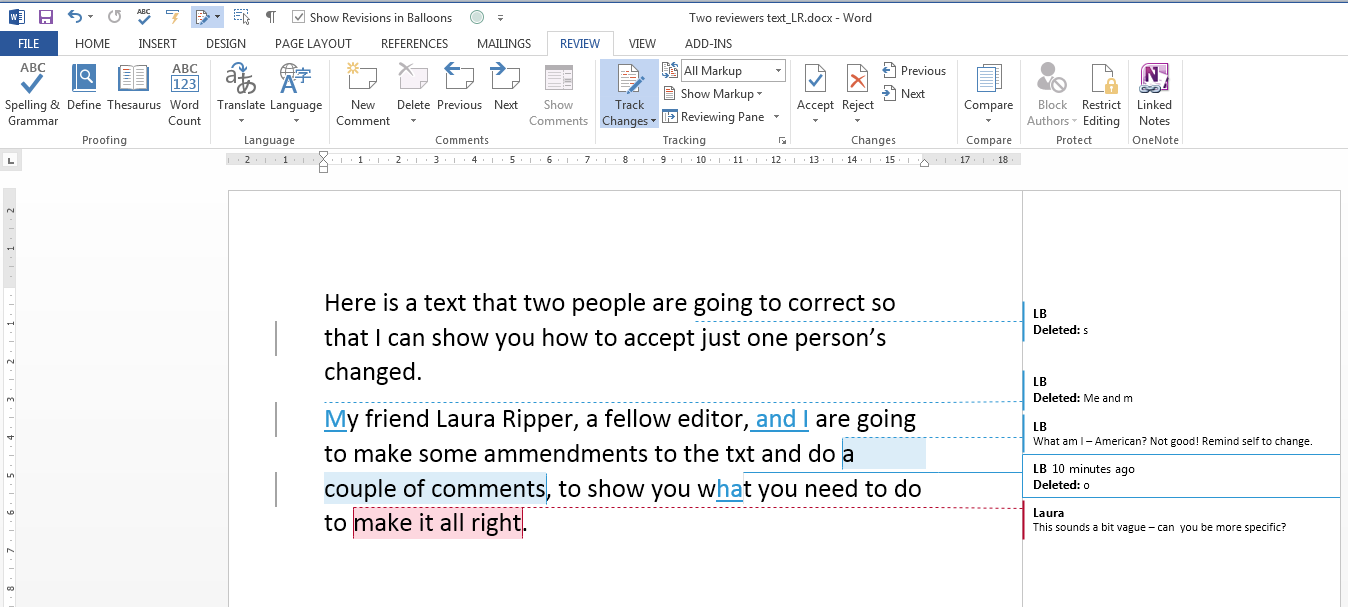
Here is our text commented on and corrected by two people. I want to view and accept the red changes made by Laura, then view my own ones in blue to review them (Yes, if you’re reading this all the way through, Word 2010 and Word 2013 chose the opposite colours for the two reviewers).
First we need to view only the blue corrections in order to accept only those ones. In the Review tab, Track Changes area, click on Show Markup then Reviewers. This gives us the option to tick or untick by each individual reviewer. Here, I’m going to untick LB.
Now we can just see Laura’s changes in red.

We can accept these changes by choosing Review tab – Track Changes area and clicking on the arrow at the bottom of the Accept button. Then, we choose Accept All Changes Shown (note, Accept All Changes will accept all of the changes, red or blue, visible or hidden: we don’t want that):
Now all of the insertions and deletions have been accepted and we’re left with just the comment balloon:

To see and review the suggestions made in blue by me, we go back to Review tab – Track Changes area – Show Markup – Reviewers and re-tick by the LB:
Now we can see all of the changes suggested by LB as well as the comments by both people.
This is another one written when I had a specific need and had to go hunting around, so I hope you’ve found it useful. If so, please share using the buttons below or pop a comment on!
Please note, these hints work with versions of Microsoft Word currently in use – Word 2007, Word 2010 and Word 2013 all for PC. Mac compatible versions of Word should have similar options. Always save a copy of your document before manipulating it. I bear no responsibility for any pickles you might get yourself into!
This is part of my series on how to avoid time-consuming “short cuts” and use Word in the right way to maximise your time and improve the look of your documents. Find all the short cuts here …
Related posts on this blog:
Track changes 1 – why use it, where can you find it, what can you do with it?
Track changes 2 – customising Track Changes
Track changes 3 – working with a document with tracked changes
Formatting comments balloons – everything you have ever wanted to know!
What to do if your comment boxes go tiny in Word – A common problem, hard to find the answer!
What to do if your comment box text runs right to left – Useful if you edit texts from Arabic authors
Changing the language in your comment balloons – From US to UK English and beyond …


Steve Dunham
April 10, 2015 at 12:49 pm
Thanks, Liz. This is helpful.
LikeLike
Arthur
November 24, 2015 at 1:31 pm
Very helpful.
LikeLike
Shira Taylor Gura
January 5, 2016 at 7:49 am
THANK YOU! THANK YOU! THANK YOU!
LikeLike
Maggie
August 2, 2017 at 11:10 pm
Thanks this was great. I count myself as a word guru and this was driving me mad (when I accepted changes it accepted all of them, as I did not realise that the menu changes to ‘accept all changes shown’). Instructions were very detailed and excellent. Keep up the good work.
LikeLike
Liz Dexter
August 3, 2017 at 7:59 am
Thank you for taking the time to post a comment, and I’m glad I could help!
LikeLike
Loreta Hoffmann
May 4, 2018 at 11:29 am
Thanks, you’ve saved a lot of my time 🙂
LikeLiked by 1 person
tieubinhqua93
May 29, 2018 at 3:15 am
Thank you very much, it is of great help.
LikeLike
Liz Dexter
May 31, 2018 at 7:05 am
I’m glad you found this helpful!
LikeLike
Gloria
May 16, 2019 at 2:32 pm
What Maggie said, above — I’m a Word power user (or something close to it), but I never knew the menu changes to Accept All Changes Shown once you hide a particular reviewer’s comments. Since finding your explanation on a last-try search for such a feature, I’ve been browsing your Resource Guide, and I like the way you set up your posts; they’re easy to absorb. Thanks for sharing so much knowledge!
LikeLike
Liz Dexter
May 17, 2019 at 5:48 am
Thank you so much, that’s a lovely thing to read!
LikeLike