 Sometimes you want to set a watermark on a Word document. This article explains what a watermark is, why you might want to add one to your document, how to add a watermark, how to customise a watermark, and how to remove them.
What is a watermark?
A watermark is a word, phrase or picture that appears “behind” the text in a document. It gets its name from the physical marks that are created during the paper-making process. The pulp is floated in water, and a frame is brought up under it to collect the pulp into a square. The frame is lined with thin wires (and symbols or text can be included, too) and when the pulp is collected in the frame, it will be thinner where there’s a wire or other protruding part of the frame. When the pulp has dried into a sheet of paper, the thinner parts of the paper will let through more light when held up to a light source, and so you can see the symbols and words, as well as the lines of the original frame (this is how papermakers marked their stock and also how you can tell how a book was put together. For more information on the fascinating world of watermarks, you can start off with this Wikipedia article.
Why would I want to watermark my Word document?
If you watermark a document, whoever opens that document will see the watermark sitting behind that document. This is basically to stop it being used either in their everyday work or for other commercial purposes. It’s very much like the way that photos from mass sports events or wedding photographer sites often have words printed faintly across them. It stops you printing them out and using them without buying them.
Some reasons to do this:
- You’ve prepared a document for someone and you’re charging them after you’ve completed the job. Sending them a watermarked document will proved that you’ve fulfilled your side of the bargain but prevent them from actually using the document. Once they’ve paid you, you can send them a non-watermarked version.
- You’ve prepared a document to send out to people but you don’t want them to share it further or claim authorship, or you want to remind them it’s a sample. I’ve done this with the sample chapter of my book that I send out to people who sign up to receive my newsletter. It has “Sample” written across the page behind the text, so that people can’t use it in another way and to remind them that it’s just a sample and they can buy the whole thing.
- You’re sending out a late reminder of an invoice and if you were doing it on paper, you’d use one of those URGENT stamps and red ink.
- You’re creating a corporate document and want to include corporate branding of some sort behind the text.
Note that if you’re watermarking to protect your work, the watermarking should go alongside copyright statements if you want to use it for that purpose, and I’m not an expert on, or advising you on, copyright here – just telling you how to apply a watermark.
How do I add a watermark to a Word document?
To access the Watermark menu, go to the Page Layout tab, then look in the Page Background area, where you will find the Watermark button:
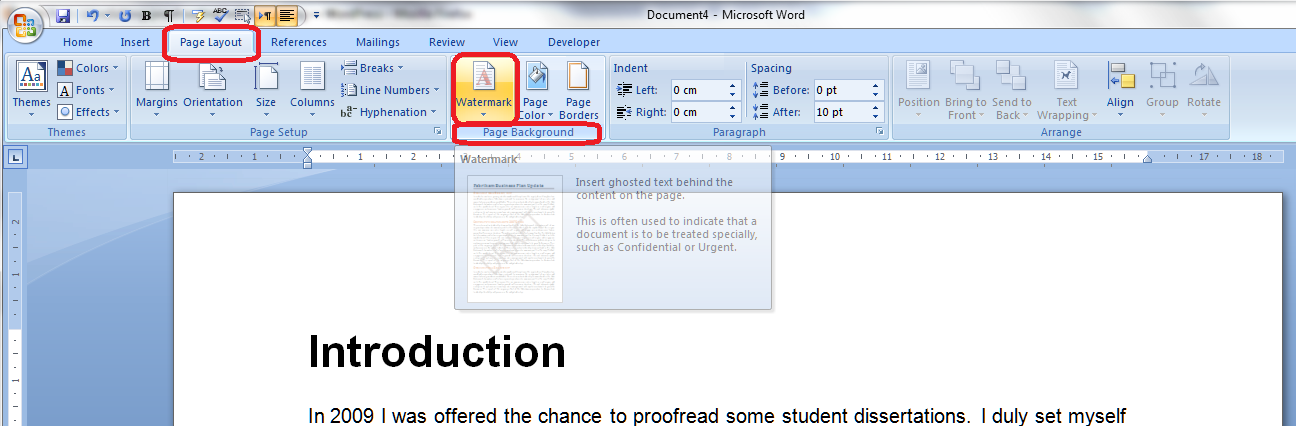
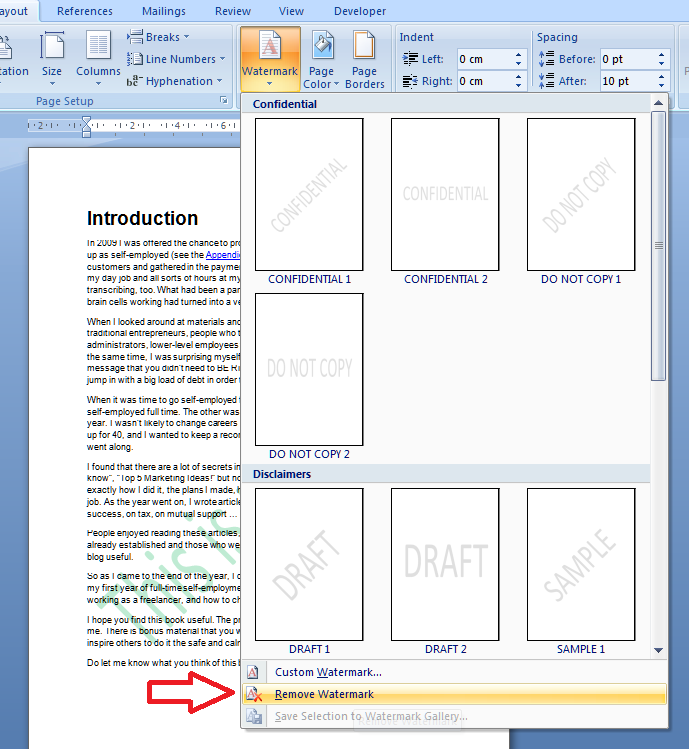
The Watermark button has a small downward-pointing arrow which implies that you can access a menu. Click on the arrow and there’s the menu:

If you select any of the standard examples that they give you (and note the scroll bar on the right, which you can use to see more default watermarks, that watermark will go straight onto your document. But you might want to customise the watermark in terms of wording, colour, text size and font, etc. and you can do that by selecting Custom Watermark at the bottom of this menu.
How do I customise my Word watermark?
Of course you will find lots of options for customising. Select Custom Watermark at the bottom of the Watermark menu to access the Custom Watermark menu:
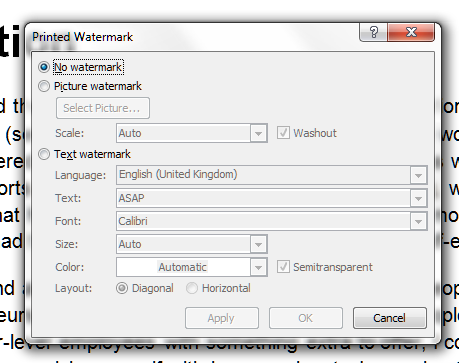
You can see here that the menu defaults to No watermark, because that’s what we started with. But there are options for adding a Picture watermark or Text watermark, and you select which you want to work with by clicking on the radio buttons in the left-hand margin. We’re going to work with a text watermark in this example, so we click on the radio button next to Text watermark:
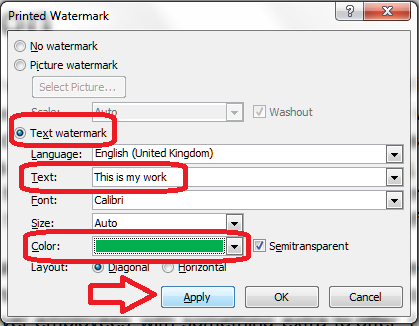
Now the fields to do with text watermarks become active (are no longer greyed-out) and we can change the language, the actual text, the font, size, colour and orientation.
Here I’m changing the text – it defaults to the first standard text but you can just type in what you want to appear there. I’m also changing the colour – but note that I’ve left Semitransparent ticked. If you don’t do that (see below), the watermark will be much heavier and will actually obscure part of the text … which can be useful, of course!
Once you’ve made your choices and changed the text, colour, etc., press the Apply button to apply the changes.
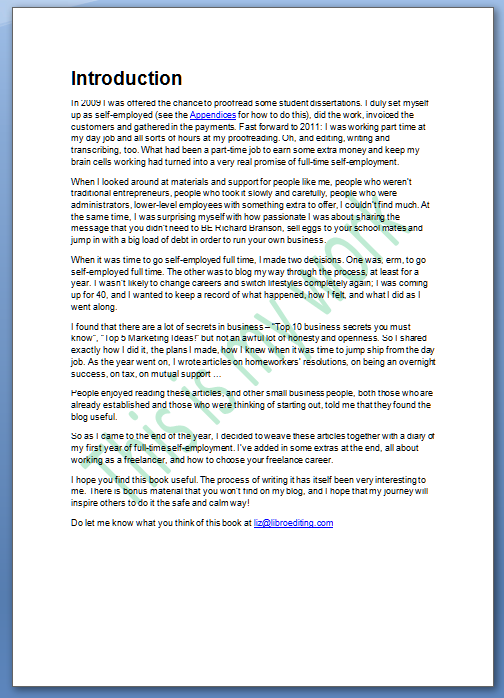
And here’s my custom watermark – my text, in the colour I chose.
Advanced watermark customisation
We won’t go into all the detail about customising here, as the menus are pretty self-explanatory. You can use the Picture watermark option to, for example, add your company logo to a tender document, or another image to make your documents look more attractive (beware of making them too “busy” or, worse, undermining their readability: remember that you need to consider people with low vision who might be reading the printed or on-screen document, and if you suspect the document might be photocopied in the future, steer clear of a lot of watermarking, as it’s apt to become darker and more visible when it’s copied).
A quick look at transparency: if you untick the Semitransparent box in the Custom Watermark menu above, your watermark will be a lot heavier and may obscure some of the text. Here I’ve changed the colour to black and unticked Semitransparent.
How do I edit my watermark?
In the case I’ve just shown you, I simply went back into the Watermark menu then the Custom Watermark menu; my choices were there already and I changed them. The choices you have made will stay in the menu until you change them or remove the watermark entirely, so you can pop in and adjust it as you like.
How do I remove watermarks?
If you want to remove the watermarks on a document, go to the Watermark menu and select Remove Watermark:
Of course, this means that other people could remove your watermark, too. So if you watermark a document to protect it, and you don’t want someone to remove that watermark, you will need to protect the document itself by making it uneditable, either by security protecting it or changing it into a pdf document (the latter is what I have done with my sample chapter). That’s an article for another time …
How do I apply a watermark in Word 2013?
If you’re using Word 2013, you will need to note that they’ve added an extra Design tab, and you’ll find the Watermark feature there.
How do I create a default watermark for all of my documents?
There’s no way to save a default watermark or add one permanently to your watermark gallery. If all of your documents are going to have the same watermark, it’s best to create a blank document with the watermark applied, then save it as a Word template (Save – Save as – drop down Type – Word template). Then, use that template when you’re starting a new document in Word. Thanks to my commenters for suggesting this addition to the article!
———————
This is part of my series on how to avoid time-consuming “short cuts” and use Word in the right way to maximise your time and improve the look of your documents.
If you found this interesting, you might also be interested in:
How to protect your document in Word 2007
How to protect your document in Word 2010
Please note, these hints work with versions of Microsoft Word currently in use – Word 2003, Word 2007 and Word 2010, all for PC. Mac compatible versions of Word should have similar options. Always save a copy of your document before manipulating it. I bear no responsibility for any pickles you might get yourself into!
Find all the short cuts here …


Don
September 14, 2013 at 3:49 pm
Is it possible to change the default font for watermarks
LikeLike
Liz at Libro
September 14, 2013 at 5:01 pm
Thanks for your question, Don. I’ve had a look around and I’ve gone through the styles, etc. I wondered if it was affected by the font in the main document, but no. I suspect that it is pulled from the default font in the normal.dot template, as in my Word, both are set to Calibri. However, if you choose Custom Watermark, you can change the font there, at least. I hope that helps!
LikeLike
Thomas Dohling
November 13, 2015 at 4:56 am
Yes.
LikeLike
Kathy
June 20, 2014 at 3:36 pm
Can I put a watermark in a protected word document
LikeLike
Liz at Libro
June 20, 2014 at 3:39 pm
It depends whether you’ve protected it, and the level of protection that’s been applied. If you try to follow these instructions, but the buttons you want to use are greyed out, you have been prevented from doing this. If you’re the one who protected the document, you should be able to watermark it.
LikeLike
Kathy
June 20, 2014 at 4:40 pm
It was sent to me as a protected document.
Thank you!
LikeLike
Lorrie
September 9, 2014 at 11:51 pm
My question is similar to Don’s. I’d love to create a default watermark because my watermark is always the same in the work I do. I also want to use the same font every time. As it is the fonts that pop up under the custom option vary from Calibri to Courier (yick). Are you aware of any developments since your answer to Don about a year ago? Thank you!
LikeLike
Liz at Libro
September 10, 2014 at 5:56 am
Thanks for your question, Lorrie. I’m a little confused and probably need more detail, as I’ve just tested Word 2007, 2010 and 2013 and I get all of the fonts that are available in Word in the font selection box – the initial view starts with Calibri, but you can move up and down the list with the scroll arrows.
As for creating a default watermark, the easiest way to do that is to create a blank document with the watermark already on it and then save it as a template (save as – save as type – Word template). Then use that template when you go to create a new document, and the watermark will already be there.
LikeLike
Lorrie
September 10, 2014 at 3:17 pm
Thanks for your quick response! I do get the full menu of fonts in the font selection box, but I want to set it so that it my watermark is always “DRAFT” in Times New Roman, and I don’t have to always select the text and font of my watermark. It sounds like this option is not available in Word. Thanks again!
LikeLike
Liz at Libro
September 10, 2014 at 3:20 pm
Yes, it is not available, but saving it as a template would work completely and do what you need. You just select that template when you hit New document and there it will be.
LikeLike
jacky
December 3, 2014 at 10:13 am
Hi, I have created a letterhead for my company using word and has water marked it.Now I want to edit the contact details on it.How do I go about it.
Thank you
LikeLike
Liz Dexter
December 3, 2014 at 10:19 am
Did you create the contact details in the header or watermark? If the former, click on the header and you should be able to edit. If the latter, follow the same process to amend the watermark. I hope this helps – if it doesn’t, please give me more specific details on what you’re trying to do and I’ll try to help further.
LikeLike
Ranjith
September 11, 2015 at 7:50 am
Thank you Team. Need to insert the water mark image after completing the alignment process. i did the same procedure but its not visible. Can anyone please help me.
LikeLike
amjad quran
April 10, 2017 at 8:55 am
hi Dear,
Can i use the watermar image as adefault watermark in every dwcuments
LikeLike
Liz Dexter
April 10, 2017 at 8:56 am
You can set up a blank watermarked Word document then save it as a template to use when you want to have a watermark on all of your documents based on that template.
LikeLike
Jennika A. Smith
June 16, 2017 at 1:03 pm
Thank you so much, I was up to 3am trying to find how set up a watermark on my images and do laundry, at that point I realized. I had shut down and a good nights rest had brought me back and this morning I found you with no problem. I’m on my way to theft proofing my art work before I post it online.
LikeLike
Liz Dexter
June 17, 2017 at 2:07 pm
Glad to help!
LikeLike