RSS

Tag Archives: Word tips

Track changes – how to find it, how to use it

This is part of my series on how to use Word to the full to get what you need out of it.  Today we’re going to talk about why you might want to use Track Changes, how to find it and how to start using it. Next time, we’ll look at customising Track Changes, then working with the changes that have been tracked and ending up with a nice clean document.

Why use Track Changes?

Track changes helps you collaborate with someone else on your text – or mark it up for yourself. Reasons you might use it:

  1. Two or more people are collaborating on a document. You want to know who’s written what, and comment on the work
  2. You’re editing someone else’s work. I use Track Changes when working with students, so that they can see what I’m suggesting and make the decision as to whether to accept or reject my changes, thus retaining their control over the changes and the authorship of the text
  3. You’re editing your own work – you can see what you’ve deleted and added, or leave notes for yourself, just like working on the paper manuscript

How do I find Track Changes in Word 2003?

Like with most features, once you’ve found this in the menu system, it works the same in 2007 and 2010. This is how you find Track Changes in Word 2003: Go to the Tools menu, drop it down, and select Track Changes.

Finding Track Changes in Word 2003

How do I find Track Changes in Word 2007?

Go to the Review tab, and you will find the Track Changes options half way along the ribbon:

How do I find Track Changes in Word 2010?

This works the same as in Word 2007 – go to the Review tab and you’ll find the Track Changes options half way along the ribbon. The rest of the screen shots will be from Word 2007 but apply equally to Word 2010, as it works in the same way.

How do I turn Track Changes on and off?

You will see a big button marked Track Changes. Don’t worry about the little arrow in the corner for now, just press the button. It will go yellow, and this means Track Changes is turned on, and everything you do to the document from now on will be marked on the document.

If you want to turn Track Changes off, press the yellow button again and it will turn grey. From now on, anything you change will NOT be marked up.

What happens when I delete and add text with Track Changes turned on?

When you add text to the document (marked in blue) it will insert in a different colour, and underlined (note: the colour may not always be red. See the article on customising Track Changes for why and how to change it). When you delete text from the document (marked in red), it will either hook it out of the document and stick it in a balloon to the side of the text (as here, and how I like to do it), or cross it out in the document itself (see the Word 2003 example below). Again, you can choose which it does, and we’ll look at that next time.

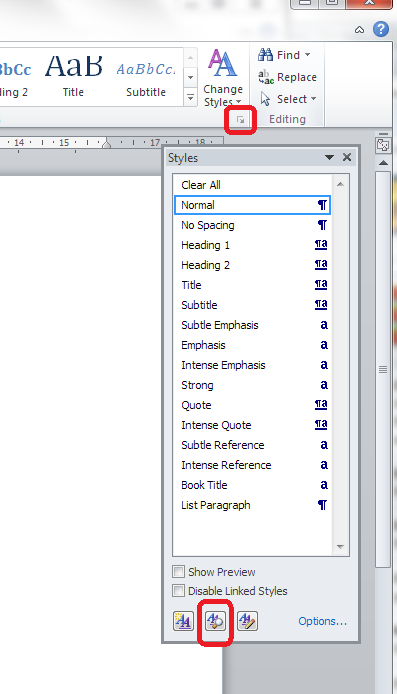
How do I add a comment?

Sometimes you might want to add a comment to the document. This is helpful if you don’t understand what the other author is saying, or if something just needs to be commented on. You might want to leave a note for yourself in the margin.

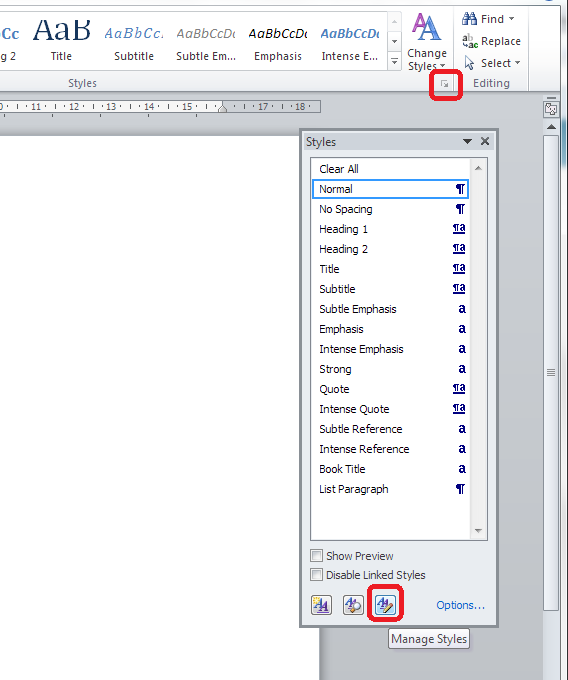
When you want to do this, highlight the text you want to comment on and press the New Comment button in the ribbon. A comment balloon will appear in the right-hand margin, where you can type your comment.

Note, sometimes the text in this box comes out tiny or running right to left, especially if you are commenting on someone else’s document. See those links in the previous sentence? Click on those for how to solve both these problems.

You can pop back into the comment balloon at any time to edit what you’ve typed there.

And what does this all look like in Word 2003? Like this (note the crossed out deleted text):

In the next two posts, we will be looking at how to customise your Track Changes markup, and how to deal with a text containing tracked changes and comments.

Thanks to Kathy O’Moore Klopf for the Word 2003 screen shots!

Please note, these hints work with versions of Microsoft Word currently in use – Word 2003, Word 2007 and Word 2010, all for PC. Mac compatible versions of Word should have similar options. Always save a copy of your document before manipulating it. I bear no responsibility for any pickles you might get yourself into!

Find all the short cuts here … and do share or post a comment if you have found this useful!

 
12 Comments

Posted by on September 26, 2012 in Copyediting, Errors, New skills, Short cuts, Word, Writing


Tags: , , , ,

My short cuts: full dialogue boxes for fonts, paragraphs etc.

This post was inspired by my partner, Matthew, suddenly asking me about this. Once again, I realised it was something that I and other people who work with Word know about as second nature, and assumed everyone else did, too. Apparently not!

Ever wondered what the little arrow in the bottom right corner of your Word 2007 and 2010 ribbon areas was? Wonder no more – today you will find out what they do, and how to access the font, paragraph, headings (etc!) dialogue boxes with the click of a mouse button.

Expansion arrows in the Word Ribbon

In the Home, Page Layout and References tabs on the standard Word 2007 and Word 2010 ribbons, you may notice little arrows in the bottom right-hand corner of some of the sections, for example, Home – Paragraph, Page Layout – Page Setup or References – Footnotes. Some of them are indicated by the red arrows in the image above. What do they do? Click and find out!

Basically, there is not enough room on that pesky ribbon for all of the functionality and options that Word 2003 used to show you in nice, sensible menus (one of these days I’ll share with you how to get the classic menu view in Word 2007 and 2010).

So, if you see a little arrow in the corner, try clicking it and see what different options you have. The one you’ve always wanted to be able to do might be languishing there, waiting for your click!

Please note, these hints work with versions of Microsoft Word currently in use – Word 2003, Word 2007 and Word 2010, all for PC. Mac compatible versions of Word should have similar options. Always save a copy of your document before manipulating it. I bear no responsibility for any pickles you might get yourself into!

This is part of my series on how to avoid time-consuming “short cuts” and use Word in the right way to maximise your time and improve the look of your documents. Find all the short cuts here

 
3 Comments

Posted by on September 5, 2012 in New skills, Short cuts, Word


Tags: , , , ,

My short cuts – automatic formatting as you type (and how to get rid of it)

My short cuts – automatic formatting as you type (and how to get rid of it)

In this post we looked at AutoCorrect, and automatic formatting is really an aspect of AutoCorrect – although I find it’s more annoying than useful, I have to admit. In this post I’ll show you where to find auto formatting, what it does, and how to turn it off.

This is part of my series on how to avoid time-consuming “short cuts” and use Word in the right way to maximise your time and improve the look of your documents.

What is automatic formatting?

Automatic formatting is basically Word trying to be helpful. Instead of a Paperclip Man or cartoon dog popping up in the corner of your screen, it will try to guess what you’re doing and format it to what it thinks you want. This can be very useful, or it can drive you mad, depending on context.

Where do I find the AutoFormat menus?

AutoFormat lives on a set of tabbed menus alongside AutoCorrect. For full instructions on how to access AutoCorrect, see my article on AutoCorrect and where to find it, or if you’re confident, do this:

  • Word 2003: Tools – AutoCorrect Options
  • Word 2007: Office button – Word Options – Proofing – AutoCorrect Options
  • Word 2010: File tab – Options – Proofing – AutoCorrect Options

When you’ve done that, you should see a window that looks like this:

AutoFormat tabs in the Autocorrect window

The two features we’re interested in are AutoFormat and AutoFormat As You Type.

What is the AutoFormat menu for?

Let’s look at the AutoFormat menu first. Click on the relevant tab in the AutoCorrect Options window and you’ll see this:

AutoFormat menu

This is how you tell Word what you want to automatically format – however, whatever you change here doesn’t affect AutoFormat as you type. In fact, if you search on Google or in Word’s own help menus, it’s hard to find out what to do with this menu. I can tell you, after exhaustive research, that this menu is used to format your document after the event, at the end, when the document has already been created.

By pressing OK, you will apply all of the automatic formats that you have ticked to the document in question. You can pick and choose which ones you apply, and they are all pretty self explanatory, and you can ask it to retain the styles already set up in the document if you want to.

What is the difference between AutoFormat and AutoFormat As You Type?

AutoFormat is used to format the document after it’s been written. This is particularly useful if you’re sent a document to use which has the “wrong” quote marks, etc. AutoFormat As You Type is used when you’re creating a new document, so you can automate the format and make it consistent as you go along.

What is the AutoFormat As You Type Menu For?

The AutoFormat As You Type menu allows you to choose what Word helpfully automatically formats for you. Let’s have a look at the menu: just click the relevant tab if you’re looking at AutoCorrect or AutoFormat.

AutoFormat As You Type menu

You can see that there are lots of options here – most of them are pretty self-explanatory, especially as they give examples by each tick box. The ones that cause most issues, in my experience, are

Replace as you type: Internet and network paths with hyperlinks

Apply as you type: automatic bulleted lists / automatic numbered lists

Let’s look at what these do in your document … and then how you can stop this if you want to.

What does AutoFormat As You Type do?

As I said before, AutoFormat As You Type tries to be helpful. It particularly likes helping you make nice neat lists. So if you start some bullet points by typing a * or

and then a space, for example, it will turn them into bullet points for you!

Notice the little AutoCorrect Options icon appearing to tell you what Word’s doing. When you type some text and hit Enter, you’ll automatically be given a new bullet point to start you off:

(You escape from this treadmill by hitting Enter twice at the end of your last list item.)

If you start typing a list by putting a 1. at the beginning of a sentence …

… when you press the space bar, it assumes you’re writing a list and helpfully indents it:

and when you press Enter at the end of that line, it helpfully numbers the next line for you:

As you can see, you do need that full stop after the number, otherwise it doesn’t “realise” you’re writing a list.

It does it with letters, too, which is all well and good, until you happen to start the line with the letter A, but you don’t want to create a lettered list. What do I mean by this?

Well, in my case, I do a lot of transcription. I need to type the person’s name (usually initial and surname) followed by what they said. If it’s a name that begins with anything but A, that’s fine. I type the initial and full stop and carry on, and all is fine:

However, if their name begins with an A, I type my A.:

and Word springs into action, handily giving me that little icon to show that it’s making me a list.

OK, I can click on the little AutoCorrect Options icon and change the settings from there …

But it’s still rather annoying.

Automatic hyperlinked URLs and email addresses

The other annoying “feature” is when Word automatically turns any URL or email address you type into a hyperlink, complete with attractive text colour change and underline. This is all well and good if you’re typing a document that will be looked at on screen and you want the reader to be able to click through, but if you’re just happening to type an email address into the dialogue in your novel …

… you don’t want it to do this:

(You can tell it’s a novel: I’d never not reply to an email!)

How do I stop Word applying AutoFormatting As You Type?

It’s simple, fortunately. Go back to that menu and untick the items you don’t want Word to AutoFormat. Make sure you also click on OK before closing the window:

Now you can type whatever you want and Word will leave it as it is, and won’t try to “help” you.

Hooray!

Please note, these hints work with versions of Microsoft Word currently in use – Word 2003, Word 2007 and Word 2010, all for PC. Mac compatible versions of Word should have similar options. Always save a copy of your document before manipulating it. I bear no responsibility for any pickles you might get yourself into!

Why don’t you take a look at my other useful short cuts here

 
4 Comments

Posted by on August 22, 2012 in Copyediting, Errors, New skills, Short cuts, Word, Writing


Tags: , , , ,

My short cuts: format painter

Today I’m going to introduce you to a lovely quick short cut that can save what can only be described as a lot of faffing around: format painter.

We use format painter to pick up the formatting of some text, copy it, and paste it into some other text, to make the formatting match. I’ll give you a simple example.

How do I copy the formatting of one bit of text into another?

Here we have some text in the format we want, and some text not in that format, which we want to change.

Now the trick is to use a little button you may not have even noticed before. It’s on the Home tab (in Word 2007 and Word 2010; in Word 2003 it’s in the Format menu) in the cut, copy, paste area. Handily, it has its name next to it:

Now, it’s important to get this next bit in the right order! Highlight the text which is formatted in a way you want to copy, in this case the first line of text, and, once it’s highlighted, press the Format Painter button:

It doesn’t matter how much of the original text you pick up, as long as it has the right formatting. Now you will notice that the cursor has changed into a little paintbrush. Annoyingly, this doesn’t show up on a screen print, so you will have to take my word for it. “Paint” with the paintbrush across all of the text you want to change, keeping your left mouse button down, and it will highlight it (but nothing will change … yet):

Now let go of the mouse button and hey presto …

Note: the formatting will change to exactly what you picked up from the original text. So if you have a word in bold in the middle of your text, it will change to whatever the original had.

This is quite a simplistic example, but here’s where it comes in handy:

Say you’re editing a document with a lot of different text styles, header styles, etc. Maybe there’s a table with a variety of fonts. Rather than clicking on the text that you want your text to look like, noting the font, size, etc. then highlighting your text and changing all those features manually, simply highlight, format painter, and paint away!

Please note, these hints work with versions of Microsoft Word currently in use – Word 2003, Word 2007 and Word 2010, all for PC. Mac compatible versions of Word should have similar options. Always save a copy of your document before manipulating it. I bear no responsibility for any pickles you might get yourself into!

This is part of my series on how to avoid time-consuming “short cuts” and use Word in the right way to maximise your time and improve the look of your documents. Find all the short cuts here

 
4 Comments

Posted by on July 25, 2012 in New skills, Short cuts, Word


Tags: , , , ,

What to do if my comment boxes are running right to left

A friend of mine had this issue this week, and then I did, too. Both of us were working on documents that originated from Arabic-speaking countries, and this is where I usually see this problem. It’s hard to describe, but completely obvious if you’ve ever experienced it: you’re using Track Changes to mark changes in a document, you go to write a comment in a comment balloon / box, and the text runs from right to left instead of left to right. Sometimes even the word order is reversed. It looks something like this:

The cursor is at the wrong end of the line of text, it’s all justified to the right, it shows oddly as you type, and editing it is a nightmare. So how do we change the orientation of the comment text?

Changing the orientation of comment text in Word 2007

What we want to do is change the comment box text from wanting to run right to left to making it want to run left to right. And the easiest way I’ve found to do this is to add a secret little button to your Quick Access Toolbar, then use that to sort out your text. Go to my article on how to add buttons to the Quick Access Toolbar if you need a refresher (or note that you click the down arrow on the QAT at the top of your screen then choose More Commands).

When you get to the part on the Customize Screen menu where you choose the button to add, type L to get near the right place and/or scroll down until you come to Left-to-Right Text Direction and add that to the Quick Access Toolbar.

Now you will have a button on your QAT which looks like a paragraph mark with an arrow next to it. If you hover the mouse cursor over it, it will announce to you that it’s the Left-To-Right Text Direction button. Make sure your typing cursor is in the comment balloon and press this button …

And now your text in your comment balloon should be the right way round (for you):

Please note: you will have to do this for each comment box you create. But it’s only a matter of pressing one additional button, and it WORKS reliably, where fiddling around with the Styles really won’t always work (I know: I’ve been there).

Changing the orientation of comment text in Word 2010

Now, this works just the same in Word 2010, apart from the fact that the button has a different name and a different appearance! Of course!

So when you have reminded yourself how to add buttons to the Quick Access Toolbar if you need a refresher (or note that you click the down arrow on the QAT at the top of your screen then choose More Commands), you will need to start by typing an L and/or scrolling down, but this time you’re looking for Ltr Run.

And when you want to change the orientation of your text in your comment balloon from right-to-left to left-to-right, you’ll need to click on the little green blob (although, again, it will admit that it is the Ltr Run button if hovered over):

Again, please note: you will have to do this for each comment balloon you create. But it’s only a matter of pressing one additional button, and does WORK reliably, where fiddling around with the Styles really won’t always work (I know: I’ve been there in Word 2010, too).

And if you’re using a Mac? Well, apparently you can’t do it, and will need to send it to a friend with a PC. But if you know better, do let me know!

… and if that doesn’t work …

It’s always worth trying copying and pasting your text into a new document. And if that doesn’t work, here are two more methods to try.

Changing the balloons one by one using Style Inspector

Put your cursor in the offending balloon. In the Home tab, go to Styles and click the down arrow in the bottom corner. Then, instead of Manage Styles, click the second button along, Style Inspector:

8 alternative

This will make a little dialogue box come up. Click on the top A button (marked with an arrow) and the Paragraph Formatting box should change to Normal.

9 alternative

Close the box and OK everything else until you’re back with your document, and your comment box should be the right way around! You will need to apply this per comment balloon, but it’s less drastic than this one …

Delete the styles

We also found this more drastic way. Thanks to Mr. Libro for finding this workaround.

Go to the Home tab, click the Styles down arrow and select Manage Styles (the third button):

10 alt 2

Put the list of styles into alphabetical order by clicking the dropdown arrow and choosing Alphabetical:

11 alt 2

Find your three Comment styles and delete them IN THIS ORDER: Comment Reference, Comment Subject, Comment Text (otherwise Word is liable to crash):

12 alt 2

Press Delete then confirm that you’re sure:

13 alt 2

You can just go back to the list each time. Watch out – your place in the list may well jump around and you may have to scroll up or down to find your style.

Delete Comment Text as the last one (you will see that the others grey out) …

14 alt 2

And then press OK until you’re back at your document. All of your comment boxes will now be the correct way around.

————

Want even more detail on how to customise your comment boxes? Read my article on customsing comment boxes!

Related posts: What to do if my comment boxes go tiny in Word.

Changing the language in your comment balloons

Please note, these hints work with versions of Microsoft Word currently in use – Word 2003, Word 2007 and Word 2010, all for PC. Mac compatible versions of Word should have similar options. Always save a copy of your document before manipulating it. I bear no responsibility for any pickles you might get yourself into!

This is part of my series on how to avoid time-consuming “short cuts” and use Word in the right way to maximise your time and improve the look of your documents. Find all the short cuts here

 
70 Comments

Posted by on July 11, 2012 in Copyediting, New skills, Short cuts, Word, Writing


Tags: , , , ,

My short cuts: adding shortcuts to the quick access toolbar

Do you use commands in Word that are usually buried inside a menu inside a menu inside a menu? I’m going to show you how to add these onto your Quick Access Toolbar, so you can get at them using a shortcut in just one click. And scroll to the bottom for a very quick way to do this …

The example I’m going to use is AutoCorrect Options. I have posted about how to find and work with AutoCorrect, but it is buried within some nested menus, which means you have to click and click and click whenever you want to add a new entry, wasting time to do something in order to save time. Now, I can access the menu I want with just one click!

So, first of all we need to go up to the Quick Access Toolbar, right at the top of your screen in Word 2007 and Word 2010 (in Word 2003, right click on the main toolbar and customise it). Note the down arrow to the right of your standard buttons, and click it:

You will notice an option to choose More Commands – this is how you add more buttons to the Quick Access Toolbar. Click on that, and you’ll get a screen which allows you to customize the Quick Access Toolbar:

Note at this point that you can access this menu via Word Options – Customize, too, if you want to.

We can now see a whole load of Popular Buttons you can add on to the Quick Access Toolbar – so you can pop them on there to get at them whenever you want to. These are a few buttons that appear at the top level when you click on any of the tabs on your main ribbon.

We’re going deeper, though, into buttons and commands which don’t appear on the top level of your tab menus. So click on the arrow next to Popular Commands and you’ll get a list of options:

You can choose All Commands, which will give you every command and button (with a hover-over tip to which menu they belong to so you can choose, for example, Spell Check from the Review tab rather than the Blog version, which won’t do much for you in a standard Word document. In this case, to add our deeply buried button, we want to choose Commands not on the Ribbon.

Now you have a list of every command and button that exists in Word. How handy that AutoCorrect begins with an A! Look for your button and highlight it, then click on Add >> to add it to the list on the right – which is the list of buttons that appear on your Quick Access Toolbar. At this point you can even choose when these buttons will appear, but I always leave it on All documents. When you’ve pressed Add, there it is, on the list:

Click on OK and it will magically appear on your Quick Access Toolbar:

Want to check it’s true? Click on the little icon, and there’s our familiar AutoCorrect menu.

What a time saver! I’ve added all my very commonly used buttons from different menus onto my Quick Access Toolbar, from Bold to Spellcheck and all sorts of other things in between …

Adding items quickly to the QAT

Edit to add: If you have the button you want to add to the QAT in front of you, simply right click on that button and you will get the option to add it to the quick access toolbar!

Magic! And it works however deeply buried the button is in your lists of commands – for example, you can choose something that appears in a menu within a menu:

Please note, these hints work with versions of Microsoft Word currently in use – Word 2003, Word 2007 and Word 2010, all for PC. Mac compatible versions of Word should have similar options. Always save a copy of your document before manipulating it. I bear no responsibility for any pickles you might get yourself into!

This is part of my series on how to avoid time-consuming “short cuts” and use Word in the right way to maximise your time and improve the look of your documents. Find all the short cuts here

 
24 Comments

Posted by on June 27, 2012 in Errors, New skills, Short cuts, Word


Tags: , , , , , ,

My short cuts – Using AutoCorrect in Word (2) Why and how to use it

Welcome to the second article in my series on AutoCorrect. Last time, we learned what AutoCorrect does (automatically changes words you type or spell incorrectly to their correct forms, e.g. changing “teh” to “the”) and where to find it in Words 2003, 2007 and 2010, and we can also set up a shortcut button to make it more accessible.

Now we’re going to look at how you can use AutoCorrect to speed up your typing and make it more efficient, and how you actually amend the AutoCorrect entries to tailor them to your requirements.

Why would I use AutoCorrect?

Apart from correcting common typos, AutoCorrect has two very handy uses: I use it in these ways all the time, and if you, you will save yourself time and effort.

  1. If there is a word you can never remember how to spell, set up a short cut AutoCorrect, just type in the first few letters, and AutoCorrect will auto complete it for you. No more finding it in the spell checker yet again.  Type in Kaz and Word will display Kazakhstan.
  2. If there is a long word or particularly a phrase that you use over and over again – “Creative and Marketing Director”, “economic forecasting”, “qualitative and quantitative research methodologies”, set up a short cut for each one and save all that typing (and possible typos). Type cmd, ef or qq and watch the phrases type themselves!

How do I tailor AutoCorrect to my individual requirements?

The key to this is in the AutoCorrect menu we met last time.

First of all, there are some useful features on the screen directly in front of you. Here’s how you turn on and off all those useful features that sort out typing errors as you go (we’ve all typed THe at the beginning of a sentence, haven’t we). You just untick the box if you don’t want it to do something. By the way, we’ll be looking at those other tabs along the top, especially AutoFormat As You Type, in another article.

So, for now, we’re working with the standard AutoCorrect. We’ve started off with a list of signs and symbols, because they come before “A” in Word’s alphabet. To see what else there is, try typing a letter into the top, blank fields. Here we have a mixture of the standard AutoCorrect entries (abouta changes to about, etc.) but the top two are my own additional entries. See how many keystrokes and how much time I save by typing aaa and getting accountability agent application inserted into my document (plus it’s typed correctly first time!).

How to add a new entry to AutoCorrect

Let’s look at how to add those new, personalised AutoCorrect entries. Well, it’s pretty simple. Type the abbreviation or mis-spelling in the left hand column (or field), the text that you want to appear in the document in the right hand field (or highlight the word you want to add an entry for in your document, then access this menu), and press Add.

You can see that your entry has now appeared on the AutoCorrect list, in its place in the alphabetical order. Now, whenever you type lb, the words Liz Broomfield will appear in your document.

How to delete an AutoCorrect entry

What if you want to delete an AutoCorrect entry? I did this recently – I had set re to AutoCorrect to recognize for a document I was working on that had no contractions (they’re, etc.). Of course, when I was then typing something more informal, I got lots of they’recognize as it tried to do what I’d asked it to do. So I wanted to get rid of that entry altogether. Here’s how you do that: Look up the entry by typing in your abbreviation – what you type as opposed to what you want to come up. When you’ve found the one you want to delete, press the Delete button.

Now you can see that the entry for lb/Liz Broomfield has disappeared and the list goes from lastyear to learnign. Note: it doesn’t ask you if you’re sure you want to delete, but it does leave that entry in the top text fields, so if you’ve made a mistake, you can just add it again.

How to change or replace an AutoCorrect entry

You may want to change an AutoCorrect entry – for example, you’re stopping talking about Liz Broomfield and want to refer to Lionel Blair. Type in your abbreviation and your new version of what you want Word to insert, in this case Lionel Blair. AutoCorrect will find the original entry and highlight it. The Replace button will appear – so press that.

Word does like to make sure you mean to do it when you change something, so you’ll get another little dialogue box asking if you do want to redefine this AutoCorrect entry. Press Yes (if you do).

and there you go: Liz Broomfield has changed into Lionel Blair.

Today we’ve learned why to use AutoCorrect and how to personalise it to help you type efficiently.  If you’ve found this article helpful, please leave a comment or click one of the “like” buttons below! Thank you,

Please note, these hints work with versions of Microsoft Word currently in use – Word 2003, Word 2007 and Word 2010, all for PC. Mac compatible versions of Word should have similar options. Always save a copy of your document before manipulating it. I bear no responsibility for any pickles you might get yourself into!

This is part of my series on how to avoid time-consuming “short cuts” and use Word in the right way to maximise your time and improve the look of your documents. Find all the short cuts here


Tags: , , , ,

How do I count the words in my Word document?

Looking at the search engine searches people have done before coming to this website, I’ve realised I need to publish some notes on how to count the words in your Word document. This information covers Word 2003, Word 2007 and Word 2010, although most of the screenshots are from Word 2007.

How do I count the number of words in my Word 2007 document?

Word 2007 and 2010 handily display your word count at the bottom of the screen. Well, it should be there. Let’s see …

 But what if it’s not there? If you want to display your word count at the bottom of your document, right click with your mouse on the lower menu bar – that’s the blue bit at the bottom of the window, indicated with an arrow on this screen shot:

Do take a moment to marvel at all the different things you can do on this menu bar – we will come back to them another time! Now, when you’ve clicked on Word Count, you should see your word count at the bottom of the window:

OK, so that’s one way, but what if you want more information, such as the number of characters (maybe you’re writing some text that has to keep to a certain character limit)? Never fear, there are often two ways to do things in Word, and this is no exception.

We’re going to stop looking at the bottom of the screen and move up to those tabs at the top. Click on the Review tab and you will see the Word Count option to the left:

 Click on Word Count and you will get a little dialogue box telling you all sorts of information …

Now, what if you want to count just the words in a particular section of your document (you might be trying to keep to a word limit per chapter or be writing lots of short articles you want to check)? Simply highlight the section of text you want to count, then either look at the bottom of the screen, where it will tell you that you have highlighted x out of a total of y words, or click on Word Count on the Review tab and your dialogue box will tell you just about the words you’ve highlighted:

How do I count the number of words in a Word 2010 document?

Word 2010 works in exactly the same as Word 2007 as far as the lower menu bar goes, so just follow the instructions above to show the word count at the bottom of your document.

When it comes to the Review tab and Word Count option, it’s all pretty much in the same place, but looks a little bit different:

How do I check the number of words in a Word 2003 document?

In Word 2003, you can access Word Count from the Tools drop down menu.

Please note, these hints work with versions of Microsoft Word currently in use – Word 2003, Word 2007 and Word 2010, all for PC. Mac compatible versions of Word should have similar options. Always save a copy of your document before manipulating it. I bear no responsibility for any pickles you might get yourself into! This is part of my series on how to avoid time-consuming “short cuts” and use Word in the right way to maximise your time and improve the look of your documents. Find all the short cuts here


Tags: , , , ,

My short cuts – Using AutoCorrect in Word (1) What it is and where to find it

Have you come across AutoCorrect yet? Open up a Word document and type “teh”. Did it magically change to “the” in front of your eyes? That’s AutoCorrect.

So, it’s great for correcting common typing mistakes that lots of people make. But did you know that you can harness its power to help you write and type more efficiently and faster? In this article, I’ll tell you more about AutoCorrect and explain where to find it in different versions of Word, so you can tinker with it to tailor it to your requirements. In the next post, I explain just how to do that.

How to access AutoCorrect in Word 2003

Let’s look at Word 2003 first. You can find AutoCorrect under the Tools screen (I have to admit that it was so much better when it was so accessible, right here off a main menu. Nowadays, they like to hide it!). Click on Tools and then near the bottom, you’ll find AutoCorrect Options.

Once you’ve clicked on AutoCorrect Options, you’ll find yourself at a screen that will start to look familiar as you work your way through this article. This is where you can see what is already set up, and delete / change / add AutoCorrect entries as you wish. More about that in the next article!

How to access AutoCorrect in Word 2007

Here is how to access AutoCorrect in Word 2007. When I first moved over to Word 2007, I found it a bit hard to track down AutoCorrect – the key is to click on that Office button in the top left corner of the screen. When you do that, a menu will come up below the button, with a list of the files you’ve recently accessed (that’s what I’ve blanked out, for confidentiality purposes!), with a list of things you can do and, right at the bottom, a Word Options button. Click that button.

Once you have clicked on the Word Options button, you’re confronted with another menu (oh, for the simplicity of Word 2003!). You’ll find lots of intriguing options here, some of which we’ll be exploring in further articles, but for now, what you want is Proofing, about half way down on the left hand side. Click on Proofing and you will get a menu including the heading AutoCorrect Options. Click on the AutoCorrect Options button …

… and you come to a rather familiar screen, offering you a place to delete, change and add AutoCorrect entries as you wish. More about that in the next article! Note that you can also set up a shortcut button on your Quick Access Toolbar if you use this a lot.

How to access AutoCorrect in Word 2010

Now, in Word 2010 I feel like they’ve buried AutoCorrect just that one level deeper. But we’ll find it! To access AutoCorrect in Word 2010, you need to first click on that File tab, one to the left of Home, to which Word defaults. This has replaced the Office button from Word 2007. Anyway, Click on the File tab and you will be given a menu which, handily enough, doesn’t have a “Word Options” entry, but just Options. Click on Options.

Once you have clicked on Options, you will be given a new menu. This is quite similar to the one in Word 2007. Choose Proofing and then AutoCorrect Options.

… and here is your menu where you can see what is already set up, and delete / change / add AutoCorrect entries as you wish. More about that in the next article! Note that you can also set up a shortcut button on your Quick Access Toolbar if you use this a lot.

In the second half of this article, we look at how to tailor the automatic corrections to suit your purpose, whether you have a word you just can’t spell or type correctly, or you need to type a lot of words fast and want to auto-type particular common phrases.

Many thanks to Katharine O’Moore Klopf for the Word 2003 screen shots!

Please note, these hints work with versions of Microsoft Word currently in use – Word 2003, Word 2007 and Word 2010, all for PC. Mac compatible versions of Word should have similar options. Always save a copy of your document before manipulating it. I bear no responsibility for any pickles you might get yourself into!

This is part of my series on how to avoid time-consuming “short cuts” and use Word in the right way to maximise your time and improve the look of your documents. Find all the short cuts here


Tags: , , , ,

My short cuts – how to change your text from upper case to lower case

This is part of my series on how to avoid time-consuming “short cuts” and use Word in the right way to maximise your time and improve the look of your documents.

Sometimes you really want to change a sentence from, maybe, all lower case to All Title Case, or ALL CAPITALS to all lower case, or some other variant.

And you know how to do it, right: delete the sentence and retype it, or delete the first letter of each word and retype it, or turn on overtype then forget to turn it back to insert when you’ve finished … well, there is a way to just do it with a couple of keystrokes!

How do I change all small letters to all capitals or all capitals to all lower case letters?

This is such a simple one. Highlight your sentence (1). With the sentence still highlighted, press shift and F3 at the same time. Magic! With each press of shift-F3 it will cycle through Title Case (2), UPPER CASE (3) and then back to lower case (4).

This is so useful if you’re grappling with a bibliography you’ve written or you’re editing (especially when the capitalisation in article or book titles is not consistent), or if you accidentally type something all in capitals.

Please note, these hints work with versions of Microsoft Word currently in use – Word 2003, Word 2007 and Word 2010, all for PC. Mac compatible versions of Word should have similar options. Always save a copy of your document before manipulating it. I bear no responsibility for any pickles you might get yourself into!

Find all the short cuts here


Tags: , , , ,