RSS

Category Archives: Short cuts

What to do if my comment boxes are running right to left

A friend of mine had this issue this week, and then I did, too. Both of us were working on documents that originated from Arabic-speaking countries, and this is where I usually see this problem. It’s hard to describe, but completely obvious if you’ve ever experienced it: you’re using Track Changes to mark changes in a document, you go to write a comment in a comment balloon / box, and the text runs from right to left instead of left to right. Sometimes even the word order is reversed. It looks something like this:

The cursor is at the wrong end of the line of text, it’s all justified to the right, it shows oddly as you type, and editing it is a nightmare. So how do we change the orientation of the comment text?

Changing the orientation of comment text in Word 2007

What we want to do is change the comment box text from wanting to run right to left to making it want to run left to right. And the easiest way I’ve found to do this is to add a secret little button to your Quick Access Toolbar, then use that to sort out your text. Go to my article on how to add buttons to the Quick Access Toolbar if you need a refresher (or note that you click the down arrow on the QAT at the top of your screen then choose More Commands).

When you get to the part on the Customize Screen menu where you choose the button to add, type L to get near the right place and/or scroll down until you come to Left-to-Right Text Direction and add that to the Quick Access Toolbar.

Now you will have a button on your QAT which looks like a paragraph mark with an arrow next to it. If you hover the mouse cursor over it, it will announce to you that it’s the Left-To-Right Text Direction button. Make sure your typing cursor is in the comment balloon and press this button …

And now your text in your comment balloon should be the right way round (for you):

Please note: you will have to do this for each comment box you create. But it’s only a matter of pressing one additional button, and it WORKS reliably, where fiddling around with the Styles really won’t always work (I know: I’ve been there).

Changing the orientation of comment text in Word 2010

Now, this works just the same in Word 2010, apart from the fact that the button has a different name and a different appearance! Of course!

So when you have reminded yourself how to add buttons to the Quick Access Toolbar if you need a refresher (or note that you click the down arrow on the QAT at the top of your screen then choose More Commands), you will need to start by typing an L and/or scrolling down, but this time you’re looking for Ltr Run.

And when you want to change the orientation of your text in your comment balloon from right-to-left to left-to-right, you’ll need to click on the little green blob (although, again, it will admit that it is the Ltr Run button if hovered over):

Again, please note: you will have to do this for each comment balloon you create. But it’s only a matter of pressing one additional button, and does WORK reliably, where fiddling around with the Styles really won’t always work (I know: I’ve been there in Word 2010, too).

And if you’re using a Mac? Well, apparently you can’t do it, and will need to send it to a friend with a PC. But if you know better, do let me know!

… and if that doesn’t work …

It’s always worth trying copying and pasting your text into a new document. And if that doesn’t work, here are two more methods to try.

Changing the balloons one by one using Style Inspector

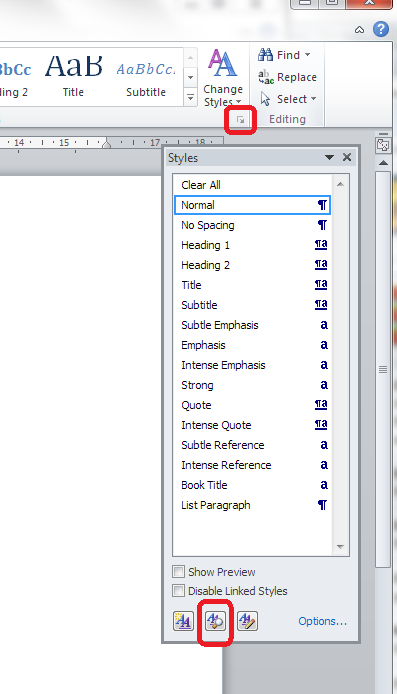
Put your cursor in the offending balloon. In the Home tab, go to Styles and click the down arrow in the bottom corner. Then, instead of Manage Styles, click the second button along, Style Inspector:

8 alternative

This will make a little dialogue box come up. Click on the top A button (marked with an arrow) and the Paragraph Formatting box should change to Normal.

9 alternative

Close the box and OK everything else until you’re back with your document, and your comment box should be the right way around! You will need to apply this per comment balloon, but it’s less drastic than this one …

Delete the styles

We also found this more drastic way. Thanks to Mr. Libro for finding this workaround.

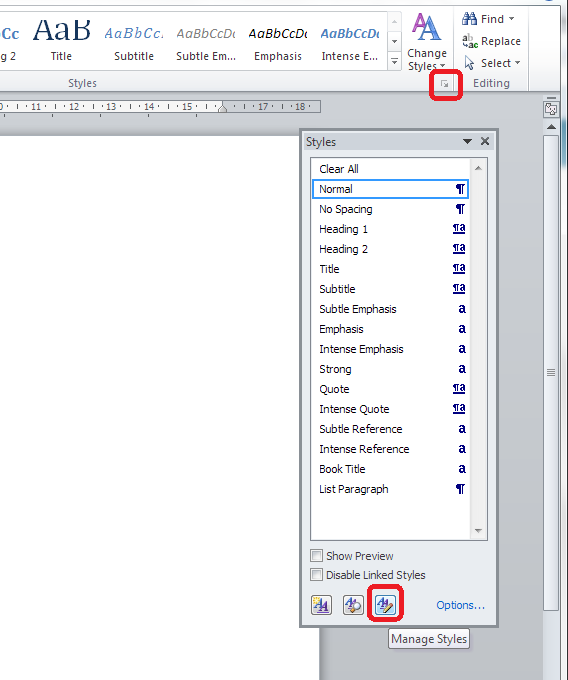
Go to the Home tab, click the Styles down arrow and select Manage Styles (the third button):

10 alt 2

Put the list of styles into alphabetical order by clicking the dropdown arrow and choosing Alphabetical:

11 alt 2

Find your three Comment styles and delete them IN THIS ORDER: Comment Reference, Comment Subject, Comment Text (otherwise Word is liable to crash):

12 alt 2

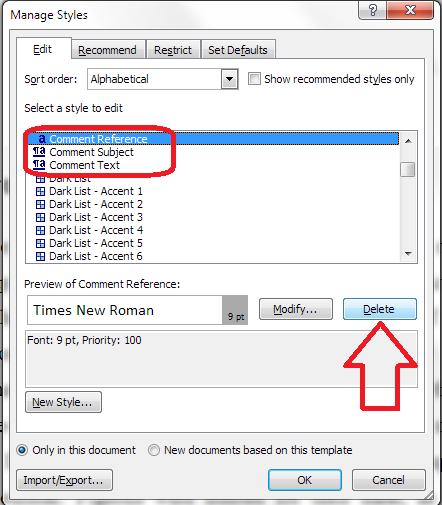
Press Delete then confirm that you’re sure:

13 alt 2

You can just go back to the list each time. Watch out – your place in the list may well jump around and you may have to scroll up or down to find your style.

Delete Comment Text as the last one (you will see that the others grey out) …

14 alt 2

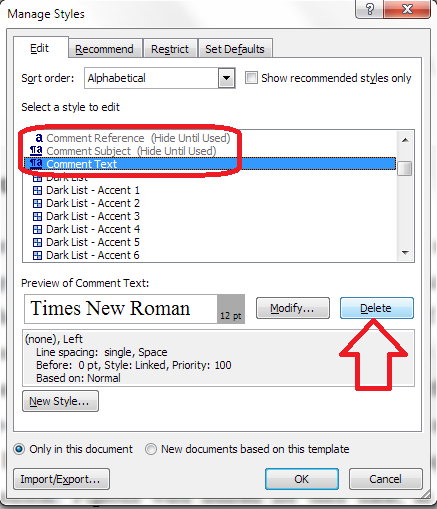
And then press OK until you’re back at your document. All of your comment boxes will now be the correct way around.

————

Want even more detail on how to customise your comment boxes? Read my article on customsing comment boxes!

Related posts: What to do if my comment boxes go tiny in Word.

Changing the language in your comment balloons

Please note, these hints work with versions of Microsoft Word currently in use – Word 2003, Word 2007 and Word 2010, all for PC. Mac compatible versions of Word should have similar options. Always save a copy of your document before manipulating it. I bear no responsibility for any pickles you might get yourself into!

This is part of my series on how to avoid time-consuming “short cuts” and use Word in the right way to maximise your time and improve the look of your documents. Find all the short cuts here

 
70 Comments

Posted by on July 11, 2012 in Copyediting, New skills, Short cuts, Word, Writing


Tags: , , , ,

My short cuts: adding shortcuts to the quick access toolbar

Do you use commands in Word that are usually buried inside a menu inside a menu inside a menu? I’m going to show you how to add these onto your Quick Access Toolbar, so you can get at them using a shortcut in just one click. And scroll to the bottom for a very quick way to do this …

The example I’m going to use is AutoCorrect Options. I have posted about how to find and work with AutoCorrect, but it is buried within some nested menus, which means you have to click and click and click whenever you want to add a new entry, wasting time to do something in order to save time. Now, I can access the menu I want with just one click!

So, first of all we need to go up to the Quick Access Toolbar, right at the top of your screen in Word 2007 and Word 2010 (in Word 2003, right click on the main toolbar and customise it). Note the down arrow to the right of your standard buttons, and click it:

You will notice an option to choose More Commands – this is how you add more buttons to the Quick Access Toolbar. Click on that, and you’ll get a screen which allows you to customize the Quick Access Toolbar:

Note at this point that you can access this menu via Word Options – Customize, too, if you want to.

We can now see a whole load of Popular Buttons you can add on to the Quick Access Toolbar – so you can pop them on there to get at them whenever you want to. These are a few buttons that appear at the top level when you click on any of the tabs on your main ribbon.

We’re going deeper, though, into buttons and commands which don’t appear on the top level of your tab menus. So click on the arrow next to Popular Commands and you’ll get a list of options:

You can choose All Commands, which will give you every command and button (with a hover-over tip to which menu they belong to so you can choose, for example, Spell Check from the Review tab rather than the Blog version, which won’t do much for you in a standard Word document. In this case, to add our deeply buried button, we want to choose Commands not on the Ribbon.

Now you have a list of every command and button that exists in Word. How handy that AutoCorrect begins with an A! Look for your button and highlight it, then click on Add >> to add it to the list on the right – which is the list of buttons that appear on your Quick Access Toolbar. At this point you can even choose when these buttons will appear, but I always leave it on All documents. When you’ve pressed Add, there it is, on the list:

Click on OK and it will magically appear on your Quick Access Toolbar:

Want to check it’s true? Click on the little icon, and there’s our familiar AutoCorrect menu.

What a time saver! I’ve added all my very commonly used buttons from different menus onto my Quick Access Toolbar, from Bold to Spellcheck and all sorts of other things in between …

Adding items quickly to the QAT

Edit to add: If you have the button you want to add to the QAT in front of you, simply right click on that button and you will get the option to add it to the quick access toolbar!

Magic! And it works however deeply buried the button is in your lists of commands – for example, you can choose something that appears in a menu within a menu:

Please note, these hints work with versions of Microsoft Word currently in use – Word 2003, Word 2007 and Word 2010, all for PC. Mac compatible versions of Word should have similar options. Always save a copy of your document before manipulating it. I bear no responsibility for any pickles you might get yourself into!

This is part of my series on how to avoid time-consuming “short cuts” and use Word in the right way to maximise your time and improve the look of your documents. Find all the short cuts here

 
24 Comments

Posted by on June 27, 2012 in Errors, New skills, Short cuts, Word


Tags: , , , , , ,

My short cuts – Using AutoCorrect in Word (2) Why and how to use it

Welcome to the second article in my series on AutoCorrect. Last time, we learned what AutoCorrect does (automatically changes words you type or spell incorrectly to their correct forms, e.g. changing “teh” to “the”) and where to find it in Words 2003, 2007 and 2010, and we can also set up a shortcut button to make it more accessible.

Now we’re going to look at how you can use AutoCorrect to speed up your typing and make it more efficient, and how you actually amend the AutoCorrect entries to tailor them to your requirements.

Why would I use AutoCorrect?

Apart from correcting common typos, AutoCorrect has two very handy uses: I use it in these ways all the time, and if you, you will save yourself time and effort.

  1. If there is a word you can never remember how to spell, set up a short cut AutoCorrect, just type in the first few letters, and AutoCorrect will auto complete it for you. No more finding it in the spell checker yet again.  Type in Kaz and Word will display Kazakhstan.
  2. If there is a long word or particularly a phrase that you use over and over again – “Creative and Marketing Director”, “economic forecasting”, “qualitative and quantitative research methodologies”, set up a short cut for each one and save all that typing (and possible typos). Type cmd, ef or qq and watch the phrases type themselves!

How do I tailor AutoCorrect to my individual requirements?

The key to this is in the AutoCorrect menu we met last time.

First of all, there are some useful features on the screen directly in front of you. Here’s how you turn on and off all those useful features that sort out typing errors as you go (we’ve all typed THe at the beginning of a sentence, haven’t we). You just untick the box if you don’t want it to do something. By the way, we’ll be looking at those other tabs along the top, especially AutoFormat As You Type, in another article.

So, for now, we’re working with the standard AutoCorrect. We’ve started off with a list of signs and symbols, because they come before “A” in Word’s alphabet. To see what else there is, try typing a letter into the top, blank fields. Here we have a mixture of the standard AutoCorrect entries (abouta changes to about, etc.) but the top two are my own additional entries. See how many keystrokes and how much time I save by typing aaa and getting accountability agent application inserted into my document (plus it’s typed correctly first time!).

How to add a new entry to AutoCorrect

Let’s look at how to add those new, personalised AutoCorrect entries. Well, it’s pretty simple. Type the abbreviation or mis-spelling in the left hand column (or field), the text that you want to appear in the document in the right hand field (or highlight the word you want to add an entry for in your document, then access this menu), and press Add.

You can see that your entry has now appeared on the AutoCorrect list, in its place in the alphabetical order. Now, whenever you type lb, the words Liz Broomfield will appear in your document.

How to delete an AutoCorrect entry

What if you want to delete an AutoCorrect entry? I did this recently – I had set re to AutoCorrect to recognize for a document I was working on that had no contractions (they’re, etc.). Of course, when I was then typing something more informal, I got lots of they’recognize as it tried to do what I’d asked it to do. So I wanted to get rid of that entry altogether. Here’s how you do that: Look up the entry by typing in your abbreviation – what you type as opposed to what you want to come up. When you’ve found the one you want to delete, press the Delete button.

Now you can see that the entry for lb/Liz Broomfield has disappeared and the list goes from lastyear to learnign. Note: it doesn’t ask you if you’re sure you want to delete, but it does leave that entry in the top text fields, so if you’ve made a mistake, you can just add it again.

How to change or replace an AutoCorrect entry

You may want to change an AutoCorrect entry – for example, you’re stopping talking about Liz Broomfield and want to refer to Lionel Blair. Type in your abbreviation and your new version of what you want Word to insert, in this case Lionel Blair. AutoCorrect will find the original entry and highlight it. The Replace button will appear – so press that.

Word does like to make sure you mean to do it when you change something, so you’ll get another little dialogue box asking if you do want to redefine this AutoCorrect entry. Press Yes (if you do).

and there you go: Liz Broomfield has changed into Lionel Blair.

Today we’ve learned why to use AutoCorrect and how to personalise it to help you type efficiently.  If you’ve found this article helpful, please leave a comment or click one of the “like” buttons below! Thank you,

Please note, these hints work with versions of Microsoft Word currently in use – Word 2003, Word 2007 and Word 2010, all for PC. Mac compatible versions of Word should have similar options. Always save a copy of your document before manipulating it. I bear no responsibility for any pickles you might get yourself into!

This is part of my series on how to avoid time-consuming “short cuts” and use Word in the right way to maximise your time and improve the look of your documents. Find all the short cuts here


Tags: , , , ,

How do I count the words in my Word document?

Looking at the search engine searches people have done before coming to this website, I’ve realised I need to publish some notes on how to count the words in your Word document. This information covers Word 2003, Word 2007 and Word 2010, although most of the screenshots are from Word 2007.

How do I count the number of words in my Word 2007 document?

Word 2007 and 2010 handily display your word count at the bottom of the screen. Well, it should be there. Let’s see …

 But what if it’s not there? If you want to display your word count at the bottom of your document, right click with your mouse on the lower menu bar – that’s the blue bit at the bottom of the window, indicated with an arrow on this screen shot:

Do take a moment to marvel at all the different things you can do on this menu bar – we will come back to them another time! Now, when you’ve clicked on Word Count, you should see your word count at the bottom of the window:

OK, so that’s one way, but what if you want more information, such as the number of characters (maybe you’re writing some text that has to keep to a certain character limit)? Never fear, there are often two ways to do things in Word, and this is no exception.

We’re going to stop looking at the bottom of the screen and move up to those tabs at the top. Click on the Review tab and you will see the Word Count option to the left:

 Click on Word Count and you will get a little dialogue box telling you all sorts of information …

Now, what if you want to count just the words in a particular section of your document (you might be trying to keep to a word limit per chapter or be writing lots of short articles you want to check)? Simply highlight the section of text you want to count, then either look at the bottom of the screen, where it will tell you that you have highlighted x out of a total of y words, or click on Word Count on the Review tab and your dialogue box will tell you just about the words you’ve highlighted:

How do I count the number of words in a Word 2010 document?

Word 2010 works in exactly the same as Word 2007 as far as the lower menu bar goes, so just follow the instructions above to show the word count at the bottom of your document.

When it comes to the Review tab and Word Count option, it’s all pretty much in the same place, but looks a little bit different:

How do I check the number of words in a Word 2003 document?

In Word 2003, you can access Word Count from the Tools drop down menu.

Please note, these hints work with versions of Microsoft Word currently in use – Word 2003, Word 2007 and Word 2010, all for PC. Mac compatible versions of Word should have similar options. Always save a copy of your document before manipulating it. I bear no responsibility for any pickles you might get yourself into! This is part of my series on how to avoid time-consuming “short cuts” and use Word in the right way to maximise your time and improve the look of your documents. Find all the short cuts here


Tags: , , , ,

My short cuts – Using AutoCorrect in Word (1) What it is and where to find it

Have you come across AutoCorrect yet? Open up a Word document and type “teh”. Did it magically change to “the” in front of your eyes? That’s AutoCorrect.

So, it’s great for correcting common typing mistakes that lots of people make. But did you know that you can harness its power to help you write and type more efficiently and faster? In this article, I’ll tell you more about AutoCorrect and explain where to find it in different versions of Word, so you can tinker with it to tailor it to your requirements. In the next post, I explain just how to do that.

How to access AutoCorrect in Word 2003

Let’s look at Word 2003 first. You can find AutoCorrect under the Tools screen (I have to admit that it was so much better when it was so accessible, right here off a main menu. Nowadays, they like to hide it!). Click on Tools and then near the bottom, you’ll find AutoCorrect Options.

Once you’ve clicked on AutoCorrect Options, you’ll find yourself at a screen that will start to look familiar as you work your way through this article. This is where you can see what is already set up, and delete / change / add AutoCorrect entries as you wish. More about that in the next article!

How to access AutoCorrect in Word 2007

Here is how to access AutoCorrect in Word 2007. When I first moved over to Word 2007, I found it a bit hard to track down AutoCorrect – the key is to click on that Office button in the top left corner of the screen. When you do that, a menu will come up below the button, with a list of the files you’ve recently accessed (that’s what I’ve blanked out, for confidentiality purposes!), with a list of things you can do and, right at the bottom, a Word Options button. Click that button.

Once you have clicked on the Word Options button, you’re confronted with another menu (oh, for the simplicity of Word 2003!). You’ll find lots of intriguing options here, some of which we’ll be exploring in further articles, but for now, what you want is Proofing, about half way down on the left hand side. Click on Proofing and you will get a menu including the heading AutoCorrect Options. Click on the AutoCorrect Options button …

… and you come to a rather familiar screen, offering you a place to delete, change and add AutoCorrect entries as you wish. More about that in the next article! Note that you can also set up a shortcut button on your Quick Access Toolbar if you use this a lot.

How to access AutoCorrect in Word 2010

Now, in Word 2010 I feel like they’ve buried AutoCorrect just that one level deeper. But we’ll find it! To access AutoCorrect in Word 2010, you need to first click on that File tab, one to the left of Home, to which Word defaults. This has replaced the Office button from Word 2007. Anyway, Click on the File tab and you will be given a menu which, handily enough, doesn’t have a “Word Options” entry, but just Options. Click on Options.

Once you have clicked on Options, you will be given a new menu. This is quite similar to the one in Word 2007. Choose Proofing and then AutoCorrect Options.

… and here is your menu where you can see what is already set up, and delete / change / add AutoCorrect entries as you wish. More about that in the next article! Note that you can also set up a shortcut button on your Quick Access Toolbar if you use this a lot.

In the second half of this article, we look at how to tailor the automatic corrections to suit your purpose, whether you have a word you just can’t spell or type correctly, or you need to type a lot of words fast and want to auto-type particular common phrases.

Many thanks to Katharine O’Moore Klopf for the Word 2003 screen shots!

Please note, these hints work with versions of Microsoft Word currently in use – Word 2003, Word 2007 and Word 2010, all for PC. Mac compatible versions of Word should have similar options. Always save a copy of your document before manipulating it. I bear no responsibility for any pickles you might get yourself into!

This is part of my series on how to avoid time-consuming “short cuts” and use Word in the right way to maximise your time and improve the look of your documents. Find all the short cuts here


Tags: , , , ,

My short cuts – how to change your text from upper case to lower case

This is part of my series on how to avoid time-consuming “short cuts” and use Word in the right way to maximise your time and improve the look of your documents.

Sometimes you really want to change a sentence from, maybe, all lower case to All Title Case, or ALL CAPITALS to all lower case, or some other variant.

And you know how to do it, right: delete the sentence and retype it, or delete the first letter of each word and retype it, or turn on overtype then forget to turn it back to insert when you’ve finished … well, there is a way to just do it with a couple of keystrokes!

How do I change all small letters to all capitals or all capitals to all lower case letters?

This is such a simple one. Highlight your sentence (1). With the sentence still highlighted, press shift and F3 at the same time. Magic! With each press of shift-F3 it will cycle through Title Case (2), UPPER CASE (3) and then back to lower case (4).

This is so useful if you’re grappling with a bibliography you’ve written or you’re editing (especially when the capitalisation in article or book titles is not consistent), or if you accidentally type something all in capitals.

Please note, these hints work with versions of Microsoft Word currently in use – Word 2003, Word 2007 and Word 2010, all for PC. Mac compatible versions of Word should have similar options. Always save a copy of your document before manipulating it. I bear no responsibility for any pickles you might get yourself into!

Find all the short cuts here


Tags: , , , ,

New ways to navigate the resources on the Libro blog

I’ve built up loads of information on all sorts of topics on this blog over the past few years, so I thought it was time to put together a resource to help you find what’s most useful for you. I ran a poll, people said yes, so I did it!

I put this new guide together about a week ago, and it’s proved popular so I thought I’d let you know about it quickly.

I’ve put together one simple resource guide with three main sections:

  • Resources for business – these include posts on how to set up a small business, things to do to grow your business, hints on networking, motivation, etc.; then some information about tax and finally an additional link to my small business interviews (note that business formation and tax posts are relevant to the UK although the rest of it will translate anywhere)
  • Resources for students – how to write an essay or dissertation, plagiarism and quoting sources, and lots more to come
  • Resources for Word users – all sorts of tips and hints to make your documents more consistent and easy to write, change and navigate, including tabs, margins, headings, contents pages and more obscure matters like how to put text in alphabetical order. Also includes a few notes on PowerPoint and other applications,

The whole resource guide offers a good way to find out what you need to know – do have a look and a play around, and let me know if you’ve found anything particularly useful!  I’ll be adding both resources and entries to the resource guide as I go along, of course. Watch this space …

And of course, we still have the index to the Troublesome Pairs and index to all the Saturday Small Business Chat posts.

I hope you enjoy the resource guide and indexes, and the resources they guide you to!


Tags: , , , , , , , , ,

How to count the words in a PowerPoint 2007 presentation

I recently needed to know the word count in a PowerPoint presentation. In my case, this was because I charge my clients by the word, in the main, and needed to know how much to charge someone for editing her PowerPoint text. But I’m sure it will be useful in other cases, too, for example if you’re a student with a word count target.

And it’s NOT obvious. Plus it’s different in Word 2007 and Word 2010, of course.

So, this is what you do …

How do I count the words in a PowerPoint 2007 presentation?

Open your document and click on the big Office button in the top left (1)

Click on Prepare (2) (like that’s obvious!) then Properties (3). This will give you some of the document properties in a bar along the top (these vary according to how you set up your document in the first place):

And because nothing ever shows you what you want immediately, you then need to click on Document Properties then choose Advanced Properties from the drop down. Then, finally, you get …

A lovely dialogue box with all the properties you could ever want, including the word count.

Please note, these hints work with versions of Microsoft Powerpoint 2007, for PC. Mac compatible versions should have similar options. Always save a copy of your document before manipulating it. I bear no responsibility for any pickles you might get yourself into!

Related posts:

How do I count the number of words in a PowerPoint 2010 presentation?

How do I count the number of words in a PowerPoint 2013 presentation?

Find all the short cuts here


Tags: , , , ,

How to put text in alphabetical order in Word

I was inspired to write this post after having to put yet another student’s bibliography into alphabetical order. I know the quick and easy way to do this – but I don’t think a lot of people know that you can do this!

So, you’ve got your bibliography, and you’ve been very good and followed the rules for setting it out (I’ve used Harvard method here) but it’s not in alphabetical order by author surname, and, except in certain cases,* it really should be.

*A very few referencing systems ask for the bibliography to be in the order in which the references appear in the text. I’ve hardly ever had to deal with them. But I like completeness!

So, a lovely list of books but not in order by the authors’ surnames. How can we resolve this without swapping all the lines around?

First, highlight all the text you want to alphabetise. Then, make sure you’ve got the Home tab at the front. See that little button you’ve never even seen before, next to the paragraph mark?

Press the A-Z button and up pops a dialogue box.

There are all sorts of ways in which you can order the text, which are very similar to the ways you can order text and numbers in Excel. You can even specify whether what you’re sorting has a header row (I’m not sure why you’d want to do that, as you can just exclude the header row when you’re doing the highlighting, but I suppose it would be useful if you realise you’ve accidentally highlighted the headers too). I’ve sorted by Paragraph, Text, and in Ascending Order here, and to be honest, that’s what I always do. Click on OK, and look what you get:

Here’s our bibliography in order by author surname with just a highlight of the text and a few clicks – much quicker and with far less risk of human error than doing it manually.

Note: if your results come out a bit odd and have split your entries up into two halves, reverse your alphabetising by either hitting Control-Z or the Undo button, and check there aren’t any pesky hard returns hiding out in the middle of paragraphs (the best way to do this is to click the Paragraph button, to the right of the A-Z button and look out for bent arrows signifying carriage returns). Get rid of those and alphabetise again to your heart’s content!

This is part of my series on how to avoid time-consuming “short cuts” and use Word in the right way to maximise your time and improve the look of your documents.

If you have enjoyed this post and found it useful, please click on the “share” buttons below or tell your friends and colleagues about it! Thank you!

Please note, these hints work with versions of Microsoft Word currently in use – Word 2003, Word 2007 and Word 2010, all for PC. Mac compatible versions of Word should have similar options. Always save a copy of your document before manipulating it. I bear no responsibility for any pickles you might get yourself into!

Find all the short cuts here


Tags: , , , ,

My short cuts – how to create a contents page in Word

This is part of my series on how to avoid time-consuming “short cuts” and use Word in the right way to maximise your time and improve the look of your documents.

Today we’re going to look at how to create a contents page or contents list in Word. I am breaking this series up into small pieces, so we have already learned about setting up headings and then numbering them.

You will use this to save yourself time and ensure consistency when you’re setting up a large document and you want it to have a contents page. You can do it manually, but it is FAR easier to do it this way.

First, have a look at the two headings articles to make sure you understand how to assign headings and how to number them (if you want to).

Now, for the purposes of making a more interesting contents page, I’ve popped each heading onto a separate page (and we all know how to do that, don’t we!)

So the text is all set up, with headings that are also numbered, and each heading is on a separate page. Now we’re going to put our cursor at the beginning of the document, and make sure we’re in the References tab.

You can see the Table of Contents button highlighted – click on that and have a look at the box that comes up:

Here we have lots of different styles of contents page to choose between. Either double click on the one you want – I clicked on the first one – or click once to highlight it and then Insert Table of Contents. And look what appears! Magic!

You can see lots of lovely headings and their numbers, all laid out nice and clearly (imagine if this was a PhD or another long document with lots of sub-headings.

But what happens if we need to change something in the text? Look – there’s a problem with the document here …

I can see that I should have typed “How Much it Costs” for section 3, and it’s on page 8 along with Section 2, when it should be on page 9. Oh no!

So let’s go to page 8, move the heading onto page 9 and amend the heading itself:

Great – so now the text is sorted out and the heading is on page 9, where it should be. How do we update the Table of Contents to reflect this change?

Go back to the Table of Contents and highlight it (it all comes up in blue if you click on one bit of it). Left click and you should find it puts everything in grey and gives you a little tab at the top like this.

You can use this to change all sorts of attributes on the contents page, or you can just click on Update Field from here or left click when you have the contents list in blue in the last step, and you get this choice:

I always choose Update entire table, just in case. And with one click, it’s updated the Contents list to match the document.

So, no more fiddling around doing a contents page by hand. As long as you set up your headers, you can insert and update your Contents page however you want and whenever you want – so much easier!

This is why, if you use my proofreading services, I will put a note on your contents page reminding you to update it at the last minute, to take into account any changes we might have made to your pagination or heading numberings. Update the Contents page at the very last stage, and it’ll be completely accurate and up to date.

If you have enjoyed this post and found it useful, please click on the “share” buttons below or tell your friends and colleagues about it! Thank you!

Please note, these hints work with versions of Microsoft Word currently in use – Word 2003, Word 2007 and Word 2010, all for PC. Mac compatible versions of Word should have similar options. Always save a copy of your document before manipulating it. I bear no responsibility for any pickles you might get yourself into!

Find all the short cuts here


Tags: , , , ,