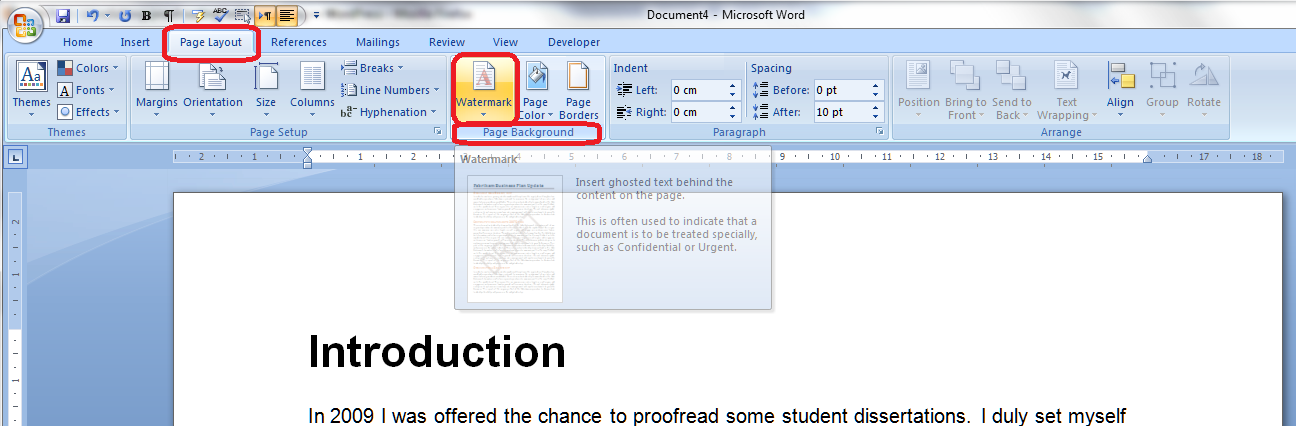
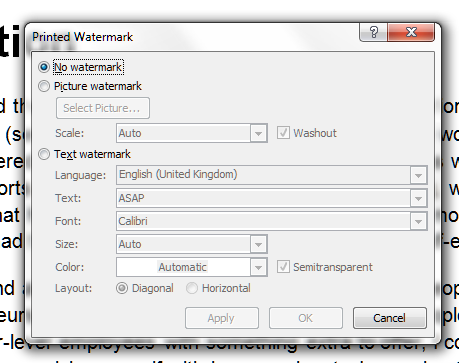
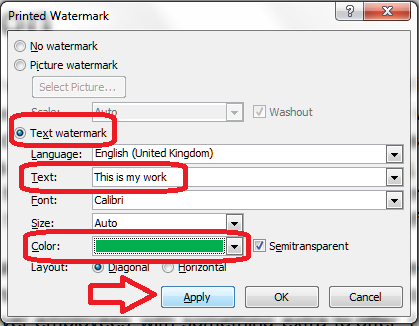
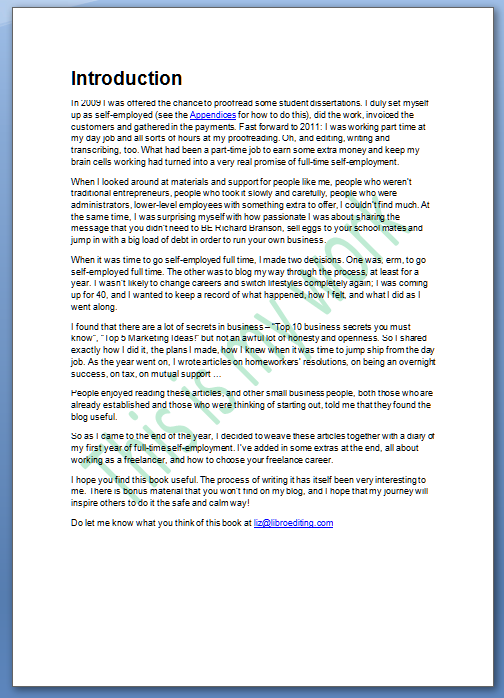
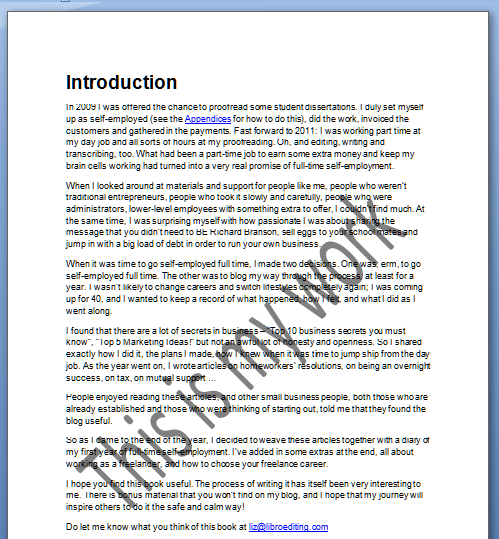
In a previous article, we talked about protecting your Word document using a Watermark (watermarks can also be used to extend your corporate or other branding through your documentation). Today we’re going to look at other, stronger ways to protect your Word 2010 document and prevent people from making changes to it.
Why might I want to protect my Word 2010 document?
Protecting a Word 2010 document means that anyone apart from you can either only access the document by using a password or is unable to make certain, or any, editorial changes to the original document.
Why would I want to stop people opening a document?
- If you are storing confidential documents on a shared drive in a company-wide network
- If you want to send a document to someone who shares an email address with a number of other people (for example a general email address at your accountant’s office)
- If you want to send a document to someone but need to ensure that anyone intercepting it cannot open the document
Why would I want to stop people editing a document?
- You’ve completed a final version of a document and want to make sure no one does any more edits
- You are sending something like an invoice or a contract and want to make sure the recipient does not change anything
- You’ve created a procedural document to be saved on a shared drive and don’t want your colleagues to make unauthorised changes
Where is the menu for protecting documents in Word 2010?
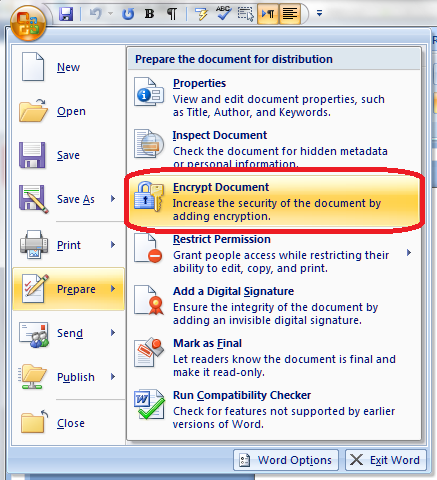
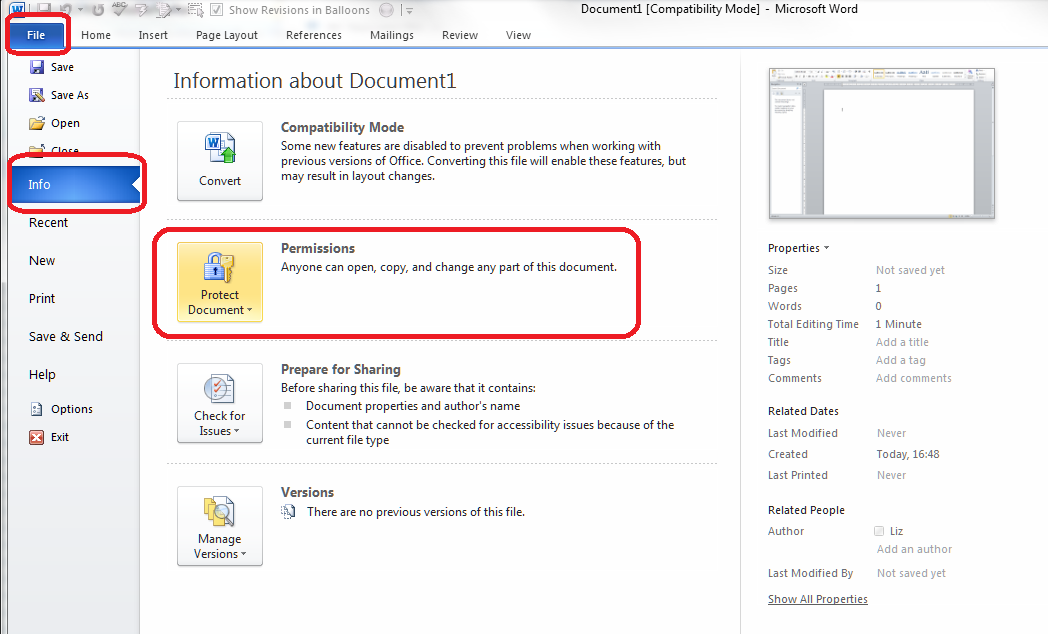
To access the menu for protecting documents, select the File tab at the extreme left of the row of tabs (remembering that it’s Home that is automatically selected), then visit the Info area, where you will find a section titled Protect Document:

Click on the Protect Document button and you’ll be presented with a list of options:

We’ll go through these in turn. Some of them are not applicable if you’re working on your own, with only one computer on your network, but we’ll take a quick peek at them anyway.
What are my options for protecting my document?
Taking the options in turn …
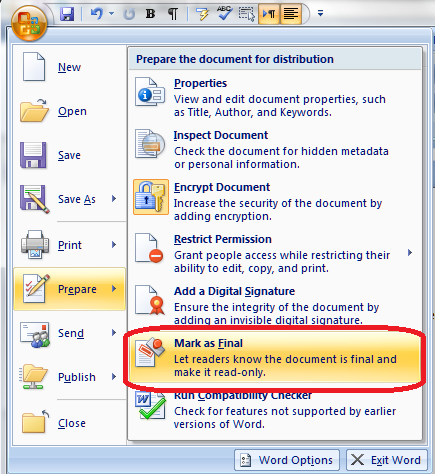
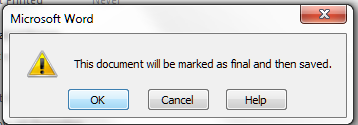
Mark as Final
The Mark as Final option creates a read-only version of the document which will be marked as final and which will not let anyone make any changes. Access it via the menu we discussed above:
 Click on the button and you’re given a dialogue box to click on:
Note: it’s a good idea to save this under a new file name.
You will then need to go and set the document to being Read-Only, which you can see how to do below in the Restrict Editing section.
Note 2: No one else can edit the read-only document, however they could possibly “save as” and then edit it (only turning a document into a PDF protects it from all changes).
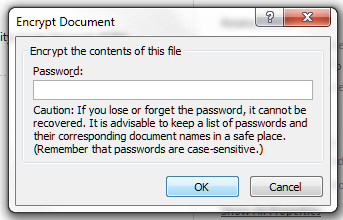
Encrypt with Password
The second option allows you to apply a password to the document. This will mean that no one can open it without having the password, whether on your standalone computer, a shared network drive, or a copy of the document that you have emailed to them:

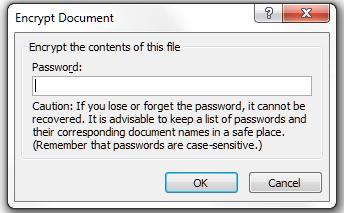
When you click this button, you will be asked to enter a password:

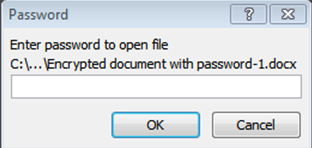
You will then be asked to enter the password again (the dialogue box looks the same).
When you or anyone else tries to open the document, this box will appear:

If you want anyone else to be able to access the document you will need to let them know the password. If you’re sending the document as an attachment to an email, common sense tells you not to send the password in the body of the email …
Note: Once the user has accessed the document using the password, they will be able to edit and save it freely unless you have also applied one of the other levels of protection.
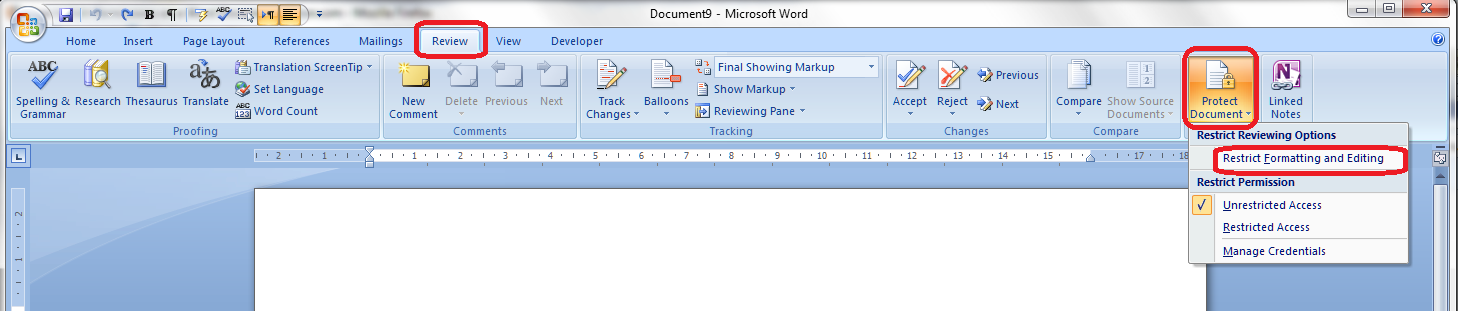
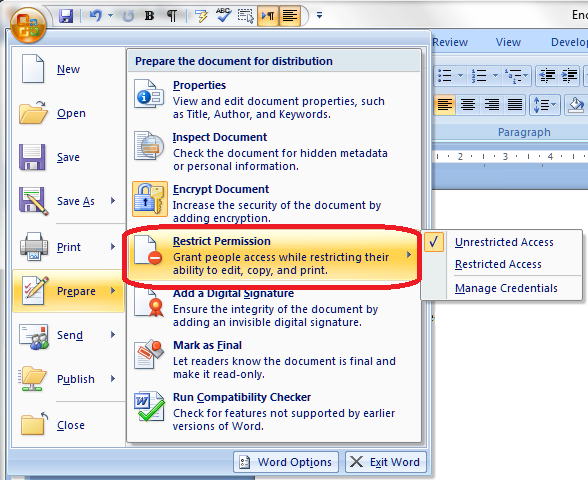
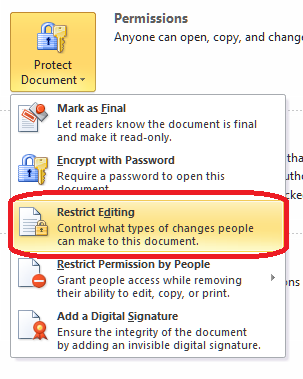
Restrict Editing
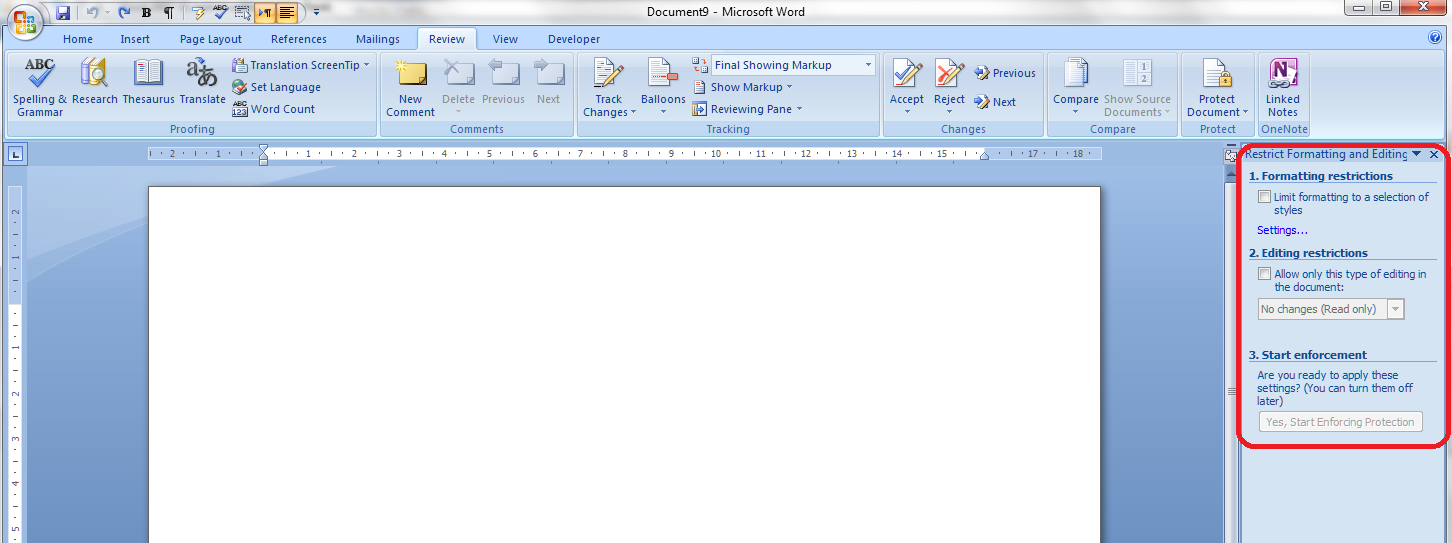
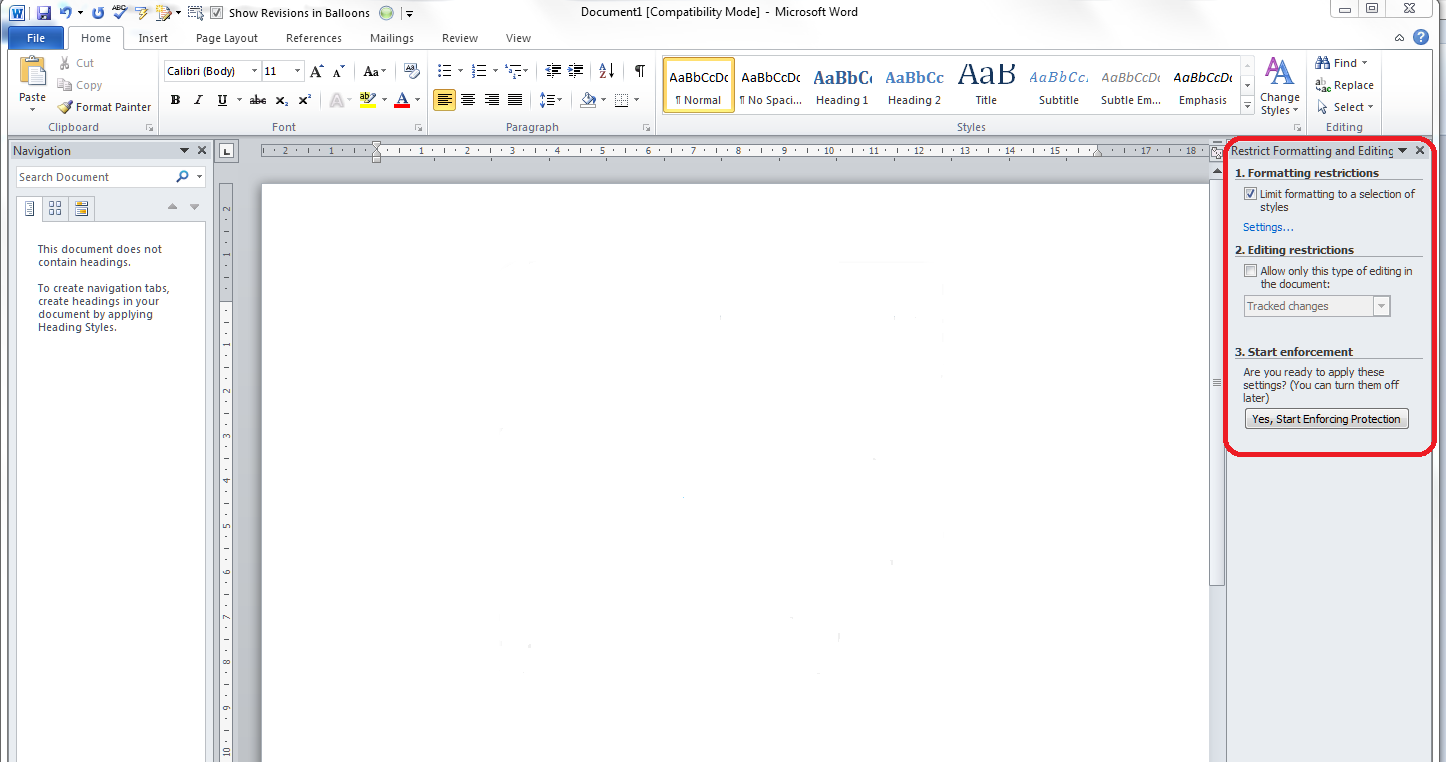
The next option, Restrict Editing, allows you to choose what parts or aspects of the document can be edited:

Click on this option and you are able to choose what levels of the document anyone else can edit. It will return you to your original document and give you a sidebar on the right hand side of your document:

Lots of options here, but looking at them in turn, you can …
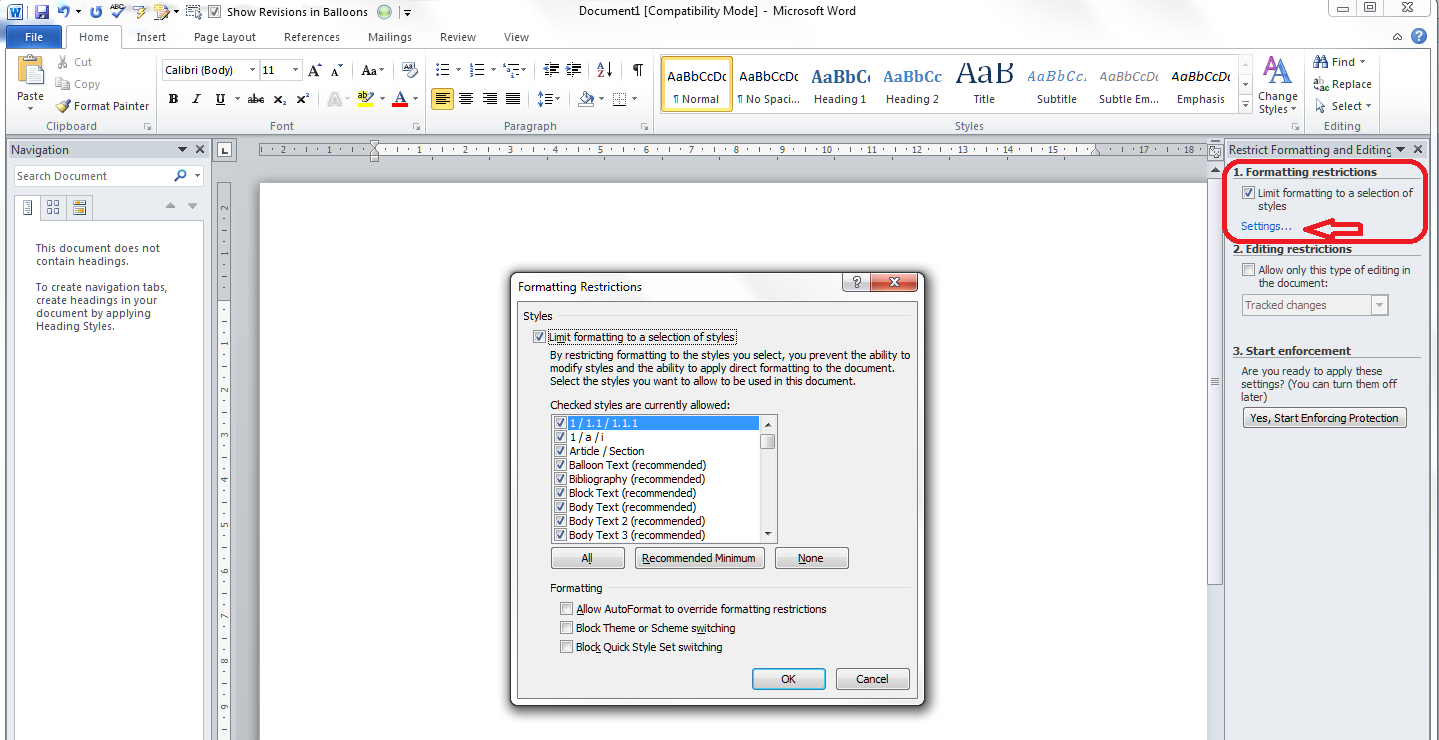
Limit which styles can be edited – you will be given a list of options. This is useful if you have carefully set lots of headings styles and don’t want them to be changed:

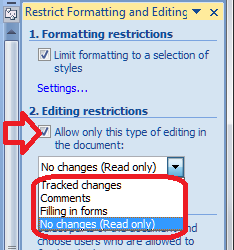
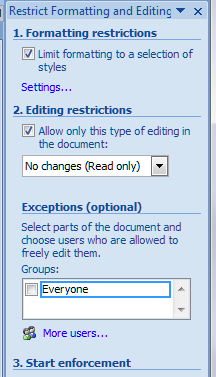
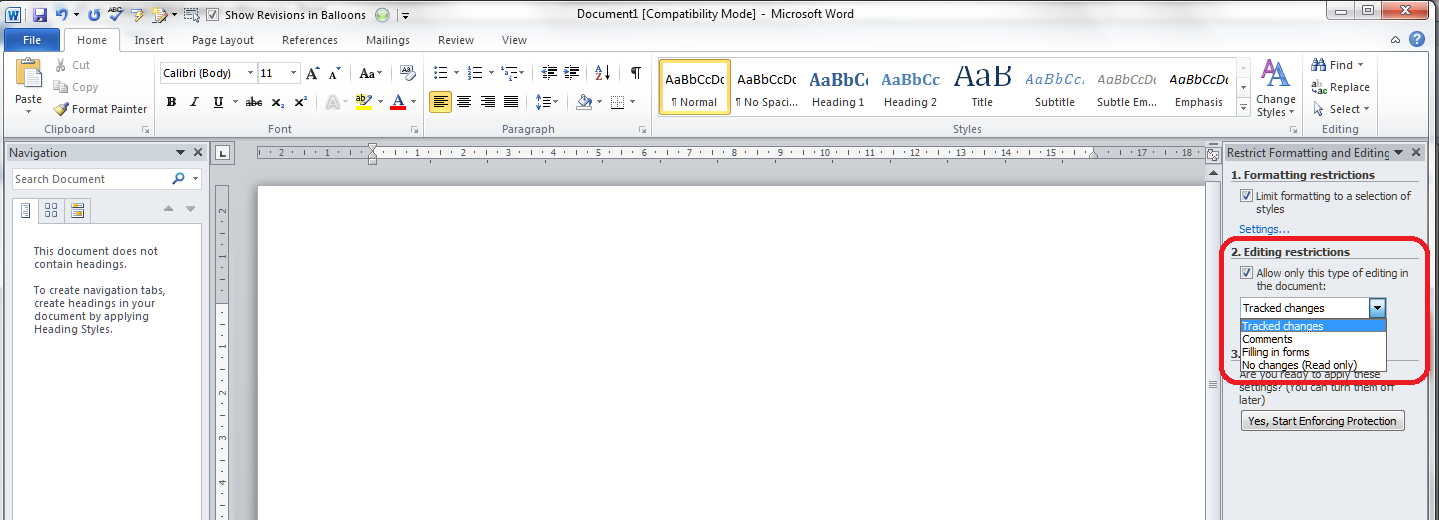
Or allow only certain types of editing to be done:

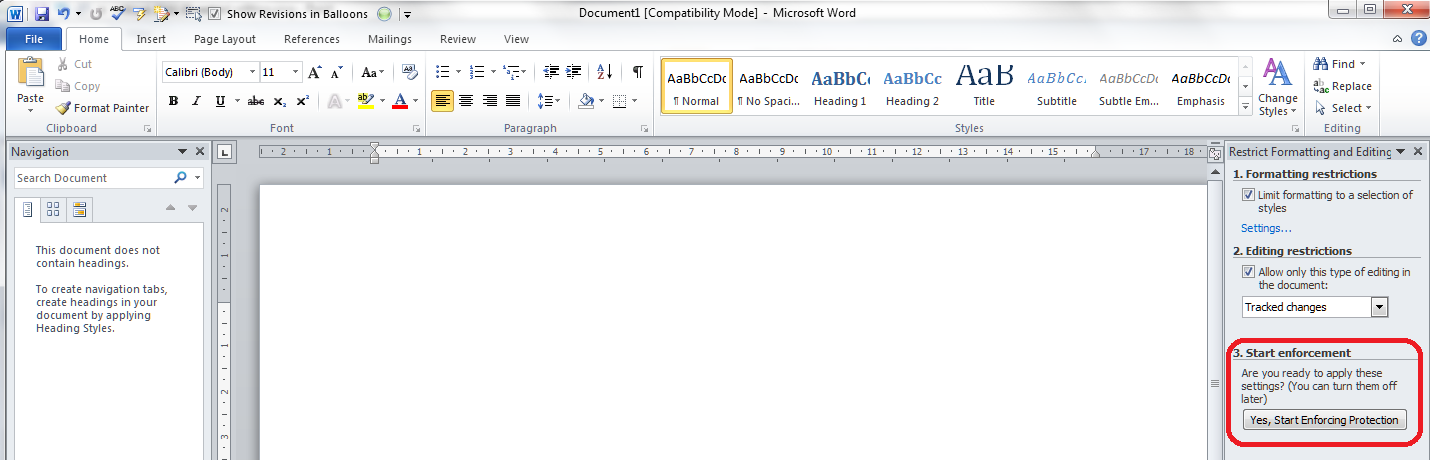
This is where you can make the document Read-Only, i.e. it cannot now be edited.
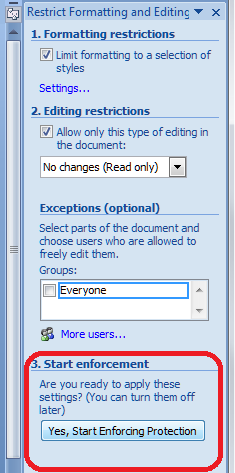
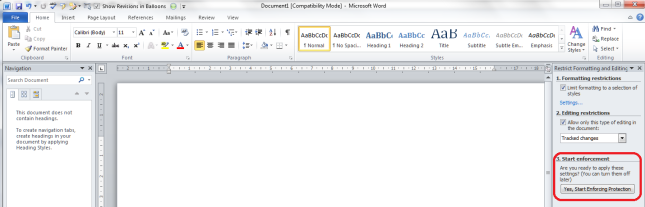
Once you’ve made your selections here, you will need to press the Start enforcement button to initiate this. I believe that you cannot then make restricted edits yourself, although clearly you can go in and change these settings on your own document.
I suspect that almost no one knows about these settings, by the way, so if you are setting such restrictions, it might be polite and save time in the long run to let the recipient know that you’re doing this.
Restrict editors
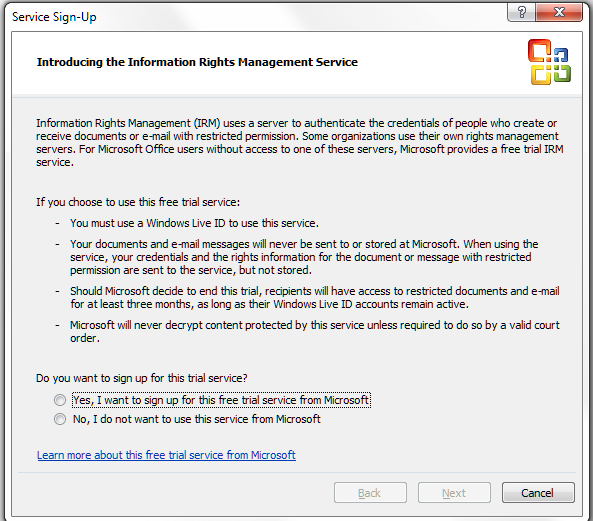
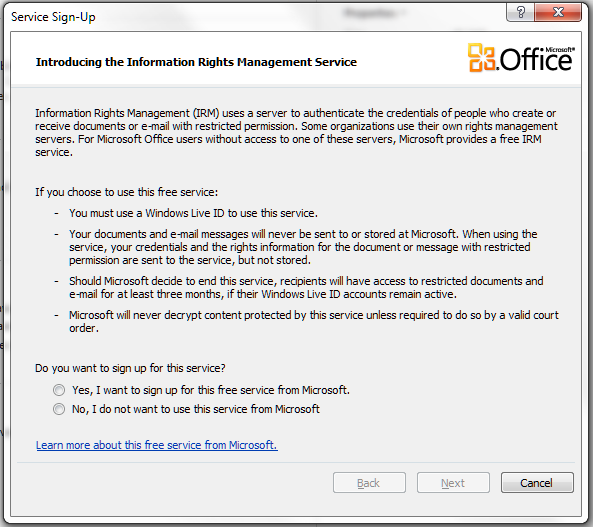
This is a Windows-specific option that can allow you to set permissions for various people, usually within an organisation.
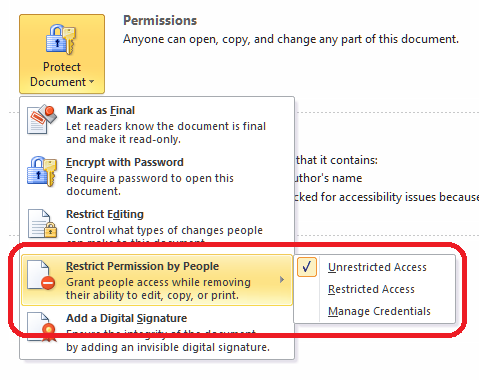
This involves using Microsoft’s Information Rights Management Service and being signed up to Windows Live. The message you get if you try to click Restricted Access or Manage Credentials explains it in more detail:

As the message says, many organisations (and all of the ones that I’ve worked in) have their own rights management systems embedded in their procedures and file/drive setups. It’s fine to set permissions and protect your document in that way, but that’s outside the scope of this article: you will need to talk to your IT support people or a knowledgeable administrator in your department. But this is there, and can be done if you have the relevant signups (again, contact IT or your systems administrator before signing yourself and others up for something that can affect access to documents on a shared organisational system).
Adding a digital signature
This last option is another one where you have to sign up for something extra …
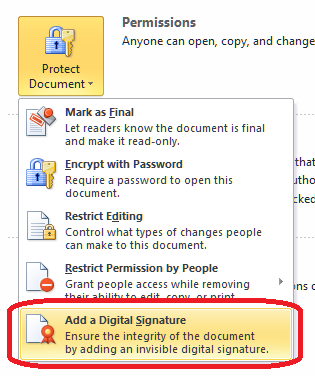
This is another useful way to protect your document, however, you will need to purchase a signature service from the Office Marketplace or you can sign up for a third-party service which will apply a digital signature to your document.

I have signed up to a third-party system which applies a digital version of my signature which I have previously uploaded onto documents, which some of my clients insist on me doing when signing contracts, etc. I am not entirely sure how this would hold up legally in a court of law if you were trying to protect your document, however.
Creating a PDF using Word 2010
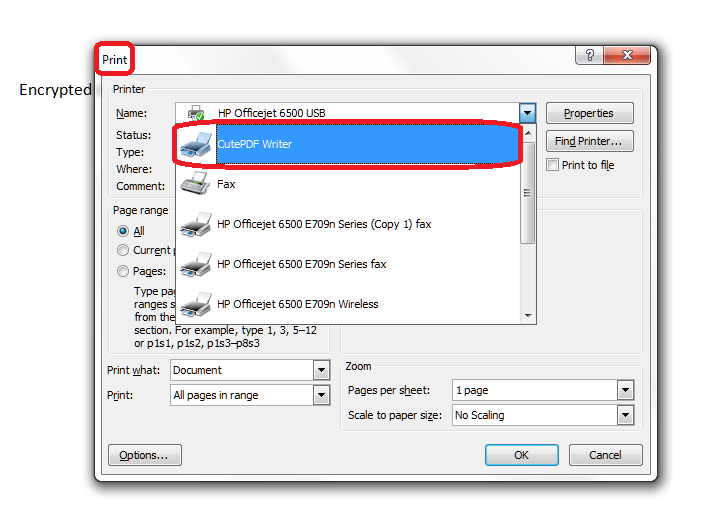
The best way to protect your document from being changed is still to convert it into a PDF. A PDF is a copy of a document, a bit like a photocopy, which cannot be edited and changed. Well, that’s not strictly true nowadays: the VERY best way to protect a document is to turn it into a PDF and password protect it so it can only be opened by the recipient and make it read-only so it can’t be edited. I’m going to publish an article on PDFs soon, so look out for that.
You used to have to use a separate programme to create a PDF from a Word document; however, from Word 2010 onwards, you can create a PDF directly within Word.
In the Save and Send menu under the File tab, choose Create PDF/XPS Document:

What is an XPS document? Open XML Paper Specification (also called OpenXPS) is an open specification for a page description language and a fixed-document format, developed by Microsoft. It’s kind of an equivalent standard to PDF. If you’re asked to send someone a document in this format, now you know what it is (I’ll admit here that I have never done this myself).
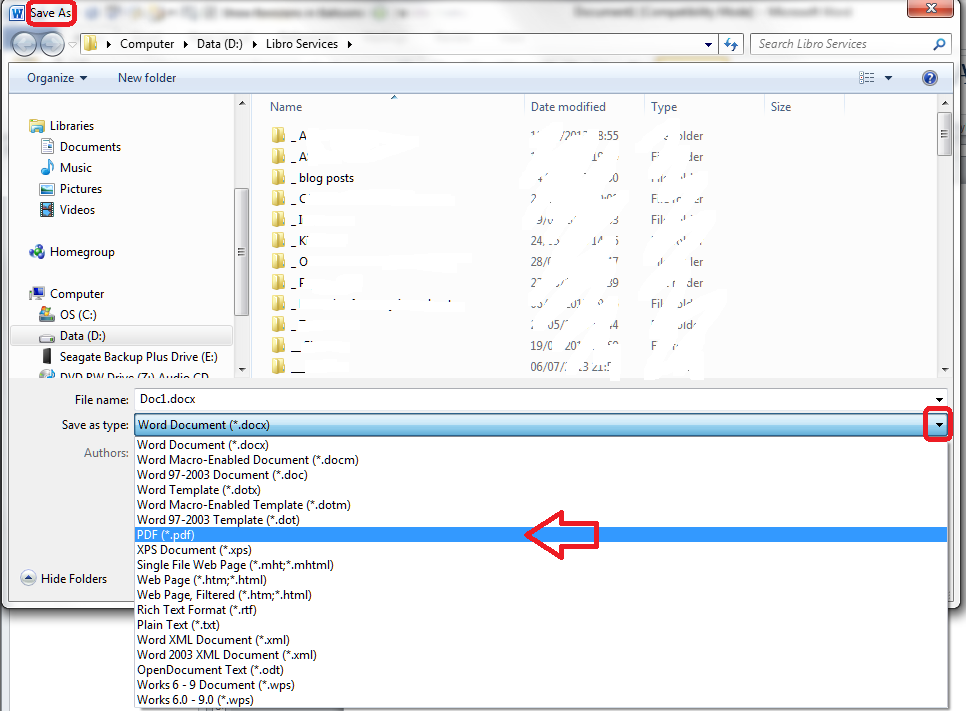
Hit the Create PDF/XPS button and you’ll be taken to the Save As screen to save your document as a PDF (note that it might well take you to a temporary file folder and you’ll need to navigate to whichever folder you’ve saved your original document in).
You can also use the Save As menu directly from the Home tab for this function:

I’ll go into more detail about how you can protect that PDF further in my article on PDFs.
For now, we’ve learned how to protect a document in Word 2010, including information on why you’d want to do that, where you can find the menus, and what you can do.
Related articles
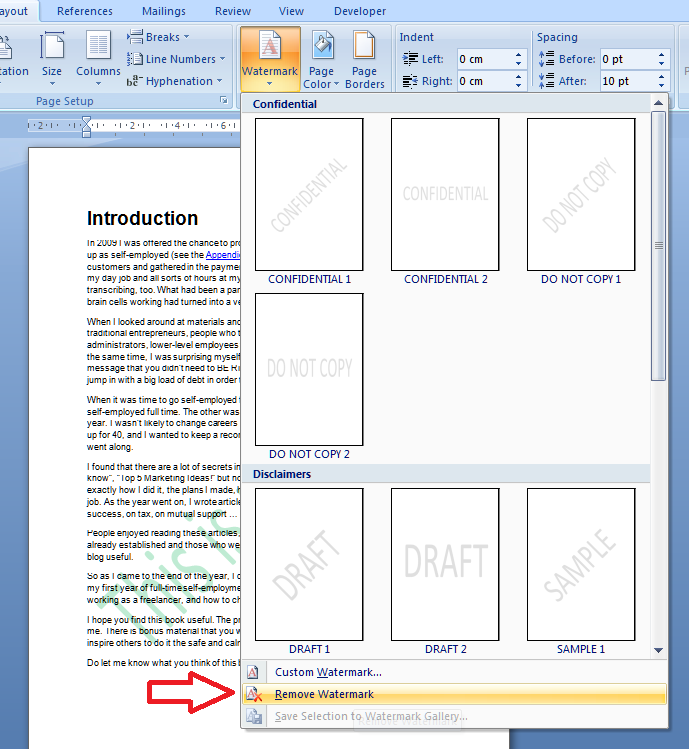
How to Watermark your document
How to protect your document in Word 2007
(coming soon):
Protecting your document using PDFs
———————
This is part of my series on how to avoid time-consuming “short cuts” and use Word in the right way to maximise your time and improve the look of your documents.
Please note, these hints work with versions of Microsoft Word currently in use – Word 2003, Word 2007 and Word 2010, all for PC. Mac compatible versions of Word should have similar options. Always save a copy of your document before manipulating it. I bear no responsibility for any pickles you might get yourself into!
Find all the short cuts here …