RSS

Tag Archives: Word2007

How to add page numbers to a Word document (2)

We’re already learned the basics of adding page numbers to a Word document, and now we’re going to look at some more things you can do with page numbers, including:

  • how to stop your first page displaying a page number
  • how to have page numbers in different formats in your document

This will be particularly useful if you’re formatting the page numbers on a PhD or other thesis or dissertation – many of my student clients don’t know how to do this, which is what inspired me to write this series of articles.

How can I have different page number formats in different parts of my document?

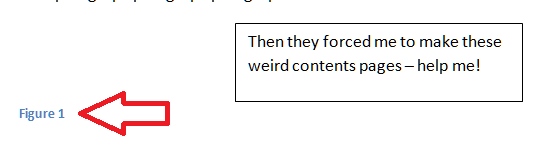
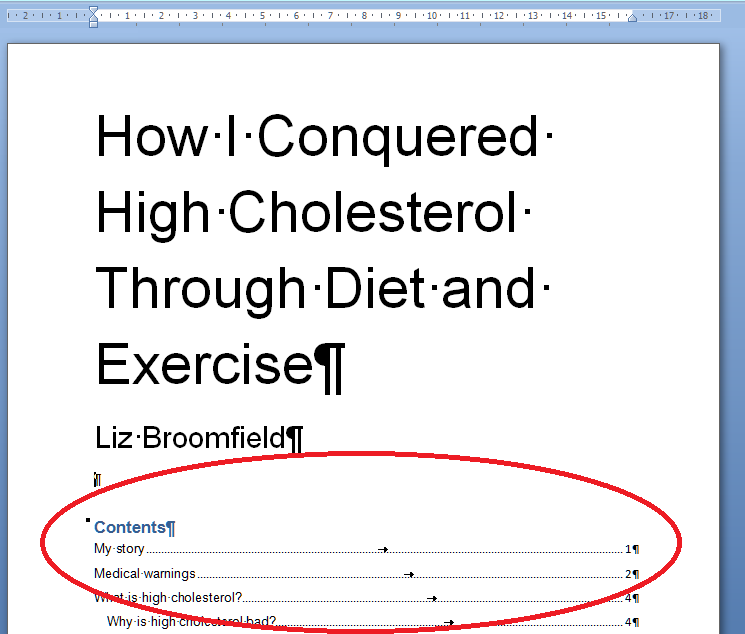
Imagine that you’ve written a thesis or a book – something that has a title page (red), a contents list (blue) and then the main body of the text (yellow). It’ll look something like this …

1 the document

Now imagine that you’d like to have different page numbering for different parts of the document – for example, no page numbering on the title page, Roman numerals for the contents pages, and then the numbering continuing in Arabic numerals for the main body of the text. Look at a non-fction book or someone else’s thesis and you’ll see that this is how they’re often laid out.

How do you do this? First of all, you need to divide your document into discrete sections, using section breaks. Let’s learn how to do that …

How do I see what formatting I have in my document?

If you plan to insert section or other breaks in a document, it’s useful to be able to see what breaks you have in there already. In the document I’m using an example, I would suspect that the aurhor has added some sort of breaks to make the contents page and then main text start on new pages.

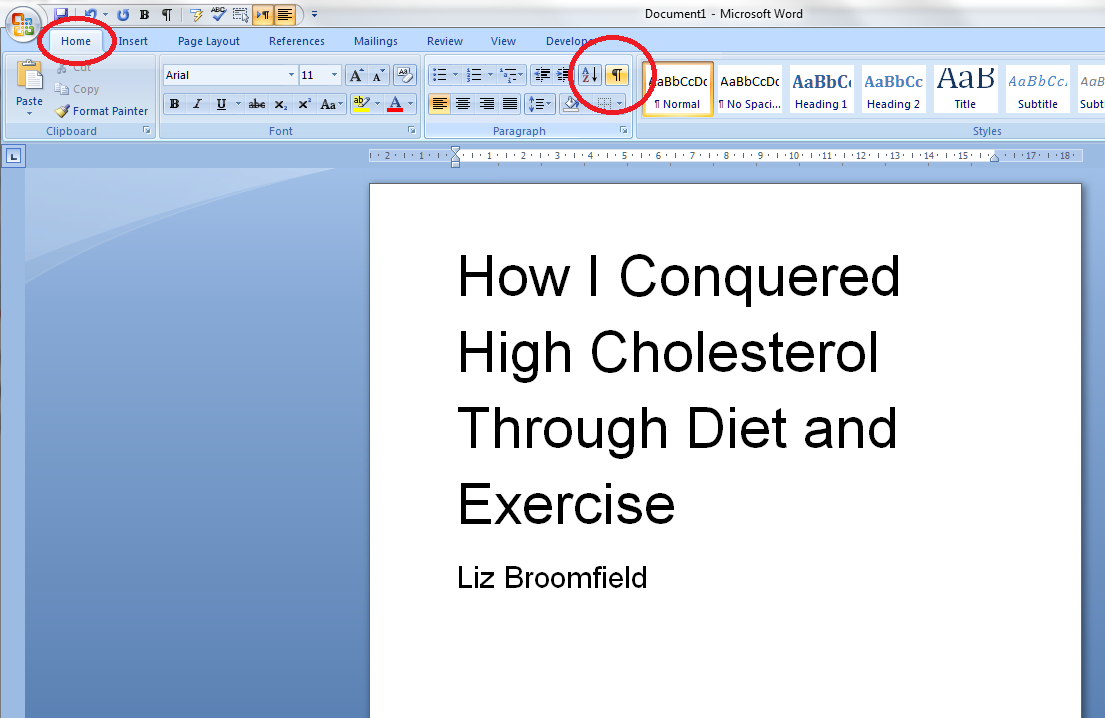
How do we check this? Make sure you’re on the Home tab and then press the Paragraph button in the Paragraph section

2 show coding

Once you’ve pressed the button, you’ll find all sorts of strange marks appear. You can also see that the new page has been started by inserting a Page Break (and not using the Enter key – hooray. If you want to know the reason for the “hooray”, read this article.

3 page break

The paragraph mark indicates a return, and the Page Break label shows that a page break has been inserted here. That’s great if you just want to start the next chunk of text on the next page, but we want to format each section differently, and this requires a section break rather than just a page break.

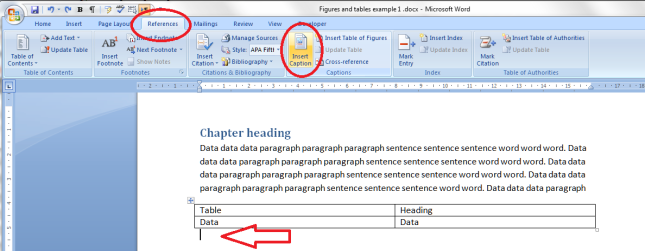
How do I insert a section break?

In order to insert a Section Break, we need to delete the page break first. Highlight the page break and press the Delete key or place the cursor just to the right of it and press the Backspace button. As soon as you do that, you’ll notice that the text which sat neatly at the top of the next page has jumped up onto this page. Don’t worry, it will disappear again …

4 no page break

To insert the Section Break, you need to be in the Page Layout tab (not the Insert tab, confusingly). There you will find an area called Page Setup which includes a Breaks menu:

5 breaks

When you press the Breaks button, you’ll see a menu offering several different options for the break you wish to insert – including our old friend the page break and our new friend the section break.

6 section break next page

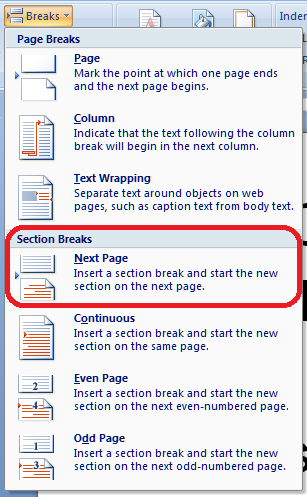
The one we want is Section Break – Next Page. As the text explains, this will insert a Section Break and start the next chunk of text on the next page – exactly what we want to do. Choose that option and hey presto …

7 section break done

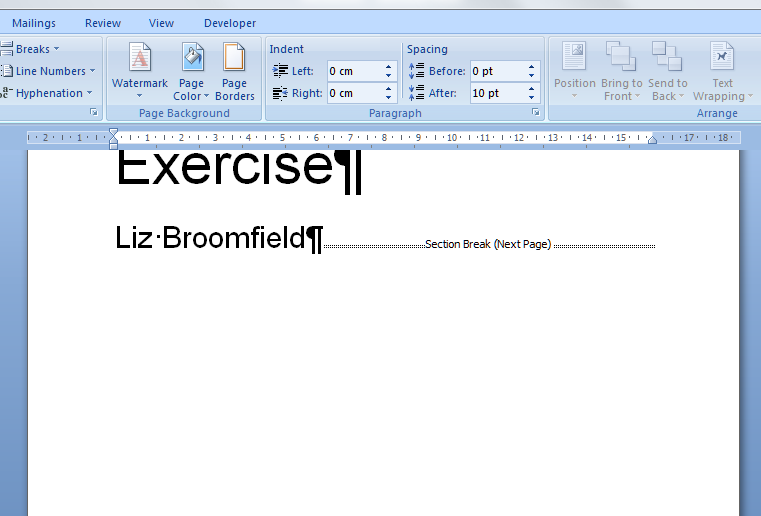
… a Section Break (Next Page) appears on your page. And the Contents page has moved back to Page 2.

Note that in this example, we’re dividing the document into three sections, using two section breaks, so we need to add one at the end of the contents list, too …

8 section break done

So now our document is divided into three sections – 1, the title page, 2, the contents list and 3. the main body of the text:

9 the document sections

How do I add different formats of numbers to different sections of my document?

Now it’s time to add those page numbers, remembering that we want no page numbers at all on the title page, the Roman numerals on the conents pages followed by Arabic numerals for the rest of the document.

We’ve seen how to add page numbers before, using the Headers and Footers on the document. We’ll do that in a moment. But this time we need to do something else first: we need to remove the association between each section and make tat sure each one is independent. This will allow us to assign different page number formats to each section (and other formatting – I’ll write about this another time, but it’s the way you get your document to let you have certain pages in landscape rather than portrait orientation, etc.

How do I stop my footer having the same format as the previous section?

The trick here is to make sure that the footers do not simply copy the previous section of the document. if they do, you will have trouble making each section different. We now need to go into the second section of the document and disconnect its footers from those of the first section.

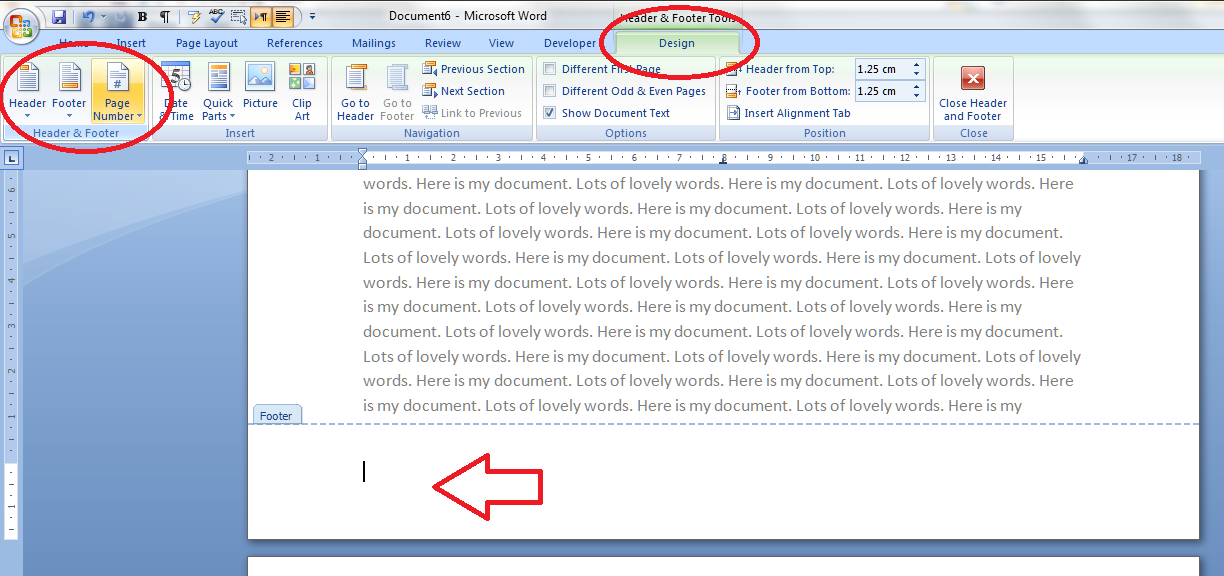
So, first of all, go into the Design tab or just left click on the bottom part of your page, below the text. In both cases, the Design tab will display and you need to look at the Navigation area. You will see that the footer automatically decides to be Same as Previous – we need to disconnect this footer from the previous one. Up in the Ribbon, Link to Previous is highlighted, reminding us that this section’s footer is linked to the previous one and providing a handy hint as to how to stop that.

10 not the same as previous

If you press the Link to Previous button it will turn from yellow back to white, you’ll notice that the Link to Previous note in fhe footer has disappeared. This means that you can format Section 2 independently of whatever’s going on in Section 1,

blog post

Note that the Header has its own ability to Link to Previous, which is separate from that of the Footer, which means that you can keep any header text you’ve added to the document working throughout the document without needing to re-insert it into each section.

Before we start getting excited about adding those page numbers, make sure you’ve done the same to Section 3, disconnecting it from Section 2. Changing Same as previous in one section won’t have any effect on the next section:

12 unlink these too

Remind me how to add page numbers …

Now we’re ready to add the page numbers to the document. Ignoring Section 1, which doesn’t need a page number, we can go into the page number add part of Section 2. Just to remind you, that’s on the Page Number area of the Design tab, and in this case we want to add a page number at the bottom of hte page, so we select Page Number then Bottom of Page and the particular position we require, so as to set up the page number position before formatting the actual numbers.

13 page numbers

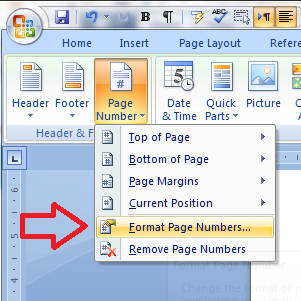
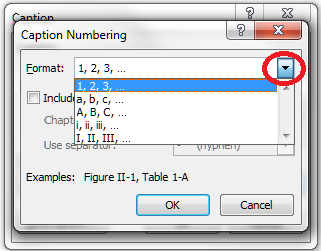
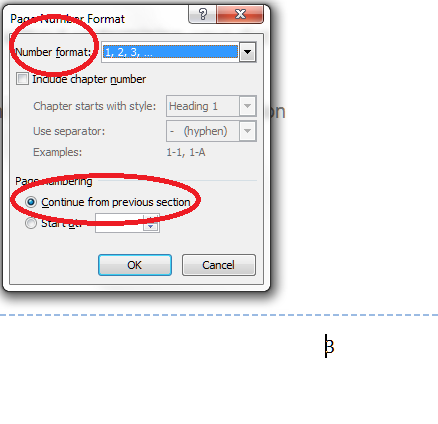
Now it’s time to format the page numbers. So its back to the Page Number button but we choose Format Page Numbers

14 format page numbers

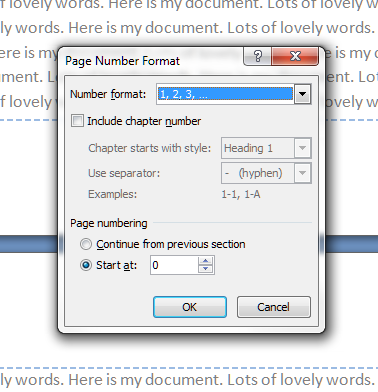
You will see on this example that the page number has automatically inserted itself on the first page of the contents (Page 2 of the document), but it has defaulted to being in Arabic numbers and to helpfully inform us that we’re on page 2 of the document. However, we want Roman numerals, AND we want it to start with Page 1. So, into that Page Number format menu, and there we can …

15 format page numbers

… choose Roman numerals (top) and start at page 2, not page 2. Press OK to set those …

16 roman numeral

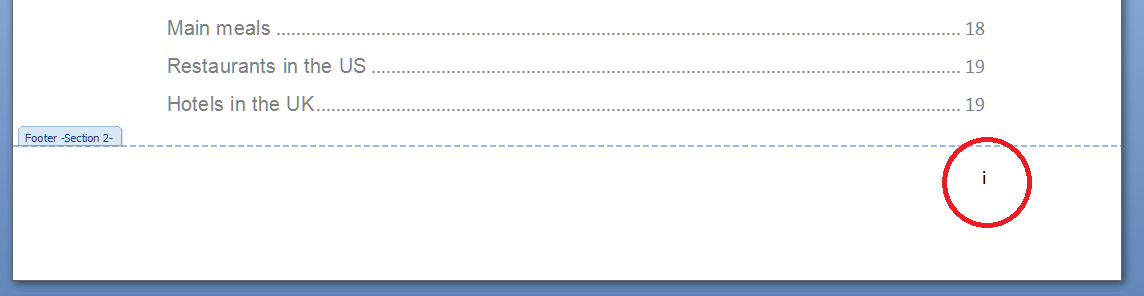
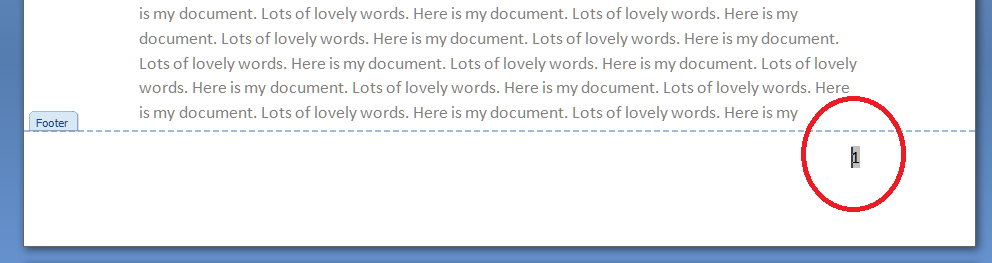
And look – as if by magic, the page number is now i instead of 2.

Now, for section 3, the main body of the text, we want Arabic numerals which continue from the last number in Section 2. So in this case we choose the Number Format to be the default, Arabic, opion, and tick Continue from previous section. In this screenshot, I’ve already pressed OK, so look at the bottom of the page …

16 next section

and there’s a lovely figure three.

So, to you what weve done in a colourful and dramatic way which is a bit more over the top than what we would actually want our document to look like, we’ve done this:

17 all done

And while individual institutions’ formatting rules still take precedence, this is what most of my PhD students like their thesis page numbering to look like.

In this article we’ve learned how to add different kinds of page number to different parts of the document, and more complicated formats for page numbers. If you need more of a recap on the basics of page numbering, see the article on that topic.

If you have found this article useful, please share it using the buttons below, and leave me a comment!

If you’re at all interested in my anti-cholesterol diet book which I used as an example in this document, find out more here.

This is part of my series on how to avoid time-consuming “short cuts” and use Word in the right way to maximise your time and improve the look of your documents.

Please note, these hints work with versions of Microsoft Word currently in use – Word 2003, Word 2007 and Word 2010, all for PC. Mac compatible versions of Word should have similar options. Always save a copy of your document before manipulating it. I bear no responsibility for any pickles you might get yourself into!

Find all the short cuts here

 
11 Comments

Posted by on March 6, 2013 in Errors, New skills, Short cuts, Word, Writing


Tags: , , , , , , , ,

How to add page numbers to a Word document (1)

This article is going to teach you the basics of adding page numbers to a Word document, using Word 2007 or Word 2010. Later articles in the series will tackle more complicated topics such as mixing Roman and Arabic numerals and making sure your first page doesn’t have a number if you don’t want it to.

Why add page numbers to a Word document?

Good question? You might have a perfectly nice, short document, that looks a bit like this ..

1 page

And you don’t really need to add page numbers. But what if it’s going to be a book, or you’re going to introduce a contents page or index? What if people are going to want to quote from it, or refer back to a particular section? Even though if they read your document on their Kindle, they might not be able to see the page numbers, these are all good reasons why you might want to give your readers some page numbers to help them navigate their way through your text.

Where are the menus and buttons for adding page numbers?

As usual, there are a couple of ways to access the menus and buttons you need for adding page numbers. But, again, as usual, they lead to the same place in the end.

Method One involves choosing the Insert tab. Once you’re there, you’ll find a section called Header & Footer, and there’s your Page Numbers button:

2 insert

Method Two involves clicking with your left mouse button in the blank space at the bottom (or top) of your page. Another way to do this is to select the Design tab, but sometimes that doesn’t show up by default. Clicking on the blank bit of the page will bring up the Headers and Footers and your Page Numbers button:

2 click footer

In Word 2003, you can find the page numbers options in the Header and Footer menu.

Now you’ve found the Page Numbers button, it all stays the same from now on, and its menu looks like this:

3 page numbering options

We’ll look at how to position your page numbers, and then how to format them (it’s best to do it this order).

How do I choose the position of my page numbers?

You will find two options for positioning your page numbers:

1. At the top or bottom of the page

2. Elsewhere in the page margins

To choose the position of the page numbers in the top or bottom areas of the page, choose Top of Page or Bottom of Page (the positions are identical for the two). Here we choose Top of Page:

4 number placement options

You can see lots of options for positioning your page numbers, including that fancy “Page 3 of 12” you’ve seen on other people’s documents. To select the position, click on the example that suits you best (you can scroll down for even more choices).

If you try out Page Margins, you will be given another set of options allowing you to insert your page numbers all over the place:

5 number placement options page margin

Again, you can scroll down for even more options.

I find that people have one or two favoured number positions and ignore the others (in much the same way that we only use two programmes on our washing machines). But it’s useful to know how to find all those extra places, in case you’re working collaboratively or with a client who has particular preferences.

Now we’ll look at some basics of formatting your page numbers.

How do I format my page numbers?

This is best done once you’ve decided on the page number position, and you can come back and format them at any time, by finding and clicking on the Page Numbers button. We’re just going to look at the basics here, with more complex choices being discussed next time.

To format the page numbers, find the Page Numbers button and choose Format Page Numbers:

6 format page numbers

Select Format Page Numbers and you’ll find some more options for changing your page numbers from Arabic to Roman (or Roman capitals) and for where to start the numbering:

7 number format

If you drop down the Number format list, you’ll find your choices laid out. You are not likely to want to use anything other than straight Arabic numerals (1, 2, 3 …) if you are just using one numbering style for the whole document; the others will come in handy when we learn how to apply different numeral styles to difference sections of the text. But the choices are there:

8 number format

Again, Chapter numbering and Continue from previous section / Start at are mainly used when you’re applying different numbering styles to different parts of your document (Roman numerals for the contents page and foreword, Arabic for the main text, etc.) but it’s worth knowing where to find these choices for next time.

So, let’s summarise and look at how to apply standard, straightforward page numbering to a document.

How do I apply standard page numbering to my document?

If you just want simple numbers in Arabic numerals at, say, the bottom right hand corner of each page, here’s how you do it.

First, click on the Page Numbers button and choose Bottom of Page, then select the example that best fits where you want your page numbers to appear:

9 basic format

Then, choose Format Page Numbers and make sure your options are set to Arabic numerals 1, 2, 3 … and page numbering to start at 1:

10 basic format

Once you’ve pressed OK, you will be back in the Footer of your document, with the main text still in grey and the page number in black, because you’re in the Footer, not the main text:

11 page number

Left click on the body of the text, and the page will reverse – the Footer indicator will disappear, your text will be in black and your number will be in grey, because it’s part of the Footer, not of the text:

12 page number

How do I insert different types of page number into one document?

In this article we’ve learned how to find the Page Numbers button and how to position the page numbers on the page and format them into different kinds of number. In Part 2 of this series, we look at adding different kinds of page number to different parts of the document, and more complicated formats for page numbers.

If you have found this article useful, please share it using the buttons below, and leave me a comment!

This is part of my series on how to avoid time-consuming “short cuts” and use Word in the right way to maximise your time and improve the look of your documents.

Please note, these hints work with versions of Microsoft Word currently in use – Word 2003, Word 2007 and Word 2010, all for PC. Mac compatible versions of Word should have similar options. Always save a copy of your document before manipulating it. I bear no responsibility for any pickles you might get yourself into!

Find all the short cuts here

 
10 Comments

Posted by on February 27, 2013 in Errors, New skills, Short cuts, Word, Writing


Tags: , , , , , , , ,

How to highlight text in a Word document

If you are amending a Word document or perhaps working on a document with someone else (a colleague or an editor), it is sometimes useful to be able to highlight some of the text in order to point it out to your collaborator.

Here are three useful ways to highlight text in Word … and one TERRIBLE way that you will never think of using once you’ve read and digested this article.

How to highlight text by changing its colour

This can be useful if you want to mark text you want to change, edit, delete, expand, etc.

Make sure you’re in the Home tab and the Font section. Highlight the text you want to change and click on the Change Text Colour button:

1 change text colour

Choose the colour you want your text to be, and click on it. Hey presto:

2 change text colour result

This can be useful but there is a limited range of colours that are a) legible on a white background and b) sufficiently distinguishable from black. This can be particularly problematic for a reader with a visual impairment or colour blindness.

So you might want to think about using the next option …

How to highlight text using the “highlighter pen”

Just like in real life, you can scribble all over your document using a highlighter pen!. Again, you will find the Highlighter Pen button in the Home tab, Font section, next to the Change Text Colour button. You can use this in two ways:

1. Highlight your text first, then click on the button and choose a colour:

3 highlighter pen

The text you had highlighted will now appear in black with the background colour you selected:

4 highlighter pen effect

2. Place your cursor anywhere on the page and click the Highlighter Pen button. Your mouse pointer (which usually looks like a capital I unless you’ve changed it) will change to look like a pen. (Unfortunately this does now show up on a screen print. If anyone can find me a copyright-free image of this cursor change, please let me know!)

5 highlighter pen

Left click where you want to start and run the mouse pointer/pen along the text you want to highlight:

6 highlighter pen effect

The text will become highlighted as you run the pen along. Note, though, that if you use this option, your mouse pointer will keep on acting like a highlighter pen until you click back on the Highlighter Pen button and choose Stop Highlighting:

7 stop highlighting

This is all great if you just want to mark, say, chunks of text that you’ve changed so your editor can see what they need to recheck. But if you need to make any comments on that text, pay very close attention to the two methods coming up and make sure you choose the correct one!

How to highlight and comment on text the CORRECT WAY

If you want to comment on some text, the correct way to do it is this. Highlight the text and in the Review tab, Comments area, click on New Comment:

8 comment

A comment balloon will appear, and you can type your comment inside the balloon. If your collaborator wants to comment back, they can just add a new comment in a new balloon, and so it goes on.

9 comment effect

The joys of using this method are twofold:

1. You can skip through the comments using the Next Comment button and you’ll never miss one.

2. You can delete the comments you’ve dealt with, the highlighting will automatically disappear, and you’ll be left with a nice tidy document.

If you’re working with someone on a document and you want to draw their attention to something and make a comment, this way we’ve just seen is the way to do it.

How to highlight and comment on text the WRONG way

Please, don’t do this. If there’s a lovely, neat way to add comments to a document, which there is (see above), there is no need to write your comments within the text itself, like this:

10 don't do this

If you receive a document marked up like this, for each instance of a comment from your collaborator, you’re going to need to change the colour back to normal, delete the comment, or maybe add one of your own. No skipping lightly from comment to comment, but a grim stare at the document to spot the issues.

You can learn more about using Track Changes and Comments in other posts on this blog. Please don’t be tempted to try this method at home!

So, in this article we have learned how to highlight text in three good and one bad way. I hope you’ve found this useful.

If you have found this article useful, please share it using the buttons below, and leave me a comment!

This is part of my series on how to avoid time-consuming “short cuts” and use Word in the right way to maximise your time and improve the look of your documents.

Please note, these hints work with versions of Microsoft Word currently in use – Word 2003, Word 2007 and Word 2010, all for PC. Mac compatible versions of Word should have similar options. Always save a copy of your document before manipulating it. I bear no responsibility for any pickles you might get yourself into!

Find all the short cuts here

 
5 Comments

Posted by on January 23, 2013 in Errors, New skills, Short cuts, Word, Writing


Tags: , , , , , , , ,

Table of figures and table of tables

Are you stuck trying to create additional contents pages for the tables and figures in your document? Read on for simple instructions on how to do this.

We’ve already learned how to apply headings styles and create an automatic table of contents. But what if you’ve got figures and/or tables and you want to show those in the contents pages, too? It can be a bit fiddly, and I’ve partly written this post to give myself a reference document, too.

In this article, we are going to learn the correct and easy way to do this without heartache and hideousness. I’ll devote another article to dealing with something that’s gone wrong …

Why do I need a table of figures?

It’s often useful to provide a list of the figures and tables in your document, especially if it’s a long one, like a dissertation or thesis. They should be separate from the main table of contents, and listed below.

The tricky thing is creating two lists, one of tables and one of figures. This is where people usually come unstuck. Follow these instructions and you should be OK!

How do I create a list of figures and a list of tables?

We’re going to take a few basic steps here. They boil down to:

  • Mark all your figures as Figures and all your tables as Tables
  • Create a Table of Figures
  • Create a Table of Tables

Once you’ve done that, you’ll end up with something like this:

TOF 17

How to apply captions to tables and figures

I know what you’ve done … you’ve inserted your figure or table then typed its caption underneath, haven’t you? Like everyone else in the world. But let’s make life easier for you.

It doesn’t matter if you’ve already typed in all the caption names just as straight text – let’s do this the proper way and we can move those typed captions into the correct place as we go!

TOF 1

Click on the References tab. Find the Captions section. Put your cursor where you want the caption to go (arrow), Click on the Insert Caption button.

Let’s start off with a table caption. Remember, we want to mark a difference between tables and figures so that Word can create automatic lists.

Don’t worry if you’ve already got caption text in there at the moment: do this on a new line. We can tidy things up afterwards. You might want to copy your caption text so it’s available to paste.

TOF 2You can see a drop down list which says Figure at the moment. But we want to differentiate between figures and tables, so click on the arrow on the right to drop down the list.

TOF 3… and choose Table. Once you’ve clicked, the Caption section above it will also change to read Table 1.

Now you can type the caption text straight into this box.

TOF 4

If you’ve copied the caption text you had previously entered, you can use Control-V to paste it into this box. Note: right-click and paste won’t work here, but Control-V will work.

If you haven’t copied the caption text, and you haven’t typed it in the box, don’t worry, as you will have another opportunity to insert it in a moment. Press the OK button and Table 1 and any text you’ve entered will appear below your table.

TOF 5

Now we’re going to add a figure caption.

Put your cursor below the figure and click on the same Insert Caption button. This time, choose Figure rather than Table:

TOF 6This time, just leave the Caption box blank apart from the words Figure 1.

TOF 7Now you can type the caption text in here, or even paste it in – just make sure it goes blue like the words Figure 1 (we can change that later) to ensure it’s all included as part of the caption.

Now you can go through and mark all of your figure and table captions using this method.

Modifying and formatting caption numbering etc.

You can modify your captions, especially their numbering. When you’re adding a caption, click the Numbering button.

TOF 8You will now get options for changing the numbering from 1, 2, 3 to a, b, c, etc.

TOF 9

Use the drop down arrow to pick what you want.

You can also link the numbering to your chapter numbering – so you have Figures 1-1, 1-2, 2-1, 2-2 etc. (this is particularly useful in a long and complex document where you’re referring to lots of figures, as it saves the numbering going odd if you move figures around). To do this, click the “Include chapter number” tick box then specify what you count as a chapter number (you will need to have numbered headings to make this work):

TOF 10

Creating a table of figures and a table of tables

Once you’ve labelled all of your captions correctly as I’ve shown you, you can create your table of figures and table of tables.

Let’s do the table of figures first (it doesn’t matter which order you do this in).

Create a blank page where you want your table of figures to go, or click just below your Table of Contents if you’ve already created that.

Staying on the Reference tab, click on Insert Table of Figures:

TOF 11

You will now get some options, and this is where we choose whether we want the figures or tables to be listed. We’re adding the figures first:

TOF 12

Note, Table will be the default option. Choose Figure by dropping down the menu using the arrow on the right. Table will be highlighted in blue so click on Figure. As if by magic …

TOF 13

A table of figures!

Now return down a couple of spaces in your document and do the same to insert a Table of Tables:

TOF 14

Make sure it’s on Table and click OK. Hey presto …

TOF 15

Customising your table of figures

You can customise your table of figures in the same way that you can customise a Table of Contents, choosing from a range of styles and specifying how they are laid out:

TOF 16

I’m going to write an article about this soon, so for now just note that you can choose different “looks” for the list, and you will get a preview in the pane above these drop-down menu sections.

Adding headings to the table of figures and table of tables

You will probably want to add headings to your tables. Remember to mark these as Heading 1 so they appear in your automated Table of Contents, which I’ve also added here:

TOF 17

Updating your table of figures and table of tables

If you change anything in the page numbering, document layout or captions themselves (particularly useful if you or your proofreader finds an error) or delete or insert tables and figures, you will need to update your table of figures / tables.

You do this in exactly the same way as updating a table of contents. Right-click on the table, making sure the grey highlighting shows up. Then select Update Field and then Update Entire Table.

TOF 18And that’s it.

We’ve created captions the correct way, and created tables of figures and tables of tables, done some customisation and learned how to update them.

If you have found this article useful, please share it using the buttons below, and leave me a comment!

This is part of my series on how to avoid time-consuming “short cuts” and use Word in the right way to maximise your time and improve the look of your documents.

Please note, these hints work with versions of Microsoft Word currently in use – Word 2003, Word 2007, Word 2010, Word 2013 and Word 2016 all for PC. Mac compatible versions of Word should have similar options. Always save a copy of your document before manipulating it. I bear no responsibility for any pickles you might get yourself into!

Find all the short cuts here

Related articles on this blog

How do you create a two-line figure caption and a one-line entry in the table of figures?

How to create a Table of Contents

How to update your Table of Contents, Table of Tables or Table of Figures

Editing and the Table of Contents


193 Comments

Posted by on December 27, 2012 in Errors, New skills, Short cuts, Word, Writing


Tags: , , , , , , , ,

Bullet points – grammar and punctuation

Last week we talked about when to use bullet points and how to personalise them. This week, we’re going to have a look at the actual language of bullet points, including top tips on making them easy to understand for the reader. There are two parts to this: word forms / grammar and punctuation.

Punctuation in bullet points

Over recent years there has been a shift towards less punctuation and “cleaner” looking documents. I remember this being called “open” punctuation, and it’s the difference between typing an address as:

1, Avenue Gardens,

Brighton,

BN1 1AA.

and

1 Avenue Gardens

Brighton

BN1 1AA

Of course there is a place for punctuation, but it can get a bit messy looking, and I’m all for clean lines as long as you don’t forget your semi colons within normal runs of text!

So, here are some things not to do. We never introduce a list in a sentence with a semi colon, and we don’t introduce a bulleted or numbered list with one, either.

It used to be the case that we included semi colons and even “and”s at the end of every line. But I think that does look old-fashioned and cluttered nowadays …

Regarding the full stop at the end of the last bullet point … well, the jury is out on that one. It’s one of those style choices that don’t have a specific rule. I’ve checked in my New Oxford Style Manual and my Oxford Guide to Plain English: the former doesn’t talk about the punctuation much at all, and the latter has some general standards to consider following.

Here are my suggestions:

  • If the bullet points come in the middle of a sentence, and it is still clear when you read that sentence even though it’s got bullets in the middle, you can
    • start each bullet point with a lower case letter
    • put a full stop at the end.
  • If the bullet points are very short and don’t form a sentence, like this:
    • Start with a capital
    • Don’t add full stops
    • Use full stops sparingly
  • It is fine to add a full stop at the end of each bullet if the bullet points are long and include:
    • More than one line of text which therefore forms a solid block when you look at it on the page.
    • More than one sentence. It would look odd to have a full stop there and not here.

In summary:

But the single most important thing to do is KEEP IT CONSISTENT within each bulleted list! If you use capital letters or lower case letters to start each bullet, keep them the same throughout. If you end the first bullet with a full stop, end each of them with a full stop.

But of course, you can use different styles for different lists, as the context demands, although I’d be wary of having wildly different ones very close together, as it can look messy.

And this point on keeping it consistent brings me on to …

Grammar in bullet points

We insert bullet points into a text to make it more easy for the reader to understand. This means that the grammar within the bullet points should be consistent, so the reader doesn’t end up scratching their head and going over and over the same bit of text, trying to work it out.

Have a look at this example, and you’ll see what I mean:

Even if the reader can understand the basic sense of this, the uncomfortable disconnect between the different grammatical forms bring the reader’s attention to the form of the text and not the meaning of its content. And that’s not what good, clear writing should do. However, this is one of the most common mistakes I find in the text I proofread and edit. Especially if the bulleted list is long, the writer will lose track part way through and start going all inconsistent.

This is what that list above should look like:

Nice and tidy: everything following the same structure.

The grammar of bullet points must be consistent and matching so that the reader is not confused. It’s a different matter with the punctuation, which is, when it comes down to it, more of a matter of choice. Personally, I prefer capital letters and no full stop in my bullet points, which is why, if you’re my client and your bullet point punctuation is a little inconsistent, you’ll find me using that as standard!

So now you know all about how to insert and customise bulleted and numbered lists, and the grammar and punctuation to use with them! I hope you have found this helpful.

This is part of my series on how to avoid time-consuming “short cuts” and use Word in the right way to maximise your time and improve the look of your documents. Find all the short cuts here

Do let me know if this has helped you – and do share with the buttons at the bottom of this article.

 
13 Comments

Posted by on November 28, 2012 in Language use, New skills, Short cuts, Writing


Tags: , , , , , , ,

Bullet points – how and when to use them

It’s Word Tips time and today I’m going to talk about bullet points – why we use them and how to use and format them. Next week, I’m going to treat you to some tips about how the language and punctuation of bullet pointed text works. But for now …

Why do we use bullet points?

Bullet points help to make what you’re saying more clear. They break up blocks of text into tidy chunks so the reader can take in what you’re saying. They present lists in a clear format so people can see it’s a list. They emphasise points you want to emphasise. They show the organisation of things. In short:

  • They’re useful
  • They’re tidy
  • They’re good at emphasising things
  • They make sure the reader knows this is a list

How do I use bullet points in Word?

In Word, you want to be in the Home Tab. Then, look at the Paragraph section and you’ll find a set of useful little buttons. One has a list of dots, one has a list of numbers, one has an indenting list of numbers, and two have paragraphs and arrows:

These are the buttons you need to make your bullet pointed lists.

So, here’s a plain list without any bullet points. To make a list bulleted, you need to highlight the areas you need to change. So in this example, we want to leave the first line alone and highlight the other ones:

Once we have the lines highlighted, we can click on the bullets button (just in the middle of the button for the time being) to make the highlighted lines into bullet points:

You can do the same but hit the number button to the right of the bullets button – now we get a numbered list:

How do I create sub-bullet points?

What if you want nested bullet points in sub-categories? That’s fine – put your list into bullets, then select just the line you want to change and click on the Increase Indent key to move it along one. You’ll see the bullet point itself (or the number) change when you do this.

There’s another way to do this (of course there is!) – get your cursor just before the first letter of the first word of the line you want to indent and hit the Tab key on your keyboard. You will get the same effect.

How do I customise my bullets and numbering?

You may not like the standard bullet points you’re given by Word. That’s fine, because you can customise them.

The bullet and number button each have a tiny arrow on the right-hand side of the button. Try clicking on the one on the bullet button …

… and you’ll get a choice of different bullet markers you can use. If you click on Define New Bullet, you can even upload your own images to use as bullet points: useful if you’re creating a document that needs to be on brand with the rest of your brand identity, for example.

You can do this with the numbers, too, allowing you to choose between letters, Arabic numbers and Roman numerals:

Again, you can define your own new number format if you want to.

Customising the list style

To go just that little bit deeper into customisation, you can also fully customise how the sub-bullets work and even set a new Style for this document or all future documents.

To do this, we use the Multilevel List button. This one’s a bit of a swizz, I think – it gives you a tiny arrow on the right, but it doesn’t actually matter where on the button you click; you will still get the same menu.

So this gives you the chance to choose between different multi-level list formats and to define your own.

If you select Define New Mulitlevel List you will be given a new set of options. Choose this if you just want to change one list in your document.

If you want to define a style for all of the lists in your document, or a new List Style to use in all documents forever, choose Define New List Style.

Then you can go ahead and crate a new list style that will appear in your Styles on your Home tab, and can be used for lists in just this document, or documents from now on.

We’ve learned how to set up and customise bulleted and numbered lists.

Next week, we’ll look at the text you write in lists and how to make sure that works clearly and appropriately.

This is part of my series on how to avoid time-consuming “short cuts” and use Word in the right way to maximise your time and improve the look of your documents. Find all the short cuts here

Do let me know if this has helped you – and do share with the buttons at the bottom of this article.

 
7 Comments

Posted by on November 21, 2012 in Copyediting, Errors, New skills, Short cuts, Word, Writing


Tags: , , , ,

My short cuts – the line space button

Today we’re finding out all about the wonder that is the Line Space button. Do you know what it does? Did you know it was even there? And did you know how many ways there are to get to the Paragraph menu …? All this and more in today’s Short Cuts!

What is line spacing and why do I need to know about it?

Line spacing defines a large portion of what your document looks like on the page. It’s all about the gaps between the lines you type. Too close together, and your document can be hard to read. Too far apart, and there aren’t enough words on the page, with all that white space glaring at you. Of course, sometimes you’re told that your work must be presented in a particular way – double line spaced is popular for both academic work and fiction being submitted to a publisher or magazine.

It’s also really useful to be able to insert a gap between paragraphs automatically, to save you having to insert one manually – and if you find you’re working on a document that has odd spacing (or, worse, inconsistent spacing!) between lines and paragraphs, this is how you sort it out.

How do I alter the spaces between lines in my document?

We’re in Word 2007 or Word 2010 now, with that handy “ribbon” containing hundreds of little square buttons. Make sure you’re in the Home tab and have a look at the Paragraph section. You should find a button with up and down arrows to the side and lines of text in the middle: the Line Space button. There’s a big version at the top of this post, and you can find it here:

When using this button, or indeed anything that changes the word, line, paragraph, page or whole document that you are working on, make sure you’ve highlighted the text to which you want the change to apply first. Then click on the button and see what choices you are presented with:

The first thing you’ll notice is that one of the line spacing options (in the top half of the box) is already ticked, and you have an option to Remove Space After Paragraph (in the bottom part of the box) which, you can see by comparing it to the line above it, implies that there is a space set to appear after each paragraph at the moment. So one useful feature here is that clicking on the paragraph and then the line space button will tell you what is already set up for that part of the document. In this case, the spacing is 1.15 (just a little bigger than single line spacing) and there’s an extra line space after each paragraph.

Let’s try changing something …

Here, we’ve changed the line spacing to 1 and clicked on Remove Space After Paragraph, so it’s flipped to saying Add Space After Paragraph (red arrows). And look what’s happened (immediately) to our highlighted text. All of the lines are closer together, and the space between the paragraphs has disappeared (blue arrow).

We can change it back and go the other way, too …

This image is at the same scale as all of the other ones, but you can see that changing the line spacing to 1.5 and adding spaces before and after the paragraphs has really spaced it out, and moved it further down the page to start off with.

Now, there’s one line in the dialogue box we haven’t looked at yet: Line Spacing Options… What does that do?

How do I use Line Spacing Options?

The Line Spacing Options … erm, option can be found between the line spacing and paragraph spacing choices:

When you click it, you’ll be given a new dialogue box, which is actually the standard Paragraph options box. It has two tabs, and the first one is Indents and Spacing:

If you want to customise your document completely, this is where you come to set the paragraph indent, and the actual distance between paragraphs. There’s a handy Preview pane at the bottom which will show you the effect of any changes you make on some sample text (circled in blue). You can also work with Tabs from here – we talked about Tabs in another session. And, if you wish, you can change everything on here and then set it as being your default setting for paragraphs for this documents, or all documents based on this template that you ever work on:

The other tab on this dialogue box is all about Line and Page Breaks:

These are topics in themselves, so I’ll write about them in another session (if I forget to come back and put a link in here, use the Search box in the right hand column of this blog, or look it up in my index).

When you’ve finished with all of these options, just press the OK or Cancel buttons to accept your changes or go back to the document.

How do I access the Paragraph menu?

This being Word, you will find the same Paragraph menu we’ve just been looking at popping up on other routes through the software. If you just need the Paragraph menu and not the Line Spacing options in particular, you can access it from any Word document by highlighting your text, clicking with the right mouse button and selecting Paragraph from the selection that appears:

Or you can access it by clicking on the little tiny arrow at the bottom of the Paragraph title bar (if that’s what it’s called!) on the ribbon (I talk about these little arrows elsewhere, too):

I hope you’ve found these hints helpful! Do pop a comment on this post if I’ve helped you learn something new or solved a tricky problem for you, and do explore the rest of my blog if this is your first visit!

Please note, these hints work with versions of Microsoft Word currently in use – Word 2007 and Word 2010, all for PC. Mac compatible versions of Word should have similar options. Always save a copy of your document before manipulating it. I bear no responsibility for any pickles you might get yourself into!

This is part of my series on how to avoid time-consuming “short cuts” and use Word in the right way to maximise your time and improve the look of your documents. Find all the short cuts here

 
2 Comments

Posted by on October 24, 2012 in Copyediting, Errors, New skills, Short cuts, Word, Writing


Tags: , , , ,

Working with Track Changes in a document

Here’s the last part of my series on working with Track Changes. We’ve already learned what Track Changes is, why we use it and where to find it, and how to customise Track Changes to suit our own preferences. Now it’s time to learn how to work with a document that has Tracked Changes – i.e. how to get rid of all those marks and comment boxes and be left with a clean document with no errors.

Why do I need to work with Track Changes in a document?

These instructions will be useful to anyone who has their work edited, critiqued or otherwise commented on by other people. For example, I work in Track Changes with all of my student customers, because they need to see what I’m suggesting they should change so they can make the decisions and retain their understanding and authorship of their own texts.

If a text has Track Changes on it and you want to submit it for your Master’s or PhD, a journal, a magazine that publishes creative writing … you need to remove those Tracked Changes so they don’t show up when someone else reads your document.

(Note: in the last article we looked at how the different views of track changes don’t actually delete the changes – review this article for more information in the section “How can I change which changes I can see?”)

How do I remove the Track Changes markup from my document?

To get back to basics, you’ll find all the buttons and drop-downs you need in the Review tab in Word 2007 or 2010 (or the Tools dropdown in Word 2003):

Review section

We’re looking at the Accept / Reject area to the right of this section, and then the New Comment / Delete area to the left.

And let’s just remind ourselves what a document with Track Changes looks like: here’s the one we’ve been working on for a little while now. Additions show up in red underlined, deletions disappear and pop into a comment box, and comments and corrections appear in different colours depending on who entered them:

Document with tracked changes

So, first of all you will need to look at each of the changes that are showing in your document and decide whether to accept or reject them. Then you need to review all the comments, make the necessary amendments, and delete the comment. Finally, you need to check that all the markup has actually disappeared, and you’re left with a nice clean document.

How do I accept changes in a document?

The area you need to look at for accepting (and rejecting) changes is that section in the middle of the Review tab that looks like this.

Accept changes button

You will notice that there’s a little arrow on the Accept button; if you drop that down you get a range of choices. Let’s see what happens if you position the cursor by the change you want to accept and hit Accept Change:

Change accepted

You can see that the word “text” has stopped being underlined and changed from red to black. You have accepted the change, and the additional text has basically become part of the actual, final version of the document now.

You can Accept and Move to Next if you want to skip through all of the changes one by one – a good option to take that ensures you don’t miss one. Or you can do this manually using those blue arrows to the right of the Accept and Reject buttons. Or, you can choose Accept All Changes:

Accept all changes

If you do this, as you can see, all of the tracked changes (but not the comment boxes) disappear.

Note: I don’t encourage student clients to do this, as I prefer them to look at every change and accept or reject it individually. However, I use this option if I have been asked to provide two versions of a document for a client: one with changes marked and one “clean” copy. It’s a quick way of accepting all the changes I’ve made and seeing what I’m left with.

You can undo any individual Accept Change or Accept All Changes, immediately after you’ve done it, by hitting the Undo button:

undo button

How do I reject changes in a document?

Rejecting changes is done in exactly the same way as Accepting changes. Obviously, if your editor has suggested a change for you, they are the expert and it’s worth seriously considering accepting it. But there could be a choice involved (with a comment box nearby explaining it) or you could be working collaboratively with a colleague and deciding to reject a change one of you has made.

Anyway, there’s a Reject button with a dropdown arrow, and the choices are the same, when you place the cursor by a marked change, allowing you to reject just that change or reject it and move on to the next one …

Reject change

When you reject this change, you will see that the text will revert back to what it said originally, with a word missing. The insertion has been deleted, and again there is nothing there in red or underlined, but that’s because it has been removed from the document.

reject change - text altered

And again, you can decide to Reject All Changes (not if I’ve made them for you, though!), in which case …

reject all changes

all of the changes (but not the comments) will disappear and you’ll be left with your original textt, just as it started out. Of course, you won’t want to do this if you’ve asked an editor to offer their suggestions, but you need to know what this does and how to use it.

How do I remove the comments in a document?

OK, so we’ve gone through all of the changes in the text and accepted or rejected them. Now how do we get rid of all those comments in the margin?

The area for doing this is on the left of the Review section. You will see a series of buttons for handling comments:

comments buttons

The important thing to remember here is that, like with the accept or reject changes functions, you need to have the cursor on the affected text when you choose to delete the comment.

deleting a comment

When you press the Delete Comment button, both the highlight in the text and the comment box in the margin will disappear:

comment deleted

You can choose to Delete all Comments: I suppose this would be useful if you’ve reviewed all the comments and done what they say, although personally I like to review a comment, do what it instructs, then delete the comment individually, and that’s how I would always recommend you work through them.

Anyway, once you have accepted or rejected all the changes, and deleted all the comment boxes, you should be left with a clean, amended text with no coloured or underlined text, no lines in the left hand margin, and no comment boxes:

clean copy

Why can’t I make all the Tracked Changes disappear?

You may sometimes find that there are some sneaky bits of markup left in your text once you’ve done all the above. This usually shows up as lines in the margin where a small change has been made.

The other culprit is thinking that you can use the Final Showing Markup menu to hide the track changes. You can’t. Any method you use to customise track changes will only appear in your own version on your own computer. Several of my clients have reported that they have turned off Track Changes, then all the changes have “reappeared” when they re-opened the document. That’s because they had chosen the Show Final option, thinking they had removed the markup but really only hiding it on their version of the document.

As I mentioned at the beginning of this article, review this paragraph under the heading “How can I change which changes I can see?” for more information on this aspect of customising track changes..

In summary: the only way to remove Track Changes markup is to:

  • Go through each change
  • Decide whether you accept it
  • Accept or reject it
  • Move on to the next item
  • Review the comments and do whatever you are instructed to do
  • Remove the comments once you have reviewed them

If any last vertical lines then remain in the left hand margin, it’s fine to hit Accept all Changes, which will get rid of them once and for all.

———-

This article has taught you how to work with a document that has been marked up using Track Changes. You can read more about what Track Changes is and why we use it, and learn how to customise Track Changes.

If you have found this article useful, please share or “like” it using the buttons below, or leave me a comment to tell me what you think. Thank you!

This is part of my series on how to avoid time-consuming “short cuts” and use Word in the right way to maximise your time and improve the look of your documents.

Please note, these hints work with versions of Microsoft Word currently in use – Word 2003, Word 2007 and Word 2010, all for PC. Mac compatible versions of Word should have similar options. Always save a copy of your document before manipulating it. I bear no responsibility for any pickles you might get yourself into!

Find all the short cuts here

 
35 Comments

Posted by on October 10, 2012 in Copyediting, Errors, New skills, Short cuts, Word, Writing


Tags: , , , ,

Customising Track Changes

So how do I customise Track Changes (and why would I want to?). Previously, we learned about why you might want to use Track Changes and how to find and use it to delete and add text and make comments. Now we’re going to go one step further and customise it all (and you can also find out how to work with a text that contains tracked changes).

So, here’s our original text with some changes tracked that we created last time:

Why customise Track Changes?

Customising Track Changes basically makes things more comfortable for you and means you can work in a way that suits you. For example, some people like to cross out text in a document, like if you were editing a written manuscript, while others like to remove the deleted text altogether and place it to one side.

Please note: This is customising your view of the document. It’s personal to you, your computer and your document. When someone else opens the document, they will not necessarily see what you see, especially if you’ve customised it away from the defaults. Note this, because it becomes ever so important later on …

How do I customise Track Changes?

Your key area for this is the Review tab, then the section marked Tracking. You can change three things:

  • Tracking Options themselves (the colours and fonts that mark the changes)
  • Balloons (whether changes are marked within the text or to the side of it)
  • Final showing markup (which changes show in your version of the text)

We’ll look at these in turn, and also at what happens when more than one person makes changes to the document.

How do I change the tracking options?

To change the tracking options you need to click on the little arrow at the bottom right of the Track Changes button. This gives you another way to turn Track Changes on and off, a menu item to click to access the tracking options, and a final item we’ll look at later on.

For now, let’s click on that middle menu item. Up pops a great big dialogue box with all sorts of things to change:

I think this is fairly self-explanatory. On the left hand side, you can change how the text appears when you do something to it (underline, double underline, etc.) and on the right hand side you can change the colour.

Let’s change some things …

So here we’ve changed insertions and deletions to double underlines and double crossings-out and the comments to blue. Watch what happens to our text (actually, the crossing-out won’t show up until the next section … )

Because the crossings-out are shown in balloons, not in the text, we can’t see them. But that will all change …

How do I customise the balloons?

Now we’re moving on to talk about what appears in balloons and what appears “inline” or in the text itself.

Important note: This is not how you change what comments themselves look like. For that, you will need to see my posts on comment boxes.

The menu we need here is the next one to the right of the Track Changes button, called, inventively, Balloons:

At the moment, Show Revisions in Balloons is ticked. Note that to change between the options, you need to tick the one you want – no unticking allowed! Try ticking Show All Revisions Inline:

and watch what happens to the document. Gone is the right hand margin, gone are all the balloons, and instead you can see what has been crossed out, and you can only read comments by hovering the mouse over the note indicating there is a comment:

Now, personally I don’t like it looking like this, but some people do.

For more information than you would ever want on how to further customise your balloons, please see my article on customising comment text.

How do I change which changes I can see?

You can review particular changes individually using the next button along: Show Markup. Drop it down and you can see that you can choose to see various kinds of correction, and also only changes made by a particular person:

I don’t think I need to show you examples of all of these – have a play with them and you can see what’s what.

Above this menu item is Final Showing Markup. Now: this is important. Yes, you can choose how you view the document …

For example, you can choose Final and you’ll see the document in its final form with no changes showing:

But: REMEMBER – this is all about what YOU can see. The Tracked Changes have not gone away: they’re still on the document, just hidden. So if you send the document to someone else, they can change their view and see all your changes and comments! Eeps!

You can only “get rid” of changes and comments by accepting or rejecting them, individually or en masse, and that’s a job for next week’s post.

How can I tell which reviewer has made which comments?

If more than one of you is reviewing the document, Track Changes  makes it easy to see who said what. All you need to do is make sure that the “by author” option is chosen in Tracking Options …

… and your comments and alterations will appear in different colours:

Again, avoid telling the other person, “Oh, my comments will appear in blue”, as it’s up to the individual and their own computer as to what colours will appear.

How do I change my initials in comments?

If you want to change your initials in the comments, perhaps because there are two reviewers with the same first initial, you need to go back to Tracking Options and choose Change User Name. This will bring up the Word Options dialogue box, and at the bottom you can change the initials that appear in the comments balloon:

Next time I make a comment, my initials have changed!

However, please note that when I change L to LB here, the change takes effect from that moment, and is not applied retrospectively. Well, you can’t have everything!

A final note

You may want to pin some of your most common choices to the Quick Access Toolbar – read this article to find out how.

So, we already knew how to find Track Changes, today we’ve learned how to customise Track Changes so it works just as we want it to. Next time, we’ll be talking about how to work with the Track Changes you, or someone else, has applied to the document, leaving it nice and tidy and clean! And there will be a separate article on formatting comment balloons, coming soon. In the meantime, if you want to customise the text in your comment balloons or it goes all small or runs from right to left, click on the appropriate links to find out what to do.

This is part of my series on how to avoid time-consuming “short cuts” and use Word in the right way to maximise your time and improve the look of your documents.

Please note, these hints work with versions of Microsoft Word currently in use – Word 2003, Word 2007 and Word 2010, all for PC. Mac compatible versions of Word should have similar options. Always save a copy of your document before manipulating it. I bear no responsibility for any pickles you might get yourself into!

Find all the short cuts here

 
74 Comments

Posted by on October 3, 2012 in Copyediting, Errors, New skills, Short cuts, Word, Writing


Tags: , , , ,

Track changes – how to find it, how to use it

This is part of my series on how to use Word to the full to get what you need out of it.  Today we’re going to talk about why you might want to use Track Changes, how to find it and how to start using it. Next time, we’ll look at customising Track Changes, then working with the changes that have been tracked and ending up with a nice clean document.

Why use Track Changes?

Track changes helps you collaborate with someone else on your text – or mark it up for yourself. Reasons you might use it:

  1. Two or more people are collaborating on a document. You want to know who’s written what, and comment on the work
  2. You’re editing someone else’s work. I use Track Changes when working with students, so that they can see what I’m suggesting and make the decision as to whether to accept or reject my changes, thus retaining their control over the changes and the authorship of the text
  3. You’re editing your own work – you can see what you’ve deleted and added, or leave notes for yourself, just like working on the paper manuscript

How do I find Track Changes in Word 2003?

Like with most features, once you’ve found this in the menu system, it works the same in 2007 and 2010. This is how you find Track Changes in Word 2003: Go to the Tools menu, drop it down, and select Track Changes.

Finding Track Changes in Word 2003

How do I find Track Changes in Word 2007?

Go to the Review tab, and you will find the Track Changes options half way along the ribbon:

How do I find Track Changes in Word 2010?

This works the same as in Word 2007 – go to the Review tab and you’ll find the Track Changes options half way along the ribbon. The rest of the screen shots will be from Word 2007 but apply equally to Word 2010, as it works in the same way.

How do I turn Track Changes on and off?

You will see a big button marked Track Changes. Don’t worry about the little arrow in the corner for now, just press the button. It will go yellow, and this means Track Changes is turned on, and everything you do to the document from now on will be marked on the document.

If you want to turn Track Changes off, press the yellow button again and it will turn grey. From now on, anything you change will NOT be marked up.

What happens when I delete and add text with Track Changes turned on?

When you add text to the document (marked in blue) it will insert in a different colour, and underlined (note: the colour may not always be red. See the article on customising Track Changes for why and how to change it). When you delete text from the document (marked in red), it will either hook it out of the document and stick it in a balloon to the side of the text (as here, and how I like to do it), or cross it out in the document itself (see the Word 2003 example below). Again, you can choose which it does, and we’ll look at that next time.

How do I add a comment?

Sometimes you might want to add a comment to the document. This is helpful if you don’t understand what the other author is saying, or if something just needs to be commented on. You might want to leave a note for yourself in the margin.

When you want to do this, highlight the text you want to comment on and press the New Comment button in the ribbon. A comment balloon will appear in the right-hand margin, where you can type your comment.

Note, sometimes the text in this box comes out tiny or running right to left, especially if you are commenting on someone else’s document. See those links in the previous sentence? Click on those for how to solve both these problems.

You can pop back into the comment balloon at any time to edit what you’ve typed there.

And what does this all look like in Word 2003? Like this (note the crossed out deleted text):

In the next two posts, we will be looking at how to customise your Track Changes markup, and how to deal with a text containing tracked changes and comments.

Thanks to Kathy O’Moore Klopf for the Word 2003 screen shots!

Please note, these hints work with versions of Microsoft Word currently in use – Word 2003, Word 2007 and Word 2010, all for PC. Mac compatible versions of Word should have similar options. Always save a copy of your document before manipulating it. I bear no responsibility for any pickles you might get yourself into!

Find all the short cuts here … and do share or post a comment if you have found this useful!

 
12 Comments

Posted by on September 26, 2012 in Copyediting, Errors, New skills, Short cuts, Word, Writing


Tags: , , , ,