RSS

Tag Archives: blogging

Six things that you can do to increase your website or blog’s SEO (search engine optimisation)

Graphic showing an increasing numberSEO or Search Engine Optimisation is one of those mysterious areas of knowledge – like setting up a website – that people like to keep to themselves. If you’ve been involved at all with a website or blog, you will know that people tend to almost prey on newbies, offering to increase their SEO if they work with this or that company.

The impetus for this post came from offering some help to a community organisation I’m helping out with. They don’t have the money to spend on expensive consultancy, so I’ve put together this guide for them – and you – to help clarify the myths and provide you with some advice to help you build good SEO.

What is SEO / search engine optimisation?

SEO means making sure that search engines like Google and Bing find your content and present it to people who are searching near the top of the results (just below the adverts).

Although they obviously work for a profit and want to make people advertise with them, the search engines do want to get reliable, decent and useful information to their users – otherwise those users will go elsewhere. They go to a lot of trouble to weed out spammy and dodgy sites that will put users off and don’t provide useful and relevant information (if every search you did on Google only gave you results on how to improve your SEO, when you wanted to know about Halloween outfits for dogs, you’d soon get bored and use a different search engine).

Therefore, we need to make sure our blogs and websites have the right information and content that will prove to Google that we’re legitimate sites full of useful content that it’s good to show their users.

There are various technical and writing related ways to do this and I’m going to cover the simple ones that you can do with, for example, a free WordPress.com website or blog and no coding skills.

I’ll note here that there are more detailed and technical things that you can do, to do with the coding of the actual site – this will however give you some simple tools that I’ve used to get good viewing figures and good SEO.

My blog post referrersWhy do I need SEO?

You want people to read your stuff, right? Well, although many people will find your content, services, products, etc. through social media, recommendations, blog readers, etc., the majority will find you through search engines.

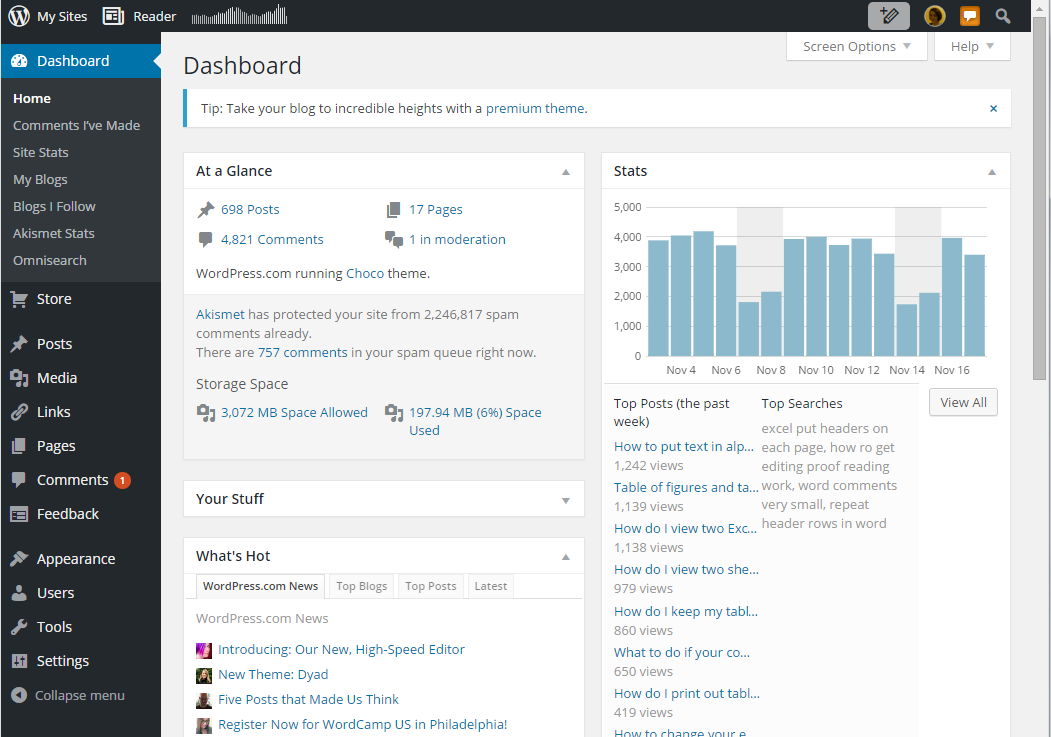
Have a look at the statistics pictured. This was on a day when I published an article that was shared quite a lot on social media. Where did I get all my hits from? Search engines. So it’s really important to make sure that when people search for keywords to do with my blogs in the search engines, they find my blogs and find their way to me, so they can buy my services / be helped by my informative posts / buy my books.

How do I improve and maintain my SEO?

1. Publish useful, relevant, original and “natural” content

This is my number one top tip. The search engines are always looking for ways to stop people gaming the system and this is a clear example – we’ve all found websites which just have lists of keywords, etc.

I’ve got good results from the fact that the text on this site is useful, it’s relevant, as in it fits in to various categories and has information on those categories (Word, business, social media, etc.), it’s original (all written by me) and it’s written in natural language that looks like it’s been written by a human, not a robot or machine translator or spammer. This will always outweigh everything else.

2. Publish content regularly

Search engines like material that’s updated regularly, as it’s indicative that the site is still live and up to date. Try to post at least once, if not twice a week – it doesn’t have to be massive long articles, but something twice a week is better than five posts in one week then none for a month.

3. Use keywords wisely

There are some “rules” about the keywords that you want to use to attract readers. Here are the ones that have worked well for me, as far as I can tell:

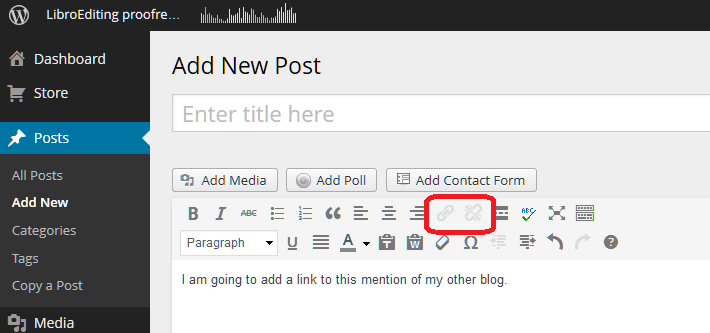
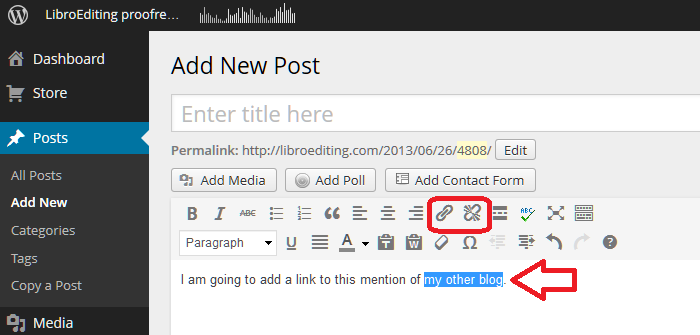
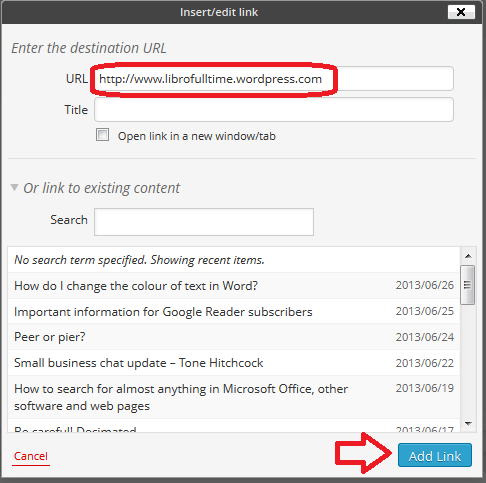
  • Place the keyword / phrase in the title of the piece – so, here I have used “Increase your blog or website’s SEO” in the title.This automatically adds is to the “metadata”, in this case the URL of the piece. There is more you can do with metadata which is outside the range of this article.
  • Place it in an H1 or H2 level heading – here, I’ve used it in top-level headings.
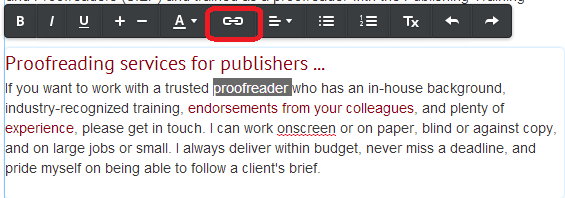
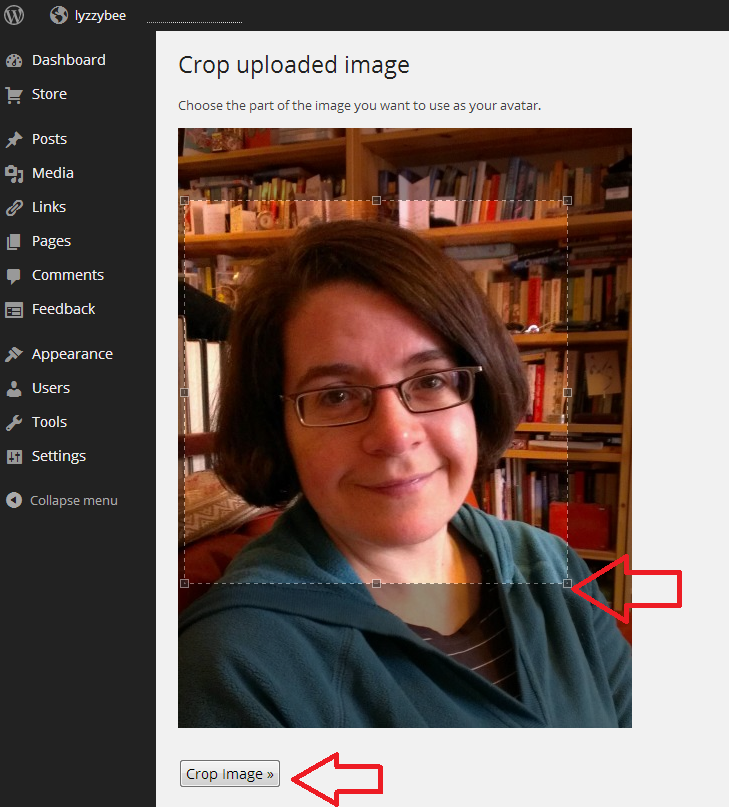
  • Use it in the description of an image – the image above has the words “increase SEO” in the description field.
  • Use it early on in the text and in the final paragraph.
  • Scatter it throughout the text – but NATURALLY. A good aim is to have the keyword / phrase represent no more or less than 5% of the whole of the text (so if your text is 100 words long, you need the keyword to appear around five times.

4. Use questions in the title and headings

Many people search using questions these days – have a look at your statistics if you can and see how many question phrases appear.

So, use questions in your title (this one doesn’t have a question, but many of my blog posts do), and in your headings. These may well echo the exact phrases that people use to search, boosting you higher in the results.

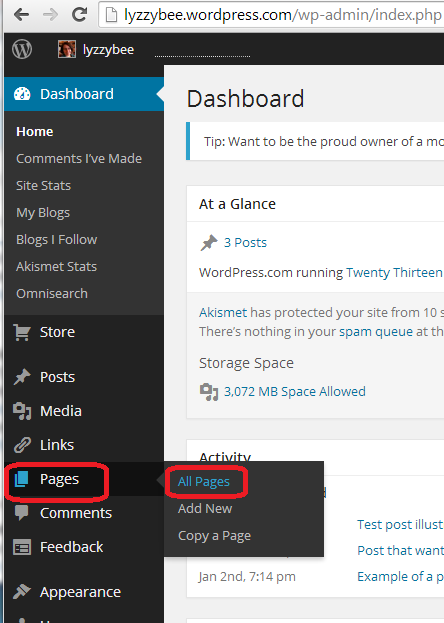
5. Use categories and tags or whatever your blogging platform offers

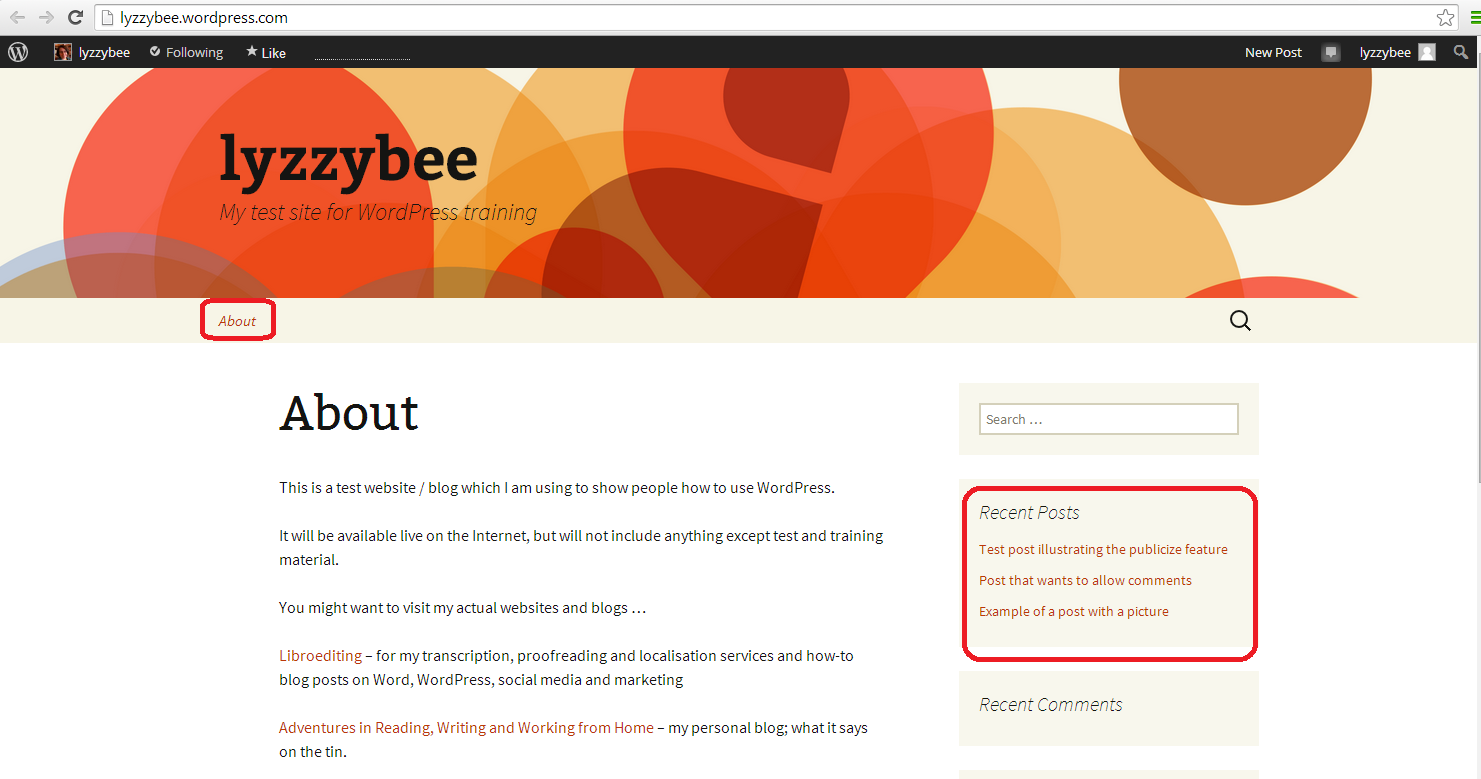
Categories, tags, whatever your blogging platform calls them, will be searched by search engines, increase the validity of your site and improve your SEO. Use them wisely, using general (reading, writing) and specific (WordPress, copyediting) ones to help your visibility and to help your readers navigate around your site and stay on the site for a longer time.

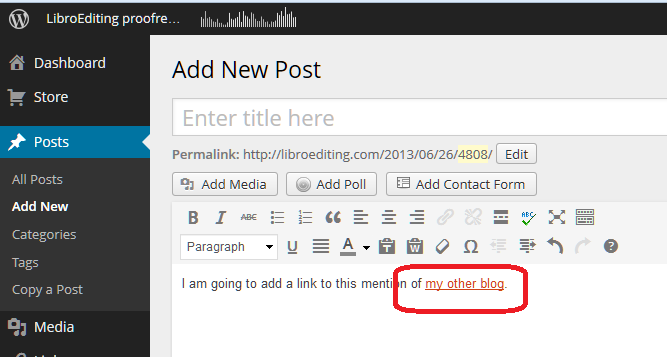
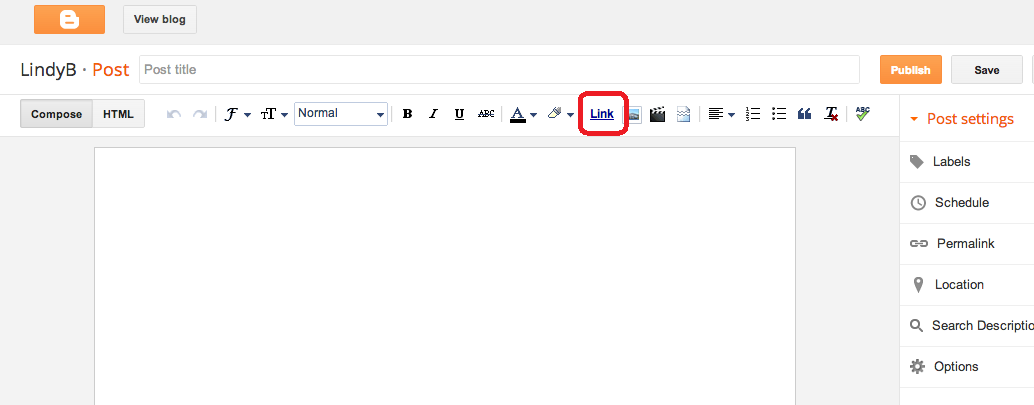
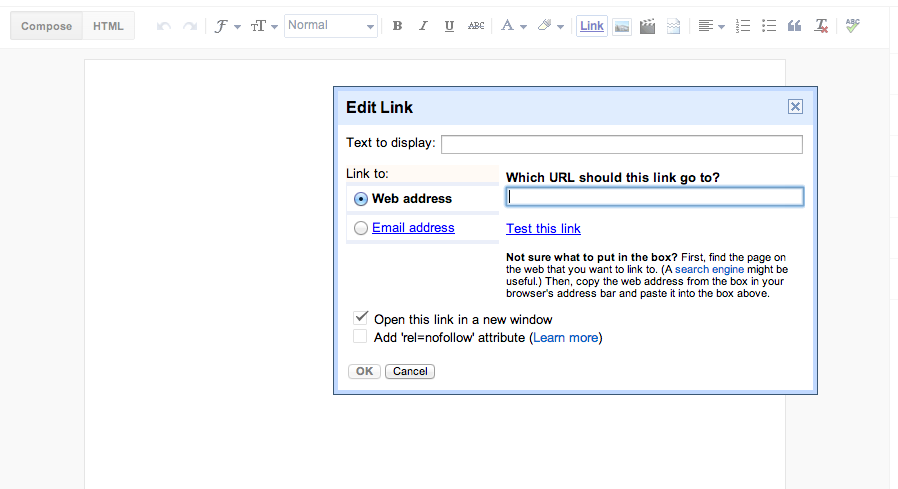
6. Make judicious and careful use of backlinks

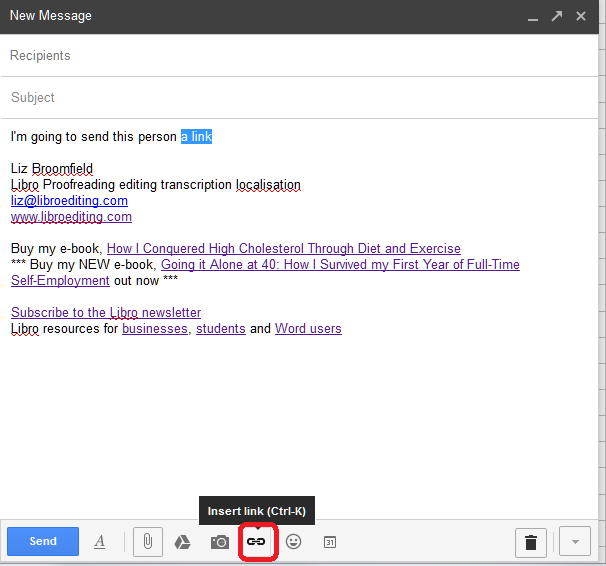
Search engines like to know that a site is reputable and well-respected by peers. Therefore, they put a high premium on the sites that link into your website or blog (i.e. they include your URL / website address on their own site). Of course, a good way to build these is to reference other well-known and well-respected blogs and websites on yours.

However, this is a tricky area that is used very heavily by spammers, too. So here are some dos and don’ts:

Do:

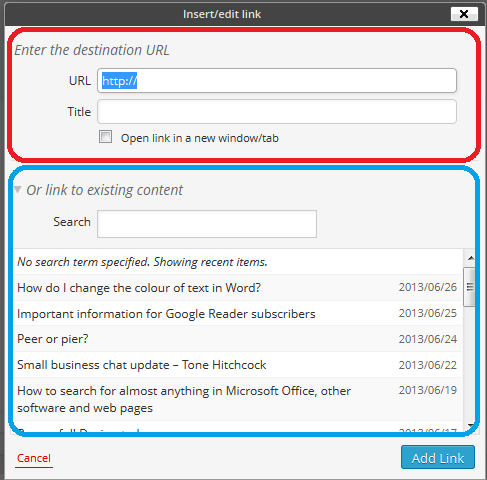
  • Place guest posts on other people’s blogs that are relevant and useful to both your audiences. You should be given the opportunity to include a link back to your website.
  • Offer people in your industry guest posts on your blog (or run interviews with them, etc.) and ask them to link back to the piece on their social media and website.
  • Get yourself in well-renowned and useful / appropriate listings – for example I’m in a Find a Proofreader listing and one for a professional discussion list I belong to.
  • Carefully comment on relevant articles and blog posts, with a relevant and useful comment. As an example of another blog, I comment on book bloggers’ review posts if I’ve read the book or have something to say about the book they’ve read, and include the URL of my own book review blog in the URL field. That way, a network of links builds up.
  • Use whatever reblogging facility you have on your platform (WordPress has a reblog button) to share interesting and relevant content on your blog (I don’t do this myself, but I’ve been reblogged a lot). This will publish a snippet of your blog and a link on the reblogger’s own page and direct readers to you and reassure the search engines that your content is useful.
  • Publicise your blog posts on social media (you can do this automatically) to increase the number of places your web address will appear.

Don’t:

  • Randomly ask to place guest posts on unconnected blogs – you might well get accepted but it’s not going to do you much good long-term.
  • Accept random and unconnected pieces to place on your blog, even if they say they’ll pay you – it’s not worth it long-term, as your readership will suspect it and anyone visiting your website for Dallas real estate and finding the rest of your articles are about crocheting will not stick around.
  • Put random comments full of your own links on people’s blogs that are not in any way connected with yours. Again, some might let these through (I delete any comments like this on my blogs) but it’s not going to look great, as many people will spot what you’re doing and it’s artificial, not natural, so may well harm you in the future.
  • Copy other people’s blog posts wholesale and paste them onto your site – search engines take a dim view of exactly duplicated content and will tend to push both examples right down the results screen. If you want to share something, share a snippet and a link to the rest of the content on the site where it was originally posted
  • Sign up with a company that offers to increase your SEO without checking very carefully whether they do this kind of thing – many of the rogue random comments and links I get on here obviously come from third parties unscrupulously throwing their customer’s URL all over the Internet

These dos and don’ts are to do with being decent, honourable and ethical. I’ve done it this way, and my blog is pretty successful. I will probably write about this in greater depth, but this should help as a handy guide.

————————–

OK, that’s six things that you can do with your next blog post to help improve your website or blog’s SEO or search engine optimisation. This article itself has been optimised following my rules, and I hope you can pick out what I’ve done now. Do let me know if you have questions or comments using the comments option below, and please share using the share buttons if you’ve found this post useful.

Other useful posts on this site

Reciprocity and Social Media – how to negotiate social media kindly and politely

10 reasons to start a blog – why you should do it now!

Is it worth having a website for my business?

WordPress 1 – the basics – joining and setting up a blog (links to all the other WordPress tutorials)

Resource guide – blogging and social media

 
7 Comments

Posted by on October 29, 2015 in Blogging, Business, SEO, Social media, WordPress


Tags: , , , , , ,

How do I add a link to a blog post?

This is a re-post of an older post that was attracting lots of spam comments, reposting it to see if it helps. But it is a useful post, still, so do read, enjoy and share!

Why would I add a link to a blog post?

Adding a link means that you’re putting a hyperlink to either another website or another of your blog posts in the one that you’re writing. There are many reasons for doing this: these are some of the reasons why I do it …

And did you notice that all of those bullet points were links to examples of what I was talking about?

A note about SEO and links (back-links)

One major advantage of links is in helping your Search Engine Optimisation (SEO). I’m not going to go deeply into that here, but basically, Google and the other search engines like to see your pages linked to on other people’s pages, as it shows you’re trustworthy and respected within your community enough for people to link back to you. Yes, people do try to abuse this (we’ve all had blog “comments” from spammers trying to get their URL on your list of comments and now we know why) but when used properly, reciprocal linking to content that does actually interest you and is relevant for your readers does help your fellow bloggers and will hopefully lead to them linking to you, too.

How do I add a link to my blog post?

Of course, all of the blogging platforms (WordPress, LiveJournal, Blogger and others) do it slightly differently. But the difference usually comes down to the icon that they use and how much you can do once you’ve clicked on that icon.

I’m going to use WordPress as the main example, showing all the steps to create a link, but then I’ll show you what the link button looks like in Blogger and LiveJournal and, in fact, Gmail, too. And at the end I’ll share those link images so you know what to look out for.

How do I add a link to a WordPress blog post?

The first thing you need to do is have some text on which you want to base the link. Here I’ve typed in a few words. You can see that in the case of WordPress, there’s a little greyed-out icon that’s not clickable if you haven’t highlighted any text:

Wordpress 1

As soon as I highlight the text that I want to use as the basis of my link, the two greyed-out icons appear in all their clickable glory:

Wordpress 2

Keeping the text highlighted, click on the left-hand icon that looks a bit like a staple. Or in fact, as has been pointed out in the comments on this post, a link in a chain. This will bring up a dialogue box for inserting your link:

Wordpress 3

WordPress allows you to do two things here; you can either link to a URL for a page outside your own blog (circled in red) or you can choose one of your own previous blog posts to link to (circled in blue) – very handy.

We’re going to concentrate on linking to a URL. Type in the URL you want to link to – including http:// at the beginning:

Wordpress 4

Note here that I’m read to hit Add Link and I have NOT ticked Open link in a new window/tab. This is because I used to do that and an experienced website manager I know got into a bit of a frenzy and told me that it’s not good practice and I should NOT do that. So I don’t now.

Note: if you want to open a link in a new window or tab when you’re reading a blog or web page, right-click on that link and you should get a list of options including those.

Having pressed Add Link, my text is underlined:

Wordpress 5

… and it will be a link just like the ones in the first section, above.

If you want to edit the link, highlight the underlined text and click on the same Link button – you can now change it as you wish.

If you want to delete the link, highlight the underlines text and click on the icon to the right, which is supposed to look like a link being broken (or a staple being removed).

How do I add a link to a Blogger blog post?

Thanks to my friend Linda for the screenshots for this one! (And that’s a link to the website she’s set up with background information to a book she’s just published.)

Blogger works in a similar way to WordPress, but the icon you need to use is the word Link:

Blogger 1

and the dialogue box doesn’t give you the option to choose a previous blog post to link to, but has the familiar URL entry field:

Blogger 2

How do I add a link to a LiveJournal blog post?

LiveJournal uses another common icon that you’ll find for a link – this is apparently a globe with a link of a chain attached …

Livejournal 1

and you’ll get a similar dialogue box when you click that icon.

How do I add a link to a Weebly blog post?

Thanks to Louise Harnby for the screenshot for this one. We encounter the link  / staple icon again for Weebly, this time in white on a black background:

weebly 1

How do I add a link to a Gmail email?

And just because it demonstrates one of the other icons that is commonly used, if you want to add a link to a Gmail email, for example to point a friend to this blog post, the icon is another chain link / staple, but a horizontal one similar to Weebly’s:

Gmail 1

Icons that represent adding a link

Here are those common icons again. If you find another one, do contact me and send me a screenshot and I’ll add it to this post!

If you want to add a link to any kind of text and you’re looking for the appropriate icon on a button, it is likely to be one of these or similar:

icon 2 stapleicon 3 wordicon 1 worldicon 2.5 another staple

I hope you found this useful. If so, please take a moment to like, share or comment, and spread the word! And feel free to use the Search function on the right hand sidebar to look for more posts about blogging …

 
9 Comments

Posted by on September 17, 2015 in Blogging, Writing


Tags: , , ,

2 top tips on dealing with the endless pitches for guest posts or reviews

handshakeLast week, I wrote down the 10 top tips for pitching guest posts and asking bloggers to review your product (you can read the article here). I wrote that from the point of view of somebody who receives requests to host guest posts and review stuff All The Time.

It can be time-consuming replying to these emails and messages, but if you’re anything like me, you welcome genuine and relevant content (and interesting book review requests) and don’t like to be rude, unless something’s obviously spammy (in which case, I’m only rude enough to ignore the message!). So, in this article I’m sharing the two methods I use to allow me to respond to pitches quickly, easily and politely, which also have the effect of weeding out the time-wasters.

1. Have a policy for guest posts and reviews

I’ve got a guest post and review policy on both this website (visit it here) and my book review blog (visit it here).

It’s standard practice to have a policy – it sets things out and allows you to filter out approaches you don’t want. Of course, I don’t know how many people this filters out before they contact me, but it must get rid of a few.

This is also hugely useful for when you respond to pitches. When I send my automated email (see point 2 below), I include a link to my policy in my email. This means …

a) The pitcher has to go and look at a web page before they respond (filtering out people who were blanket-bombing blogs and probably won’t be relevant to you)

b) I can change my policy once, on this page, without having to remember to update my standard pitch response email.

c) If a pitcher replies to my email and clearly hasn’t looked at the guidelines, that’s a clear indication that it’s time to terminate the conversation.

2. Create a standard automated pitch response email

Most email providers allow you to create standard replies which you can select and send out without having to type out a new email every time. In Gmail, you can set up something called Canned Responses (and you can find my instructions on how to set them up here).

This saves you loads of time responding individually to pitches for guest posts or product reviews. I tend to get more of the first category for this blog, and this is what my email says:

Thank you for your enquiry about posting your content on my blog.

Before we go any further, please read my Terms and Conditions on Guest Blog Posts and Sponsored Posts, make sure that you can answer the questions posed there, and then get back to me with your suggestions. Best wishes,

Liz

This really does cover most eventualities (and for the few that it doesn’t cover, I can easily add a bit to the email). It takes about three clicks of the mouse button to reply and send, and, to be honest, it usually puts people off! But then, that’s the idea …

—-

Using both of these methods has speeded up my response time to pitches and allowed me to sift out the wheat from the chaff, the genuine opportunities for cooperation from the spammers trying to insert their link onto every website and blog going.

I hope you’ve found this article enjoyable and useful. If you have, please take a moment to share it using the sharing buttons below, and I always appreciate relevant comments!

Relevant posts on this blog

Guest blogging 1: how to be the host with the most

Guest blogging 2: how to be the perfect guest

10 top tips for pitching your guest post or asking a blogger to review your product

 
Leave a comment

Posted by on August 5, 2015 in Blogging, Business, Marketing, Writing


Tags: , , , , ,

10 Top Tips for Pitching a Guest Post or Getting a Blogger to Review your Product

handshakeI get lots and lots of requests every day, via my contact form or email, to accept a guest blog post from somebody. I also get requests to accept books for review on my personal book review blog. Although I’ve written in more depth about being a good guest blogger, I think it’s worth putting down a few points here to help people get the most out of their pitch to get a genuine and useful guest post or review on a blogger’s website.

Because … I reject about 98% of requests for a guest post after the first email.

So, here are my Top 10 tips for pitching a guest post or getting a blogger to review your product

1. Before you even start, think about the relevance of the website you’re contacting.

I get so many queries that have nothing to do with my website in the slightest. Things like, “I love your [editing] website, would you accept an article on real estate in Texas?”

Now, on rejecting one of these a while ago, I had a back-and-forth with the pitcher. She was determined that I would benefit from having her totally non-relevant content, full of dodgy links, on my website. I ended up saying to her “No reputable website would take this as a guest post”. Her reply, “You’d be surprised, LOL”.

The thing is, Google is adjusting its search algorithms all the time. It already specifically works against backlinks (a link to your content on someone reputable’s website which ups your credibility in the “eyes” of the search engines) which are in lists of random links and content which is full of keywords but no useful content. In time, your link to your bead firm on a blog about wind farms will impress the search engines less and less.

You’ll get far more hits as a genuine person seeking to place guest posts on a website if you target appropriate and relevant hosts.

2. Give detail.

If I get a generic, one-line email asking for a guest post or review that doesn’t give me any other info, that’s going straight in the reject pile. You might get my standard email response if you’re lucky.

If’s fine to keep it short, but make sure there is some information in there.

3. Show you’re familiar with the target blog / review site

I am looking for you to  have actually read my blog and know a little bit about what I do. Just a mention of the URL isn’t enough: you can cut and paste that. I want to  know that you know what I do, who my readers are, what topics I cover.

4. Watch out for mail merges / cut and paste carefully.

I’m putting this here because without fail, emails requesting guest posts start with “I have been reading URL INSERTED for some time and love your content”. This doesn’t work so well as a hook if you re-use an email and include the incorrect blog title or URL!

5. State what you want to do.

The target will want to know what you want to do – send in a blog post, pitch some ideas, post them a sample. Put this clearly early on.

6. State what you want out of it.

If you want a book review, say so. If you want your website address included in a guest post you’ve written, say so. If you want to include links that you’ve promised your customer to get onto several reputable websites, also say so – because your target is likely to notice this further down the line and get a bit cross with you.

7. State what the target will get out of it.

State clearly the benefit for the target. Yes, they might be desperate for content – if you see they haven’t posted for a while, this is OK to mention. Will you be helping their readers, bringing a new but related audience to their blog? Tell them. One useful offer is to do a reciprocal guest post – i.e. you will host a post from your target on your website on a similar or related matter.

8. Show you know who your target’s audience is.

I want to know that you’ve thought about who this will reach. An example when pitching to me might be, “I would guess given your writing on dissertations that your audience includes students. This product helps students to bind their dissertations so might be useful to that part of your readership”.

9. Give links and reviews.

If you’ve got examples of your work or product on other websites or you can showcase your own writing on your own website, include links. If your product, book, etc. has been reviewed on other websites, include links.

10. Keep it simple, keep it correct.

If you’re pitching a guest post, make sure to write clearly and grammatically – a reputable blogger will not want to either edit your text for hours or hosts something of lower quality than the content they usually post up. If you’re pitching a product, make sure you are clear and knowledgeable and point to a well-designed and informative website. Will your target want to embarrass themselves pointing their readers to a terrible website?

A good example

This post was triggered  by two things – one, another request but with another company’s URL in the message – d’oh! The other was an excellent pitch from an author asking me to review her book. I’m going to go into specifics another day, but she included …

  • A greeting using my name and a farewell using hers
  • A note confirming that she had read my blog, mentioning something I’d talked about on it recently
  • Details of her book title and the fact she was asking me to review it
  • A few sentences about the book
  • A link to its sales page and a review by a reputable reviewer
  • A polite request to consider taking a review copy

And do you know what? I’ve got a review copy of that book sitting in my To Be Read pile right now.

In summary

If you’re serious about pitching your content or product to reputable websites where their presence can do you some good, make sure that you give your target blogger information about both what your pitching and your own credibility. I’m not saying that you will succeed every time, but your target blogger is more likely to read your email and consider your pitch if you do.

I hope you’ve found this article enjoyable and useful. If you have, please take a moment to share it using the sharing buttons below, and I always appreciate relevant comments!

Relevant posts on this blog

Guest blogging 1: how to be the host with the most

Guest blogging 2: how to be the perfect guest

 
4 Comments

Posted by on July 29, 2015 in Blogging, Business, Marketing, Writing


Tags: , , , , ,

Why writing a blog post is (a bit) like writing a sermon

A hand, writing with a fountain penI was reading (yet) another mid-20th-century novel featuring a vicar hard at work over his Sunday sermon (sorry, I haven’t read a book featuring a female vicar, as far as I know. Are there any yet?) and an analogy struck me: writing a blog post is quite a lot like writing a sermon. As both involve constantly seeking fresh ways of looking at things, I thought I’d run with that idea and see where it took me, so here goes…. but please do read the comment at the bottom of the post if you’re at all concerned about this content …

10 reasons why writing a blog post is (a bit) like writing a sermon

If you commit to writing a blog, it’s a good idea to publish at least one post a week. When I was thinking about writing a batch of posts one day, it reminded me of vicars, from Jane Austen onwards, heading to their desk to write their weekly sermon. Here’s why, in particular.

1. You have to produce something new every week. If you said the same thing over and over again, people would soon get bored and drift away.

2. It’s good to base your text on a real-world problem. The best blog posts, in my opinion, are based on something real that’s happened, whether you’ve encountered a tricky problem using Word (that’s how my whole series of Word posts started), are reacting to something in the news or are sharing a story you’ve created.

3. You base your work on truth and you refer to the relevant authorities. A sermon will of course be based around a Bible reference. When I write about a topic, I will often include the real-life experience of others, or links to their work, or screen shots of what’s going on in a program. If I claim to state a fact, I try to provide a reference. If I’m responding to someone else, I include a link.

4. You need to add value and a learning point (or lesson, if we’re being straightforward). It’s all very well to talk about a real-world issue, but you need to draw something from it, a useful lesson, something to make it worthwhile reading the post.

5. You need to leave your audience thinking. They might have enjoyed your latest novel extract, know there’s now a place to get information on comment boxes or have learned more about DIY funerals (as I did myself earlier this week), but if they go away thinking, they’ll remember you next time.

6. You are often talking about things that have been talked about before. There’s not much new in the world, and it’s unlikely that any of us will produce anything totally new, but there are ways to find new ways to talk about things, as I might have done here!

7. You’re trying to help people! You might be entertaining, explaining, sharing a book, giving information on a technical matter, sharing your own experience of something, but I think most successful bloggers are in it to help people as well as pour out their souls or publicise their business.

8. You want people to come back. No one wants to drive readers (or worshippers) away, so you’re intending to encourage them to visit again, by providing well-crafted content that they want or need.

9. You are often trying to inspire people to take action in some way. Whether you’re encouraging people to try a new craft, read a new book or venture into running their own business, or trying to change their mind on a contentious topic, many blog posts aim to inspire.

10. Your best work is probably produced after pondering for a while rather than dashing it off in a blind panic at the last minute (as my old friend Paulette says, “more like a birth than a rupture!”). This is certainly true of many of mine, although the actual writing up may come a little close to the wire sometimes.

Do you agree? Can you add any other analogies? Do vicars have a day of writing sermons to get ahead of themselves? (seriously, I’d love to know!)

Thanks and disclaimer:

I checked this idea with a group of people who are more religious than me / regularly attend worship / are vicars / are related to or married to vicars and other people of the cloth (thank you to all of them, and particularly Paulette Stubbings for a valuable suggestion). They all thought it was a fun  /interesting / good idea. It’s not my intention to offend anyone, and if I do, please let me know, and why, and I’ll take that into consideration. I’m certainly not undermining the work of religious leaders or claiming that bloggers are the new priests or anything silly like that. Edited to add: I also understand that I am not empowered by any higher spirit or authority of any kind when writing, but I do have a serious intent in sharing information and helping people: not all blogs do that, but I’m primarily talking about myself and similar informational bloggers here.

To read more about blogging, visit the resource page

 
8 Comments

Posted by on December 17, 2014 in Blogging, Writing


Tags: , ,

WordPress 9 – setting up a Posts page

This post and the one on setting a static home page will walk you through helping your readers to navigate your blog/website by creating a Menu item to allow people to access your blog posts and a static home page so that they understand what you’re all about.

Why would I want to set up a Posts page?

If you’ve set up a static page for viewers to land on when they visit your blog (which is recommended for any set of pages and posts where you’re promoting a service, company or product, whether that’s your crafts, plumbing services or travel or writing blog), then your readers will need a place to visit your blog posts.

WordPress will set up a “Recent posts” area somewhere on your theme (depending on the theme you chose when you set up the blog), but it’s nice to have something to click on in the main menu:

WordPress blog default

You can see that there’s only one page on the menu at the top of the page (menu location will vary depending on your theme; menu items will vary depending on how many pages you have set up) and then a list of recent posts. Clicking on the blog title will bring you to this “About” page again, which is fine, because that’s the first page you want your readers to see. But it’s not helping them to see your blog.

How do I set a Posts page?

In order to set up a Posts page for your readers to navigate to, you need to create a new page to link to your blog, and then tell WordPress to display it. Here’s how to do just that:

First of all, you need to set up a page for the posts to be associated with. Why? Because a page is a static, unchanging lump of text on a screen, and WordPress likes to add pages, and not posts (which are constantly renewed and have dates on them) to menus. So we need to set up an empty page called, for example, “Blog” first (another popular choice is “News”).

To set up a new page, in the Dashboard, select Pages then All Pages:

Pages menu in WordPress

You can view here what pages you have set up – in this case, just the About page:

Viewing all pages

To add a new page, click on Add New under the Pages menu in the sidebar. You will now see a new, blank page:

Adding  a page

Give the page a title – Blog, or News, or however you want people to find your blog posts / diary entries / news bulletins, but don’t add any text to the main part of the page, and then press the Publish button:

Adding a new page called Blog

Now you have a lovely page called Blog, which you can see if you navigate back to All Pages:

Page added to WordPress

And if you view your blog (I keep a separate tab open in my browser in which I display the reader’s view of the page, refreshing it when I’ve changed something on the site), you have an automatic menu item on the screen called Blog …

Page added - Blog appears on menu

… but when you click on that, all you see is an empty page with the title Blog:

Page added for Blog but not linked to the Posts

Oh no! But don’t worry, you just need to tell WordPress what you want your readers to see when they navigate to this page.

To set the Blog page to display your blog posts, go into Dashboard, then Settings and Reading:


Setting home screen

Once in the Reading Settings screen, you can choose what the Posts page (or blog / news page) displays. Here, the default is currently set to nothing (“– Select –“), meaning that no page has been selected to display any blog posts. Click on the down arrow and choose Blog from the list of pages that you have set up (if you have more than two pages, all of them will display here):

Setting the posts page

Click on the page you wish to select. You can now see that, after following these two sets of instructions, you have set a home or landing page (static page) and a page on which to display your blog (or news, constantly changing and updating):

Both bome pages set

Click on the Save Changes button at the bottom of the screen. When viewing the website and clicking on Blog, you now have a menu item and page that your readers can navigate to in order to read your blog.

Blog page set up

Yes, this is a bit convoluted, but it’s how to make a posts page that’s easily findable by your readers. If you look at the top of this blog post, if you’re viewing it on my website rather than in an email or via an aggregator, you will see Home and Blog among the menu items at the top, and most good sites will have something of the sort.

I hope you’ve found this post useful. Please do share it using the buttons below so that other people can find it and benefit from the instructions! Thank you!

Related posts on this website

You can find all of the social media and blogging posts, including WordPress, in my Resource Guide

Adding pages to WordPress blogs

 
6 Comments

Posted by on May 8, 2014 in Blogging, WordPress


Tags: , ,

WordPress 8 – setting a static Home page

This post and the next one will walk you through setting a static Home page for your WordPress blog or website, and then creating a Menu item to allow people to access your blog posts.

Why would I want to set a static Home or landing page?

If you’re writing a blog, the content will update regularly, and the first page that any viewer will come across by default will be your latest blog post. This may not necessarily get across who you are and what the blog / website is for – especially if you’re using it to publicise a company, books, products or whatever else, rather than just using it as a private diary.

We’ve already learned how to add pages to a blog, It’s generally considered a good idea to have a single “static” (i.e. unchanging) page for people to “land on” when they type in your URL or search for your website. For example, the Home page for this website is the one you will reach if you type http://www.libroediting.com into your address line or search for Libroediting.

How do I set a static page to be my landing page?

As I mentioned above, by default, WordPress will show visitors to your page your latest blog post. For example, if I enter the URL http://www.lyzzybee.wordpress.com, the first thing that I will encounter is the latest blog post on my blog. It’s particularly important in this case NOT to have this showing first, as I only post test and illustrative messages on this blog!

default WordPress view - blog posts

Instead of this long list of blog posts, I want to display a static page when people visit the site (remember – pages are static, unchanging pages like you find on any website; posts are constantly updating, dated diary entries).

Let’s remind ourselves of how to view what pages we have set up. In the Dashboard, select Pages then All Pages:

Pages menu in WordPress

Now you will be able to have a look at what pages you have set up. In this case, I’ve just got one page, called “About”. I might want to set up a Home page in the future, as I have on the blog you’re reading right now, but for now, I know I’ve got at least one page I can use as a landing page.

List of pages

To set one of these pages as the landing or Home page, go into Dashboard, then Settings and Reading:


Setting home screen

Once in the Reading Settings screen, you can choose what the Front page (or landing / home page) displays. Here, the default is currently set, so “Your latest posts” is selected, meaning that the first page your viewers see will be those blog posts.

Setting home screen

Select “A static page”, then drop down the list of pages. In this case, we only have one, but if you have more than one page, a list of all of them will appear here:

Choose a static page

Click on the page you wish to select and then the Save Changes button at the bottom of the screen. When viewing my website now, people will see my About page first of all.

Public view of landing page

But how do people find my blog posts now?

Read my next post for instructions on how to make your blog posts more visible … Don’t panic, though – as you can see on the screenshot above, WordPress defaults to showing your recent posts in the sidebar, so your readers can click there to navigate to your blog.

I hope you’ve found this post useful. Please do share it using the buttons below so that other people can find it and benefit from the instructions! Thank you!

Related posts on this website

You can find all of the social media and blogging posts, including WordPress, in my Resource Guide

Adding pages to WordPress blogs

 
4 Comments

Posted by on April 30, 2014 in Blogging, WordPress


Tags: , ,

How to Set up a WordPress blog 7: Adding your profile picture or avatar

In this post about WordPress I’m going to tell you how to add your image to your blog, so that it appears on your comments and replies to comments. This gives a human face to your blog (if you choose to use an image of a human face, of course!) and makes it nice and tidy and complete.

To add or change your user image, go to the Dashboard and choose Settings then General:

12 setup

The General Settings are where you do things like changing the title and tagline for your blog – and over to the right, you can change your blog picture or icon. Click on Choose File:

14 setup

This will take you into your standard File Explorer, where you can navigate to find the picture file you want to use. Once you’ve clicked on the image and OK, you need to click Upload Image:

15 setup

Once the image has uploaded, you’ll have the opportunity to crop it. The image will be quite small on the page, so it’s important to have your face (or the main part of whatever image you use) filling the little square. Move the dotted lines around the square until you’re happy that you have a big, central image:

16 setup

Then click Crop image and you will return to the main screen. Once there, click on Save Changes:

14.5 setup

You will be shown what your image will look like in various places on your blog. Go Back to blog options anyway, but you can always go back around the loop and change or upload a new picture.

17 setup

This article has told you how to add and update your image on WordPress. If you found it useful, please add a comment and share using the sharing buttons below. Thank you!

Related posts on this blog:

WordPress 1 – the basics

WordPress 2 – adding pages to create a website

WordPress 3 – adding images to your post or page

WordPress 4 – adding slideshows and galleries of images

WordPress 5 – linking your blog to your social media

WordPress 6 – sharing buttons


12 Comments

Posted by on April 24, 2014 in Blogging, WordPress


Tags: , ,

How to allow comments on your WordPress blog posts

I recently had a cry for help from a friend: she’d posted her first blog post but it wasn’t letting anyone post comments. I told her about the standard way to allow / disallow commenting on blog posts, but that wasn’t helping, and I ended up rolling up my sleeves and ferreting around in her blog Dashboard myself before discovering the answer to our dilemma. So here I’m going to share the correct way to allow comments, and then the way to change your preferences on individual posts – which I have to say is not obvious.

Please note that this works for WordPress.com blogs and not for self-hosted blggs and their themes – you will need to look at the widgets you can download for that.

How do I allow comments to be made on blog posts?

We all want people to be able to interact and make comments on our blog posts (well, most of us). The way to set this up is in the Dashboard, Settings, Discussion. I’ve talked about this at length in another post, so have a look here if you want all the details, but basically you can choose to allow comments on blog posts here:

18 setup

As I said above, have a look at my basic WordPress article for all of the information about how this page works: for now, just make sure that Allow people to post comments on new articles is ticked.

allow comments

How do I allow / disallow comments to be made on individual blog posts?

So now we know how to allow comments in general. But what if you’ve created a post and people can’t comment on it? Here we have a post with no place to add a reply or a comment:

no comments

I want to encourage people to post comments – so how do I do that? You might think that this is done in the Edit screen for your post. But it isn’t.

To enable or disable comments on an individual post, you need to go to Dashboard, then Posts, then All Posts, until you get this view of all of your posts in a table:

all posts

Now, hover with the cursor over the post that you want to edit – in this case the top one, and a list of options will appear. Click on Quick Edit:

quick edit

Now you will see the Quick Edit screen, where you can change things like tags and categories, the blog title and … the comments. Here the Allow comments box is unticked:

allow comments option

Tick Allow Comments:

allow comments option ticked

Press the Update button. When we view the page, now anyone can add a comment:

comments

This post has sorted out the problem of how to enable comments on an individual blog post. If you found it useful, please do let me know in a comment, and click on the sharing buttons below. You might want to explore the related WordPress articles on this blog, too.

Related posts on this blog:

WordPress 1 – the basics

WordPress 2 – adding pages to create a website

WordPress 3 – adding images to your post or page

WordPress 4 – adding slideshows and galleries of images

WordPress 5 – linking your blog to your social media

WordPress 6 – sharing buttons

 
48 Comments

Posted by on April 16, 2014 in Blogging, WordPress


Tags: , ,

Setting up a WordPress blog 5: publicising your posts and connecting WordPress to social media

Continuing my series of articles about WordPress, today we’re going to learn how to publicise posts by sharing them on the social media platforms that we use.

Why should I publicise my WordPress blog posts?

Using the Publicize feature to share your WordPress blog posts has two main advantages:

1. It shares your content and lets people other than subscribers and people who are searching on the search engines know that it’s there.

2. It adds content to your Facebook page, Twitter stream, LinkedIn profile, etc., without you making any effort at all.

If you’re going to share links to your blog posts on social media, you might as well automate it and save yourself the bother of posting about it all over the place, right?

How do I link my WordPress blog to my social media platforms?

Today we’re going to be spending time in the Settings – Sharing area of the Dashboard:

menu

When you click on Sharing, you will come to this Sharing Settings page. There are two sections: Publicize and Sharing Buttons. We’re going to be talking about Publicize today, and Sharing Buttons next time (watch this space – I will add a link when that one’s live):

1 publicize

Looking at the Publicize section, we can see buttons for connecting various social media platforms to your WordPress blog. What this will do in effect is auto-post a link to any blog post that you publish it, at the time that you publish it, without any effort on your part.

1a publicize options

How do I link Facebook to WordPress?

Note that all of the linking is done from WordPress rather than from the individual social media platforms. For example, to link Facebook so that an announcement of every blog post appears in your timeline, click the Connect button next to Facebook. You will be presented with a Facebook login screen. Add your normal Facebook login details and press the Log In button:

1b Facebook

If you enter the correct details, your connection will be confirmed:

1c Facebook

There are two things to note here. One, you can only link one Facebook account at a time, whereas you can add more than one login to most other social media types. Libro Proofreading … is my business page – for this blog, I have linked posts to that account, and then I pop in and share them onto my personal timeline.

The other thing to note is “Make this connection available to all users of this blog?” This is for a situation where you have more than one person with admin rights over the blog: you can choose, for example, your company or organisation’s Facebook page to auto-post to, and make that option available to everyone who posts on your blog.

Once you’ve chosen the account to connect to and pressed OK, you will return to the Sharing Settings screen, and you can see here that my Facebook page has been added to the page:

1d Facebook

You can go on now to connect, for example, your Google+ and Twitter accounts. For Google+, you will be asked to log in then confirm who you want G+ to share posts with:

1f Google+ permissions

When connecting Twitter, again, you’ll be asked to log in and then authorise the app. This is all quite standard and doesn’t mean WordPress will do anything odd to your social media – all it will do is post on your behalf when you publish a blog post (we’ll have a look at what that looks like in a moment):

1g Twitter permissions

When you return to the Sharing Settings screen, you will see all of the social media accounts that you’ve connected to, confirming which accounts they are:

1h all connected

How do I disconnect my WordPress blog from a social media platform?

If you wish to disconnect any of your social media platforms across all new blog posts, click on the x next to the “Connected as [your name]” message. It will ask you if you’re sure: if you click on OK, the link will be severed.

1e Facebook

To reconnect, go through the same process as above. WordPress may remember some of the steps when you do this, such as your username.

How do I manage Publicize in my blog posts?

Let’s have a look at what Publicize looks like in your blog posts.

When you select Posts – Add New and enter the Edit screen, you will see the Publicize section in the Publish area:

1i when you post

Let’s look at that in close-up. You can see that all of the social media sites you’ve linked to are showing here:

1j close-up when you post

Note that sometimes WordPress will become disconnected from one of them for apparently no reason. A message asking you to relink will appear in this area. Click through, provide the details it asks for and the two will be reconnected.

When in this individual post view, you can click on Edit and choose not to promote a link to your blog post to a particular site by clicking on the cross and making the square blank. You can also change the standard text that goes out with the link in Custom Message:

1k edit publicize

Clicking on Settings just takes you back to the original Sharing Settings screen we were looking at above.

When you’ve written your blog post, click Publish as normal:

1l in action

 What gets posted to my social media when I’m connected to WordPress?

I’m just going to share two examples here, but you’ll get the idea.

When WordPress is connected to Facebook, an entry will appear in your timeline, with any picture that you included in the post (very large in the current incarnation of Facebook!) and a bit of the text, and there will be a link, arrowed here, which will take the reader to the blog post itself.

1m in action

In Twitter, WordPress posts a shortened version of the full URL as a link and the automatic text taken from your blog heading:

1n in action

Today we’ve learnt how to use the Publicize feature of WordPress to link it to your social media platforms such as LinkedIn, Twitter and WordPress. Next time, we’ll be looking at how you can enable your readers to share your blog posts through the use of sharing buttons.

If you’ve enjoyed this post and found it useful, do please comment and/or use the sharing buttons below this post to share it with other potential readers who might find it useful. Thank you!

Related posts on this blog

How to set up a WordPress blog

How to add pages to make your WordPress blog into a website

How to add images to your WordPress blog posts and pages

How to add slideshows and galleries to your WordPress blog posts and pages

WordPress 6 – sharing buttons

WordPress 7 – adding an avatar picture

 
19 Comments

Posted by on April 3, 2014 in Blogging, WordPress


Tags: , ,