RSS

Author Archives: Liz Dexter

Unknown's avatar

About Liz Dexter

Book blog is at http://www.librofulltime.wordpress.com Writer, proofreader, editor, transcriber. Also runner, gym-goer, volunteer and BookCrosser! My married name is Liz Dexter but my maiden name and the name on the books I write is Liz Broomfield.

How do I view two Excel spreadsheets at a time?

You’re looking at a spreadsheet and you want to compare it to another one. In Word, it’s easy to line up two separate documents side by side to look at them both. In Excel – not so easy. This article explains how you can view two Excel spreadsheets next to each other on your screen and compare the two spreadsheets easily (or more, if you want!). Next week, we’re looking at how to view two sheets from the same workbook side by side, too! This article is valid for Excel 2007, Excel 2010 and Excel 2013 to some extent. The problem doesn’t exist in Excel 2013 as you can move spreadsheets around just like you can in Word, however the options still exist for arranging your multiple views (thanks to Alison Lees for pointing out the resolution of the problem).

Why can’t I view two Excel files on the same screen?

If you’re used to working with Word, you’ll know that if you have two Word documents open in any version of Word, you can pick them both up by the top bar (I usually do it near to the name of the document), slide them across to the left and right until they ping back and fill half of the screen …

Two Word documents on one screen

… and end up with two documents next to each other (you can, of course, move the boundary between them to make one bigger and one smaller):

Two Word documents showing side by side

But, if you’ve ever tried to do this with two Excel spreadsheets, you’ll have found that you move one over …

Moving an excel spreadsheet

… and the other one moves to sit underneath it, inaccessible and impossible to view at the same time as, say, Spreadsheet 1:

Second spreadsheet hidden

Move Spreadsheet 2 across to the right and Spreadsheet 1 will follow it. Grrr!

I’m going to show you how you can view both (or even lots of) spreadsheets on the same screen, in various arrangements, and then return to viewing only one. And next week I’ll show you how you can view two sheets from one workbook side by side.

The quick way to view two spreadsheets side by side

We’re going to look at the View tab here. In the View tab, you’ll find a button labelled View Side by Side.

view side by side excel

If you have two spreadsheets open in, say, Excel 2010 (from which these screenshots are taken, but the process is the same for Excel 2007, 2010 and 2013), pressing this button will show you both spreadsheets, one above the other (this always reminds me of playing competitive driving games on the games console):

View side by side - result excel

You can see that the Synchronous Scrolling button is highlighted in the image above. This is a really useful function – if you have both spreadsheets lined up to start with (i.e. you can see Column A and Line 1 at the top left of both), if this button is showing in yellow, scrolling in one spreadsheet (the active one has the scroll bar) will move the other spreadsheet up and down or left and right at the same time:

view side by side synchronous scrolling

However, if you don’t want to use this feature, you can click on the Synchronous Scrolling button to turn it white, and then your two spreadsheets can be scrolled independently (the scroll bar still displays on the active spreadsheet, i.e. the one you’ve clicked on):

view side by side remove synchronous scrolling

Note that synchronous scrolling only works in this View Side by Side option, so if that’s important to you, choose this option.

But what if you want to view the sheets side by side, or more than two in a tiled layout (I’ve got a widescreen monitor so I always want to view side by side)? Read on for that option  …

How do I view two spreadsheets next to each other or in a tiled layout?

To view your multiple spreadsheets arranged next to each other, to swap to the horizontal view we just looked at, or to use the cascade option, stay in the View tab and the same area but click on the Arrange All button:

excel arrange all button

This will give you a range of options for displaying the spreadsheets that you currently have open:

excel arrange all button options

Let’s look at these in turn …

Arrange all – Tiled

If you have two spreadsheets open, the Tiled option in Arrange All will simply show them arranged vertically, i.e. next to each other. All of my other examples feature two spreadsheets, but to demonstrate the Tiled option, here are four spreadsheets:

excel arrange all Tiled option

Note that the spreadsheets arrange themselves in the order in which you have them open, so if Spreadsheet 4 is the last one you looked at, that will appear top left. You can expand and move the individual spreadsheets, then return to Arrange All – Tiled to click them back into position again.

Arrange all – Horizontal

If you choose the Horizontal option in Arrange All, your spreadsheets will appear on top of each other, with the split between them horizontal:

12 arrange all horizontal

Note here that I had Spreadsheet 2 active (visible) when I chose this option, so it appears at the top. To choose which one appears at the top, have that particular spreadsheet visible and active when you click on the Arrange All button.

Arrange All – Vertical

Choosing the Vertical option in Arrange All gives you the two (or more) spreadsheets arranged next to each other, with the split between them vertical:

excel arrange all vertical option

This is how I prefer to view them.

Arrange All – Cascade

I find this one a bit odd. When you choose the Cascade option in Arrange All, the windows containing the individual spreadsheets all appear on top of each other, with a little bit of one poking out from underneath the active one. Here, Spreadsheet 1 is just showing at the top, but if I click on Spreadsheet 1, Spreadsheet 2 will be sticking out at the bottom. It’s odd, but there must be a reason for it, or Excel wouldn’t offer it:

excel arrange all cascade option

How do I get back to viewing only one spreadsheet at a time?

If you want to return to a full-screen view of a particular spreadsheet, simply double-click on the title bar of your spreadsheet (by its name) and it will expand and be the only one visible:

excel return to single sheet view

In this article, we’ve learned how to view two or more Excel spreadsheets on the screen at the same time, and how to return to a single spreadsheet view.

If you’ve enjoyed this article and found it useful, please take a moment to share it using the buttons below!

Please note, these hints work with versions of Microsoft Excel currently in use – Excel 2007, Excel 2010 and Excel 2013, all for PC. Mac compatible versions of Excel should have similar options. Always save a copy of your document before manipulating it. I bear no responsibility for any pickles you might get yourself into!

Find all the short cuts here … and view the blog resource guide here.

 
35 Comments

Posted by on September 17, 2014 in Excel, New skills, Short cuts


Tags: , , , , , ,

How to avoid two common mistakes when using MailChimp

Mailchimp is a very popular program for sending newsletters – mainly because it’s free to use to send newsletters and other messages to up to 12,000 emails per month to up to 2,000 subscribers. I use it myself, as do the people who write quite a few of the newsletters I subscribe to. If you use MailChimp yourself, this post helps you to avoid two common mistakes that I see occurring very frequently (and if you don’t use it yourself, I bet you see at least one of these in the newsletters you subscribe to – feel free to share this post with their creators!).

What am I talking about?

Well, this is what you might see in your email box when you receive a newsletter:

MailChimp newsletter email with errors

Ignore the “[Test]” – that’s me sending test copies of my newsletter to myself for demonstration purposes. So, with email on preview mode, and then when you open the email:

Full MailChimp email with errors

… what can we see here?

  1. The email subject is simply “Newsletter”. Not that inviting.
  2. This is the biggie – there’s an odd bit of text in the preview that reads “Use this area to offer a short preview of your email’s content.”

How often have you seen the second point and been confused or even tutted slightly to yourself? (Note: as a kind editor, I avoid tutting. But I do smile wryly every time I see it and think, “I really MUST write a blog post about that one”).

How do these MailChimp mistakes come about?

I’m going to assume here that you know how to set up and send a MailChimp newsletter campaign, and just concentrate on eliminating these errors. If you need a step-by-step MailChimp walkthrough, let me know in the comments and I’ll put one together for you if enough people want it.

The boring email title error comes on the Campaign Info page:

MailChimp campaign info pageIf you set up your very first campaign with a title like this, it will carry on sending it like that forever, but this is editable. I’m not going to go into ideas for good subject lines here – first off, MailChimp obviously provides a link to some further information, as you can see from the screenshot, but I’d like to take a moment here to mention my client Nathan Littleton’s book, “Delivered“, which has masses of information on creating a good email marketing campaign, including lots of advice on subject lines (he’s not sponsoring this post: I edited this book and I got loads of ideas from it which I’ve implemented in my own newsletter, to good effect).

So, first things first: change that Email subject field to a good, interesting phrase and I’d like to bet that you’ll stop boring your subscriber list and get more opens.

The second one is the dreaded “Use this area … ” text. How does it get there?

Well, when you get to the Design screen in your campaign creation process, bits of helpful text automatically appear in your template to tell you what to do. And one of the bits of helpful text that always appears is this one, right in the top of the screen, and in ever such a small font so that you’re very likely not to see it:

Sample teaser text in MailChimp

And that’s where that text pulls from that displays in your recipients’ emails.

Whatever the design, it’s always up there. Your eye is of course drawn to the main body of the email – the nice picture, the lovingly crafted text you’re going to place into the template.

What do you need to do here? Simply click on that teaser text, just like you would to edit the main body of the newsletter, and you can enter whatever text you want to.

What should it look like?

Once you’ve given your newsletter a more dynamic subject line and eradicated that bit of pesky sample text, this is what your email recipients will see:

MailChimp errors corrected

I think you’ll agree that you’d be more likely to open that one .. and so will your newsletter recipients!

In this article I’ve shared how to avoid two common MailChimp newsletter errors. Please do use the sharing buttons below to share this with anyone who you think might find it useful – thank you!

 
48 Comments

Posted by on September 10, 2014 in Business, Errors, Social media


Tags: , ,

How do I stop pictures jumping around when I edit a Word document? Combining words and pictures 2

More from my own editor, Catherine Fitzsimons, creator of educational materials and community magazines, on the tricky task of controlling how images behave in Word documents …

Last week, we looked at the ways in which Word can wrap text around pictures. To control how close the text is to the edge of a picture we opened the More Layout Options window from the right click menu. You may have noticed there are two other tabs in this:

Diagram 9One lets you control the size of your picture, but there are easier ways to do that (see How do I change the size of pictures in Word? on my website). The other, Position, provides some detailed options for controlling where your pictures go and is the key to stopping them from jumping around. It looks complicated, but I don’t think I’ve ever, in years of creating worksheets and doing magazine layout, had to resort to changing anything in the sections labelled ‘Horizontal’ and ‘Vertical’ – I’ve just used the ‘Options’ section.

Diagram 11Before we go on to that though have a look at the ‘Allow overlap’ button. This is useful if you want to get two pictures closer together than their boundary boxes would otherwise allow. For example, here you can see that although the books themselves don’t overlap, the boxes round them do. Notice also how the Tight-wrapped text goes inside the boxes because these images have a transparent background.

Diagram 12

Why do pictures move? How do I stop pictures moving?

Basically, pictures can either be locked in position on the page or moved around with the text.

In Word 2013 ‘Move with text’ and ‘Fix position on page’ appear as options on the Wrap Text menu and on the little pop out Layout Options menu (so long as your picture isn’t in line with the text).

Diagram 5Diagram 4bIn earlier versions you have to go into More Layout Options|Position and check or uncheck ‘Move object with text’ – it’s checked as default. If you have a picture exactly where you want it on a page, all you have to do is uncheck the box (or make the appropriate selection from one of the menus in Word 2013). That picture will then stay exactly where it is when you edit or add to the text or insert another picture – it will move only if you grab it and place it somewhere else yourself (or play with the numbers in the ‘Position’ tab of More Layout Options).

Allowing pictures to move with text is a little more complicated and depends on understanding the idea of anchors.

When you whizz a picture around the page, Word makes a decision about what text to tie it to: it generates an ‘anchor’, usually at the beginning of the paragraph nearest to the top left corner of the figure (working up). If you then move or delete that bit of text, the image will move or be deleted with it — that’s why pictures sometimes vanish unexpectedly. They usually jump because an anchor and its picture have to be on the same page. That means that if you type an extra paragraph and the anchor moves to a new page, the picture will jump to that new page too. It’s Word trying to be helpful, aiming to keep pictures and the writing about them together, but it does feel pretty random if you don’t know the logic.

Word 2013 helpfully shows you the anchors whenever you’re clicked on a picture, but it is possible to see them in earlier versions: since they are formatting marks, they will show up if you click the symbol that looks like a backwards P in the Paragraph group on the Home ribbon. If you can see them, they can help you work out why a picture won’t go where you want it or keeps disappearing altogether.

Diagram 13

In Word 2010 or 2007 you can also get the anchor marks to show all the time (without the other formatting marks) by going to File (Office button in 2007)|Options|Display|Always show these formatting marks on the screen, then ticking ‘Object anchors’ and OK.

Once you get the hang of how the wrapping styles and the anchors affect where the pictures go, it becomes much easier to put a picture in the right place and make it stay there. Here’s the order I suggest for creating a document that has words and pictures:

  • Write and type all the text first (or work a page or two at a time).
  • If possible, get the pictures as close as you can to how you want them (size, resolution, cropping, colours) before you add them to your text – either use image editing software or get it right in a blank document then copy and paste into the one you’re working on.
  • Once you have a picture where you want it, with the right sort of size and wrapping, consider locking it in place.
  • If a picture that has to stay with the text appears to be misbehaving, go in search of its anchor to track down the problem.

Still can’t get the pictures where you want?

If you’re creating something with a lot of images, or need more complex layout — such as for a brochure or worksheet — then there are alternatives to putting the text and pictures straight into the document. I explain how to use a table to combine text and pictures in How do I organise a lot of pictures on a page? over on my own blog where, in future posts, I will look at alternative solutions, and other issues to do with using pictures.

Other useful posts

On this blog:

How do I make pictures go where I want them to in Word?

On Catherine’s blog:

How do I organise a lot of pictures on a page?

How do I change the size of a picture in Word?

 
14 Comments

Posted by on August 27, 2014 in Short cuts, Word


Tags: , , , ,

How do I make pictures go where I want them to in Word? Combining Words and Pictures 1

Today and next week we have guest posts from Catherine Fitzsimons on placing images in Word documents. This is a tricky topic and one I’ve been wanting to write about for ages: Catherine does a lot of work with newsletters and other complex documents, which makes her the ideal person to write these posts for me!

How do I combine text and pictures?

Have you ever tried to put a picture in Word and found your text, which started at the top of the page, suddenly moves down? And then, as you type more, or change the size of the picture* to make it fit better, things move to unexpected places? Or the picture stays where it is, but leaves you lots of blank space on the page? Then, when you try to move it around, things only get worse and you end up with something like this:

Diagram 4

This is because Word assumes two things:

  • That you want the picture (or, to be precise, the bottom left of it) to be placed where the cursor is. That means it goes immediately after the last thing you typed before choosing Insert|Picture and, when you try to move it, you can see a vertical line where it believes you want it to go.
  • That you would like the text to run right up to the picture and carry on straight after it.

In other words Word treats your picture like an outsize character and refers to this option as having the picture ‘In Line with Text’.

However, you can change your picture to what is known as a ‘floating figure’ so you can put it where you like but, before we delve into all that, have a look at a handy shortcut in the ribbon versions of Word. If you select your picture, go to the Picture Tools|Format ribbon that appears and click the down arrow by Position, you will get a choice of nine places to place your picture without any fiddling around at all.

Diagram 4a

In fact, in Word 2013 some of these appear in a little pop-up menu that you can call up by clicking the thing that looks like a rainbow drawn on lined paper which hovers at the top right of a picture when you select it.

Diagram 4b

All wonderful, but what if you need more flexibility? Read on.

Once again, select the picture and go to the Picture Tools|Format ribbon but this time click the down arrow by Wrap Text. (Alternatively, or in older versions of Word, right click on the picture and choose Wrap Text from the menu that appears.)

Diagram 5

Doing that brings up another menu which lets you choose the relationship between your text and picture. The icons helpfully explain the options:

Square means that the text will wrap all the way around your picture (strictly speaking around the ‘bounding box’ – the rectangle that appears when you select it). When you move the picture around the page the text flows above, below and to the sides – or one side if you put your picture up against a margin. Notice, though, that it doesn’t make text down the sides into columns – it reads across the picture. (If you want your picture in the middle of a page like this, it’s probably best to make your text into two columns first.)

Diagram 6

Top and Bottom does exactly that. It looks just the same as if you had typed Enter before and after inserting your picture but with the important difference that the picture moves as an object, not a character, so it’s easy to place it somewhere new.

Tight only works with images which are not rectangular or, like some clip-art, have a transparent background. It wraps the text around the edges of the image (assuming these ‘wrap points’ have been defined) rather than around the bounding box.

Diagram 7Through is a complicated one and I don’t know anyone who has used it. It works the same way as Tight except that it will also put words right down into any transparent sections of the picture that are linked to the background, again, providing that the wrap points have been set up properly.

Behind Text makes the words go over the top of your picture (which can work well so long as the image isn’t too detailed or too similar in colour to the font), whereas In Front of Text means that non-transparent parts of your image obliterate the words. Why might you want to do that? If you insert a an ellipse that has Shape Fill as ‘No Fill’ and Shape Outline red, and float it in front of text then you have a useful little shape for circling things you want to highlight.

Diagram 8You can refine Square, Tight and Through further in Picture Tools|Format|Wrap Text|More Layout Options. As you can see, you can tell Word to put text on one side of the picture only – Left, Right or whichever has the most space for text. This is also the window you use if you want to make your text squish up closer to your picture — if it already has a lot of white space around it for example — or back off a bit if the words run right to the edge of your picture. Unsurprisingly, you can also adjust the spacing above and below for Top and Bottom wrapping.

Diagram 9This version has text wrapped Tight to largest side only and the Distance from text adjusted to 0cm on Left and Right as well as top and bottom.

Diagram 10So, that’s the official way to put the pictures into the correct place in your document. And, more often than not, it works. However if you are adding more than one image, or later add a text box or table (anything that Word calls an ‘object’), or if you revise what you have written then pictures you’ve put in sometimes jump around or even disappear. You can minimise the chances of that happening by typing all your text before thinking about layout and images but, even then, it still sometimes happens. I’ll explain why, and suggest how to stop it next week.

*But how do I change the size of a picture? See How do I change the size of a picture in Word? on my own blog.

Catherine Fitzsimons has the unenviable job of being my own editor for my books on business and other careers topics. Ever since she first started using Word she has been finding ways of getting pictures and text to sit together exactly the way she wants: first as a teacher making worksheets then doing layout for community magazines.

Other useful posts

On this blog:

How do I stop pictures jumping around in a Word document?

On Catherine’s blog:

How do I organise a lot of pictures on a page?

How do I change the size of a picture in Word?

 
8 Comments

Posted by on August 20, 2014 in Short cuts, Word


Tags: , , , ,

Infographic – social media etiquette

Today I have a guest post with a difference – an infographic, for the first time on this blog. It’s from writer and infographic specialist Ivan Serrano, and talks about many different kinds of social media and how to interact with them. It acts as a complement to my more detailed social media posts.

What do you think? Should I have more infographics on this blog? Do comment below with any thoughts …

——————————————————————————-

“Have you seen what (insert important person or business here) posted on (insert social network here)?” seems to be a question that people hear quite often nowadays. Depending on how you word your message and conduct yourself on social media, it can go viral and your business can get brand recognition, or, on the flip side, it can go viral for all the wrong reasons.

That’s why it’s important for businesses to conduct themselves properly on social media. In addition to following general social media etiquette, certain social media networks have their own rules of etiquette as well. Businesses must remember that they have a reputation to consider—one inappropriate tweet or post could leave your reputation reeling, and that may take quite a while to recover from depending on how well you handle it. The infographic below gives you a guide on how to present yourself on the numerous social media networks.

social media etiquette infographic

Ivan Serrano is a writer and infographic specialist from Northern California. Ivan covers topics ranging from global business to tech and social media. He is an avid “Bay Area” sports fan and tries to attend as many games as possible.

 
7 Comments

Posted by on August 13, 2014 in Business, Social media


Tags: , , , , , , ,

How to leverage your social capital

handshakeHow to leverage your social capital, eh? What a lot of jargon! I thought you didn’t like jargon, Liz? – Well, I don’t, and that’s why I’m going to take a few minutes to explain what this little chunk of jargon means.

Social capital is a fancy term for the people you know and, to be blunt, the favours they owe you. You build it up through networking, doing things for other people, being a linking person, an information provider, a helpful person. You build it through knowing people, through having worked with people, through keeping in touch with people. Then, when you need it, something like karma springs into action, and the work you’ve put in comes back to you in bucketloads.

Now I’m sounding cynical as well as jargon-filled! Goodness me! Let’s break it down with some heavily disguised but based-on-reality examples, to show you that leveraging your social capital isn’t really the cynical and shallow procedure you might imagine, but a new way for an old process that is made easier to build and use through social media and our networked society.

Social capital gets leveraged, everyone goes away happy

Here are some examples of people leveraging their social capital to gain freelance jobs and repeat clients. Note that in NONE of these cases does Person A directly ask for something. Instead, the connections they’ve built up do it all for them.

Example 1: Person A, Bob, ‘meets’ Person B, John, online via a mutual interest group that’s applicable to the industry they’re both in. Bob is about to go full-time with his freelance career but doesn’t have many clients. John is a full-time freelancer of a few more years’ experience. He’s looking for people to recommend enquirers on to when he can’t fit them in. He’s also keen to get some holiday cover set up so he can go and play golf without worrying about his graphic design clients. They make friends and build trust – they even start to meet up to play golf together. When John gets yet another enquiry about leaflet design, it’s easy for him to recommend Bob. Bob worries sometimes that all of his jobs come through John’s recommendations, but soon he has his own string of client referrals because he does a good job. And when Bob goes on holiday, he passes John a big project that he hasn’t got time for – from a client originally recommended by John!

Who benefits: both of them. Bob gets new clients and builds his customer base. John has people he can refer clients on to and that all-important holiday cover.

Bonus social capital leverage: When Bob, now nice and busy himself, finds out that a friend he’s made at a networking event is looking for clients, not only can he recommend his own overflow to Tony, but he can advise John to, as well!

Example 2: Person A, Millie, used to work with Jeremy before they both left and went their separate ways. But they’ve kept in touch via Facebook and chat online every month or so. Jeremy moves between jobs and continents, so knows lots of people. When he hears from Simon, an ex-colleague in Australia that they’re looking for someone with the skillset Millie possesses, and that they don’t need someone on the spot, Jeremy puts Millie in touch with Simon, and they work on the project together.

Who benefits: both of them. Millie gets a job out of it, and Jeremy maintains contact with an ex-colleague and does them a favour, which could well be repaid in the future.

Example 3: Person A, Tim, meets person B, Shona, at a local networking event. They’re not in the same line of work at all, but they have a good chat and get on well. They say hello at a few other monthly events. One day, Tim is contacted by Sean, who wants to use him for a major new contract; he’s been recommended by Shona, even though she has no direct experience of his work (of course, Sean has checked out Tim’s website and references before contacting him). Not only does Tim get the job, but Sean recommends him on his website and to other clients of his.

Who benefits: In this case, it looks like it’s mainly Tim, however, he is so grateful to Shona that he goes out of his way to retweet and share messages Shona sends out on social media, and to introduce her to useful people at the networking events they attend.

How to build social capital

So, how do you build this social capital? Note that it’s not social MEDIA capital, although social media makes it easier to do. But you can build social capital through networking and more old-fashioned face-to-face contact, too. In both Examples 2 and 3, the initial contact was in person, and social media only comes into play to make the contacts between the people who want the work doing and lucky old Person A.

Building social capital shouldn’t be a cynical process, but a natural one that involves making a bit of effort. Ways you can increase your social capital include:

  • Getting out there – the more people you meet, the more people can help you
  • Telling people what you’re looking for – whether it’s announcing to your Facebook friends that your violin-making business is looking for commissions or joining a networking group and explaining what services or products you’re promoting
  • Making yourself memorable – whether you’re the “good hair lady” (true example) or the person who always brings cakes to the meetup, make yourself memorable in a good way
  • Making yourself easy to explain – this comes down to your elevator pitch. Do people know you as “the man who makes violins on commission” or “that music chap”? The more precise your description, the more likely you are to have people sent your way who you can actually work with
  • Being gracious – if someone is introduced to you who you can’t help (or with whom you’re not interested in working), see if you can recommend them on, or have a chat anyway. You need to leave a positive impression on everyone you meet if you possibly can
  • Do things for other people – this should go without saying, but I’m going to say it. More below on this one

It’s cynical to say that someone “owes you one”, and it can be far more complex than that, but it can’t be ignored: the more you help other people, the more they will help you in return. How can you do things for other people?

  • If they’re in the same business as you, see if you can pass overflow work to them
  • If they’re in a closely related business to you, mention them to your clients as someone who can help them – e.g. the violin maker might know a musicians’ agent who they can recommend to their clients
  • If they’re in a fairly different business to you, bear them in mind and mention them – e.g. the violin maker might be chatting to a musician and mention that he knows an event organiser who’s looking for entertainment for a summer party
  • If they’re in a completely different business to you, still bear them in mind and suggest them – e.g. the violin maker is chatting to a musician whose wife needs a web page to be designed
  • You could create a Links page on your website with links to known and trusted contacts in your field and others
  • You could put a poster for their event in your shop window or volunteer at an event they run
  • You could introduce a friend with a different kind of business to one of the networking events you go to
  • You could share tweets and Facebook posts by your contacts with your audience (you should be doing this anyway)
  • You could cross-guest-post on each other’s blogs

 What has worked for you?

Knowing and trusting people + getting out and about and meeting them face to face or online x helping people out yourself = increased social capital

Have you got good examples of your contacts creating opportunities for you with third parties? I’d love to hear about your successes and how they came about …

Further reading on this blog:

Reciprocity and social media

Networking and social media marketing

Networking for newbies

If you’ve enjoyed this post and found it useful, please comment below or use the sharing buttons to share it with your network. If you’re considering setting up a new business or have recently done so, why not take a look at my books, all available now, in print and e-book formats, from a variety of sources.


Leave a comment

Posted by on August 6, 2014 in Business, Social media


Tags: , ,

Happy fifth birthday, Libro!

Libro birthday cartoonI started working for myself (very much part time) in August 2009 – so now it’s Libro’s fifth birthday!

What am I doing to celebrate? Well …

I’m having a little party today over on the Libro Facebook page … including a draw to win a free Kiva loan

I’m making some loans to Kiva (see below) and donating one to someone else

I’m celebrating the relaunch of my two main business books, with their new titles and covers …

… And I’m launching my new website devoted entirely to the books I write, where people can find info, links, reviews and news in one place

I hope you’ll join me in celebrating Libro’s birthday by popping over to say hello on the Facebook page or by doing a Kiva loan yourselves.

Happy Birthday to me!

Quick update: the Kiva competition in now CLOSED. Alison Mead won the free loan and was sent a voucher. I started new loans to a man selling spare parts in Benin, a travelling salesman in Paraguay and a food stall in Bolivia. These were all people who friends of mine had already lent to.

Kiva is an organisation that facilitates loans to small businesses around the world, who traditionally find it hard to raise capital. You commit from $25 upwards, and you can choose by gender, country, industry sector and individuals within those areas. They then pay the loan back to you in small increments – you get an update email on repayments once a month and sometimes updates on the individual or group you’ve loaned to, if the organisation handling the loan provides them. Once the money’s paid back, you can reinvest it or withdraw it if you want to. I love helping people to help themselves in this way; it feels like I’m helping to make a difference to another small business somewhere far away from me.

 
19 Comments

Posted by on August 1, 2014 in Business, Celebration, Ebooks


Tags: , ,

ASCII codes for common non-standard characters

In last week’s post I explained how to insert non-traditional characters into your Word or other text-based document. I promised to share a list of commonly used ASCII keyboard shortcut Alt+ codes, and here they are. If you have a favourite non-standard character that is not represented here, please let me know in the comments below, and I’ll consider adding it.

Where did I get these codes from? As explained previously, you can pick them up in Word when inserting a character (Insert – Symbol – drop down From to ASCII) or in the Character Map (click on a symbol, look bottom right for the code). There are also various online resources that list them, and this is a list of my favourites. I hope you find it useful!

à  Alt-0224 lower case a grave

á  Alt-0225 lower case a acute

â  Alt-0226 lower case a circumflex

ä  Alt-0228 lower case a diaeresis

æ  Alt-0230 lower case ae

ç  Alt-0231 lower case c cedilla

è  Alt-0232 lower case e grave

é  Alt-0233 lower case e acute

É  Alt-0201 upper case e acute

ê  Alt-0234 lower case e circumflex

í  Alt-0237 lower case i acute

ñ  Alt-0241 lower case n tilde

ô  Alt-0244 lower case o circumflex

õ Alt-0245 lower case o tilde

ö Alt-0246 lower case o diaeresis

ø  Alt-0248 lower case o stroke

ð  Alt-0240 lower case eth

Р Alt-0208 upper case eth

þ  Alt-0254 lower case thorn

Þ  Alt-0222 upper case thorn

ß  Alt-0223 lower case sharp

× Alt-158 multiplication symbol

÷ Alt-246 division symbol

Note: there is no ASCII code for a tick / check mark – you need to use Wingdings2 and a P in Word, not sure how people manage it elsewhere (add a comment if you know how to do this).

If you would like to suggest additions or would like to comment on this post in general, please do – also do consider sharing it via the buttons below.

Related posts on this blog:

how to insert non-traditional characters

 
12 Comments

Posted by on July 30, 2014 in Language use, Short cuts, Word, Writing


Tags: , , ,

How to insert non-standard English characters into almost any text

text including eth and thorn in wordToday we’re going to learn how to insert non-standard English characters into Word and pretty well anywhere else where you might want to type some text.

What do I mean by non-standard English characters? I mean those characters that do not appear in a standard English alphabet, i.e. diacritics (letters with accents that you find in most European accents) and additional letters you don’t find in English, such as the eth and thorn found in Icelandic.

I’ll show you how to insert these in Word in a couple of different ways, and then share the best and most simple universal way to create these characters, as well as the special codes for some of my favourites.

Why would I want to type non-standard characters?

There are many reasons why you might want to type non-standard characters in your English documents / text / fields / whatever. Here are some of the reasons why I’ve done this myself:

  • As a cataloguer (and this is where I learnt about them and memorised some of the codes), I was required to catalogue in different languages, or enter people’s names which had accents on various letters into author fields.
  • I have a client called Jörg. He has to spell it Joerg in his email address and email signature. I prefer to be polite and spell it in the correct way when I email him and say “Hello Jörg”.
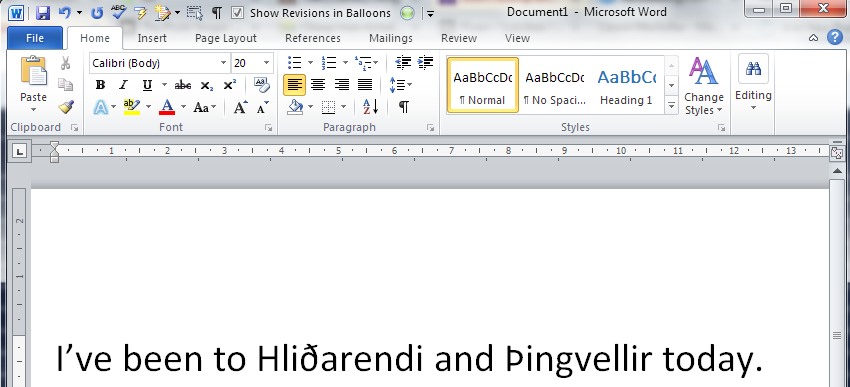
  • I’ve just been to Iceland. If I’m talking about places I’ve been or things I’ve read, I want to be able to use the full range of Icelandic letters – and they have two extra ones that we don’t use (nowadays) in English.
  • I work with bibliographies which might include non-English words with accents, etc. – if I need to add something or make a correction, it’s handy to know how to add the correct characters.

In many of these cases, I’m typing in a Tweet, a special piece of software or an email, as well as using Word for some of them. Many people know how to insert special characters in Word, but not everyone knows about the codes that you can use to pepper all of your communications with nice non-standard characters.

I’ll talk about Word first, and then broaden things out.

How do I insert special characters into my Word document?

There are two ways to insert special characters into a Word document. If you know the Alt-code for the letter, you can just hit Alt and a special four-figure number. More about that later on.

The official way is to Insert Character. This is how you do it (this works for all versions of Word for PC).

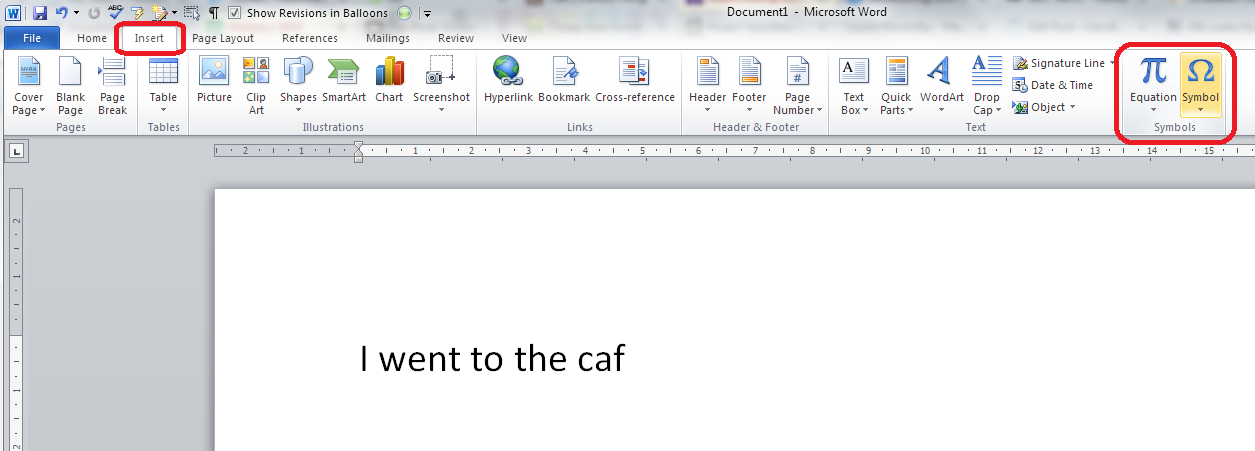
When you get to the place where you want to insert your special character, in this case an é at the end of café, go to the Insert tab (or menu in Word 2003) and choose Symbol from the Symbols area on the right:

Insert symbol word

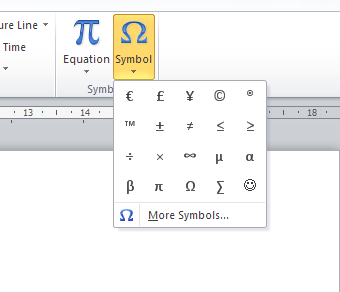
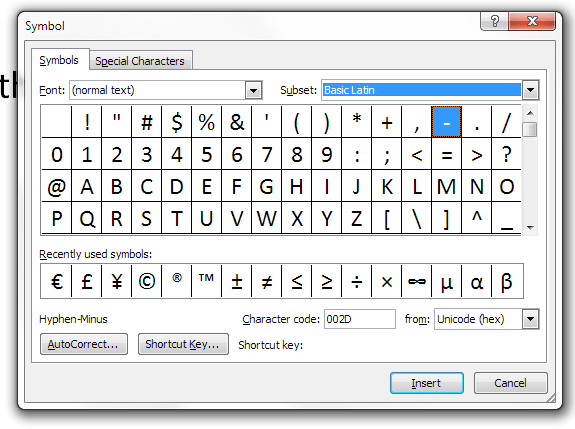
When you press the Symbol button, a selection of commonly used symbols will appear (this will give you symbols that you’ve recently used; however, it will carefully offer you a range of popular ones if you’ve not used this method to insert very many symbols in the past). The one I want isn’t there:inserting symbols


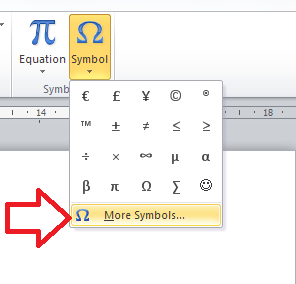
You can now click on More Symbols to bring up the whole range:

More symbols in word
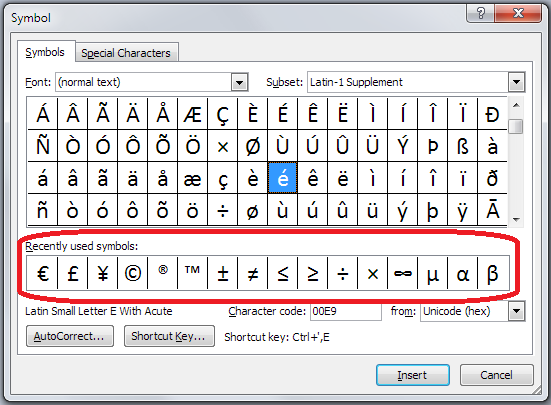
At this point, a box including lots of symbols and special characters will pop up:

choice of symbols in word

You can now scroll down to find your symbol. Most of the common ones are on this default list. Here’s my acute e …

Selecting a symbol in word

And once I’ve pressed the Insert button, it will appear in my text.

It’s worth noting at this stage that a list of your recently viewed symbols is displayed in this window, and you can click on any of those and insert them in the same way. Word populates this with common symbols if you haven’t used this method to insert many symbols before (I personally use a different method), but as you use different ones, they will appear here and on that pop-up that appears when you initially click on Symbol (see above):

recently viewed symbols

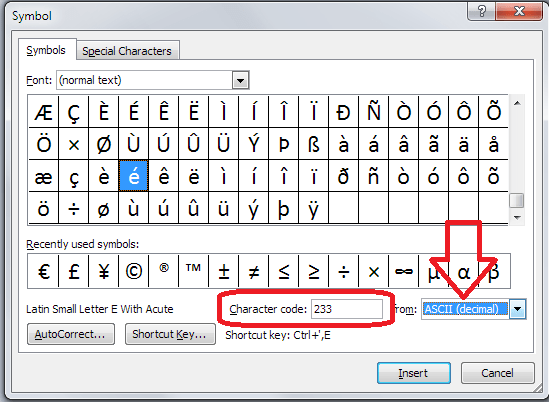
One more thing to note before we press Insert: this screen also displays character codes. These are codes that you can use in conjunction with other codes and keys, including the Alt key method that I mentioned above. Drop down the arrow by From to get to ASCII and you will find a very useful four-figure code that you can use with Alt to insert non-standard characters into anywhere, not just Word.

Symbol codes

So, that’s how you insert a non-standard character in Word. What if you want to put one in Facebook, Twitter, etc?

How to use the character map on your computer to insert special characters

There is a character map on your computer that you can use to insert special, non-standard characters into any typing that you’re doing that will support these. Note that this works for a PC.

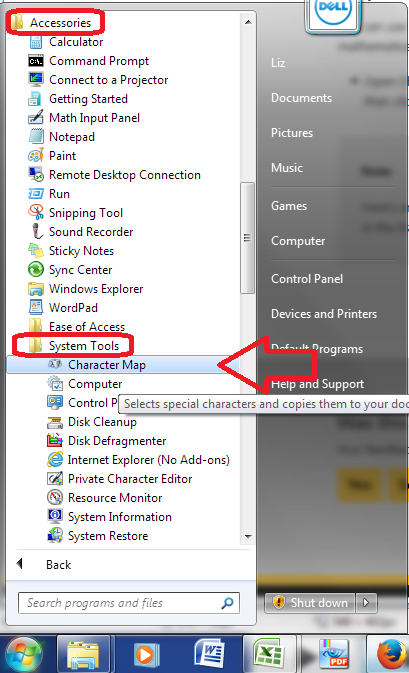
How do you access the character map? Hit the Start button in the bottom left-hand corner of your screen (in Windows 95 onwards and Windows 8.1, Windows 8 doesn’t have one but you can use the Win-R shortcut below), then choose Accessories / System Tools / Character Map:

Character map

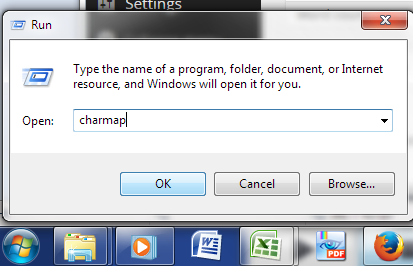
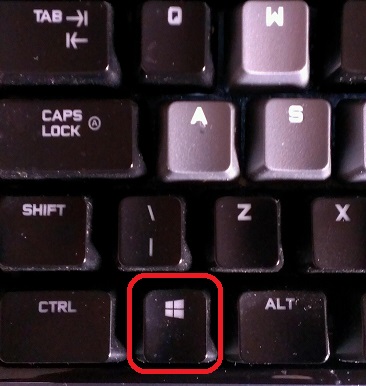
You can also use this handy shortcut: Hit the Windows button on your keyboard and R together

windows key

or the Start button and Run and type Charmap into the box that appears:

Run charmap

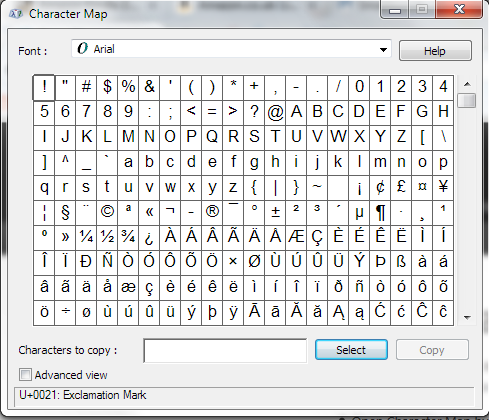
However you get to it, you should see the character map, which looks like this:

character map

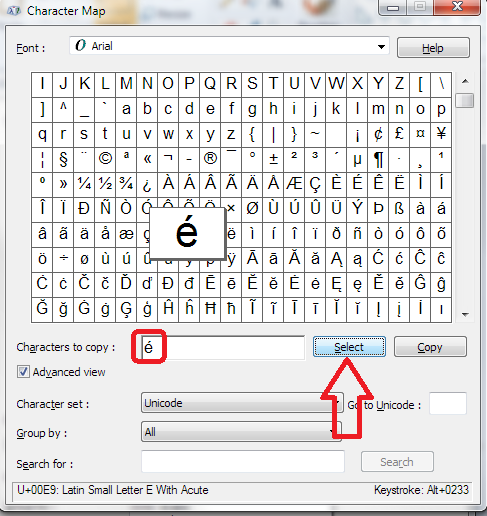
This looks a lot like the map in Word, and works in a similar but not identical way. Find the character you want, scrolling down or changing font if necessary. Click on it until it is highlighted (pops out of the box as below). Press Select and it will appear in the Characters to copy box below the grid.

character map select character

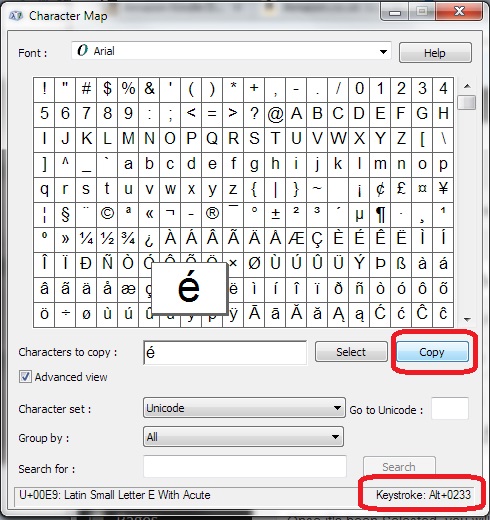
Once it’s been Selected, you will need to Copy it by pressing the Copy button (note: this means that you can select several characters in a row, if you have two non-traditional characters next to each other, for example). Copy will copy everything in the Characters to copy box.

character map copy

Note also here that in the bottom right you are given the keystroke or ASCII code Alt+0233 which you can use as a keyboard shortcut (more on that again later).

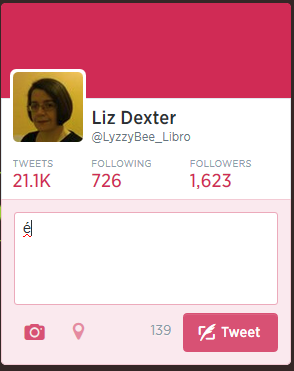
Once you’ve copied your character, you can paste it into pretty much any text box you want to, here in Twitter:

Inserting character into Twitter

 Using ASCII codes / keyboard shortcuts / Alt+ to insert special characters

The way I insert special and non-standard characters is to use these Alt+ ASCII keyboard shortcut codes that I’ve been mentioning all the way through this post. Hit Alt-0233 and you’ll get an é without having to click all over the screen, copy and paste. There’s a code for almost every character you could think of.

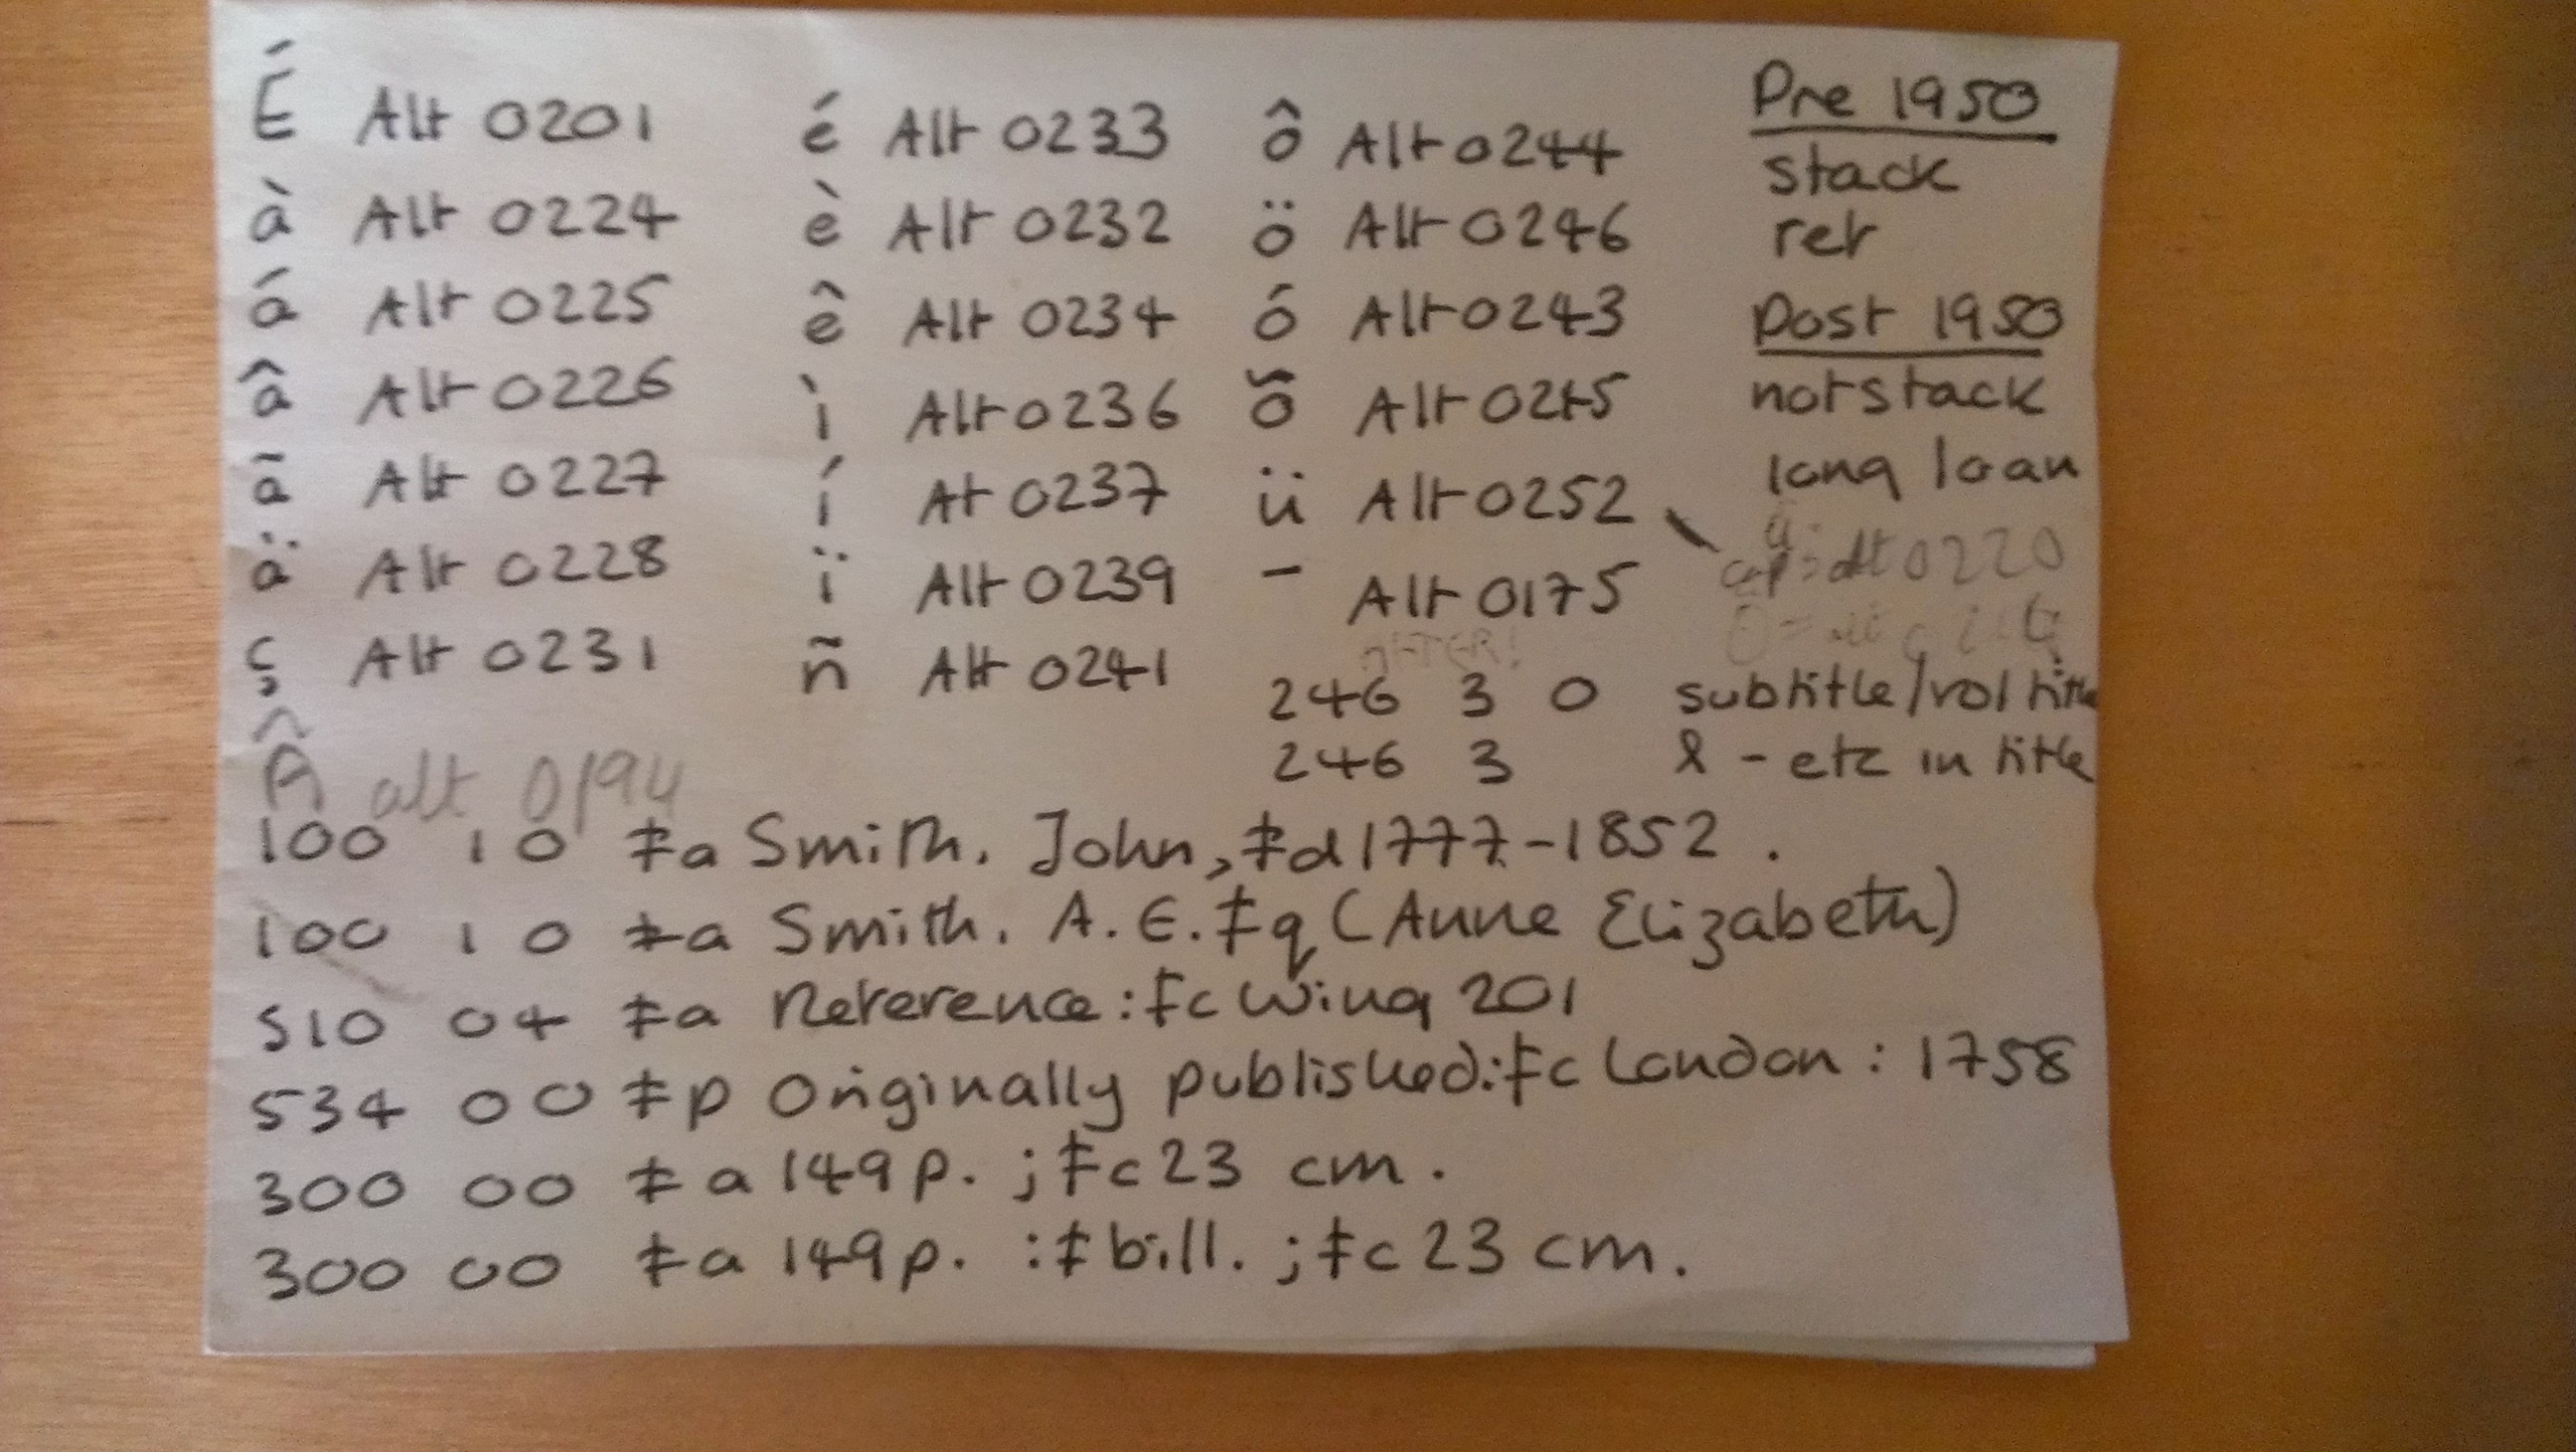
How do I know a load of these off by heart? Because I used to be a cataloguer at a library, and one of the things I did was catalogue foreign language publications, which were full of diacritics and non-standard characters. So, every day I would end up needing to insert many of these characfers into the cataloguing program we used. I, and everyone else, had little handwritten notes of the ones we used regularly. Here’s mine (yes, when I left the library in December 2011 to do this Libro stuff and blogging full time, I took my little bit of paper with me):

Alt+ codes notes

So there’s a little bit of Liz history you weren’t expecting (ignore the MARC codes at the bottom unless you’re a librarian, too). You, too, can have a bit of paper like this if you use non-traditional characters a lot – or you’ll commit them to memory, as I ended up doing.

How can I find out the ASCII codes for special characters?

You can use one of the two methods I describe above:

  • In Word: Insert – Symbol, drop down From to change it to ASCII and note the Character code
  • In Character Map: click on the symbol and look at the bottom right of the dialog box

or you can search for it online …

In this post, we’ve learned why we might use special characters and how to insert special characters in Word, Twitter, Facebook and any other places that you might want to insert text. If you liked this or found it useful, do please comment below and/or use the sharing buttons to share it! Thank you!

Related posts on this blog:

ASCII codes for common special characters

Other posts of interest:

This blog post was referenced in this one on using the correct degree sign in scientific writing, which is a great resource!

 
7 Comments

Posted by on July 23, 2014 in Short cuts, Word, Writing


Tags: , , , , ,

Using Twitter for your business

Using Twitter for your business

Twitter is an absolutely brilliant tool for business owners – if you use it in the right way. If you use in the wrong way, it can be a nightmare, as bad (or embarrassing) news travels very fast in the Twitter universe!

I personally got a lot out of Twitter in the early days, actually securing clients through using it – and long-term clients who recommended me on to more clients, too. I’d go as far as to say that it’s my number four source of work, after repeat business, personal recommendations and the Proz website. My clients still recommend me to other clients via Twitter, even several years on (the other month, a music journalist tweeted that she was looking for a transcriber. FIVE of my current clients tweeted her with my name!).

Benefits of Twitter: it’s quick and easy to use. Disadvantage: it can be a time-sink. Most important thing to remember: People only tend to see a snapshot of their tweets every day. I only know one person who reads ALL of the tweets in his timeline. This means that your tweeting strategy should be a bit different from your other social media posting strategies.

Setting up your Twitter profile

When you join Twitter, it’s very quick and easy to set up your profile. Your profile is a quick guide to who you are. Anyone clicking on it or searching for it needs to know that they’ve found the right Liz Broomfield / Libro (or whatever) and to see easily what you do.

Twitter profile

I would recommend including the following on your profile, and I’ve seen plenty of other people recommend this, too:

  • Your real name when you log in, as well as your company name for your Twitter ID
  • Your photograph on your profile, rather than your company logo (you can add that to your background)
  • Your company URL in the field where you can provide that
  • Use your 140 letters of profile to the max, including what you do and any extra URLs

As with any profile, you can change it at any point; just click on your image and choose Settings,  Edit profile of in the Home Screen, click on your Twitter ID and the Edit Profile button.

Following and followers

Once you’ve set up your Twitter account, you can start following a few people. Twitter will suggest ones that you don’t really want, based on who’s popular, but you can find interesting people to follow in a variety of ways:

Ask someone for their Twitter ID when you meet them or glean it from their business card or website. Then enter that ID in the search field on Twitter. Or you can search for the person’s name or company name in the search field on Twitter.

Twitter search

Or you can go to http://www.twitter.com/%5BID without an @ sign]:

search using Twitter url

Have a look at their profile to check it’s the correct person, then press the Follow button if it is:

follow on Twitter

If you’re following someone in an interesting field, have a look at who they’re following. If you click on their profile, you will see links to Tweets, Following and Followers. Click on Following

Following button

and have a look – there will be a handy Follow button by each name so you can simply follow from there (if you’re already following someone, it will be marked as such). Once you’re viewing who someone is following, you will see a dropdown button marked More which will take you to their Lists.

Who someone is following on Twitter

See more about Lists later on, but you can follow either  an entire list or members of one by clicking on the list, and this is another good way to glean people to follow in a particular area of interest.

How do I choose who to follow?

It’s entirely up to you how many people you follow and whether you organise them in any way. When I’m deciding whether to follow people who I’ve found, or who have followed me (you don’t HAVE to follow everyone who’s followed you, but it’s polite to have a look at least), this is what I do:

  • Check their profile to see whether they’re interesting to me
  • Check their list of tweets to see if they tweet interesting information
  • Check their tweets for the same tweet repeated over and over again – this means a lack of imagination, something akin to spamming or an automated response
  • Check their tweets for regularity and date of tweeting – if someone tweets once a week or hasn’t tweeted for a number of months, unless they’re hugely important to me, I won’t bother to follow them because their tweets will get lost in the general melee

I do also regularly run a check over the people I’m following (click on Home, your own Twitter ID and Following) to make sure they’re still active. If not, I tend to cull. Sorry!

Who am I following?

Lists

Lists are a great way to put the people who you follow into categories or filters that you can look at independently. For example, I have a “Must know” list which includes all of the real-life friends plus some news feeds that I follow, so that if I only have time for a quick dip into Twitter, I can see what’s really important. I also have a “Journos” one so that I can see what my music journalist clients and a few others are up to, for some entertainment.

To add someone to a list …

Click on their name in your timeline to view their profile …

Add to list from profile

… or go to your list of accounts followed (Me – Following)

add to list from me - following

Click the User Options button (next to Following, it looks like a cog)

Click on Add or Remove From Lists

You’ll see a list of all of the lists you’ve already set up (if you have set any up) plus a button, Create a List

Either click on a list name to add that person then press the X in the top right corner to close the dialogue box:

Add to twitter list

or click on Create a List

create a twitter list

and make up a new list name to add this person to:

create new list

(if you make a list private, only you can see it – you’ll know when a list is private because it will have a padlock symbol next to the list name). Once you hit Save list, you will need to tick the particular list you want to add this person to:

add person to new list

Once you have some lists, you’ll see a Lists entry under More when you click on Me. Ideas for lists include friends, particular interests, your business sector, news feeds, sport – anything you want.

You can follow other people’s lists or mine them for good accounts to follow – just click on a particular person’s Twitter ID and you’ll get their following, followers and lists.

Note – this doesn’t work exactly the same on mobile devices or third-party Twitter management dashboards as it does on the basic web-based Twitter interface. These instructions are for the latter.

How Twitter works – @ and #

One thing that you’ll see a lot of on Twitter is the symbols @ and #

@ is used in front of a Twitter ID to notify the person that you’re talking to them or to point someone else to their account. For example, someone might recommend an account for me to follow:

Megmac: @lyzzybee_libro have a look at @thecreativepenn for a good feed for writers

This makes the message appear in my Connect list (see below) and TheCreativePenn’s Connect list, so I will see the recommendation and she will see that she’s been recommended to me. If she wants, she can then reach out to me, and say thank you to the recommender.

# is used to create clickable links that will pull information on a particular topic together in one view. It’s often used at events and conferences – so, for example, #cbsms is used by people tweeting about the Central Birmingham Social Media Surgery. When you see a hashtag (as this is called) in a tweet, it will be a clickable link. Click on the hashtag and you will see all of the recent tweets with that hashtag, giving you a view of what’s going on and who’s talking about it.

Lyzzbee_libro: Off to the social media surgery to help a few people today #cbsms

It is also used to link tweets on a wider topic, e.g. #amwriting, which writers use to talk about the writing process. You can pop a hashtag on a tweet when you want it to come up in such searches, for example I might tweet about my book on transcription and add #transcription at the end, so that anyone looking at that hashtag will see my tweet.

Your Twitterstream and mentions

Whether you’re viewing Twitter online on a computer or via a phone or a third party dashboard, you will have a twitterstream and then various other views.

Your Home will show you your twitterstream: all the most recent tweets by people / companies / whatever that you’re following.

Your Notifications list will show you anything directly concerning your own Twitter account – so messages that have been sent to you with an @[your Twitter ID] as well as people who have followed you. It’s good practice to keep an eye on this so that you can reply to any messages sent to you and say thank you for recommendations and follows. Note here that Notifications gives you information on who’s followed you and favourited your messages, and any messages that start with your name:

Twitter notifications

while Mentions will also show you when you’ve been @ mentioned by someone else:

Twitter mentions

Getting rid of spammers

Everyone gets spammed by Twitter accounts, dodgy or otherwise, that are usually either looking for random followers to boost their numbers or clicks to their undesirable links. The ones with links often only have a link in the text – this is a real red flag and you should never click on a link in a tweet, even from a friend, if there’s only a link and no text (your friend could have had their account hacked).

If you receive an odd tweet or one with just a link, click on the photo or name of the sender. You will typically see that they’ve sent the same short message or no message and link to multiple people. Click on the User Actions button on their profile and you have options to Block or Report: [Note: I’m just using this chap as an example, he’s a good guy really!]

Block on twitter

Once you’ve clicked on Block or Report you will see this screen, which allows you to tell Twitter why exactly you are blocking or reporting the person:

Block and report on Twitter

This alerts Twitter that the person is spamming, and will help to save someone not as savvy as you from clicking on a dodgy link and going who knows where in cyberspace!

If you’re just getting annoyed or bored by a Twitter account that you follow, you can click on their photo or name and press the button marked Following – this will change to Unfollow as you hover over it; click it and you’ll unfollow them and no longer see them in your Twitterstream.

Rules for using Twitter effectively

Using Twitter effectively is a matter of knowing how it works and how people view it, and being sensible and polite.

Posting multiple times

The main point about tweeting is that very few people read every single tweet on their timeline. People typically check Twitter on the way to work, at lunchtime, on the way home, and some time in the evening. Once you’re following more than about fifty people, there’s no way that you’re going to see all of their tweets – so think of people as viewing a snapshot of their Twitterstream rather than everything.

This means that it’s fine to tweet a message multiple times, where it would be seen as rude and intrustive to post a Facebook status multiple times in one day.

You also need to be aware of your markets and their time zones – if you have a lot of Australian clients, and you’re in the UK, you will need to tailor your tweets to their time zone, maybe investing in a Twitter dashboard that will allow you to pre-schedule your tweets.

Using a dashboard

It can be very useful to use a dashboard such as Tweetdeck to manage your Twitter accounts. You can view multiple accounts at a time and post as them (handy if you have, say, a personal and a work account) and view your lists in their own feeds. Some of them will also allow you to schedule your tweets to be published at a certain time or on a certain date, which can be very useful (although watch out that you still keep an eye on when these go out, as there have been numerous examples of an auto-tweet posting when it’s really not appropriate, such as after a disaster).

Sharing other people’s material

The other main rule is to be polite and reciprocate and say thank you.

If you retweet other people’s tweets, they are more likely to share your tweets with their network. To retweet, click on the word retweet underneath the tweet, or look for that ‘arrows-in-a-square’ icon which has the same effect. Some people reckon that you should share five other tweets to every one of your own that you post. I’m not that scientific, but I do try to share as much as I post.

Saying thank you and being proactive

If other people retweet or otherwise share your tweets, which you will find out about by reviewing your Connect feed, do drop them a message to say thank you.

If someone recommends your Twitter account or your services to someone else, contact the person to whom you’re being recommended with a polite “how can I help you” and a way to contact you, and say thank you to the recommender.

Not automating too much and not spamming

I’m not a big fan of the automated message when I follow someone’s Twitter account, and many other people find this annoying, too. I like to know that there’s a person behind the account. Similarly, all sales and no sharing, or all automated tweeting and no replying to @ messages will probably get people irritated.

Other useful posts

On this blog: Using Twitter to find jobs

Using LinkedIn for your business

Social media resource guide for this blog

My friend Sandy’s post on Twitter for professional development

 
9 Comments

Posted by on July 16, 2014 in Business, Skillset, Social media


Tags: , ,