Hopefully, you’ve already read about simple Find and Replace in Word in my earlier post. In this article, I’m going to show you some of the Advanced Find features to do with word forms, wildcards and where you’re actually searching. Handily enough, these are the same in Word 2007, 2010 and 2013. For hints on replacing, see the previous article, and for finding formats, look out for my next post in this series (I will link it to this post once it’s live). I’m going to start by discussing the three different options for viewing the results of a simple Find search in Word 2010 and 2013, then move on to the Advanced Find options in all three versions.
Find options in Word 2010 and Word 2013 (Navigation)
When you hit Ctrl-F to Find in Word 2010 and 2013, you are shown the Navigation side panel. This gives you three options for viewing the results of your simple search (i.e. you’ve searched for just a word or phrase, no whole word only or match case options applied).
The first tab on the left gives you the Outline view – if you have headings in your document, it will give you a run-down of those,and highlight in yellow where your search term appears. The search term “localisation” has been input into the search box at the top.

The second tab gives you a Page view, showing only the pages that the search term appears on (you will see that it’s displaying pages 5, 6 and 14 here) with the search term highlighted.

The third tab along gives you the Paragraph view, and this is the one that I find most useful, as it shows you the search term in its context. Click on the box and you’ll navigate to that place in the text. As you can see here, the word has also been highlighted in the actual text, and this is true for all of these views. This paragraph view is the most useful for seeing where you’ve used a word and deciding whether to change it.

Now we’re going to look at some of the Advanced Find options. You can get to Advanced Find by clicking on the More button in Word 2007’s Search box, or by clicking the down arrow by the search input field and choosing Advanced Find in Word 2010 or 2013. Note, in Word 2010 and 2013, you can click on Options after clicking the down arrow, but that isn’t as specialised or useful as choosing Advanced Find.
If you’re confused about how to find the Advanced Find dialogue boxes, read this post for screen shots and explanations.
Advanced Find options: Find In
The Find In option allows you to specify where exactly you want to look for your search term. This is particularly useful if you are looking for something you or someone else has said in the Comments area of the text, or indeed the footnotes. Here I have a document with a main text, Comments and footnotes. I use the dropdown arrow next to Find In to access my options:

Whichever of these options you choose, it will only search in that area, saving time and narrowing down your search to exactly what you’re looking for.
Advanced Find options: Match case
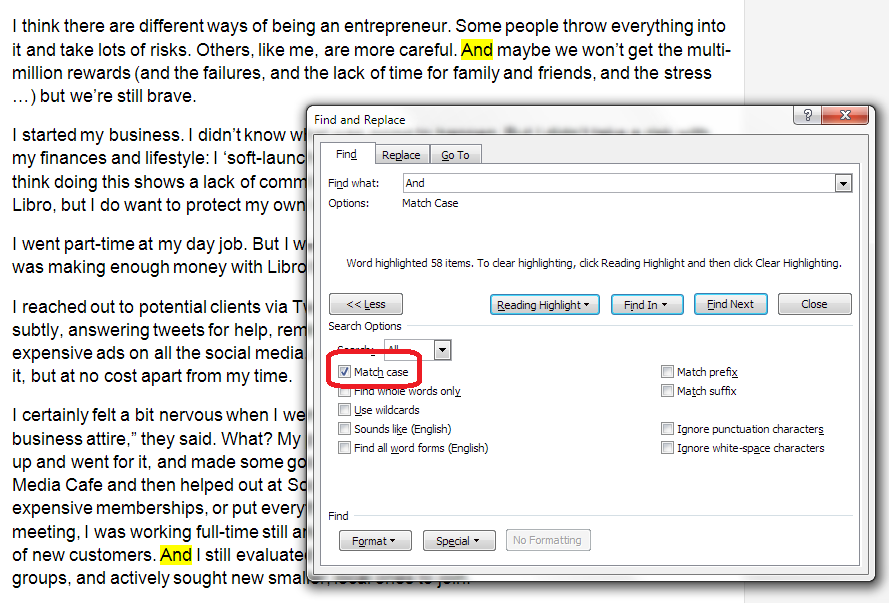
Match case is extremely useful if you are only looking for a particular form of a word. For example, I might want to catch the instances where I’ve started a sentence with “And”. If I just search for “and” with no other options set, Word will usefully highlight all instances of the word. I’ve highlighted the one that I’m looking for in green here, but you can see how hard it would be to find amidst a sea of and … and … and. Note that I typed the word in with a capital letter, but unless I tell Word to take account of that, it will ignore it, and treat And, and, aNd, ANd, Andy, understanding, etc. all the same (to get rid of those last two, see the next section).

Tick the Match case box and it’s a different story. Now it’s only looking for And with a capital A. Note how the line under the search box includes a note of the option that I’ve selected:
Advanced Find: Find whole words only
As we saw briefly above, search for “and” without ticking any additional options, and Word will find the letters “and” however they may be capitalised and wherever they will be. Here, a search for and highlights the word understanding, too.
This can be really annoying, especially if you’re searching for a word that can appear as part of other words (like under, or stand!) and you want to do a Replace All on them or just find when you’ve used that particular word, not its compound. This is what happens when you don’t choose any options:

To stop this happening, tick the box next to Find whole words only. Now Word will only find the word “and” as a discrete word:

Note: you can use these two options together. For example, search for But using Match case and Find whole word only and you will limit what you find to sentences beginning with the word “But”, instead of all the examples of but in the middle of sentences and sentences beginning with “Butterflies” or “Butter” …
Advanced Find options: Wildcards
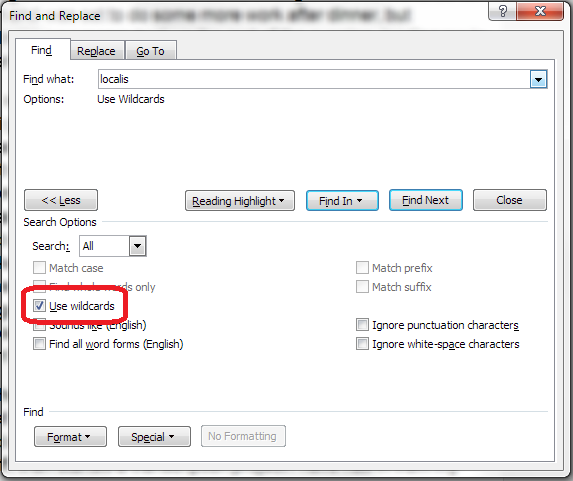
Lots of people know about the above two options, but Wildcards can seem a little alarming to the novice or even quite experienced Word user. Wildcards allow you to search very precisely for different forms or spellings of a word.
To use Wildcards in your search, tick the Wildcard option.
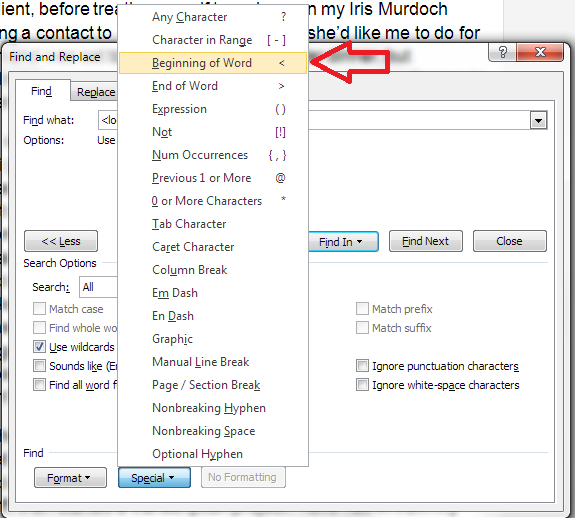
If you already know the special character to use in your Wildcard search, type your search term in the search box. If you need to check which special character to use, click on the Special dropdown on the button at the bottom of the screen. This will give you a huge range of choices for narrowing down your search:

In this case, I’m looking for words beginning with “localis”, so I choose the Beginning of Word option from the list:
Word inserts the special character in the search input box, and finds all of the words beginning with “localis”:

Now, you could just do a basic search for a bit of a word, but that’s only useful if the selection of letters you’re looking for all occur together. In the example above, we’re looking at the letters appearing at the beginning of a word, but what if you’re looking for a word and you can’t remember how you spelled it, or you fear you sometimes used an s and sometimes a z in “organisation”? Use the question mark option and search for “organi?ation” and you will find both spellings.
Note, there are many further special characters here apart from the ones used for Wildcards (which are ? – < and >) – I will be covering some of the most useful of those in future posts.
Advanced Find options: a note on Sounds like and Find all word forms
The two options at the bottom of the list can look quite tempting. But I will be honest and say that I don’t use them in my everyday work (if you do, please comment and share why you find them useful!).
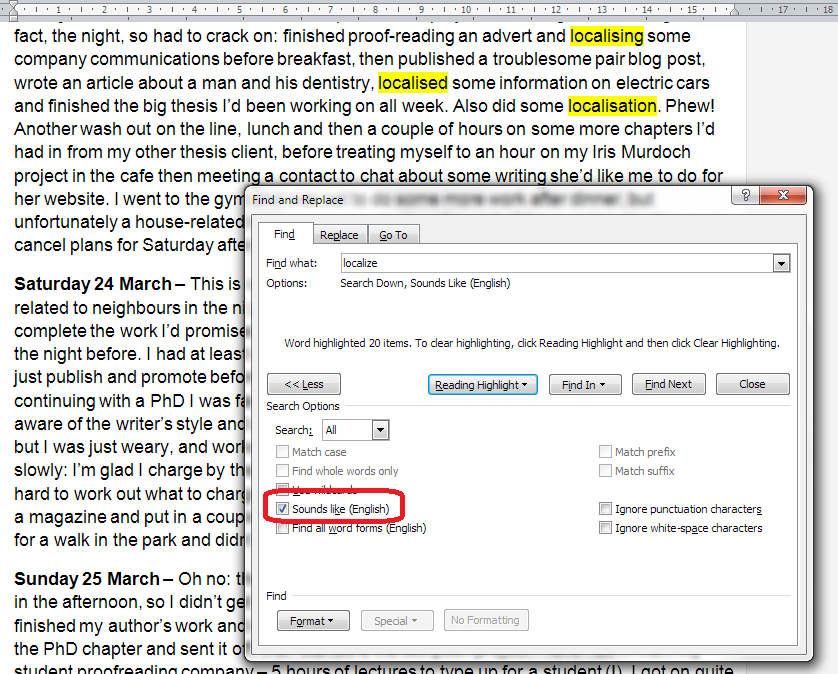
Sounds like is the more useful of the two. It only works for the English language (presumably if you’ve bought a UK or US copy of Word) and it does what it says it does, finding words that sound like the word that you have entered.
Here I’ve searched for “Localize” and it has found the words that I would be looking for. They’re not spelled the same, but they do sound the same.
However, Find all word forms does NOT find “localisation” in the same piece of text, so I’d be careful about using this one (in fact, try not to), as it will miss out words from your search:

In this article, we’ve learned how to use some of the more advanced features of the Find function in Word 2007, Word 2010 and Word 2013 in order to be able to look for the correct, specialised word in our document, including being able to choose where in the document it is and choosing fewer or more examples of words containing the letters we’re searching for.
If you’ve found this useful, please take a moment to share it, using the buttons under the article, or send me a comment, as I love hearing from my readers and knowing that I’ve helped! Thank you!
—————————
This is part of my series on how to avoid time-consuming “short cuts” and use Word in the right way to maximise your time and improve the look of your documents.
Please note, these hints work with versions of Microsoft Word currently in use – Word 2007, Word 2010 and Word 2013 all for PC. Mac compatible versions of Word should have similar options. Always save a copy of your document before manipulating it. I bear no responsibility for any pickles you might get yourself into!
Find all of the short cuts here …
Related posts on this blog:
How to use Find and Replace 1 – basic find and replace