RSS

Author Archives: Liz Dexter

Unknown's avatar

About Liz Dexter

Book blog is at http://www.librofulltime.wordpress.com Writer, proofreader, editor, transcriber. Also runner, gym-goer, volunteer and BookCrosser! My married name is Liz Dexter but my maiden name and the name on the books I write is Liz Broomfield.

How to highlight text in a Word document

If you are amending a Word document or perhaps working on a document with someone else (a colleague or an editor), it is sometimes useful to be able to highlight some of the text in order to point it out to your collaborator.

Here are three useful ways to highlight text in Word … and one TERRIBLE way that you will never think of using once you’ve read and digested this article.

How to highlight text by changing its colour

This can be useful if you want to mark text you want to change, edit, delete, expand, etc.

Make sure you’re in the Home tab and the Font section. Highlight the text you want to change and click on the Change Text Colour button:

1 change text colour

Choose the colour you want your text to be, and click on it. Hey presto:

2 change text colour result

This can be useful but there is a limited range of colours that are a) legible on a white background and b) sufficiently distinguishable from black. This can be particularly problematic for a reader with a visual impairment or colour blindness.

So you might want to think about using the next option …

How to highlight text using the “highlighter pen”

Just like in real life, you can scribble all over your document using a highlighter pen!. Again, you will find the Highlighter Pen button in the Home tab, Font section, next to the Change Text Colour button. You can use this in two ways:

1. Highlight your text first, then click on the button and choose a colour:

3 highlighter pen

The text you had highlighted will now appear in black with the background colour you selected:

4 highlighter pen effect

2. Place your cursor anywhere on the page and click the Highlighter Pen button. Your mouse pointer (which usually looks like a capital I unless you’ve changed it) will change to look like a pen. (Unfortunately this does now show up on a screen print. If anyone can find me a copyright-free image of this cursor change, please let me know!)

5 highlighter pen

Left click where you want to start and run the mouse pointer/pen along the text you want to highlight:

6 highlighter pen effect

The text will become highlighted as you run the pen along. Note, though, that if you use this option, your mouse pointer will keep on acting like a highlighter pen until you click back on the Highlighter Pen button and choose Stop Highlighting:

7 stop highlighting

This is all great if you just want to mark, say, chunks of text that you’ve changed so your editor can see what they need to recheck. But if you need to make any comments on that text, pay very close attention to the two methods coming up and make sure you choose the correct one!

How to highlight and comment on text the CORRECT WAY

If you want to comment on some text, the correct way to do it is this. Highlight the text and in the Review tab, Comments area, click on New Comment:

8 comment

A comment balloon will appear, and you can type your comment inside the balloon. If your collaborator wants to comment back, they can just add a new comment in a new balloon, and so it goes on.

9 comment effect

The joys of using this method are twofold:

1. You can skip through the comments using the Next Comment button and you’ll never miss one.

2. You can delete the comments you’ve dealt with, the highlighting will automatically disappear, and you’ll be left with a nice tidy document.

If you’re working with someone on a document and you want to draw their attention to something and make a comment, this way we’ve just seen is the way to do it.

How to highlight and comment on text the WRONG way

Please, don’t do this. If there’s a lovely, neat way to add comments to a document, which there is (see above), there is no need to write your comments within the text itself, like this:

10 don't do this

If you receive a document marked up like this, for each instance of a comment from your collaborator, you’re going to need to change the colour back to normal, delete the comment, or maybe add one of your own. No skipping lightly from comment to comment, but a grim stare at the document to spot the issues.

You can learn more about using Track Changes and Comments in other posts on this blog. Please don’t be tempted to try this method at home!

So, in this article we have learned how to highlight text in three good and one bad way. I hope you’ve found this useful.

If you have found this article useful, please share it using the buttons below, and leave me a comment!

This is part of my series on how to avoid time-consuming “short cuts” and use Word in the right way to maximise your time and improve the look of your documents.

Please note, these hints work with versions of Microsoft Word currently in use – Word 2003, Word 2007 and Word 2010, all for PC. Mac compatible versions of Word should have similar options. Always save a copy of your document before manipulating it. I bear no responsibility for any pickles you might get yourself into!

Find all the short cuts here

 
5 Comments

Posted by on January 23, 2013 in Errors, New skills, Short cuts, Word, Writing


Tags: , , , , , , , ,

Zeros or zeroes?

DictionariesI have to admit that I had never given this one any consideration until it came up in something I was working on yesterday, and I had to look it up to check. So: zeros or zero?

Zeros is a plural noun, and oddly enough it’s the plural of zero. No e when you have lots of zeros.

Zeroes is a form of the verb to zero (in), meaning either to set a measuring device back to zero (I have never heard or read this myself, but M confirms that he uses it with measurement devices in his scientific job!), or to home in on something: “She zeroed in on the fact that he had hidden the muddy boots in the shed”.

So the noun has no e – “there are too many zeros in this post” and the verb does have an e – “my reader zeroes in on the fact that I had to look it up and contacts me to ask me why I don’t know everything off the top of my head”.

You can find more troublesome pairs here and the index to them all so far is here.

 
9 Comments

Posted by on January 11, 2013 in Errors, Language use, Troublesome pairs, Writing


Tags: , , ,

Freezing rows and columns in Excel

It was time to create a new Gantt chart for myself to keep my various projects under control, and yet again I had forgotten how to freeze the columns and rows in the way I like. So I created this post to help myself – and you!

What is “freezing” rows and columns?

When you freeze a row or column in an Excel spreadsheet, you make sure that it’s on display however much you scroll down or across your document.

So, if you have a row of dates as a heading along the top or a column of customer names down the side, and your document becomes longer or wider than the screen on which you are viewing it, you can keep those columns and rows visible, instead of having to scroll up and down and backwards and forwards to find your headings.

For example, in the Gantt chart that records my work projects, I need to be able to see the dates and client names all the time, however large my document becomes:

Excel document

Where is the Freeze Panes button in Excel 2007 and Excel 2010?

To find the Freeze Panes button, you need to be in the View Tab, then the long Window area. Click on Freeze Panes and you’ll be given three options: Freeze Panes (note, this toggles between Freeze and Unfreeze, as we’ll discover later); Freeze Top Row; and Freeze First Column.

2 freeze top or side

How do I freeze the top row or first column of my spreadsheet?

In a shock move, something that Microsoft Office gives you as a short cut is actually useful! If you click on that Freeze Panes button and select Freeze Top Row or Freeze First Column, it will automatically freeze that row or column for you. This is because the first row and column on a given spreadsheet are likely to be the ones where you’ve inserted your headers.

Click on one of these buttons and you’ll freeze just that row or column. Freeze the top row, scroll down thousands of rows, and that top row will still be on show. Hooray!

BUT: this will only freeze one of those two areas. Want to freeze the spreadsheet so it shows more than just the first row or column? Read the next three sections.

BUT (2): this will only allow you to freeze the row or the column. If you, like me, want to freeze both a row and a column, scan down to the section titled Can I freeze a row and a column at the same time?

How do I freeze a particular row of my spreadsheet?

Say, for example, you’ve got a double row of headers, or you’ve inserted a graph at the top of your spreadsheet that you want to be able to see as you scroll down. This is where you need to be able to select the point at which the spreadsheet freezes.

Here’s where it gets a tiny bit tricky (but you’ll save this post so you remember).

Click on the row BELOW the point at which you want to freeze the spreadsheet. Not the row you want to freeze, the one below it. In this example, we’re highlighting Row 3 in order to freeze Rows 1 and 2.

Once you’ve highlighted the correct row, by clicking on the 3 in the left hand margin in this case (you can see that it’s become darker, with a line around it), click on the Freeze Panes button and select the Freeze Panes option.

3 freeze any row

Your spreadsheet is now frozen at the bottom of Row 2. If you scroll down the page, you will notice that Rows 3 and onwards start to disappear, and a horizontal black line appears at the point of freezing.

Now you can scroll down as far as you like, and Rows 1 and 2 will always be visible at the top of the screen:

Effect of freezing any row

How do I unfreeze a row or column?

Once you go to do something else with freezing, you will notice that the Freeze Panes option has changed to read Unfreeze Panes. This is because you can only do one Freezing action at a time. If you decide that you want to freeze a column instead, or want to practise doing that, you need to click the Freeze Panes button then select the Unfreeze Panes option first.

Note: you don’t need to have anything highlighted to click this. It will unfreeze anything you’ve previously frozen.

4 unfreeze panes

Oh, and you can freeze a column and row at the same time, as we’ll learn in a few moments.

How do I freeze a particular column of my spreadsheet?

If you want to freeze a particular column of your spreadsheet, you do it in the same way as you froze the particular row.

But in this case, you need to highlight the column one to the RIGHT of the column you wish to freeze. In the example below, we want to freeze at Column B, so we highlight Column C (by clicking on the C at the top of the column). Again, click the Freeze Panes button then select the Freeze Panes option.

5 freeze any rows

Now, if you scroll across the document, Columns A and B will remain visible, and a thick black line will mark where the freezing has taken place:

5 freeze any rows effect

Can I freeze a row AND a column at the same time?

Sometimes you might want to freeze both the top row and the first column of your spreadsheet. For example, I want to be able to see my list of clients, however many dates come across the page, and my dates in the top row, however long my list of clients becomes.

We’ve already learnt how to freeze just the top row or just the first column (see above), but as you might have realised,  you can’t do both – if you go back to the menu to do the second one, it just tells you to Unfreeze the panes first.

Here’s  how you do it:

Highlight the cell ONE DOWN and ONE TO THE RIGHT of the row and column you want to freeze. It’s just like freezing rows or columns. In this case, think of the cell nestling in the angle formed where the row and column you want to freeze meet. Here, we want to freeze Row 1 and Column A so that they are always visible. So we highlight the point at which Row 2 meets Column B.

6 freeze row and columnt

Using the same procedure to freeze the panes (Freeze Panes button, Freeze Panes option), we have now frozen Row 1 and Column A. If we scroll both down and across, Row 1 with the dates and Column A with the client names are still visible.

6 freeze row and column effect

Yes, Column A will scroll and the top will slide up and disappear temporarily, and yes, the dates in Row 1 will disappear as we scroll across, but the basic principle holds good:  we can see Row 1 and Column A, however much we move around the spreadsheet.

We’ve learned how to freeze rows, columns and rows plus columns today. I hope you’ve found this useful.

If you have found this article useful, please share it using the buttons below, and leave me a comment!

Related posts: How to print out the header row on every page

This is part of my series on how to avoid time-consuming “short cuts” and use Microsoft Office in the right way to maximise your time and improve the look of your documents.

Please note, these hints work with versions of Microsoft Excel currently in use – Excel 2003, Excel 2007 and Excel 2010, all for PC. Mac compatible versions of Word should have similar options. Always save a copy of your document before manipulating it. I bear no responsibility for any pickles you might get yourself into!

Find all the short cuts here

 
16 Comments

Posted by on January 9, 2013 in Errors, Excel, New skills, Short cuts, Writing


Tags: , , , , , , ,

Table of figures and table of tables

Are you stuck trying to create additional contents pages for the tables and figures in your document? Read on for simple instructions on how to do this.

We’ve already learned how to apply headings styles and create an automatic table of contents. But what if you’ve got figures and/or tables and you want to show those in the contents pages, too? It can be a bit fiddly, and I’ve partly written this post to give myself a reference document, too.

In this article, we are going to learn the correct and easy way to do this without heartache and hideousness. I’ll devote another article to dealing with something that’s gone wrong …

Why do I need a table of figures?

It’s often useful to provide a list of the figures and tables in your document, especially if it’s a long one, like a dissertation or thesis. They should be separate from the main table of contents, and listed below.

The tricky thing is creating two lists, one of tables and one of figures. This is where people usually come unstuck. Follow these instructions and you should be OK!

How do I create a list of figures and a list of tables?

We’re going to take a few basic steps here. They boil down to:

  • Mark all your figures as Figures and all your tables as Tables
  • Create a Table of Figures
  • Create a Table of Tables

Once you’ve done that, you’ll end up with something like this:

TOF 17

How to apply captions to tables and figures

I know what you’ve done … you’ve inserted your figure or table then typed its caption underneath, haven’t you? Like everyone else in the world. But let’s make life easier for you.

It doesn’t matter if you’ve already typed in all the caption names just as straight text – let’s do this the proper way and we can move those typed captions into the correct place as we go!

TOF 1

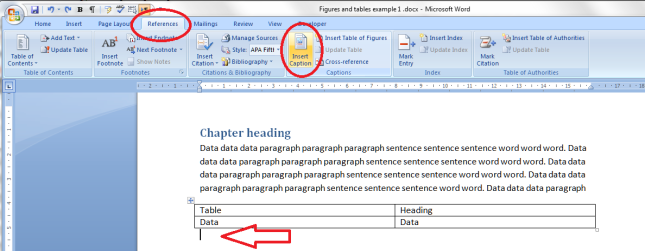
Click on the References tab. Find the Captions section. Put your cursor where you want the caption to go (arrow), Click on the Insert Caption button.

Let’s start off with a table caption. Remember, we want to mark a difference between tables and figures so that Word can create automatic lists.

Don’t worry if you’ve already got caption text in there at the moment: do this on a new line. We can tidy things up afterwards. You might want to copy your caption text so it’s available to paste.

TOF 2
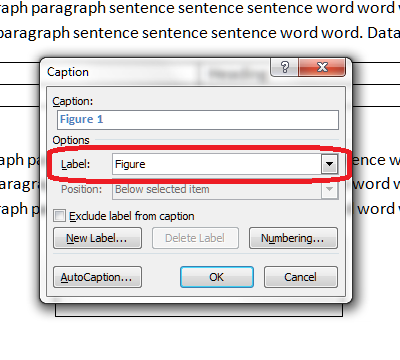
You can see a drop down list which says Figure at the moment. But we want to differentiate between figures and tables, so click on the arrow on the right to drop down the list.

TOF 3
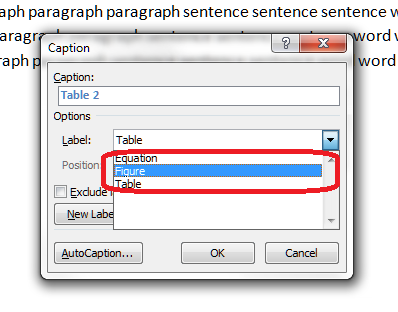
… and choose Table. Once you’ve clicked, the Caption section above it will also change to read Table 1.

Now you can type the caption text straight into this box.

TOF 4

If you’ve copied the caption text you had previously entered, you can use Control-V to paste it into this box. Note: right-click and paste won’t work here, but Control-V will work.

If you haven’t copied the caption text, and you haven’t typed it in the box, don’t worry, as you will have another opportunity to insert it in a moment. Press the OK button and Table 1 and any text you’ve entered will appear below your table.

TOF 5

Now we’re going to add a figure caption.

Put your cursor below the figure and click on the same Insert Caption button. This time, choose Figure rather than Table:

TOF 6This time, just leave the Caption box blank apart from the words Figure 1.

TOF 7
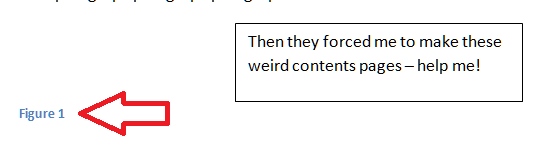
Now you can type the caption text in here, or even paste it in – just make sure it goes blue like the words Figure 1 (we can change that later) to ensure it’s all included as part of the caption.

Now you can go through and mark all of your figure and table captions using this method.

Modifying and formatting caption numbering etc.

You can modify your captions, especially their numbering. When you’re adding a caption, click the Numbering button.

TOF 8You will now get options for changing the numbering from 1, 2, 3 to a, b, c, etc.

TOF 9

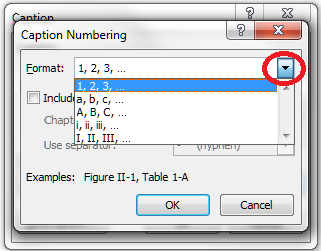
Use the drop down arrow to pick what you want.

You can also link the numbering to your chapter numbering – so you have Figures 1-1, 1-2, 2-1, 2-2 etc. (this is particularly useful in a long and complex document where you’re referring to lots of figures, as it saves the numbering going odd if you move figures around). To do this, click the “Include chapter number” tick box then specify what you count as a chapter number (you will need to have numbered headings to make this work):

TOF 10

Creating a table of figures and a table of tables

Once you’ve labelled all of your captions correctly as I’ve shown you, you can create your table of figures and table of tables.

Let’s do the table of figures first (it doesn’t matter which order you do this in).

Create a blank page where you want your table of figures to go, or click just below your Table of Contents if you’ve already created that.

Staying on the Reference tab, click on Insert Table of Figures:

TOF 11

You will now get some options, and this is where we choose whether we want the figures or tables to be listed. We’re adding the figures first:

TOF 12

Note, Table will be the default option. Choose Figure by dropping down the menu using the arrow on the right. Table will be highlighted in blue so click on Figure. As if by magic …
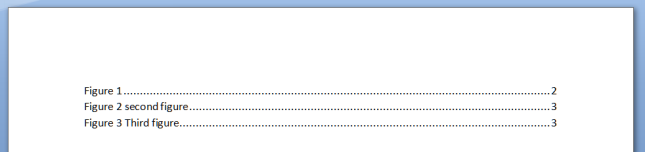
TOF 13

A table of figures!

Now return down a couple of spaces in your document and do the same to insert a Table of Tables:

TOF 14

Make sure it’s on Table and click OK. Hey presto …

TOF 15

Customising your table of figures

You can customise your table of figures in the same way that you can customise a Table of Contents, choosing from a range of styles and specifying how they are laid out:

TOF 16

I’m going to write an article about this soon, so for now just note that you can choose different “looks” for the list, and you will get a preview in the pane above these drop-down menu sections.

Adding headings to the table of figures and table of tables

You will probably want to add headings to your tables. Remember to mark these as Heading 1 so they appear in your automated Table of Contents, which I’ve also added here:

TOF 17

Updating your table of figures and table of tables

If you change anything in the page numbering, document layout or captions themselves (particularly useful if you or your proofreader finds an error) or delete or insert tables and figures, you will need to update your table of figures / tables.

You do this in exactly the same way as updating a table of contents. Right-click on the table, making sure the grey highlighting shows up. Then select Update Field and then Update Entire Table.

TOF 18And that’s it.

We’ve created captions the correct way, and created tables of figures and tables of tables, done some customisation and learned how to update them.

If you have found this article useful, please share it using the buttons below, and leave me a comment!

This is part of my series on how to avoid time-consuming “short cuts” and use Word in the right way to maximise your time and improve the look of your documents.

Please note, these hints work with versions of Microsoft Word currently in use – Word 2003, Word 2007, Word 2010, Word 2013 and Word 2016 all for PC. Mac compatible versions of Word should have similar options. Always save a copy of your document before manipulating it. I bear no responsibility for any pickles you might get yourself into!

Find all the short cuts here

Related articles on this blog

How do you create a two-line figure caption and a one-line entry in the table of figures?

How to create a Table of Contents

How to update your Table of Contents, Table of Tables or Table of Figures

Editing and the Table of Contents


193 Comments

Posted by on December 27, 2012 in Errors, New skills, Short cuts, Word, Writing


Tags: , , , , , , , ,

Slay or sleigh?

DictionariesSomeone told me that they had actually seen this one on a festive poster last week, so welcome to the Christmas 2012 Troublesome Pair!

To slay is to kill in a violent manner. You can also use it in a metaphorical way: “I’m going to slay that demon and face up to the supermarket on Christmas Eve”.

Slay (as a noun) is also an alternative spelling for sley, which is a tool which is used in weaving, to push the weft into place. No, I didn’t know that either, and I’m guessing that the author of the unfortunate poster wasn’t talking about Santa and his weaving activities.

A sleigh is a sledge drawn by reindeer or horses. A sledge is a vehicle set on runners which is used to travel over snow and ice, propelled by gravity downhill or pushed or pulled. Oh, and a sled is a North American term for sledge. Don’t say I don’t give you added value!

Season’s Greetings and I hope you enjoy 2013’s Troublesome Pairs and Trios!

You can find more troublesome pairs here and the index to them all so far is here.

 
4 Comments

Posted by on December 24, 2012 in Errors, Language use, Troublesome pairs, Writing


Tags: , , ,

Silicon or silicone?

I have to admit that I hadn’t fully grasped the differences between these two. So I’m guessing lots of other people hadn’t done either. And the dictionary is quite opaque on this, talking about chemical compounds rather than the essential, understandable differences, although my trusty “New Oxford Style Manual” does better.

Silicon is a naturally occurring element (symbol Si) which is hard and durable and used in the silicon chips inside computers.

Silicone is a synthetic compound of silicon, and this is the one that’s used in breast implants and cooking utensils: it can be a liquid or gel as well as a solid.

So, actually two that it’s a good idea NOT to get mixed up!

You can find more troublesome pairs here and the index to them all so far is here.


Tags: , , ,

Tips for coping with writing up a PhD

mugsI have worked with many PhD students and have several friends who are in the middle of the process at the moment, or about to start off (exciting!) so here are some top tips for how to cope with the dreaded end stage: writing up, gleaned from my experience over the years.

Think of this like a chat over a cup of tea. I’m here to help, to reassure you that everyone goes through the same stuff – and that you WILL get through it.

Yes, it’s difficult, so don’t beat yourself up

Not everyone gets to do a PhD. It’s an achievement to get onto the course, it’s an achievement to gather all your data, do all your literature review stuff, grapple with statistics … and then start to write it all up.

Hopefully, nobody said it would be easy. Because it’s not. But if it was easy, everyone would be doing it! A big achievement like a doctorate isn’t worth it if there isn’t a struggle. No one’s goes smoothly, even if they say it is. I have worked with lots and lots of PhD candidates. Even the most organised and seemingly perfect person has underlying panics, lost texts, confusions, chapter sections that just won’t go right …

If you accept that it’s difficult, that it’s going to be a struggle, that it’s a major achievement you’re aiming at, you can get your head down and bite away at chunks of it until it’s done.

Everyone goes through the same stuff

I thought this one was obvious, then I realised that not many people are privileged to work with and know so many people starting off on their research career. Almost every time I tell a student that what they’re going through is what everyone else goes through, they’re incredibly relieved.

  • It’s not just you
  • Everyone gets through it
  • There is normal life at the end

It’s a bit like when I’m doing the Birmingham Half-Marathon, which I do every year. At a certain point, around Mile 10 (of 13), you start to look around and see the pain, slight sicky feeling and effort etched on everyone’s faces. But then you see the finishers walking back down the route with their medals and silver foil cloak things and you know that the end is in sight!

You will experience this

From my experience with PhD students, I can pretty well guarantee you will experience one or more of these phenomena:

  • You will get quite a lot fatter or quite a lot thinner
  • You will get paler and a bit bug-eyed. This is because
  • You will go outside less and less
  • A frown will start to etch itself on your forehead (this will go)
  • Your hair will get really long (boy or girl. Haircuts? No time! I could write a paragraph in that time!)
  • You will eat odd things
  • At odd times
  • You will get no sleep and wake up tired
  • Whenever you get a slight break (you’ve handed in a chapter!) you will sit down and fall asleep
  • You will make excuses not to see friends
  • You will see friends and end up in a frenzy of self-flagellation about not being at your desk
  • You will wake up with heavy eyes and a feeling of dread
  • Everything about the entire document will be wrong
  • You will sit down and be unable to write anything
  • You will feel like your supervisor either hates you or pities you so much – either way, they’re sending you coded messages not to continue via the comments they make (they’re not)
  • You will feel that your supervisor doesn’t care / understand (they do: they’ve seen it all before so they’re not panicking because they know you can get through it)

I can guarantee you that everyone in the whole world of research experiences many if not all of these phenomena. You are not alone!

What can you do?

This is going to sound boring, but when I tell people to do this, and they listen and do it, it does, honestly, make it better.

  • Eat as healthily as you can. Accept that offer of a casserole or a vat of soup from your housemate or friend. Take an evening to make up batches of good sauces that you can freeze and re-heat. Keep healthy snacks around.
  • Take breaks. No one can work for more than about an hour solidly without needing to refocus their eyes, get up, stretch, and think about something else for a few minutes. This will NOT eat into your writing-up time: it will make it more productive. Every hour, stand up, stretch, look out of the window.
  • Get outside – at least once a day, in the daylight. Even if you just go into the garden and jump around a bit – but preferably get off the premises and go for a walk around the block. Again, this will NOT eat into your writing-up time: it will make you more productive.
  • Take some exercise. If you are a runner or a gym bunny, keep it up, even if you have to do shorter sessions than normal. This is not the time to take up a new sport or activity, but even a good, brisk walk is great. You need to keep your body active as well as your mind. This will help you sleep better, too.
  • Give yourself a treat. Once you’ve finished a chapter or achieved something specific, have a chocolate bar, a read in the bath, an evening off. Simple things can mean a lot at this time and really help.
  • Don’t just start at one corner and work your way round. Oh, hang on: that’s ironing a shirt. Anyway, have a plan for how to write up, don’t just start at the beginning and try to write it straight through. Set up the headings and fill bits in as you go, sure, but have those headings and structures in place so you can do that (see my post on top tips for dissertations and theses for more on this).

These seem both dull and obvious, but they are obvious because they work. They work in all sorts of contexts, actually: they’re quite similar to my Home Working Rules, for example. But when you’re concentrating on a big project, you do need to be reminded of these!

No one is superhuman, no one can just sit down and write the thing, and the more you look after yourself, the more you will get done.

Get help

It’s not weak to ask for help. If you need help, ask. People will be happy to help you, and for some of this stuff, you can help yourself, too.

  • Your supervisor – if you’re really struggling or panicking, talk to your supervisor. They might act like they’ve seen it all before, but then they have. But they do care about you: they have a professional duty to you, if nothing else, and they can’t help you if you don’t tell them you’re struggling!
  • University resources – the chaplaincy, departmental support services, University support services, services for foreign students, drop in sessions at the Library – use them.
  • Proofreaders and other professionals – if you’re struggling with your writing, whether you are using assistive technology (e.g. dictating rather than typing), have issues with dyslexia, or are writing in a language that’s not your native language, there are people who can help you. If the issue is to do with your need for technology or extra support, you may be able to talk to your department about defraying part of the cost. Note: research this carefully, try to make sure you’re talking to the real person who’ll be working on your document, and get references and examples. People like me won’t look down on you: even if English is your native language, you’re fluent and have no issues it’s easy to make mistakes when you’re mashing sentences together and mixing things around. We’re here to help.

In addition, it’s worth setting up the following at the beginning of the writing up process and during the first stages.

  • Know how to use Word – I can’t say this enough – if you don’t know how to do these things as a minimum, find out before you start writing up. You do not want to be in a big pickle about this at the end of the process when you’re rushing to hand it in. I talk about lots of these in my handy Word tips blog posts and there are lots of other resources around, too.
    • Setting up headings levels
    • Automated contents pages
    • Tabs and margins
    • Page breaks and section breaks
    • Placing images in text (if you have images or figures)
    • Tables
    • Spell checking
    • Track changes (if you are going to get the document proofread)
  • Get used to saving your work regularly
    • Press that Save button all the time. Better to save too much than lose it
    • Make multiple back-ups – on a pen drive or whatever. Save the most up to date copy each time
    • Version control – if you want to keep previous drafts, number your versions so you know which is the most up to date, which has been checked by your proofreader, etc.
  • Sort out your referencing. I have a post on this for you to read. Whatever you do:
    • Keep a note of what you refer to
    • Use a notebook, Excel, Word, a specific referencing system – but keep it all in the same place
    • Record ALL the information – book publisher details; journal page numbers
    • If you’re unsure of how to reference something, do a Google search and find out how others have done it (this particularly applies when you can’t tell which is the first name and surname of an author – easily done!)
    • Find out what referencing system your department uses and learn about it now, not right at the end. You should be given information on this at the beginning of your course. If not, talk to your library rep or supervisor
  • Make a style sheet for yourself. Stick it all down on a note pad or Word document. This seems like a fussy thing to do now, but it will make everything consistent and save you having to decide each time. If you don’t use a proofreader, this will make your examiners exclaim over your tidiness and organisation. If you do use a proofreader, it will save them (and you) time.
    • Decide what kind of spellings you’re going to use (ise / ize).
    • Decide how you’re going to number figures and tables (1, 2, 3 throughout, or 1.1, 1.2, 2.1, 2.2 per chapter – I recommend the latter)
    • Decide how you’re going to number headings if you decide to do that
    • Decide how you are going to refer to common words and phrases – initials with a key at the beginning?
    • Decide what you’re going to capitalise
    • Decide if you’re going to use footnotes or in-text citations
    • Decide how you’re going to format longer quotations and make a note (e.g. 2 cm left and right margins, italics)

You can do it

If you’re at writing up stage, you will get there. I admire you, and so do lots of people. Remember …

  • It’s not easy but no one finds it easy
  • Everyone goes through the same stuff
  • Get outside
  • Seek help when you need it

Good luck!

If you’ve found this post useful, please share it using the buttons below, and/or make a comment – I love to get feedback about my posts. Also, if there’s something I haven’t covered here or a top tip for this stage, do add a comment. Thank you!

You might find these useful: Top tips for students and Word users

 
7 Comments

Posted by on December 19, 2012 in New skills, Organisation, Students, Word, Writing


Tags: ,

Pair, pear or pare?

It’s homonym time in Libro Towers, with this classic easily confused trio …

A pair is a set of two things which are joined together or otherwise considered as a unit – including people or animals which are considered together – a pair of naughty boys; a pair of horses used to pull a carriage; a pair of wires twisted together to conduct your home phone signal.

A pear is an edible fruit or the tree that bears that fruit.

To pare (notice that this one’s a verb where the others are nouns) is to trim something by cutting the outer edges off, so you might pare an apple to take the skin off – it also has a more metaphorical meaning around reducing or diminishing something in stages rather than all at once, like taking the outer then inner layers off a piece of fruit, so you might pare down staffing levels gradually rather than sacking everyone at once.

So, if you had two pieces of fruit and you wanted to remove the skin from them, you might pare a pair of pears!

You can find more troublesome pairs here and the index to them all so far is here.

 
1 Comment

Posted by on December 14, 2012 in Errors, Language use, Troublesome pairs, Writing


Tags: , , ,

On tax

tax paidI paid my tax bill yesterday, as you can see from the accompanying picture. I have been thinking about this subject recently, as there has been a furore over Starbucks, Amazon, etc., as well as various celebrities and people who are (in my opinion) rich enough already, using loopholes and legal means to squirrel away as much money for themselves as they can, ignoring what taxes are for, what they pay for, and the benefit they bring to the society among which and from which they make their money.

I’m not going to get overly political here. No, I’m not a fan of the present government, and on how they are distributing public funds, but the fact that there are any public funds to distribute in the first place is down in large part to people who do pay their tax.

I’m actually quite annoyed (especially in the year where I must pay double tax because of the payment on account system) that other companies operating in the UK are behaving like this, and giving businesses a bad name, too.

I have been checking on a few companies that I use recently to make sure I am making the most ethical choices I can (hooray for Eat. and Lush!). And it struck me that I should make some sort of statement on my own position regarding tax.

Statement on Libro and tax

I confirm that Libro is a British entity fully subjected to UK taxes. I have no cross-border arrangements that transfer profits to lower tax countries.

I pay a fair amount of tax and I claim back what I consider to be fair (expenses like reference books, memberships of organisations and a small amount towards the heating and lighting of the part of the house occupied by my office).

I do not engage in any tax avoidance (that’s the legal one: it’s tax evasion that’s the “bad” one) practices, even were they to be officially legal. I do not claim for anything I do not have, and all payments, including cash payments and tips, are put through my books, recorded and entered into the calculations that work out my tax burden.

I operate in what I consider to be an ethical and fair way, and this extends to my relationship with HMRC.

Other posts about Libro and tax

I’m obviously quite interested in tax, as I’ve published these other two posts on the topic:

Why I do my tax return in April

Income tax payment on account


Thanks for reading – do share if you find this useful or interesting (there are many buttons just below) or tell me whether you’ve posted up a statement on your tax position if you’re a small or medium sized business.

 
Leave a comment

Posted by on December 12, 2012 in Business


Tags:

Season’s Greetings 2012

165 L 3 day trip 2.78 Tozeur oasis

Season’s Greetings and Happy Holidays to all of Libro’s friends and clients. Thank you for a great first year of Libro full time, and here’s to a happy and healthy 2013 for all of us!

I thought we could do with a cheery pic, and there are many dates in the shops at the moment, after all …

 
5 Comments

Posted by on December 9, 2012 in Celebration