RSS

Category Archives: Short cuts

How do I highlight the text related to my comment balloon in Word 2013 and 2016?

I have already published a range of posts on issues with comment boxes or comment balloons, including ones on comment boxes suddenly going tiny, or comment box text running in the wrong direction, changing the language in your comment balloons. This article covers how to highlight the text that a comment balloon relates to.

Why can’t I see which bit of text this comment balloon is about?

As a default in Word 2013 and Word 2016, you can see your text and you can see your comments, but you can’t see which bit of text the comment refers to. Why? I have no idea. Microsoft tends to try to make things look simpler, but personally, I don’t find it helpful. It looks like this …

1-default

… and what we want to see is this:

3-result

How do I highlight the text that’s being commented on?

You can change the settings to do this by going to the Review Tab and the Track Changes area. You will see a box marked Simple Markup. Click on the down arrow to the left to access the dropdown menu:

2-comments

Select All Markup.

Now the text that the comment is about will be highlighted when you’re looking at the document:

3-result

Don’t forget …

This only applies to your individual view of the document on your particular computer / screen. If your editor, client or co-writer wants to change this view, they’ll have to change it themselves. Send them here to see how it’s done!

If you have found this article helpful, please add a comment and/or share it using the buttons below. Thank you!

Other related posts on this blog

What to do if your comment boxes go tiny in Word

What to do if your comment boxes start running from right to left

Changing the language in your comment balloons

Customising your comment boxes – everything you need to know

Customising Track Changes

 
1 Comment

Posted by on September 28, 2016 in proofreading, Short cuts, Word, Writing


Tags: , , ,

How do I change a column into a row or a row into a column in Excel 2007, 2010 and 2013?

In this article, I’m going to explain how to change a column into a row or change a row into a column in Excel 2007, 2010 and 2013 (I think this works in 2016 too but have not yet tested it).

Why would I want to swap a column for a row?

You might start off creating a header row then decide it should be a column, or create a spreadsheet then want to rotate it 90 degrees. Or, worse, someone might decide that for you and expect you know how to do it!

How to change a column into a row or rotate a block of cells

Here’s our original block of cells:

Swap excel rows for columns

We want to turn this around so that everything runs along the top rather than down the side. Here’s how to do it:

First, copy all the cells you want to move:

Highlight the cells, right-click with the mouse, and select Copy:

copying cells in excel

Now, and this is important, find a free, empty cell to paste into. Don’t worry about it being in the middle of the spreadsheet, we will tidy that later.

Right-click with your mouse in an empty cell and then choose Paste Special and Transpose (a hint will appear when you hover over the button, but it’s the one on the bottom right)

How do I swap columns and rows in Excel

Behind all those dialogue boxes, Excel will show you what this is going to look like.

Click on Transpose and your cells will appear, starting from the empty cell you clicked on:

swapped columns and rows

Your original cells are still there – so highlight their columns, right-click with the mouse and choose Delete:

Flipped cells in Excel

And here’s your spreadsheet, the opposite way around from how you started!

5 finished

In this article, we’ve learned how to change rows into columns and change columns into rows in Excel 2007, 2010, 2013 and probably 2016.

If you’ve found this article helpful, please do post a comment below, and if you think others would find it useful, please share it using the sharing buttons below the article. Thank you!

Other useful posts on Excel on this blog:

How to view two workbooks side by side in Excel 2007 and 2010

How to view two pages of a workbook at the same time

How do I print the column headings on every sheet in Excel?

How to print the column and row numbers/ letters and gridlines

Freezing rows and columns in Excel – and freezing both at the same time

How to flip a column in Excel – turn it upside down but keep the exact same order!

 
4 Comments

Posted by on June 8, 2016 in Excel, Short cuts


Tags: , ,

What do I do when Word just won’t work (Word 2005, 2007, 2010, 2013 and 2016 edition)

Word 2010 Word 2016 Word 2013

Sometimes, Word gets itself into a pickle

People often contact me, either using the comments on blog posts or privately via email or my contact form, when they’re at the end of their tether with Word. Word has stopped working, Word won’t do what they want it to, the formatting in their document has gone weird, putting something in italics makes the overwrite button engage, the paragraph spacing just will not work, paragraphs keep going into bold BY THEMSELVES …

All of these things have happened to me or my correspondents.

Why does Word go wrong?

I’m not entirely sure why Word goes wrong. I think it sometimes just gets itself into a pickle; there are too many things, too many commands and codes, too much text … or the originating text comes from an unofficial or unregistered copy of Word, or has been converted from another program. Sometimes if something’s saved as and saved as, or worked over too much, like overworked pastry, it just. goes. wrong.

What do you do when Word goes wrong?

Well, I have three methods, which are not nice, and are certainly not fun, but do work most of the time. And as the latest person to contact me didn’t know about these, I’m going to share them with you now.

Before you do any of these, save your document and then make a copy to do all this with, just in case.

Method for sorting out major Word problems 1

  • Turn it off and turn it on again.

I know. But if Word gets into a pickle, sometimes SAVING, closing Word and reopening it can work.

Method for sorting out major Word problems 2

  • Copy the text – all of it.
  • Open a brand new Word document
  • Paste the text into it

This works in about 70% of cases.

Method for sorting out major Word problems 3

This one involves stripping out all the formatting. All your italics and your lovely bibliography. All your headings and styles. But sometimes it has to be done.

Note: There is a Clear formatting button in Word (in the Home tab, a little picture of an eraser rubbing out an ABC). But you don’t know that there isn’t something weird just outside where you’ve put the cursor. So I advise using this method.

  • Copy the text – all of it
  • Open a text editor
    • If you’re on a PC running any form of Windows, you will have Notepad as standard.
      • In Windows 7 do Start > All Programs > Notepad
      • In Windows 8 hit the Windows button > R > type in “Notepad”
      • In Windows 10 go to the magnifying glass in the bottom task bar and type in “Notepad”
  • Paste the text into the text editor
  • Open a new Word document
  • Copy and paste the text in the text editor into Word

It can literally not bring ANY formatting codes or bits and bobs through from your original document. But you will have to put all the formatting in again, from scratch.

I hope you’re found this useful. I know it might read like a bit of a blunt instrument, but if you have a Word document that is not behaving itself and you need to make Word work for you, sometimes this is the only way to do it!

If you have found this useful, do please comment and / or share using the options below. Thank you!


10 Comments

Posted by on June 2, 2016 in Short cuts, Word


Tags: , , ,

How do I flip a column in Excel 2007, 2010 and 2013?

In this article, I’m going to explain how to flip a column in Excel 2007, 2010 or 2013 (using screen shots from Excel 2013). Flip a column is what I searched for – you might have asked how to reverse a column or put a column in reverse order.

Note: I was a bit surprised by the solution to this one, but I’ve asked the experts and it is the only way to do this. If you have a better and simpler way (that doesn’t involve macros or coding) please pop a comment on this article or contact me!

Why would I want to put a column in reverse order?

I’m doing my accounts at the moment. I have a spreadsheet of my bank transactions which runs from the newest at the top to the oldest at the bottom. My list of invoices runs from the oldest at the top to the newest at the bottom. If I want to compare them, I want them to both be the same way around, but I need the bank transactions to be in exactly the same order, just the other way around.

Will using Data > Sort flip my column?

The usual way to change the order of columns in Excel is to use the Data > Sort function. However, if you sort by transaction date, it won’t necessarily sort it into the same order the other way around.

For example, we have a set of bank transactions which I’ve named in alphabetical order down the client column to make it easier to see what happens next:

1 spreadsheet

If I highlight all of the columns, go to the Data tab and choose to sort by date, older to newer, I get this result, which is NOT in exact reverse order:

1a spreadsheet sorted by date

So, what’s the solution? I was a bit surprised when I searched and searched for the answer, but it is the only way to do it …

So, how do I flip my columns so they’re in exact reverse order?

To do this, we need to create an extra column to sort by, and then reverse sort by that rather than date or any other column.

First, create a new column called sort and fill it with numbers from 1 to whatever your total number of rows is:

2 sort column

Expert tip: rather than typing these numbers manually, if you have a lot of rows, and to avoid errors, you can create a quick formula to insert the numbers automatically. Type 1 in the first row then the formula you can see below in the next row, where you get the F2 by clicking on the cell containing the 1:

2a sort column

Then, copy the cell with the formula (right-click, copy), highlight the rest of that column down to the last row and right-click, paste. This will give you the same effect. Note, though, when you sort by this column, the numbers will turn into rows of #####, BUT the sort will still work OK.

Once you have your additional Sort column, you are ready to reverse your columns.

Highlight all of the data and, in the Data Tab, choose Sort:

4 sort data

In the Sort Dialog Box, choose to sort by the Sort column, and from Largest to Smallest (i.e. the reverse order to its current order):

5 sort data

Press OK and hooray – your spreadsheet is sorted into exact reverse order. Just delete the now-redundant Sort column (highlight, right-click, delete):

7 delete sort column

and here’s your bank transactions in reverse order – you have flipped the column!

6 data sorted

This article has explained the (slightly surprising) way to flip the columns in an excel 2007, 2010 or 2013 spreadsheet, not using data sort, but another message. If you need to reverse the order of your columns exactly, then this is the way to do it.

If you’ve found this article helpful or if you have a better solution, please do post a comment below, and if you think others would find it useful, please share it using the sharing buttons below the article. Thank you!

Other useful posts on Excel on this blog:

How to view two workbooks side by side in Excel 2007 and 2010

How to view two pages of a workbook at the same time

How do I print the column headings on every sheet in Excel?

How to print the column and row numbers/ letters and gridlines

Freezing rows and columns in Excel – and freezing both at the same time

 
6 Comments

Posted by on May 25, 2016 in Excel, Short cuts


Tags: , ,

How to update your Table of Contents, Table of Figures or Table of Tables

This article explains how to update the Table of Contents (Contents Page) or Table of Figures or Table of Tables in your Word 2007, 2010 or 2013 document, which could be a report, dissertation, thesis, book or anything else. To find out how to create a Table of Contents in Word, please refer to this article. To find out how to create Tables of Figures and Tables of Tables, please refer to this article. We’ll refer to it as “Table of Contents” in this article, but this works for all kinds of contents listings.

Why would I want to update my Table of Contents?

If you create a Table of Contents for a document but then change the actual document, it’s likely that you will also change …

  • One or more headings (maybe swapping between Title Case and Sentence case or just changing the wording)
  • What page a heading falls on (and all the other headings after it) (maybe by adding text or just moving a heading to join its text on the next page)

Although a Table of Contents will update to match the actual contents “automatically”, you have to tell it to do so. This is how to update your Table of Contents so that it matches what your reader will find in the actual document.

How do I update my Table of Contents?

First of all, hover your cursor over the Table of Contents. It should be highlighted in light grey. Right click on any part of the grey area:

update contents page word

This will give you a menu – you need to select Update Field:

update contents page - update field

Once you’ve clicked on Update Field, you are given the choice of Update page numbers only or Update entire table:

update page numbers or all fields

Choose wisely – see below! Once you’ve chosen, click OK and your Table of Contents will update!

When to update page numbers only in your Table of Contents

You might want to Update page numbers only if …

  • You are absolutely sure that you have only changed what text / heading is on what page (but you could still Update entire table anyway, just to be certain)
  • You have manually amended your Table of Contents (e.g. one heading was too long to fit on a line and you shortened it) AND you know you haven’t changed any heading text in the actual document.

In the second case, when you’ve manually amended the contents page, if you choose Update entire table, it will over-ride your manual change and replace it with the exact text that is in your heading in the main document, and you’ll have to manually update it again.

Apart from the case where you have manually edited the Table of Contents, I STRONGLY SUGGEST that you always choose Update entire table.

When to update entire table in your Table of Contents

I highly recommend that you always use this option. In this way, your Table of Contents will match the text of your document.

This is especially important to remember if someone else has amended and edited your document.

—–

In this article, we have learned how to update a Table of Contents, Table of Figures or Table of Tables. If you have enjoyed this article or found it useful, please share it using the sharing buttons below.

Please note, these hints work with versions of Microsoft Word currently in use –  Word 2007, Word 2010 and Word 2013, all for PC. Mac compatible versions of Word should have similar options. Always save a copy of your document before manipulating it. I bear no responsibility for any pickles you might get yourself into!

Find all the short cuts here

Other relevant posts on this blog:

How to create a contents page in Word

Tables of figures and tables of tables

 
7 Comments

Posted by on July 15, 2015 in New skills, Short cuts, Word, Writing


Tags: , , , ,

How do I change the numbering style of footnotes and endnotes in Word?

As part of my series on footnotes and endnotes, here’s how to change your footnote and endnote numbering styles on the go (e.g. while editing someone’s work, or when you change your mind, or when you’re working to a particular journal’s style and need to amend something you’ve already written)  in Word 2007, Word 2010 and Word 2013.

Why would I want to change my footnote or endnote numbering style?

The main reason to change your footnote or endnote numbering style is because of the style guide of whatever you’re writing the document for. For example, academic journals will usually have some form of Guidelines for Authors which will lay out (sometimes) the font, heading styles, reference styles and footnote styles that you are expected to use. If you’re re-using an article which has been rejected by another journal, or repurposing a chapter of your PhD, you might find that the style for one journal is different from what you’ve done previously.

Alternatively, you may just decide you would prefer to use roman numerals, arabic numerals, symbols or whatever for your footnotes or endnotes, and want to change them.

How to change the number format for footnotes/endnotes

In this example, we’re starting off with some footnotes or endnotes that use roman numerals (i, ii, iii …):

footnote with roman numeral

Now, we want to change them to, for example, arabic numerals (1, 2, 3 …)

First of all, go to the Footnotes menu. This is in the References tab, and there’s a whole area called Footnotes:

Footnote menu

Click the little arrow at the bottom right of the Footnotes area to access the Footnote and Endnote menu. Once you’ve clicked on the little arrow, you should see this menu:

footnote menu dialogue box word

We can see lots of things we can do here, including changing the number footnotes start at, whether they restart every chapter, etc. (these more obscure details will be the subject of another article). But for our purposes, the important features are choosing whether you’re telling Word about Endnotes or Footnotes and telling Word what the number format should be.

In this case, we’re using Endnotes (although these instructions cover both), so I’ve clicked the radio button (circle) next to Endnotes. This tells Word that we’re using Endnotes and talking about the Endnote numbering.

Going down one section, you can see that at the moment, the Number format is set to i, ii, iii … To change this, click on the down arrow to the right of the box saying i, ii, iii … (if the Endnotes are set to 1, 2, 3 or a, b, c, this will display in this box):

footnote menu change style

Once you’ve clicked that arrow, you will be able to see all of the choices you have for your footnote or endnote numbering. Now click on the format that you want to use:

footnotes change numbering style word

The Number format will now change to the one that you have chosen. Once you have got the correct format in this box, click the Apply button to apply the changes:

footnotes apply change word

When we return to our document, the endnote numbering has changed from a roman numeral (i) to an arabic numeral (1). You can change this as many times as you want.

footnote with correct style word

This article has explained how to change the number format in your footnotes or endnotes.

Related posts from this blog:

How to insert and format footnotes

How to insert and format endnotes

How to swap between using footnotes and endnotes

Please note, these hints work with versions of Microsoft Word currently in use – Word 2007, Word 2010 and Word 2013, all for PC. Mac compatible versions of Word should have similar options. Always save a copy of your document before manipulating it. I bear no responsibility for any pickles you might get yourself into!

Find all the short cuts here

 
30 Comments

Posted by on June 3, 2015 in Errors, New skills, Short cuts, Word, Writing


Tags: , , , , , , , , ,

How do I display my horizontal scroll bar in Word?

I was innocently using Word one day when I discovered that my horizontal scroll bar had disappeared. This was annoying, because I had a document open at the time at the side of another document, and wanted to navigate around it. Where had my scroll bar gone? This is how I got it back …

How do I display my horizontal scroll bar?

You do this in Word Options.

In Word 2007, click the Home button at the top left, and choose Word Options from the box that opens:

Accessing Word Options Word 2007

In Word 2010 and 2013 click on File at the top left and then Options

Accessing Word Options Word 2010 and 2013


Once you are in Word Options, go to Advanced options, then Display:

Word Options - advanced - display

Make sure that you tick Show horizontal scroll bar, and there you are:

horizontal scroll bar is displayed

Please note, these hints work with versions of Microsoft Word currently in use – Word 2007, Word 2010 and Word 2013 all for PC. Mac compatible versions of Word should have similar options. Always save a copy of your document before manipulating it. I bear no responsibility for any pickles you might get yourself into!

This is part of my series on how to avoid time-consuming “short cuts” and use Word in the right way to maximise your time and improve the look of your documents. Find all the short cuts here

Related posts on this blog:

How do I display the rulers in Word?

How do I hide the taskbars in Word?

 
16 Comments

Posted by on December 3, 2014 in proofreading, Short cuts, Word


Tags: , , , , , ,

How do I tell Word not to spell-check certain paragraphs?

This topic came up after someone commented on one of my other Word-related posts: he had a document that included programming code and he wanted to exclude that from the spell check because a) it wasted time and b) when displaying spelling errors, the red wiggly lines distracted him. He had used an easy method to exclude these in Word 2003 (highlight, click spell check, tick “do not check spelling and grammar”) but had got stuck with Word 2010.

This article will tell you …

  • How to exclude text in your document from being spell checked
  • How to only spell check a particular section of your document

How do I tell Spell Check not to check particular paragraphs in Word 2003?

So, in Word 2003, Spell Check is on the toolbar and you can highlight the text you don’t want to check, click spell check and tick “do not check spelling and grammar”. it’s actually very similar in Word 2007, 2010 and 2013 – here’s my hint for the easiest and quickest way to do this.

How do I tell Spell Check not to check particular paragraphs in Word 2007, 2010 and 2013?

First of all, highlight the paragraph (or paragraphs, holding down the control key) that you want to exclude from Spell Check.

Then you have two ways of telling Word not to spell check these sections:

1. The quick way: click on the language at the bottom of your screen:

Select text to exclude from spell check

If the editing language is not showing at the bottom of the screen, left-click on the bottom tool bar and choose to display language. If that doesn’t work, see this post).

2. The official way: on the Review tab, select Language and then Set Proofing Language (note: don’t click on Spelling and Grammar, as that will spell check the highlighted text, exactly opposite to what you want to happen):

Word language setting

Both of these options will display the Language Selection dialogue box:

Language selection dialogue box

Once you have the language choices displaying, tick your language and tick “Do not check grammar and spelling“. That should mark all of the text you highlighted such that the spell checker avoids it. I hope that works for you and takes less than 5 minutes – do let me know!

How do I just spell check one paragraph or section of my document in Word?

Allied to this is the question of how you just check a particular part of your text. Here’s how:

Highlight the text you want to check.

Press the Spell Check button, which you can find in the Review tab:

Spell check one section of a document

Word will spell check only that highlighted paragraph (or word, if you so choose) and will helpfully ask you if you’d like to continue checking everything else:

Continue spell check?

I hope you’ve found these hints helpful! Do share or pop a comment on this post if I’ve helped you learn something new or solved a tricky problem for you, and do explore the rest of my blog if this is your first visit!

Please note, these hints work with versions of Microsoft Word currently in use – Word 2007, Word 2010 and Word 2013 all for PC. Mac compatible versions of Word should have similar options. Always save a copy of your document before manipulating it. I bear no responsibility for any pickles you might get yourself into!

This is part of my series on how to avoid time-consuming “short cuts” and use Word in the right way to maximise your time and improve the look of your documents. Find all the short cuts here

Related posts on this blog:

How do I use Spell Check in Word 2007 and 2010?

How do I use Spell Check in Word 2013?

How do I change the editing language of my document?

Why do I need to use Spell Check if my work is being edited?

 
2 Comments

Posted by on November 19, 2014 in proofreading, Short cuts, Word


Tags: , , , , , ,

How do I insert clip art in Word 2007, 2010 and 2013 and other Microsoft Office applications?

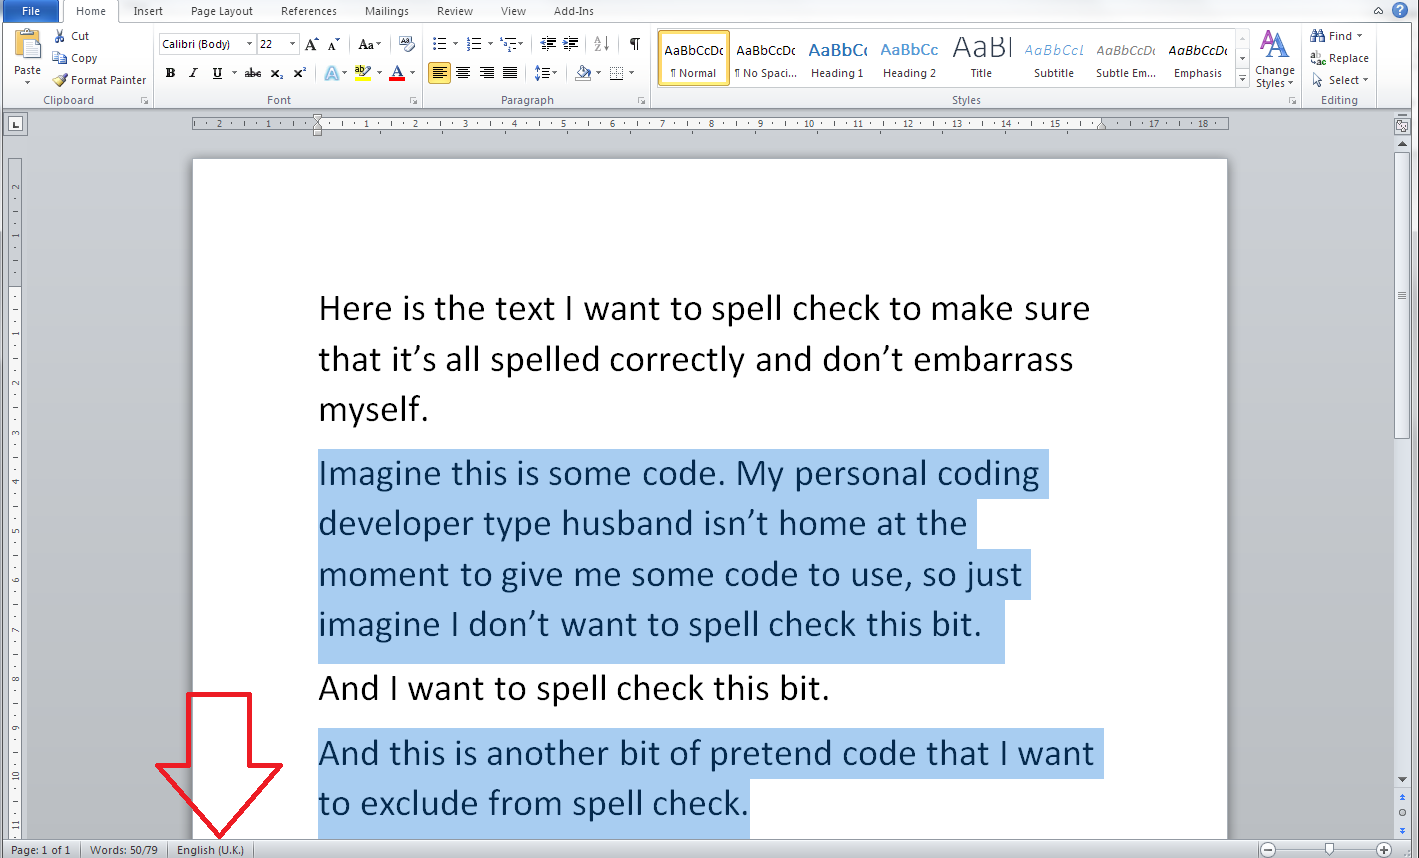
I have to admit to being a little surprised when I was asked to post about clip art. I hadn’t used it for years, and I was taken back to the old days, when you used to buy a computer magazine with a free floppy disk full of clip art pictures …

However, the very useful point about clip art is that it’s copyright free and so simple to use: you can pop a MS Office clip art image into your presentation or document and know that you’ve not stolen someone’s work of art (although there are copyright rules about using them in commercial publications).

They’re also not as ‘cartoony’ as they used to be, including photographs as well as drawings, and there are some really good images: I found this great one when I searched for “editor”, for example!

clip art of editor holding book

From MS Word Clip Art

This article applies to Microsoft Office applications such as Word, Excel and PowerPoint. Examples are taken from Word, but the process works in the same way in all applications.

Of course, choosing and inserting your clip art varies between Word (Excel and PowerPoint) 2007/2010 and Word (Excel and PowerPoint) 2013, so if you want the latter, please scroll down a bit to the relevant heading!

How do I use clip art in Word 2007 and Word 2010 and other Microsoft Office software?

Clip art is found in the Insert tab, in the Illustrations area (this is an image from Word 2010; the button in Word 2007 has a slightly different, but recognisable, icon and is in the same place):

Word 2010 insert clip art

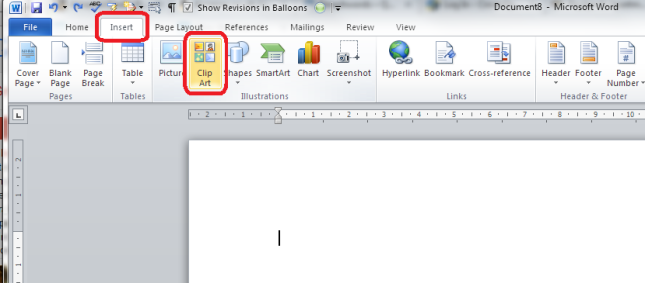
Making sure that your cursor is at the point where you want the clip art image to appear, click the Clip Art button:

word choosing clip art

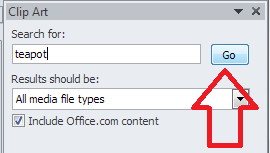
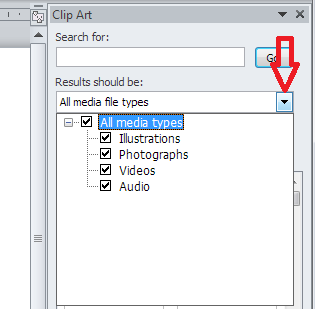
A clip art search area will appear in the right-hand margin. It’s pretty simple: you can enter a search term, and you can also choose which kind of media you are searching for (useful for PowerPoint presentations, for example, or if you only want photographs to illustrate your document):

Word clip art choose format

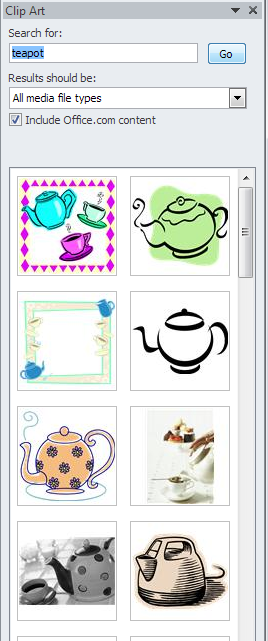
Leaving this on all media, let’s search for “teapot” – pop the word in the search box and click the Go button:

Word clip art search

You should then see a grid of clip art images:

clip art search results

Stop press – you might only find you have the option to search online now – as Microsoft have withdrawn the copyright-free clip art they had offered for so many years. I believe that if you have a standalone version of Word that doesn’t receive updates, the clip art will stay, otherwise you’ll just now have an option to search Bing. Very annoying!

clip art find more

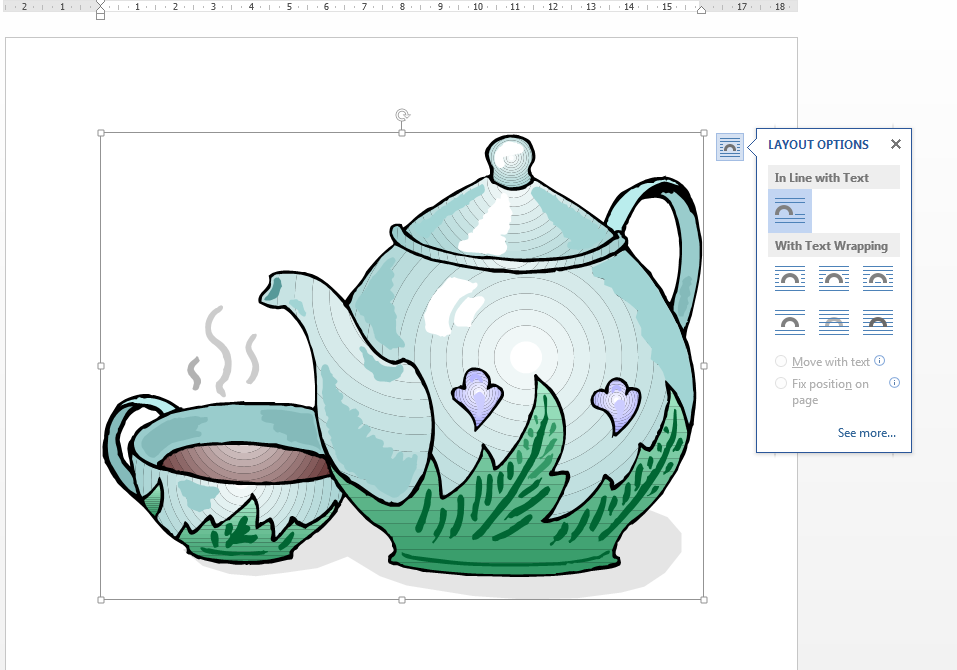
Anyway, back to our 57 teapots (which is surely enough for anyone!). When you’ve found an image you want to insert, double-click on it and it will move into your document:

clip art insert image

You will also notice here that the image is selected and can be enlarged and reduced using the little blocks around the image outline. It can also be moved, if you hover inside the box until an arrow appears.

For more on placing images in text, please see this article.

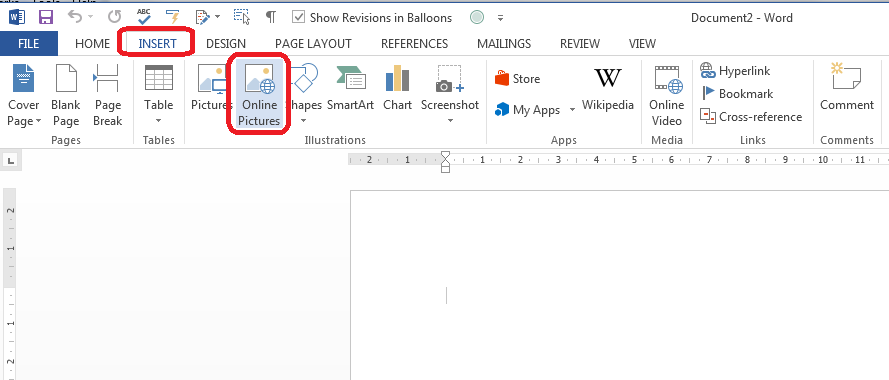
How do I use clip art in Word 2013 and other Microsoft Office software?

For Office 2013, Microsoft went all online-based, and as a result, the way in which you access clip art changed. Note that these instructions work for both the standalone version of Word 2013 (and other software) if you bought it once, and the subscription version through Office 365 which downloads updates periodically.

You access clip art from the same menu, on the Insert tab, in the Illustrations area, but it’s now called Online Pictures:

clip art office 2013

Making sure your cursor is in the place where you want your picture to be, click on Online Pictures:

Word 2013 clip art search

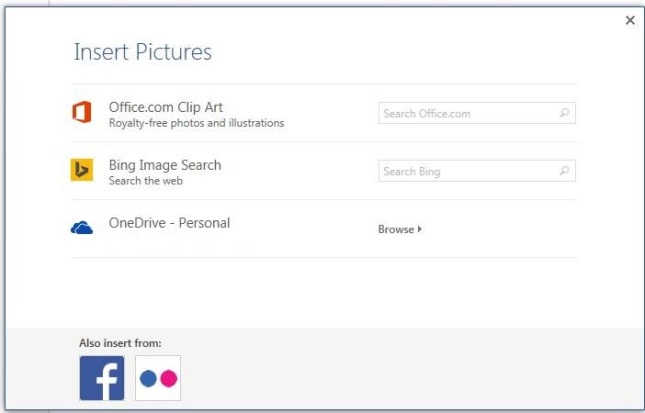
You now have the option to search royalty-free illustrations on the office.com clip art website or do a Bing Image search for general images.

Note Unless you have a completely standalone and isolated version of Word 2013, you will not now have the option to use clip art based within Word itself – you will probably just see Bing search. If you don’t get updates on your version of Word, it’s likely you will still have them, because Word can’t update itself to make them go away. Grrr, frankly.

Because I’m not logged in at the moment, I have the option to sign in with my Microsoft office account. If you are logged in, or do subsequently log in, you will get these additional options – OneDrive, Facebook and Flickr:

Word 2013 image search options if logged in(thanks to Laura Ripper for this screen shot)

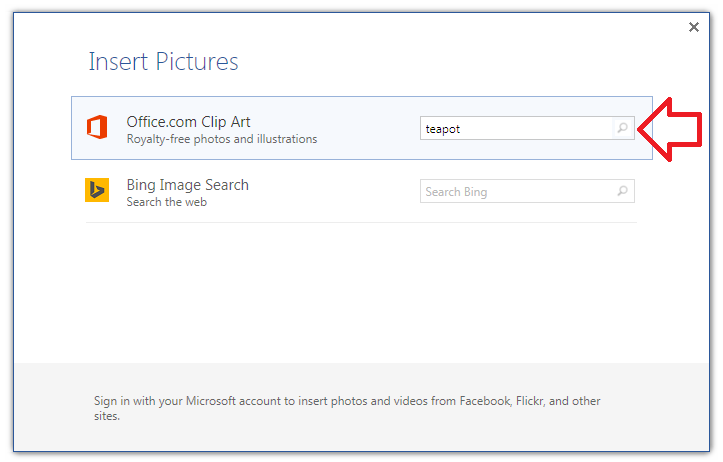
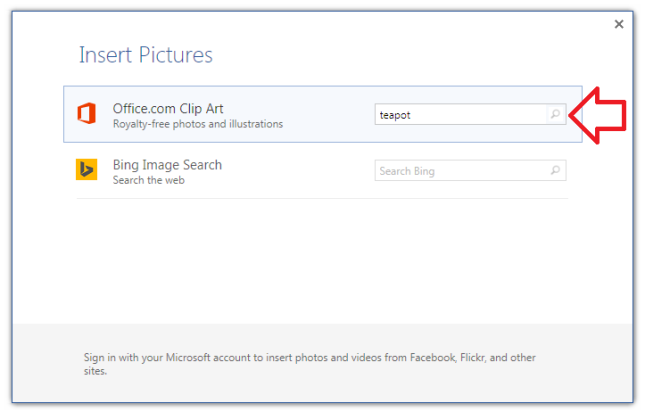
To search in clip art, enter the search term “teapot” into the first text box and click on the magnifying glass icon:

Word 2013 clip art search

This will bring up the same results as for Word 2007 and 2010 (interestingly, you can’t differentiate at this stage between different kinds of file to insert, as you can with earlier versions):

Word 2013 clip art results
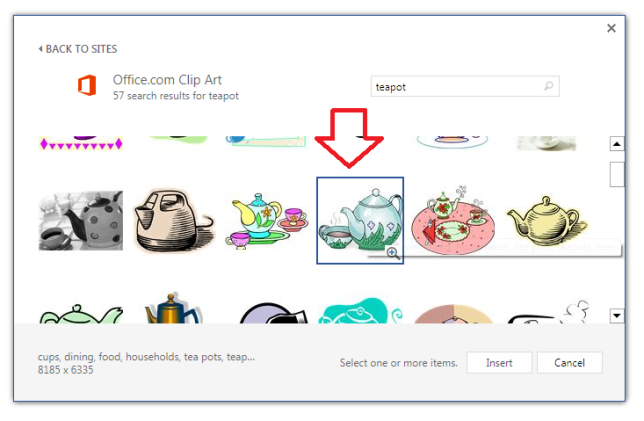
Double-click on the image you want to insert, or single click and click on the Insert button

Word 2013 clip art inserted

Note that in Word 2013, not only do you get the frame which allows you to change the image size, but the Layout Options dialogue box also pops out, allowing you to choose where the image sits in any text you might have.

For more on placing images in text, please see this article.

Related posts on this blog

How do I make pictures go where I want them to in Word?

How do I stop the pictures jumping around when I edit a Word document?

———————

This is part of my series on how to avoid time-consuming “short cuts” and use Word in the right way to maximise your time and improve the look of your documents. If you’ve enjoyed the post or found it useful, please use the sharing buttons below to share it via your social media networks – thank you!

Please note, these hints work with versions of Microsoft Word currently in use – Word 2007, Word 2010 and Word 2013 and other Office software for PC. Mac compatible versions of Word should have similar options. Always save a copy of your document before manipulating it. I bear no responsibility for any pickles you might get yourself into!

Find all the short cuts here … and see the full resource guide here.

 
31 Comments

Posted by on November 12, 2014 in Errors, New skills, Short cuts, Word, Writing


Tags: , , , , , , , ,

How do I hide the toolbars and taskbars in Word 2007, 2010 and 2013 and other MS Office applications?

In this article we’re going to learn how to (temporarily) hide the toolbars, taskbars, rulers and whatnot in Word.  Note that these processes will also work for other Microsoft Office applications such as Excel, PowerPoint, etc.

Why would I want to hide the taskbars in Word?

There are various reasons why you might want to have just a blank white screen in front of you when using Word. If you’re trying to write, write, write, you might want to remove all distractions. If you’re displaying Word on a large screen using a projector, there are many reasons why a plain screen with no additional information might be useful.

In fact, the second reason, wishing to display just some text and images via an overhead projector, is why I was asked to write this article in the first place.

How to hide taskbars and toolbars in Word

This works for Word 2007, 2010 and 2013: I’ve used Word 2010 in the example because it’s what I use most of the time, but the principles remain the same.

How to minimise the ribbon in Word

You might just want to minimise the ribbon. If this is the case, first right-click anywhere on the actual ribbon, then select Minimize the Ribbon from the menu that displays:

Word minimise ribbon

How do I reverse minimize ribbon?

To reverse the minimize ribbon action, you can either …

1. Right-click anywhere on the small ribbon headings that will appear and click again on Minimize the Ribbon: the tick will disappear and the ribbon will reappear:

un-minimize ribbon2. Click on the small down arrow that appears at the top right of the screen when the ribbon is minimised:

reverse ribbon minimise

How do I remove wording and symbols from the lower task bar

If you’re fed up of seeing your word count or document language in the lower task bar, you can right-click on the taskbar, at which point a list of all items you can display pops up, and you can untick the ones you don’t want:

remove items from lower task bar

You will see the displayed items at the bottom start to disappear until you’re left with just one:

remove from lower task bar

How do I reverse clearing the lower task bar?

To add items back on to the task bar, right-click on the taskbar and click on the features you want to see – the tick will reappear next to the items you select, and the information will display in the lower task bar.

How do I hide the rulers?

For instructions on hiding the rulers in Word, please see this article.

How do I hide all of the toolbars in Word and other Office applications?

If you want to go further and just have a blank screen, you can use the shortcut Alt+V, U

Note that you must follow this process to do this:

  • Press down the Alt key and keep it pressed down
  • Press the V key and release it (keeping Alt pressed down)
  • Press the U key and release it (you can then release the Alt key)

Pressing both letters together does not have the same effect. Once you’ve pressed this key combination, you will have just the document, no toolbars, taskbars, menus, etc. However, you are still likely to have the Windows taskbar showing.

Just a document, no toolbars

So you’re not quite there, but first …

How do I reverse Alt+VU?

The first time I did this, I got a bit panicky because I assumed that you needed to press AltVU again to get back to the menus, but that’s not what you do.

To reverse Alt+VU and get back to seeing your taskbars, hit the Escape key on your keyboard. Phew!

How do I hide the Windows taskbar?

You’ve got your lovely clean document showing but you want to get rid of that Windows taskbar at the bottom of the screen. Here’s what you do:

First, unlock the taskbar (if it is locked) by right-clicking on the lower task bar and seeing if Lock the taskbar is ticked. If it is, click on it to untick it.

unlock task bar windows

This dialogue box will disappear, so right-click on the taskbar again and this time choose Properties:

Windows taskbar properties

This will give you a new dialogue box:

Windows taskbar properties

Making sure that you’re in the Taskbar tab, click on the tickbox to Auto-hide thie taskbar.

The taskbar will now disappear, leaving you with a lovely clear screen containing only your document.

How do I reverse hiding the Windows taskbar?

To show the Windows taskbar, move the mouse to the bottom of the screen (assuming your Windows task bar is usually there), at which point it should appear. Then right-click at the bottom of the screen and select Properties, then untick Auto-hide the taskbar.

———————

This is part of my series on how to avoid time-consuming “short cuts” and use Word in the right way to maximise your time and improve the look of your documents. If you’ve enjoyed the post or found it useful, please use the sharing buttons below to share it via your social media networks – thank you!

Please note, these hints work with versions of Microsoft Word currently in use – Word 2007, Word 2010 and Word 2013 for PC. Mac compatible versions of Word should have similar options. Always save a copy of your document before manipulating it. I bear no responsibility for any pickles you might get yourself into!

Other useful posts on this blog

How to display and hide rulers in Word

How to add buttons to the Quick Access Toolbar

Find all the short cuts here … and see the full resource guide here.

 
8 Comments

Posted by on November 5, 2014 in Errors, New skills, Short cuts, Word, Writing


Tags: , , , , , , , ,