RSS

Tag Archives: learning

Using tables in Word 1 – Menus and options

This is the first in a series of articles about Tables in Word. It covers Word 2007 and Word 2010, and will include Word 2013 in time. The following articles will cover all of the different types of table and option in detail, as well as useful features such as how to retain your table heading line on every page of your document.

Why use tables in Word?

Tables can be a very useful way to show information in an easy-to-read form, and are essential if you have a lot of data – in words or numbers – to share with your readers. There are many different ways to construct tables in Word, so this post will show you the basics, then further posts will elaborate on each method.

How do I insert tables in Word?

To put a table into a Word document, you need to choose the Insert tab and then look for the (very small) Tables section. There you will find a Tables button

1 menu

Press the Tables button and you’ll be shown a grid followed by a list of other options:

2 menu

We will now take a quick look at all of these options in turn.

Insert table

The first option gives you a grid which you can highlight to create the table you want. The squares represent the number of rows and columns you want, although on the page, the columns will fit to the width of your page and the rows will be one line deep.

Move your mouse over the grid and the table will appear on the document behind the menu:

3 grid

Let go, and there’s your table (we’ll learn about adding and deleting rows and columns in another post).

Insert table (2)

The first text option on the list below the grid is, rather confusingly, also called Insert table. But if you choose this option, you’ll find a rather more familiar and in some ways simpler menu.

4 insert table

The Insert Table menu allows you to choose the number of columns and rows by moving the up and down arrows for each. We’ll look at the other options later. For now, these choices will give you a table five columns across and two rows down when you click OK:

5 insert table

Draw table

The Draw table option allows you to hand draw the cells of your new table.

6 draw table

The Table tab will open up and Draw Table will be highlighted. You get a cursor that looks like a pencil and you have to draw each cell with that (there’s an eraser next to the draw button).

7 draw table

I personally find this really fiddly to use: you do have to play with it a bit to work out what to do with it. But I suppose it must be useful!

Convert text to table

This is particularly useful if you’ve imported text or figures from another program. Highlight your text and choose this option …

8 convert

… and you can specify whether you want the columns to separate at each comma, full stop or other character. Apparently, Mr Libro always uses this option when he creates a table, creating the text first and then the table!

Insert Excel spreadsheet

This option allows you to have a mini Excel spreadsheet, with all its normal functionality, inside your Word document:

9 spreadsheet

Note: this inserts a blank, empty spreadsheet into your document:

10 excel

Once you’ve created your data and clicked away from the spreadsheet, you will have a table made out of your spreadsheet (click on it to amend):

11 excel

If you want to insert an Excel spreadsheet that you’ve already created into your Word document, you need to choose Object from the far right-hand side of the Insert tab

Insert Quick Tables

The last option in the list will allow you to choose from a ready-made set of sample tables …

12 quick tables

As you can see, this is particularly useful if you want to print out or insert a calendar!

——————–

This post has gone through the Table menu and the options it offers for inserting tables. In other posts, I will go into more detail about how to edit tables, add and delete rows and columns, etc. If you want to know more, subscribe to this blog (see links at the top left or add to your RSS reader) or keep your eye on the resource guide.

If you have enjoyed this post, please share the link!

Please note, these hints work with versions of Microsoft Word currently in use – Word 2007 and Word 2010, for PC. Mac compatible versions of Word should have similar options. Always save a copy of your document before manipulating it. I bear no responsibility for any pickles you might get yourself into!

Find all the short cuts here

 
1 Comment

Posted by on September 11, 2013 in Errors, New skills, Short cuts, Word, Writing


Tags: , , , , , , , ,

What to do if your paragraph spacing won’t work in Word

This article tells you what to do if you think you’ve set your paragraph line spacing for the whole document but individual paragraphs refuse to behave. This is valid for Word 2007 and Word 2010, with Word 2013 to follow soon.

My spaces between paragraphs are uneven – help!

This just happened to me, which is why I’ve written up this article.

I was working on a bibliography for a client.

I set the paragraph and line spacing as I normally do: highlight the whole document, go to the Home tab, Paragraph section, and click the down arrow on the Spacing button:

1 paragraph and line space menu

This gives you the Spacing menu:

2 menu options

from which you choose your line spacing and lines after paragraphs options (I will write up a main post about this soon).

But it didn’t work!

Individual paragraphs still had no automatic spaces between then, even if I removed the line feed and pressed Enter again.

How to solve the problem of inconsistent paragraph spacing

Here’s how I did it.

I highlighted all of the text.

I right-clicked on the highlighted text and chose Paragraph from the options:

3 para

I then stayed on the Indents and Spacing tab and set my After spacing to 12pt and my line spacing to 2 (just in case). I also unticked Don’t add space between paragraphs of the same style (it was filled in with blue rather than ticked so I clicked twice to get a tick and then no tick):

highlight all

I pressed OK and the paragraphs all behaved beautifully.

I’m not entirely sure why this method works over the previous one, to be honest, but it worked for me and it was hard for me to find an easy, quick answer, so hopefully this will help a few people!

————————–

If you have enjoyed this post or found it useful, please share the link!

Please note, these hints work with versions of Microsoft Word currently in use – Word 2007 and Word 2010, for PC. Mac compatible versions of Word should have similar options. Always save a copy of your document before manipulating it. I bear no responsibility for any pickles you might get yourself into!

Find all the short cuts here

 
61 Comments

Posted by on September 4, 2013 in Errors, New skills, Short cuts, Word, Writing


Tags: , , , , , , , ,

How do I print out table headings at the top of every page in Excel?

I recently wrote about retaining your headers across multiple pages in a Word document. This post will tell you how to make your header rows (or columns) in Excel 2007 and Excel 2010 print on multiple pages when you print them out.

What is the header row in Excel?

The header row is the row in a spreadsheet that contains the headings for all of the columns in your spreadsheet. It’s usually Row 1, or maybe a few rows at the top of the spreadsheet.

(If your columns have headings in Column A instead or as well as your rows, you can use all of the stages in this post but choosing the columns option where appropriate, or both.)

1 spreadsheet

Why would I want my header rows to print out on multiple pages?

If you’ve got a complicated spreadsheet that you want to print out in a report, as a handout, or as a pdf, it’s useful to have the header row show on every page. When you’re using Excel itself, you can freeze the rows and/or columns so you can see them as you scroll down. But this doesn’t carry over to the printout.

How do I check if my header row will be printed on every page?

To check what the printout will look like, you need to change from the standard Normal view of your document (see the first image in this post) to the Page Layout view.

To do this, choose the View tab, then the Workbook Views section and press the Page Layout button. Your view will change to what the document will look like on the page (this is also where you add headers and footers to an Excel document – more on that another time)

1 view menu

If we scroll down to the second page of our document in this view, we can see that the second page just starts with the next line of the spreadsheet – not very useful if you want to be able to see the headings at the top of each page:

2 no headers

How do I make the heading row print at the top of every page?

Staying in the Print Layout view, choose the Page Layout tab and look at the Page Setup section. In the bottom right corner, you’ll find a little arrow. Click on the arrow to access the Page Setup menu:

3 page layout menu

The Page Setup menu will default to showing you the Page tab. Click on the Sheet tab at the extreme right:

4 page setup menu

At last we’re in the Sheet menu. This is where you can choose the print area, titles, gridlines, quality, etc., but what we’re interested in is Rows to repeat at top (and/or Columns to repeat at left, if you have either or both of these):

5 page setup menu sheet

Now, how do you tell Excel which row you want to print at the top of every page? I got a bit flummoxed by this at first, I have to admit. Here’s how you do it:

Make sure your cursor is in the appropriate input box – in this case I have left-clicked with the mouse in Rows to repeat at top.

Then click with the mouse on the far left of the row you want to select. Can you see the dotted line round it on the image below? That means that it’s been selected. If you just click on one row, $1-$1 will appear in the text entry box. If you highlight more than one row, it will read $1-$2, etc.

6 page setup menu sheet choose

If you want to make sure that a heading column appears on every page of your printout, make sure the cursor is in the Columns to repeat at left box and click above the column you want to choose. You can choose a row(s) and a column(s) if you want to!

Once you’ve clicked on OK, you can scroll down in Page Layout view to see the top of the second page. There are the headings, ready to print on every page! You can change back to Normal view: the instructions that you’ve given Excel here will stay the same.

7 done

We’ve learned how to make sure that your heading row (or column) prints on every page of your printout when you’re printing out your Excel 2007 or Excel 2010 document.

If you’ve enjoyed this post, please do share it using the buttons below!

Related posts:

Freezing rows and columns in Excel

How do I keep my table headings over multiple pages in a Word document?

———————

This is part of my series on how to avoid time-consuming “short cuts” and use Microsoft Office in the right way to maximise your time and improve the look of your documents.

Please note, these hints work with versions of Microsoft Excel currently in use – Excel 2007 and Excel 2010 for PC. Mac compatible versions of Excel should have similar options. Always save a copy of your document before manipulating it. I bear no responsibility for any pickles you might get yourself into!

Find all the short cuts here

 
54 Comments

Posted by on August 29, 2013 in Errors, New skills, Short cuts, Word, Writing


Tags: , , , , , , , ,

How do I keep my table headings over multiple pages in a Word document?

If you have got a table that extends over several pages in a Word document, it’s useful to be able to repeat the header row at the top of each page automatically, so that it stays there no matter what you change in the table itself. This article shows you how to do that in Word 2007 and Word 2010 (we use the same procedure for both)

Why would I want to repeat my header row on multiple pages?

If you’re presenting a table which contains fairly self-explanatory information, for example, name, surname, book title, year, then you probably don’t need to repeat the heading row, even if the table runs across more than one page. But if you think that the person who will consult the table will need to keep reminding themselves about what the different columns contain, it’s useful to add the header row at the top of each page.

Doing this automatically rather than manually inserting a new row into each page of the table ensures that however much the table changes, the header row will stay at the top of each page.

How do I repeat the header row in Word?

We’re going to use the example of a list of books I have read. Here’s the table:

1 table

Now, this is a long list, and it goes over more than one page. OK, it’s fairly self-explanatory, but I might forget what the Acquired and Read headers are.

At the moment, when the table goes onto the next page of the document, the table just carries on, with no  header rows on the second and third pages:

2 table

Please NOTE that we’re in Print Layout view on the View menu at the moment: when we repeat the headers, the repeat is only visible in Print Layout or Print Preview, both of which show you what your document will look like when it’s printed. Word defaults to Print Layout view, but check, just in case:

3 view

Select the header row of your table so that you can tell Word that this is the header row by left-clicking with your cursor to the left-hand side of that row:

4 select

Now, because you’ve got a table in your document, Word will have added the Table menu tabs to your ribbon. There are two: Layout and Design. Choose the Layout tab. Find the Repeat Header Rows button:

5 repeat header rows

Click on the Repeat Header Rows button. Like magic, if you scroll down the page, you will now see that your header row is repeated!

6 repeat header rows done

Note: if you don’t have a row selected, the Repeat Header Row button will be greyed out and you can’t press it.

Here’s the magical thing: you can of course do this manually by inserting a row at the top of each page of your table. But then, if you move the text of the table around or resize it, you risk your manual header row not being the top row of your page.

Using the automatic function means that, whatever you do to your table, the top row of a new page will always be the header row (UNLESS you force a manual page break).

Here, I’ve changed the text size to make it larger. You can see that the first entry on the second page is no longer Coleridge, but the header row is still in place:

7 repeat header rows done

How do I repeat multiple header rows in Word?

You can display multiple header rows in Word in the same way. Make sure that you highlight BOTH rows that you want to repeat, and press the Repeat Header Rows button as before:

8 repeat multiple header rows

And there you go: the first two lines of the table repeat on each page:

9 repeat multiple header rows done

How to repeat header rows in Word 2003

In Word 2003, you will need to use menus rather than the ribbon.

Highlight the header row of your table.

Select the Table menu and click Heading Rows Repeat.

———–

Today we’ve learned how to make the header rows repeat in a Word document. This is part of a series on Tables which I’ll be writing and publishing over the next few weeks.

Related posts:

Tables 1 – how to create a table

Please note, these hints work with versions of Microsoft Word currently in use – Word 2003, Word 2007 and Word 2010, all for PC. Mac compatible versions of Word should have similar options. Always save a copy of your document before manipulating it. I bear no responsibility for any pickles you might get yourself into!

Find all the short cuts here

 
61 Comments

Posted by on August 21, 2013 in Errors, New skills, Short cuts, Word, Writing


Tags: , , , , , , , ,

Portrait and landscape orientation in Word and Excel

In this article, we’re talking about the Portrait and Landscape orientations in Word and Excel, what they are, why you might want to use each one, and how to swap between them.

What are Portrait and Landscape?

Portrait and Landscape are the terms used for the orientation of the page in applications that deal with pages, such as Word and Excel. Orientation means the relative position of the page when you’re looking at it:

1 pages

Portrait means that the page has the shorter sides at top and bottom. Think of a portrait in a gallery or museum. They are usually this way round. Landscape means that the page has the shorter sides on the left and right. Again, think of an art gallery. Which way round are views painted of the landscape? Exactly.

Why would I want to use the landscape orientation?

Word and Excel documents default to being in the portrait orientation. That’s the format of most books, reports, folders, etc. But landscape can be very useful if …

In Word

  • Your layout is such that it comes out wider than it’s high – maybe a poster or a sign to put up in your office or building
  • You have a wide table to insert into the document with lots of columns and it gets too squashed up and hard to read if you try to fit it onto a standard portrait A4 page
  • You have a diagram to insert into the document that’s wider than it’s high
  • You have a picture to insert into the document that’s wider than it’s high

In the last three incidences, you might only want one page of the document to appear in landscape. That’s easily done, and you can find out how to have portrait and landscape in one document here.

In Excel:

  • Your spreadsheet is too wide to fit comfortably onto a portrait A4 page

How do you change between Portrait and Landscape in Word 2007 and Word 2010?

You swap between Portrait and Landscape using the Orientation menu in Word. This can be found in the Page Layout tab, in the Page Setup section:

2 menu

Press the Orientation button (or the little arrow at the bottom) to access the menu:

3 menu

Choose your orientation, and the whole document will change to that orientation, unless you’re only changing one section (see below)

How do you change one page in Word to be in Landscape?

To change one page in Word to be in Landscape, you need to set Section Breaks first, so that Word knows which pages you want to change. See this post on Section Breaks for instructions on how to do this and change just one page or section.

How do you change between Portrait and Landscape in Excel 2007 and Excel 2010?

Changing the orientation in Excel works in exactly the same way as doing it in Word. Find the Orientation menu by going into the Page Layout tab and Page Setup section:

4 excel

Then press the Orientation button to make your selection.

How do you change between Portrait and Landscape when you’re printing?

Sometimes you don’t realise that you need to print your document in Landscape rather than Portrait (it’s usually this way around, I find) until you have printed out one copy and find that your lovely picture or table falls off the edge of the page.

You can change the orientation of the printing while printing – however, the orientation of your original document will NOT change if you use this method, and if you want it to change to Landscape permanently, you will need to go back and follow the instructions I give above.

If you want to change the orientation of your printing (in Word or Excel or when you’re printing off a web page or a map or anything!) …

First, select the Print option. When the Print dialogue box comes up, click the Properties button:

5 printer

You will usually then be given a screen something like this which will have a Features tab:

6 printer

Find choice buttons for Portrait / Landscape, select the one you want, and OK, and then your printout will be in that orientation.

—————–

In this article we have learned what the portrait and landscape orientations are, why they are useful, how to change them in Word and Excel and how to change orientation when you are printing.

If you have enjoyed this post, please share the link using the buttons below or sharing the Facebook, Twitter or LinkedIn alert that you followed to get here!

Other useful posts: Section breaks in Word

Please note, these hints work with versions of Microsoft Word currently in use – Word 2007 and Word 2010, for PC. Mac compatible versions of Word should have similar options. Always save a copy of your document before manipulating it. I bear no responsibility for any pickles you might get yourself into!

Find all the short cuts here

 
28 Comments

Posted by on August 14, 2013 in Errors, New skills, Short cuts, Word, Writing


Tags: , , , , , , , ,

Using the split screen view in Word

In this article, I’m going to tell you all about using the split screen view in Word, including why you would use it, how to use it, and how to stop using it. I’ve also added an alternative way to get the split screen view, which explains the problem: “help! I’ve got a split screen and I don’t know how I got it!”

What does split screen mean?

If you split the screen in Word, it means that you can see two parts of the same document in the same window, allowing you to scroll through both parts independently or keep one section on screen at all times. It’s a bit like splitting panes in Excel, although you can only do it horizontally.

Why would I want to split the screen in Word?

It’s often useful to be able to see two sections of a document at one time, without having to open two copies of the document (if you do that, one will be read-only and you can’t make amendments to it). Some examples of why split screen view is useful:

  • You are creating a large table and want to be able to see your column headings all of the time (this is similar to the use of Freeze Panes in Excel)
  • You’re creating a lesson plan and you want to look at the plan and notes at the same time.
  • You’re checking that a contents page includes the correct titles and page numbers and you don’t want to keep whizzing back and forth through the document.
  • You’ve written an introduction to a chapter and want to make sure that it refers to all of the content in that chapter.
  • You’re working on some worked examples in a textbook and you want to check the answers at the end of the document

In this worked example, I want to review the text in the February chapter of my book to make sure that the content within it is reflected in the introduction to the chapter. I want to keep the introduction (circled in red) visible on the screen while I scroll through the rest of the chapter.

1 all one screen

How do I make the screen split in Word 2007 and Word 2010?

This is another example where Word 2007 and Word 2010 operate in exactly the same way.

The Split button can be found in the View tab, in the Window section:

2 menu

Once you press this Split button, the screen will automatically split into two. Initially, a grey line will appear – this is a guide line that you can move and position as you wish:

3 line

Once you’ve positioned the screen split (it can go anywhere horizontally on the page), it turns into a second ruler:

4 ruler

Your screen is now split and ready to use.

You can scroll up and down both halves of the screen, although usually you will want to keep the top half still and just move the bottom. Here, I’ve scrolled down to the bottom of the essay on tea to see what comes next:

5 scroll

The scroll bars on the right hand side will remind you of your position in each part of the document.

Remember that you must have your cursor in the half of the screen that you wish to scroll!

How do I cancel Split Screen view?

You can revert to a single viewing pane at any time by pressing the Remove Split button (which was the Split button):

6 remove split

Your document will return to single pane view – starting at the top point of your upper pane:

1 all one screen

Using the Split Screen button

You can also use a tiny button on the top right of the screen to split your screen (and you can use this in any Microsoft Office application). I didn’t realise this until I was trying to sort out a problem for someone who had got stuck with split screen and couldn’t make it go away – I couldn’t work out how he’d got a split screen without choosing those particular menu items above. Now I know.

In the top right of your Word screen, you’ll find a tiny button like a letterbox, just above a bigger button:

7 split button

Here it is in close-up:

8 split button

Left-click on this button and the cursor will change to having two horizontal lines. Drag the cursor down, holding the left mouse button down, and the grey line will follow, just as with the other method.

9 split down

Return it by clicking, keeping the mouse button down and moving the split line up to the top of the screen.

You can mix and match these ways of adding and removing the screen split, so if you start one way, you can remove it in the other way.

So, if you’ve got a split screen and you don’t know why, you probably clicked on that little button by accident, and you can remove it in one of two ways: go into View and Remove Split or click on the split bar and move it up to the top of the screen.

In this article, we’ve learned about splitting the screen in Word, why we might want to do that, how we do it, and how to return to standard view.

If you have enjoyed this post, please share the link!

Please note, these hints work with versions of Microsoft Word currently in use – Word 2007 and Word 2010, for PC. Mac compatible versions of Word should have similar options. Always save a copy of your document before manipulating it. I bear no responsibility for any pickles you might get yourself into!

Find all the short cuts here

 
17 Comments

Posted by on August 7, 2013 in Errors, New skills, Short cuts, Word, Writing


Tags: , , , , , , , ,

Ferment or foment?

I can’t remember where I came across this one now, but it’s an interesting pair that I thought got confused in certain circumstances regarding the stirring up of unrest. But wouldn’t you know it – a different picture emerges when I look into it more deeply, and this joins the select ranks of words such as decimated or gunnel that I am not really allowed to be as picky about as I’d like to be!).

To ferment as a verb means to undergo the process of fermentation (“His beer was fermenting nicely and would be ready to drink in a few weeks”) or to stir up disorder. A ferment (as a noun) means social unrest and agitation.

To foment, as a verb, means to instigate or stir up something like strife or revolution – i.e. the same as the secondary meaning of ferment as a verb. What a shame! I think we should still use this for revolutions and ferment for beer, myself (to foment has a nice archaic meaning of bathing a part of the body with a warm or medicated lotion, or fomentation. I doubt any of us will ever use that, but it’s quite jolly, in my opinion).

You can find more troublesome pairs here and the index to them all so far is here.


Tags: , , ,

Section breaks in Word

Today we’re going to be talking about adding section breaks in Word documents.

Why would I want to add a section break?

Section breaks are used if you want to have different formatting in different parts of your document. For example, you might want to …

  • have your page numbering in Roman numerals for part of your document and Arabic numerals in the rest of it
  • have some pages in portrait and some in landscape (for example if you’re including wide tables or images in your document)
  • include watermarks for branding or protection in parts of your document but not other parts
  • have different headers and footers associated with different parts of your document

Basically, if you want to change parts of your headers, footers, background or page layout for parts of your document only, you will need to divide up those parts using Section Breaks.

We’re going to use a document where one page should be in portrait and one in landscape for demonstration purposes.

What happens if you don’t use Section Breaks?

In this example, we want Page 1 to be in portrait and Page 2 to be in landscape orientation.

If you don’t enter any section breaks, even if you have your cursor on Page 2, changing its orientation to landscape …

1 without section break 1

… will change the orientation of Page 1, too:

2 without section break 2

Where is the Section Break menu in Word 2007 and Word 2010?

The good news is that the Section Breaks menu is exactly the same in Word 2007 and 2010.

Go into the Page Layout tab, and you will find the Breaks menu in the Page Setup area:

3 section break menu

Note that you can apply Section Breaks to automatically happen continuously and on every odd or even page. I’ve never needed to do that: what I have done many times is insert a section break and start the next section on a new page.

How do I insert a Section Break into my document?

Make sure that your cursor is flashing where you want your Section Break to appear (i.e. at the end of your current section). Then select Section Break – Next Page:

4 section break menu

Once you’ve done this, the section break will have been inserted at the point at which you had your cursor. But you can’t see it – it’s one of those hidden messages that is only displayed if you use the Paragraph Mark button (see this article for further information):

c

Once you’ve pressed the Paragraph Mark button, you will be able to view your section break:

5 section break visible

If you look at your Header and Footer, you will see that they also show that Page 1 is part of Section 1, and Page 2 is part of Section 2:

6 header and footer showing section break

This is a good way to check which parts of the document belong to which section.

What effect does inserting a Section Break have?

Now that your document is divided up into Sections, you can apply different formatting to different sections of the document. Page numbering is covered in this post, and in order to have Section 2 in landscape, all we need to do is make sure that the cursor is in Section 2, and select the landscape option:

1 without section break 1

Now that it has been separated off into Section 2, Page 2 will change to landscape, while Page 1, in Section 1, will stay in portrait orientation:

7 portrait then landscape

How do I add more sections to my document?

There is no limit to the amount of sections you add to a document, however, it’s worth keeping track of them and remembering that your formatting will need to be set individually for each section – if you’ve changed everything in Section 2 into landscape, if you add a new section, it will stay in landscape and you will need to change it back to portrait if that’s how you want it to orientate.

How do I delete a Section Break?

To delete a section break, simply turn on Paragraph Marks so you can see the section breaks (see above), put the cursor next to the break and press the Delete button on your keyboard.

—-

In this article you have learned about Section Breaks, what they are used for, how to apply them, and how to use them to change the page orientation in your document. If you’ve found it useful, please share!

Other useful posts:

Proper page breaks

Page numbering – how to have different page number formats in different parts of your document

Changing between Landscape and Portrait (to come)

Please note, these hints work with versions of Microsoft Word currently in use – Word 2003, Word 2007 and Word 2010, all for PC. Mac compatible versions of Word should have similar options. Always save a copy of your document before manipulating it. I bear no responsibility for any pickles you might get yourself into!

Find all the short cuts here

 
14 Comments

Posted by on August 2, 2013 in Errors, New skills, Short cuts, Word, Writing


Tags: , , , , , , , ,

Libel or liable?

This one is dedicated to Matt P, who, having posted a not-entirely-positive review of a pub on TripAdvisor, was accused by the pub management of having committed “liable”. This one’s for you, Matt!

Libel is a noun meaning the publication of a false statement that damages someone’s reputation (see libel or slander).

Liable is an adjective which means responsible by law for something – “He is liable for the damages in the case” or likely to do something – “The cat is liable to tread on the keys and insert characters into your document, so it’s best to keep him off the desk”. You can also use liable to in the sense of “likely to experience something” (usually something undesirable) – “This area of low-lying land is liable to flooding”. (Note: I don’t like this last use – I’d be tempted to change it to “liable to flood” but that’s just my personal opinion).

You can combine them, of course – “The newspaper was found liable for all charges in the libel case brought by Mr. Brown regarding his damaged reputation and the lies that the paper had printed”.

You can find more troublesome pairs here and the index to them all so far is here.


Tags: , , ,

How to protect your Word 2007 document

As part of my series on protecting your document, which has looked at Applying Watermarks and Protecting Word 2010 Documents, today we’re going to look at the features for protecting your document offered by Word 2007.

Why would I want to protect a document?

We covered this in more detail in the post on Word 2010, but in summary, it’s useful to be able to protect your documents because …

  • You can stop the wrong people from opening the document (including if you’re sending it via email etc.)
  • You can stop the wrong people from editing the document (protecting what you’ve written and/or changed)

Where is the menu for protecting documents in Word 2007?

You will find the menu for protecting documents under the Start button at the extreme top left of your screen. Once you’ve clicked on the round button, you will see a menu starting with New, Open …

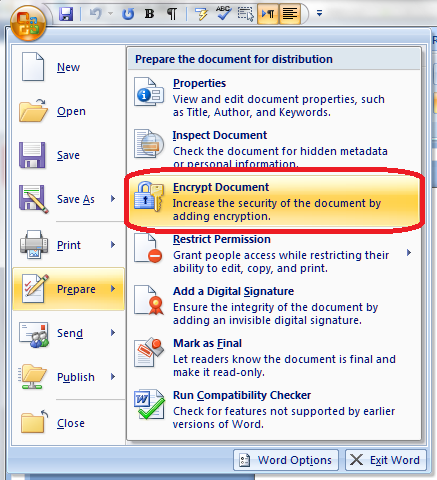
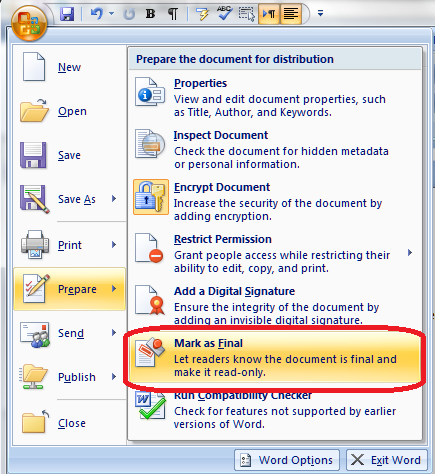
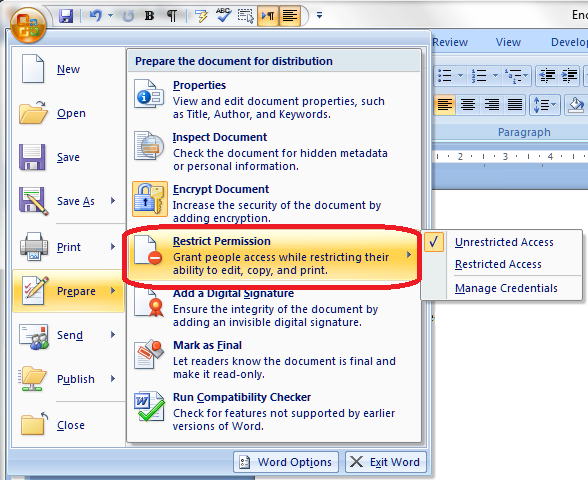
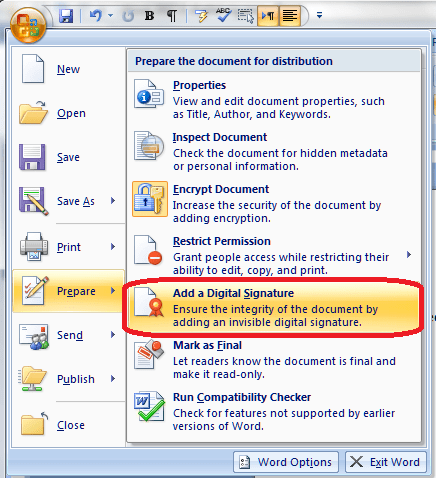
Click on Prepare and you are given a menu to do with preparing the document to be sent, protecting it, and editing its properties:

Word 2007 1 menu

How do I add a password to a Word 2007 document?

The most simple way to protect a document is to add password protection. This means that no one without the password can open it (so if you email it to someone, it can’t be intercepted and opened, or people who aren’t meant to see confidential information can’t open a confidential document).

Go to the Encrypt Document entry on the menu and click on it:

Word 2007 1 add password

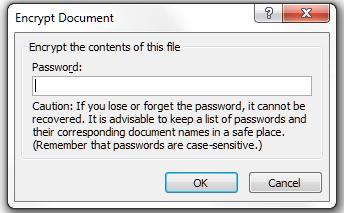
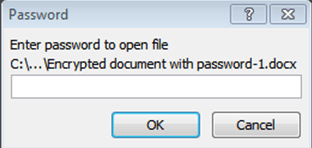
You will then be asked to enter a password (twice). Do remember this, and remember to share it with anyone else who might be permitted to open and read it.

Word 2007 2 add password

This is what happens when you or anyone else tries to open the file:

Word 2007 2a add password

How do I make a Word 2007 document read-only?

Another way to protect your document from unwanted edits is to make it read-only. Of course, anyone can “save as” the document and make all the changes they want, but your original document, with its file name, is protected, and often people don’t realise that they can save as, anyway.

To do this, select the Mark as Final entry from the menu:

Word 2007 7 mark final

Now, when someone opens this document, they will be told that it is read-only and they cannot edit it.

How do I restrict editing in a Word 2007 document?

Another option is to restrict certain types of editing in your document.

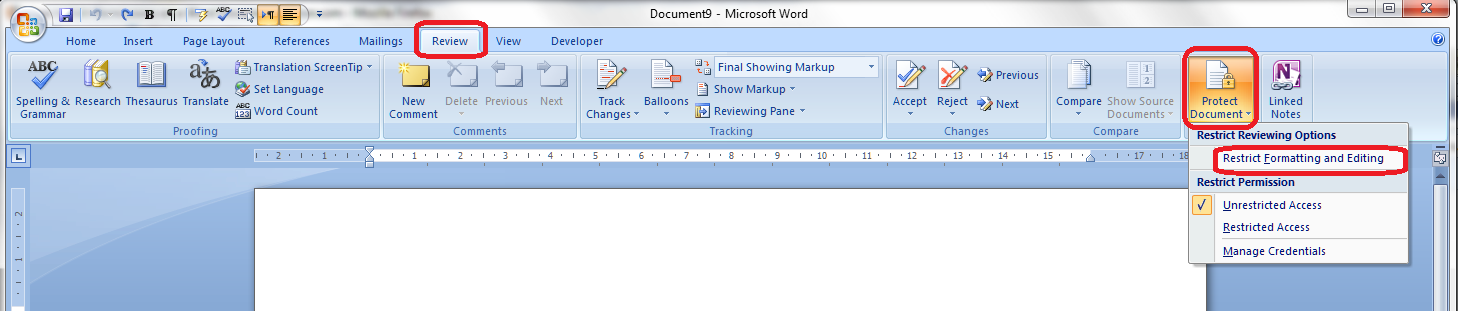
Confusingly, this is in a different area of the menus to the rest of the protection features. You will need to go to the Review tab, then the Protect section, which consists of a single button marked Protect Document. Click on the button itself or, if you must, the little arrow at the bottom right of that button (this has exactly the same effect. Why did they add that little arrow? Who knows!) to bring up the menu:

Word 2007 10 restrict editing

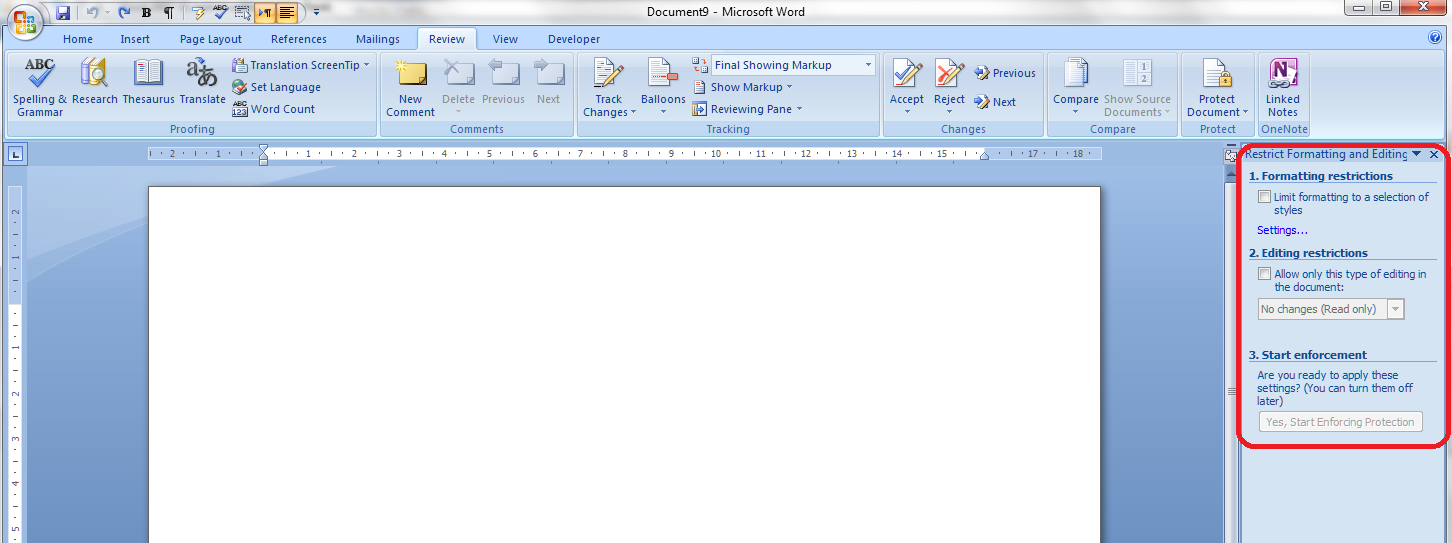
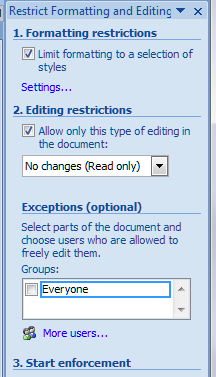
Click on Restrict Formatting and Editing to be given a list of options: Formatting restrictions, Editing restrictions and Start enforcement:

Word 2007 11 restrict editing

Formatting restrictions

This option allows you to select what formatting other people can apply to the document (you will want to do this after you have done all your own formatting to make sure that you can do what you want to do). Click on the tick box and then Settings to choose what formatting can be changed:

Word 2007 12 restrict editing

You are given a dialogue box with lots of different options. Note that you can allow the AutoFormat to override the formatting restrictions if you want to. But this is where you can choose what can be amended and what cannot be amended. This is particularly useful if you want to ensure that the Headings Styles that you’ve carefully set up will stay the same in the document.

Editing restrictions

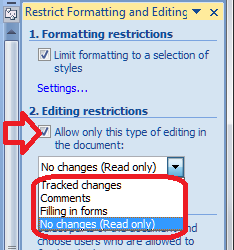
You can edit what changes other users can make to your document in terms of textual changes, too. Have a look at the Editing restrictions section, tick the tick-box, and drop down the menu to see the options:

Word 2007 13 restrict editing

Editing restrictions allow you to choose whether the document becomes Read only or will allow tracked changed editing only or adding comments or filling in forms. Some of my clients make the documents that they send me tracked changes only so they can see exactly what I change in their documents. It’s a good way to remind people to keep Track Changes on if you’re working together collaboratively. Filling in forms is useful if you want people to fill in your form but not change the actual form.

Restricting editors

It is possible to restrict the ability to make changes to certain people if you’re working in a multi-user, networked environment:

Word 2007 14 restrict editing

These permissions can be restricted to individual editors; however, see the next section for details on this option, as it needs to run alongside other network options that you may or may not be using..
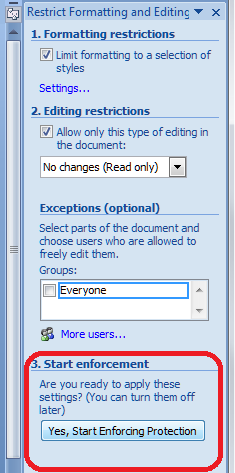
Start enforcement

When you want to put these restriction in place, click on the Start enforcement button that appeared as soon as you click or change anything:

Word 2007 15 restrict editing

How do I add individual editing permissions to a Word 2007 document?

The Restrict Permission part of the original menu we’ve been talking about, under the top left button and Prepare, allows you to add individual editing permissions to your document (this can also be accessed in the Review – Protect menu as discussed in the section above):

Word 2007 3 permissions

This is a Windows option that allows you to set permissions for different people, and is usually used within an organisation. You need to use Microsoft’s Information Rights Management Service alongside it and be signed up to Windows Live. The message that comes up if you click Restricted Access or Manage Credentials explains in more detail:

Word 2007 4a permissions

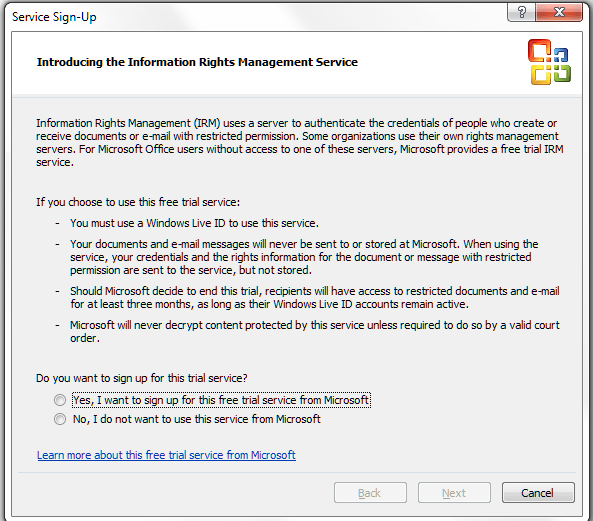
Most larger organisations have rights management systems that inform their procedures and file/drive setups, and these will usually allow you to set permissions and protect your document in that way. As this is outside the scope of this article: you will need to talk to your administrator or  IT support department.

But this option is here for you to use, and can be done if you have the relevant signups.

Be careful: Contact IT or your systems administrator before signing  up for something that can affect access to documents on a shared organisational system.

How do I add a digital signature to a Word 2007 document?

Adding a digital signature to a Word document can protect it to an extent and mark it as yours, plus an increasing number of companies request this if they’re signing you up to their pool of contractors, etc. Once again we’re in Start button – Prepare territory – this time we want the Add a Digital Signature section:

Word 2007 5 digital sig

In order to use this feature, you need to purchase a signature service from the Office Marketplace, as Word will tell you if you click on this option:

Word 2007 6 digital sig

Alternatively, you can sign up to a third-party digital signature service which will apply your digital signature to documents via an uploading and downloading service.

How do I print to PDF using Word 2007?

Making a Word document into a PDF is still the best way to protect it. A PDF is like an image of the document that can’t be edited, a bit like a photocopy or a picture taken of it.

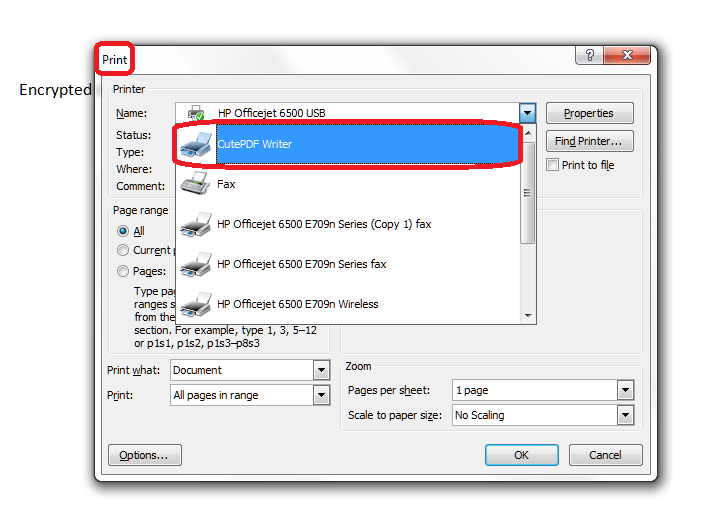
Unlike with Word 2010, you can’t actually print direct to PDF using Word 2007. If you want to turn Word 2007 document into PDFs, you will need to download a PDF printer such as Adobe or CutePDF Writer.

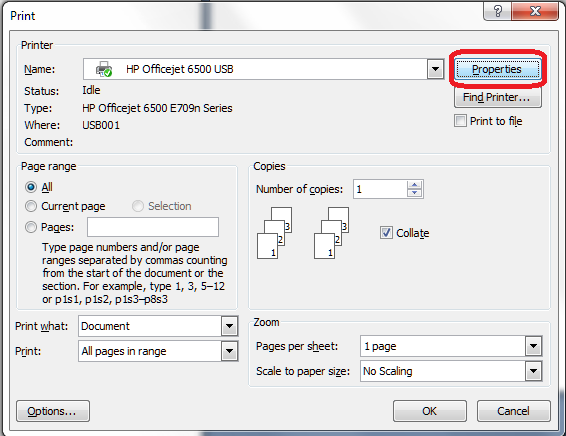
Once you have got a PDF writing program installed, you can “Print” to PDF by hitting the Print button as usual then selecting your PDF writer as the “printer”:

Word 2007 8 print to pdf

Once you’ve pressed OK, you will then be asked to choose a filename and a path under which to save the document:

Word 2007 9 print to pdf

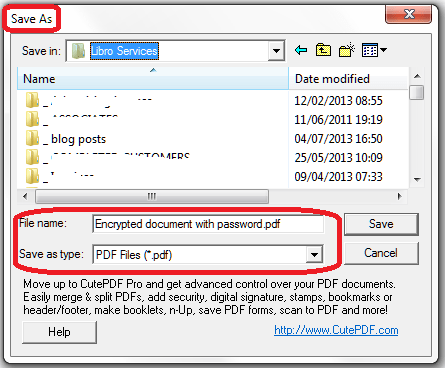
Note that, as in the above picture, you can password protect your PDF at this stage. This is a good idea, as software is now available that will let people edit PDFs, something that was not previously easy to do. We’ll talk more about using PDFs to protect your document in the next article.

In this article, we’ve learnt how to use the features of Word 2007 to protect your document, using passwords, read-only status, editing restrictions, permissions and digital signatures.

———————

This is part of my series on how to avoid time-consuming “short cuts” and use Word in the right way to maximise your time and improve the look of your documents.

Related posts:

Applying Watermarks

Protecting Word 2010 Documents

(coming soon)

Protecting your document using PDF

Please note, these hints work with versions of Microsoft Word currently in use – Word 2003, Word 2007 and Word 2010, all for PC. Mac compatible versions of Word should have similar options. Always save a copy of your document before manipulating it. I bear no responsibility for any pickles you might get yourself into!

Find all the short cuts here

 
14 Comments

Posted by on July 24, 2013 in Errors, New skills, Short cuts, Word, Writing


Tags: , , , , , , , ,