RSS

Tag Archives: Word2013

How to update your Table of Contents, Table of Figures or Table of Tables

This article explains how to update the Table of Contents (Contents Page) or Table of Figures or Table of Tables in your Word 2007, 2010 or 2013 document, which could be a report, dissertation, thesis, book or anything else. To find out how to create a Table of Contents in Word, please refer to this article. To find out how to create Tables of Figures and Tables of Tables, please refer to this article. We’ll refer to it as “Table of Contents” in this article, but this works for all kinds of contents listings.

Why would I want to update my Table of Contents?

If you create a Table of Contents for a document but then change the actual document, it’s likely that you will also change …

  • One or more headings (maybe swapping between Title Case and Sentence case or just changing the wording)
  • What page a heading falls on (and all the other headings after it) (maybe by adding text or just moving a heading to join its text on the next page)

Although a Table of Contents will update to match the actual contents “automatically”, you have to tell it to do so. This is how to update your Table of Contents so that it matches what your reader will find in the actual document.

How do I update my Table of Contents?

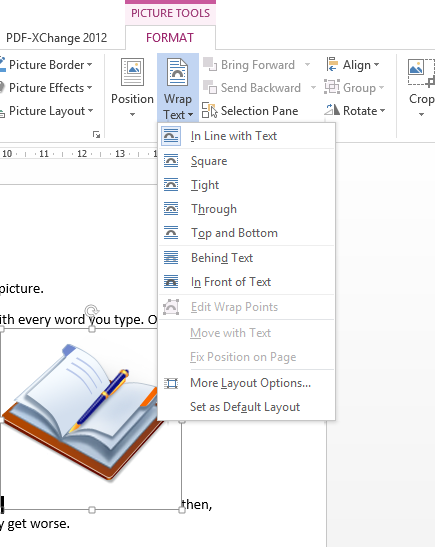
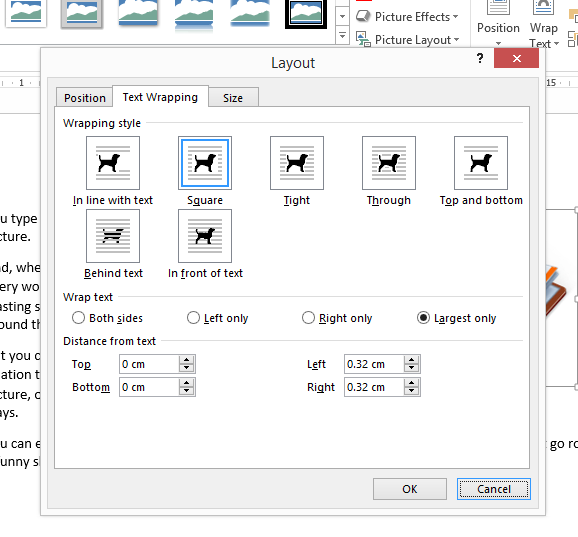
First of all, hover your cursor over the Table of Contents. It should be highlighted in light grey. Right click on any part of the grey area:

update contents page word

This will give you a menu – you need to select Update Field:

update contents page - update field

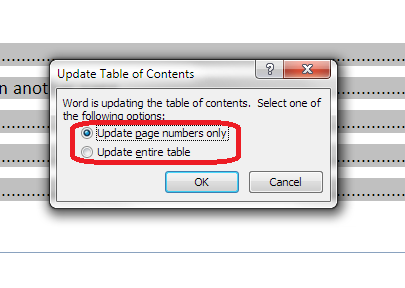
Once you’ve clicked on Update Field, you are given the choice of Update page numbers only or Update entire table:

update page numbers or all fields

Choose wisely – see below! Once you’ve chosen, click OK and your Table of Contents will update!

When to update page numbers only in your Table of Contents

You might want to Update page numbers only if …

  • You are absolutely sure that you have only changed what text / heading is on what page (but you could still Update entire table anyway, just to be certain)
  • You have manually amended your Table of Contents (e.g. one heading was too long to fit on a line and you shortened it) AND you know you haven’t changed any heading text in the actual document.

In the second case, when you’ve manually amended the contents page, if you choose Update entire table, it will over-ride your manual change and replace it with the exact text that is in your heading in the main document, and you’ll have to manually update it again.

Apart from the case where you have manually edited the Table of Contents, I STRONGLY SUGGEST that you always choose Update entire table.

When to update entire table in your Table of Contents

I highly recommend that you always use this option. In this way, your Table of Contents will match the text of your document.

This is especially important to remember if someone else has amended and edited your document.

—–

In this article, we have learned how to update a Table of Contents, Table of Figures or Table of Tables. If you have enjoyed this article or found it useful, please share it using the sharing buttons below.

Please note, these hints work with versions of Microsoft Word currently in use –  Word 2007, Word 2010 and Word 2013, all for PC. Mac compatible versions of Word should have similar options. Always save a copy of your document before manipulating it. I bear no responsibility for any pickles you might get yourself into!

Find all the short cuts here

Other relevant posts on this blog:

How to create a contents page in Word

Tables of figures and tables of tables

 
7 Comments

Posted by on July 15, 2015 in New skills, Short cuts, Word, Writing


Tags: , , , ,

How do I change the numbering style of footnotes and endnotes in Word?

As part of my series on footnotes and endnotes, here’s how to change your footnote and endnote numbering styles on the go (e.g. while editing someone’s work, or when you change your mind, or when you’re working to a particular journal’s style and need to amend something you’ve already written)  in Word 2007, Word 2010 and Word 2013.

Why would I want to change my footnote or endnote numbering style?

The main reason to change your footnote or endnote numbering style is because of the style guide of whatever you’re writing the document for. For example, academic journals will usually have some form of Guidelines for Authors which will lay out (sometimes) the font, heading styles, reference styles and footnote styles that you are expected to use. If you’re re-using an article which has been rejected by another journal, or repurposing a chapter of your PhD, you might find that the style for one journal is different from what you’ve done previously.

Alternatively, you may just decide you would prefer to use roman numerals, arabic numerals, symbols or whatever for your footnotes or endnotes, and want to change them.

How to change the number format for footnotes/endnotes

In this example, we’re starting off with some footnotes or endnotes that use roman numerals (i, ii, iii …):

footnote with roman numeral

Now, we want to change them to, for example, arabic numerals (1, 2, 3 …)

First of all, go to the Footnotes menu. This is in the References tab, and there’s a whole area called Footnotes:

Footnote menu

Click the little arrow at the bottom right of the Footnotes area to access the Footnote and Endnote menu. Once you’ve clicked on the little arrow, you should see this menu:

footnote menu dialogue box word

We can see lots of things we can do here, including changing the number footnotes start at, whether they restart every chapter, etc. (these more obscure details will be the subject of another article). But for our purposes, the important features are choosing whether you’re telling Word about Endnotes or Footnotes and telling Word what the number format should be.

In this case, we’re using Endnotes (although these instructions cover both), so I’ve clicked the radio button (circle) next to Endnotes. This tells Word that we’re using Endnotes and talking about the Endnote numbering.

Going down one section, you can see that at the moment, the Number format is set to i, ii, iii … To change this, click on the down arrow to the right of the box saying i, ii, iii … (if the Endnotes are set to 1, 2, 3 or a, b, c, this will display in this box):

footnote menu change style

Once you’ve clicked that arrow, you will be able to see all of the choices you have for your footnote or endnote numbering. Now click on the format that you want to use:

footnotes change numbering style word

The Number format will now change to the one that you have chosen. Once you have got the correct format in this box, click the Apply button to apply the changes:

footnotes apply change word

When we return to our document, the endnote numbering has changed from a roman numeral (i) to an arabic numeral (1). You can change this as many times as you want.

footnote with correct style word

This article has explained how to change the number format in your footnotes or endnotes.

Related posts from this blog:

How to insert and format footnotes

How to insert and format endnotes

How to swap between using footnotes and endnotes

Please note, these hints work with versions of Microsoft Word currently in use – Word 2007, Word 2010 and Word 2013, all for PC. Mac compatible versions of Word should have similar options. Always save a copy of your document before manipulating it. I bear no responsibility for any pickles you might get yourself into!

Find all the short cuts here

 
30 Comments

Posted by on June 3, 2015 in Errors, New skills, Short cuts, Word, Writing


Tags: , , , , , , , , ,

How do I accept one reviewer’s changes in Track Changes in Word 2010 and Word 2013?

This article tells you how to view just one reviewer’s changes in Track Changes in Word (the screenshots are for Word 2010 and Word 2013 separately but this works for all version of Word, including Word 2003 and Word 2007). Once you can see the changes made by one editor or reviewer, you can delete the changes made by that one reviewer, leaving only the changes made by the other reviewers.

Why would I want to accept only one reviewer’s changes in Track Changes?

Recently, I worked on a document where I made all of my usual changes or comments, then the author responded and sent it back to me for re-checking. They hadn’t accepted my initial changes, but had told me in the email that they were OK. Because the document looked really messy and confusing, I wanted to accept all of my changes and just work with the author’s additions and amendments. Here’s how I did it.

Note, it looks slightly different in Word 2007/2010 and Word 2013, with subtly different terminology, so we’ll look at 2007-2010 first and then 2013

How do I see and accept one reviewer’s changes in Word 2007 and Word 2010?

Here’s our text, with comments and corrections by two reviewers, shown in two colours. What I want to do is accept the changes made in blue and just end up with the ones in red to review.

Word 2010 two reviewers

First of all, we need to show only one reviewer’s corrections. We do this in the Review tab, Track Changes area. Click on the arrow next to Show Markup and then Reviewers on the drop-down menu. This allows you to tick or un-tick by different names. IN this case, I want to interact with just the changes made in blue – the ones I want to accept. So I click on the tick box by the LB initials, to un-tick that box and only see Laura’s corrections:

Word 2010 show reviewers

Once I’ve done that, I can only see the blue corrections. Note that the red comment box has also disappeared. We only see comments and corrections by Laura, but the ones made by LB will still be there behind the scenes.

Word 2010 show one reviewer

Now I want to accept these blue changes. In the Review tab, Track Changes, I click on the arrow at the bottom of the Accept button and click Accept All Changes Shown (it’s important to pick this one – if I chose Accept All Changes in Document, all of the changes, hidden and visible, would be accepted).

Word 2010 accept changes showing

Now all of the blue changes have been accepted and only the comment by L[aura] is visible.

Word 2010 changes shown accepted

Just to prove that my corrections are still there, and in case I want to review those, we can view all reviewers by going back to Review – Track Changes – Show Markup – Reviewers and clicking in the box to tick LB:

Word 2010 show all reviewers

Now I can see the corrections in red and all of the comment boxes, and review them happily.

Word 2010 result

How do I see and accept one reviewer’s changes in Word 2013?

Here is our text commented on and corrected by two people. I want to view and accept the red changes made by Laura, then view my own ones in blue to review them (Yes, if you’re reading this all the way through, Word 2010 and Word 2013 chose the opposite colours for the two reviewers).

Word 2013 two reviewers


First we need to view only the blue corrections in order to accept only those ones. In the Review tab, Track Changes area, click on Show Markup then Reviewers. This gives us the option to tick or untick by each individual reviewer. Here, I’m going to untick LB.

Word 2013 show reviewers

Now we can just see Laura’s changes in red.

3 2013 show one reviewer

We can accept these changes by choosing Review tab – Track Changes area and clicking on the arrow at the bottom of the Accept button. Then, we choose Accept All Changes Shown (note, Accept All Changes will accept all of the changes, red or blue, visible or hidden: we don’t want that):

Word 2013 accept changes shown

Now all of the insertions and deletions have been accepted and we’re left with just the comment balloon:

Word 2013 changes shown accepted

To see and review the suggestions made in blue by me, we go back to Review tab – Track Changes area – Show Markup – Reviewers and re-tick by the LB:

Word 2013 show all reviewers

Now we can see all of the changes suggested by LB as well as the comments by both people.

Word 2013 one reviewer's corrections accepted

This is another one written when I had a specific need and had to go hunting around, so I hope you’ve found it useful. If so, please share using the buttons below or pop a comment on!

Please note, these hints work with versions of Microsoft Word currently in use – Word 2007, Word 2010 and Word 2013 all for PC. Mac compatible versions of Word should have similar options. Always save a copy of your document before manipulating it. I bear no responsibility for any pickles you might get yourself into!

This is part of my series on how to avoid time-consuming “short cuts” and use Word in the right way to maximise your time and improve the look of your documents. Find all the short cuts here

Related posts on this blog:

Track changes 1 – why use it, where can you find it, what can you do with it?

Track changes 2 – customising Track Changes

Track changes 3 – working with a document with tracked changes

Formatting comments balloons – everything you have ever wanted to know!

What to do if your comment boxes go tiny in Word – A common problem, hard to find the answer!

What to do if your comment box text runs right to left – Useful if you edit texts from Arabic authors

Changing the language in your comment balloons – From US to UK English and beyond …

 
14 Comments

Posted by on April 8, 2015 in Copyediting, Word, Writing


Tags: , , , , , ,

How do I display my horizontal scroll bar in Word?

I was innocently using Word one day when I discovered that my horizontal scroll bar had disappeared. This was annoying, because I had a document open at the time at the side of another document, and wanted to navigate around it. Where had my scroll bar gone? This is how I got it back …

How do I display my horizontal scroll bar?

You do this in Word Options.

In Word 2007, click the Home button at the top left, and choose Word Options from the box that opens:

Accessing Word Options Word 2007

In Word 2010 and 2013 click on File at the top left and then Options

Accessing Word Options Word 2010 and 2013


Once you are in Word Options, go to Advanced options, then Display:

Word Options - advanced - display

Make sure that you tick Show horizontal scroll bar, and there you are:

horizontal scroll bar is displayed

Please note, these hints work with versions of Microsoft Word currently in use – Word 2007, Word 2010 and Word 2013 all for PC. Mac compatible versions of Word should have similar options. Always save a copy of your document before manipulating it. I bear no responsibility for any pickles you might get yourself into!

This is part of my series on how to avoid time-consuming “short cuts” and use Word in the right way to maximise your time and improve the look of your documents. Find all the short cuts here

Related posts on this blog:

How do I display the rulers in Word?

How do I hide the taskbars in Word?

 
16 Comments

Posted by on December 3, 2014 in proofreading, Short cuts, Word


Tags: , , , , , ,

How do I tell Word not to spell-check certain paragraphs?

This topic came up after someone commented on one of my other Word-related posts: he had a document that included programming code and he wanted to exclude that from the spell check because a) it wasted time and b) when displaying spelling errors, the red wiggly lines distracted him. He had used an easy method to exclude these in Word 2003 (highlight, click spell check, tick “do not check spelling and grammar”) but had got stuck with Word 2010.

This article will tell you …

  • How to exclude text in your document from being spell checked
  • How to only spell check a particular section of your document

How do I tell Spell Check not to check particular paragraphs in Word 2003?

So, in Word 2003, Spell Check is on the toolbar and you can highlight the text you don’t want to check, click spell check and tick “do not check spelling and grammar”. it’s actually very similar in Word 2007, 2010 and 2013 – here’s my hint for the easiest and quickest way to do this.

How do I tell Spell Check not to check particular paragraphs in Word 2007, 2010 and 2013?

First of all, highlight the paragraph (or paragraphs, holding down the control key) that you want to exclude from Spell Check.

Then you have two ways of telling Word not to spell check these sections:

1. The quick way: click on the language at the bottom of your screen:

Select text to exclude from spell check

If the editing language is not showing at the bottom of the screen, left-click on the bottom tool bar and choose to display language. If that doesn’t work, see this post).

2. The official way: on the Review tab, select Language and then Set Proofing Language (note: don’t click on Spelling and Grammar, as that will spell check the highlighted text, exactly opposite to what you want to happen):

Word language setting

Both of these options will display the Language Selection dialogue box:

Language selection dialogue box

Once you have the language choices displaying, tick your language and tick “Do not check grammar and spelling“. That should mark all of the text you highlighted such that the spell checker avoids it. I hope that works for you and takes less than 5 minutes – do let me know!

How do I just spell check one paragraph or section of my document in Word?

Allied to this is the question of how you just check a particular part of your text. Here’s how:

Highlight the text you want to check.

Press the Spell Check button, which you can find in the Review tab:

Spell check one section of a document

Word will spell check only that highlighted paragraph (or word, if you so choose) and will helpfully ask you if you’d like to continue checking everything else:

Continue spell check?

I hope you’ve found these hints helpful! Do share or pop a comment on this post if I’ve helped you learn something new or solved a tricky problem for you, and do explore the rest of my blog if this is your first visit!

Please note, these hints work with versions of Microsoft Word currently in use – Word 2007, Word 2010 and Word 2013 all for PC. Mac compatible versions of Word should have similar options. Always save a copy of your document before manipulating it. I bear no responsibility for any pickles you might get yourself into!

This is part of my series on how to avoid time-consuming “short cuts” and use Word in the right way to maximise your time and improve the look of your documents. Find all the short cuts here

Related posts on this blog:

How do I use Spell Check in Word 2007 and 2010?

How do I use Spell Check in Word 2013?

How do I change the editing language of my document?

Why do I need to use Spell Check if my work is being edited?

 
2 Comments

Posted by on November 19, 2014 in proofreading, Short cuts, Word


Tags: , , , , , ,

My work is being proofread – why do I need to use Spell Check?

Spell check buttonI recently posted a how-to article about using Spell Check (well, one for Word 2007/2010 and one for Word 2013, actually). Today I want to talk about why you should use Spell Check, even if you’re using an editor or proofreader of the human variety to check your work.

Using Spell Check before you send your work to your editor

So, you’re using an editor to check your work: why on earth should you need to run a spell check first?

I’m not talking about going through your document with a big pile of style guides and dictionaries by your side. I’m talking about taking maybe half an hour to press the spell check button and go through your manuscript removing the obvious errors. You know, the ones where you spell it obvis errrors.

As an editor, it can get a bit frustrating when you’re picking away at typos (form for from, fried for friend) which are composed of ‘real’ words (which obviously a spell checker program won’t notice) and then you find a load of fromms or frends which a spell check would have eliminated. And here’s the thing: we’re human. If we’re concentrating on picking up your incorrect spellings and non-existent words, we’re less likely to be able to concentrate in detail on what we’re supposed to be doing: making your language express your thoughts and meaning as clearly as possible.

Yes, we can run a spell check for you, and if I spot more than the odd error that this would eliminate, I will do that myself. But it’s time-consuming. And that’s another thing: time-consuming. Some editors charge by the time spent, some by the word. I’m a charge-by-the-word woman myself, but if you’re paying for someone’s time, why pay them to do something you can do yourself?

So, there are two points to bear in mind here:

  1. If your work isn’t spell checked, your editor will be concentrating on those issues and less able to go deeper into their work
  2. If you’re paying by the hour, you’ll be paying extra needlessly

I have to add here that it can seem a little impolite, too, to not run a spell check before you send the manuscript in to your editor. A little bit as if you’re the creative person with the big ideas and you’re sending it off to the paid help who will sort out things you’re too important to do. I’m pretty sure that this is NOT the case for the majority of authors, but it’s always best to avoid that impression if at all possible. See the caveats below …

What if I don’t know whether spell check is correct?

That’s fine. We’re the experts, you’re the creative one. If you’re not sure of your spelling and which word is correct, you can always either leave a note in the margin or let us know you ran a spell check but you’re not sure of a few things. In fact, spell check itself isn’t always correct (see below). All I’m saying here is that the fewer avoidable mistakes there are in your manuscript, the better the job that I’m able to do for you.

Times when pre-spell-checking isn’t appropriate

I’m not a monster and I’m not inflexible – nor are the other editors I know. We’re a kind and helpful bunch. If you have issues with your spelling, dyslexia or any other special situations, of course we’re not going to reprimand you over issues in the spelling in your document. Also, if you’re using voice recognition software, I’m not actually sure how the spell-checker works in that situation (if someone who uses such software wants to comment, that will be very so useful and I’ll include your notes in an update).

However, it is important to let your editor know if you have any special issues like these. It will help us to do a better job for you, and perhaps even to explain our choices and changes in a way that’s easiest for you. Also, we can look out for particular artefacts that might arise in your manuscript because of the way in which you’ve written it (voice recognition software is notorious for inserting homophones into the texts it produces). As I said, we’re an understanding and helpful bunch, and we want to help you in the best way possible.

Using Spell Check when you’ve received your work back from your editor

No – I don’t mean right away! Well, if you find a load of legitimate errors  you might want to speak to your editor (although nobody’s perfect and no editor I know can do 100% perfect work: we’re human). But, most of the time, your manuscript is going to come back to you either in Word with Track Changes turned on or in an annotated PDF which you then need to update. In both of those cases, you doing the corrections can allow errors to creep in. It’s nobody’s fault, it’s just what happens.

I learned this the hard way when I received my last manuscript back from my editor. I accepted changed as I went along and did one final Accept all changes once I’d reviewed the document, but some oddities had crept in, especially in the spacing around punctuation. Luckily, I noticed in time, ran a quick spell check and got it all sorted out – but if someone who’s an editor herself can manage to introduce errors when dealing with her editor’s edits (sorry!), I’m going to assume that anyone can manage to do that!

Beware: Spell Check is not always right (gasp!)

There is a caveat here.

Much of English grammar is not totally prescriptive. There are often two ways of going about doing something, especially when you look at hyphenation and capitalisation. This means that when you’re spell-checking after the edit, you should bear in mind the style sheet that your editor’s sent you. If they’ve chosen a particular word form to make things consistent in your manuscript, I’d consider keeping it even if the automated spell check says it’s wrong (in its opinion). Microsoft software appears to use something called the “Microsoft Manual of Style“, but obviously if you’re working to a particular style guide such as Oxford or Chicago Manual of Style, they will over-ride Microsoft if there’s a clash. A classic example of this is “proofreader” – that’s the accepted way of writing the word in most of the major style guides, but Word Spell Check does like to change it to proof-reader. I’d kind of assume your editor knows how to (not) hyphenate that one, but do bear this in mind when you’re doing that final check.

Also, if you’re writing creatively, your editor might have left something in which is correct, but creative, while spell check (even without grammar check) might take issue with it. A classic example I find is spell check trying to change they’re to their, irrespective of the actual correct use of the word. So beware on grammar or word form choice issues like that – you can always check back with your editor or consult a style guide if you’re not sure.

This article has talked about why writers should use spell check even if they have an editor. If you’ve got an opinion on this, or a good reason NOT to use spell check, do please post a comment below! And if you’ve enjoyed this post or found it useful, please do share it using the share buttons!

Related posts on this blog:

Using Spell Check in Word 2007 and 2010

Using Spell Check in Word 2013


Tags: , , , , , , ,

How to use spell check in Word 2013

Because Spell Check looks different in Word 2013, here is a special article just on that version of Word. It should be read alongside the more detailed post on Spell Check for Word 2007 and Word 2010 which you can find here.

What is Spell Check?

Spell Check in Word checks  the spelling and grammar in your document, highlighting any words that it thinks are spelled incorrectly and offering alternatives.

It’s always worth using Spell Check, even if you’re an accomplished writer or feel you can edit your own work – we all make mistakes, and this will catch many of them.

How do I start Spell Check?

We run Spell Check from the Review tab in Word:

Word 2013 spell check

Note: I’ve added the Spell Check button there because I use it a lot. If you want to learn how to add buttons to the QAT, read this article.

With your cursor at the beginning of the document, click on the Spelling and Grammar button. Word will highlight each word that it thinks is incorrect, starting with the first one:

Word 2013 spell check

Here, I started at the beginning of the text, but you’ll notice that it’s missed out “peace of txt” – see more detail in the main article on this.

What options does Spell Check give you?

  • Ignore Once ignores that instance of the word in question
  • Ignore All ignores that exact word throughout the rest of the piece
  • If you own a copy of Word 2013 outright or have a subscription and are logged in, Add to Dictionary will add that exact word to the Spell Check dictionary so it will never ask you ever again if you’ve miss-spelled it. I have used this for my name in the past, which is why this Spell Check process won’t pick up “Broomfield” or “Dexter”, and I also add in commonly used technical terms and jargon that comes up a lot in the texts I work with.
  • Change changes that instance of “misteaks” to “mistakes”. Any other examples will stay as they are
  • Change All changes every instance of “misteaks” to “mistakes”.
  • If you own a copy of Word 2013 outright or have a subscription and are logged into your Microsoft Office account, AutoCorrect is available and brings up the AutoCorrect screen (see this article for more on AutoCorrect) which allows you to set up an automatic correction for the future, so whenever you type “misteaks” it will change to “mistakes”. This is really useful if you notice that you’re mistyping a word regularly.

Grammar check in Word 2013

Grammar check not only highlights where you’ve gone wrong, but gives you a little lesson in the Spell Check panel, too:

Word 2013 spell check grammar check

I find the grammar checker to be quite rigid and a bit odd. It’s up to you whether you allow grammar checking, and instructions for tweaking the Spell Checker will appear in a later article.

What if I change my mind or make a mistake?

In Word 2007 and 2010 there was a handy button in the Spell Check dialogue box that allowed you to undo previous changes. This has gone in Word 2013, so if you realise you’ve made a mistake, you will need to use the Undo button (or press Control-Z) to go back to correct your mistake.

Does Spell Check ever get it wrong?

In short – yes. See the main article for more explanation and examples.

Help – my Spell Check’s making everything go into American English!

Your Spell Checker will work with whatever variety of English (or any other language) that your text is set to. So if you have your text set to be in American English, that’s the language your Spell Check will use. Learn how to change the language of your document and your editing language  – and watch out, as your comment boxes might appear in another language, too, which will upset your Spell Checker – use this article to make sure your comment language matches the rest of the document.

Can I use spell check in other applications ?

Wherever you see a button like this, you should find a spell check option:

spell check icon

In this article we’ve looked at Spell Check in Word 2013 and how it differs from previous versions. In future articles I’ll be sharing how to tweak your Spell Check settings, how to tell Spell Check NOT to look at particular text, and when to use Spell Check when you’re working with an editor. Oh, and there will be a parallel post on Spell Check in Word 2013, too!

———————

This is part of my series on how to avoid time-consuming “short cuts” and use Word in the right way to maximise your time and improve the look of your documents. If you’ve enjoyed the post or found it useful, please use the sharing buttons below to share it via your social media networks – thank you!

Please note, these hints work with versions of Microsoft Word currently in use – Word 2007 and Word 2010 for PC. Mac compatible versions of Word should have similar options. Always save a copy of your document before manipulating it. I bear no responsibility for any pickles you might get yourself into!

Other useful posts on this blog

Spell Check in Word 2007 and Word 2010

How to change the language of your Word document

How to change your editing language

How to change the language of your comment boxes

How to use AutoCorrect

How to add buttons to the Quick Access Toolbar

Find all the short cuts here … and see the full resource guide here.

 
3 Comments

Posted by on October 15, 2014 in Errors, New skills, Short cuts, Word, Writing


Tags: , , , , , , ,

How do I stop pictures jumping around when I edit a Word document? Combining words and pictures 2

More from my own editor, Catherine Fitzsimons, creator of educational materials and community magazines, on the tricky task of controlling how images behave in Word documents …

Last week, we looked at the ways in which Word can wrap text around pictures. To control how close the text is to the edge of a picture we opened the More Layout Options window from the right click menu. You may have noticed there are two other tabs in this:

Diagram 9One lets you control the size of your picture, but there are easier ways to do that (see How do I change the size of pictures in Word? on my website). The other, Position, provides some detailed options for controlling where your pictures go and is the key to stopping them from jumping around. It looks complicated, but I don’t think I’ve ever, in years of creating worksheets and doing magazine layout, had to resort to changing anything in the sections labelled ‘Horizontal’ and ‘Vertical’ – I’ve just used the ‘Options’ section.

Diagram 11Before we go on to that though have a look at the ‘Allow overlap’ button. This is useful if you want to get two pictures closer together than their boundary boxes would otherwise allow. For example, here you can see that although the books themselves don’t overlap, the boxes round them do. Notice also how the Tight-wrapped text goes inside the boxes because these images have a transparent background.

Diagram 12

Why do pictures move? How do I stop pictures moving?

Basically, pictures can either be locked in position on the page or moved around with the text.

In Word 2013 ‘Move with text’ and ‘Fix position on page’ appear as options on the Wrap Text menu and on the little pop out Layout Options menu (so long as your picture isn’t in line with the text).

Diagram 5Diagram 4bIn earlier versions you have to go into More Layout Options|Position and check or uncheck ‘Move object with text’ – it’s checked as default. If you have a picture exactly where you want it on a page, all you have to do is uncheck the box (or make the appropriate selection from one of the menus in Word 2013). That picture will then stay exactly where it is when you edit or add to the text or insert another picture – it will move only if you grab it and place it somewhere else yourself (or play with the numbers in the ‘Position’ tab of More Layout Options).

Allowing pictures to move with text is a little more complicated and depends on understanding the idea of anchors.

When you whizz a picture around the page, Word makes a decision about what text to tie it to: it generates an ‘anchor’, usually at the beginning of the paragraph nearest to the top left corner of the figure (working up). If you then move or delete that bit of text, the image will move or be deleted with it — that’s why pictures sometimes vanish unexpectedly. They usually jump because an anchor and its picture have to be on the same page. That means that if you type an extra paragraph and the anchor moves to a new page, the picture will jump to that new page too. It’s Word trying to be helpful, aiming to keep pictures and the writing about them together, but it does feel pretty random if you don’t know the logic.

Word 2013 helpfully shows you the anchors whenever you’re clicked on a picture, but it is possible to see them in earlier versions: since they are formatting marks, they will show up if you click the symbol that looks like a backwards P in the Paragraph group on the Home ribbon. If you can see them, they can help you work out why a picture won’t go where you want it or keeps disappearing altogether.

Diagram 13

In Word 2010 or 2007 you can also get the anchor marks to show all the time (without the other formatting marks) by going to File (Office button in 2007)|Options|Display|Always show these formatting marks on the screen, then ticking ‘Object anchors’ and OK.

Once you get the hang of how the wrapping styles and the anchors affect where the pictures go, it becomes much easier to put a picture in the right place and make it stay there. Here’s the order I suggest for creating a document that has words and pictures:

  • Write and type all the text first (or work a page or two at a time).
  • If possible, get the pictures as close as you can to how you want them (size, resolution, cropping, colours) before you add them to your text – either use image editing software or get it right in a blank document then copy and paste into the one you’re working on.
  • Once you have a picture where you want it, with the right sort of size and wrapping, consider locking it in place.
  • If a picture that has to stay with the text appears to be misbehaving, go in search of its anchor to track down the problem.

Still can’t get the pictures where you want?

If you’re creating something with a lot of images, or need more complex layout — such as for a brochure or worksheet — then there are alternatives to putting the text and pictures straight into the document. I explain how to use a table to combine text and pictures in How do I organise a lot of pictures on a page? over on my own blog where, in future posts, I will look at alternative solutions, and other issues to do with using pictures.

Other useful posts

On this blog:

How do I make pictures go where I want them to in Word?

On Catherine’s blog:

How do I organise a lot of pictures on a page?

How do I change the size of a picture in Word?

 
14 Comments

Posted by on August 27, 2014 in Short cuts, Word


Tags: , , , ,

How do I make pictures go where I want them to in Word? Combining Words and Pictures 1

Today and next week we have guest posts from Catherine Fitzsimons on placing images in Word documents. This is a tricky topic and one I’ve been wanting to write about for ages: Catherine does a lot of work with newsletters and other complex documents, which makes her the ideal person to write these posts for me!

How do I combine text and pictures?

Have you ever tried to put a picture in Word and found your text, which started at the top of the page, suddenly moves down? And then, as you type more, or change the size of the picture* to make it fit better, things move to unexpected places? Or the picture stays where it is, but leaves you lots of blank space on the page? Then, when you try to move it around, things only get worse and you end up with something like this:

Diagram 4

This is because Word assumes two things:

  • That you want the picture (or, to be precise, the bottom left of it) to be placed where the cursor is. That means it goes immediately after the last thing you typed before choosing Insert|Picture and, when you try to move it, you can see a vertical line where it believes you want it to go.
  • That you would like the text to run right up to the picture and carry on straight after it.

In other words Word treats your picture like an outsize character and refers to this option as having the picture ‘In Line with Text’.

However, you can change your picture to what is known as a ‘floating figure’ so you can put it where you like but, before we delve into all that, have a look at a handy shortcut in the ribbon versions of Word. If you select your picture, go to the Picture Tools|Format ribbon that appears and click the down arrow by Position, you will get a choice of nine places to place your picture without any fiddling around at all.

Diagram 4a

In fact, in Word 2013 some of these appear in a little pop-up menu that you can call up by clicking the thing that looks like a rainbow drawn on lined paper which hovers at the top right of a picture when you select it.

Diagram 4b

All wonderful, but what if you need more flexibility? Read on.

Once again, select the picture and go to the Picture Tools|Format ribbon but this time click the down arrow by Wrap Text. (Alternatively, or in older versions of Word, right click on the picture and choose Wrap Text from the menu that appears.)

Diagram 5

Doing that brings up another menu which lets you choose the relationship between your text and picture. The icons helpfully explain the options:

Square means that the text will wrap all the way around your picture (strictly speaking around the ‘bounding box’ – the rectangle that appears when you select it). When you move the picture around the page the text flows above, below and to the sides – or one side if you put your picture up against a margin. Notice, though, that it doesn’t make text down the sides into columns – it reads across the picture. (If you want your picture in the middle of a page like this, it’s probably best to make your text into two columns first.)

Diagram 6

Top and Bottom does exactly that. It looks just the same as if you had typed Enter before and after inserting your picture but with the important difference that the picture moves as an object, not a character, so it’s easy to place it somewhere new.

Tight only works with images which are not rectangular or, like some clip-art, have a transparent background. It wraps the text around the edges of the image (assuming these ‘wrap points’ have been defined) rather than around the bounding box.

Diagram 7Through is a complicated one and I don’t know anyone who has used it. It works the same way as Tight except that it will also put words right down into any transparent sections of the picture that are linked to the background, again, providing that the wrap points have been set up properly.

Behind Text makes the words go over the top of your picture (which can work well so long as the image isn’t too detailed or too similar in colour to the font), whereas In Front of Text means that non-transparent parts of your image obliterate the words. Why might you want to do that? If you insert a an ellipse that has Shape Fill as ‘No Fill’ and Shape Outline red, and float it in front of text then you have a useful little shape for circling things you want to highlight.

Diagram 8You can refine Square, Tight and Through further in Picture Tools|Format|Wrap Text|More Layout Options. As you can see, you can tell Word to put text on one side of the picture only – Left, Right or whichever has the most space for text. This is also the window you use if you want to make your text squish up closer to your picture — if it already has a lot of white space around it for example — or back off a bit if the words run right to the edge of your picture. Unsurprisingly, you can also adjust the spacing above and below for Top and Bottom wrapping.

Diagram 9This version has text wrapped Tight to largest side only and the Distance from text adjusted to 0cm on Left and Right as well as top and bottom.

Diagram 10So, that’s the official way to put the pictures into the correct place in your document. And, more often than not, it works. However if you are adding more than one image, or later add a text box or table (anything that Word calls an ‘object’), or if you revise what you have written then pictures you’ve put in sometimes jump around or even disappear. You can minimise the chances of that happening by typing all your text before thinking about layout and images but, even then, it still sometimes happens. I’ll explain why, and suggest how to stop it next week.

*But how do I change the size of a picture? See How do I change the size of a picture in Word? on my own blog.

Catherine Fitzsimons has the unenviable job of being my own editor for my books on business and other careers topics. Ever since she first started using Word she has been finding ways of getting pictures and text to sit together exactly the way she wants: first as a teacher making worksheets then doing layout for community magazines.

Other useful posts

On this blog:

How do I stop pictures jumping around in a Word document?

On Catherine’s blog:

How do I organise a lot of pictures on a page?

How do I change the size of a picture in Word?

 
8 Comments

Posted by on August 20, 2014 in Short cuts, Word


Tags: , , , ,

ASCII codes for common non-standard characters

In last week’s post I explained how to insert non-traditional characters into your Word or other text-based document. I promised to share a list of commonly used ASCII keyboard shortcut Alt+ codes, and here they are. If you have a favourite non-standard character that is not represented here, please let me know in the comments below, and I’ll consider adding it.

Where did I get these codes from? As explained previously, you can pick them up in Word when inserting a character (Insert – Symbol – drop down From to ASCII) or in the Character Map (click on a symbol, look bottom right for the code). There are also various online resources that list them, and this is a list of my favourites. I hope you find it useful!

à  Alt-0224 lower case a grave

á  Alt-0225 lower case a acute

â  Alt-0226 lower case a circumflex

ä  Alt-0228 lower case a diaeresis

æ  Alt-0230 lower case ae

ç  Alt-0231 lower case c cedilla

è  Alt-0232 lower case e grave

é  Alt-0233 lower case e acute

É  Alt-0201 upper case e acute

ê  Alt-0234 lower case e circumflex

í  Alt-0237 lower case i acute

ñ  Alt-0241 lower case n tilde

ô  Alt-0244 lower case o circumflex

õ Alt-0245 lower case o tilde

ö Alt-0246 lower case o diaeresis

ø  Alt-0248 lower case o stroke

ð  Alt-0240 lower case eth

Р Alt-0208 upper case eth

þ  Alt-0254 lower case thorn

Þ  Alt-0222 upper case thorn

ß  Alt-0223 lower case sharp

× Alt-158 multiplication symbol

÷ Alt-246 division symbol

Note: there is no ASCII code for a tick / check mark – you need to use Wingdings2 and a P in Word, not sure how people manage it elsewhere (add a comment if you know how to do this).

If you would like to suggest additions or would like to comment on this post in general, please do – also do consider sharing it via the buttons below.

Related posts on this blog:

how to insert non-traditional characters

 
12 Comments

Posted by on July 30, 2014 in Language use, Short cuts, Word, Writing


Tags: , , ,