RSS

Category Archives: Word

What to do when you encounter plagiarism: student work

PlagiarismThis post is for editors who suspect that they might have come across deliberate or accidental plagiarism, or are concerned that they are doing “too much” and thus causing their client to unwittingly engage in plagiarism. By sharing how I approach this, and asking for comments, I hope I can gather together a resource of best practices for other editors / proofreaders.

What is plagiarism?

Plagiarism is, at its most basic, the act of passing someone else’s work off as your own. It usually involves copying someone else’s work, text, content, however you want to describe it, without pointing out that  you’ve copied it or referencing it back to the original work.

In my work, plagiarism is found most often in student work and business marketing content such as websites and blogs. This post is about student work, and I discuss business content in another post.

Plagiarism in academic work

Plagiarism is, unfortunately, rife in academic work. You can kind of understand it: students are under a lot of pressure, and overseas students in particular can have a lot of financial pressure from their funders to return home with a good degree and pick up a high-level job. With courses over-subscribed and A-levels often not preparing students for the rigours of academic work, the student may not understand that they are not supposed to use other people’s work unattributed, although universities do provide them with reams of paper and things to sign which are intended to explain and prevent plagiarism.

I tend to find two kinds of plagiarism, deliberate and accidental:

Deliberate plagiarism

I’ve come across some pretty shocking examples of deliberate plagiarism in my work. This includes sections marked in a different colour, with a note in the covering email: “Can you please rewrite the sections I’ve highlighted”. More heartrending are the examples where the author says to me, “My English is not good enough to rewrite the parts from other authors, please help me to rewrite them”. But I can’t.

Deliberate or accidental plagiarism

I often come across direct quotations used as if they are the author’s own words. Unfortunately, to the experienced editor, it becomes all-too-clear when a direct quotation is being used without being referenced. Here are some markers of the unattributed block of text that I’ve found:

  • The language changes subtly: more multi-syllable words, different kinds of linking words used
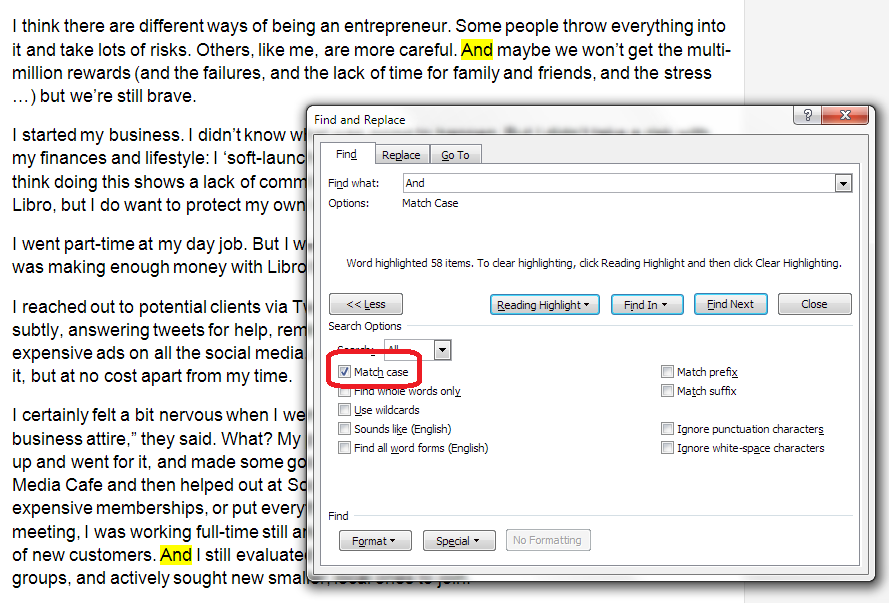
  • The standard of the English becomes markedly higher, with no corrections needed to be made (even if you miss these as you go along, the island of white in a sea of coloured corrections and highlights stands out as you look at the page)
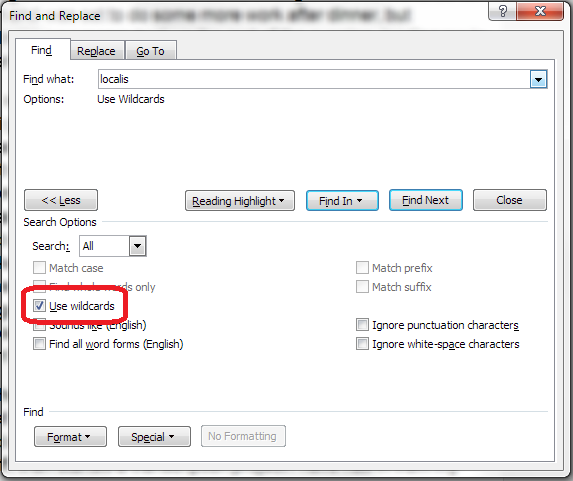
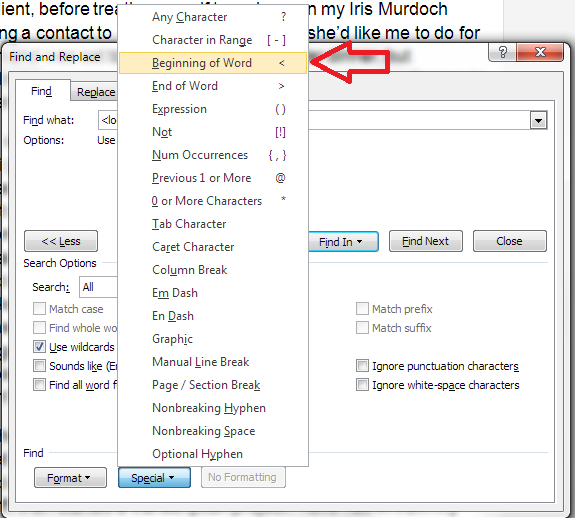
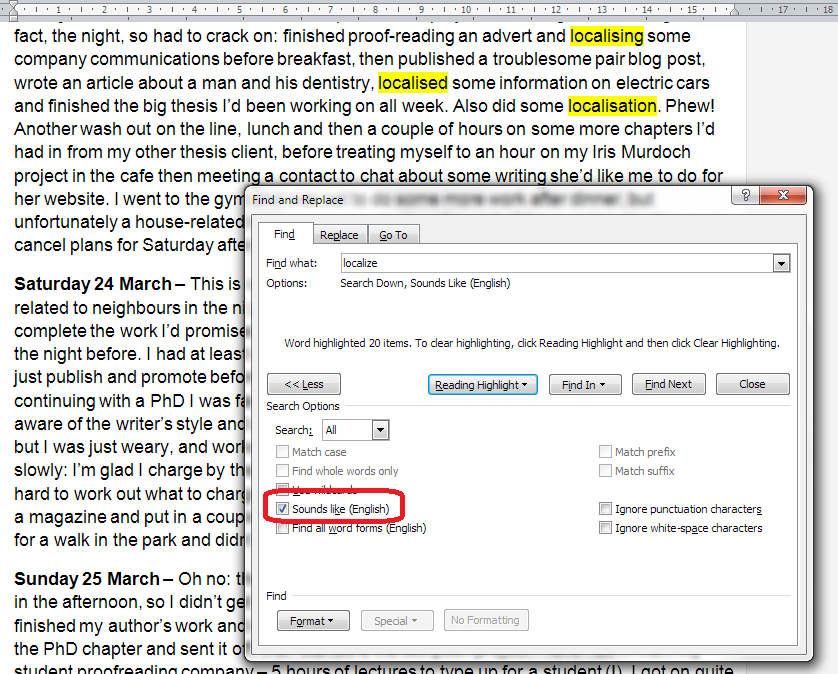
  • The language changes from American to British English or vice versa (many students are inconsistent in their spellings, but a block of the opposite type of English is a real giveaway)
  • The font, size or colour of the text, or the indentation, line spacing or justification changes – a classic case of copy and paste

Sometimes you can give the student the benefit of the doubt here. Maybe they meant to rewrite and reference and forgot. Maybe they didn’t realise that they couldn’t use blocks of text like this. But it doesn’t mean that it can go unmarked.

Accidental plagiarism

I would count accidental plagiarism as a case where a student who has clearly rewritten ideas taken from other texts and referenced direct quotations and such ideas misses off a reference after a piece of text that is clearly from someone else. Of course, the cases above may be accidental, too, but they do still need to be addressed, as does the odd missed reference.

Plagiarism by the editor

There’s another form of plagiarism which the editor must resist themselves: rewriting so much of the text that it’s the editor who has in effect written the text, and not the student. I talk about how I avoid that below.

What to do when you encounter plagiarism in student work

It’s our duty as decent and principled editors to flag up plagiarism when we find it and help our student customers to realise how they should be referencing and when they’ve made a mistake. It is not our job to rewrite text or make so many corrections and suggestions that we have in effect written the essay ourselves. There are plenty of dodgy proofreading companies out there that will do that (and essay writing companies that will sell students ready-written essays), but as a decent editor, you should not be involved in those sorts of practices.

If you don’t flag up these problems, it is likely that the essay will be run through the university’s plagiarism software and that will flag them up to serious effect (many students know this, and that’s why they might ask us to rewrite sections for them). If you’re concerned about returning work to a student with plagiarism noted and discussed, remember that you’re saving them from possible penalties or even expulsion from their course if they continue to plagiarise and attempt to pass others’ work off as their own, even if you’re not concerned about helping people to obtain qualifications fraudulently.

Here’s what I do to avoid helping the student to commit plagiarism by passing off my own words as their own:

  • I always work with Track Changes turned on and instruct the student to check each change and accept or reject it themselves. Yes, I know they can press “Accept all changes”, but I send them instructions on how to work with Track Changes that don’t include this option.
  • I will delete, add and rearrange only if either the words are all correct but the order is incorrect, or the order is correct but the tenses are incorrect. You soon get a feel for the light touch needed to bring writing up to a clear output without rewriting.
  • If a sentence is obviously wrong in terms of content, I will insert a comment and advise the student to check the correctness of the content.
  • If a sentence is so garbled as to not make sense, I will insert a comment and ask the student to rewrite it.
  • If a sentence could mean one of two things, I will insert a comment to suggest the two opposite meanings and ask which they mean.
  • I am clear in my terms and conditions on this website and in my initial text to the student that this is how I operate.
  • When dealing with a bibliography, I will make small amendments to isolated errors in punctuation or order, usually up to about 10% of entries. If more than 10% of entries are not formatted according to the rules the student has sent me, or are completely chaotic, I stop editing the bibliography and insert a comment to remind the student that the bibliography is supposed to demonstrate their skill and knowledge, so they must work on it themselves.

Here’s what I do to stop the student plagiarising:

  • If I find the odd missed reference for a direct quotation, I will highlight the offending quotation and insert a comment reading “Reference required”.
  • If I find the odd obvious copy and paste which has not been referenced, I will highlight the offending sentences and insert a comment reading “Reference required”.
  • If I find an isolated substantial section which has clearly or even possibly been lifted from another source, I usually copy a few sentences and pop it in a Google search to see whether I can find the original. Then I will highlight the section and insert a comment along the lines of “This appears to come from another source without being referenced. Mark as a direct quotation and reference, or rewrite in your own words and reference”.
  • If I find several substantial sections like the above, I will stop editing and write to the student advising that much of the text has been lifted from other sources without being referenced, this is plagiarism and they need to address the issues.
  • If I find anything more than the odd missed reference to a direct quotation, I will mention the referencing issue in my covering email when returning the work, to ensure that the student is reminded to reference all direct and indirect quotations (thanks to Liam for his comment below reminding me that I do this).

What if the student says it’s OK to rewrite their work?

Sometimes when I return work to a student advising that it’s risking plagiarism to have me continue working on their text (usually because of the level of changes I’m having to make to the text rather than lifting work from other writers), they will come back to me to say that their supervisor / tutor says that it’s OK to do this amount of rewriting.

If they do this, I request that their tutor writes to me telling me it is OK to engage in this level of correction. I require this letter to be on headed paper, signed by the supervisor and scanned in and emailed to me. This hasn’t happened very often; when it has, I have contacted the supervisor to check, and continued with the work. I have saved the scanned letter alongside my copy of the student’s work in case of any comeback.

This article has outlined what I do when I encounter plagiarism in student work. I have resources on this website about plagiarism (listed below) which I am happy for you to reference if you need to (but not copy!). If you have other ways of overcoming this issue, please do submit a comment!

Related posts on this blog:

Plagiarism in business texts

On plagiarism

How to quote sources without plagiarising

Referencing for academic writing

Choosing a proofreader – student edition

My terms and conditions

Why has my proofreader not edited my bibliography?

On (not) crossing the line


Tags: , , , , ,

How to use Find and Replace in Word 2007, 2010 and 2013 2: Advanced Find

Hopefully, you’ve already read about simple Find and Replace in Word in my earlier post. In this article, I’m going to show you some of the Advanced Find features to do with word forms, wildcards and where you’re actually searching. Handily enough, these are the same in Word 2007, 2010 and 2013. For hints on replacing, see the previous article, and for finding formats, look out for my next post in this series (I will link it to this post once it’s live). I’m going to start by discussing the three different options for viewing the results of a simple Find search in Word 2010 and 2013, then move on to the Advanced Find options in all three versions.

Find options in Word 2010 and Word 2013 (Navigation)

When  you hit Ctrl-F to Find in Word 2010 and 2013, you are shown the Navigation side panel. This gives you three options for viewing the results of your simple search (i.e. you’ve searched for just a word or phrase, no whole word only or match case options applied).

The first tab on the left gives you the Outline view – if you have headings in your document, it will give you a run-down of those,and highlight in yellow where your search term appears. The search term “localisation” has been input into the search box at the top.

Word 2010 simple find options 1

The second tab gives you a Page view, showing only the pages that the search term appears on (you will see that it’s displaying pages 5, 6 and 14 here) with the search term highlighted.

Word 2010 simple find options 2

The third tab along gives you the Paragraph view, and this is the one that I find most useful, as it shows you the search term in its context. Click on the box and you’ll navigate to that place in the text. As you can see here, the word has also been highlighted in the actual text, and this is true for all of these views. This paragraph view is the most useful for seeing where you’ve used a word and deciding whether to change it.

Word 2010 simple find options 3

Now we’re going to look at some of the Advanced Find options. You can get to Advanced Find by clicking on the More button in Word 2007’s Search box, or by clicking the down arrow by the search input field and choosing Advanced Find in Word 2010 or 2013. Note, in Word 2010 and 2013, you can click on Options after clicking the down arrow, but that isn’t as specialised or useful as choosing Advanced Find.

If you’re confused about how to find the Advanced Find dialogue boxes, read this post for screen shots and explanations.

Advanced Find options: Find In

The Find In option allows you to specify where exactly you want to look for your search term. This is particularly useful if you are looking for something you or someone else has said in the Comments area of the text, or indeed the footnotes. Here I have a document with a main text, Comments and footnotes. I use the dropdown arrow next to Find In to access my options:

Advanced find options 1 find in

Whichever of these options you choose, it will only search in that area, saving time and narrowing down your search to exactly what you’re looking for.

Advanced Find options: Match case

Match case is extremely useful if you are only looking for a particular form of a word. For example, I might want to catch the instances where I’ve started a sentence with “And”. If I just search for “and” with no other options set, Word will usefully highlight all instances of the word. I’ve highlighted the one that I’m looking for in green here, but you can see how hard it would be to find amidst a sea of and … and … and. Note that I typed the word in with a capital letter, but unless I tell Word to take account of that, it will ignore it, and treat And, and, aNd, ANd, Andy, understanding, etc. all the same (to get rid of those last two, see the next section).

Advanced find options 2 no options

Tick the Match case box and it’s a different story. Now it’s only looking for And with a capital A. Note how the line under the search box includes a note of the option that I’ve selected:

Advanced find options 3 match case

Advanced Find: Find whole words only

As we saw briefly above, search for “and” without ticking any additional options, and Word will find the letters “and” however they may be capitalised and wherever they will be. Here, a search for and highlights the word understanding, too.

This can be really annoying, especially if you’re searching for a word that can appear as part of other words (like under, or stand!) and you want to do a Replace All on them or just find when you’ve used that particular word, not its compound. This is what happens when you don’t choose any options:

Advanced find options 4 no options

To stop this happening, tick the box next to Find whole words only. Now Word will only find the word “and” as a discrete word:

Advanced find options 5 whole words only

Note: you can use these two options together. For example, search for But using Match case and Find whole word only and you will limit what you find to sentences beginning with the word “But”, instead of all the examples of but in the middle of sentences and sentences beginning with “Butterflies” or “Butter” …

Advanced Find options: Wildcards

Lots of people know about the above two options, but Wildcards can seem a little alarming to the novice or even quite experienced Word user. Wildcards allow you to search very precisely for different forms or spellings of a word.

To use Wildcards in your search, tick the Wildcard option.

Advanced find options 7 wildcards

If you already know the special character to use in your Wildcard search, type your search term in the search box. If you need to check which special character to use, click on the Special dropdown on the button at the bottom of the screen. This will give you a huge range of choices for narrowing down your search:

Advanced find options 8 wildcards

In this case, I’m looking for words beginning with “localis”, so I choose the Beginning of Word option from the list:

Advanced find options 9 wildcards

Word inserts the special character in the search input box, and finds all of the words beginning with “localis”:

Advanced find options 10 wildcards

Now, you could just do a basic search for a bit of a word, but that’s only useful if the selection of letters you’re looking for all occur together. In the example above, we’re looking at the letters appearing at the beginning of a word, but what if you’re looking for a word and you can’t remember how you spelled it, or you fear you sometimes used an s and sometimes a z in “organisation”? Use the question mark option and search for “organi?ation” and you will find both spellings.

Note, there are many further special characters here apart from the ones used for Wildcards (which are ? – < and >) – I will be covering some of the most useful of those in future posts.

Advanced Find options: a note on Sounds like and Find all word forms

The two options at the bottom of the list can look quite tempting. But I will be honest and say that I don’t use them in my everyday work (if you do, please comment and share why you find them useful!).

Sounds like is the more useful of the two. It only works for the English language (presumably if you’ve bought a UK or US copy of Word) and it does what it says it does, finding words that sound like the word that you have entered.

Here I’ve searched for “Localize” and it has found the words that I would be looking for. They’re not spelled the same, but they do sound the same.

Advanced find options 11 sounds like

However, Find all word forms does NOT find “localisation” in the same piece of text, so I’d be careful about using this one (in fact, try not to), as it will miss out words from your search:

Advanced find options 12 all word forms

In this article, we’ve learned how to use some of the more advanced features of the Find function in Word 2007, Word 2010 and Word 2013 in order to be able to look for the correct, specialised word in our document, including being able to choose where in the document it is and choosing fewer or more examples of words containing the letters we’re searching for.

If you’ve found this useful, please take a moment to share it, using the buttons under the article, or send me a comment, as I love hearing from my readers and knowing that I’ve helped! Thank you!

—————————

This is part of my series on how to avoid time-consuming “short cuts” and use Word in the right way to maximise your time and improve the look of your documents.

Please note, these hints work with versions of Microsoft Word currently in use – Word 2007, Word 2010 and Word 2013 all for PC. Mac compatible versions of Word should have similar options. Always save a copy of your document before manipulating it. I bear no responsibility for any pickles you might get yourself into!

Find all of the short cuts here

Related posts on this blog:

How to use Find and Replace 1 – basic find and replace

 
51 Comments

Posted by on January 23, 2014 in Short cuts, Word, Writing


Tags: , , , ,

How to use find and replace in Word 1: simple search and replace

This is the first of three articles about the useful Find and Replace functions in Word. It covers Word 2007, Word 2010 and Word 2013 in detail, although once you’ve got past the first hurdle, they all work in exactly the same way. This article tells you why you might want to use Find and Replace, how to locate them, and basics of how to use them. Subsequent articles look in more detail at how to find specific words and phrases, and even symbols and formatting.

Why would I use Find and Replace?

The Find function in Word is very useful if you need to locate all of the places where you’ve used a particular word or phrase. I use it to check that I’ve kept things consistent. I might look for every instance of the word “Find” in an article on Find and Replace, for example, to check …

  • Have I always used it with a capital letter or sometimes with a lower-case initial letter?
  • Have I always typed Find and Replace, or sometimes Find & Replace?
  • Have I used find, finding, etc. too many times around the word Find, making the piece look clumsy?

I also use Find and Replace if I have decided that I want to change something throughout the text, for example:

  • I’ve used “low fat” and “low-fat” inconsistently and want to change all instances to low-fat
  • A client wants me to eliminate double spaces after full stops. I Find ”  ” and replace it with ” “
  • I’ve misheard an album title in a transcription and want to go back and find the incorrect version and replace it with the correct one

So, that’s why we use it – how do we use Find and Replace?

How do I access Find and Replace in Word 2007?

You can access the Find and Replace dialogue box in Word 2007 by going to the Home tab and clicking on the arrow to the right of Find at the right-hand end of the menu bar:

1a Word 2007

Word 2007 also uses the simple Ctrl-F keyboard shortcut to bring up the Find and Replace dialogue box (this also works in Word 2003).

1 Word 2007

Once you’ve brought up the dialogue box, type in the text you want to search for and press Enter or the Find Next button.

How do I access Find and Replace in Word 2010?

In Word 2010, you can access find and replace using the Home tab and the Find option at the right (note Advanced Find option):

2a Word 2010

If you just choose Find, you’ll get the sidebar shown below, if you choose Advanced Find, you’ll jump straight to the dialogue box.

Pressing Ctrl-F will bring up a sidebar with a simple search option. This seems very odd if you’re used to Word 2003 and Word 2007, as you are left wondering where the familiar dialogue box is, but it’s actually very useful, as you can see at a glance how many times your word is used and where in the text it can be found, and the word searched for (in this case localisation) is highlighted in the text:

2 Word 2010

If you want to access the more advanced Find and Replace dialogue box that you’re used to from Word 2007, you need to either choose Advanced Find from the Home tab Find area, or click on the arrow to the right of the magnifying glass in the side panel. If you do that, you’ll get a drop-down menu which includes Advanced Find.

3 Word 2010

Whichever option you choose, you will then be confronted with the familiar Find and Replace dialogue box:

3a Word 2010

Once you’ve brought up the dialogue box, type in the text you want to search for and press Enter or the Find Next button.

How do I access Find and Replace in Word 2013?

This works pretty well exactly the same as in Word 2010, just with fewer colours and less handy yellow highlighting (I’m sure you can add that back in and I’ll write about that when I find out  how to do it). So, you can either access Find and Replace using the Home tab, Find area, and dropping down the arrow at the right to choose Find or Advanced Find:

3a Word 2013

If you just choose Find, you’ll get the sidebar shown below, if you choose Advanced Find, you’ll jump straight to the dialogue box.

Or press Ctrl-F to access that useful sidebar that will surprise you if you’re accustomed to Word 2003/2007 … which will show you all instances of any word you search for in the whole document and highlight them (in yellow!):

4 Word 2013

Then, to reach the dialogue box, click the arrow to the right of the magnifying glass and choose Advanced Find:

5 Word 2013

And there’s your familiar dialogue box:

5b Word 2013

Once you’ve brought up the dialogue box, type in the text you want to search for and press Enter or the Find Next button.

Are there more options for Find?

You can access more options for Finding specific text by pressing the More button in the dialogue box:

5.5 more options 2010

This will give you lots more options for refining your search. Some are quite obvious, but I’m going to write about all of them in depth in another post.

Advanced find options

How do I replace text in Word 2007 / Word 2010 / Word 2013

(Note: all screenshots are from Word 2010, however this works exactly the same for all versions of Word back to Word 2003 and up to Word 2013 (at least)).

To Replace text, you need to go to the second tab along in the Find and Replace dialogue box, marked Replace. You will then be given an extra space to fill in the text you want to replace your found text with. In this case, I’m finding “localisation” and replacing it with “localization”:

6 replace

At this point you have a choice: hitting Find Next (to find the next instance of the word) and then Replace (to replace it with your new word) for each individual occurrence, or going wild and pressing Replace All (which will automatically replace every occurrence of the word you’ve found with the one you’re replacing it with),

7 replace what

I would always recommend using Find Next – Replace unless you absolutely know that you are not going to be replacing something you don’t mean to replace. Even replacing a double space with a single might play havoc if the person who wrote the document has used spaces to format tables (even if they shouldn’t do that, some still do). And consider this:

“John” means “toilet” in American English. So I might do a search and replace to Find John and replace it with toilet. But what if there’s a character or just someone mentioned called John Bloggs. Or, soon to be, Toilet Bloggs. It’s so easy for this to happen …

So, be careful with your Find and Replace and you’ll be fine!

———-

This article has covered the basics of Find and Replace. Next time, we have a look at the options you can use and using wildcards, and I will also look at finding and replacing formatting  …

If you’ve enjoyed this article or found it useful, please comment, or hit one of the share buttons you can see below this article. Thank you!

This is part of my series on how to avoid time-consuming “short cuts” and use Word in the right way to maximise your time and improve the look of your documents.

Please note, these hints work with versions of Microsoft Word currently in use – Word 2007, Word 2010 and Word 2013 all for PC. Mac compatible versions of Word should have similar options. Always save a copy of your document before manipulating it. I bear no responsibility for any pickles you might get yourself into!

Find all the short cuts here

Related posts on this blog:

Advanced Find and Wildcards

 
4 Comments

Posted by on December 11, 2013 in Errors, New skills, Short cuts, Word, Writing


Tags: , , , , , , , ,

Using the Control Key keyboard shortcuts

hands typingBack in June, I wrote about the wonders of Control-F and how you can use this keyboard shortcut to find text in almost everything you would do on a computer (Word, Excel, PowerPoint, web pages, WordPress back-end, etc., etc., etc). This post tells you about the other Control- or Ctrl+ keyboard shortcuts that you can use to …

  • save your mouse hand
  • do things quickly
  • impress your friends (maybe – depends what kind of friends you have …)

What keyboard shortcuts does the Control Key give you?

I’m going to categorise these into different areas for you. For each shortcut, you will typically need to highlight the text that you want to change if you’re doing something like changing its style or copying or cutting it, and pop the cursor in the right place if you want to paste. I’ll tell you what you need to do by each one. For each one, you need to press the Control key, usually marked Ctrl (and you might have more than on on your keyboard) then keep it pressed down while you press the second key on the keyboard).

Keyboard shortcuts for copying and pasting:

Ctrl-C – COPY Highlight the text you want to copy (leaving it where it is but making a copy you can paste elsewhere) and hit Control + c

Ctrl-X – CUT Highlight the text you want to cut out of your text (and maybe paste elsewhere) and hit Control + x

Ctrl-V – PASTE – pop the cursor where you want the text you’ve cut or copied to appear and hit Control + v

Ctrl-A – HIGHLIGHT ALL – if you want to highlight all of your text in Word, Excel, etc., you can use Control + a to do so

Bonus shortcut: if you want to switch between ALL CAPITALS, Title Capitals and Sentence capitals on a section of text, Shft-F3 is your friend. More detail here.

Keyboard shortcuts for bold, italics and underline

In each case, highlight the text you want to change, and press these keys:

Ctrl-B – to turn non-bold text into bold OR take the emboldening off a section of text, press Control + b

Ctrl-I – to turn non-italic text into italics OR take the italicisation off a section of text, press Control + i

Ctrl-U – to underline text OR take underlining away from a section of text, press Control + u

Keyboard shortcuts for Find, Goto and Replace

Ctrl-F – almost everywhere, pressing Control + f will open up a window to allow you to find a string of text (see this article for more detail)

Ctrl-H – in any document where you can replace text (i.e. Word, Excel, Powerpoint, etc.), pressing Control + h will open up the find and replace window which allows you to change a particular string of text into another particular string of text (I will be writing about this in more detail soon)

Ctrl-G – in documents with pages, pressing Control + g will allow you to navigate to a particular page

Keyboard shortcuts for undoing and redoing

Ctrl-Z – UNDO – if you want to undo what you’ve just done, hitting Control-Z has the same effect as hitting that little backwards arrow in your toolbar. It also works if you typed in a URL and the page is taking ages to load – Control-Z will cancel the operation

Ctrl-Y – REDO – lots of people know about Ctrl-Z, but did you know that you can redo an operation that you’ve undone by hitting Control-Y?

Keyboard shortcuts for open / new / print / save

Ctrl-N – if you want to open a new document in Word, Excel, etc., or a new browser window, pressing Control + n will do that for you

Ctrl-O – To open a document, wherever you are on your computer, pressing Control + o will open Windows Explorer so you can find and open your document

Ctrl-S – To open up Windows Explorer and save your document, pressing Control + s will save you clicking with your mouse

Ctrl-P – Want to print? Open up a printer dialogue box using Control + p

———————

Go on – admit it: did you really know ALL of these shortcuts? They’ll save you a few mouse clicks and I find some to be a lot quicker and more useful than the other methods you can use to get the same results. Which are your favourite keyboard shortcuts?

Related posts on this blog:

The control+ shortcuts I don’t cover here

How to find text almost anywhere

Changing from lower case to upper case

Find all of the short cuts here

 
23 Comments

Posted by on November 20, 2013 in Errors, New skills, Short cuts, Word, Writing


Tags: , , , , , , , ,

How do I change my initials in Word 2007, 2010 and 2013?

Your name and initials appear in the File Properties of your Word document, and also in any comments that you make on a document, plus in the text that appears when someone hovers over text that you’ve added or deleted. So it’s important that it’s right – usually Word pulls this over from your registration details, but you may wish to change it, for example if you want to add a general company or team name and initials rather than your own. Here’s how!

You will find the option to change your initials and name in Word Options. Word Options are accessed slightly differently in Word 2007, 2010 and 2013, so I will break this down by the version of Word that you’re using:

How do I change my initials in Word 2007?

Access Word Options by clicking the Office button at top left, then Word Options at the bottom:

1 word options 2007

Your Word Options box will open on the Popular tab and you can now change your name and initials:

1 2007

How do I change my initials in Office 2010?

Click on the File tab and select Options:

2 word options 2010

Click on Options, and you can change your name and initials:

2 2010

How do I change my initials in Word 2013?

First click on the File tab:

3a word options 2013

Select Options at the bottom of the list (use the arrow in a circle at the top left to get back to your document):

3b word options 2013

Click on Options and change your initials and name:

3 2013

This is part of my series on how to avoid time-consuming “short cuts” and use Word in the right way to maximise your time and improve the look of your documents. Find all the short cuts here

Do let me know if this has helped you – and do share with the buttons at the bottom of this article.

 
22 Comments

Posted by on November 13, 2013 in Copyediting, New skills, Students, Word, Writing


Tags: , , , , , , ,

How do I access Word Options in Word 2007, 2010 and 2013?

Word Options is the place where you customise the look of your Word document, how it corrects your words as you type away, the spell checker, your initials on any comments and the document properties, etc. It’s a great place to explore and enables you to customise Word and get it exactly how you want it.

However, it does work slightly differently in the three most commonly used versions of Word for PC: Word 2007, Word 2010 and Word 2013, so here’s a quick guide to how to access Word Options in these different versions of Word.

How to access the Word Options in Word 2007:

Click on the Office button in the top left of the screen, then click on Word Options at the bottom of the box:

1 word options 2007

Your Word Options box will now display:

1b word options 2007

How to access the Word Options in Office 2010:

In Word 2010, click on the File tab and then select Options, one up from the bottom of the list on the left hand side:

2 word options 2010

Once you’ve clicked on Options, your Word Options box will appear:

4 trust center

How to access Word Options in Word 2013:

In Word 2013, click on the File tab:

3a word options 2013

This has the effect of making your screen disappear, but you will get a list of things to do, out of which you select Options at the very bottom of the list (you can click that left-pointing arrow in a circle at the top left to get back to your document):

3b word options 2013

Clicking on Options will bring up the Options box:

3c word options 2013

This is part of my series on how to avoid time-consuming “short cuts” and use Word in the right way to maximise your time and improve the look of your documents. Find all the short cuts here

Do let me know if this has helped you – and do share with the buttons at the bottom of this article.

 
16 Comments

Posted by on November 6, 2013 in Copyediting, New skills, Students, Word, Writing


Tags: , , , , , , ,

Help – my Word comment box initials keep changing

comment balloonI had a query about this issue the other day and found there were no blog posts about it. Now there are.

My correspondent was busy adding comments to a document. Each time he did so, his initials appeared in the comment box, as they do (I will post soon on how to change your initials in your comment boxes). But each time he pressed Save, the initials changed back to “A”. Why?

Well, I went to look and it took me and a friend searching to find a rather obscure help forum that explained what was happening! So here’s what you do to stop the initials in your comment balloons changing by themselves in Word 2007, Word 2010 and Word 2013.

Why do the initials in my comment balloons keep changing every time I press Save?

The reason for your own initials disappearing is that Word is carefully applying a rule called “Remove personal information from file properties on save”. The properties are details attached to your document about who created and edited the document. And how do you change this?

Go into Word Options.The way into this differs for Word 2007, Word 2010 and Word 2013, although fortunately all of these routes end up in pretty well the same place, so …

Accessing Word Options in Word 2007:

Click on the Office button in the top left of the screen, then click on Word Options at the bottom of the box:

1 word options 2007

Accessing Word Options in Office 2010:

In Word 2010, click on the File tab and then select Options, one up from the bottom of the list on the left hand side:

2 word options 2010

Accessing Word Options in Word 2013:

In Word 2013, click on the File tab:

3a word options 2013

This has the effect of making your screen disappear, but you will get a list of things to do, out of which you select Options at the very bottom of the list (you can click that left-pointing arrow in a circle at the top left to get back to your document):

3b word options 2013

Accessing the Trust Center

The Options screen that will now come up is very similar in Word 2007, 2010 and 2013, so I’m going to use screenshots from Word 2010 as a middle way from now on – the others differ slightly, but you will still see the same options to choose from.

4 trust center

From here, click on Trust Center and then Trust Center Settings:

5 trust center settings

Now select Privacy Options, and you should find an option “Remove personal information from file properties on save”. Note that if this is enabled, it will be ticked and you will be able to untick it. Here, it’s greyed out, but you can see where you can find it:

6 privacy options

Once you have unticked this box, your initials will remain on your comment boxes however many times you save or close and open your document!

————————-

Why not take a look at these related topics, which should help you with any other comment box issues?

What to do if your comment boxes go tiny in Word

What to do if your comment boxes start running from right to left

Changing the language in your comment balloons

Customising Track Changes

This is part of my series on how to avoid time-consuming “short cuts” and use Word in the right way to maximise your time and improve the look of your documents. Find all the short cuts here

Do let me know if this has helped you, saved your bacon, etc. – and do share with the buttons at the bottom of this article.

 
5 Comments

Posted by on October 23, 2013 in Copyediting, New skills, Students, Word, Writing


Tags: , , , , , , ,

How do I change footnotes to endnotes in Word?

As part of my series on footnotes and endnotes, here’s how to turn your footnotes into endnotes and your endnotes into footnotes in Word 2007, Word 2010 and Word 2013.

We begin with a document with footnotes, arranged at the bottom of their relevant page, as footnotes tend to be:

1 footnotes

But we want to turn these footnotes into endnotes. How?

Go to the Footnotes menu, which you can find in the References tab:

2 ribbon

Click on the little arrow at the bottom right to bring up the Footnote/Endnote Options dialogue box:

2 menu

Here you will find a Convert button to press. Press the button:

3 menu

This is context-specific, so if you have only footnotes, the option to convert endnotes to footnotes and to swap the two will be greyed out. Hit OK (or, if you already have both endnotes and footnotes, choose the option you wish to use then hit OK).

Your footnotes will have changed to endnotes:

4 endnotes

Related posts from this blog:

How to insert and format footnotes

How to insert and format endnotes

Please note, these hints work with versions of Microsoft Word currently in use – Word 2007, Word 2010 and Word 2013, all for PC. Mac compatible versions of Word should have similar options. Always save a copy of your document before manipulating it. I bear no responsibility for any pickles you might get yourself into!

Find all the short cuts here

 
3 Comments

Posted by on October 17, 2013 in Errors, New skills, Short cuts, Word, Writing


Tags: , , , , , , , , ,

How do I add endnotes to a Word document?

Writers use endnotes to find a place for additional text which doesn’t fit into the flow of the document at hand but needs to be included for reference purposes. The reasons for doing this are the same as for using footnotes (to provide translations, to expand on information in the text, to provide references for sources used, etc.)

What is the difference between footnotes and endnotes?

The only difference between footnotes and endnotes lies in their position.

The text of footnotes sits at the bottom of the page on which the footnote is referenced.

The text of endnotes sits at the end of the chapter, article or even the whole book in which the footnote is referenced.

What do endnotes look like?

Unlike footnotes, which can use symbols or numbers, an endnote will usually be marked using a raised number after the bit of text that they refer to, like this.1 The reason for this is that a whole set of endnotes might appear at the end of a chapter or book, and there aren’t enough symbols to cover more than about five.

The text of the endnote will be marked with the same number, and will include all of the text that you want to appear outside the main text.

Endnotes at the end of a chapter will usually start at 1 for each new chapter. However, endnotes for an entire book might be numbered either starting at 1 for each new chapter or running sequentially through the whole book, running into the hundreds.

Sometimes endnotes don’t have a number in the text, but just refer in their own text to a section of the main document. These tend to be done by hand rather than automatically in the way I’m going to show you today.

You can see here that the endnote number is on the first page (circled) but the endnote itself appears at the end of the whole document:

1 endnote

How do I create an endnote in Word 2007 and Word 2010?

The Endnote section is found in the References tab of the ribbon (not Insert):

1 menu

Place the cursor in the position where you want the endnote to appear and either press the Insert Endnote button (as above) or click on the drop down arrow for your options (I find that sometimes the Endnote numbering defaults to something odd, so it’s useful to do this:

2 options

This will bring up your endnote options. Choose your options (see next section) and when you press Insert, a number will appear in your text, and an endnote number will appear right at the end of your document (or chapter), ready for your endnote text.

Type the text you want into your endnote field, noting that you can change the paragraph style, size and font as with any text, although it’s common for the endnote font to be smaller than the main document font.

To insert the next endnote, follow the same sequence, although once you’ve set up your options, you can just hit the Insert endnote button instead of dropping down the options.

How do I delete an endnote?

Using the automated endnote system means that the numbering will adjust itself to stay correct if you delete and move notes around.

Don’t highlight the endnote itself and delete it. This has no effect on the numbering.

Instead, highlight the number in the text or position your cursor at the point just after it and press delete.

3 delete

Here, I’m deleting Endnote 3. Press delete and

4 delete

changes to:

5 delete

What are the endnote options?

We have already seen that clicking on the little arrow at the bottom right of the Footnotes section, brings up a range of Footnote and Endnote options that you can customise:

2 options

Here you can choose the number format, whether the endnotes appear at the end of each section (you will need to apply Section Breaks to make this work) or at the end of the whole document, and whether the numbering starts at the beginning of each new section or just runs through all of the document continuously.

6 options

For more detail on these options, see the relevant sections in the article on Footnotes.

How do I make the endnotes appear on a new page?

To make your endnotes appear on a new page, simply add a Page Break before them by putting your cursor at the end of the main text and pressing Control-Enter.

How to add endnotes in Word 2003

In Word 2003, you add endnotes using the Insert – Reference menus. The footnote options are then the same as above.

How not to add endnotes to Word documents

It is NOT RECOMMENDED to add endnotes manually (insert a superscript number and type the note at the bottom of the document) If you do this, you will lose all the advantages of using this automated system:

  • automatically adding the numbers in order
  • automatically renumbering the endnotes if you delete or add one or move one around

————-

In this article we’ve learnt what an endnote is, why you use them, all about inserting and deleting them and the options for customsing them.

Related posts from this blog:

How do I add footnotes to a Word document?

Changing footnotes to endnotes

How do I change the format of my endnotes and footnotes?

Please note, these hints work with versions of Microsoft Word currently in use – Word 2003, Word 2007 and Word 2010, all for PC. Mac compatible versions of Word should have similar options. Always save a copy of your document before manipulating it. I bear no responsibility for any pickles you might get yourself into!

Find all the short cuts here

 
7 Comments

Posted by on October 9, 2013 in Errors, New skills, Short cuts, Word, Writing


Tags: , , , , , , , ,

How to add page 1of 2 to a Word 2007 or Word 2010 document

I’ve had quite a few searches coming through to this blog from people wanting to know how to create a specific kind of page numbering – the kind when it reads “page 1 of 2”, “page 1 of 5”, “page 2 of 3”, etc. If you want more detail on page numbering, read this article on the basics and this one on the finer points. If you want to know how to make “page 1 of 10” appear on your document read on!

Why would I want to make my page numbers say page 1 of 2?

It’s a matter of personal choice as to how you format your page numbers. However, your department or office might have a style guide that dictates this, so it’s as well to know how to do it.

How do I get page numbers to say page 1 of 2?

As I mentioned, I have more detailed resources on page numbering. This is more of a ‘quick and dirty’ guide.

Go to the Insert tab, move to the Header and Footer area, and click on the little arrow at the bottom right of the Page Numbers button. This will give you a menu where you can select where your page number is to appear. Choose, for example, Top of Page, then scroll down the list of options to find Page X of Y:

page 1 of 1

This gives you three places where you can insert page x of y into your document. I’ve chosen the top one. Click the option and there you have it:

page 1 of 1 done

Note that you can’t change this in Page Number Options, you must do it using the Page Numbers option as shown above.

If you have found this article useful, please share it using the buttons below, and leave me a comment!

This is part of my series on how to avoid time-consuming “short cuts” and use Word in the right way to maximise your time and improve the look of your documents.

Related posts on this blog:

How to add page numbers to your document 1 – the basics

How to add page numbers to your document 2 – advanced editing etc.

Please note, these hints work with versions of Microsoft Word currently in use – Word 2003, Word 2007 and Word 2010, all for PC. Mac compatible versions of Word should have similar options. Always save a copy of your document before manipulating it. I bear no responsibility for any pickles you might get yourself into!

Find all the short cuts here

 
21 Comments

Posted by on October 2, 2013 in Errors, New skills, Short cuts, Word, Writing


Tags: , , , , , , , ,