RSS

Tag Archives: thesis

How to add line numbers to a Word document

This article explains the correct – and incorrect – way to add line numbers to a Word document. Why would you want to do that? Read on and find out! This works for Word 2007, Word 2010 and Word 2013.

Why do I need to add line numbers to a Word document?

I was inspired to write this post after my colleague Katharine O’Moore Klopf mentioned that she’d been asked to do this by the editors of a journal for which she was editing an article. Presumably they wanted to be able to refer to particular line numbers in their criticism of the piece.

Transcriptions will sometimes have line numbers, if they’re going to be discussed in detail, and we can probably all recall from our dim and distant pasts working on critiques of poems and plays which had 5, 10, 15 etc. in the margins.

So these are all reasons for adding line numbers to a Word document.

How NOT to add line numbers to a Word document

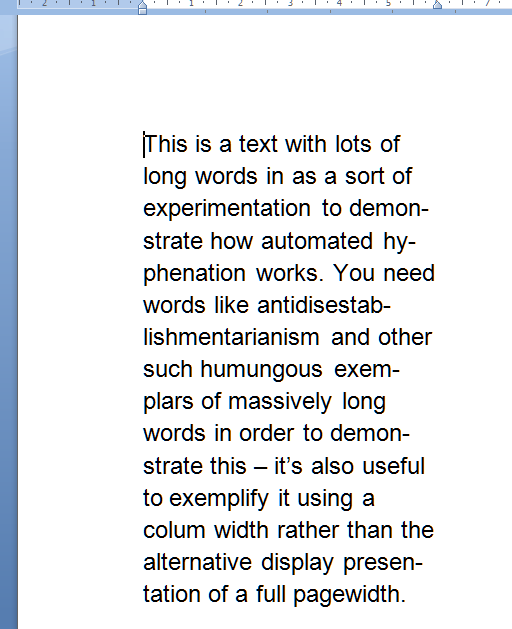
If you find the need to add line numbers, it’s kind of natural that you might think – oh, I’ll just make the whole document into a numbered list. Well, to do this you would have to put a return at the end of each line to make it into a new line. Then you would highlight the whole text and add numbered bullets. But, oh, look what happens:

1 what you don't do

The numbers push the lines across and they run over onto the next line; all possibility of right justification is lost; and heaven help you if you want to insert or delete any text once you’ve done it!

So, don’t do that.

How to add line numbers to a Word document – the correct way (Word 2007, Word 2010 and Word 2013)

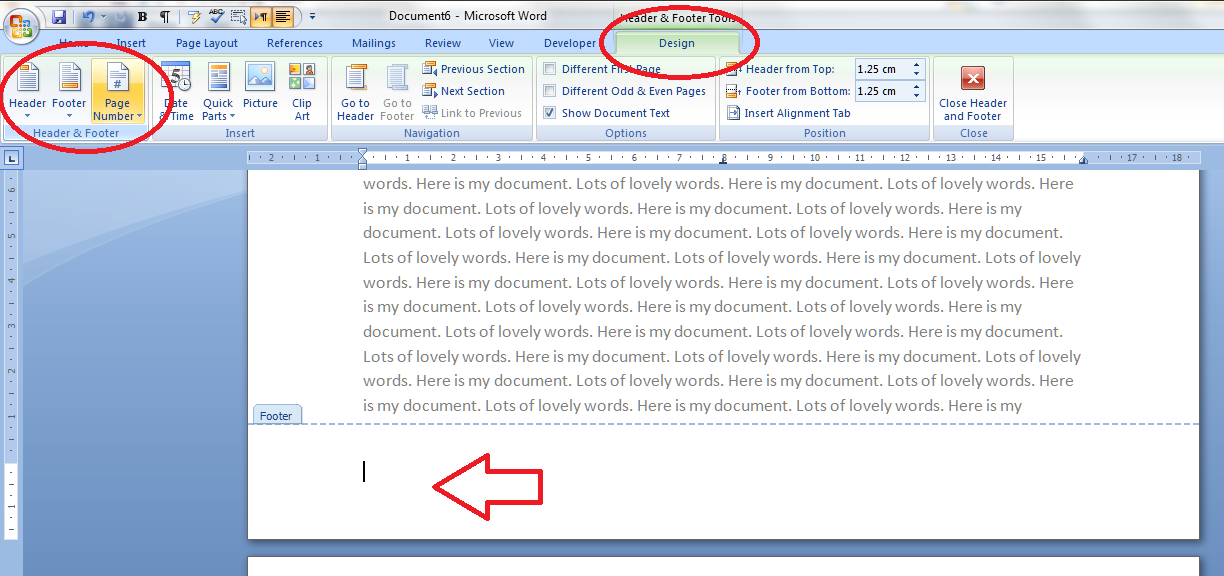
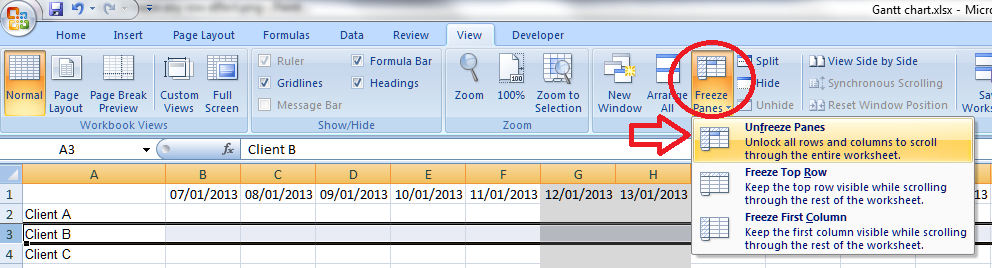
Line numbering and its options can be found in Word 2007 and Word 2010 in the Page Layout tab, in the Page Setup area. There you will find Line Numbers:

2 menu

Click on the arrow next to Line Numbers to bring up its Options menu:

3 numbering options

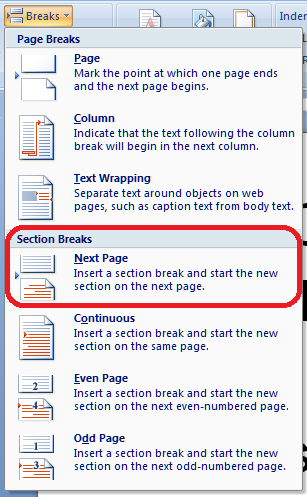
It will automatically be set to None – choose Continuous and see what happens to your paragraphs …

4 continuous

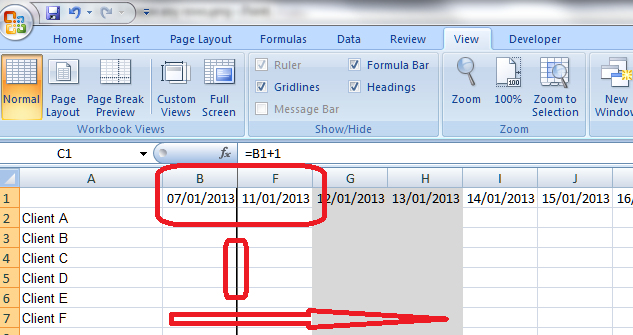
Line numbers have automatically appeared, but the formatting of the text, its justification etc., remain as they were. This menu also allows to you to choose whether to restart the numbering at the beginning of each page, or each section, or to suppress the numbering for the particular paragraph your cursor is in.

Line numbering options in Word

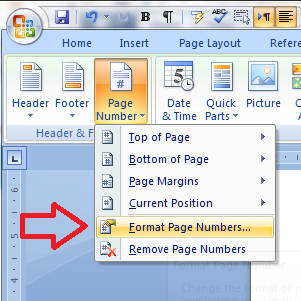
You also have a number (sorry!) of options to choose from in order to customise your line numbering. You reach these options from the last item on the Line Numbering menu

5 options menu

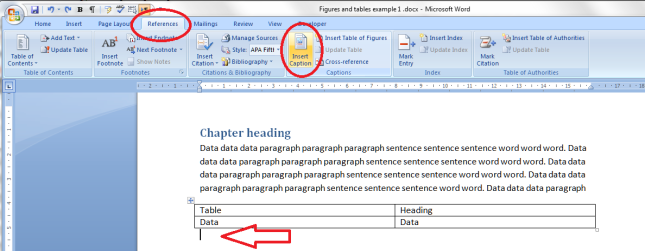
… although when you click on this option, you are taken into a general dialogue box for Page Layout:

6 options menu line numbers

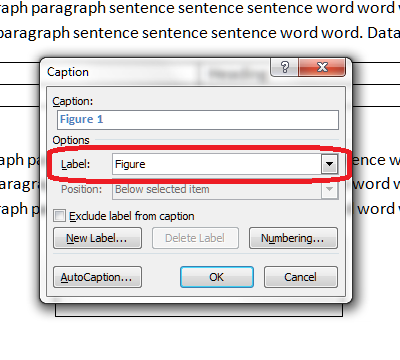
and you need to click on Line Numbers… at the bottom, which will finally give you a list of options:

7 options menu line numbers

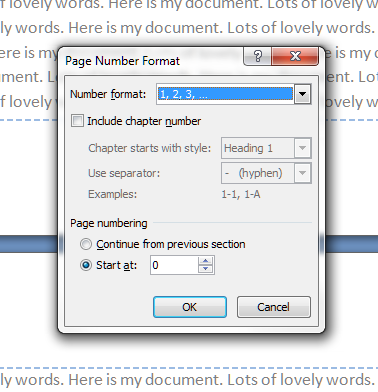
To go through the options in order …

  • Add line numbers – this gives you the chance to add or remove them at this stage
  • From text – the distance between the text and the number. Click on the arrows to choose the distance (I usually just use Auto)
  • Count by – this allows you to display only every x number. I don’t think “Count by” is a particularly useful way to describe this, but scroll down to see it in action
  • Numbering Restart each page / Restart each section / Continuous – this repeats the options you found on the first screen, but it’s useful to have them here if you’re generally messing around in the Page Layout menu and don’t want to go out of it to set your line numbering

Whatever you choose on here, click OK twice to get out of this dialogue box and the Page Layout one.

How do I produce a line number every five or ten lines?

You may remember from literature lessons at school that poetry and plays often have every 5th line marked. You can do this in Word by choosing that Count by option in the Line Numbering Options menu (see above for how to get to it).

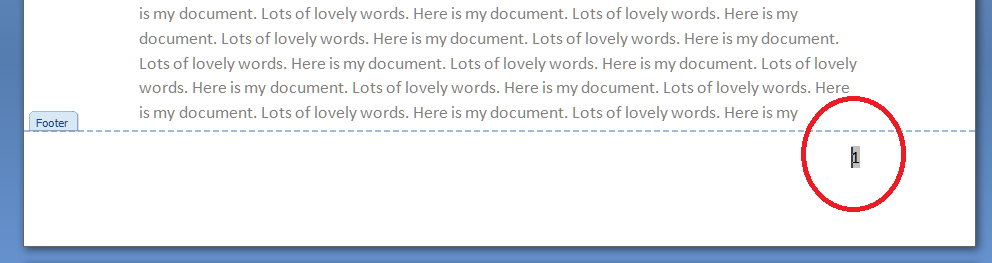
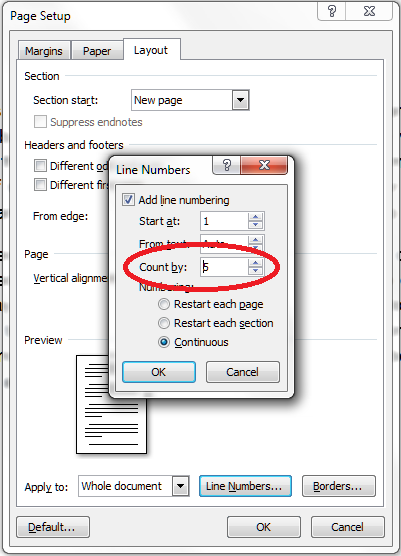
Set the number to 5 …

8 count by 5

… and as if by magic, when you return to your document after choosing OK – OK, you will find every fifth line numbered:

9 counted by 5

Working in Word 2003

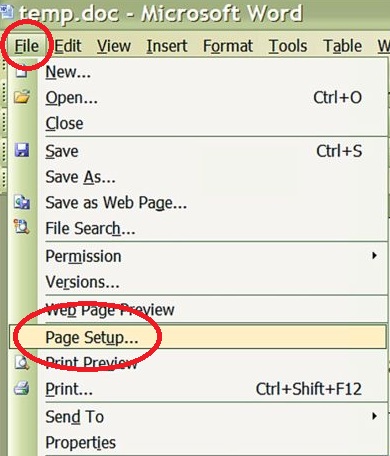
In Word 2003 you will need to follow these menus: File – Page Setup:

W2003_01

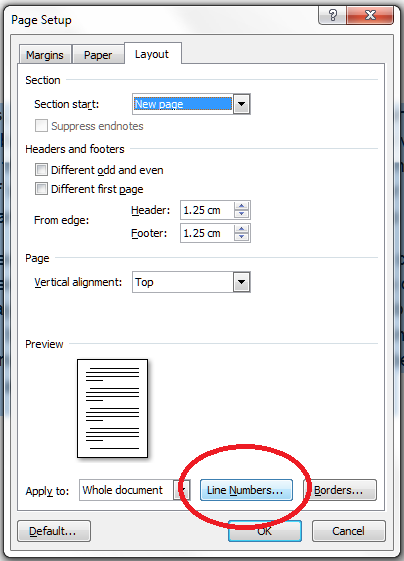
Choose the Layout tab in the dialogue box and the Line Numbers button. Choose to Apply to the Whole document or This point forward. Click on Line Numbers:

W2003_02

Tick Add line numbering and choose to Restart each page/section and Continuous. Click OK twice to accept – in this dialogue box you also find the options Start at, From text and Count by that are explained above.

Thanks to Katharine O’Moore Klopf for the Word 2003 screen shots and instructions.

Copying and pasting a document with line numbers

It’s come to my attention (thanks to a commenter on this post) that it’s not possible to copy and paste text with line numbers into a new blank document.

This is because the line numbers function actually displays a feature of your document (much like if you turn on paragraph marks) but the line numbers are not a part of the document itself.

If you want to transfer your line numbers into another document, you can do this in one of two ways:

  1. Save As the document to make an exact copy (with a different file name) and then add your other text around it
  2. Copy and paste your text into a new document and add the line numbers again

At least we know now …

—-

This article has explained why you might want to add line numbers to your document, and how to do it. If you found this useful, please post a comment, share and like this article! Thank you!

This is part of my series on how to avoid time-consuming “short cuts” and use Word in the right way to maximise your time and improve the look of your documents.

Please note, these hints work with versions of Microsoft Word currently in use – Word 2003, Word 2007, Word 2010 and Word 2013 all for PC. Mac compatible versions of Word should have similar options. Always save a copy of your document before manipulating it. I bear no responsibility for any pickles you might get yourself into!

Find all the short cuts here

 
53 Comments

Posted by on April 17, 2013 in Errors, New skills, Short cuts, Word, Writing


Tags: , , , , , , , , ,

How to add and remove hyphenation in a Word document

This article explains how to add and remove hyphenation in a Word document, and how to work with the options you have in the hyphenation menu.

Why would I want to add hyphens to a document?

This issue doesn’t normally come up with standard documents where the text is in a smallish size and extends across the entire width of the page. In fact I hardly ever see it in the work I do, and was only reminded of it when a client had accidentally set automated hyphenation in part of his document that happened to contain long words. Where did all these hyphens come from, I wondered.

It is useful, however, if you are working with columns, say in a table, or for a newsletter you’re publishing, or some other part of a document where you want to have a narrow band of text running down the page. If you just put your text in your column and don’t justify it on the right hand side, you will end up with a very ragged look:

3 without justification or hyphenation

In fact, as you can see (marked by the arrow), one word is just too long for the line and splits at the last letter, something which doesn’t obey any of the standard rules of hyphenation (I bet this has happened in your tables – it has in my clients’).

Maybe we can neaten it up by applying Right Justification

4 with justification without hyphenation

Oh no! In its effort to make everything tidy, Word has carefully inserted huge spaces between words (unlike someone typesetting properly on a computer or by hand, it doesn’t space out the letters in the words so much as just add massive spaces). And poor old Mr Long Word is still dangling a letter onto the next line.

This looks pretty horrible, doesn’t it. Adding automatic or manual hyphenation is the way forward.

How do I add automatic hyphenation to my Word document?

To work with the hyphenation options, we need to be in the Page Layout tab, and the Page Setup area, and there you’ll find Hyphenation (with a little pop-up box explaining it). This is the case in Word 2007 and Word 2010. In Word 2003, you need to select the following menus: Tools > Language > Hyphenation.

1 menu

If you click on the arrow to the left of the word Hyphenation, you get a menu that looks like this:

2 drop down hyphenation menu

You can choose here between None, Automatic and Manual, and then have some options, too. We’ll look at those options in a moment.

What happens if I add automatic hyphenation to my document?

If you highlight the text and then select Automatic from the Hyphenation menu, Word will automatically insert hyphens into the text to break the words in sensible, permitted places (there is a whole art to this which I will discuss another time. I’m not sure which exact rules Word follows, but a quick look shows that it’s pretty good). So if your text is right justified, you’ll get this:

5 with justification and hyphenation

You can see here that Word has hyphenated all of the longer words that previously caused those big gaps, and made the text an awful lot tidier.

You can do this on unjustified text, too:

6 without justification and with hyphenation

but I personally think that this still looks a bit messy.

How do I remove automatic hyphenation?

To remove automatic hyphenation when you find it in a document and don’t want it, highlight the offending text and choose None from the Hyphenation menu in Page Layout > Page Setup:

2 drop down hyphenation menu

All of the automatic hyphenation should disappear.

How do I use manual hyphenation in my document?

If you choose the manual hyphenation option, based on where your cursor is placed at the time you select this option, Word will give you a choice of where and whether to hyphenate your words:

7 manual hyphenation

(here we can see our unhyphenated text, with the cursor on “demonstrate”). Once you’ve clicked on Yes or No, it will hop along to the next word that’s a candidate for hyphenation.

Why shouldn’t I just hyphenate totally manually?

Of course, you can just look for gaps and manually type a hyphen in the middle of the word, and it will split over two lines. However, this is a concrete character that you’ve inserted into the word, and so if you change the wording in your text so that the offend-ing word no longer comes at the end of the line, you’ll retain the hyphen charac-ter and get artefacts like the ones you can see in this para-graph. Much better to automate the manual process, so to speak …

What are the hyphenation options?

If you click on the Hyphenation Options at the bottom of the Hyphenation dialogue box, you are given a few choices:

6 hyphenation options

Working from the top …

  • Automatically hyphenate document – does what it says on the tin
  • Hyphenate words in CAPS – you may not want to split long acronyms, etc. – if not, then untick this box
  • Hyphenation zone – this is the maximum space allowed between a word and the right hand margin. Increase this number and the hyphenation zone becomes wider – and you will have fewer hyphens. A lower number will give you more hyphens
  • Limit consecutive hyphens to – allows you to prevent Word from hyphenating at the end of every line – best adjusted once you’ve set hyphenation and seen what it looks like
  • Manual… – gives you another way to get to the Manual Hyphenation feature

——————-

In this article we’ve learned why we might want to apply automatic hyphenation to a document, how we do it, how to remove automatic hyphenation, and the options that are available in the hyphenation menu.

This is part of my series on how to avoid time-consuming “short cuts” and use Word in the right way to maximise your time and improve the look of your documents. Do like and share as much as you can, and/or leave me a comment if this article has been useful to you.

Please note, these hints work with versions of Microsoft Word currently in use – Word 2003, Word 2007 and Word 2010, all for PC. Mac compatible versions of Word should have similar options. Always save a copy of your document before manipulating it. I bear no responsibility for any pickles you might get yourself into!

Find all the short cuts here

 
32 Comments

Posted by on April 10, 2013 in Errors, New skills, Short cuts, Word, Writing


Tags: , , , , , , , ,

How to add page numbers to a Word document (2)

We’re already learned the basics of adding page numbers to a Word document, and now we’re going to look at some more things you can do with page numbers, including:

  • how to stop your first page displaying a page number
  • how to have page numbers in different formats in your document

This will be particularly useful if you’re formatting the page numbers on a PhD or other thesis or dissertation – many of my student clients don’t know how to do this, which is what inspired me to write this series of articles.

How can I have different page number formats in different parts of my document?

Imagine that you’ve written a thesis or a book – something that has a title page (red), a contents list (blue) and then the main body of the text (yellow). It’ll look something like this …

1 the document

Now imagine that you’d like to have different page numbering for different parts of the document – for example, no page numbering on the title page, Roman numerals for the contents pages, and then the numbering continuing in Arabic numerals for the main body of the text. Look at a non-fction book or someone else’s thesis and you’ll see that this is how they’re often laid out.

How do you do this? First of all, you need to divide your document into discrete sections, using section breaks. Let’s learn how to do that …

How do I see what formatting I have in my document?

If you plan to insert section or other breaks in a document, it’s useful to be able to see what breaks you have in there already. In the document I’m using an example, I would suspect that the aurhor has added some sort of breaks to make the contents page and then main text start on new pages.

How do we check this? Make sure you’re on the Home tab and then press the Paragraph button in the Paragraph section

2 show coding

Once you’ve pressed the button, you’ll find all sorts of strange marks appear. You can also see that the new page has been started by inserting a Page Break (and not using the Enter key – hooray. If you want to know the reason for the “hooray”, read this article.

3 page break

The paragraph mark indicates a return, and the Page Break label shows that a page break has been inserted here. That’s great if you just want to start the next chunk of text on the next page, but we want to format each section differently, and this requires a section break rather than just a page break.

How do I insert a section break?

In order to insert a Section Break, we need to delete the page break first. Highlight the page break and press the Delete key or place the cursor just to the right of it and press the Backspace button. As soon as you do that, you’ll notice that the text which sat neatly at the top of the next page has jumped up onto this page. Don’t worry, it will disappear again …

4 no page break

To insert the Section Break, you need to be in the Page Layout tab (not the Insert tab, confusingly). There you will find an area called Page Setup which includes a Breaks menu:

5 breaks

When you press the Breaks button, you’ll see a menu offering several different options for the break you wish to insert – including our old friend the page break and our new friend the section break.

6 section break next page

The one we want is Section Break – Next Page. As the text explains, this will insert a Section Break and start the next chunk of text on the next page – exactly what we want to do. Choose that option and hey presto …

7 section break done

… a Section Break (Next Page) appears on your page. And the Contents page has moved back to Page 2.

Note that in this example, we’re dividing the document into three sections, using two section breaks, so we need to add one at the end of the contents list, too …

8 section break done

So now our document is divided into three sections – 1, the title page, 2, the contents list and 3. the main body of the text:

9 the document sections

How do I add different formats of numbers to different sections of my document?

Now it’s time to add those page numbers, remembering that we want no page numbers at all on the title page, the Roman numerals on the conents pages followed by Arabic numerals for the rest of the document.

We’ve seen how to add page numbers before, using the Headers and Footers on the document. We’ll do that in a moment. But this time we need to do something else first: we need to remove the association between each section and make tat sure each one is independent. This will allow us to assign different page number formats to each section (and other formatting – I’ll write about this another time, but it’s the way you get your document to let you have certain pages in landscape rather than portrait orientation, etc.

How do I stop my footer having the same format as the previous section?

The trick here is to make sure that the footers do not simply copy the previous section of the document. if they do, you will have trouble making each section different. We now need to go into the second section of the document and disconnect its footers from those of the first section.

So, first of all, go into the Design tab or just left click on the bottom part of your page, below the text. In both cases, the Design tab will display and you need to look at the Navigation area. You will see that the footer automatically decides to be Same as Previous – we need to disconnect this footer from the previous one. Up in the Ribbon, Link to Previous is highlighted, reminding us that this section’s footer is linked to the previous one and providing a handy hint as to how to stop that.

10 not the same as previous

If you press the Link to Previous button it will turn from yellow back to white, you’ll notice that the Link to Previous note in fhe footer has disappeared. This means that you can format Section 2 independently of whatever’s going on in Section 1,

blog post

Note that the Header has its own ability to Link to Previous, which is separate from that of the Footer, which means that you can keep any header text you’ve added to the document working throughout the document without needing to re-insert it into each section.

Before we start getting excited about adding those page numbers, make sure you’ve done the same to Section 3, disconnecting it from Section 2. Changing Same as previous in one section won’t have any effect on the next section:

12 unlink these too

Remind me how to add page numbers …

Now we’re ready to add the page numbers to the document. Ignoring Section 1, which doesn’t need a page number, we can go into the page number add part of Section 2. Just to remind you, that’s on the Page Number area of the Design tab, and in this case we want to add a page number at the bottom of hte page, so we select Page Number then Bottom of Page and the particular position we require, so as to set up the page number position before formatting the actual numbers.

13 page numbers

Now it’s time to format the page numbers. So its back to the Page Number button but we choose Format Page Numbers

14 format page numbers

You will see on this example that the page number has automatically inserted itself on the first page of the contents (Page 2 of the document), but it has defaulted to being in Arabic numbers and to helpfully inform us that we’re on page 2 of the document. However, we want Roman numerals, AND we want it to start with Page 1. So, into that Page Number format menu, and there we can …

15 format page numbers

… choose Roman numerals (top) and start at page 2, not page 2. Press OK to set those …

16 roman numeral

And look – as if by magic, the page number is now i instead of 2.

Now, for section 3, the main body of the text, we want Arabic numerals which continue from the last number in Section 2. So in this case we choose the Number Format to be the default, Arabic, opion, and tick Continue from previous section. In this screenshot, I’ve already pressed OK, so look at the bottom of the page …

16 next section

and there’s a lovely figure three.

So, to you what weve done in a colourful and dramatic way which is a bit more over the top than what we would actually want our document to look like, we’ve done this:

17 all done

And while individual institutions’ formatting rules still take precedence, this is what most of my PhD students like their thesis page numbering to look like.

In this article we’ve learned how to add different kinds of page number to different parts of the document, and more complicated formats for page numbers. If you need more of a recap on the basics of page numbering, see the article on that topic.

If you have found this article useful, please share it using the buttons below, and leave me a comment!

If you’re at all interested in my anti-cholesterol diet book which I used as an example in this document, find out more here.

This is part of my series on how to avoid time-consuming “short cuts” and use Word in the right way to maximise your time and improve the look of your documents.

Please note, these hints work with versions of Microsoft Word currently in use – Word 2003, Word 2007 and Word 2010, all for PC. Mac compatible versions of Word should have similar options. Always save a copy of your document before manipulating it. I bear no responsibility for any pickles you might get yourself into!

Find all the short cuts here

 
11 Comments

Posted by on March 6, 2013 in Errors, New skills, Short cuts, Word, Writing


Tags: , , , , , , , ,

How to add page numbers to a Word document (1)

This article is going to teach you the basics of adding page numbers to a Word document, using Word 2007 or Word 2010. Later articles in the series will tackle more complicated topics such as mixing Roman and Arabic numerals and making sure your first page doesn’t have a number if you don’t want it to.

Why add page numbers to a Word document?

Good question? You might have a perfectly nice, short document, that looks a bit like this ..

1 page

And you don’t really need to add page numbers. But what if it’s going to be a book, or you’re going to introduce a contents page or index? What if people are going to want to quote from it, or refer back to a particular section? Even though if they read your document on their Kindle, they might not be able to see the page numbers, these are all good reasons why you might want to give your readers some page numbers to help them navigate their way through your text.

Where are the menus and buttons for adding page numbers?

As usual, there are a couple of ways to access the menus and buttons you need for adding page numbers. But, again, as usual, they lead to the same place in the end.

Method One involves choosing the Insert tab. Once you’re there, you’ll find a section called Header & Footer, and there’s your Page Numbers button:

2 insert

Method Two involves clicking with your left mouse button in the blank space at the bottom (or top) of your page. Another way to do this is to select the Design tab, but sometimes that doesn’t show up by default. Clicking on the blank bit of the page will bring up the Headers and Footers and your Page Numbers button:

2 click footer

In Word 2003, you can find the page numbers options in the Header and Footer menu.

Now you’ve found the Page Numbers button, it all stays the same from now on, and its menu looks like this:

3 page numbering options

We’ll look at how to position your page numbers, and then how to format them (it’s best to do it this order).

How do I choose the position of my page numbers?

You will find two options for positioning your page numbers:

1. At the top or bottom of the page

2. Elsewhere in the page margins

To choose the position of the page numbers in the top or bottom areas of the page, choose Top of Page or Bottom of Page (the positions are identical for the two). Here we choose Top of Page:

4 number placement options

You can see lots of options for positioning your page numbers, including that fancy “Page 3 of 12” you’ve seen on other people’s documents. To select the position, click on the example that suits you best (you can scroll down for even more choices).

If you try out Page Margins, you will be given another set of options allowing you to insert your page numbers all over the place:

5 number placement options page margin

Again, you can scroll down for even more options.

I find that people have one or two favoured number positions and ignore the others (in much the same way that we only use two programmes on our washing machines). But it’s useful to know how to find all those extra places, in case you’re working collaboratively or with a client who has particular preferences.

Now we’ll look at some basics of formatting your page numbers.

How do I format my page numbers?

This is best done once you’ve decided on the page number position, and you can come back and format them at any time, by finding and clicking on the Page Numbers button. We’re just going to look at the basics here, with more complex choices being discussed next time.

To format the page numbers, find the Page Numbers button and choose Format Page Numbers:

6 format page numbers

Select Format Page Numbers and you’ll find some more options for changing your page numbers from Arabic to Roman (or Roman capitals) and for where to start the numbering:

7 number format

If you drop down the Number format list, you’ll find your choices laid out. You are not likely to want to use anything other than straight Arabic numerals (1, 2, 3 …) if you are just using one numbering style for the whole document; the others will come in handy when we learn how to apply different numeral styles to difference sections of the text. But the choices are there:

8 number format

Again, Chapter numbering and Continue from previous section / Start at are mainly used when you’re applying different numbering styles to different parts of your document (Roman numerals for the contents page and foreword, Arabic for the main text, etc.) but it’s worth knowing where to find these choices for next time.

So, let’s summarise and look at how to apply standard, straightforward page numbering to a document.

How do I apply standard page numbering to my document?

If you just want simple numbers in Arabic numerals at, say, the bottom right hand corner of each page, here’s how you do it.

First, click on the Page Numbers button and choose Bottom of Page, then select the example that best fits where you want your page numbers to appear:

9 basic format

Then, choose Format Page Numbers and make sure your options are set to Arabic numerals 1, 2, 3 … and page numbering to start at 1:

10 basic format

Once you’ve pressed OK, you will be back in the Footer of your document, with the main text still in grey and the page number in black, because you’re in the Footer, not the main text:

11 page number

Left click on the body of the text, and the page will reverse – the Footer indicator will disappear, your text will be in black and your number will be in grey, because it’s part of the Footer, not of the text:

12 page number

How do I insert different types of page number into one document?

In this article we’ve learned how to find the Page Numbers button and how to position the page numbers on the page and format them into different kinds of number. In Part 2 of this series, we look at adding different kinds of page number to different parts of the document, and more complicated formats for page numbers.

If you have found this article useful, please share it using the buttons below, and leave me a comment!

This is part of my series on how to avoid time-consuming “short cuts” and use Word in the right way to maximise your time and improve the look of your documents.

Please note, these hints work with versions of Microsoft Word currently in use – Word 2003, Word 2007 and Word 2010, all for PC. Mac compatible versions of Word should have similar options. Always save a copy of your document before manipulating it. I bear no responsibility for any pickles you might get yourself into!

Find all the short cuts here

 
10 Comments

Posted by on February 27, 2013 in Errors, New skills, Short cuts, Word, Writing


Tags: , , , , , , , ,

How to highlight text in a Word document

If you are amending a Word document or perhaps working on a document with someone else (a colleague or an editor), it is sometimes useful to be able to highlight some of the text in order to point it out to your collaborator.

Here are three useful ways to highlight text in Word … and one TERRIBLE way that you will never think of using once you’ve read and digested this article.

How to highlight text by changing its colour

This can be useful if you want to mark text you want to change, edit, delete, expand, etc.

Make sure you’re in the Home tab and the Font section. Highlight the text you want to change and click on the Change Text Colour button:

1 change text colour

Choose the colour you want your text to be, and click on it. Hey presto:

2 change text colour result

This can be useful but there is a limited range of colours that are a) legible on a white background and b) sufficiently distinguishable from black. This can be particularly problematic for a reader with a visual impairment or colour blindness.

So you might want to think about using the next option …

How to highlight text using the “highlighter pen”

Just like in real life, you can scribble all over your document using a highlighter pen!. Again, you will find the Highlighter Pen button in the Home tab, Font section, next to the Change Text Colour button. You can use this in two ways:

1. Highlight your text first, then click on the button and choose a colour:

3 highlighter pen

The text you had highlighted will now appear in black with the background colour you selected:

4 highlighter pen effect

2. Place your cursor anywhere on the page and click the Highlighter Pen button. Your mouse pointer (which usually looks like a capital I unless you’ve changed it) will change to look like a pen. (Unfortunately this does now show up on a screen print. If anyone can find me a copyright-free image of this cursor change, please let me know!)

5 highlighter pen

Left click where you want to start and run the mouse pointer/pen along the text you want to highlight:

6 highlighter pen effect

The text will become highlighted as you run the pen along. Note, though, that if you use this option, your mouse pointer will keep on acting like a highlighter pen until you click back on the Highlighter Pen button and choose Stop Highlighting:

7 stop highlighting

This is all great if you just want to mark, say, chunks of text that you’ve changed so your editor can see what they need to recheck. But if you need to make any comments on that text, pay very close attention to the two methods coming up and make sure you choose the correct one!

How to highlight and comment on text the CORRECT WAY

If you want to comment on some text, the correct way to do it is this. Highlight the text and in the Review tab, Comments area, click on New Comment:

8 comment

A comment balloon will appear, and you can type your comment inside the balloon. If your collaborator wants to comment back, they can just add a new comment in a new balloon, and so it goes on.

9 comment effect

The joys of using this method are twofold:

1. You can skip through the comments using the Next Comment button and you’ll never miss one.

2. You can delete the comments you’ve dealt with, the highlighting will automatically disappear, and you’ll be left with a nice tidy document.

If you’re working with someone on a document and you want to draw their attention to something and make a comment, this way we’ve just seen is the way to do it.

How to highlight and comment on text the WRONG way

Please, don’t do this. If there’s a lovely, neat way to add comments to a document, which there is (see above), there is no need to write your comments within the text itself, like this:

10 don't do this

If you receive a document marked up like this, for each instance of a comment from your collaborator, you’re going to need to change the colour back to normal, delete the comment, or maybe add one of your own. No skipping lightly from comment to comment, but a grim stare at the document to spot the issues.

You can learn more about using Track Changes and Comments in other posts on this blog. Please don’t be tempted to try this method at home!

So, in this article we have learned how to highlight text in three good and one bad way. I hope you’ve found this useful.

If you have found this article useful, please share it using the buttons below, and leave me a comment!

This is part of my series on how to avoid time-consuming “short cuts” and use Word in the right way to maximise your time and improve the look of your documents.

Please note, these hints work with versions of Microsoft Word currently in use – Word 2003, Word 2007 and Word 2010, all for PC. Mac compatible versions of Word should have similar options. Always save a copy of your document before manipulating it. I bear no responsibility for any pickles you might get yourself into!

Find all the short cuts here

 
5 Comments

Posted by on January 23, 2013 in Errors, New skills, Short cuts, Word, Writing


Tags: , , , , , , , ,

Freezing rows and columns in Excel

It was time to create a new Gantt chart for myself to keep my various projects under control, and yet again I had forgotten how to freeze the columns and rows in the way I like. So I created this post to help myself – and you!

What is “freezing” rows and columns?

When you freeze a row or column in an Excel spreadsheet, you make sure that it’s on display however much you scroll down or across your document.

So, if you have a row of dates as a heading along the top or a column of customer names down the side, and your document becomes longer or wider than the screen on which you are viewing it, you can keep those columns and rows visible, instead of having to scroll up and down and backwards and forwards to find your headings.

For example, in the Gantt chart that records my work projects, I need to be able to see the dates and client names all the time, however large my document becomes:

Excel document

Where is the Freeze Panes button in Excel 2007 and Excel 2010?

To find the Freeze Panes button, you need to be in the View Tab, then the long Window area. Click on Freeze Panes and you’ll be given three options: Freeze Panes (note, this toggles between Freeze and Unfreeze, as we’ll discover later); Freeze Top Row; and Freeze First Column.

2 freeze top or side

How do I freeze the top row or first column of my spreadsheet?

In a shock move, something that Microsoft Office gives you as a short cut is actually useful! If you click on that Freeze Panes button and select Freeze Top Row or Freeze First Column, it will automatically freeze that row or column for you. This is because the first row and column on a given spreadsheet are likely to be the ones where you’ve inserted your headers.

Click on one of these buttons and you’ll freeze just that row or column. Freeze the top row, scroll down thousands of rows, and that top row will still be on show. Hooray!

BUT: this will only freeze one of those two areas. Want to freeze the spreadsheet so it shows more than just the first row or column? Read the next three sections.

BUT (2): this will only allow you to freeze the row or the column. If you, like me, want to freeze both a row and a column, scan down to the section titled Can I freeze a row and a column at the same time?

How do I freeze a particular row of my spreadsheet?

Say, for example, you’ve got a double row of headers, or you’ve inserted a graph at the top of your spreadsheet that you want to be able to see as you scroll down. This is where you need to be able to select the point at which the spreadsheet freezes.

Here’s where it gets a tiny bit tricky (but you’ll save this post so you remember).

Click on the row BELOW the point at which you want to freeze the spreadsheet. Not the row you want to freeze, the one below it. In this example, we’re highlighting Row 3 in order to freeze Rows 1 and 2.

Once you’ve highlighted the correct row, by clicking on the 3 in the left hand margin in this case (you can see that it’s become darker, with a line around it), click on the Freeze Panes button and select the Freeze Panes option.

3 freeze any row

Your spreadsheet is now frozen at the bottom of Row 2. If you scroll down the page, you will notice that Rows 3 and onwards start to disappear, and a horizontal black line appears at the point of freezing.

Now you can scroll down as far as you like, and Rows 1 and 2 will always be visible at the top of the screen:

Effect of freezing any row

How do I unfreeze a row or column?

Once you go to do something else with freezing, you will notice that the Freeze Panes option has changed to read Unfreeze Panes. This is because you can only do one Freezing action at a time. If you decide that you want to freeze a column instead, or want to practise doing that, you need to click the Freeze Panes button then select the Unfreeze Panes option first.

Note: you don’t need to have anything highlighted to click this. It will unfreeze anything you’ve previously frozen.

4 unfreeze panes

Oh, and you can freeze a column and row at the same time, as we’ll learn in a few moments.

How do I freeze a particular column of my spreadsheet?

If you want to freeze a particular column of your spreadsheet, you do it in the same way as you froze the particular row.

But in this case, you need to highlight the column one to the RIGHT of the column you wish to freeze. In the example below, we want to freeze at Column B, so we highlight Column C (by clicking on the C at the top of the column). Again, click the Freeze Panes button then select the Freeze Panes option.

5 freeze any rows

Now, if you scroll across the document, Columns A and B will remain visible, and a thick black line will mark where the freezing has taken place:

5 freeze any rows effect

Can I freeze a row AND a column at the same time?

Sometimes you might want to freeze both the top row and the first column of your spreadsheet. For example, I want to be able to see my list of clients, however many dates come across the page, and my dates in the top row, however long my list of clients becomes.

We’ve already learnt how to freeze just the top row or just the first column (see above), but as you might have realised,  you can’t do both – if you go back to the menu to do the second one, it just tells you to Unfreeze the panes first.

Here’s  how you do it:

Highlight the cell ONE DOWN and ONE TO THE RIGHT of the row and column you want to freeze. It’s just like freezing rows or columns. In this case, think of the cell nestling in the angle formed where the row and column you want to freeze meet. Here, we want to freeze Row 1 and Column A so that they are always visible. So we highlight the point at which Row 2 meets Column B.

6 freeze row and columnt

Using the same procedure to freeze the panes (Freeze Panes button, Freeze Panes option), we have now frozen Row 1 and Column A. If we scroll both down and across, Row 1 with the dates and Column A with the client names are still visible.

6 freeze row and column effect

Yes, Column A will scroll and the top will slide up and disappear temporarily, and yes, the dates in Row 1 will disappear as we scroll across, but the basic principle holds good:  we can see Row 1 and Column A, however much we move around the spreadsheet.

We’ve learned how to freeze rows, columns and rows plus columns today. I hope you’ve found this useful.

If you have found this article useful, please share it using the buttons below, and leave me a comment!

Related posts: How to print out the header row on every page

This is part of my series on how to avoid time-consuming “short cuts” and use Microsoft Office in the right way to maximise your time and improve the look of your documents.

Please note, these hints work with versions of Microsoft Excel currently in use – Excel 2003, Excel 2007 and Excel 2010, all for PC. Mac compatible versions of Word should have similar options. Always save a copy of your document before manipulating it. I bear no responsibility for any pickles you might get yourself into!

Find all the short cuts here

 
16 Comments

Posted by on January 9, 2013 in Errors, Excel, New skills, Short cuts, Writing


Tags: , , , , , , ,

Table of figures and table of tables

Are you stuck trying to create additional contents pages for the tables and figures in your document? Read on for simple instructions on how to do this.

We’ve already learned how to apply headings styles and create an automatic table of contents. But what if you’ve got figures and/or tables and you want to show those in the contents pages, too? It can be a bit fiddly, and I’ve partly written this post to give myself a reference document, too.

In this article, we are going to learn the correct and easy way to do this without heartache and hideousness. I’ll devote another article to dealing with something that’s gone wrong …

Why do I need a table of figures?

It’s often useful to provide a list of the figures and tables in your document, especially if it’s a long one, like a dissertation or thesis. They should be separate from the main table of contents, and listed below.

The tricky thing is creating two lists, one of tables and one of figures. This is where people usually come unstuck. Follow these instructions and you should be OK!

How do I create a list of figures and a list of tables?

We’re going to take a few basic steps here. They boil down to:

  • Mark all your figures as Figures and all your tables as Tables
  • Create a Table of Figures
  • Create a Table of Tables

Once you’ve done that, you’ll end up with something like this:

TOF 17

How to apply captions to tables and figures

I know what you’ve done … you’ve inserted your figure or table then typed its caption underneath, haven’t you? Like everyone else in the world. But let’s make life easier for you.

It doesn’t matter if you’ve already typed in all the caption names just as straight text – let’s do this the proper way and we can move those typed captions into the correct place as we go!

TOF 1

Click on the References tab. Find the Captions section. Put your cursor where you want the caption to go (arrow), Click on the Insert Caption button.

Let’s start off with a table caption. Remember, we want to mark a difference between tables and figures so that Word can create automatic lists.

Don’t worry if you’ve already got caption text in there at the moment: do this on a new line. We can tidy things up afterwards. You might want to copy your caption text so it’s available to paste.

TOF 2You can see a drop down list which says Figure at the moment. But we want to differentiate between figures and tables, so click on the arrow on the right to drop down the list.

TOF 3… and choose Table. Once you’ve clicked, the Caption section above it will also change to read Table 1.

Now you can type the caption text straight into this box.

TOF 4

If you’ve copied the caption text you had previously entered, you can use Control-V to paste it into this box. Note: right-click and paste won’t work here, but Control-V will work.

If you haven’t copied the caption text, and you haven’t typed it in the box, don’t worry, as you will have another opportunity to insert it in a moment. Press the OK button and Table 1 and any text you’ve entered will appear below your table.

TOF 5

Now we’re going to add a figure caption.

Put your cursor below the figure and click on the same Insert Caption button. This time, choose Figure rather than Table:

TOF 6This time, just leave the Caption box blank apart from the words Figure 1.

TOF 7Now you can type the caption text in here, or even paste it in – just make sure it goes blue like the words Figure 1 (we can change that later) to ensure it’s all included as part of the caption.

Now you can go through and mark all of your figure and table captions using this method.

Modifying and formatting caption numbering etc.

You can modify your captions, especially their numbering. When you’re adding a caption, click the Numbering button.

TOF 8You will now get options for changing the numbering from 1, 2, 3 to a, b, c, etc.

TOF 9

Use the drop down arrow to pick what you want.

You can also link the numbering to your chapter numbering – so you have Figures 1-1, 1-2, 2-1, 2-2 etc. (this is particularly useful in a long and complex document where you’re referring to lots of figures, as it saves the numbering going odd if you move figures around). To do this, click the “Include chapter number” tick box then specify what you count as a chapter number (you will need to have numbered headings to make this work):

TOF 10

Creating a table of figures and a table of tables

Once you’ve labelled all of your captions correctly as I’ve shown you, you can create your table of figures and table of tables.

Let’s do the table of figures first (it doesn’t matter which order you do this in).

Create a blank page where you want your table of figures to go, or click just below your Table of Contents if you’ve already created that.

Staying on the Reference tab, click on Insert Table of Figures:

TOF 11

You will now get some options, and this is where we choose whether we want the figures or tables to be listed. We’re adding the figures first:

TOF 12

Note, Table will be the default option. Choose Figure by dropping down the menu using the arrow on the right. Table will be highlighted in blue so click on Figure. As if by magic …

TOF 13

A table of figures!

Now return down a couple of spaces in your document and do the same to insert a Table of Tables:

TOF 14

Make sure it’s on Table and click OK. Hey presto …

TOF 15

Customising your table of figures

You can customise your table of figures in the same way that you can customise a Table of Contents, choosing from a range of styles and specifying how they are laid out:

TOF 16

I’m going to write an article about this soon, so for now just note that you can choose different “looks” for the list, and you will get a preview in the pane above these drop-down menu sections.

Adding headings to the table of figures and table of tables

You will probably want to add headings to your tables. Remember to mark these as Heading 1 so they appear in your automated Table of Contents, which I’ve also added here:

TOF 17

Updating your table of figures and table of tables

If you change anything in the page numbering, document layout or captions themselves (particularly useful if you or your proofreader finds an error) or delete or insert tables and figures, you will need to update your table of figures / tables.

You do this in exactly the same way as updating a table of contents. Right-click on the table, making sure the grey highlighting shows up. Then select Update Field and then Update Entire Table.

TOF 18And that’s it.

We’ve created captions the correct way, and created tables of figures and tables of tables, done some customisation and learned how to update them.

If you have found this article useful, please share it using the buttons below, and leave me a comment!

This is part of my series on how to avoid time-consuming “short cuts” and use Word in the right way to maximise your time and improve the look of your documents.

Please note, these hints work with versions of Microsoft Word currently in use – Word 2003, Word 2007, Word 2010, Word 2013 and Word 2016 all for PC. Mac compatible versions of Word should have similar options. Always save a copy of your document before manipulating it. I bear no responsibility for any pickles you might get yourself into!

Find all the short cuts here

Related articles on this blog

How do you create a two-line figure caption and a one-line entry in the table of figures?

How to create a Table of Contents

How to update your Table of Contents, Table of Tables or Table of Figures

Editing and the Table of Contents


193 Comments

Posted by on December 27, 2012 in Errors, New skills, Short cuts, Word, Writing


Tags: , , , , , , , ,

Tips for coping with writing up a PhD

mugsI have worked with many PhD students and have several friends who are in the middle of the process at the moment, or about to start off (exciting!) so here are some top tips for how to cope with the dreaded end stage: writing up, gleaned from my experience over the years.

Think of this like a chat over a cup of tea. I’m here to help, to reassure you that everyone goes through the same stuff – and that you WILL get through it.

Yes, it’s difficult, so don’t beat yourself up

Not everyone gets to do a PhD. It’s an achievement to get onto the course, it’s an achievement to gather all your data, do all your literature review stuff, grapple with statistics … and then start to write it all up.

Hopefully, nobody said it would be easy. Because it’s not. But if it was easy, everyone would be doing it! A big achievement like a doctorate isn’t worth it if there isn’t a struggle. No one’s goes smoothly, even if they say it is. I have worked with lots and lots of PhD candidates. Even the most organised and seemingly perfect person has underlying panics, lost texts, confusions, chapter sections that just won’t go right …

If you accept that it’s difficult, that it’s going to be a struggle, that it’s a major achievement you’re aiming at, you can get your head down and bite away at chunks of it until it’s done.

Everyone goes through the same stuff

I thought this one was obvious, then I realised that not many people are privileged to work with and know so many people starting off on their research career. Almost every time I tell a student that what they’re going through is what everyone else goes through, they’re incredibly relieved.

  • It’s not just you
  • Everyone gets through it
  • There is normal life at the end

It’s a bit like when I’m doing the Birmingham Half-Marathon, which I do every year. At a certain point, around Mile 10 (of 13), you start to look around and see the pain, slight sicky feeling and effort etched on everyone’s faces. But then you see the finishers walking back down the route with their medals and silver foil cloak things and you know that the end is in sight!

You will experience this

From my experience with PhD students, I can pretty well guarantee you will experience one or more of these phenomena:

  • You will get quite a lot fatter or quite a lot thinner
  • You will get paler and a bit bug-eyed. This is because
  • You will go outside less and less
  • A frown will start to etch itself on your forehead (this will go)
  • Your hair will get really long (boy or girl. Haircuts? No time! I could write a paragraph in that time!)
  • You will eat odd things
  • At odd times
  • You will get no sleep and wake up tired
  • Whenever you get a slight break (you’ve handed in a chapter!) you will sit down and fall asleep
  • You will make excuses not to see friends
  • You will see friends and end up in a frenzy of self-flagellation about not being at your desk
  • You will wake up with heavy eyes and a feeling of dread
  • Everything about the entire document will be wrong
  • You will sit down and be unable to write anything
  • You will feel like your supervisor either hates you or pities you so much – either way, they’re sending you coded messages not to continue via the comments they make (they’re not)
  • You will feel that your supervisor doesn’t care / understand (they do: they’ve seen it all before so they’re not panicking because they know you can get through it)

I can guarantee you that everyone in the whole world of research experiences many if not all of these phenomena. You are not alone!

What can you do?

This is going to sound boring, but when I tell people to do this, and they listen and do it, it does, honestly, make it better.

  • Eat as healthily as you can. Accept that offer of a casserole or a vat of soup from your housemate or friend. Take an evening to make up batches of good sauces that you can freeze and re-heat. Keep healthy snacks around.
  • Take breaks. No one can work for more than about an hour solidly without needing to refocus their eyes, get up, stretch, and think about something else for a few minutes. This will NOT eat into your writing-up time: it will make it more productive. Every hour, stand up, stretch, look out of the window.
  • Get outside – at least once a day, in the daylight. Even if you just go into the garden and jump around a bit – but preferably get off the premises and go for a walk around the block. Again, this will NOT eat into your writing-up time: it will make you more productive.
  • Take some exercise. If you are a runner or a gym bunny, keep it up, even if you have to do shorter sessions than normal. This is not the time to take up a new sport or activity, but even a good, brisk walk is great. You need to keep your body active as well as your mind. This will help you sleep better, too.
  • Give yourself a treat. Once you’ve finished a chapter or achieved something specific, have a chocolate bar, a read in the bath, an evening off. Simple things can mean a lot at this time and really help.
  • Don’t just start at one corner and work your way round. Oh, hang on: that’s ironing a shirt. Anyway, have a plan for how to write up, don’t just start at the beginning and try to write it straight through. Set up the headings and fill bits in as you go, sure, but have those headings and structures in place so you can do that (see my post on top tips for dissertations and theses for more on this).

These seem both dull and obvious, but they are obvious because they work. They work in all sorts of contexts, actually: they’re quite similar to my Home Working Rules, for example. But when you’re concentrating on a big project, you do need to be reminded of these!

No one is superhuman, no one can just sit down and write the thing, and the more you look after yourself, the more you will get done.

Get help

It’s not weak to ask for help. If you need help, ask. People will be happy to help you, and for some of this stuff, you can help yourself, too.

  • Your supervisor – if you’re really struggling or panicking, talk to your supervisor. They might act like they’ve seen it all before, but then they have. But they do care about you: they have a professional duty to you, if nothing else, and they can’t help you if you don’t tell them you’re struggling!
  • University resources – the chaplaincy, departmental support services, University support services, services for foreign students, drop in sessions at the Library – use them.
  • Proofreaders and other professionals – if you’re struggling with your writing, whether you are using assistive technology (e.g. dictating rather than typing), have issues with dyslexia, or are writing in a language that’s not your native language, there are people who can help you. If the issue is to do with your need for technology or extra support, you may be able to talk to your department about defraying part of the cost. Note: research this carefully, try to make sure you’re talking to the real person who’ll be working on your document, and get references and examples. People like me won’t look down on you: even if English is your native language, you’re fluent and have no issues it’s easy to make mistakes when you’re mashing sentences together and mixing things around. We’re here to help.

In addition, it’s worth setting up the following at the beginning of the writing up process and during the first stages.

  • Know how to use Word – I can’t say this enough – if you don’t know how to do these things as a minimum, find out before you start writing up. You do not want to be in a big pickle about this at the end of the process when you’re rushing to hand it in. I talk about lots of these in my handy Word tips blog posts and there are lots of other resources around, too.
    • Setting up headings levels
    • Automated contents pages
    • Tabs and margins
    • Page breaks and section breaks
    • Placing images in text (if you have images or figures)
    • Tables
    • Spell checking
    • Track changes (if you are going to get the document proofread)
  • Get used to saving your work regularly
    • Press that Save button all the time. Better to save too much than lose it
    • Make multiple back-ups – on a pen drive or whatever. Save the most up to date copy each time
    • Version control – if you want to keep previous drafts, number your versions so you know which is the most up to date, which has been checked by your proofreader, etc.
  • Sort out your referencing. I have a post on this for you to read. Whatever you do:
    • Keep a note of what you refer to
    • Use a notebook, Excel, Word, a specific referencing system – but keep it all in the same place
    • Record ALL the information – book publisher details; journal page numbers
    • If you’re unsure of how to reference something, do a Google search and find out how others have done it (this particularly applies when you can’t tell which is the first name and surname of an author – easily done!)
    • Find out what referencing system your department uses and learn about it now, not right at the end. You should be given information on this at the beginning of your course. If not, talk to your library rep or supervisor
  • Make a style sheet for yourself. Stick it all down on a note pad or Word document. This seems like a fussy thing to do now, but it will make everything consistent and save you having to decide each time. If you don’t use a proofreader, this will make your examiners exclaim over your tidiness and organisation. If you do use a proofreader, it will save them (and you) time.
    • Decide what kind of spellings you’re going to use (ise / ize).
    • Decide how you’re going to number figures and tables (1, 2, 3 throughout, or 1.1, 1.2, 2.1, 2.2 per chapter – I recommend the latter)
    • Decide how you’re going to number headings if you decide to do that
    • Decide how you are going to refer to common words and phrases – initials with a key at the beginning?
    • Decide what you’re going to capitalise
    • Decide if you’re going to use footnotes or in-text citations
    • Decide how you’re going to format longer quotations and make a note (e.g. 2 cm left and right margins, italics)

You can do it

If you’re at writing up stage, you will get there. I admire you, and so do lots of people. Remember …

  • It’s not easy but no one finds it easy
  • Everyone goes through the same stuff
  • Get outside
  • Seek help when you need it

Good luck!

If you’ve found this post useful, please share it using the buttons below, and/or make a comment – I love to get feedback about my posts. Also, if there’s something I haven’t covered here or a top tip for this stage, do add a comment. Thank you!

You might find these useful: Top tips for students and Word users

 
7 Comments

Posted by on December 19, 2012 in New skills, Organisation, Students, Word, Writing


Tags: ,

Top tips for dissertations and theses

It’s right in the middle of dissertation season, and thousands of students will be hard at work putting together both undergraduate and postgraduate dissertations.  I work with many students  – including lots of people whose English isn’t their first language as well as native English speakers.  I love working with students – helping someone out at the beginning of their career, supporting them in their writing and helping them improve their English and writing skills (of course I’m careful not to help TOO much – see this post for how I avoid plagiarism!).

Over the years I’ve worked with almost a hundred students getting ready to submit dissertations and theses.  Although I didn’t end up completing my Library Master’s (I moved away from the population I was researching!), I supported my partner through his (and proof-read it; perhaps the hardest thing I’ve ever proof-read.  Cognitive neuroscience!) and am working on my own research project at the moment. So I’ve called upon my experience and that of the “hive minds” of Facebook and Twitter to put together some top tips for getting that dissertation or thesis researched and written.  Thank you to everyone who contributed!

The start – reading, topics and supervisors

It’s vitally important to choose a topic you’re interested in and can commit to – even for a shorter undergraduate dissertation.  For a PhD, you have to almost be obsessed with your topic, otherwise, when the going gets tough, it’ll be easier to give up.  Meg1987 (via Twitter) agrees with this from an undergraduate perspective: “Start early and make sure it’s on a subject you don’t mind taking over your life!” and tutor and supervisor Gill Rose agrees: “Choose a topic you are really interested in.  Then, when you get completely demoralised, your interest will keep you going (oh yes it will).

The proposal can be an important part of the process; this isn’t usually needed at undergraduate level, but you’ll usually have to think up your own topic from Master’s level onwards.  Gill recommends keeping it simple: “Making it complicated does not show your superior knowledge, you usually just get tied up in knots”, and is more keen on the students showing that they can take a research methodology and apply it to a real-life situation than seeing intellectual fireworks.  And if the thing changes between proposal and writing up? Linda Bates, who recently gained a doctorate from Cambridge University, reassures us: “By the end of your first term or first year or whenever, your actual work won’t bear much resemblance to whatever is in your research proposal. But that’s the nature of research and not something to worry about (unless it’s so far away from the proposal that you have to send an entirely new proposal to your funding body in order to keep justifying their payments…)”

It’s worth having a look at some books on writing a thesis / dissertation.  I’ve personally found Gary Thomas’ “How to do your research project” (London: Sage, 2009) very helpful, although it’s more for the humanities/social sciences/education fields.  You’ll be based at a University – so use the library – subject specialists will have recommended purchases that they consider to be useful, and these books can give you a good base from which to start.

A word on supervisors.  Yours is usually chosen by their specialism as well as their teaching role, so they know something about your subject or its background.  Zoe Toft (via Twitter – playbythebook) stresses the importance of a good, honest relationship with your supervisor, right from the start, adding: “It’s important not to be afraid of criticism (as a student) or acknowledging areas where you’re not an expert if you’re a supervisor – which happens more often than supervisors like to admit!”

Concentration and keeping going

So, you’ve had a chat with your supervisor, you’ve submitted your proposal and had it accepted (or chosen your subject) – now what? How do you get down to the work?

Linda Bates acknowledges the need to maintain contact with the outside world: “The internet is a real friend/foe dichotomy: in subjects like English where you can spend 3-4 years working on a PhD without having to speak to a single person, it is valuable to use [social media] to interact with peers” but warns that it mustn’t be allowed to get out of control.  I tend to turn off Twitter, etc., if I’m really concentrating on something, with a half hour break at the end for chatting and catching up with emails.

When I’ve got a big project to concentrate on, I try to make myself just sit down and DO SOMETHING, whatever that something is, for a set amount of time.  Some people structure their time management around half hour blocks, some, such as Ali Noakes, suggest longer time periods (Ali’s just finished an Occupational Therapy degree):  “It helped me to set aside a block of time, such as a day, rather than jumping between assignments. I needed to become immersed in it. We occupational therapists call it occupational flow.”

And Laura Stevens simply says: “Set yourself deadlines and stick to them.”

Keeping records

I talked about referencing in another post.  It’s so important to make a note of the books, journal articles and websites you’ve referred to as you go along.  You can use specialised software for this or just keep a spreadsheet going – or even a notebook! This will solve a lot of problems when you come to write up.

Back up your work regularly, preferably onto a pen drive or an external hard disk (or you could email it to yourself if you’ve got enough bandwidth on your email account).  And keep control of the versions – if you make a lot of changes, number the versions of each chapter as you go along, so you know which is the most recent one.

Chaletfan says, via twitter, “don’t put a superbly edited print out in the bin. I’ve *totally* not just done this.”

Writing skills and writing up

So, it’s the end of the project, and it’s time to write it up.  Or is it? Should you write as you go? One thing I was always taught was that your introduction and conclusion, at least, should be written such that a reasonably intelligent and well-educated person can understand what you’re saying.  So keep it clear, explain the acronyms, and don’t make assumptions about the readers’ prior knowledge (this also means you can use a general proof-reader, like me, rather than someone very specific to your field, unless it’s something very highly specialised, like maths).

A dissertation or thesis will usually include the following sections: Introduction – Literature Review – Design and Methodology – Findings – Analysis and Discussion – Conclusion.  Gary Thomas, in his book referenced above, suggests allocating the following amount of the work to each section: Introduction 5% – Literature Review 30% – Design and Methodology 15% – Findings 15% – Analysis and Discussion 30% – Conclusion 5%.  Break your total target word count down in these proportions and you’ll have a guide to how much to write for each section.

Zoe Austin-Cope recommends (for a dissertation) “Start writing the thing at least three weeks before the deadline, not two.”  This certainly applies to making sure you’ve got all the text in the right places and that the document works as a whole, and in many cases you can work like this.

There’s also a case to be made for writing up as you go along. Arthur Lugtigheid told me how he did this:  “When you’re doing experimental work, write as you go along. It will save you so much work later. I find writing very difficult, almost like starting a painting – where do you put your first brush stroke? Once I get going I find it easier and easier and when you have something to work from as a first draft things get very easy. But you need to get there first. I start with a rough outline – and I find that for me, getting to a first draft requires ‘verbal diarrhoea’ stages, where I just write whatever comes up. I then structure this into a more coherent story. It’s a bit like polishing a gem piece by piece.”  He goes on to detail: “I always start with the methods while I’m actually working on the experiment. Then you write results. You might argue that the introduction is important to write first, but that’s not true at all. In practice, what you want to mention in the introduction largely depends on what you find in your results and how you write your methods. The discussion is always written last, but before your abstract.”  Gill Rose, working in a different discipline, agrees that it’s best to plan it out then fill in the sections in general before going into more detail: “If you have not been given a structure to work to, organise one of your own. Don’t feel you have to do one section before moving on to the next. Much better to do an initial plan, then fill out each section a bit, then get down to the detail; that way, you are better able to see what should go where.”

I agree, too – my research consists of a case study and then a questionnaire-based study.  I’m writing about my methodology as I formulate the theory behind it into the appropriate terms, as well as getting information for the case study in two halves: one half is already written up and the other is awaiting further input.  Meanwhile, I have a lot of the theoretical background of the main study done, and am able to do this while I’m waiting for the rest of my questionnaires to come in.  It’s good to know I am learning how to code up the questionnaire results before I actually have to do it!

Other tips

I would say this, I know – but do have someone read through your work before you submit it.  Even if you can do without a proofreader (really a copyeditor but it always seems to be called proofreading in this context: you all read the blog and know the difference, anyway), then have a friend or family member read it through for any glaring errors.  We all make mistakes and we all get tired, and this can prevent you from submitting a piece of work containing the sentence “More things that could be researched on this are more things” (real-life example, not drawn from any of my clients!)

Treat yourself! Save up supermarket rewards and treat yourself to a nice meal.  Studenthood often goes with poverty, so this can be a real bonus. Also, and I can’t stress this enough: look after yourself.  It can be a really frazzling experience writing a dissertation or thesis.  Make sure you get: Enough sleep.  Enough good food (not junk). Enough exercise.  Even though I’ve got a job, a business to run and a research project to work on, I always prioritise the gym and running. I see so many students, especially if they’re in a new country, grappling with a Master’s course, or they’re on the long haul of a PhD, running themselves into the ground, getting thinner and paler (or fatter and paler), short-tempered and wild-eyed. When someone gives me the final version of their precious chapters, I usually email them: “Now have a good meal and go to sleep!”  Pay special attention to good nutrition and having enough sleep.  You don’t need to turn into a gym bunny, but go for a walk – and do get out of the house at least once a day!

I hope these fairly general hints and tips, backed up with information from people who know about the process first hand, prove helpful. If you have more tips to offer, please do put them in the comments!

All my posts to do with students can be found here.


Tags: , , ,

What I’ve been up to in June

Before I tell you what Libro has been up to in June, I wanted to mention the results (so far!) of my user survey.  Last month, I posted a survey in order to get some feedback on how my blog was going, what people thought of the content, how often I posted, how often I told people about what I’d posted, etc.  The poll is still running, but I’ve gathered together some interim results, and am making some changes as a result.

14 people have been kind enough to respond to the survey so far. I know this doesn’t lend itself kindly to statistically significant results, but I have drawn out some trends. As regards the content of my blog posts, reactions were varied, with the guest posts and these “what I’ve been up to” posts attracting the most extreme likes and dislikes. But … these weighed each other out. For every person who didn’t like so much detail about what I’ve been doing, there was someone who wanted more of that! So the content of my blog posts is going to stay pretty much the same.  After all, when I promote a post, you get an idea of what it’s about, and can choose whether to click to read further.

Although the majority thought I was doing it just right, slightly more people thought I advertised my blog posts too much than too little.  Most of those people were people who accessed the posts through Facebook.  So I’ve cut down on the number of times I promote my posts on Facebook (and I now post about them more often to the people who’ve “liked” my Libro page, on the grounds that they have actually signed up to know stuff about Libro, than to my friends list), with maybe slightly more on Twitter, as people do miss great chunks of Tweets through the day.

Quite a few people thought I posted articles a bit too much during a typical week.  I did get a bit over-enthusiastic for a while, especially with similar, marketing-type posts.  And I know I posted two articles yesterday, plus this one today – but those two were on very different, and not very Libro-centric, topics.  So I have listened, and I have cut down and varied things a bit.  Each week, you should see one or two “troublesome pairs”, a main post on a Wednesday about a topic that’s important to Libro, over the next few weeks, something for the students instead of a troublesome pair on a Friday, and a freelancer interview on a Saturday.  With the odd extra cafe review or Iris Murdoch update.

There’s still time to fill in the survey, so please feel free to do so if you haven’t already. And I really appreciate those of you who took a moment to fill in the survey and add your comments!

What I’ve been up to in June

Trying to get this a bit closer to the end of the month than I managed for May …

I’ve had a good, busy and varied month. I worked on some tender documents for a company that provides these for other companies trying to get contracts with local authorities etc. (although I just do the proofreading at the end, this ties in with the contract writing work I used to do in London – everything comes in handy one day!); continued working for my lovely regular customers; helped someone write an introduction to a book; copyedited parts of two PhD theses and a couple of dissertations; worked on an e-book on marketing; transcribed some tutor-student interviews; proofread a Kindle version of a book; did a substantive copyedit on a novel.

If you want to know what any of these tasks involve, the blog posts in the what do I do category should help.

In other projects, I sorted out my libroediting domain names so my web address is now http://www.libroediting.com and my email address liz@libroediting.com; gained a logo in a skills swap with a graphic designer (I wrote her some marketing letters) and sorted out a dedicated mobile phone for Libro. I also helped out at another Social Media Surgery and attended a great Social Media Cafe at the end of the month, where I met some lovely new people and introduced some old and new friends to one another.  I’ve also started publishing a series of interviews with fellow freelancers; I plan to revisit them all in a year’s time to see how they’re getting on.

And I collected some lovely quotes for my references page!


Tags: , , , , , , , ,