RSS

Category Archives: New skills

How to use find and replace in Word 1: simple search and replace

This is the first of three articles about the useful Find and Replace functions in Word. It covers Word 2007, Word 2010 and Word 2013 in detail, although once you’ve got past the first hurdle, they all work in exactly the same way. This article tells you why you might want to use Find and Replace, how to locate them, and basics of how to use them. Subsequent articles look in more detail at how to find specific words and phrases, and even symbols and formatting.

Why would I use Find and Replace?

The Find function in Word is very useful if you need to locate all of the places where you’ve used a particular word or phrase. I use it to check that I’ve kept things consistent. I might look for every instance of the word “Find” in an article on Find and Replace, for example, to check …

  • Have I always used it with a capital letter or sometimes with a lower-case initial letter?
  • Have I always typed Find and Replace, or sometimes Find & Replace?
  • Have I used find, finding, etc. too many times around the word Find, making the piece look clumsy?

I also use Find and Replace if I have decided that I want to change something throughout the text, for example:

  • I’ve used “low fat” and “low-fat” inconsistently and want to change all instances to low-fat
  • A client wants me to eliminate double spaces after full stops. I Find ”  ” and replace it with ” “
  • I’ve misheard an album title in a transcription and want to go back and find the incorrect version and replace it with the correct one

So, that’s why we use it – how do we use Find and Replace?

How do I access Find and Replace in Word 2007?

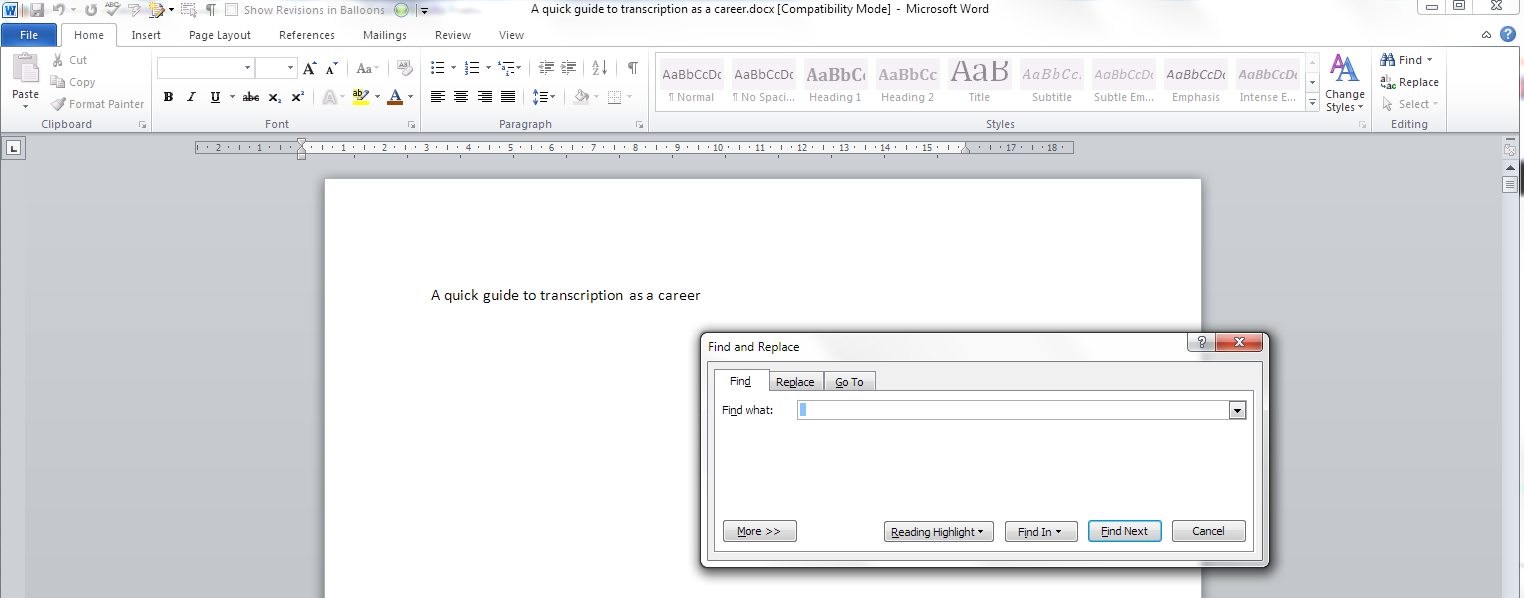
You can access the Find and Replace dialogue box in Word 2007 by going to the Home tab and clicking on the arrow to the right of Find at the right-hand end of the menu bar:

1a Word 2007

Word 2007 also uses the simple Ctrl-F keyboard shortcut to bring up the Find and Replace dialogue box (this also works in Word 2003).

1 Word 2007

Once you’ve brought up the dialogue box, type in the text you want to search for and press Enter or the Find Next button.

How do I access Find and Replace in Word 2010?

In Word 2010, you can access find and replace using the Home tab and the Find option at the right (note Advanced Find option):

2a Word 2010

If you just choose Find, you’ll get the sidebar shown below, if you choose Advanced Find, you’ll jump straight to the dialogue box.

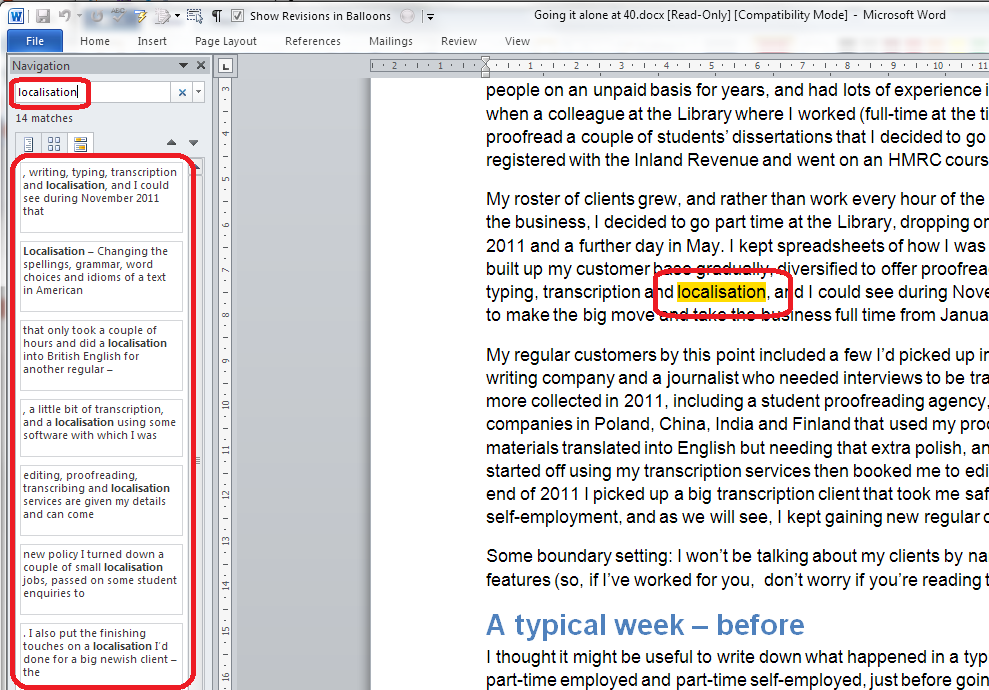
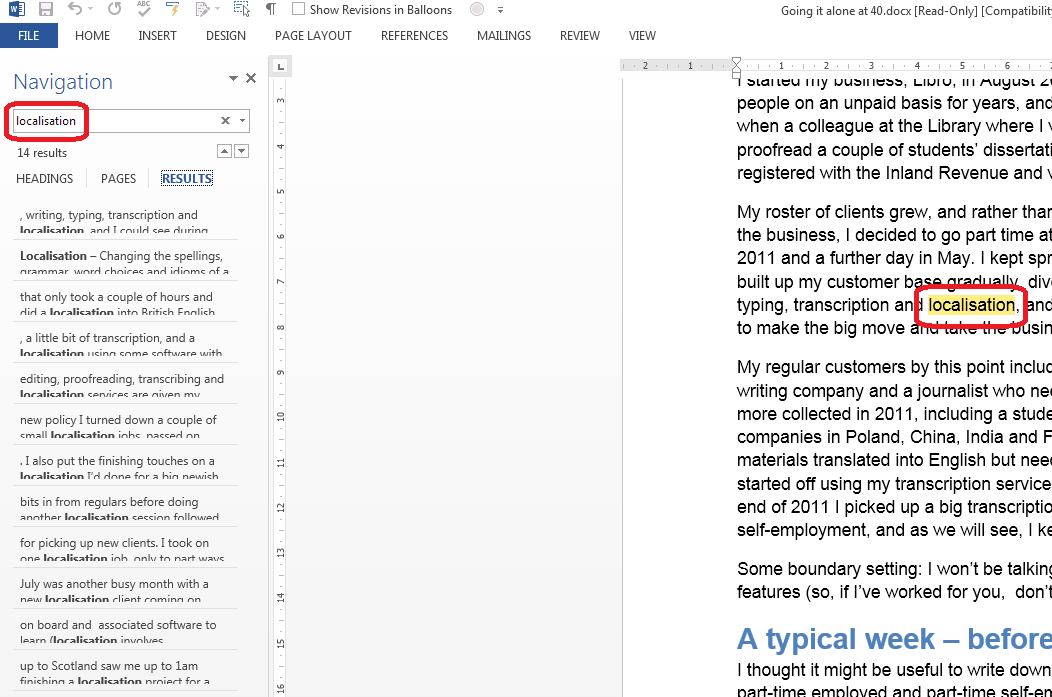
Pressing Ctrl-F will bring up a sidebar with a simple search option. This seems very odd if you’re used to Word 2003 and Word 2007, as you are left wondering where the familiar dialogue box is, but it’s actually very useful, as you can see at a glance how many times your word is used and where in the text it can be found, and the word searched for (in this case localisation) is highlighted in the text:

2 Word 2010

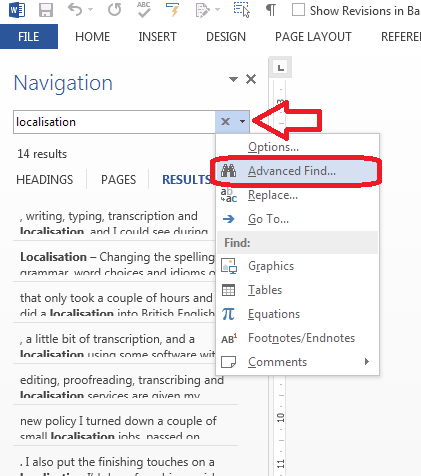
If you want to access the more advanced Find and Replace dialogue box that you’re used to from Word 2007, you need to either choose Advanced Find from the Home tab Find area, or click on the arrow to the right of the magnifying glass in the side panel. If you do that, you’ll get a drop-down menu which includes Advanced Find.

3 Word 2010

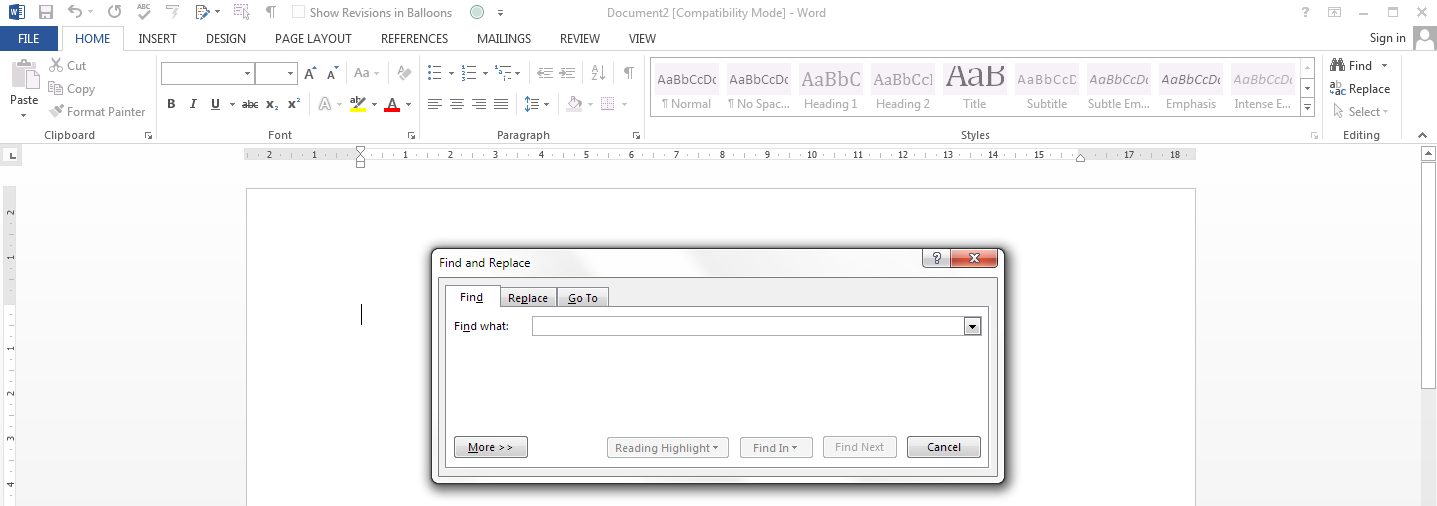
Whichever option you choose, you will then be confronted with the familiar Find and Replace dialogue box:

3a Word 2010

Once you’ve brought up the dialogue box, type in the text you want to search for and press Enter or the Find Next button.

How do I access Find and Replace in Word 2013?

This works pretty well exactly the same as in Word 2010, just with fewer colours and less handy yellow highlighting (I’m sure you can add that back in and I’ll write about that when I find out  how to do it). So, you can either access Find and Replace using the Home tab, Find area, and dropping down the arrow at the right to choose Find or Advanced Find:

3a Word 2013

If you just choose Find, you’ll get the sidebar shown below, if you choose Advanced Find, you’ll jump straight to the dialogue box.

Or press Ctrl-F to access that useful sidebar that will surprise you if you’re accustomed to Word 2003/2007 … which will show you all instances of any word you search for in the whole document and highlight them (in yellow!):

4 Word 2013

Then, to reach the dialogue box, click the arrow to the right of the magnifying glass and choose Advanced Find:

5 Word 2013

And there’s your familiar dialogue box:

5b Word 2013

Once you’ve brought up the dialogue box, type in the text you want to search for and press Enter or the Find Next button.

Are there more options for Find?

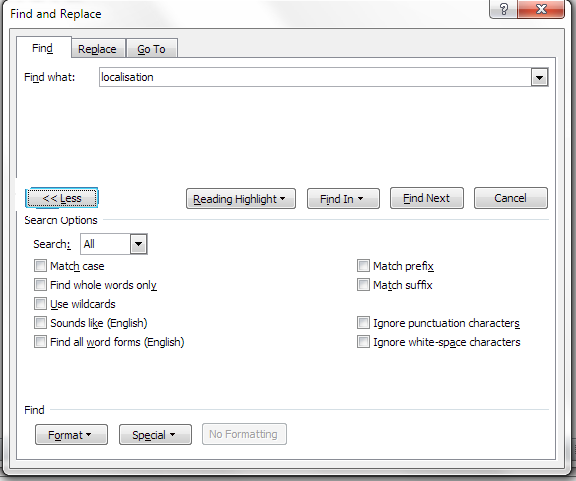
You can access more options for Finding specific text by pressing the More button in the dialogue box:

5.5 more options 2010

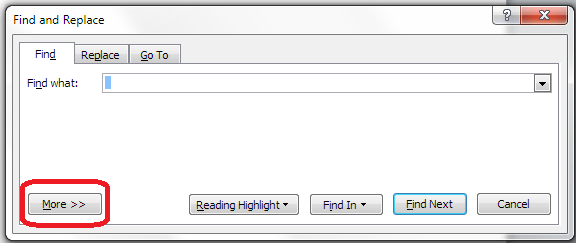
This will give you lots more options for refining your search. Some are quite obvious, but I’m going to write about all of them in depth in another post.

Advanced find options

How do I replace text in Word 2007 / Word 2010 / Word 2013

(Note: all screenshots are from Word 2010, however this works exactly the same for all versions of Word back to Word 2003 and up to Word 2013 (at least)).

To Replace text, you need to go to the second tab along in the Find and Replace dialogue box, marked Replace. You will then be given an extra space to fill in the text you want to replace your found text with. In this case, I’m finding “localisation” and replacing it with “localization”:

6 replace

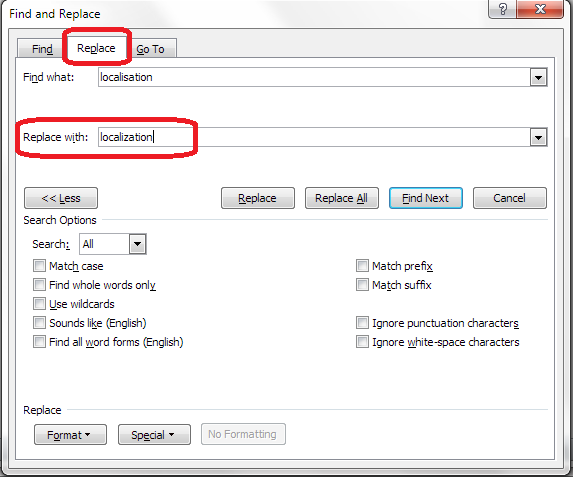
At this point you have a choice: hitting Find Next (to find the next instance of the word) and then Replace (to replace it with your new word) for each individual occurrence, or going wild and pressing Replace All (which will automatically replace every occurrence of the word you’ve found with the one you’re replacing it with),

7 replace what

I would always recommend using Find Next – Replace unless you absolutely know that you are not going to be replacing something you don’t mean to replace. Even replacing a double space with a single might play havoc if the person who wrote the document has used spaces to format tables (even if they shouldn’t do that, some still do). And consider this:

“John” means “toilet” in American English. So I might do a search and replace to Find John and replace it with toilet. But what if there’s a character or just someone mentioned called John Bloggs. Or, soon to be, Toilet Bloggs. It’s so easy for this to happen …

So, be careful with your Find and Replace and you’ll be fine!

———-

This article has covered the basics of Find and Replace. Next time, we have a look at the options you can use and using wildcards, and I will also look at finding and replacing formatting  …

If you’ve enjoyed this article or found it useful, please comment, or hit one of the share buttons you can see below this article. Thank you!

This is part of my series on how to avoid time-consuming “short cuts” and use Word in the right way to maximise your time and improve the look of your documents.

Please note, these hints work with versions of Microsoft Word currently in use – Word 2007, Word 2010 and Word 2013 all for PC. Mac compatible versions of Word should have similar options. Always save a copy of your document before manipulating it. I bear no responsibility for any pickles you might get yourself into!

Find all the short cuts here

Related posts on this blog:

Advanced Find and Wildcards

 
4 Comments

Posted by on December 11, 2013 in Errors, New skills, Short cuts, Word, Writing


Tags: , , , , , , , ,

How do I count the words in a PowerPoint 2013 presentation?

Some time ago, I published what has turned into a pretty popular post on how to count the words in your PowerPoint 2007 document. This is something that is a little tricky to find, so perfect for one of these how-to posts.

All was well and good, then I had some editing to do on a PowerPoint document and my PC automatically opened it in PowerPoint 2013. Where on earth did I find out how to count the words now? Here’s how …

Why would I want to count the words in a presentation?

You might have a word limit imposed by a course tutor, or, more likely, you’re an editor with a per-word rate who needs to check how many words you’ve actually edited.

How do I count the number of words in a PowerPoint 2013 presentation?

To do this, with your document open, you need to go into the FILE tab at the extreme left of the tab list … (one day I’ll work out how to get those tab titles out of capitals and let you know!)

menu

Once in the File tab, stay in the Info area where you land, and click on the arrow next to Properties in the right hand column. Once clicked, you will have a choice between Show Document Panel and Advanced Properties. Click on Advanced Properties:

1 properties

This is, dare I say it, a little easier than in PowerPoint 2007. Once you’ve clicked on Advanced Properties, you’re given a list of properties. Click on the Statistics tab at the top and you’ll find your Word Count, among other information.

2 properties

To return to your document, click OK and then back to the Home tab in your document.

How do I count the number of words in a PowerPoint 2010 presentation?

Please see the post on PowerPoint 2010.

Related posts:

How do I count the number of words in a PowerPoint 2007 presentation? (this is a little different).

How do I count the number of words in a PowerPoint 2010 presentation? (different again!)

If you’ve enjoyed this post or found it useful, please do comment, or share using the buttons below! Thank you!

Please note, these hints work with versions of Microsoft Office currently in use – Office 2007, Office 2010 and Office 2013, all for PC. Mac compatible versions of Word should have similar options. Always save a copy of your document before manipulating it. I bear no responsibility for any pickles you might get yourself into!

Find all the short cuts here

 
10 Comments

Posted by on December 4, 2013 in Errors, New skills, PowerPoint, Short cuts, Writing


Tags: , , , , , ,

How do I count the words in a PowerPoint 2010 presentation?

Some time ago, I published what has turned into a pretty popular post on how to count the words in your PowerPoint 2007 document. This is something that is a little tricky to find, so perfect for one of these how-to posts.

How do I count the words in a PowerPoint 2010 presentation?

It’s all a bit different in a PowerPoint 2010 document if you’re used to PowerPoint 2007, because they’ve got rid of the Office button and replaced it with a File tab.

So: open the document and click on the File tab to the left of the Home tab.

This will bring you up a screen where you can open previous documents, save as, etc. Click on Info on the left and your properties will come up on the extreme right.

But of course, yet again, the thing you want to see isn’t immediately visible. Go right to the bottom of the screen and click Show All Properties.

And there’s your word count.

Related posts:

How do I count the number of words in a PowerPoint 2007 presentation? (this is a little different).

How do I count the number of words in a PowerPoint 2013 presentation? (different again!)

If you’ve enjoyed this post or found it useful, please do comment, or share using the buttons below! Thank you!

Please note, these hints work with versions of Microsoft Office currently in use – Office 2007, Office 2010 and Office 2013, all for PC. Mac compatible versions of Word should have similar options. Always save a copy of your document before manipulating it. I bear no responsibility for any pickles you might get yourself into!

Find all the short cuts here

 
5 Comments

Posted by on December 4, 2013 in Errors, New skills, PowerPoint, Short cuts, Writing


Tags: , , , , ,

What is Storify and how do I use it?

Storify logoIn response to a request for information*, today I’m going to be talking about Storify: what is it, why would you use it, and how do you use it? I wasn’t already a user, so this post takes you through the stages of logging in and creating your first story through screenshots created as I did it for the first time myself!

What is Storify?

Storify is a social media tool that lets you create stories or timelines from a variety of social media resources like Facebook and Twitter, as well as other web resources. You can use it to pull together information on whatever you want, and can customise it how you want, then share your story on the site with your friends on those social media sites.

Why use Storify?

I’ve mainly come into contact with Storify in relation to events. For example, Karen Strunks pulls together a Storify after every Social Media Cafe in Birmingham. She gathers any Tweets and Facebook posts which have used the hashtag #bsms and creates a storyline showing the event through its before, during and after stages, and what people were saying about it. Here’s an example of one of her Storify stories.

So you can see that it’s a great way to pull together information and images and make a story that you can share with others. It’s useful for events, news on particular topics, or fundraising and awareness raising campaigns. You don’t have to base it around hashtags (a hashtag is a short code with a # in front of it that creates a searchable link in Twitter and Facebook, etc., which allows you to find all of the tweets on a particular topic. For example, even if you’re not a member of Twitter, searching for the hashtag #amwriting, used by authors, will give you these results, all containing the hashtag (example)).

How do I join Storify?

If you’re not already a member, you need to go to www.storify.com and sign up. If you don’t already have an account, you need to click the Login button at the top right:

Storify home page

You will be given the option to log in using Twitter or Facebook. Actually, you will still need to create a password and account with Storify: what this does is associate your Storify account with your social media account. You can also just create a username and password.

2 login

I chose to sign up using my Twitter account, as that’s what I use most for business and sharing. As it says, it only connects to your Twitter account and uses its authentication, it doesn’t see your password etc. And when it says it will Tweet for you, that’s only when you create a story, not randomly!

3 Twitter login

So I told it my Twitter username then added my email address and a password:

4 sign up

And that was it, I was ready to create my first story!

How do you create a Storify story?

Once you’ve created your account, you’re ready to create a story. There’s a big green button on the top row of the website, Create Story. Click that …

5 create

… and you’re taken to a slightly alarming page – alarming because it manages to look both blank and complicated! But look: little tips come up the first time you use it which guide you through what to do!

Basically you’ve got an area where you create your story on the left and a place to search for content on the right.

The first thing to do is create a name for your story. You can also press the Save Now button at this stage, which will prompt it to autosave as you go along.

6 create

I’ve given my story the edifying title “Test CBSMS story” and now I’m ready to add content, or Search for elements, as Storify calls it:

7 create

There’s a row of tabs along the top – I clicked on Twitter and then searched for #cbsms [Central Birmingham Social Media Surgery], because I knew that that was the hashtag used around the event. But you can search for anything here:

8 search

You can see that a set of Twitter results has come up, and all of them contain the hashtag. Storify now handily told me what to do: drag and drop the tweets I wanted into the story area:

9 choose

This means that you can pick up particular results but not all of them – useful if some of them are repeated or just ‘chatter’ that you don’t want to include. It also means that you can put them into whatever order you want, rather than the order imposed by the standard Twitter view (I made this one like Twitter, with the newest tweets at the top, but if you look again at Karen’s example, she switched it round to read from top to bottom).

Click on the tweet you want to include and drag it across into your story area:

10 choose

Once I’d popped a couple of items in, I was told that I could add text:

11 comment

You click on the space between your items and type whatever text you want to add:

12 comment

So I added a note explaining the last two entries in the story, where I checked it was OK to use the hashtag to create this worked example.

I then hit the Save Now button – which I mentioned earlier and should have done at the point at which I mentioned it! Just in case!

13 save

Adding more sources to your Storify

You’re not limited to creating a Storify from only one source. Along the top of the search area you can see loads of different options, including Facebook, Google+, YouTube, Google, and your own photos and links.

Note that if you choose Facebook, you will need to log in and link it to your own Facebook account (again, this won’t do anything nasty, it just appears to need to use your own Facebook timeline. Of course, you can search for anything on Facebook once you’re logged in). You don’t seem to need to do that with Google+, though.

14 connect other accounts

This time, I didn’t bother with any Facebook items, but I did pop into Google search and picked up some explanatory information about the Social Media Surgery to add to my story:

15 connect other accounts

How do I publish my Storify story?

The first step is to hit the Publish button at the top right:

15.5 publish

Just in case I had pressed it too soon, I was shown a confirmation box:

16 publish

I was ready to publish, so I clicked on Publish story.

The next step was Share & notify. Sharing creates an automated Tweet with a link to your story. I imagine that if you’ve signed in to Facebook, etc., you will also be given the option to post an automated status update.

Notify lets you autotweet anyone who’s a friend on Twitter and is mentioned in your story to tell them that their tweet has been included in your story. I really like receiving these notifications, so I left these ticked, but you can untick them if you don’t want to do this.

17 share and notify

This process creates my story in Storify. At this point, the story gets assigned a URL that I can quote in emails or add to my blog. In the case of this story, it’s http://storify.com/LyzzyBee_Libro/test-cbsms-story, and this stays with the story on my profile for ever more.

18 live

What does my Storify look like on my Twitter account?

Finally, I popped over to my Twitter account to see what my story looked like on there. The top tweet is the automatic tweet with the link to my story, and the ones underneath are those ones that automatically tell people that they’ve been included. Exactly what it said it would do.

19 live on Twitter

What else can I do with Storify?

When you’re searching, you can refine your search to exclude retweets, etc.

You can get a paid account which is useful for large businesses or organisations. This seems to allow a lot more customisation and also real-time updates – however, I like the editable nature of the free version and I’m not sure if that would get lost if real-time updates were running. Maybe someone who has a paid account will come along to share the uses of that. But I think most people will be OK with the free version.

* I was helping the Chinese Community Centre in Birmingham at the November 2013 Social Media Surgery and they wanted to use Storify to pull together stories from their Oral History Project. We ended up talking about their blog rather than Storify, but I promised to put together some instructions for them. This one’s for you! Note: This is not a sponsored post, but an exploration of a potentially useful tool.

———————

This post has taught you – through my own learning process – about using Storify. You can find more posts about using social media in the relevant part of my resource guide.

If you would like more detail about how to use Storify for your content marketing, have a look at this article by Fiona Cullinan.

If you’ve found this article useful and/or interesting, please do post a comment and share using the buttons below! Thank you!

 
26 Comments

Posted by on November 27, 2013 in Blogging, New skills, Social media


Tags: , , , ,

Using the Control Key keyboard shortcuts

hands typingBack in June, I wrote about the wonders of Control-F and how you can use this keyboard shortcut to find text in almost everything you would do on a computer (Word, Excel, PowerPoint, web pages, WordPress back-end, etc., etc., etc). This post tells you about the other Control- or Ctrl+ keyboard shortcuts that you can use to …

  • save your mouse hand
  • do things quickly
  • impress your friends (maybe – depends what kind of friends you have …)

What keyboard shortcuts does the Control Key give you?

I’m going to categorise these into different areas for you. For each shortcut, you will typically need to highlight the text that you want to change if you’re doing something like changing its style or copying or cutting it, and pop the cursor in the right place if you want to paste. I’ll tell you what you need to do by each one. For each one, you need to press the Control key, usually marked Ctrl (and you might have more than on on your keyboard) then keep it pressed down while you press the second key on the keyboard).

Keyboard shortcuts for copying and pasting:

Ctrl-C – COPY Highlight the text you want to copy (leaving it where it is but making a copy you can paste elsewhere) and hit Control + c

Ctrl-X – CUT Highlight the text you want to cut out of your text (and maybe paste elsewhere) and hit Control + x

Ctrl-V – PASTE – pop the cursor where you want the text you’ve cut or copied to appear and hit Control + v

Ctrl-A – HIGHLIGHT ALL – if you want to highlight all of your text in Word, Excel, etc., you can use Control + a to do so

Bonus shortcut: if you want to switch between ALL CAPITALS, Title Capitals and Sentence capitals on a section of text, Shft-F3 is your friend. More detail here.

Keyboard shortcuts for bold, italics and underline

In each case, highlight the text you want to change, and press these keys:

Ctrl-B – to turn non-bold text into bold OR take the emboldening off a section of text, press Control + b

Ctrl-I – to turn non-italic text into italics OR take the italicisation off a section of text, press Control + i

Ctrl-U – to underline text OR take underlining away from a section of text, press Control + u

Keyboard shortcuts for Find, Goto and Replace

Ctrl-F – almost everywhere, pressing Control + f will open up a window to allow you to find a string of text (see this article for more detail)

Ctrl-H – in any document where you can replace text (i.e. Word, Excel, Powerpoint, etc.), pressing Control + h will open up the find and replace window which allows you to change a particular string of text into another particular string of text (I will be writing about this in more detail soon)

Ctrl-G – in documents with pages, pressing Control + g will allow you to navigate to a particular page

Keyboard shortcuts for undoing and redoing

Ctrl-Z – UNDO – if you want to undo what you’ve just done, hitting Control-Z has the same effect as hitting that little backwards arrow in your toolbar. It also works if you typed in a URL and the page is taking ages to load – Control-Z will cancel the operation

Ctrl-Y – REDO – lots of people know about Ctrl-Z, but did you know that you can redo an operation that you’ve undone by hitting Control-Y?

Keyboard shortcuts for open / new / print / save

Ctrl-N – if you want to open a new document in Word, Excel, etc., or a new browser window, pressing Control + n will do that for you

Ctrl-O – To open a document, wherever you are on your computer, pressing Control + o will open Windows Explorer so you can find and open your document

Ctrl-S – To open up Windows Explorer and save your document, pressing Control + s will save you clicking with your mouse

Ctrl-P – Want to print? Open up a printer dialogue box using Control + p

———————

Go on – admit it: did you really know ALL of these shortcuts? They’ll save you a few mouse clicks and I find some to be a lot quicker and more useful than the other methods you can use to get the same results. Which are your favourite keyboard shortcuts?

Related posts on this blog:

The control+ shortcuts I don’t cover here

How to find text almost anywhere

Changing from lower case to upper case

Find all of the short cuts here

 
23 Comments

Posted by on November 20, 2013 in Errors, New skills, Short cuts, Word, Writing


Tags: , , , , , , , ,

How do I change my initials in Word 2007, 2010 and 2013?

Your name and initials appear in the File Properties of your Word document, and also in any comments that you make on a document, plus in the text that appears when someone hovers over text that you’ve added or deleted. So it’s important that it’s right – usually Word pulls this over from your registration details, but you may wish to change it, for example if you want to add a general company or team name and initials rather than your own. Here’s how!

You will find the option to change your initials and name in Word Options. Word Options are accessed slightly differently in Word 2007, 2010 and 2013, so I will break this down by the version of Word that you’re using:

How do I change my initials in Word 2007?

Access Word Options by clicking the Office button at top left, then Word Options at the bottom:

1 word options 2007

Your Word Options box will open on the Popular tab and you can now change your name and initials:

1 2007

How do I change my initials in Office 2010?

Click on the File tab and select Options:

2 word options 2010

Click on Options, and you can change your name and initials:

2 2010

How do I change my initials in Word 2013?

First click on the File tab:

3a word options 2013

Select Options at the bottom of the list (use the arrow in a circle at the top left to get back to your document):

3b word options 2013

Click on Options and change your initials and name:

3 2013

This is part of my series on how to avoid time-consuming “short cuts” and use Word in the right way to maximise your time and improve the look of your documents. Find all the short cuts here

Do let me know if this has helped you – and do share with the buttons at the bottom of this article.

 
22 Comments

Posted by on November 13, 2013 in Copyediting, New skills, Students, Word, Writing


Tags: , , , , , , ,

How do I access Word Options in Word 2007, 2010 and 2013?

Word Options is the place where you customise the look of your Word document, how it corrects your words as you type away, the spell checker, your initials on any comments and the document properties, etc. It’s a great place to explore and enables you to customise Word and get it exactly how you want it.

However, it does work slightly differently in the three most commonly used versions of Word for PC: Word 2007, Word 2010 and Word 2013, so here’s a quick guide to how to access Word Options in these different versions of Word.

How to access the Word Options in Word 2007:

Click on the Office button in the top left of the screen, then click on Word Options at the bottom of the box:

1 word options 2007

Your Word Options box will now display:

1b word options 2007

How to access the Word Options in Office 2010:

In Word 2010, click on the File tab and then select Options, one up from the bottom of the list on the left hand side:

2 word options 2010

Once you’ve clicked on Options, your Word Options box will appear:

4 trust center

How to access Word Options in Word 2013:

In Word 2013, click on the File tab:

3a word options 2013

This has the effect of making your screen disappear, but you will get a list of things to do, out of which you select Options at the very bottom of the list (you can click that left-pointing arrow in a circle at the top left to get back to your document):

3b word options 2013

Clicking on Options will bring up the Options box:

3c word options 2013

This is part of my series on how to avoid time-consuming “short cuts” and use Word in the right way to maximise your time and improve the look of your documents. Find all the short cuts here

Do let me know if this has helped you – and do share with the buttons at the bottom of this article.

 
16 Comments

Posted by on November 6, 2013 in Copyediting, New skills, Students, Word, Writing


Tags: , , , , , , ,

New series on expanding your business – looking for contributors

handshakeI’m planning a series of blog posts on how to expand and grow your business, and I’d like to feature guest posts from professionals and case studies from people who have taken the various paths, as they’re not something of which I have direct and personal experience.

Ideally, I’d like to have at least one professional (HR consultant, accountant, estate agent, etc.) and at least one case study for each topic.

I want to write about:

  • Changing from being a Sole Trader into a Limited Company
  • Going into a partnership with another person or company
  • Going VAT registered
  • Moving into premises
  • Employing your first staff members
  • Doing nothing – staying as a Sole Trader

and I want each article to cover:

From the professionals:

  • Why you should do it
  • When you should do it
  • How to do it
  • Potential benefits
  • Potential pitfalls

From the business owners:

  • Why you did it
  • When you did it (i.e. what stage was your business at?)
  • How you did it
  • Benefits gained
  • Pitfalls / disadvantages you experienced or saw coming and managed to avoid
  • Would you recommend it to other businesses? Why / why not?

Note: I am primarily aiming this at the UK market, however if you have useful information about how this stuff works in the US or elsewhere, do feel free to join in, just let me know the region to which your experience/advice applies.

What do you get out of it? Well, in the article where I mention you, I’ll put whatever links you’d like to your website, twitter feed etc at the bottom. I might be looking to put it into my new book, too, again with a full credit and links in the e-book version – let me know when you get in touch whether you’re OK with that. I can also keep you anonymous if you’d like to contribute but not have your name on the piece.

I get around 20,000 hits per month on this website / blog and that’s still building every month, and I have great Search Engine Optimisation so this website / blog shows up well on search engine searches.

If you’d like to take part, please contact me via email or my Contact Form.

These articles will appear on this blog and will be indexed in the Careers section of the blog.


Tags: , , ,

Localisation as a career

localisationI was recently asked for some hints about developing a career in localisation, and so here I share a bit of information about this rather specialised area of work.

What is localisation?

I covered the definition of localisation in an earlier post, but basically it’s all about changing content (whether that’s content in a novel, a website, marketing materials, dialogue in a computer game, instructions for operating equipment, etc.) so that it works in a different geographical location.

Typically, being a British English native speaker, I am asked to localise from American English into British English, for the British (or British English influenced English speaking) market.

“Oh,” you might cry, “that just means you change color to colour and organize to organise, right?” Well, there is a bit more to it than that, and I really don’t think it’s something that just anyone – even any editor – can do.

What background and skills do you need to do localisation?

As well as the classic attention to detail and background in perhaps editing, or indeed translation (it is actually often seen as a branch of translation, which brings its own issues, as we’ll find below), I think that it is vital to have experience in the language out of which you are localising: the way it works, its vocabulary, its punctuation, its spelling.

I used to work for an American company in its UK office. I spent a lot of time working on documents aimed for the two marketplaces. I travelled to America and had a lot of dealings with American colleagues, as well as travelling to America at other times, and got a good grasp of the difference between the two cultures. Still, like translators are meant to do, I will only localise out of US English into UK English. I do edit American English, so I see it and am made aware of its differences and special rules on at least one job per week.

Because of the links with translation, you also need a very special set of skills to do with operating specific, specialised translation software – which is very often not easy to use. I’ll talk about that in a minute.

I’ve also got a number of reference books – the New Oxford Style Manual is good on the variants in spelling, and I have other books in addition to the resources I use to edit in US English.

What is involved in US – UK English localisation?

As I mentioned above, it’s not just a question of changing the or spellings to our and taking out some zs (actually, British English of the Oxford variety does allow zs; however, I’ve found that all of my localisation clients or those who ask for work in specifically British English prefer to have the s spellings which they associate with British English – I do as I’m asked!). American and British English differ in terms of their spelling, punctuation and other grammar, and terminology. Here’s an invented example (US English on the left):

localisation

Now, of course, English is nothing if not subjective, and you might not agree with my choices here, but this serves as an example of the level of work involved in localisation. I might not change so much in every sentence, but there are an awful lot of issues to be aware of.

Another important issue is the range of texts involved in localisation projects. Most of mine have been under Non Disclosure Agreements, but I can tell you that I’ve worked on instructions for medical devices; dialogue for computer games; error messages for software; marketing materials for various large multinationals; and quizzes for people who sell a particular brand of product. So you need to be aware of the different registers involved in English writing, perhaps more even than when you’re editing.

How do localisation jobs work?

Herein lies the rub. As I mentioned earlier, localisation is often seen as akin to translation. And very often, a British English localisation is just one of a whole slew of translations into other languages that is being done, or it’s being handled by a company that handles translations and is used to dealing with translation software.

So, while pretty well all of my editing and proofreading jobs come in Word or PDF files, just one document to be annotated or changed, my localisation jobs come in the form of:

  • A Word document that has been output from translation software and has two columns, one for US English (the Source) and one for UK English (the Target), usually with the US English pasted into the UK column to be changed and marked up, broken up into sentences or sentence fragments, often with some highlighted in different colours
  • An Excel document in two or more columns, again broken up into sentences or sentence fragments. Sometimes the UK English is pre-populated into the Target column, sometimes not.
  • A file to be manipulated using standard translation software like Trados or Across. To use the full versions of these, you might need to buy and download somewhat expensive software.
  • A file to manipulated using the client’s own proprietary translation software – this is often web-based and free, but can take some learning, and they are ALL DIFFERENT

I’m not going to go into the details here, but basically any work done in a translation management system can be a bit frustrating for the localiser, as typically you’re not changing words in every segment, yet you will have to mark each segment as translated, often by hand and using a repetitive set of actions. All very well if you’re a translator, poring over every word, not so great when you are only changing one segment in five!

How do I get localisation work?

I tend to get my localisation work in two ways:

  • Through my membership of Proz.com, which is a jobs (and more) website specifically for translators, but which does have editing (usually non-native English texts) and transcription jobs
  • Through people searching the web and finding that I discuss and offer localisation

I have several regular localisation clients. However, I don’t think I would want to do only localisation, as it’s quite a specific field and the projects involved can be quite long and complex.

In conclusion, localisation is something I would only suggest you go into if you have …

  • Good, solid experience with US and UK English
  • A high tolerance and capacity for learning new software interfaces fast and dealing with often recalcitrant and tricky systems

————

Related posts on this blog:

Read all of my careers advice posts here!

 
14 Comments

Posted by on October 28, 2013 in Business, Localisation, New skills, Skillset


Tags: ,

Help – my Word comment box initials keep changing

comment balloonI had a query about this issue the other day and found there were no blog posts about it. Now there are.

My correspondent was busy adding comments to a document. Each time he did so, his initials appeared in the comment box, as they do (I will post soon on how to change your initials in your comment boxes). But each time he pressed Save, the initials changed back to “A”. Why?

Well, I went to look and it took me and a friend searching to find a rather obscure help forum that explained what was happening! So here’s what you do to stop the initials in your comment balloons changing by themselves in Word 2007, Word 2010 and Word 2013.

Why do the initials in my comment balloons keep changing every time I press Save?

The reason for your own initials disappearing is that Word is carefully applying a rule called “Remove personal information from file properties on save”. The properties are details attached to your document about who created and edited the document. And how do you change this?

Go into Word Options.The way into this differs for Word 2007, Word 2010 and Word 2013, although fortunately all of these routes end up in pretty well the same place, so …

Accessing Word Options in Word 2007:

Click on the Office button in the top left of the screen, then click on Word Options at the bottom of the box:

1 word options 2007

Accessing Word Options in Office 2010:

In Word 2010, click on the File tab and then select Options, one up from the bottom of the list on the left hand side:

2 word options 2010

Accessing Word Options in Word 2013:

In Word 2013, click on the File tab:

3a word options 2013

This has the effect of making your screen disappear, but you will get a list of things to do, out of which you select Options at the very bottom of the list (you can click that left-pointing arrow in a circle at the top left to get back to your document):

3b word options 2013

Accessing the Trust Center

The Options screen that will now come up is very similar in Word 2007, 2010 and 2013, so I’m going to use screenshots from Word 2010 as a middle way from now on – the others differ slightly, but you will still see the same options to choose from.

4 trust center

From here, click on Trust Center and then Trust Center Settings:

5 trust center settings

Now select Privacy Options, and you should find an option “Remove personal information from file properties on save”. Note that if this is enabled, it will be ticked and you will be able to untick it. Here, it’s greyed out, but you can see where you can find it:

6 privacy options

Once you have unticked this box, your initials will remain on your comment boxes however many times you save or close and open your document!

————————-

Why not take a look at these related topics, which should help you with any other comment box issues?

What to do if your comment boxes go tiny in Word

What to do if your comment boxes start running from right to left

Changing the language in your comment balloons

Customising Track Changes

This is part of my series on how to avoid time-consuming “short cuts” and use Word in the right way to maximise your time and improve the look of your documents. Find all the short cuts here

Do let me know if this has helped you, saved your bacon, etc. – and do share with the buttons at the bottom of this article.

 
5 Comments

Posted by on October 23, 2013 in Copyediting, New skills, Students, Word, Writing


Tags: , , , , , , ,