RSS

Category Archives: Word

What do I do when Word just won’t work (Word 2005, 2007, 2010, 2013 and 2016 edition)

Word 2010 Word 2016 Word 2013

Sometimes, Word gets itself into a pickle

People often contact me, either using the comments on blog posts or privately via email or my contact form, when they’re at the end of their tether with Word. Word has stopped working, Word won’t do what they want it to, the formatting in their document has gone weird, putting something in italics makes the overwrite button engage, the paragraph spacing just will not work, paragraphs keep going into bold BY THEMSELVES …

All of these things have happened to me or my correspondents.

Why does Word go wrong?

I’m not entirely sure why Word goes wrong. I think it sometimes just gets itself into a pickle; there are too many things, too many commands and codes, too much text … or the originating text comes from an unofficial or unregistered copy of Word, or has been converted from another program. Sometimes if something’s saved as and saved as, or worked over too much, like overworked pastry, it just. goes. wrong.

What do you do when Word goes wrong?

Well, I have three methods, which are not nice, and are certainly not fun, but do work most of the time. And as the latest person to contact me didn’t know about these, I’m going to share them with you now.

Before you do any of these, save your document and then make a copy to do all this with, just in case.

Method for sorting out major Word problems 1

  • Turn it off and turn it on again.

I know. But if Word gets into a pickle, sometimes SAVING, closing Word and reopening it can work.

Method for sorting out major Word problems 2

  • Copy the text – all of it.
  • Open a brand new Word document
  • Paste the text into it

This works in about 70% of cases.

Method for sorting out major Word problems 3

This one involves stripping out all the formatting. All your italics and your lovely bibliography. All your headings and styles. But sometimes it has to be done.

Note: There is a Clear formatting button in Word (in the Home tab, a little picture of an eraser rubbing out an ABC). But you don’t know that there isn’t something weird just outside where you’ve put the cursor. So I advise using this method.

  • Copy the text – all of it
  • Open a text editor
    • If you’re on a PC running any form of Windows, you will have Notepad as standard.
      • In Windows 7 do Start > All Programs > Notepad
      • In Windows 8 hit the Windows button > R > type in “Notepad”
      • In Windows 10 go to the magnifying glass in the bottom task bar and type in “Notepad”
  • Paste the text into the text editor
  • Open a new Word document
  • Copy and paste the text in the text editor into Word

It can literally not bring ANY formatting codes or bits and bobs through from your original document. But you will have to put all the formatting in again, from scratch.

I hope you’re found this useful. I know it might read like a bit of a blunt instrument, but if you have a Word document that is not behaving itself and you need to make Word work for you, sometimes this is the only way to do it!

If you have found this useful, do please comment and / or share using the options below. Thank you!


10 Comments

Posted by on June 2, 2016 in Short cuts, Word


Tags: , , ,

Glossaries for transcription: What, why, when and how?

Glossaries for transcription: What, why, when and how?

It’s sometimes useful for and sometimes imposed upon a transcriber to use a glossary. What is a glossary, why would you use one, when should you use one and how do you use one?

What is a transcription glossary?

In my opinion, a good transcriber is an accurate transcriber. They look things up rather than sticking down the first thing they (think they) hear. When I’m transcribing, I always have some kind of reference resource open, whether that’s Google, the subject’s website, Wikipedia or something specific like discogs for looking up band and album information.

A glossary is a list of technical or subject-specific words or phrases which appear regularly in (usually a long series of) transcriptions. It helps you to avoid having to look things up more than once. The glossary acts as a reference for you, so you need only look up, say, the place the subject was born or the names of her children once, note them down, then have them to hand when they crop up again. It’s like a style sheet in many ways.

You might also be given a glossary as part of a corporate transcription project – this will happen where (usually) a company requires you to use certain specific terminology or acronyms in your transcription. I always ask for one of these at the start of a big corporate project, as it saves annoying the company by (for example), typing Park Run throughout the transcription rather than parkrun [that’s a completely invented example; I’ve never transcribed anything about parkrun].

Why should I use a transcription glossary?

As I said above, a good transcriber will look stuff up. If you’ve got a series of transcriptions, for example a set of interviews for a ghostwriter, a set of lectures about a particular topic or a set of tester interviews for a cosmetics company, it makes sense to keep a note of specific or technical terms and phrases. For example, if someone’s made a number of YouTube films, having a list of them is easier than looking it up each time.

Using the glossary will save time, as instead of looking up your subject’s children’s names three times, you’ll look it up once, note it down once, then cast your eyes over your glossary next time.

Of course, as I also mention above, you might be asked to use a glossary (or word list, or list of terms) by your client – usually a corporate client.

When should I use a transcription glossary?

There’s no point in putting together a glossary for a one-off interview or other transcription job. These are some examples of when I’ve used glossaries [these are disguised due to NDAs]

  • working for a ghostwriter writing a book about an entertainer – place of birth, film-making colleagues and YouTube video titles were all checked and written down
  • working for a marketing agency testing lipsticks with a panel – lipstick colour names, technical terms to do with lipsticks and general cosmetics terms
  • working for a student researching attitudes to perfumes – technical perfume terms, companies making perfumes and perfume names
  • working for a financial company taking down lectures and discussions, I was given a list of technical terms and acronyms to use

How do I put together a transcription glossary?

I have a Word document open alongside the one in which I’m typing my transcription. As I look up a name or term, I pop it on the list. I will usually divide up the list by people, places, albums, etc.

I then keep both documents open, so I can see the glossary as I’m typing, which means I can just flick my eyes across to the glossary when the interviewee says “Mytholmroyd”, I know how to spell it or indeed what they’re saying [apologies to anyone from there].

This article has explained what a transcription glossary is and when, why and how you might find one useful in your work as a transcriber.

If you’ve found this article useful, please do comment below – I always love to hear from my readers! There are sharing buttons there, too, so you can share this on whatever social media platforms you use. Thank you!

Other useful articles on this blog

How do you start a career in transcription? – are you suited for it?

The professional transcriber – the technology you need

10 top tips for transcribers – what every new transcriber needs to know

Why do you need human transcribers, anyway? – I explain why!

Keyboards, ergonomics and RSI – the risks and keeping safe

Transcribing multiple voices – hints to make it easier

Why do transcribers charge by the audio minute? – explains it all

My book, Quick Guide to your Career in Transcription is available in print and online

 
2 Comments

Posted by on May 18, 2016 in Business, Transcription, Word


Tags: , ,

How can I transcribe more quickly?

Because transcription is usually paid by the audio minute (i.e. if you have a 20 minute tape, you will be paid 20 x your per-minute rate), the faster (and more accurately) you transcribe, the more money you can make per hour. Here are some tips from my own experience about how you can transcribe more quickly. It’s not all about typing faster, either – it’s about typing faster and typing smarter and working smarter.

All links are to my own articles that explain the topics in greater depth.

Typing faster

One main way (but not the only way) to improve your transcription speed is to simply (ha!) type more quickly. Here are some tips on how to build your typing speed. The first one might surprise you ..

  • Number one tip: trim your fingernails.

I have studied this (because someone has to) and I can improve my typing speed by about 5% by trimming my nails. I can type more quickly when just the pads of my fingers are striking the keys. It also takes longer to wear the letters off your keys if you’ve not got long nails to scratch them …

  • If you’re serious about going into transcription, especially if you have a specialised medical or legal background where the fees are that bit higher, it’s worth investing in typing training – have a look at Pitman courses.
  • A decent keyboard will also help you to type more quickly. Have a look at my post on ergonomics and keyboards, as I cover that there in a lot of detail. But typing on a decent keyboard as opposed to bashing away at a laptop or netbook will improve your typing speed.
  • The more you type, the faster you’ll typically get, up to a point. So you might start off a bit slow, but your speed should pick up, if you’re touch-typing reasonably accurately.

Typing smarter

As well as physically typing faster, you can use technology to help you to transcribe more quickly and efficiently.

  • If you’re not using transcription management software, start doing so (read more on this here). This doesn’t do your typing for you, but it allows you to manage the speed of your tape and stop and start it in the most ergonomic way possible.
  • Use autocorrect to your advantage. I’ve written about this at length in another article, but these are the most important points for building speed and accuracy:
    • Set up common shortcuts right from the start – bec = because, w = with, nec = necessarily, etc. Add these are you come across them.
    • Set up any words you commonly misspell – you can do this when you’re spell-checking, as there’s an autocorrect option in the spell check dialogue box (I have trouble typing occurred correctly, for example).
    • As soon as you recognise commonly used words or phrases in your particular tape, get them into the autocorrect. Long album titles? The name of a big exhibition the artist is working on? Moisturiser and concealer in a set of interviews assessing makeup? If they come up more than twice, create an autocorrect for them.
    • If you’re typing the names of people in the conversation, have a convention, e.g. aa for the interviewer, bb for the first interviewee, change the autocorrected text for that shortcut for each tape (e.g. aa might be Interviewer for one tape, Manager for another, Anita for a third, bb might be Interviewee, Employee or Jane), and always use the same shortcut for the main and secondary person, so it’s super-easy to remember what to type.
  • How about using voice recognition software? This has got a way to go, and editing it, in my experience, takes as long as transcribing in the first place.

Working smarter

This is mainly around the things that delay you in doing the work – looking things up and distractions.

  • I look things up when I’m transcribing – band names, place names, etc. It’s far more professional to provide a transcription with the facts checked and anything you can’t hear or are unsure of marked. Make looking things up work the way you need it to:
    • I find it easist to look them up as I go along, you might finid that disturbs the flow. Do what’s best for you.
    • I have found from experience that if I can’t hear a word, especially a technical term or proper noun, often the interviewer will ask the interviewee to spell it out … just after I’ve spent ages looking it up. So let the tape run a bit and see if it helps you pick that information up without spending time searching for it.
  • I type for an hour at the very most, as after that length of time my posture droops and my typing slows. It might only be a stretch and a march up and down the stairs, but do break it up a bit. Read more about ergonomics here.
  • I do need to have the Internet turned on while transcribing, because I need to look things up, but I’m careful not to answer phone calls or even look at emails until my break. Nothing is that urgent it can’t wait, and three minutes spent looking at something, plus the time it takes to get back in the transcription zone, can lose a few minutes per hour of transcribing. It all builds up!

A final thought

I hope these tips have helped to give you some ideas about how to transcribe more quickly and efficiently. Here are two final thoughts …

  1. If you’re reading this and you’re a journalist or researcher, not a professional typist, especially if you can’t touch type, it’s probably a better idea for you to explore finding a transcriber to do it for you than to try to get faster. I can often transcribe a tape up to twice as fast as a non-professional, freeing my clients up to do their real jobs!
  2. However quickly you type, ALWAYS assume a job is going to take slightly longer than you think. Why do you think this is being posted on Thursday morning instead of Wednesday afternoon …?

If you’ve found this article useful OR if you have more tips for transcribing more quickly, please do comment below – I always love to hear from my readers! There are sharing buttons there, too, so you can share this on whatever social media platforms you use. Thank you!

Other useful articles on this blog

How do you start a career in transcription? – are you suited for it?

The professional transcriber – the technology you need

10 top tips for transcribers – what every new transcriber needs to know

Why do you need human transcribers, anyway? – I explain why!

Keyboards, ergonomics and RSI – the risks and keeping safe

Transcribing multiple voices – hints to make it easier

Why do transcribers charge by the audio minute? – explains it all

 
Leave a comment

Posted by on March 10, 2016 in Business, Transcription, Word


Tags: , , ,

Can I edit what I am not? Editing outside your direct sphere of knowledge

DictionariesThis year so far, I’ve worked on, among other things, a book about Black history in the UK, incorporating a number of responses in prose, poetry and rap which reflected the spoken norms of inner city youth; a project about (very) experimental architecture; and a book giving advice to gay men on dating and relationships. I’ve transcribed interviews with bands I know nothing about, and I’ve localised texts about items I’m never going to use. As a straight, white woman who is not an experimental architect, doesn’t follow those bands and is unlikely to use a remote-controlled helicopter, should I have engaged with these texts where I was quite clearly the “Other” in the relationship or knew little about the topic? Or should I stick very closely to what I know?

I think it’s fine to edit and otherwise work on texts that are outside your direct experience, as long as you’re flexible, keep the audience in mind, are willing to learn and keep an open mind. I also think that there are limits to what you can work on, and I’ll talk about that, too.

Why I think it’s OK to edit outside your direct experience

It’s my personal opinion that it’s OK to edit texts that are outside your direct experience, as long as you bear a few things in mind.

  • Be flexible. The language of an inner-city rap poet might not be the same as your own casual register, let alone the register you use for formal academic writing. Think about the conventions of what you’re working on, not your own preconceptions, go with the flow and keep things consistent and clear (which is the editor’s mantra anyway)
  • Be open-minded. The advice given in a dating book on apps for hooking up with people might be way beyond your comfort zone as a happily married, middle-aged woman, but that doesn’t mean you’re right and it’s wrong, or bad, it’s just different. Which leads on to …
  • Think of the audience. What will the readers of this book want? Is the relaxed style with all the I’d and should’ve contractions something that they will feel more comfortable with? Leave those in.
  • If you’ve got a good amount of life experience and a solid general knowledge, that will see you a long way into an unfamiliar topic.

Why I think it’s positively GOOD to edit outside your direct experience

The good editors I know are wise in knowing what they don’t know and seeking to expand their knowledge. They love to learn. What teaches you more than grubbing around in the very innards of a text on something you never even knew existed? There are other positives, too.

  • By approaching the text as the “Other” (while retaining a sensible approach to the privileges you might have as someone who is not usually the “other”), you might be able to suggest subtleties or pick up on attitudes that are going too far the other way. Maybe you can help reassure an author and their readers that people outside the core audience DO understand / empathise.
  • More importantly and commonly, the aim of all writing should be to be clear and express its author’s intentions clearly. So if you, as an outsider, don’t understand the text, maybe it does need to be simplified a little. If I don’t understand something on the second or third go, I’ll pop a comment in the margin that this might need to be clarified.
  • I think I have a tendency to edit better and more carefully when I’m working on something slightly unfamiliar. It’s like editing your own writing: if you really know the topic, you tend to see what you expect to read, and may skim over errors. I know I have this propensity, so I work extra hard on texts on known topics, and try not to enjoy the process too much at the expense of doing a good job!
  • You learn all sorts of things that might be useful in your everyday life, the next thing you edit, or even pub quizzes. Your next client will benefit from that extra knowledge (or maybe the one after that – I edited a load of texts on Agile working a few months ago, so can cheerfully say I know all about it when another prospective text comes in).

When I think it’s NOT good to edit outside your direct experience

There are some occasions when I do think a text is best left alone. Complete incomprehension of a technical topic or genre is not going to make for a good editing process. I pass those jobs along to a colleague (and get some co-opetition karma in the process). Examples in my own work of jobs I’ve turned down have included:

  • A book all about optimising your motor vehicle engine use, with lots of diagrams and examples. I know nothing about this, and there was little value I could add to something so technical.
  • A localisation job where I would have had to research European legislation on a topic I knew little about to start off with, and match it up to US legislation. That’s too dangerous to mess with.
  • Editing novels in genres I am not familiar with myself such as romance and science fiction – you do need to know your genres if a book is to be edited to fit into them. I’ve actually pretty well stopped working on fiction apart from the odd thriller for an on-going client, as they are pretty well all in genres where I know someone else will do a better job.
  • Specialised transcription – medical and legal in particular. I’ll cheerfully type about makeup I don’t wear or economic policy that can be checked easily, but I don’t go near the specialised terminology used in medical and legal transcription.

In summary … in my opinion, it’s good to stretch the boundaries of the areas you work on and to edit and otherwise work with texts on topics that are unfamiliar, unless the level of technical or specialist content is high enough that you are floundering and uncomprehending. In that case, there’s always someone who  knows more about the topic that you can pass it on to. Happy learning!

What are your thoughts on the subject?


Tags: , ,

Using a style sheet – for editors and proofreaders

DictionariesA little while ago, I wrote an article explaining what a style sheet was, mainly for my own clients, so I could send them a link when I sent their completed work and style sheet to them.

It struck me, though, that it might be useful to write about style sheets from the perspective of the editor / proofreader as well (I’m going to use “editor” to refer to both here, for simplicity, unless I’m distinguishing between the two).

I assume this will primarily be useful for people new to editing who are picking up tips from those of us who have been in the game a little longer. But whoever you are and however long you’ve been editing, do pop a comment below if you have anything to contribute!

What is a style sheet?

A style sheet is a list which spells out how things are to be done when writing and/or editing a text, including information on spellings, hyphenation and capitalisation, referencing and special information. Its aim is to keep texts consistent.

When you’re an editor, you will encounter three types of style sheet:

  1. Style sheets you receive from someone earlier in the process or general ones prepared by particular publishers, journals, etc.
  2. Style sheets you create yourself as you work on a project
  3. Style sheets created by the previous editor when you’re taking over a job or doing the proofreading for something that’s previously been edited (this is unfortunately rare, in my experience)

All three types serve the same purpose: to record the style decisions (more on this later) that have been made in order to keep the look, feel and detail of the text or texts consistent.

When you’re creating a style sheet, it might only be for a single use, for a single client (e.g. a PhD student). When one is created by a journal or publisher, it’s usually so that their “house style” will be consistent across publications and journal issues. But the idea is the same: it’s a tool that’s used to keep things consistent.

What do you mean by “style decisions”?

English is a funny old language. Even if you’re adhering strictly to one of the major style guides, (Chicago Manual of Style, Oxford Style, etc.), you will find there is still room for choice in some aspect of your text.

An example where even Oxford didn’t tell me what to do: I was editing a set of articles which included lots and lots of words and phrases in a different language to English. Each then had the English translation in some form before or after the foreign word. Of course, the articles were all written by different people who had used different ways to express this (word in italics / non-italics / double or single quotation marks and English in parentheses or not, italics or not, quotation marks or not). I was looking to make this consistent … but after some rules on what to do, Oxford told me to choose a way I did this as long as it was consistent!

There will also often be individual names, phrases, etc. in the text you’re editing which will need to be set out in a consistent way, which might not have rules.

An example where there can’t be any rules: your client has lots of interviewees and they’ve referred to them with a code to ensure anonymity. Do they put Respondent OH1, just OH1, OH-1, (OH1), [OH1], etc., etc.?

Although a client a while ago said that his first editor “kept it all in his head”, I prefer to note all of this down so I have it to refer to and keep things consistent.

What does a style sheet look like?

I’m sharing here an example of one of my own style sheets. Note that I have a little explanatory note at the top to explain what it is.

You can see that I set out the most common things that can differ (in my experience) and need noting down – s or z spellings, how the paragraphs are set out, how the headings and figure / table titles are set out, etc.

style sheet 1

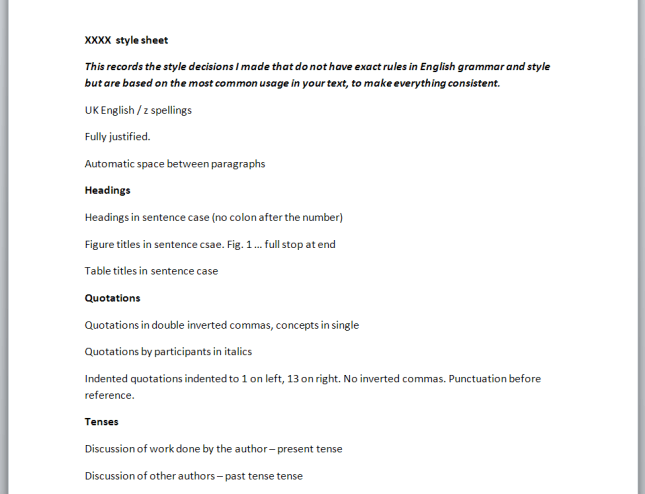
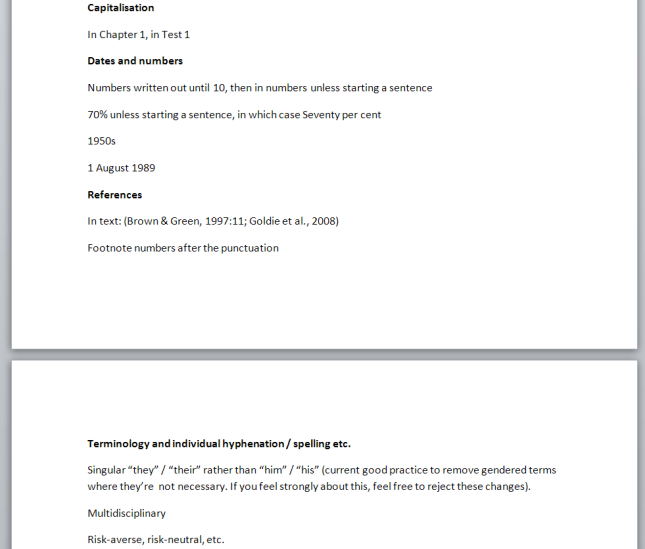
In the second half, I go on to dates and numbers, how references are laid out, and some specific things to do with the particular text I’m working on.

style sheet 2

I find that a publisher’s style sheet is set out in the same way, although it might sometimes be online or a pdf with links.

If I’m working on a text destined for a particular publisher or journal article, if their own style sheet is very long and my text is quite simple and doesn’t need all that detail, I’ll often summarise the parts I need on my sheet anyway.

When should I set up a style sheet?

I set up one of these for any text that …

  • Isn’t for a publisher or journal that has its own style sheet
  • Is for a publisher or journal that has its own style sheet but that sheet is very long and complex and I can use a summary
  • Is more than a few pages long
  • Is being sent to me chapter by chapter (this happens with PhDs I work on)
  • Is going to form part of a larger body of work or a series (e.g. the regular publications of an organisation
  • Is being worked on with a colleague – this is quite rare but does happen

When and why should I send a style sheet to my client?

I pretty well always send the style sheet to my client along with my completed work.

I typically send it with a note in the email directing the client to my explanatory article, as I’ve found that most of my clients haven’t come across this before (I happen to work with a lot of students and self-publishers, as well as translation agencies; your experience may differ if you mainly work with publishers).

I will send the style sheet to my client if …

  • They’ve asked me a lot of questions about grammar and wording issues before we start (I will probably pop down the standard hyphenation and capitalisation rules on it if that’s the case)
  • They are likely to add to the text (for example if I’ve pointed out gaps or missing references)
  • They are sending me their work chapter by chapter – sending the style sheet with the first chapter can often nip certain issues in the bud, the client learns from it and they’ll be more consistent in the next chapter (I’m always so happy when this happens!)
  • They plan to send me regular publications, etc. – if they didn’t have a style sheet I provide one for their writers to use, making my work easier and less time-consuming and meaning they have less to correct
  • It’s a substantial document (more than a few pages)

Hopefully, having a style sheet from me will mean that the client will keep things more consistent in the future.

I do also mention that they should send this on to their proofreader if they’re planning to use one in the next stage of publication. This saves their proofreader from busily changing all the Chapter Ones to chapter 1 (or at least it explains that it was an active, considered choice on my part, and not an error).

Making changes to a style sheet

If I send my style sheet to my client mid-way through a project, for example with their first PhD chapter, I ask them to look through it carefully and let me know if there’s anything they’d like to change or they’re not happy with. Sometimes in this case I ask them questions (e.g. “You’ve used ‘Interviewee RD1’ and ‘RD1’ in equal numbers in your text; which one would you prefer to use throughout it?”). If they give me feedback, I record that, or if they ask to change something and their change does actually defy a stated grammar rule I will explain why I can’t.

Working with an established style sheet

If the text I’m working on is destined for a publisher or journal that has a full style sheet, I will of course obey that to the letter, to make things as easy as possible for the in-house editor or designer. Even if that means leaving footnote numbers before the punctuation, something I don’t like to do (but some publishers prefer).

If I’m proofreading a text that someone else has already edited, or I’m working on for example corrections in a PhD that someone else has worked on, I will use their style sheet to guide the changes I make. Even if I don’t approve of their decisions personally, as long as they don’t defy a rule of grammar, I’ll keep it consistent (even if I have to move a footnote number to before the punctuation!). I aim to make as few changes as I can at the proofreading stage, in order to keep corrections (and the chance of new mistakes creeping in) to a minimum.

—-

I hope this post has been helpful and given you some more information about why we use style sheets, where they come from, setting up your own one and working with your style sheet with your clients. Do pop a comment at the bottom or like and share this article if you’ve found it useful and interesting!

Related posts on this blog

What is a style sheet? For people working with editors

 
9 Comments

Posted by on February 4, 2016 in Copyediting, Organisation, Word, Writing


Tags: , , , , ,

Transcription tips: How do I transcribe a tape with multiple voices?

keyboard earphonesAlthough transcribing interviews by journalists or students that only involve two voices is the most common work I do, transcribers often have to work with tapes with more than two voices on them. How do you tell the voices apart so that you can differentiate them on your transcript? This article shares some tips I use to tell different voices on a tape apart.

What’s the problem with transcribing multiple voices?

I was transcribing an interview with two fashion designers today; my client had said it was OK not to differentiate them and the women themselves said that their voices were often confused. How did I tell the voices apart so I could produce a transcript that had the correct words attributed to the correct people?

Although it’s sometimes very easy to tell the people who are talking on a tape apart, for example if they’re a man and a woman, or one has a very strong accent, sometimes it can be difficult. Because it will help my client to know who said what, it’s important for me to try as hard as I can to differentiate the voices and make the transcript as useful as possible.

Before the interview: who are the interviewees?

If you know it’s going to be an interview with more than one participant, you can ask your client to help you from the very beginning.

Either they could ask their interviewees to introduce themselves by name at the beginning of the tape. Even if they are all, for example, young male voices, you can pick up a lot of information from this that will allow you to differentiate between them …

Or they could ask people to introduce themselves every time they make a point (this works in a more slow round table discussion at a conference, for example)

Taking the first option once led to a very sweet tape where the musicians in a band introduced themselves by name to me, mentioning my name, at the start: “Hello Liz, my name’s … and I hope you can understand me”. Aww!

After the interview but before you start typing: checking who is who on the tape

If you didn’t get the option to ask your client to get the interviewees to introduce themselves, it is OK to ask them who is who – for example, who speaks first, who has a voice that is distinctive in some way. They might also mention that, for example, the lead singer talks most and the person who only talks about one track is the drummer.

If you’re working on a discussion at a conference, you might be able to get some information from the conference website. For example, there might be a video up already that time stamps each person’s speech with a note of their name. Play the video, check the speech against your tape, and there you go.

When you’re transcribing: how do you differentiate between the different voices?

If you have no clues about who is who or who says what, there are still ways in which you can differentiate between voices on a tape. It can take time to get used to doing this, but it is useful.

  1. Check the video. This one sounds obvious, but if you have a video to transcribe, do look at it carefully. There may well be captions stating who is speaking, at least for the first time, and you can recognise who is who by their appearance. If there’s the option of a video for a conference or marketing meeting / focus group, do take it, even if it takes longer to download.
  2. Check where people are in space. In the tape I’ve been working on most recently, the speakers were sitting either side of the tape recorder. So, even though their voices were similar, one came from the left and one from the right. Result!
  3. Check the sound level/volume. If one person is sitting further away from the recorder, they will sound fainter.
  4. Check for even slight accents. There may be a non-native-speaker or regional accent on the tape: listen for different vowel sounds or intonation.
  5. Check the ums, ers and filler noises. These really vary across speakers and can make a difference. Person 1 might say “like” constantly, while Person 2 “ums” and “ers”.
  6. Check for clues in the environmental context. Does Jane order food but Sally just have a coffee? The one talking through her dinner is likely to be Jane.
  7. Check for clues in what they say. I often switch off from the content when I’m transcribing, just letting the words come into my ear and out of my fingers. But people will refer to each other by name, and this gives you a good clue to who is who, or reinforces your first thoughts (If the person you think is Pete refers to “Pete”, unless you have several interviewees with the same name, he’s unlikely to actually be Pete!).

I have two other handy hints to add, which I use all the time …

  • Draw a plan or write notes! When I work out who is who, I will write a little diagram out or make notes – “Bella … Jean” for the left/right ones, “Jim: high-pitched. Bob: rumbly and quieter” etc.
  • If you can’t put a name by each participant, at least try to break the text up into paragraphs spoken by different people. You might be able to go back and add the names if Julie says, “As Veronica said earlier, it’s difficult opening a tin of Spam”, for example.

It can be challenging when you find you need to transcribe a tape with more than one or two voices on it. As you have seen, there are things you can do to make this easier before the interview even starts, once you receive it and during the transcription process.

If you’ve found this article useful, please click to share! If you are a transcriber and have any tips to share on this topic, please do comment below!

If you want to learn more about Transcription as a career, buy my book: A Quick Guide to Transcription as a Career – buy from Amazon UK or visit the book’s web page for worldwide links and news.

Related posts in the series:

Why do transcribers charge by the audio minute and not per word?

How do you start a career in transcription?

Why you need a human to do your transcription

Being a professional transcriber – software to use to help

Ten top tips for transcribers

 
4 Comments

Posted by on December 18, 2015 in Business, Jobs, New skills, Transcription, Word


Tags: ,

How do I combine several Word documents into one document?

This article explains how to combine several Word documents into one document. It’s particularly useful if you’ve written a dissertation, thesis or book and need to combine all of the chapters into one file.

These instructions work for Word 2007, Word 2010 and Word 2013; I’ve used Word 2010 for the screenshots

Why would I want to combine chapters into one document?

Lots of people do their writing a chapter at a time, and have it edited a chapter at a time, too. But the time will come when you want to put it all into one book, with page numbers running throughout, rather than messing around starting the page numbers for chapter 2 at the next number on from chapter 1, etc.

What’s the incorrect way to combine my chapters?

You might be tempted to pick up the text of each chapter and copy and paste it into one document. That can lead to issues and inconsistencies. This is the correct way to do it and actually takes less time and avoids you leaving out any bits of your individual chapters.

How do I prepare to combine my documents?

It’s pretty easy to combine several documents into one, however the most important point is …

The file names must be in the order that the chapters are going to be in.

Word will combine your chapter files in alphanumerical order.

If you have called your chapter files

Chapter 1 introduction

Chapter 2 review of the literature

Chapter 3 methodology

Chapter 4 conclusion

then that’s fine, they will combine in that order.

If you have called your chapter files

Introduction

Review of the literature

Methodology

Conclusion

then Word will carefully sort them alphabetically into

Conclusion

Introduction

Methodology

Review of the literature

when it combines your documents.

The best thing to do is add a number 1, 2, 3, etc at the start of your file names BEFORE YOU START COMBINING, so you know they will come out in the correct order.

How do I combine my documents?

OK, so we’ve got, say, four documents or chapters to combine into one.

First, open a new, blank document (using the Home button, New, and choosing a blank document)

Then, click on the Insert tab and find Object in the Text area:

1 insert tab

Click on the arrow to the right of Object to get the drop-down menu, and click on Text from File:

2 insert text from file

Now navigate to your files and select the ones you want to combine.

3 find your files

Hold down the Control Key and click on all the ones you want to combine (or click on the top one, hold down Shift and click on the bottom one if you want all of them). Once you have them all highlighted, click Insert.

4 select files

Note: it doesn’t matter what order you are displaying them in or what order you click them in, it will choose them and insert them in alphabetical or numerical order, as I mentioned above.

Now you will have one big document including all of your chapters!

5 combined

And … if you had footnotes in the documents, and had set page numbers to show, they will automatically update in the combined document to be numbered consecutively (if you want start your footnote numbering at 1 for each chapter, you’ll need to look at my posts on footnotes and endnotes).

Don’t forget to save your document!

PS: If you find you lose your formatting when combining Word documents, read this article for the solution.

—–

This is part of my series on how to avoid time-consuming “short cuts” and use Word in the right way to maximise your time and improve the look of your documents.

If you have enjoyed this post and found it useful, please click on the “share” buttons below or tell your friends and colleagues about it! Thank you!

Please note, these hints work with versions of Microsoft Word currently in use – Word 2007, Word 2010 and Word 2013, all for PC. Mac compatible versions of Word should have similar options. Always save a copy of your document before manipulating it. I bear no responsibility for any pickles you might get yourself into!

Find all the short cuts here

Other useful articles on this website

How to combine Word documents without losing the formatting

 
53 Comments

Posted by on September 3, 2015 in Errors, New skills, Word, Writing


Tags: , , , ,

Editing and the Table of Contents – for editors and writers

This article is all about what happens when a document that includes a Table of Contents (and a Table of Figures and/or a Table of Tables) is edited. There are a couple of pitfalls which I have encountered as an editor, and I wanted to share them with fellow editors AND writers, to help other people avoid them.

Scroll down to the bottom for a summary of advice to editors and writers if you’re not worried about the detail.

Please note that there are more detailed instruction on updating a Table of Contents in this article.

What’s the problem with Tables of Contents and the editing process?

If a document with an automated Table of Contents is being edited, the editor has two choices (and the writer will find that their editor has done one of two things):

  1. Mark any changes to headings in both the Table of Contents and the actual heading in the main text
  2. Mark any changes to headings in just the actual heading in the main text, then someone updates the Table of Contents

Let’s look at the risks with these in turn.

1. Mark any changes to headings in both the Table of Contents and the actual heading in the main text

Issue 1 – Awkwardness for the editor. To do this, you will have to have a split screen with the contents page in the top half and the text in the bottom, or you’ll have to whizz up and down the document and make sure you make the same correction in both places.

Issue 2 – Keeping things consistent. a) The editor will have to make the same change in both places, and b) the writer will have to make the same choice to reject or accept the change in both  places.

As an editor, if I do this, I place a comment linked to the words “Table of Contents” reminding the author to make the same choices here and in the main text.

If the Table of Contents is not automated, I a) suggest that the author creates one (or has me create it, if appropriate) and b) I place the comment above by the words “Table of Contents” to remind the author to keep it consistent.

2. Mark any changes to headings in just the actual heading in the main text, then someone updates the Table of Contents

If the Table of Contents is automated, this is what I tend to do.

There are two options here:

Option 1 – The writer wants a “clean copy” not one with tracked changes marked: the editor can update the Table of Contents once they’ve done their edit and accepted all changes. Everything will now match.

Option 2 -The writer wants (or needs, in the case of students) to see the tracked changes and make their own decisions on what to accept and reject. In this case, the writer will need to update the Table of Contents once they’ve gone through the changes.

Option 2 is the most common in my experience.

If the writer needs to update the Table of Contents themeselves, I always add a comment to the words “Table of Contents”:

“Please remember to update this Table of Contents after you have accepted or rejected all of my changes, to make sure that the table reflects the document accurately. Please choose Update entire table rather than Update page numbers only”.

An important choice – what to update in the Table of Contents

This information is for editors and writers.

Whether the editor or writer is updating the Table of Contents, once you’ve clicked on Update Field, you are given the choice of Update page numbers only or Update entire table:

update page numbers or all fields

It is vitally IMPORTANT that you choose “Update entire table”. This will update any changes to the headings and any changes to the page numbers. If you click on “Update page numbers only”, and any headings have been changed in the text, this will NOT be reflected in the Table of Contents.

For authors: updating your Table of Contents when your work has been edited

  • Always update your Table of Contents when your work comes back from your editor, unless they have told you that they’ve already done it
  • Always choose “Update entire table” to make sure that everything in the Table of Contents matches your actual document

For editors: updating or instructing on editing the Table of Contents

  • Always leave a note for the writer explaining what you’ve done or what you need them to do
  • If you are updating the Table of Contents yourself, always choose “Update entire table” to make sure that everything in the Table of Contents matches the actual document (I would still leave a reminder for the writer to do the same after they’ve made any final changes)
  • If you need the writer to update the Table of Contents once they have dealt with your suggestions, leave a note explaining that, and make it clear that they must “Update entire table” when doing so

—–

This article has discussed issues around updating a Table of Contents when a document is edited. if you have enjoyed this article or found it useful, please share it using the sharing buttons below.

Other relevant posts on this blog:

How to create a contents page in Word

Tables of figures and tables of tables

How to update a Table of Contents, Figures or Tables

 
3 Comments

Posted by on July 22, 2015 in Errors, New skills, Word, Writing


Tags: , , , ,

How to update your Table of Contents, Table of Figures or Table of Tables

This article explains how to update the Table of Contents (Contents Page) or Table of Figures or Table of Tables in your Word 2007, 2010 or 2013 document, which could be a report, dissertation, thesis, book or anything else. To find out how to create a Table of Contents in Word, please refer to this article. To find out how to create Tables of Figures and Tables of Tables, please refer to this article. We’ll refer to it as “Table of Contents” in this article, but this works for all kinds of contents listings.

Why would I want to update my Table of Contents?

If you create a Table of Contents for a document but then change the actual document, it’s likely that you will also change …

  • One or more headings (maybe swapping between Title Case and Sentence case or just changing the wording)
  • What page a heading falls on (and all the other headings after it) (maybe by adding text or just moving a heading to join its text on the next page)

Although a Table of Contents will update to match the actual contents “automatically”, you have to tell it to do so. This is how to update your Table of Contents so that it matches what your reader will find in the actual document.

How do I update my Table of Contents?

First of all, hover your cursor over the Table of Contents. It should be highlighted in light grey. Right click on any part of the grey area:

update contents page word

This will give you a menu – you need to select Update Field:

update contents page - update field

Once you’ve clicked on Update Field, you are given the choice of Update page numbers only or Update entire table:

update page numbers or all fields

Choose wisely – see below! Once you’ve chosen, click OK and your Table of Contents will update!

When to update page numbers only in your Table of Contents

You might want to Update page numbers only if …

  • You are absolutely sure that you have only changed what text / heading is on what page (but you could still Update entire table anyway, just to be certain)
  • You have manually amended your Table of Contents (e.g. one heading was too long to fit on a line and you shortened it) AND you know you haven’t changed any heading text in the actual document.

In the second case, when you’ve manually amended the contents page, if you choose Update entire table, it will over-ride your manual change and replace it with the exact text that is in your heading in the main document, and you’ll have to manually update it again.

Apart from the case where you have manually edited the Table of Contents, I STRONGLY SUGGEST that you always choose Update entire table.

When to update entire table in your Table of Contents

I highly recommend that you always use this option. In this way, your Table of Contents will match the text of your document.

This is especially important to remember if someone else has amended and edited your document.

—–

In this article, we have learned how to update a Table of Contents, Table of Figures or Table of Tables. If you have enjoyed this article or found it useful, please share it using the sharing buttons below.

Please note, these hints work with versions of Microsoft Word currently in use –  Word 2007, Word 2010 and Word 2013, all for PC. Mac compatible versions of Word should have similar options. Always save a copy of your document before manipulating it. I bear no responsibility for any pickles you might get yourself into!

Find all the short cuts here

Other relevant posts on this blog:

How to create a contents page in Word

Tables of figures and tables of tables

 
7 Comments

Posted by on July 15, 2015 in New skills, Short cuts, Word, Writing


Tags: , , , ,

How do I change the numbering style of footnotes and endnotes in Word?

As part of my series on footnotes and endnotes, here’s how to change your footnote and endnote numbering styles on the go (e.g. while editing someone’s work, or when you change your mind, or when you’re working to a particular journal’s style and need to amend something you’ve already written)  in Word 2007, Word 2010 and Word 2013.

Why would I want to change my footnote or endnote numbering style?

The main reason to change your footnote or endnote numbering style is because of the style guide of whatever you’re writing the document for. For example, academic journals will usually have some form of Guidelines for Authors which will lay out (sometimes) the font, heading styles, reference styles and footnote styles that you are expected to use. If you’re re-using an article which has been rejected by another journal, or repurposing a chapter of your PhD, you might find that the style for one journal is different from what you’ve done previously.

Alternatively, you may just decide you would prefer to use roman numerals, arabic numerals, symbols or whatever for your footnotes or endnotes, and want to change them.

How to change the number format for footnotes/endnotes

In this example, we’re starting off with some footnotes or endnotes that use roman numerals (i, ii, iii …):

footnote with roman numeral

Now, we want to change them to, for example, arabic numerals (1, 2, 3 …)

First of all, go to the Footnotes menu. This is in the References tab, and there’s a whole area called Footnotes:

Footnote menu

Click the little arrow at the bottom right of the Footnotes area to access the Footnote and Endnote menu. Once you’ve clicked on the little arrow, you should see this menu:

footnote menu dialogue box word

We can see lots of things we can do here, including changing the number footnotes start at, whether they restart every chapter, etc. (these more obscure details will be the subject of another article). But for our purposes, the important features are choosing whether you’re telling Word about Endnotes or Footnotes and telling Word what the number format should be.

In this case, we’re using Endnotes (although these instructions cover both), so I’ve clicked the radio button (circle) next to Endnotes. This tells Word that we’re using Endnotes and talking about the Endnote numbering.

Going down one section, you can see that at the moment, the Number format is set to i, ii, iii … To change this, click on the down arrow to the right of the box saying i, ii, iii … (if the Endnotes are set to 1, 2, 3 or a, b, c, this will display in this box):

footnote menu change style

Once you’ve clicked that arrow, you will be able to see all of the choices you have for your footnote or endnote numbering. Now click on the format that you want to use:

footnotes change numbering style word

The Number format will now change to the one that you have chosen. Once you have got the correct format in this box, click the Apply button to apply the changes:

footnotes apply change word

When we return to our document, the endnote numbering has changed from a roman numeral (i) to an arabic numeral (1). You can change this as many times as you want.

footnote with correct style word

This article has explained how to change the number format in your footnotes or endnotes.

Related posts from this blog:

How to insert and format footnotes

How to insert and format endnotes

How to swap between using footnotes and endnotes

Please note, these hints work with versions of Microsoft Word currently in use – Word 2007, Word 2010 and Word 2013, all for PC. Mac compatible versions of Word should have similar options. Always save a copy of your document before manipulating it. I bear no responsibility for any pickles you might get yourself into!

Find all the short cuts here

 
30 Comments

Posted by on June 3, 2015 in Errors, New skills, Short cuts, Word, Writing


Tags: , , , , , , , , ,