RSS

Tag Archives: skills

How do I change footnotes to endnotes in Word?

As part of my series on footnotes and endnotes, here’s how to turn your footnotes into endnotes and your endnotes into footnotes in Word 2007, Word 2010 and Word 2013.

We begin with a document with footnotes, arranged at the bottom of their relevant page, as footnotes tend to be:

1 footnotes

But we want to turn these footnotes into endnotes. How?

Go to the Footnotes menu, which you can find in the References tab:

2 ribbon

Click on the little arrow at the bottom right to bring up the Footnote/Endnote Options dialogue box:

2 menu

Here you will find a Convert button to press. Press the button:

3 menu

This is context-specific, so if you have only footnotes, the option to convert endnotes to footnotes and to swap the two will be greyed out. Hit OK (or, if you already have both endnotes and footnotes, choose the option you wish to use then hit OK).

Your footnotes will have changed to endnotes:

4 endnotes

Related posts from this blog:

How to insert and format footnotes

How to insert and format endnotes

Please note, these hints work with versions of Microsoft Word currently in use – Word 2007, Word 2010 and Word 2013, all for PC. Mac compatible versions of Word should have similar options. Always save a copy of your document before manipulating it. I bear no responsibility for any pickles you might get yourself into!

Find all the short cuts here

 
3 Comments

Posted by on October 17, 2013 in Errors, New skills, Short cuts, Word, Writing


Tags: , , , , , , , , ,

What is the best mix of customers to have?

to do list If you’ve got a mature business that is up and running and busy, then you’ve probably used something like these criteria to choose which clients to work with, and you might have used these ways to turn one-offs into regular customers. But what is the best mix of customers to end up with?

Obviously, in an ideal world, all of your jobs as a freelancer will be fun, interesting and high-paying, for clients who pay up on time. But, well, we’re not in an ideal world. The paying on time thing is non-negotiable for me (although I’m always prepared to listen if a client is having cash flow problems, IF they tell me about them), but I’ve learned to live with the fact that not all of the high-paying jobs are fascinating, and not all of the really fun ones pay well. It’s all about balance, and in this post I’m going to share with you how I balance my mix of customers, which might help you, too.

What are the types of customer?

Whatever industry you’re in, you tend to have a few types of customer:

  • Customers who send you a lot of work regularly (great, although try not to rely on just one or two of these, just in case, and sometimes they can get a bit demanding)
  • Customers who send you a bit of work irregularly (only keep these on if you really can slot them in as and when)
  • Customers who pay high rates (why? they may have set the rates for their industry and they’re in a region with higher costs of living and pay rates for freelancers)
  • Customers who pay lower rates (why? you might have long-standing customers on a historical lower rate or offer discounts, as I do, for special groups of customers such as students, individuals and music journalists)
  • Customers who have fascinating work that’s right up your street and relates to your interests
  • Customers who have dull work which nevertheless you can tackle
  • Customers who always need their work to be done at the last minute
  • Customers who send you stuff that’s at the edge of your comfort zone – or outside it

I’ve put a little space before those two, because they’re the ones who you really do need to minimise.

As I said, in an ideal world, you would have customers with loads of fascinating work who pay high rates. But that’s not always going to happen, so it’s a matter of …

BALANCE

Isn’t it always, though?

Boulders, pebbles, sand

Time management techniques make use of the boulders, pebbles and sand metaphor when talking about how to fit your tasks into your day. The idea is that you slot the big jobs (the boulders) in first, then you can fit pebbles (smaller jobs) in around them, and fill up the gaps with sand (I usually see the sand as being my admin tasks). So, if I have a big transcription that must be done by tomorrow and will take 3 hours, I will plan to do that in the afternoon, with a couple of small editing jobs slotted in around it.

It’s the same with customer types.

It would be great if you loved loved LOVED all of your projects, but some of them are still going to be more interesting than others. To take some aspects of my work as an example (but as I said, this works for all industries) …

  • Localisation is my most lucrative work but it’s often fairly repetitive marketing or web texts. It also often uses specialised software that can be quite tricky to work with.
  • Working with translators is a specialised job and so my rates are higher than for native English editing. The texts I get from my translators and agencies are varied and often interesting.
  • I have a particular transcription client who pays great rates and has interesting tapes to send me – they used to have a conference for me to transcribe for every 2 months and now it’s less regular but still interesting. I now have another regular corporate transcription client.
  • I love transcribing for music journalists. Music is an obsession of mine and I love both hearing all the bits that don’t make it into the articles and seeing how the articles are written up from the tapes I’ve transcribed. But I do charge these clients less than my corporate transcription rates, because they’re usually freelancers like me. These are very, very rarely uninteresting, even if I’m not a big fan of the music style. Even if it’s Justin Bieber.
  • Student work can be interesting but can be very tricky and time-consuming, typically involves quite a lot of emailing back and forth, and I charge a lower rate than for corporate editing. I used to work on Master’s coaching, but found that it was difficult to commit to small bits of work coming at short notice over a long period of time.

Case study: how I balance my customers out

To maintain the analogy of the boulders and pebbles, this is how I manage this customer base:

  • Boulders have to be regulars with the more lucrative end of the work. I have kept down my number of localisation clients – I could do just localisation, but it would be a bit same-y and I would end up relying on very few, large clients, which is something I avoid. So: regular localisation clients, regular translator clients and at the moment a large regular transcription client are the boulders of my client base.
  • Rocks (ha – you’re going to laugh in a minute) are my music journalists (see what I did there?). The work is fun, the clients are lovely, and I get more return on investment than just the money. But I have to be careful not to take on too many of these, because I do not make as much per hour and I am in this job to make a living. I do let the odd rock crash into my personal time, because these clients are often on odd schedules. But I encourage them to book me as far in advance as they can, and they do pay extra for urgent work.
  • Pebblesstudent work and the occasional one-off fiction or non-fiction book referral from a regular customer. I’m afraid I am more likely to take on a referral than somebody out of the blue these days – but I will always refer on anyone who I can’t take on. I already pass on all Master’s students to one of three colleagues who have the time and attention they need. Also in this category come the few clients I still have who send small projects regularly – if you have few enough of these, you can slot them in around the rocks and boulders. I have one client who sends me middle-sized projects but with lovely long deadlines – work I can break into pebbles and pour around the bigger jobs.
  • Sand of administration – my monthly invoicing session is a boulder, and because it’s sand, so each job is small, I can slot a few email replies or jotting down some blog post ideas among all of these.

It’s all about the balance

When it comes down to it, it’s all about balance and return on investment (which doesn’t take a solely monetary form).

I could do just localisation all day every day, and push for more of that work, but it would be a bit repetitive and I could run the risk of only working with a few, large clients, which leaves me a bit exposed.

I could just work with translators and translation agencies, but I’d only really be editing then and I like the variety of my other work.

I could just work with music journalists and have a whale of a time listening to all sorts and picking up on new band to like. But the work can fluctuate madly (in a nod to a certain publication this week, it can oscillate wildly from all to nothing), so it would be unreliable as a steady source of income. And I’d probably get RSI.

I could just work with students and self-publishing novelists but I wouldn’t make enough to live on doing that full time, and again, I’d just be editing all day, every day.

By balancing all of these different customers (and you can do the same, whether you’re a roofer with a mix of full roofs, porches and repair jobs, or a decorator doing whole houses, front doors and window screens, or a graphic designer creating adverts, logos and cartoons), I get variety, balance my income and have fun!

How do you do it?

Whether you’re a fellow editor / transcriber / localiser or you’re in a different industry, I’d love to know how you balance your different types of customer. Do share in the comments

————-

If you enjoyed this post, please click one or more of the share buttons below.

Find more articles about careers and freelancing in this resource guide. Related articles:

How to decide who to work with.

Turning a one-off customer into a regular.

How to make more money in your freelance business

When should I say no?

 
18 Comments

Posted by on October 15, 2013 in Business, Jobs, Organisation


Tags: , ,

How do I add endnotes to a Word document?

Writers use endnotes to find a place for additional text which doesn’t fit into the flow of the document at hand but needs to be included for reference purposes. The reasons for doing this are the same as for using footnotes (to provide translations, to expand on information in the text, to provide references for sources used, etc.)

What is the difference between footnotes and endnotes?

The only difference between footnotes and endnotes lies in their position.

The text of footnotes sits at the bottom of the page on which the footnote is referenced.

The text of endnotes sits at the end of the chapter, article or even the whole book in which the footnote is referenced.

What do endnotes look like?

Unlike footnotes, which can use symbols or numbers, an endnote will usually be marked using a raised number after the bit of text that they refer to, like this.1 The reason for this is that a whole set of endnotes might appear at the end of a chapter or book, and there aren’t enough symbols to cover more than about five.

The text of the endnote will be marked with the same number, and will include all of the text that you want to appear outside the main text.

Endnotes at the end of a chapter will usually start at 1 for each new chapter. However, endnotes for an entire book might be numbered either starting at 1 for each new chapter or running sequentially through the whole book, running into the hundreds.

Sometimes endnotes don’t have a number in the text, but just refer in their own text to a section of the main document. These tend to be done by hand rather than automatically in the way I’m going to show you today.

You can see here that the endnote number is on the first page (circled) but the endnote itself appears at the end of the whole document:

1 endnote

How do I create an endnote in Word 2007 and Word 2010?

The Endnote section is found in the References tab of the ribbon (not Insert):

1 menu

Place the cursor in the position where you want the endnote to appear and either press the Insert Endnote button (as above) or click on the drop down arrow for your options (I find that sometimes the Endnote numbering defaults to something odd, so it’s useful to do this:

2 options

This will bring up your endnote options. Choose your options (see next section) and when you press Insert, a number will appear in your text, and an endnote number will appear right at the end of your document (or chapter), ready for your endnote text.

Type the text you want into your endnote field, noting that you can change the paragraph style, size and font as with any text, although it’s common for the endnote font to be smaller than the main document font.

To insert the next endnote, follow the same sequence, although once you’ve set up your options, you can just hit the Insert endnote button instead of dropping down the options.

How do I delete an endnote?

Using the automated endnote system means that the numbering will adjust itself to stay correct if you delete and move notes around.

Don’t highlight the endnote itself and delete it. This has no effect on the numbering.

Instead, highlight the number in the text or position your cursor at the point just after it and press delete.

3 delete

Here, I’m deleting Endnote 3. Press delete and

4 delete

changes to:

5 delete

What are the endnote options?

We have already seen that clicking on the little arrow at the bottom right of the Footnotes section, brings up a range of Footnote and Endnote options that you can customise:

2 options

Here you can choose the number format, whether the endnotes appear at the end of each section (you will need to apply Section Breaks to make this work) or at the end of the whole document, and whether the numbering starts at the beginning of each new section or just runs through all of the document continuously.

6 options

For more detail on these options, see the relevant sections in the article on Footnotes.

How do I make the endnotes appear on a new page?

To make your endnotes appear on a new page, simply add a Page Break before them by putting your cursor at the end of the main text and pressing Control-Enter.

How to add endnotes in Word 2003

In Word 2003, you add endnotes using the Insert – Reference menus. The footnote options are then the same as above.

How not to add endnotes to Word documents

It is NOT RECOMMENDED to add endnotes manually (insert a superscript number and type the note at the bottom of the document) If you do this, you will lose all the advantages of using this automated system:

  • automatically adding the numbers in order
  • automatically renumbering the endnotes if you delete or add one or move one around

————-

In this article we’ve learnt what an endnote is, why you use them, all about inserting and deleting them and the options for customsing them.

Related posts from this blog:

How do I add footnotes to a Word document?

Changing footnotes to endnotes

How do I change the format of my endnotes and footnotes?

Please note, these hints work with versions of Microsoft Word currently in use – Word 2003, Word 2007 and Word 2010, all for PC. Mac compatible versions of Word should have similar options. Always save a copy of your document before manipulating it. I bear no responsibility for any pickles you might get yourself into!

Find all the short cuts here

 
7 Comments

Posted by on October 9, 2013 in Errors, New skills, Short cuts, Word, Writing


Tags: , , , , , , , ,

Ten top tips for transcribers

keyboard, headphones and penI’ve been advising a colleague on how to develop the transcription side of her business recently, and these tips and hints came out as being the most useful for her – so I’m sharing them with you, too. Do comment if you find these helpful or have more to share!

1. Make sure that you can do it!
Before you launch into your first transcription project, check that you can do it first! This includes:
  • Being able to touch type
  • Being able to type quickly
  • Having the requisite technology

You can have a look at this post to check you’re suited for the work, and this one about the technology to use. Transcription jobs often come in at short notice and have tight turnarounds, so it really pays to be prepared.

2. Make sure that your ergonomics are tip-top

Transcription is the most demanding of my tasks. Typically, you’re pounding a keyboard for several hours at a time, typing as fast as you can while straining to hear the tape. Here are some of the things I and my colleagues have learned:

  • Use a proper keyboard with little legs, not a laptop keyboard, even if it’s propped up
  • Make sure that your chair is adjusted so that you can sit straight, looking slightly down at the screen, with your forearms sloping slightly down to your hands and your hands arched over the keys
  • Make sure that your feet are flat on the floor with comfortable bends to the knees; if not, put a box or footrest in front of your chair
  • Make sure that the cable on your headphones is long enough to reach your computer without you having to bend at all sideways or twist your head
  • Make sure that your headphones or earphones are comfortable
  • Take regular breaks to stand up, stretch, give your ears a rest and refocus your eyes – once an hour at very least (I do some squats and calf raises every hour as I seem to store tension in my legs when I am transcribing)

3. Get software to manage your transcriptions

Professional transcription software allows you to control the tape using function keys or even a pedal (like in the old days of audio typing) and will make you much quicker at doing the work. More information on software here – make sure you get used to it first!

4. Make sure that you understand what the client wants

You wouldn’t believe how many choices are involved when it comes to providing transcriptions for clients. Here are just some of them:

  • Do they want  you to type out exactly what the speakers say, take out the ums and ers but retain the rest, polish up the sentences so they make grammatical sense, or make non-native English speakers sound like native English speakers?
  • If you are transcribing an interview, do they want you to include the full questions or just notes?
  • If the person who they are interviewing says that something is off the record, do they want you to stop typing, or take it down and mark it up as off the record?
  • Do they want you to include and mark pauses, and how?
  • How do they want you to mark unclear sections or words that you can’t understand but can type a phonetic version?
  • Do they want you to timestamp the document (i.e insert 05:00, 10:00 etc. at the relevant points in the document), and how often, if at all?
  • How do they want you to differentiate between the speakers? (this could range from first initial, surname, in bold, with a colon to putting the questions in italics with no names)
  • Do they want US or UK spelling? Oxford -z- spellings or “British English” -s- spellings?
  • Do they have a special font or line spacing they wish you to use?
  • Do they have a template that they wish you to use?

I have experienced all of these variations in my own transcription work. You may be working in a team where it’s vital to have all transcriptions looking the same, or the client might just work with the transcriptions in a particular way.

I have a standard list of questions I send out to clients if they don’t specify, so that I can make sure that I’m doing what they want.

5. If it is anything but a general text, ask for a list of terminology

When I work with music journalists, I always ask for the band name so I can check the album and song titles and band members’ names – I feel more professional if I get that right for them.

If I’m working with a particular kind of client and there seem to be a lot of specific terms, I ask for a list of terms, or send my own list and ask them to check if they’re correct, especially if it’s a long-term project. Again, this makes you look professional and avoids the client having to do any extra work to correct your interpretation of terms.

Of course, it helps if you know a bit about the topic to start with. I always turn down medical and legal transcription jobs because they’re very specialised, and I like to think that I know about music, but I did have to ask a client if I’d heard “Bowel Bass” correctly (I had!).

6. Get to grips with Word’s auto complete function

Auto complete can save you keystrokes and time by allowing you to type a few letters or a word fragment and have it expand into a word or phrase. I’ve written an introduction to this topic with more detail on personalising it, if you want to read up on this. Being able to type “tyv” and have “thank you very much” appear in your document, or having your “beh” turn into “behaviourally” is key to cutting down the time taken to type out that tape.

7. Monitor how long it takes you to do an hour or whatever, on average

Once you’ve got into transcribing, monitor how long it takes you to transcribe an hour of tape, on average. This will help you to predict workflows and give your client an estimate of how long you will take to complete their work.

However, do note two things here:

  • Time taken can vary considerably (see Point 8 below) so always under-promise and over-deliver. My average rates vary from 2 hours typing to 4 hours typing for one hour of tape, although my absolute average is around 3 hours typing for every hour of tape
  • Don’t forget to build in breaks – if I’m sent 3 hours of tape at midday, it will not take me until 9pm!

8. Be aware of the variables

I’ve known people who are new to transcribing to get upset when a tape takes them a long time. It might be just that the job is difficult or has some factors that would make it take longer for ANYONE to complete.. It can really vary – here are some reasons why a tape could take longer to type than average:

  • It’s a new client or project – I always speed up as I get used to the client’s voices and terminology and the way the conversations go
  • The sound quality is poor, leaving you to have to rewind and go over much more than usual
  • The job involves taking down every single word the speakers say and they have a lot of repeated words and / or talk very quickly
  • The speakers have heavy accents
  • There are more than two speakers and they are difficult to differentiate (that’s why I charge more for more than two speakers)

As I said in Point 7 – try to have a listen to the tape before you make any promises on timing, and always under-promise and over-deliver!

9. Be a perfectionist but not too much of a perfectionist

It’s brilliant if you take great care over your transcription and try to make it all as good as you can. It’s not brilliant if you spend hours labouring over every tiny section of tape, trying to make everything out or frantically Googling for obscure titles of album tracks:

  • Sometimes the tape will be unclear and no one could hear it – mark it as unclear, pop the tape timing down and move on
  • Sometimes people talk over each other and you can’t hear what one or both of them is saying – mark that and pop the tape timing down and move on
  • Sometimes people use words or talk about people whose names you cannot make out – have a go at sticking down what you can hear, mark with a question mark and the tape timing and move on

I know that when I’ve read some of the stories that my journalist clients have written, I’ve thought – “Oh, THAT’s what they said!” and I’m very experienced at this work. The clients don’t mind, as long as you get most of it and tell them about what you can’t make out. Often they will be quality checked by someone else, or the journalist will know much more about the band than you do, or they might have a little giggle at a mis-hearing and move on from it. The world will not end, and I don’t believe that anyone can transcribe a whole long tape completely perfectly.

10. Ask for feedback

Each time that I complete the first job for a new client, I ask them if there is anything that I could do differently that would help them to work with the text I produce. And if I don’t get any feedback at all from a corporate client (some of them only feed back when there is an error, which I find a bit challenging!), I will ask them for it. If you really didn’t grasp a section of tape or fear you mis-heard an important term and it’s going to come up again, ask for feedback.

And if the feedback is good AND the client says it’s OK to use it, pop it on your references page!

—————————————
Thanks to Laura Ripper for helping me to put together this list. Was it helpful? Is there anything else that I haven’t mentioned that would have helped you when you were a new transcriber?

If you want to learn more about Transcription as a career, buy my book: A Quick Guide to Transcription as a Career – buy from Amazon UK or visit the book’s web page for worldwide links and news.

Related posts on this blog:

————

If you’ve enjoyed reading this post, do share and like using the buttons below! Thank you!
 
40 Comments

Posted by on October 7, 2013 in Business, Transcription


Tags: , , , ,

How to add page 1of 2 to a Word 2007 or Word 2010 document

I’ve had quite a few searches coming through to this blog from people wanting to know how to create a specific kind of page numbering – the kind when it reads “page 1 of 2”, “page 1 of 5”, “page 2 of 3”, etc. If you want more detail on page numbering, read this article on the basics and this one on the finer points. If you want to know how to make “page 1 of 10” appear on your document read on!

Why would I want to make my page numbers say page 1 of 2?

It’s a matter of personal choice as to how you format your page numbers. However, your department or office might have a style guide that dictates this, so it’s as well to know how to do it.

How do I get page numbers to say page 1 of 2?

As I mentioned, I have more detailed resources on page numbering. This is more of a ‘quick and dirty’ guide.

Go to the Insert tab, move to the Header and Footer area, and click on the little arrow at the bottom right of the Page Numbers button. This will give you a menu where you can select where your page number is to appear. Choose, for example, Top of Page, then scroll down the list of options to find Page X of Y:

page 1 of 1

This gives you three places where you can insert page x of y into your document. I’ve chosen the top one. Click the option and there you have it:

page 1 of 1 done

Note that you can’t change this in Page Number Options, you must do it using the Page Numbers option as shown above.

If you have found this article useful, please share it using the buttons below, and leave me a comment!

This is part of my series on how to avoid time-consuming “short cuts” and use Word in the right way to maximise your time and improve the look of your documents.

Related posts on this blog:

How to add page numbers to your document 1 – the basics

How to add page numbers to your document 2 – advanced editing etc.

Please note, these hints work with versions of Microsoft Word currently in use – Word 2003, Word 2007 and Word 2010, all for PC. Mac compatible versions of Word should have similar options. Always save a copy of your document before manipulating it. I bear no responsibility for any pickles you might get yourself into!

Find all the short cuts here

 
21 Comments

Posted by on October 2, 2013 in Errors, New skills, Short cuts, Word, Writing


Tags: , , , , , , , ,

How to turn a new customer into a regular customer

handshakeWhatever field you’re working in, having a stable of good, reliable regular clients who send you work, are good communicators and pay decent rates in good time is a good place to be. The kind of client you want as a regular is the kind of client who follows all of these rules. You may have chosen to work with them based on these criteria. And, in fact, if you follow these rules for freelancers yourself, you should have no trouble in attracting regulars.

I’ve written about how to decide which companies to work with. Here are some ways to help you turn a good first-time client into a trusted regular. If you have other suggestions, do add a comment to this post!

Do a good job the first time

This one’s a bit obvious, but it’s worth saying. Do a good job the first time, and you’re likely to create a regular client just like that!

Be memorable for your good customer service

Leave the client with a good final impression. I’m always sure to say thank you for their payment and to wish them well with the publication / website / new service / novel / whatever it is that you’ve done for them this time.

Make sure that your client knows you’d like to work with them again

When I send my thank you for their payment, I make sure that I make it clear that I’d like to work with them again. Something along the lines of “I’m looking forward to working with you on future projects” will set a good note.

Remind the client that you’re available

When you’re establishing a relationship with a client, the odd little email reminder of your availability is fine (obviously don’t hassle them). If you have a newsletter, asking them if they’d like to be added to your mailing list and sending them a monthly newsletter can keep you in their mind.

Make sure that clients know about all of your services

If, like me, you offer more than one service, make sure that your clients know this, too. I’ve got several long-term customers who use me for more than one service – one has moved from using my transcription services to using me as an editor (I also still transcribe for them) and a few use me for editing and localisation. Even if they only do one thing themselves, it’s useful for people to know your range, in case they recommend you to their colleagues.

Offer an incentive

Once I have completed a job for a new customer and they’ve paid me successfully, I offer then an incentive. No, not money off! But I will usually offer to invoice them for all of the jobs I do for them in a month, at the end of the month. Win for them: they are given longer to pay and will receive one invoice for several jobs. Win for me: I only have to produce one invoice and record one payment, and I can add them to my monthly invoice run.

Note: make sure you are clear that this is an offer and they don’t have to take it up. If they don’t want to do this, make a note and invoice them how they like it to be done, for example.

Thank them for their repeated custom and treat regulars well

I regularly tell my regulars how much I appreciate their regular custom and I treat them well in as many other ways as I can, too:

  • I make it clear that at busy times, I will prioritise their work over new work (and I tell new prospects this, too – I think it gives a good impression to let everyone know that I treat my regulars well).
  • I will also go above and beyond, doing a super-fast turnaround or working late to fit a job in – not to the detriment of other clients or my own health and sanity, but I treat them as well as I can.
  • If I’m booking holiday or other time off, I will email my regulars in advance to warn them, so they don’t just find out when they get my out of office reply.
  • I will offer regulars a named holiday cover contact who they can work with when I’m not available, and introduce them to a trusted colleague if they wish me to.

————-

This is how I have converted one-off customers into regulars, and have built a group of regulars who bring me regular work and income and peace of mind in knowing I’ve got a stable business. And how I keep them!

If you have any more tips and tricks do share them in the comments. And do please click on the buttons below to share this post!

Find more articles about careers and freelancing in this resource guide. Related articles:

How to decide who to work with.

What’s the best mix of customers to have?

 
9 Comments

Posted by on September 30, 2013 in Business, Ethics, Jobs, Organisation


Tags: , ,

How do I add footnotes to a Word document?

Academic and non-fiction writers use footnotes to refer to additional text which doesn’t fit into the flow of your paragraph but does need to be included. It might be used to provide a reference for a quotation or statement you’ve made, or might contain a digression or discussion of something you’ve just written about. It might also contain a translation of a non-native quotation you’ve placed in the text, or the non-native original quotation whose translation you’ve just given.

What do footnotes look like?

Footnotes can take two forms. Either there’s a raised number after the bit of text that they refer to, like this,1 or a symbol like an asterisk or paragraph mark is used (pleasingly, there is an order for these: *, , , §, ‖, ). In timetables and other tables, superscript (up high) letters and other symbols may be used.

In relation to this marker, a note will appear at the bottom of the page with the same marker at the beginning, which includes the additional / explanatory text:

0 footnotes

How do I create a footnote in Word 2007 and Word 2010?

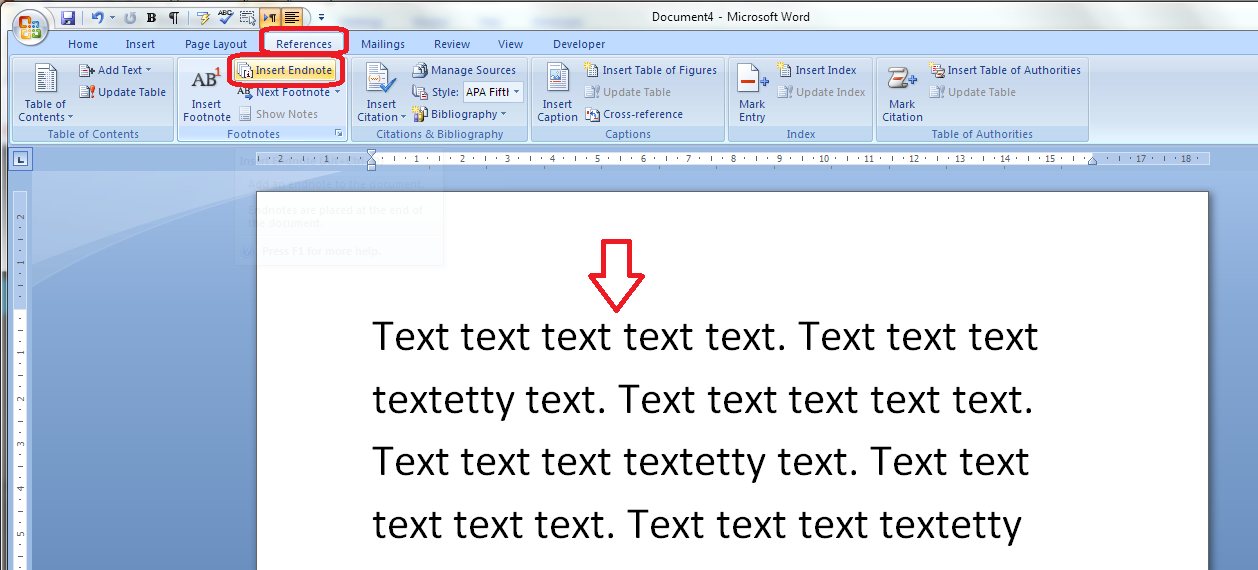
The Footnote section is found in the References tab of the ribbon (not Insert, as you might expect):

2 menu

We need some example text first. Here’s some text after which we want to place footnotes:

1 before footnotes

Position the cursor in the position in which you want the footnote to appear (note, I am putting the footnotes AFTER the punctuation. This is common but not universal. The important thing is to be consistent) and press the Insert Footnote button:

3 button

A footnote number will now appear where your cursor is, and a note number under a line at the bottom of the page, ready for you to insert your footnote text:

3.1 insert footnote

Note that this has automatically pushed down the next paragraph onto the next page of the document. This is one of the reasons why you should automate this process and not do it manually.

You can type text into your footnote field – you can also change the paragraph style, font, size etc. as you would a normal bit of text; however, the way it defaults, with notes smaller than the main text, is the standard way to do it, so try not to mess around with it too much.

3.2 insert footnote

When you want to insert the next footnote, position your cursor in the next place and hit the Insert footnote button again. The next footnote will automatically number itself with the next number (or letter, or symbol: see below under Footnote options) and position itself under the first one:

3.3 insert footnote 2

If a footnote gets particularly long, Word will automatically shift the text and footnotes around so that they are on the same page and fit in correctly.

How do I delete a footnote?

Another benefit of using the automated footnote system is that you can delete and move footnotes and the numbering will adjust itself to stay correct.

How NOT to delete a footnote: Don’t highlight the footnote itself and delete it. This will have no effect on the numbering.

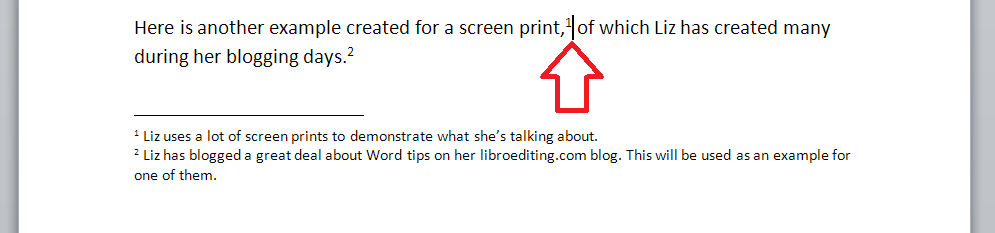
Instead, highlight the number in the text or position your cursor at the point just after it:

3.4 delete footnote

Delete that little number …

3.5 delete footnote

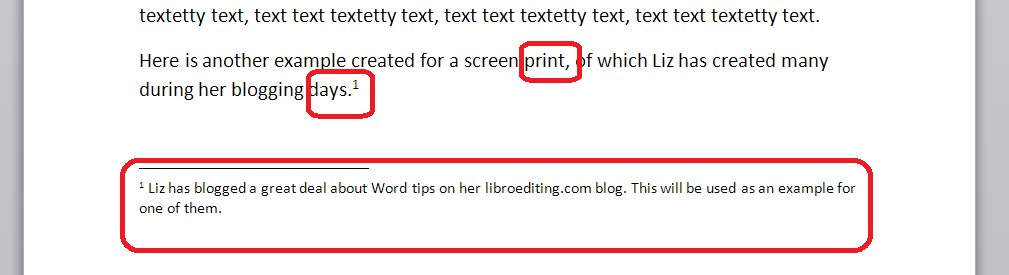
and the number will disappear from after “print,”, plus the one after “days.” will change to a 1 and footnote 1 will disappear, to be replaced by footnote 2, which has now become footnote 1. Magic!

What are the footnote options?

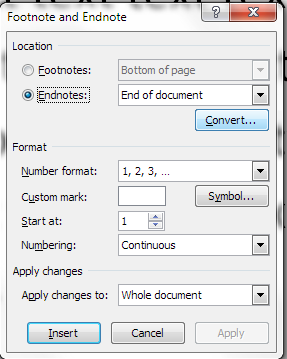
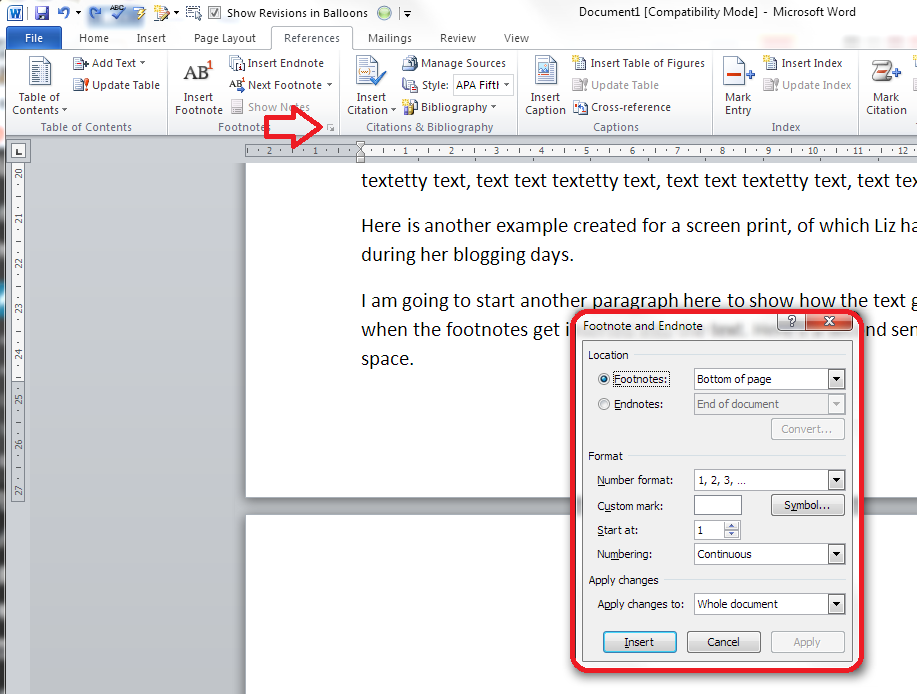
If you click on the little arrow at the bottom right of the Footnotes section, you will be given a range of Footnote and Endnote options that can be customised to suit your needs:

4 footnote options

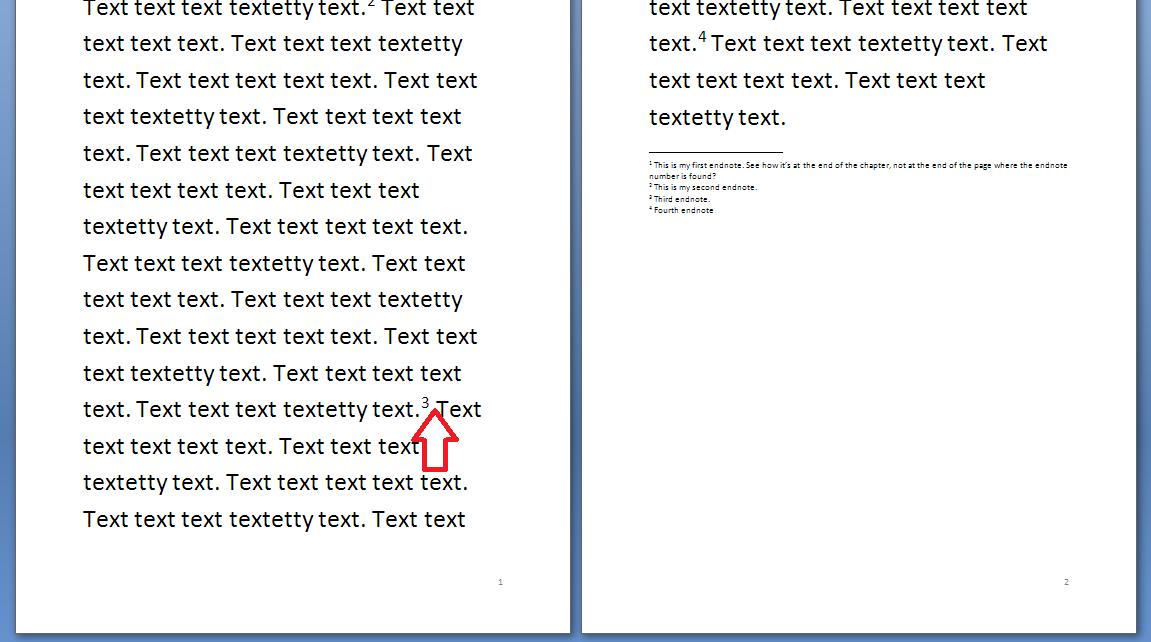
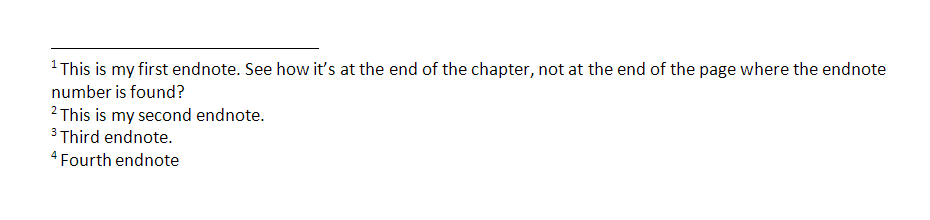
You can choose between having footnotes and endnotes here (endnotes appear at the end of a chapter or the whole text, and will also be discussed in a different post). Then, you can choose the number format (drop down the arrow in each case):

5 footnote options

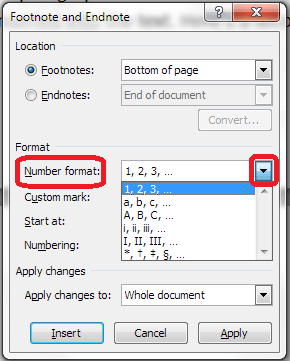
including those famous symbols (and you can also add your own symbol if you really have to). Select and hit Apply.

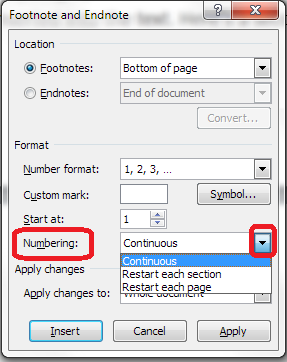
You can choose whether the numbering remains continuous throughout your document or restarts on every page (useful for tables) or in every section:

6 footnote options

And you can highlight a section of text and apply these changes only to the highlighted text (this changes to being the default when you highlight the text):

7 footnote options

How to add footnotes in Word 2003

In Word 2003, you add footnotes using the Insert – Reference menus. The footnote options are then the same as above.

How not to add footnotes to Word documents

It is possible, but NOT RECOMMENDED, to add footnotes manually by inserting a superscript number and typing the note at the bottom of the page. But this will NOT do what the automated footnoting system does:

  • automatically add sequential numbers
  • format the page so the text and footnote stay together
  • automatically renumber the footnotes if you move or delete or add one

So, don’t do that, now you know the correct way to do it!

————-

In this article we’ve learnt what a footnote is, what they look like, why you might use them, how to insert and delete them and the options available.

Related posts:

Some great notes on avid footnoters from the history of literature here.

On this blog:

How do I add endnotes to a Word document?

Changing footnotes to endnotes

How do I change the format of my endnotes and footnotes?

Please note, these hints work with versions of Microsoft Word currently in use – Word 2003, Word 2007 and Word 2010, all for PC. Mac compatible versions of Word should have similar options. Always save a copy of your document before manipulating it. I bear no responsibility for any pickles you might get yourself into!

Find all the short cuts here

 
11 Comments

Posted by on September 25, 2013 in Errors, New skills, Short cuts, Word, Writing


Tags: , , , , , , , ,

Using tables in Word 1 – Menus and options

This is the first in a series of articles about Tables in Word. It covers Word 2007 and Word 2010, and will include Word 2013 in time. The following articles will cover all of the different types of table and option in detail, as well as useful features such as how to retain your table heading line on every page of your document.

Why use tables in Word?

Tables can be a very useful way to show information in an easy-to-read form, and are essential if you have a lot of data – in words or numbers – to share with your readers. There are many different ways to construct tables in Word, so this post will show you the basics, then further posts will elaborate on each method.

How do I insert tables in Word?

To put a table into a Word document, you need to choose the Insert tab and then look for the (very small) Tables section. There you will find a Tables button

1 menu

Press the Tables button and you’ll be shown a grid followed by a list of other options:

2 menu

We will now take a quick look at all of these options in turn.

Insert table

The first option gives you a grid which you can highlight to create the table you want. The squares represent the number of rows and columns you want, although on the page, the columns will fit to the width of your page and the rows will be one line deep.

Move your mouse over the grid and the table will appear on the document behind the menu:

3 grid

Let go, and there’s your table (we’ll learn about adding and deleting rows and columns in another post).

Insert table (2)

The first text option on the list below the grid is, rather confusingly, also called Insert table. But if you choose this option, you’ll find a rather more familiar and in some ways simpler menu.

4 insert table

The Insert Table menu allows you to choose the number of columns and rows by moving the up and down arrows for each. We’ll look at the other options later. For now, these choices will give you a table five columns across and two rows down when you click OK:

5 insert table

Draw table

The Draw table option allows you to hand draw the cells of your new table.

6 draw table

The Table tab will open up and Draw Table will be highlighted. You get a cursor that looks like a pencil and you have to draw each cell with that (there’s an eraser next to the draw button).

7 draw table

I personally find this really fiddly to use: you do have to play with it a bit to work out what to do with it. But I suppose it must be useful!

Convert text to table

This is particularly useful if you’ve imported text or figures from another program. Highlight your text and choose this option …

8 convert

… and you can specify whether you want the columns to separate at each comma, full stop or other character. Apparently, Mr Libro always uses this option when he creates a table, creating the text first and then the table!

Insert Excel spreadsheet

This option allows you to have a mini Excel spreadsheet, with all its normal functionality, inside your Word document:

9 spreadsheet

Note: this inserts a blank, empty spreadsheet into your document:

10 excel

Once you’ve created your data and clicked away from the spreadsheet, you will have a table made out of your spreadsheet (click on it to amend):

11 excel

If you want to insert an Excel spreadsheet that you’ve already created into your Word document, you need to choose Object from the far right-hand side of the Insert tab

Insert Quick Tables

The last option in the list will allow you to choose from a ready-made set of sample tables …

12 quick tables

As you can see, this is particularly useful if you want to print out or insert a calendar!

——————–

This post has gone through the Table menu and the options it offers for inserting tables. In other posts, I will go into more detail about how to edit tables, add and delete rows and columns, etc. If you want to know more, subscribe to this blog (see links at the top left or add to your RSS reader) or keep your eye on the resource guide.

If you have enjoyed this post, please share the link!

Please note, these hints work with versions of Microsoft Word currently in use – Word 2007 and Word 2010, for PC. Mac compatible versions of Word should have similar options. Always save a copy of your document before manipulating it. I bear no responsibility for any pickles you might get yourself into!

Find all the short cuts here

 
1 Comment

Posted by on September 11, 2013 in Errors, New skills, Short cuts, Word, Writing


Tags: , , , , , , , ,

What to do if your paragraph spacing won’t work in Word

This article tells you what to do if you think you’ve set your paragraph line spacing for the whole document but individual paragraphs refuse to behave. This is valid for Word 2007 and Word 2010, with Word 2013 to follow soon.

My spaces between paragraphs are uneven – help!

This just happened to me, which is why I’ve written up this article.

I was working on a bibliography for a client.

I set the paragraph and line spacing as I normally do: highlight the whole document, go to the Home tab, Paragraph section, and click the down arrow on the Spacing button:

1 paragraph and line space menu

This gives you the Spacing menu:

2 menu options

from which you choose your line spacing and lines after paragraphs options (I will write up a main post about this soon).

But it didn’t work!

Individual paragraphs still had no automatic spaces between then, even if I removed the line feed and pressed Enter again.

How to solve the problem of inconsistent paragraph spacing

Here’s how I did it.

I highlighted all of the text.

I right-clicked on the highlighted text and chose Paragraph from the options:

3 para

I then stayed on the Indents and Spacing tab and set my After spacing to 12pt and my line spacing to 2 (just in case). I also unticked Don’t add space between paragraphs of the same style (it was filled in with blue rather than ticked so I clicked twice to get a tick and then no tick):

highlight all

I pressed OK and the paragraphs all behaved beautifully.

I’m not entirely sure why this method works over the previous one, to be honest, but it worked for me and it was hard for me to find an easy, quick answer, so hopefully this will help a few people!

————————–

If you have enjoyed this post or found it useful, please share the link!

Please note, these hints work with versions of Microsoft Word currently in use – Word 2007 and Word 2010, for PC. Mac compatible versions of Word should have similar options. Always save a copy of your document before manipulating it. I bear no responsibility for any pickles you might get yourself into!

Find all the short cuts here

 
61 Comments

Posted by on September 4, 2013 in Errors, New skills, Short cuts, Word, Writing


Tags: , , , , , , , ,

How do I print out table headings at the top of every page in Excel?

I recently wrote about retaining your headers across multiple pages in a Word document. This post will tell you how to make your header rows (or columns) in Excel 2007 and Excel 2010 print on multiple pages when you print them out.

What is the header row in Excel?

The header row is the row in a spreadsheet that contains the headings for all of the columns in your spreadsheet. It’s usually Row 1, or maybe a few rows at the top of the spreadsheet.

(If your columns have headings in Column A instead or as well as your rows, you can use all of the stages in this post but choosing the columns option where appropriate, or both.)

1 spreadsheet

Why would I want my header rows to print out on multiple pages?

If you’ve got a complicated spreadsheet that you want to print out in a report, as a handout, or as a pdf, it’s useful to have the header row show on every page. When you’re using Excel itself, you can freeze the rows and/or columns so you can see them as you scroll down. But this doesn’t carry over to the printout.

How do I check if my header row will be printed on every page?

To check what the printout will look like, you need to change from the standard Normal view of your document (see the first image in this post) to the Page Layout view.

To do this, choose the View tab, then the Workbook Views section and press the Page Layout button. Your view will change to what the document will look like on the page (this is also where you add headers and footers to an Excel document – more on that another time)

1 view menu

If we scroll down to the second page of our document in this view, we can see that the second page just starts with the next line of the spreadsheet – not very useful if you want to be able to see the headings at the top of each page:

2 no headers

How do I make the heading row print at the top of every page?

Staying in the Print Layout view, choose the Page Layout tab and look at the Page Setup section. In the bottom right corner, you’ll find a little arrow. Click on the arrow to access the Page Setup menu:

3 page layout menu

The Page Setup menu will default to showing you the Page tab. Click on the Sheet tab at the extreme right:

4 page setup menu

At last we’re in the Sheet menu. This is where you can choose the print area, titles, gridlines, quality, etc., but what we’re interested in is Rows to repeat at top (and/or Columns to repeat at left, if you have either or both of these):

5 page setup menu sheet

Now, how do you tell Excel which row you want to print at the top of every page? I got a bit flummoxed by this at first, I have to admit. Here’s how you do it:

Make sure your cursor is in the appropriate input box – in this case I have left-clicked with the mouse in Rows to repeat at top.

Then click with the mouse on the far left of the row you want to select. Can you see the dotted line round it on the image below? That means that it’s been selected. If you just click on one row, $1-$1 will appear in the text entry box. If you highlight more than one row, it will read $1-$2, etc.

6 page setup menu sheet choose

If you want to make sure that a heading column appears on every page of your printout, make sure the cursor is in the Columns to repeat at left box and click above the column you want to choose. You can choose a row(s) and a column(s) if you want to!

Once you’ve clicked on OK, you can scroll down in Page Layout view to see the top of the second page. There are the headings, ready to print on every page! You can change back to Normal view: the instructions that you’ve given Excel here will stay the same.

7 done

We’ve learned how to make sure that your heading row (or column) prints on every page of your printout when you’re printing out your Excel 2007 or Excel 2010 document.

If you’ve enjoyed this post, please do share it using the buttons below!

Related posts:

Freezing rows and columns in Excel

How do I keep my table headings over multiple pages in a Word document?

———————

This is part of my series on how to avoid time-consuming “short cuts” and use Microsoft Office in the right way to maximise your time and improve the look of your documents.

Please note, these hints work with versions of Microsoft Excel currently in use – Excel 2007 and Excel 2010 for PC. Mac compatible versions of Excel should have similar options. Always save a copy of your document before manipulating it. I bear no responsibility for any pickles you might get yourself into!

Find all the short cuts here

 
54 Comments

Posted by on August 29, 2013 in Errors, New skills, Short cuts, Word, Writing


Tags: , , , , , , , ,