RSS

Category Archives: New skills

How do I change the colour of text in Word?

How do you change the colour of the text in your Word document?

Why would I want to change the colour of the text in my document?

You might want a section of the text to stand out, to match your company branding or to look attractive on a menu or other display document. It’s easy to change the text colour to do this.

Note: don’t use changed text colour to alert your proofreader/editor to something you want to do – read this article to find out why.

How to change the text colour using the menu bar

You can find the text colour button in the Home tab, in the font section of the menu bar:

1 colour in menu

Make sure the text that you want to appear in a different colour has been highlighted. Locate the letter A with a red underline and click on the down arrow to the right of the letter to access the Colour menu:

1 colour template from menu

To see how to use this palette, hop down past the next section and join me at “How to select your colour”.

How to change the text colour using right click

You can do a lot to a chunk of text by highlighting it and right-clicking. Try that on some text now by highlighting it then right-clicking over the highlighted text:

2 colour in right-click

You will now find not one but two ways to change the text colour – a button with an A underlined in red (circled) and a Font menu (arrow). If you click on the button, you’ll get to the same point as in the section above. Click on Font for now ..

3 colour in right-click

In the Font menu, you’ll find all sorts of things you can do to your font – very useful if you want to apply particular effects to the highlighted section of text. For now, we’re going to use the drop down arrow under Font color to select our font colour:

4 colour template in right-click

We’ve now got a choice of basic colours, with common ones at the bottom. Click, for example, on the first green, and your highlighted text will turn green, although you’ll need to press the OK button to make that change stick:

5 change colour

How do I choose a custom colour for my text?

You can, of course, go even more customised than this. In both ways to access the menu, you’ll find the words More colors… at the bottom of the palette:

6 more colours

Clicking on this option will give you the Customise colours dialogue box, with two sets of increasingly customisable colour palettes to choose from. First of all, we have Standard colours:

7 more colours standard

You can see that we’re on the Standard tab here: there are plenty of colours and shades of grey to choose from, and you click on the colour and press OK to accept it. Or, if you’re feeling really adventurous, you can select the Custom tab

8 more colours custom

… and have a huge range of colours to choose from. Here, you can click on the colour and then move the arrow up and down to adjust the amount of black in the colour, and it handily shows you the original and new colours at the bottom of the dialogue box.

Now you know how to change the text colour in Word to an almost infinite number of colour choices. You can use the same button or right-click and font option in Excel and PowerPoint, too.

———————

This is part of my series on how to avoid time-consuming “short cuts” and use Word in the right way to maximise your time and improve the look of your documents.

Please note, these hints work with versions of Microsoft Word currently in use – Word 2003, Word 2007 and Word 2010, all for PC. Mac compatible versions of Word should have similar options. Always save a copy of your document before manipulating it. I bear no responsibility for any pickles you might get yourself into!

Find all the short cuts here

 
Leave a comment

Posted by on June 26, 2013 in Errors, New skills, Short cuts, Word, Writing


Tags: , , , , , , , ,

How to search for almost anything in Microsoft Office, other software and web pages

Today we’re going to learn about the wonders of Ctrl-F and how it can help you to search for text almost anywhere.

We’re going to look at an overview of the basics in this article, then I’ll go into more detail on advanced searching and replacing in another one.

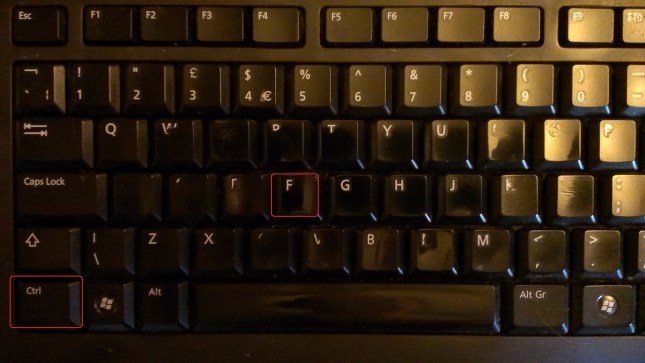
What does Ctrl-F mean?

Ctrl-F is shorthand for “press the control key and the F key at the same time“. It’s the way in which key combinations are expressed. You will have one or two Ctrl keys on your keyboard (I have two) and it’s usually easiest to press Ctrl, hold it down, then press F.

keyboard

If you’re looking at a  Word, Excel or Powerpoint document, a web page or, in fact, many other things, you will now be able to search for text in that document, on that page, etc. Let’s go through the different places you can use this.

Searching in Word 2007 using Ctrl-F

Word is one of the places where searching is most useful. It also offers the largest range of options for searching, and we’re just going to look at the most common today but watch this space for an article on advanced searching.

I use Ctrl-F to …

  • Search for a place in a text by a word in its heading
  • Search for tables / figures and references to them in a document to make sure they match up
  • Search for chapter headings in a book / thesis when I want to check they have a consistent style
  • Search for a name to check how it was spelled last time

and many other things.

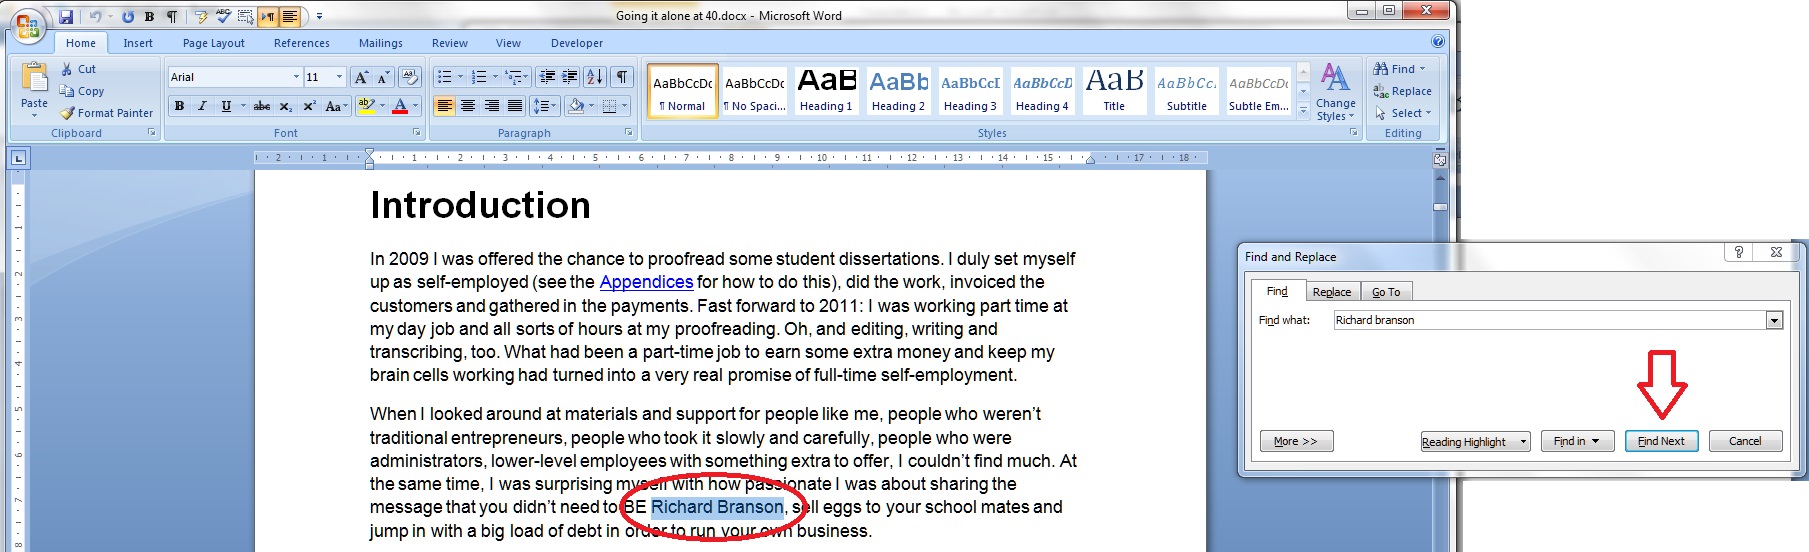
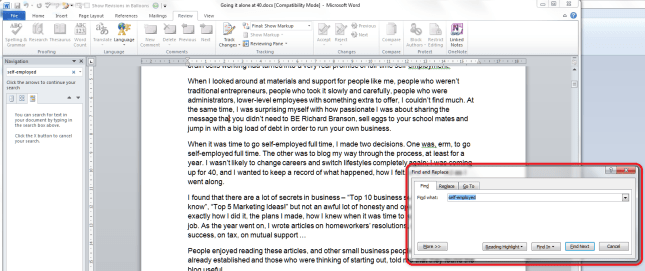
When you have a Word document open, to bring up the search dialogue box, press the Control key and the F key at the same time. You’ll then be presented with the basic search box:

Word 1

It will usually appear to the side of the document, so as not to obscure the text. Enter the text you wish to search for, in this case Richard Branson, and press the Find next button (or the Enter key). Word will highlight the text you’re looking for.

That’s great, but what if you want more accurate searching? Press the More >> button for more options:

Word 2

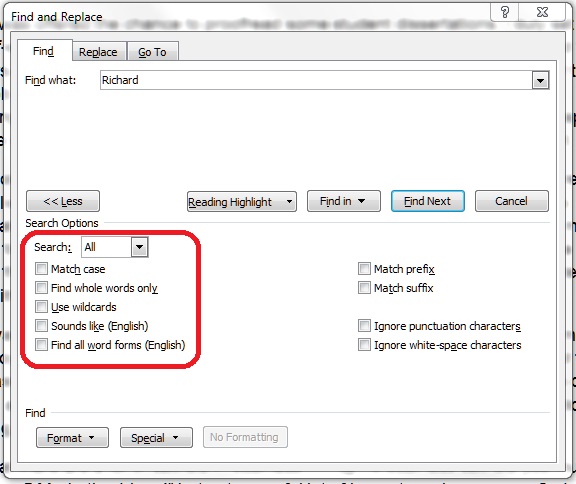
Here, you have options to match the case, find whole words only, etc. For the moment, we’re going to concentrate on just these two (see the article on advanced searching for the other options).

If you choose Match case, it will search for only those words in the exact same case as the one in the search box. If you choose Find whole words only, it will look for only that text, not that text included in a longer word. We’ll have a look at how that works in just a moment.

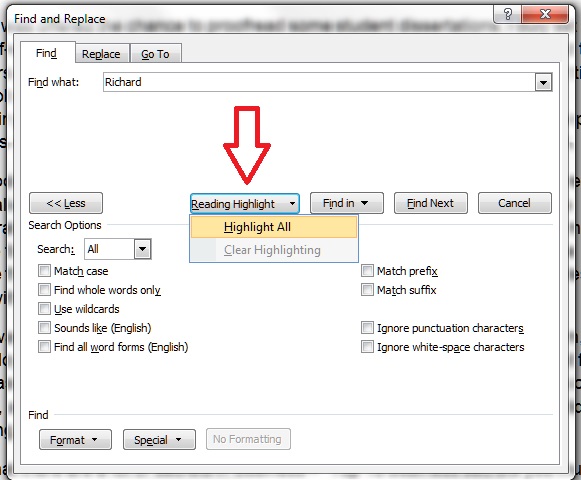
Moving along the options, we have a Reading Highlight button. This will highlight all of the instances of your search word in your document. I find this useful if I’m writing a text to use for Search Engine Optimisation purposes and want to see how many times I’ve included a particular phrase:

Word 3

Note: if you change your search term, you will need to Clear Highlighting before highlighting again, otherwise all of the original highlighting is shown.

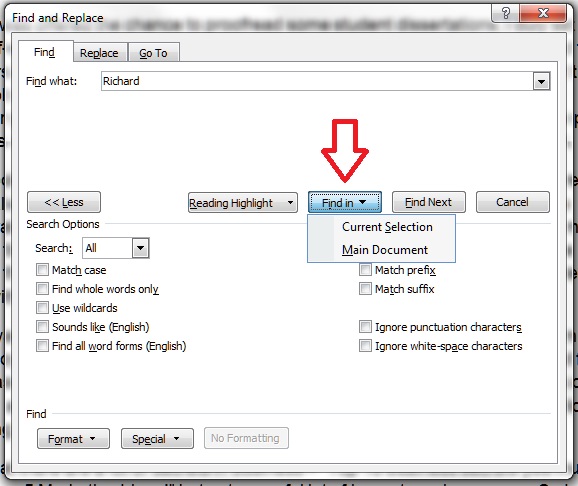
The next option is Find In. This is useful if you only want to search a particular part of the text for your word. Highlight the section in which you want to search, and then choose Current Selection (or, if you’ve got a section highlighted for some other reason, choose Main Document.

Word 4

Let’s have a look at some of these options in practice, using a rather odd paragraph I made up for illustration purposes:

Word 5

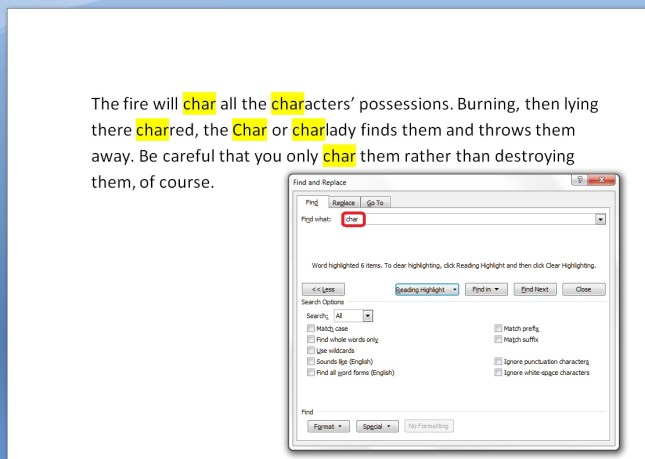
Here, I’ve just searched for char, not worrying about any additional options. You can see that it’s found char, but also character, charlady and Char, because I didn’t specify that I wanted only the word form “char”.

If I want to only find “char” in the text, I need to tell Word to Match case and Find whole words only. Then I will get the desired result:

Word 6

Searching in Word 2010 using Ctrl-F

Of course, they went and changed this to make it more useful and user-friendly in Word 2010 … I was a bit flummoxed when I first tried to use it, but you can get back to the dialogue box we’ve looked at above, and there are some additional useful features.

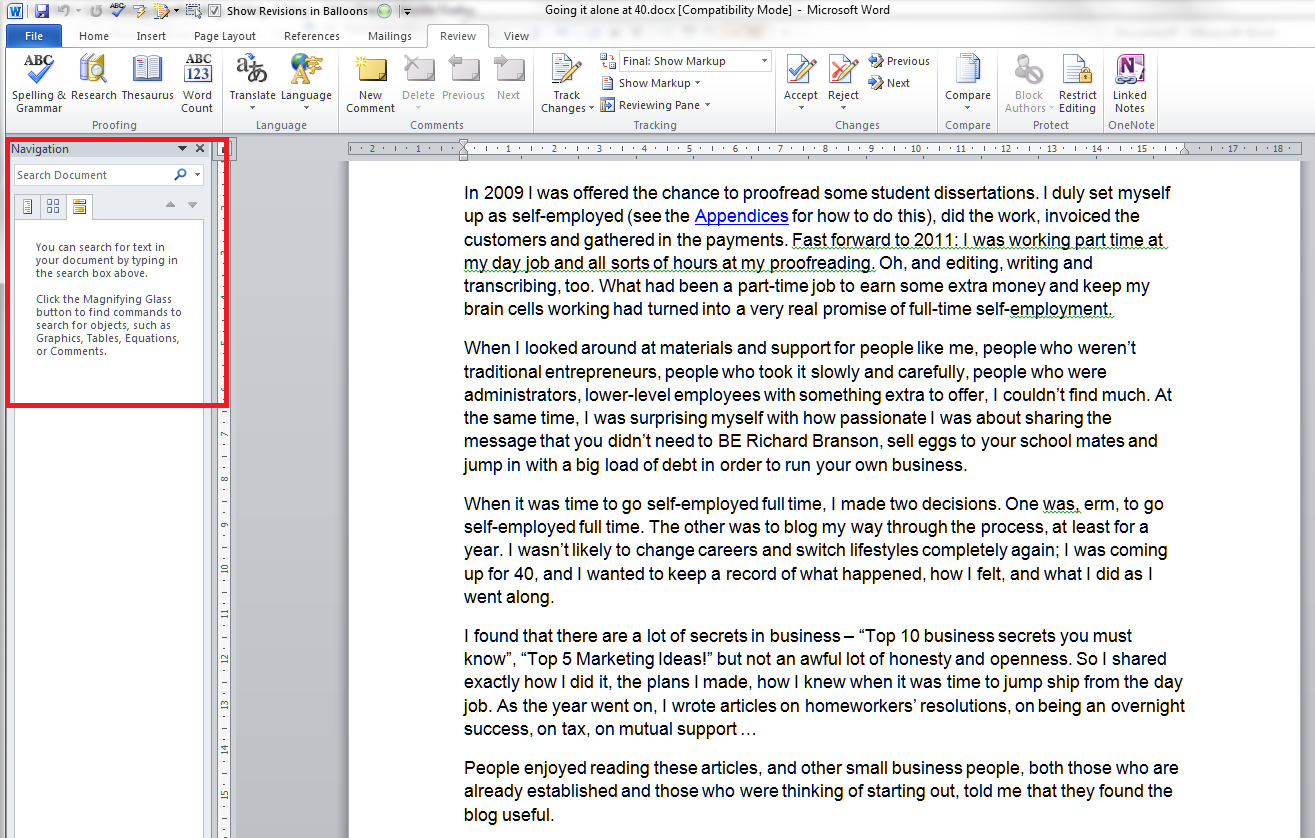
In Word 2010, if you press Ctrl-F, you’ll be given a Navigation pane to the left-hand side of the document:

Word 7

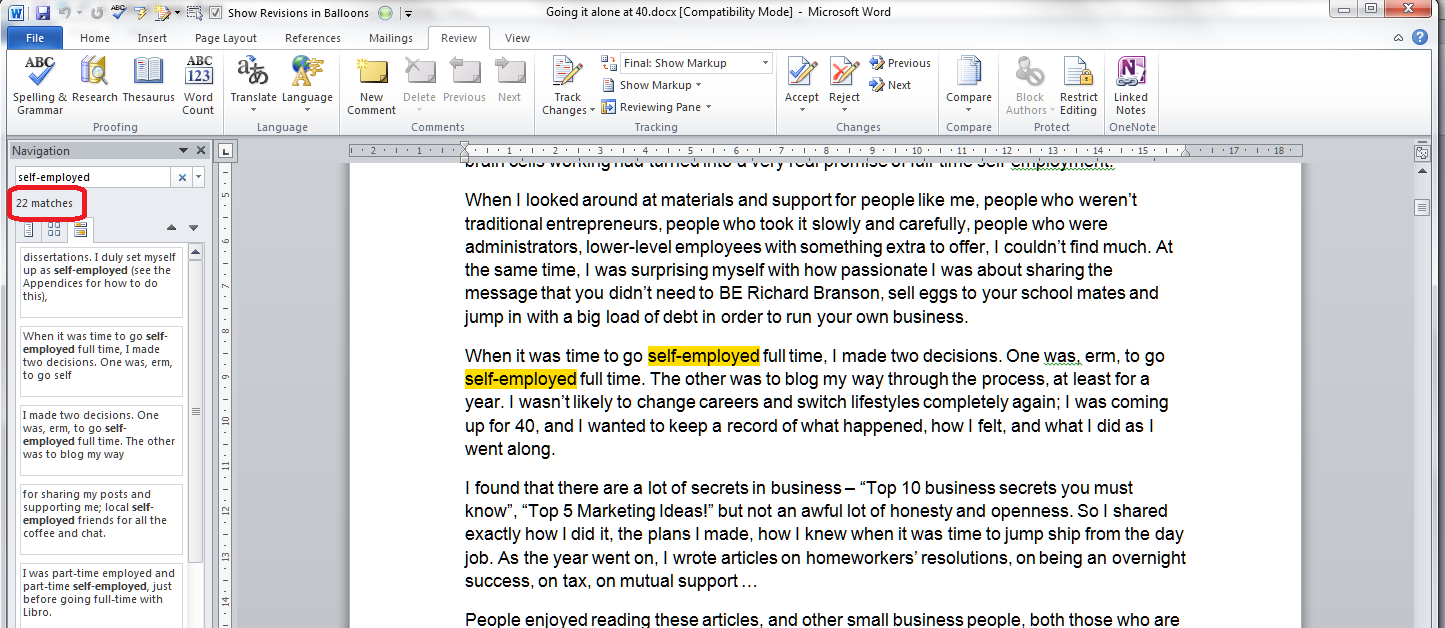
Put your search term in the box and it will automatically highlight all of the instances of that word in the document, give you the number of times it appears, and list all the instances so you can click and visit each of them:

Word 8

This is handy, and although you can do more things here to do with looking at the whole document, you can’t immediately refine your search to whole words only, match case, etc. But you can get to that familiar dialogue box.

Click the down arrow next to the search box and you’ll be presented with a list of options. We’ll look at the advanced ones next time.

Word 9

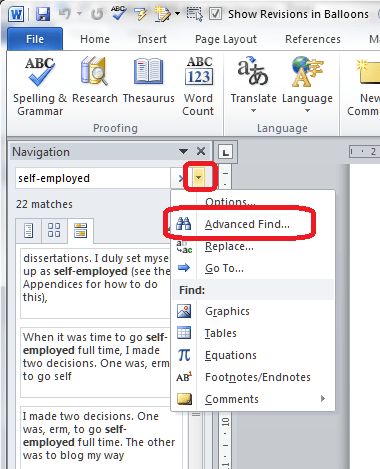
For now, select Advanced Find, and a familiar dialogue box will pop up …

Word 10

Searching in Excel using Ctrl-F

All of the other software in Microsoft Office uses Ctrl-F, however to a more limited and less customisable degree. In Excel, pressing Ctrl-F will give you this dialogue box:

Excel 1

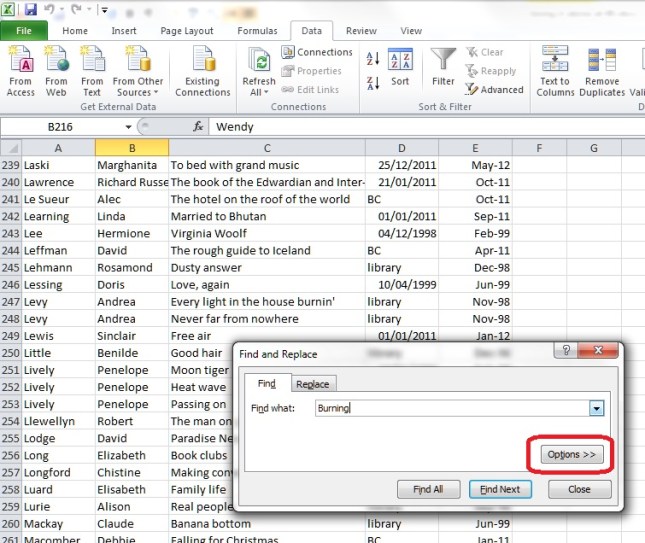
Press the Options button and you have some options for where you search and the form of the word:

Excel 2

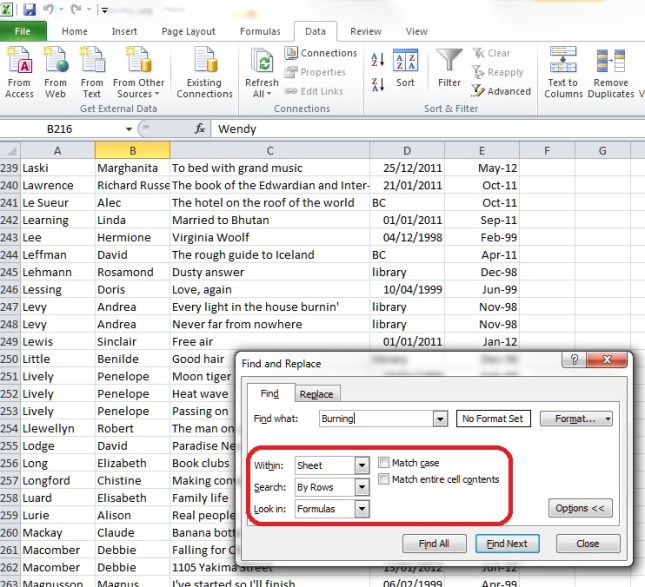
This works the same in Excel 2007 and 2010.

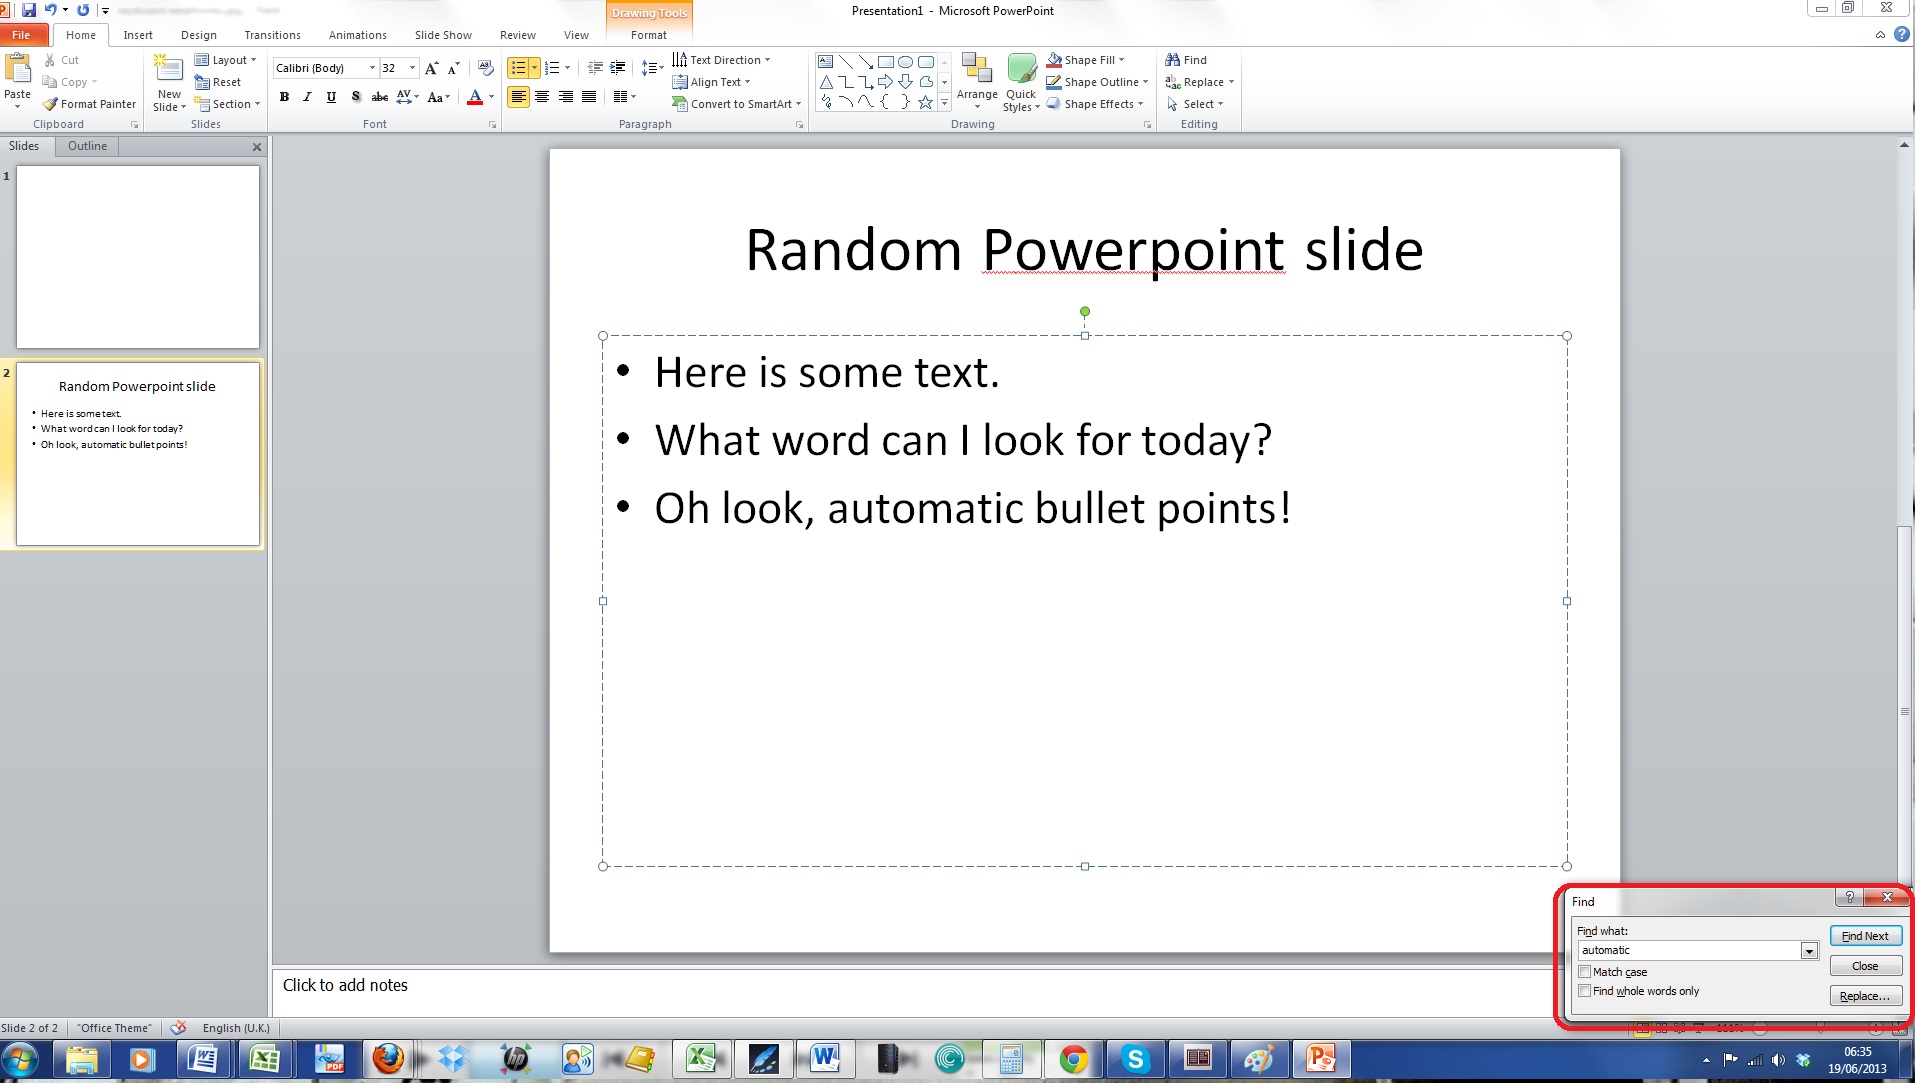
Searching in Powerpoint using Ctrl-F

In Powerpoint, Ctrl-F gives you a small dialogue box:

Powerpoint

Again, you have enough options to be useful, but not the range of options you find in Word, and again, this works the same in Powerpoint 2007 and 2010.

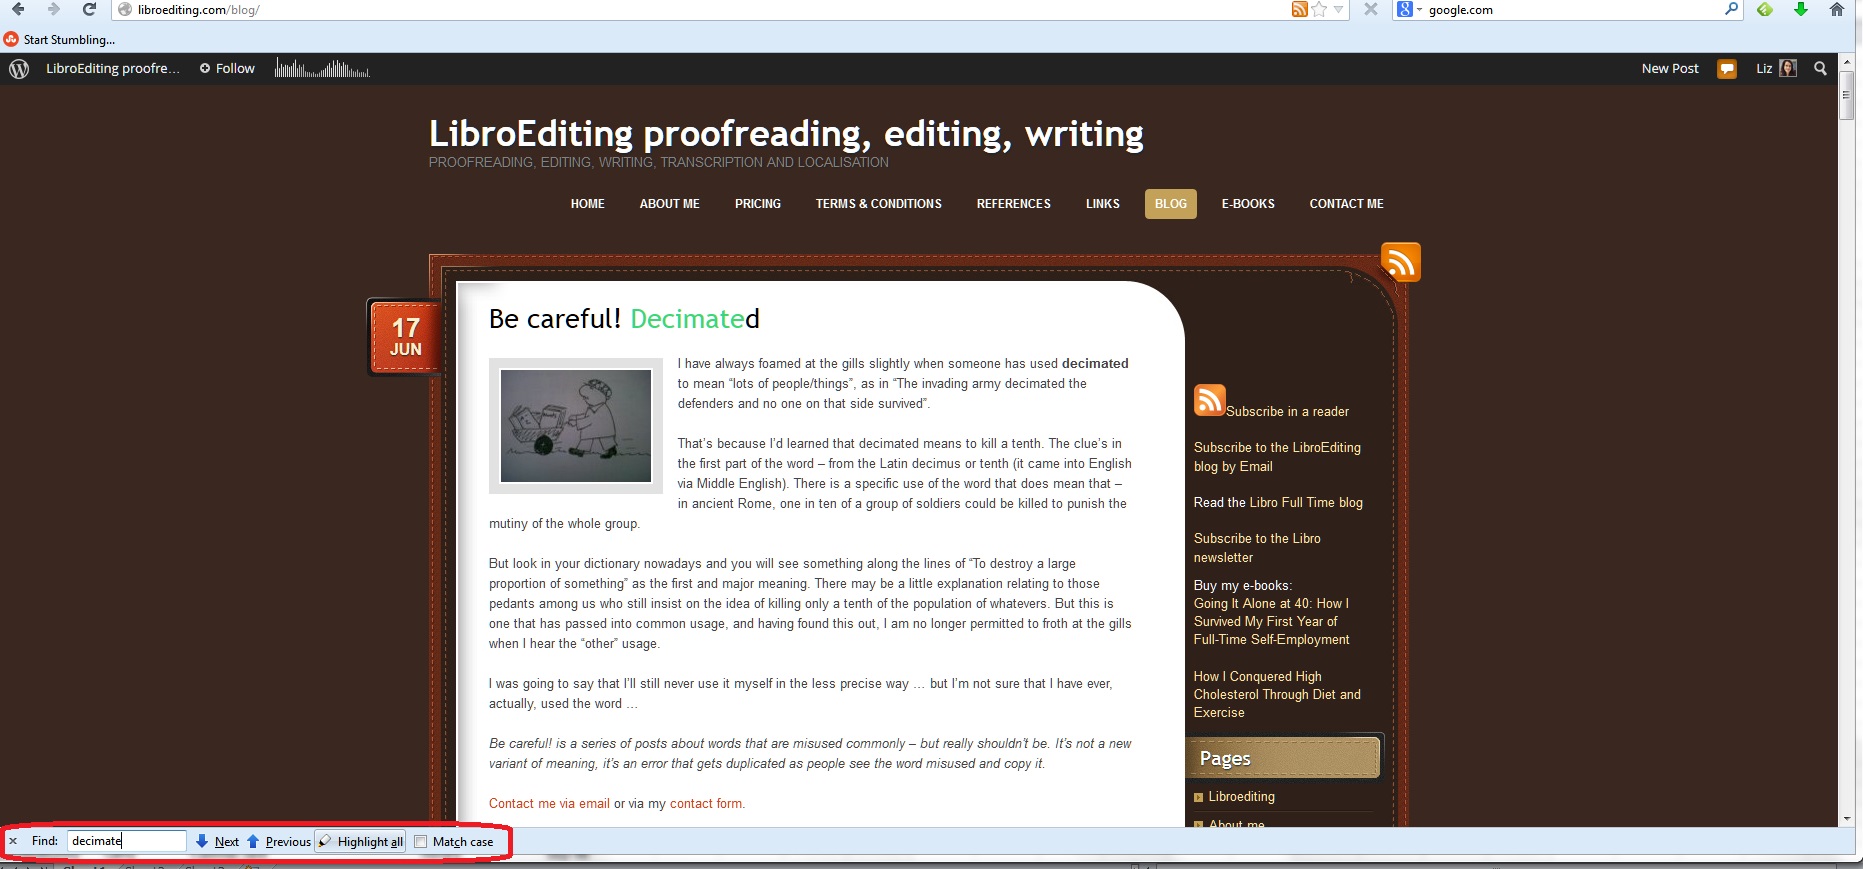
Searching on web pages using Ctrl-F

I find this so useful, especially if I’m searching my own web pages for a word I’ve used or maybe misused (I used this a great deal in the great proof-reading to proofreading change I made a few years ago.

This varies according to the browser you’re using, but hitting Ctrl-F will always bring you up a search box of some kind:

website

  • In Firefox, the search box appears at the bottom of the screen and gives you the option to highlight all and match case
  • In Chrome, the search box appears at the top of the screen and gives you the option to search whole word only and match case
  • In Internet Explorer, the search box appears at the top of the screen but doesn’t give you any options

Please note that these options might change in future as the browsers are updated.

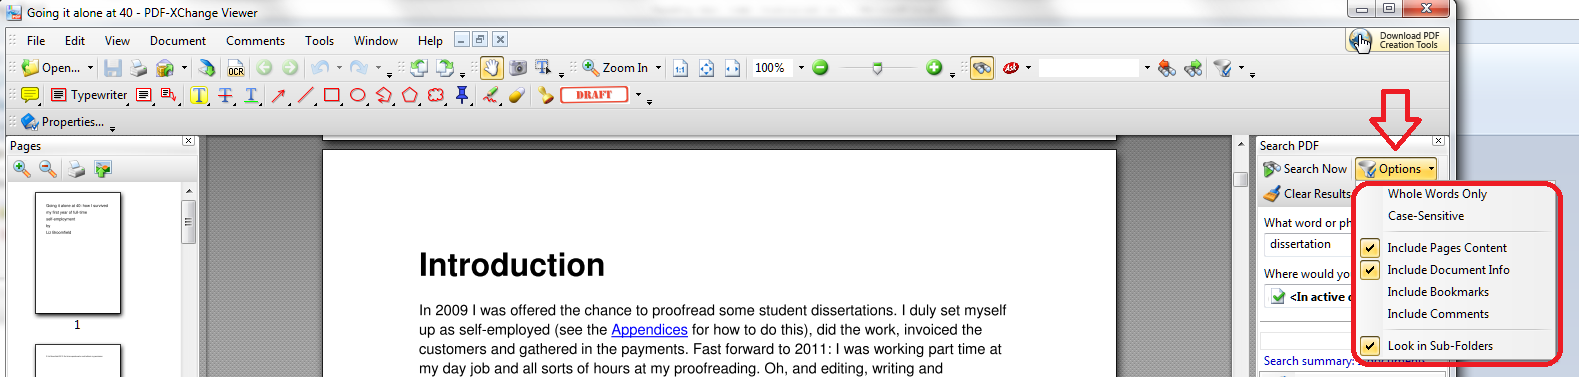
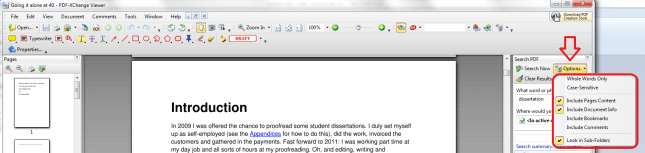
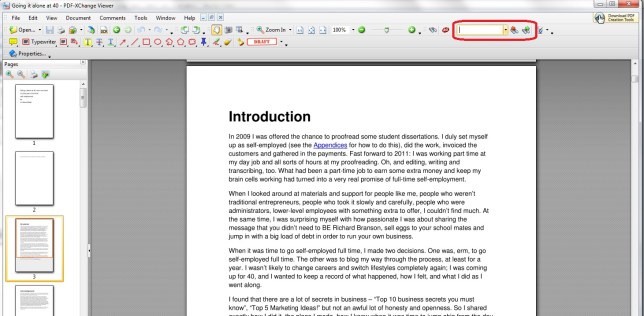
How to search a PDF using Ctrl-F

One of the few things that you can’t search using Ctrl-F is a pdf document. However, most readers (I use PDF-Exchange), as well as having their own search functionality on the page, will allow you to use Shift-Ctrl-F to search!

pdf 1

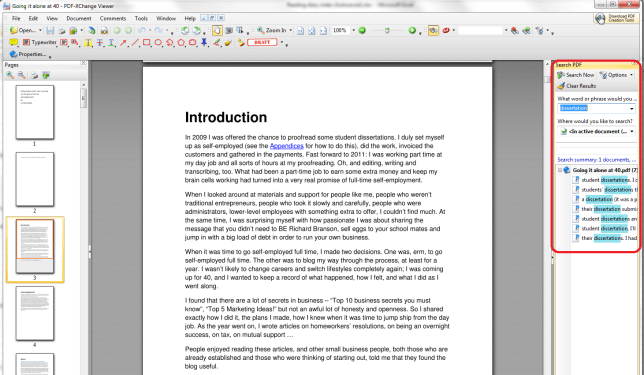
You have some options:

pdf 2

And it works in a similar way in Adobe, too.

If this doesn’t work, there is always a search function in your pdf reader itself, for example:

pdf

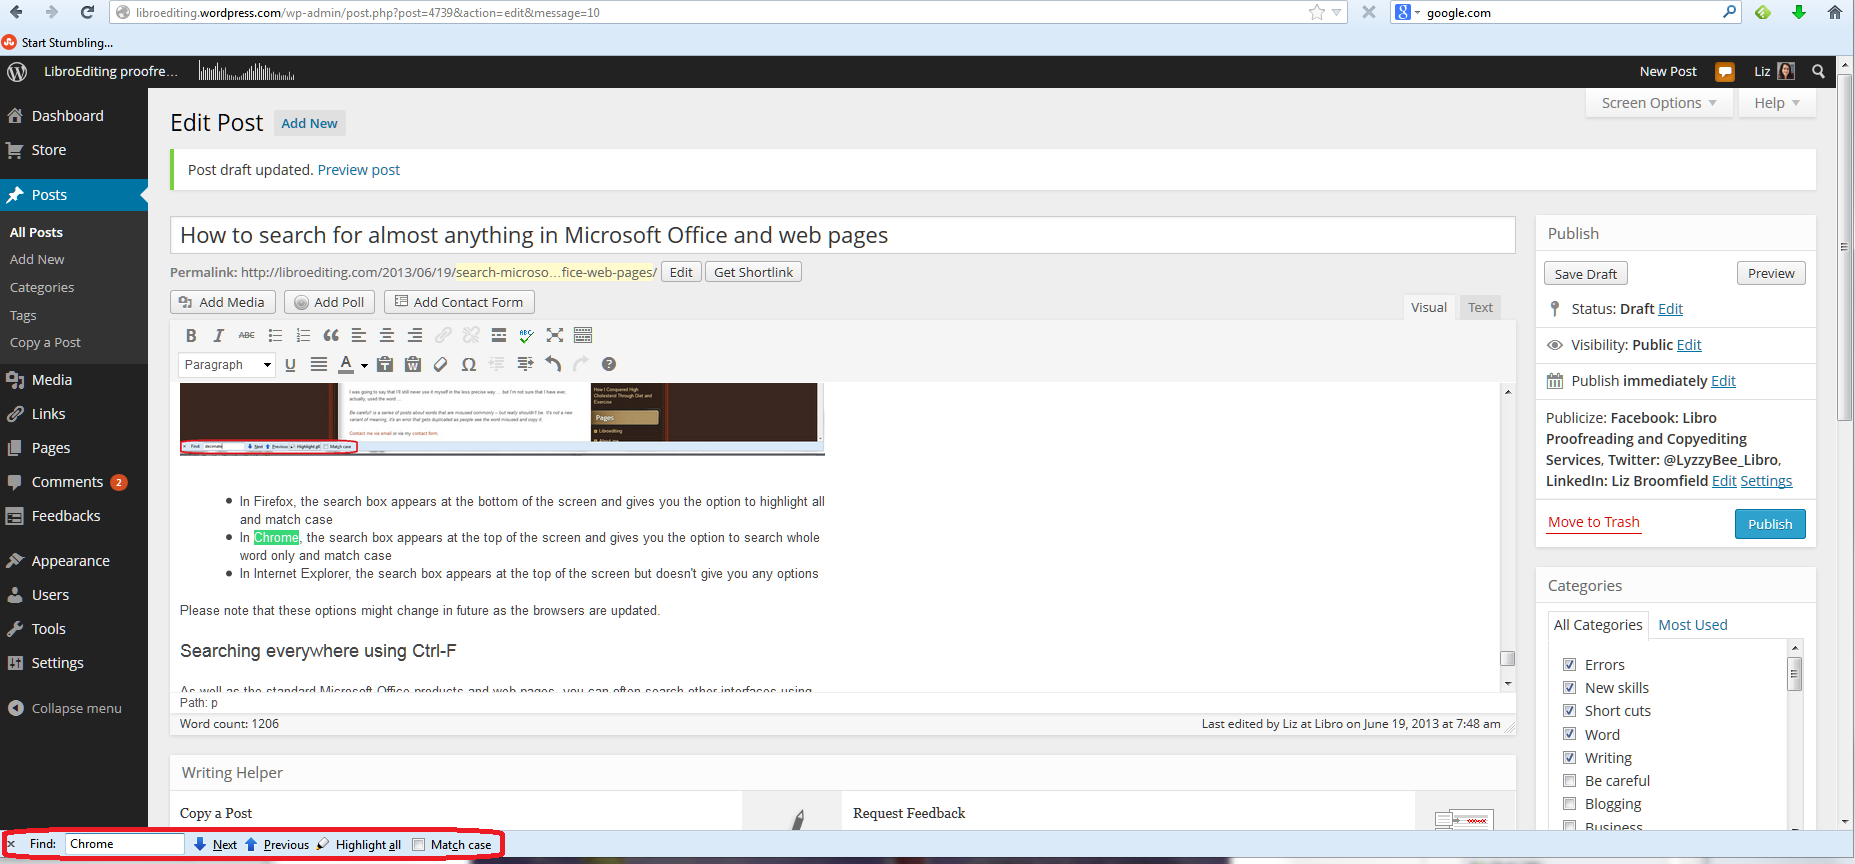
Searching anywhere using Ctrl-F

As well as the standard Microsoft Office products and web pages, you can often search other interfaces using Ctrl-F, too. For example, because my WordPress interface uses the web browser, I can search for words in posts I’m writing:

Wordpress

I can use it in Skype:

Skype

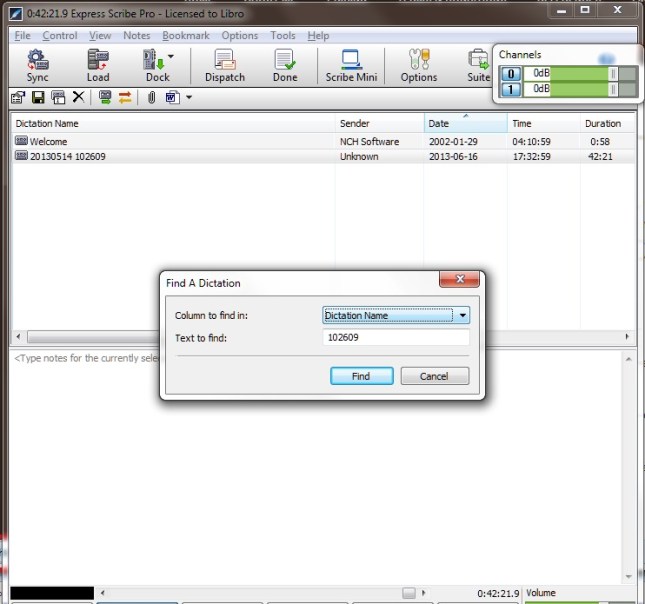
And I’ve even tried it in my transcription management software, ExpressScribe, and you can use it there, too!

express scribe

Today we’ve learned about how to use Ctrl-F to search almost anywhere in any type of document or application.

Coming soon – advanced searching in Word and Search & Replace / Go To.

———————

This is part of my series on how to avoid time-consuming “short cuts” and use Word in the right way to maximise your time and improve the look of your documents.

If you’ve enjoyed this post and/or found it useful, please take a moment to comment (I’ll just ask you to provide a name and email address; you don’t have to sign in to WordPress) and share the post using the buttons you can see below. Thank you!

Please note, these hints work with versions of Microsoft Word currently in use – Word 2003, Word 2007 and Word 2010, all for PC. Mac compatible versions of Word should have similar options. Always save a copy of your document before manipulating it. I bear no responsibility for any pickles you might get yourself into!

Find all the short cuts here


Tags: , , , , , , , ,

An Editor Writes: 10 Lessons I Learned When Writing My Own Book

going_itWhen I set out to write a full-length non-fiction book, I had two ideas in my head:

1. I can just stitch this together from my blog posts – easy!

2. I’m a professional editor and writer, I’m used to writing to deadlines, so I’ll get this done quickly and efficiently.

Wrong!

This article is about what happens when you go over to the other side – when editor and content writer becomes (self-)published author.

Sitting down to write

The first thing I found when writing my own book was that it’s so hard to make yourself do it! I knew towards the end of 2012 that I had amassed the blog posts that I needed to write a book about a year of self-employment. So I picked up all the posts out of my blogs, popped them in a Word document, and thought, “Oh, look: a book”.

First lesson learned: I should probably have organised the book using a software package like Scrivener. This would have made it easier to organise … and reorganise … and reorganise it.

Second lesson learned: I should have set aside time for this process in my diary, like I do for my clients. You’d think I’d have learned this from trying to slot some academic research into my schedule – apparently not!

Emotional blocks to writing

I don’t know whether it’s because when I write for my clients, it’s “white label” work, which means that my name doesn’t appear on the finished piece, and having this appearing under my own name made it feel like I was under the spotlight, but I kept getting blocked. When it’s paid work for a client, I’m as busy as can be, but somehow there were a zillion other things I could do to avoid working on the book (sound familiar)?

I was committed to it; I knew it could actually help people; people had TOLD me to write the thing, but I’d get blocked and veer away from it in my mind and physically when I tried to sit at my desk. This happened particularly at the editing stage.

Third lesson learned: Treat writing like a job. Set deadlines and stick to them. Try to sweep aside the emotions and get on with it, as you would with a job.

How to organise your book in a million easy stages

It all looked a bit messy and unbalanced, so I made some of the posts diary entries and some of them articles. Nope, still looked wrong. This is where I realised that you can’t just turn a blog into a book without some serious editorial decisions. I moved stuff around, added an introduction to each month, and stuck bigger, more general pieces in appendices at the end.

Fourth lesson learned: If you think it’s going to be easy, you’re probably doing it wrong. Nothing good comes without a struggle, right?

How to edit an editor

Like a good writer who’s learnt from others, I was all ready and eager for some beta readers. I recruited two friends initially. Each did a useful read-through for me and gave me some good comments. One of them, and I say this with the greatest appreciation and respect, edited my book like I was editing my book. She’s not a professional editor, but she’s good. She picked out typos (ouch) and weird sentences (ouch) and missing links (ouch) and repetitions (eek) and huge structural issues (argh!).

Ouch, ouch, ouch.

I’ve written in detail elsewhere about my reaction to this edit: suffice it to say that I felt wounded, winded and disconsolate. What a marvellous lesson about how my own clients feel when I edit them! It did put me off for a good while, thinking this book was rubbish, how dare I think I could publish something, let alone publish something good that people would want to read. In fact, I left it for FOUR MONTHS!

Fifth lesson learned: Editing is vital, but it does sting. I must continue to be as kind to my editing clients as I possibly can be. However kind the editor is, it still feels brutal to have your work criticised and pulled apart. I will not make it more brutal for them.

Sixth lesson learned: You can get a blog post out of anything. Mine on being edited was one of my most popular so far!

Getting round to rewriting

I mentioned emotional blocks: this was the big one. I read through the editing comments. No: I skim-read through them, muttering and sobbing. Then I closed the file and ran away from it. It sat there, taunting me. “So, you were going to publish in the first week of January, were you? It’s February already …” I just couldn’t make myself do it.

In the end, I had to force myself. I had to treat it like any other job, open up the file, and start on it. Of course, once I started, I could see a) how good the editing was, b) how to make it better. I was tough with my precious words. One of the major problems with the text was that it was repetitive – every time you write a blog post, you’re expecting new people to read it as well as subscribers, so you tend to reinvent the wheel. Put that in one document and you’re, frankly, boring people. So out came the delete key, and I honed and polished, added some bits too, but chopped thousands of words off the total, to make a much slimmer and better read.

Seventh lesson learned: Be ruthless. If it is at all expendable, out it comes. Chop out the dead wood. If you can’t see the dead wood, get someone to chop it out for you. It will come out better for it.

When it comes to your book, looks are everything

Well, not everything, but …

I was so keen to publish that I started out with a terrible home-made cover. Then a friend tweaked my original book’s cover to make a new matching one, but it still looked a bit too home-made. I then  found a book designer online and got a lovely cover done. I looked into getting the interior of my book designed professionally so I can put out a print-on-demand paper copy, but the book needs to sell some more copies first to be able to pay for that!

Eighth lesson learned: Your book really does look more professional with a professional cover; it will stand out for the right reasons. If you have more than one book, it’s worth getting an overall consistent look. My first book started to sell more when I got its cover updated to match the new one. Get this done first – it takes ages to update the cover on Amazon when you’re embarrassed about your old one!

Soft launch aka the obsession starts …

A read-through from another friend and it was ready to go! I’d already tried the process once (with a book that was much shorter and easier to write!) so I knew the mechanics of publishing for Kindle on Amazon. I’d read up about the process and I knew about the choices, and decided to go for Amazon exclusive, as I could then enrol the book in KDP Select. I get quite a few loans on my other book, and somehow I make more royalty on loans than sales on that one, per copy. I priced the book carefully – as low as I could make it while still getting the higher royalty from Amazon. I also knew to soft launch, build some sales and reviews, and then do a bigger launch.

So I published the book, and I did the social media thing, and I told people about it, and I sent out one or two review copies. And then I was reminded of the obsessive nature of authors – I’m still constantly checking for reviews, sales, likes, comments … It’s like it’s your baby and you have to watch over its every breath.

Ninth lesson learned: Reviews will come, whether you hassle people or not. I knew a few of my first readers. I put up pleas for reviews. It takes longer to read and review a full-length book, and the reviews will come in time! And if you read a book by an indie author – do review it, it means the world to them!

What next?

Once I had a few five-star reviews (finally!) I’m making more of a noise about the book. I picked up this tip from The Creative Penn and it worked with the last one – give people something to look at when they’re making their buying decision. And here it is, out there, selling and helping people (the main thing) and I’m proud of it and all the hard work.

Tenth lesson learned: Do it. At very least you will find out something about yourself and other authors. At best, you’ll have an income stream and you’ll see some lovely reviews and know you’ve helped and/or entertained people! Go for it!

Resources

The book that I’m talking about here: Going it Alone at 40 – and the book’s own web page with links to worldwide Amazon sites to buy it.

That blog post about being edited: On Being Edited

Book designer: I actually used someone on www.fiverr.com  for this, on the recommendation of a writer friend: I don’t normally like low-cost sites like this, but my designer offers lots of extras that pay them better, so I felt it was OK.

 
14 Comments

Posted by on June 12, 2013 in Blogging, Copyediting, Ebooks, New skills, Writing


Tags: , , ,

What is worth it for me?

dictionary coins watchIn Part 1 of this article I talked about how to tell if a product, service or outsourcing is worth it for your business. In Part 2, we looked at Return on Investment, and how both the investment and the return can take the form of money, time or effort spent or saved. This time, I’m going to share some examples of what investments have worked for me – and for some other people, too.

Investing in hardware and software

In terms of hardware, I’ve mainly spent money on these three:

  • New PC – definitely worth it in terms of speed and reliability. My current one doesn’t fall over if I try to look at a whole PhD thesis in one go.
  • New laptop – definitely NOT worth it. I could see myself working in cafes with a coffee … but of course the kind of work I do doesn’t do well in a noisy environment. And I can’t transcribe on a laptop keyboard and find a trackpad tricky for editing. In addition, I spent extra getting a giant laptop with a separate numeric keypad … which means it’s massive and heavy and hard to lug around.
  • External hard drive – definitely worth it. I spent under £100 and it automatically backs up all of my files every day.

My editor colleague, Laura Ripper, wishes she’d thought more about her printer:

What I wish I had spent more money on, in hindsight, is a printer that will take several sheets at a time for photocopying. I hate standing over it feeding in one sheet at a time!

I’m glad that we invested in a printer/scanner/copier as the most printing I do nowadays is contracts and other forms, which I invariably have to sign, scan and return to the client.

In terms of software, it boils down to:

  • Microsoft Office 2007 then 2010 – must-have items although I haven’t picked up Office 2013 yet as I don’t think any of my clients are using it yet and I need to put aside time to learn it. However, my clients use all sorts of ancient versions of Word, so I keep both 2007 and 2010 open on my machine and tend to use 2007 unless I have to move to 2010.
  • Transcription management software – I have the paid version of the software I use (full article on this here) as it saves me time so makes me more money, being able to manipulate tapes using the function keys.
  • Invoicing and time management software – I did download a free time tracker but got so obsessed with my percentage of productive time that I became less productive. I have a simple invoice template and use that at the moment.
  • Financial management software – I will be using my new Accountant’s online system to record my bank reconciliation information – watch this space for whether this is useful!

Investing in other office equipment and reference materials

I am lucky in that my partner invested in a very expensive, posh office chair when he ran his own business. I’ve inherited that up in my office, and it’s very comfortable, adjustable and cool in the summer. If you use a laptop a great deal, here’s a nifty tip from Laura:

My laptop stand from IKEA has meant I can actually sit at my desk all day if necessary without feeling like my wrists, neck or fingers are going to drop off. It was less than a fiver (£3.50) and was definitely worth the money!

I’m very glad that I’ve invested in my reference books. I have a range of them: I update the basic ones that I started off with whenever there’s a new edition, and I’ve also bought more on Plain English and international Englishes as I’ve gone along. I like using paper copies, having them there in front of me, and they save me from getting things wrong!

Investing in memberships and training

I’m going to present two different points of view on industry-related memberships here. Please bear in mind that these are about different people at different stages in their career. It might make you think, though, or feel better about not having industry memberships.

I’m an established editor who also works in lots of other different fields, has clients around the world who don’t tend to be publishers, but translation agencies, translators, marketing companies and individual writers. I have decades of experience and lots of testimonials, and I’m busy enough that I am very choosy about taking on new clients. I also work predominantly on electronic documents.

This does not make me too arrogant to join industry based associations. I did try it, but I found that, while they’re excellent for new editors, and provide training courses and forums and advice, most of the training is around paper-based editing for publishers, something that I very, very rarely do. For me, personally, it’s not worth the effort, time and money to do qualifications in an area in which I don’t actually work in order to progress my membership. But this is a very personal decision. Read on for my colleague, Laura’s, take on things:

Laura Ripper told me how useful she finds her membership of the Society For Editors and Proofreaders:

It means I can attend my local SfEP group, so that’s one way of meeting other freelancers and sharing ideas and information. It also gives me access to online forums like the Marketplace where members can post jobs they’re too busy to do, and I’ve got a couple of jobs through that. You also get discounts on SfEP training if you’re an associate or member. At the moment I’m only an associate, which isn’t as good for marketing as I can’t appear in the public directory, but after doing more training I’ll upgrade. Oh and there’s also the reassurance aspect for clients. I don’t blog, so, especially before I got any testimonials, I felt that being able to use the SfEP logo (I checked this was OK) and say I am an associate would reassure potential clients that I’m professional in my work.

Other professional organisations do exist, in editing and in other professions, of course. But it’s always worth reviewing when you’ve paid for that first year, what you got out of it in terms of support, jobs or referrals.

One membership that has worked well for me is my local business association. I pay a minimal sum, have an advert in their directory, and get to go to breakfast get-togethers: just this week I met a carpenter, financial advisor and solar panel installer who I will be in touch with later!

With regard to training, if it’s tailored to what you need and focused on your business, it can bring a great return. I’m largely self-taught but I have an English degree including a lot of Lingistics behind me, plus jobs working on dictionary editing and in marketing. I discussed my choice NOT to take an indexing course in the first post in this series, and I keep up my professional knowledge by reading blogs and participating in forums.

Sarah Bartlett  has had this good experience:

I have come to value one-to-one training from trusted freelancers in their area of expertise with the training tailored to my needs. That’s the best money I’ve spent this year so far and I intend to do it again. It’s brilliant value for money.

Investing in marketing and advertising

This splits down into two sections in my book: marketing and advertising that you put money into, and marketing and advertising that you put time and effort into.

Paid-for advertising

The two main things in terms of advertising that have done it for me have been:

  • Very local and specific advertising – early on in my career, I advertised my student proofreading services in the University staff magazine. I ran the ad for a year at a cost of £120 and made that back many times over.
  • Thanks to my friend, Sian, I bought membership of a site called Proz, which is mainly for translators, because I work editing people’s translations and people also go there looking for localisers and transcribers. That costs around £50 a year, and for that, your details are put in front of prospective clients when they put forward a particular job. I have made this money back many, may times over; probably a hundred-fold each year. Definitely worth it.

I have joined some free listings sites and get a few enquiries from them, but not enough to justify paying for enhanced listings. Some listings companies charge a fortune; others, like the thebestof range in the UK can be useful if you have a very local client catchment area.

Marketing-wise, I tend to be a bit mean and use Vistaprint for business cards and postcards. While there is a general dislike of Vistaprint, I am careful to design my materials carefully and attractively and pay to not have “vistaprint.com” on the back. People have generally liked them, and I do too – but I don’t give out millions of cards, so it is worth going to a more specialised designer if you’re giving them out all of the time.

Julia Dickson from Patricks Pieces has a good point here:

I quite like my vistaprint cards but that’s probably because I use their plain template and import my images, that way I don’t have the same motif as everyone else.

If you need to call attention to yourself at craft fairs and around and about, here are some great investments people have made:

Sarah Goode from jewellery company, Pookledo says, “I’ve invested in good display units to make everything look coherent”. And Hev Bushnell from Hev’s Happy Hounds explains an interesting marketing concept:

My car. I covered it in pawprint vinyls and also paid to have lettering on the back. I also invested in car business card holders. Since doing the car, my business has boomed!

Also worth paying for:

  • Professional photographs. I was lucky and called in some social capital here (i.e. got a friend to do it – but he is a professional photographer)
  • Website – If you’re not an expert, it’s far better to have a website designed and written for you than to link to a woeful attempt full of 1990s design and typos

Marketing using your own efforts

I’ve invested time and effort, but not money (unless you count the money I could have made if I wasn’t doing this – however paid work comes first and these efforts fit around it) in the following:

  • Website(s) and blog – they maintain and grow my reputation, bring people to me, and allow me to share what I do as well as help people. They take a long time to put together but showcase my writing and I do enjoy doing it, too.
  • Guest blog posts – I’ve been placing these more recently, to help to promote my books. It’s a good way to get link backs to your own website/blog and to get your name known. I offer guest spots on my blogs, too, of course.
  • Commenting on other blogs – comments I’ve made on colleagues’ and other writers and business people’s blogs still send people over to my own sites even years later, and you never know what someone might be looking for
  • Social media – having a presence on Facebook and Twitter has definitely got me clients. All of my music journalist clients have come out of one response to a tweet from someone looking for a transcriber, taking me on and recommending me to her colleagues (thanks, Jude!)

Investing in networking

I looked at the big, nationwide networking groups, and they can be good for some people: personally, I find that it’s hard to explain what I do in 40 seconds round a breakfast table and I’m not able to bring in referrals for other people to every monthly meeting (to squish together what the two main big organisations do). I do however go to more informal networking groups, and I’ve made friends, got advice and support and made contacts that have led to jobs at the Social Media Cafe in Birmingham.

Looking at networking in a wider sense, I gain great support, laughs, help and a feeling of a set of peers from my editor colleagues on Facebook and in person and my business colleagues on Facebook and Twitter.

Investing in outsourcing

This is a work in progress. I’ve just taken on an Accountancy firm to do my bank reconciliation, provide me with certified accounts and prepare my tax return. I hope the financial cost will be outweighed by the peace of mind and time saved messing around balancing my books … I’ll let you know!

What works for you?

I’ve shared my personal experiences of what works for me, and those of a few people who responded to my call for input on Facebook and Twitter! Over to you – what has been the best thing you’ve invested in? Do share the area of business you’re in so other people who do something similar can learn something, too.

RELATED POSTS:

How do you know if it’s worth investing?

Working out your return on investment

Interested in finding out how I made the transition from part-time to full-time self-employment and built my business safely and carefully? Take a look at my new book, out now!

 
8 Comments

Posted by on May 30, 2013 in Business, New skills, Organisation


Working out Return on Investment

dictionary coins watchIn Part 1 of this article I talked about how you work out if an investment is worth making. Now I’m going to look at how you work out what the ROI (Return on Investment) is for something you’ve bought, and in the final post I share some examples from me and some other people about what’s worked for us – and what hasn’t.

What is Return on Investment?

Return on Investment (ROI) is what you get out of something as compared to what you put into it. A straightforward example is if you invest in some stocks and shares. If you put in £10,000 and get £1,000 back on top, that’s a good ROI. If you put in £10,000 and get back £8,000, not so good.

It’s not quite that simple if you’re looking at your own investments, though.

Time / money / effort

Investments and their returns can be subdivided into several categories, for example, time, money and effort.

Investment:

  • Time: You might invest your time in learning a new skill or trying out a new tool, or writing your web text yourself.
  • Money: Lots of products and services and memberships cost money to buy. Even if you’re bartering,  there is still a “cost” involved, even if you’re paying your proofreader in falafels!
  • Effort: I’m including emotional/psychological factors here. You might put a lot of yourself into going out networking if you’re shy and would rather stay at home. Chasing late invoices can be full of effort if you hate hassling people for money. Working part time and running your business part time can involve a huge emotional and psychological investment, as can building relationships with your clients.

Returns on Investment:

  • Time: Do you save your time by using a new product or by out-sourcing? Your time is also money, of course, but there is only so much time in the day, or week, or month, and you should really be concentrating on doing the core tasks that only you can do, whether that’s making your jewellery, editing novels or selling widgets.
  • Money: If you streamline your production line with a new machine so you can make and sell more items per day, or get your invoices paid on time and improve your cash flow, or you buy a tool that makes your hand-made cards look more professional, then whatever you’ve done has saved you money, or made you more money.
  • Effort: If you hate doing something and you can pay someone to do it for you, or you want to branch out into a new area of work that you find attractive and interesting but need to do a course to get into it, or, indeed, you’re tired of the day job and know that by working hard on your business you can move away from it and gain a more free and flexible lifestyle, then those all save you effort or bring you an emotional gain in the long term.

These factors can inter-relate, so you might get something like this:

  • I spend MONEY on an accountant and she saves me MONEY in terms of the tax I pay
  • I spend TIME setting up automated invoicing systems and save myself TIME every month when I run my invoices
  • I put EFFORT into networking and save EFFORT in getting new clients in other ways I don’t like to use, like cold-calling
  • I spend MONEY on an accountant and she saves me time working on my accounts
  • I spend TIME setting up automated invoicing systems and make more MONEY because I’m more efficient, and save EFFORT tracking down invoices and chasing up late payers

And of course, you can have negative or neutral returns on investment, too:

  • I spent MONEY on paying to advertise on this website, but I’ve never directly made any MONEY from it (referrals can be tricky to work out as people sometimes see your name a few times before they buy, but if you pay for membership or an ad you should be able to see some direct worth coming from it)
  • I invested lots of TIME writing my blog but no one looks at it so I can’t be making any MONEY from it and if no one reads it and I never get any comments so I don’t get any emotional (EFFORT)  output either
  • I made MONEY making these rip-off teddy bears but I feel awful that I went against my principles

You get the idea.

So, is it worth it?

An investment, whether it’s in a product, a service or something less tangible, is only worth it if you get more out of it than you put in.

This can be very subjective. If you hate doing your bank reconciliation, you might be happy spending more on an accountant to do it for you than your friend, who quite likes doing it. If you join a professional association but get no business, kudos, support or fun through it, then it’s not worth paying those fees next year – but that can be very different for your colleague at a different stage of her career, as we will see.

So, it’s a question of sitting down and looking at what you’ve bought, and working out whether the return on investment, in terms of money, time or less tangible factors is worth it. You can do this in advance, too, for example “I need a new computer, it will cost me money but save me time recovering from crashes and increase my income as I can do more work more efficiently”, but you MUST also do this in arrears, rather than spend-spend-spend and never tot up the benefits.

Next time I’ll be talking about the investments I (and some other people) have made, which have been worth it and which have not.

RELATED POSTS:

How do you know if it’s worth investing?

What is worth it for me?

Interested in finding out how I made the transition from part-time to full-time self-employment and built my business safely and carefully? Take a look at my new book, out now!

 
6 Comments

Posted by on May 23, 2013 in Business, New skills, Organisation


How do you know when it’s worth investing?

dictionary coins watchYou want to invest in something, but how do you know when it’s worth it? Is it worth laying out a sum up front, or is it always better to save up first? In this article I reflect on some purchases I’ve made which have been worth it (and some that haven’t), and discuss how you tell if they’re going to be in advance.

How do you tell whether an investment is worth it?

Investments for a small business can be broken down into

  • Outsourcing (paying other people to take on tasks you might do in-house)
  • Products, materials and services
  • Training

Is it worth outsourcing this task?

In a previous post, I talked about how to tell when it’s time to outsource a task to do with your business. My rules then were:

  • If you’re rubbish at doing something and I’m good at it, outsource it to me (even if you’ve got the time to do it yourself or it’s going to cost you more per hour)
  • If the time it will take you costs more in your worth per hour than it would cost to pay someone else to do it, then outsource it (e.g. transcribing your interview will take you 6 hours and you’re worth £40 an hour (£240) – better to send it to me who can do it for you for £60.

This links into a couple that are about time:

  • If it’s going to take you 6 hours to do but me 3 hours to do, then outsource it to me
  • If it’s going to take you 6 hours to do and me 6 hours to do, but you don’t have those 6 hours free, then outsource it to me

But you can add in some other factors, too, such as the boredom factor:

  • If you’re perfectly able to do the task and it would cost more to have someone else do it, but it bores you to tears and you never get round to doing it until it turns into an unholy mess, outsource it to me.

This last one is how I decided to hire an accountant to do my accounts and my bank reconciliation.

Is it worth buying this product or service or these materials?

That’s all about outsourcing. What about investing in products and services? These are my rules:

  1. If it will make my work more quick or more efficient – consider buying it
  2. If it will make my records more secure – consider buying it
  3. If it will advertise my services to my core market – consider buying it (for a year on a trial)
  4. If it costs under £100 – go for it

Points two and four combined to make me buy my external back-up drive and my professional version of my transcription management software.

Points three and four combined to make me sign up for membership to Proz (a jobs board service), which I’ve stayed with, and other sites and associations, which I have trialled and haven’t stayed with (see section on Return on Investment in the next article).

Of course the £100 level is an arbitrary level I selected. In fact, I didn’t select it consciously: I’ve just noticed that that’s the level I’m comfortable with.

Regarding materials, I don’t use materials in my editing business. But the golden rule here has to be:

  • Will the price of the item you’re making be higher than the cost of the materials? If not: find cheaper materials or adjust your prices within sensible limits

Is it worth buying this training course?

And a special consideration on training, as this is something I have been pondering and decided not to invest in:

  1. Is the training run by an accredited provider that is respected in my industry?
  2. Does it train me on something I will use in my everyday work life?
  3. Will it add a skill to my portfolio that I
    • know there is a market for
    • will enjoy doing
    • have got time to commit to fully once I’m trained up?

Point two helped me decide not to take the training provided by a well-known and respected association in order to gain qualifications with them, because they are all about editing on paper and I have done one job on paper in four years.

And the last bullet in point three is how I decided NOT to pursue training in the art of indexing. Yes, there’s a market for it; yes, I would enjoy doing it; but no, I have a full roster of valued clients at the moment. If I was to take on indexing work, something would have to give: either my evenings and weekends, which I have pretty well reclaimed from Libro, or one or more of my current customers. I wasn’t ready for either of those scenarios, so let it go.

Do I invest in advance or arrears?

This is a tricky one. I’m facing it at the moment with my book.

I really want to publish a print version of my e-book. I’ve got some quotes for producing the back and spine cover art and wording, and for producing it as print-on-demand and fulfilling it via the online bookshops. I would be able to buy copies for myself and sell them at events. I’d also have a physical book with my name on.

I was always adamant that the book needed to pay its way, i.e. I wouldn’t do new or paid-for initiatives until the book had actually brought in the money into my bank account to pay for it. Ignoring the hours I put into writing and promoting the book so far, I would need to sell approximately five times as many e-copies as I have already to pay for the setup, design and print-on-demand service (the fulfilment cost comes out of the profit on each copy).

I should make at least twice the profit on each print copy that I sell as I do on the e-books, if they sell.

Do I wait until I’ve made that money to go ahead? Do I wait until I’ve made half of it and then risk the other half, assuming it will take me half as many books sold in print to get the investment back? Do I do it now and hope I sell 2.5 times the books in print that I’ve sold in electronic form to pay myself back?

Before, I’ve always waited until I have the money put aside before I buy something – I didn’t invest in my new PC and laptop until my Libro business had been going for a couple of years and I had the money in the bank (were they worth it? Read next week’s article to find out!). But I’m eager to get those print copies out there … and I really don’t know what to do at the moment.

How do you choose how to invest / whether to invest?

How do you make your decisions? Have I missed something here? I’d love to know your thoughts – do post a comment! And … should I make a leap of faith and invest in print copies of my book? Help me to decide!

In the second part of this article, I talk about how to calculate your return on investment, and I’ll be going on to share what’s been worth it for me (and some other people) – and what hasn’t.

RELATED ARTICLES

Working out Return On Investment

What is worth it for me?

Interested in finding out how I made the transition from part-time to full-time self-employment and built my business safely and carefully? Take a look at my new book, out now!

 
8 Comments

Posted by on May 15, 2013 in Business, New skills


Tags: , ,

What to do if your comment boxes are too big in Word

I have already published a range of posts on issues with comment boxes or comment balloons, including ones on comment boxes suddenly going tiny, or comment box text running in the wrong direction, changing the language in your comment balloons. Thanks to my colleague, Laura, I realised that I needed to post an article on what to do if your comment box size, or the general comment box area, is bigger than you want it to be.

Help! My comment box margin is too large!

This is the problem that my friend, Laura, had. Her comment box margin was somehow spreading across almost the whole page. Although it doesn’t encroach on the text area on the page, it makes your total page really wide. It looked something like this:

1 too wide

Even on my wide monitor, if the comment box margin is too wide, you get the choice of being able to see all of the text, as above, or all of the comment, as below – not very helpful!

2 too wide

How do you resolve this issue? You need to pop into Track Changes (in the Review tab) and click on the little arrow at the bottom to give you the Track Changes Options. Right at the bottom, you’ll find options for making the comment review pane / margin smaller (and moving it to the left or top if you so desire).

The default is 6.5 cm but if you like to have your page of text bigger but still see your comments, change this to a smaller size.

Note, that like everything in Track Changes, this only changes the view on your computer – whoever you are sending the document to will see it however they’ve set it up.

Help! My comment box text is too large!

Are you experiencing this problem:

3 too big

To change this to a normal size, we need to access the Styles dialogue box, by either

  • Pressing Control + Alt + Shift + s simultaneously
  • Going to the Home tab and clicking the little arrow at the bottom right of the Styles menu

This brings up the Styles dialogue box.

Click the right hand button at the bottom: Manage Styles. When you first open this next window, the sort order is As Recommendedclick on the down arrow to change it to Alphabetical:

Find Balloon Text (note: not Comment text) and it confirms how you have your text set up (blue circle).

Click the Modify button … to change your font and font size. You’ll notice lots of other options (blue circle) to change the spacing, etc.

The standard size for balloon text is 8 or 10 so choose that and you’ll have a nice tidy balloon again!

Press the OK button, and carry on pressing OK buttons until you get back to your document. Now, your comment will appear in the style you have chosen.

Again, these changes will only affect your computer.

These related topics should help you further:

What to do if your comment boxes go tiny in Word

What to do if your comment boxes start running from right to left

Changing the language in your comment balloons

Customising your comment boxes – everything you need to know

Customising Track Changes

This is part of my series on how to avoid time-consuming “short cuts” and use Word in the right way to maximise your time and improve the look of your documents. Find all the short cuts here

Do let me know if this has helped you, saved your bacon, etc. – and do share with the buttons at the bottom of this article.


Tags: , , , ,

Justification in Word documents

Today we’re going to learn about the different kinds of justification that you can use in Word documents, and why we would choose to use the particular options.

What is justification?

Justification is the way in which your text is set out on the page. A margin is justified if all of the words on that margin are aligned vertically. For example, this article uses left justification: all of the lines of text start in the same place on the left, unless I manually indent them using tab or bullet points, and all of the ends of the lines present a ragged appearance on the right.

How do I set the justification in my Word document?

You will find the justification menu under the Home Tab, in the Paragraph Section – four little buttons with indications of what the text will look like:

1 justification menu

You can see four little buttons, in order from left to right: left justification, centre justification, right justification, full justification.

To set the justification for text that you have already typed, highlight the text and press the appropriate button. To start typing in a particular layout, press the button, check that it’s gone orange, and then start typing.

Left justification

Left justification means that all of the lines of text are lined up on the left hand side, but are ragged on the right:

2 left justification

Full justification

Full justification is very common and does look neat, although it can have some issues, as we find when we try to type text in a column or table using this form of justification:

3 full justification

Right justification

Right justification can look a bit odd in a text (and can be confused with the right-to-left text direction, which would of course use this as standard rather than left justification). However, it is extremely useful if you want to line up a list of numbers or prices so they look lovely and neat. This works in tables and columns of course, too, and makes it so easy to make things look tidy.

4 right justification

Centre justification

Centre justification is hardly ever used in anything but a heading, a poem, maybe, or something with a special design like a menu. But if you want to do it, here it is. One thing you need to watch out for is that if you hit the enter key to make a new line in order to get the effect or layout that you want, Word will helpfully capitalise the first word on the next line for you (see circled text below). However, at least in Word 2007 and Word 2010, if you change this to lower case once, it will leave it on lower case the next time! Clever Word!

5 centre justification

We’ve learned in this article about what justification is, the different kinds of justification, their advantages and disadvantages, and when you might want to use them.  I hope you’ve learned something useful here!

This is part of my series on how to avoid time-consuming “short cuts” and use Word in the right way to maximise your time and improve the look of your documents.

Please note, these hints work with versions of Microsoft Word currently in use – Word 2003, Word 2007 and Word 2010, all for PC. Mac compatible versions of Word should have similar options. Always save a copy of your document before manipulating it. I bear no responsibility for any pickles you might get yourself into!

Find all the short cuts here

 
6 Comments

Posted by on April 24, 2013 in Errors, New skills, Short cuts, Word, Writing


Tags: , , , , , , , ,

How to add line numbers to a Word document

This article explains the correct – and incorrect – way to add line numbers to a Word document. Why would you want to do that? Read on and find out! This works for Word 2007, Word 2010 and Word 2013.

Why do I need to add line numbers to a Word document?

I was inspired to write this post after my colleague Katharine O’Moore Klopf mentioned that she’d been asked to do this by the editors of a journal for which she was editing an article. Presumably they wanted to be able to refer to particular line numbers in their criticism of the piece.

Transcriptions will sometimes have line numbers, if they’re going to be discussed in detail, and we can probably all recall from our dim and distant pasts working on critiques of poems and plays which had 5, 10, 15 etc. in the margins.

So these are all reasons for adding line numbers to a Word document.

How NOT to add line numbers to a Word document

If you find the need to add line numbers, it’s kind of natural that you might think – oh, I’ll just make the whole document into a numbered list. Well, to do this you would have to put a return at the end of each line to make it into a new line. Then you would highlight the whole text and add numbered bullets. But, oh, look what happens:

1 what you don't do

The numbers push the lines across and they run over onto the next line; all possibility of right justification is lost; and heaven help you if you want to insert or delete any text once you’ve done it!

So, don’t do that.

How to add line numbers to a Word document – the correct way (Word 2007, Word 2010 and Word 2013)

Line numbering and its options can be found in Word 2007 and Word 2010 in the Page Layout tab, in the Page Setup area. There you will find Line Numbers:

2 menu

Click on the arrow next to Line Numbers to bring up its Options menu:

3 numbering options

It will automatically be set to None – choose Continuous and see what happens to your paragraphs …

4 continuous

Line numbers have automatically appeared, but the formatting of the text, its justification etc., remain as they were. This menu also allows to you to choose whether to restart the numbering at the beginning of each page, or each section, or to suppress the numbering for the particular paragraph your cursor is in.

Line numbering options in Word

You also have a number (sorry!) of options to choose from in order to customise your line numbering. You reach these options from the last item on the Line Numbering menu

5 options menu

… although when you click on this option, you are taken into a general dialogue box for Page Layout:

6 options menu line numbers

and you need to click on Line Numbers… at the bottom, which will finally give you a list of options:

7 options menu line numbers

To go through the options in order …

  • Add line numbers – this gives you the chance to add or remove them at this stage
  • From text – the distance between the text and the number. Click on the arrows to choose the distance (I usually just use Auto)
  • Count by – this allows you to display only every x number. I don’t think “Count by” is a particularly useful way to describe this, but scroll down to see it in action
  • Numbering Restart each page / Restart each section / Continuous – this repeats the options you found on the first screen, but it’s useful to have them here if you’re generally messing around in the Page Layout menu and don’t want to go out of it to set your line numbering

Whatever you choose on here, click OK twice to get out of this dialogue box and the Page Layout one.

How do I produce a line number every five or ten lines?

You may remember from literature lessons at school that poetry and plays often have every 5th line marked. You can do this in Word by choosing that Count by option in the Line Numbering Options menu (see above for how to get to it).

Set the number to 5 …

8 count by 5

… and as if by magic, when you return to your document after choosing OK – OK, you will find every fifth line numbered:

9 counted by 5

Working in Word 2003

In Word 2003 you will need to follow these menus: File – Page Setup:

W2003_01

Choose the Layout tab in the dialogue box and the Line Numbers button. Choose to Apply to the Whole document or This point forward. Click on Line Numbers:

W2003_02

Tick Add line numbering and choose to Restart each page/section and Continuous. Click OK twice to accept – in this dialogue box you also find the options Start at, From text and Count by that are explained above.

Thanks to Katharine O’Moore Klopf for the Word 2003 screen shots and instructions.

Copying and pasting a document with line numbers

It’s come to my attention (thanks to a commenter on this post) that it’s not possible to copy and paste text with line numbers into a new blank document.

This is because the line numbers function actually displays a feature of your document (much like if you turn on paragraph marks) but the line numbers are not a part of the document itself.

If you want to transfer your line numbers into another document, you can do this in one of two ways:

  1. Save As the document to make an exact copy (with a different file name) and then add your other text around it
  2. Copy and paste your text into a new document and add the line numbers again

At least we know now …

—-

This article has explained why you might want to add line numbers to your document, and how to do it. If you found this useful, please post a comment, share and like this article! Thank you!

This is part of my series on how to avoid time-consuming “short cuts” and use Word in the right way to maximise your time and improve the look of your documents.

Please note, these hints work with versions of Microsoft Word currently in use – Word 2003, Word 2007, Word 2010 and Word 2013 all for PC. Mac compatible versions of Word should have similar options. Always save a copy of your document before manipulating it. I bear no responsibility for any pickles you might get yourself into!

Find all the short cuts here

 
53 Comments

Posted by on April 17, 2013 in Errors, New skills, Short cuts, Word, Writing


Tags: , , , , , , , , ,

How to add and remove hyphenation in a Word document

This article explains how to add and remove hyphenation in a Word document, and how to work with the options you have in the hyphenation menu.

Why would I want to add hyphens to a document?

This issue doesn’t normally come up with standard documents where the text is in a smallish size and extends across the entire width of the page. In fact I hardly ever see it in the work I do, and was only reminded of it when a client had accidentally set automated hyphenation in part of his document that happened to contain long words. Where did all these hyphens come from, I wondered.

It is useful, however, if you are working with columns, say in a table, or for a newsletter you’re publishing, or some other part of a document where you want to have a narrow band of text running down the page. If you just put your text in your column and don’t justify it on the right hand side, you will end up with a very ragged look:

3 without justification or hyphenation

In fact, as you can see (marked by the arrow), one word is just too long for the line and splits at the last letter, something which doesn’t obey any of the standard rules of hyphenation (I bet this has happened in your tables – it has in my clients’).

Maybe we can neaten it up by applying Right Justification

4 with justification without hyphenation

Oh no! In its effort to make everything tidy, Word has carefully inserted huge spaces between words (unlike someone typesetting properly on a computer or by hand, it doesn’t space out the letters in the words so much as just add massive spaces). And poor old Mr Long Word is still dangling a letter onto the next line.

This looks pretty horrible, doesn’t it. Adding automatic or manual hyphenation is the way forward.

How do I add automatic hyphenation to my Word document?

To work with the hyphenation options, we need to be in the Page Layout tab, and the Page Setup area, and there you’ll find Hyphenation (with a little pop-up box explaining it). This is the case in Word 2007 and Word 2010. In Word 2003, you need to select the following menus: Tools > Language > Hyphenation.

1 menu

If you click on the arrow to the left of the word Hyphenation, you get a menu that looks like this:

2 drop down hyphenation menu

You can choose here between None, Automatic and Manual, and then have some options, too. We’ll look at those options in a moment.

What happens if I add automatic hyphenation to my document?

If you highlight the text and then select Automatic from the Hyphenation menu, Word will automatically insert hyphens into the text to break the words in sensible, permitted places (there is a whole art to this which I will discuss another time. I’m not sure which exact rules Word follows, but a quick look shows that it’s pretty good). So if your text is right justified, you’ll get this:

5 with justification and hyphenation

You can see here that Word has hyphenated all of the longer words that previously caused those big gaps, and made the text an awful lot tidier.

You can do this on unjustified text, too:

6 without justification and with hyphenation

but I personally think that this still looks a bit messy.

How do I remove automatic hyphenation?

To remove automatic hyphenation when you find it in a document and don’t want it, highlight the offending text and choose None from the Hyphenation menu in Page Layout > Page Setup:

2 drop down hyphenation menu

All of the automatic hyphenation should disappear.

How do I use manual hyphenation in my document?

If you choose the manual hyphenation option, based on where your cursor is placed at the time you select this option, Word will give you a choice of where and whether to hyphenate your words:

7 manual hyphenation

(here we can see our unhyphenated text, with the cursor on “demonstrate”). Once you’ve clicked on Yes or No, it will hop along to the next word that’s a candidate for hyphenation.

Why shouldn’t I just hyphenate totally manually?

Of course, you can just look for gaps and manually type a hyphen in the middle of the word, and it will split over two lines. However, this is a concrete character that you’ve inserted into the word, and so if you change the wording in your text so that the offend-ing word no longer comes at the end of the line, you’ll retain the hyphen charac-ter and get artefacts like the ones you can see in this para-graph. Much better to automate the manual process, so to speak …

What are the hyphenation options?

If you click on the Hyphenation Options at the bottom of the Hyphenation dialogue box, you are given a few choices:

6 hyphenation options

Working from the top …

  • Automatically hyphenate document – does what it says on the tin
  • Hyphenate words in CAPS – you may not want to split long acronyms, etc. – if not, then untick this box
  • Hyphenation zone – this is the maximum space allowed between a word and the right hand margin. Increase this number and the hyphenation zone becomes wider – and you will have fewer hyphens. A lower number will give you more hyphens
  • Limit consecutive hyphens to – allows you to prevent Word from hyphenating at the end of every line – best adjusted once you’ve set hyphenation and seen what it looks like
  • Manual… – gives you another way to get to the Manual Hyphenation feature

——————-

In this article we’ve learned why we might want to apply automatic hyphenation to a document, how we do it, how to remove automatic hyphenation, and the options that are available in the hyphenation menu.

This is part of my series on how to avoid time-consuming “short cuts” and use Word in the right way to maximise your time and improve the look of your documents. Do like and share as much as you can, and/or leave me a comment if this article has been useful to you.

Please note, these hints work with versions of Microsoft Word currently in use – Word 2003, Word 2007 and Word 2010, all for PC. Mac compatible versions of Word should have similar options. Always save a copy of your document before manipulating it. I bear no responsibility for any pickles you might get yourself into!

Find all the short cuts here

 
32 Comments

Posted by on April 10, 2013 in Errors, New skills, Short cuts, Word, Writing


Tags: , , , , , , , ,