This article explains how to combine several Word documents into one document. It’s particularly useful if you’ve written a dissertation, thesis or book and need to combine all of the chapters into one file.
These instructions work for Word 2007, Word 2010 and Word 2013; I’ve used Word 2010 for the screenshots
Why would I want to combine chapters into one document?
Lots of people do their writing a chapter at a time, and have it edited a chapter at a time, too. But the time will come when you want to put it all into one book, with page numbers running throughout, rather than messing around starting the page numbers for chapter 2 at the next number on from chapter 1, etc.
What’s the incorrect way to combine my chapters?
You might be tempted to pick up the text of each chapter and copy and paste it into one document. That can lead to issues and inconsistencies. This is the correct way to do it and actually takes less time and avoids you leaving out any bits of your individual chapters.
How do I prepare to combine my documents?
It’s pretty easy to combine several documents into one, however the most important point is …
The file names must be in the order that the chapters are going to be in.
Word will combine your chapter files in alphanumerical order.
If you have called your chapter files
Chapter 1 introduction
Chapter 2 review of the literature
Chapter 3 methodology
Chapter 4 conclusion
then that’s fine, they will combine in that order.
If you have called your chapter files
Introduction
Review of the literature
Methodology
Conclusion
then Word will carefully sort them alphabetically into
Conclusion
Introduction
Methodology
Review of the literature
when it combines your documents.
The best thing to do is add a number 1, 2, 3, etc at the start of your file names BEFORE YOU START COMBINING, so you know they will come out in the correct order.
How do I combine my documents?
OK, so we’ve got, say, four documents or chapters to combine into one.
First, open a new, blank document (using the Home button, New, and choosing a blank document)
Then, click on the Insert tab and find Object in the Text area:

Click on the arrow to the right of Object to get the drop-down menu, and click on Text from File:

Now navigate to your files and select the ones you want to combine.

Hold down the Control Key and click on all the ones you want to combine (or click on the top one, hold down Shift and click on the bottom one if you want all of them). Once you have them all highlighted, click Insert.

Note: it doesn’t matter what order you are displaying them in or what order you click them in, it will choose them and insert them in alphabetical or numerical order, as I mentioned above.
Now you will have one big document including all of your chapters!

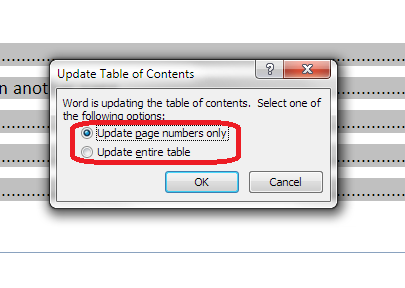
And … if you had footnotes in the documents, and had set page numbers to show, they will automatically update in the combined document to be numbered consecutively (if you want start your footnote numbering at 1 for each chapter, you’ll need to look at my posts on footnotes and endnotes).
Don’t forget to save your document!
PS: If you find you lose your formatting when combining Word documents, read this article for the solution.
—–
This is part of my series on how to avoid time-consuming “short cuts” and use Word in the right way to maximise your time and improve the look of your documents.
If you have enjoyed this post and found it useful, please click on the “share” buttons below or tell your friends and colleagues about it! Thank you!
Please note, these hints work with versions of Microsoft Word currently in use – Word 2007, Word 2010 and Word 2013, all for PC. Mac compatible versions of Word should have similar options. Always save a copy of your document before manipulating it. I bear no responsibility for any pickles you might get yourself into!
Find all the short cuts here …
Other useful articles on this website
How to combine Word documents without losing the formatting