RSS

Category Archives: Word

More Control Key keyboard shortcuts Ctrl-J and more

hands typing I have previously written about the wonders of Control-F and how this keyboard shortcut  finds text in almost everything (Word, Excel, PowerPoint, web pages, WordPress back-end, etc., etc., etc). Then I discussed other Control- or Ctrl+ keyboard shortcuts that you can use to copy and paste, embolden, italicise and underline, find, goto and replace, undo, redo and open, new, print and save. But I’ve recently had some questions about the remaining Control Key commands, so let’s round up what they do.

Why do we use keyboard shortcuts?

Keyboard shortcuts are used to save wear and tear on the wrists, to interact with a computer in other ways than just using two hands and a mouse, to save time, and, maybe, to show off your amazing computer skills.

What are the rest of the keyboard shortcuts using the Control key, then?

Ctrl-D – open the Font dialogue box using Control Key + D

Ctrl-E – centres the text in which the cursor is situated (this acts a toggle, so will un-centre centred text)

Ctrl-J – makes the text in which the cursor is situated become fully justified (again, this is a toggle, so the text will return to left justification (in a left-to-right alphabet document) if it’s already fully justified)

Ctrl-K – opens the Hyperlink dialogue box – make sure you have the text that you want to create a link for highlighted before pressing Control + k

Ctrl-L – makes the text in which the cursor in situated become left-justified (a toggle, so if it’s already only left-justified, pressing this will return the text to its full justification)

Ctrl-M – increases the indent on the left (much like the Tab key)

Ctrl-Q – removes indenting, so if you haven’t got any, it will seem this doesn’t do anything

Ctrl-R – makes the text in which the cursor is located become right-justified (a toggle, so pressing this in text that is already right-justified will change it to left-justified)

Ctrl-T – moves just the bottom indent slider across one tab at a time to create a hanging indent

Ctrl-W – closes the document, giving you the option to save

———————

Did you know ALL of these shortcuts? They’ll save you some mouse clicks and some are a lot quicker and more useful than the other methods you can use to get the same results. Which are your favourites?

Related posts on this blog:

How to find text almost anywhere

Changing from lower case to upper case

Using the Control key shortcuts (the ones that aren’t here)

Find all of the short cuts here

 
5 Comments

Posted by on September 27, 2017 in Errors, New skills, Short cuts, Word, Writing


Tags: , , , , , , , ,

How do I make my picture appear next to my comments in Word 2013 and 2016?

Here’s a problem: when I add comments to a Word document don’t show my picture by them although I’m signed in to my Microsoft account. This article explains how to make sure that your personal picture appears in your Word Comments (in Word 2013 and going forward to 2016 and beyond, for PC). If your picture has disappeared from your Word comments, it tells you how to get it back. If you don’t want to see your picture in Word comments, it tells you how to remove it.

I always try to be responsive to my commenters (see this post on comments for why!) and so I’m writing this post as a direct consequence of a comment I received on one of my articles about comment boxes in Word.

The basic problem is this: you can have your image appear next to your comments in Word. Because Word 2013 and beyond are designed largely to be used with an active subscription account with Microsoft, it can pull details from your Microsoft account through to the software to enhance your user experience.

Why would you want your image next to your comments?

I’m going to repeat the comment here (with many thanks to commenter and correspondent Lark Lands) so you can see what the problem is and why it’s important:

I have Word 2013 and from the time I first started using it when I click on the Review tab and insert a new comment it would appear showing my name and my Microsoft “account picture” plus the typed comment. Now the account picture has disappeared and all you see is that icon of a generic person. Because I’m a medical editor who is constantly working on files with comments from many different people the photo is actually useful because at a glance I can whiz through a 40-page document, just slowing down when I see the photo in order to see if people have responded to my comments.

So this comment writer uses the picture to scan down and find their own comments.

Please remember the golden rule of Track Changes and Comments here, however: how you choose to display your Word document comments and changes has no effect on what your client sees. So you can add your picture to your own view, but don’t expect this to carry through to your client’s or collaborator’s view of the document.

Where is the picture in my comments in Word?

In Word 2013 or 2016, you might see a picture in your comments: it will appear in this position if you have it set up to show pictures:

Picture appearing in comment in Word

The arrow is pointing to the placeholder picture (if you’re not logged into your Microsoft account online) or your own picture (if you are logged in)

If you don’t have pictures enabled, your comments will look like this:

Comment in word with no picture attached

How do I add or remove my picture from Word 2013 comments?

The first thing you need to do here is to make sure that you’re logged in to your online Microsoft account. If you don’t do this, the “picture” that appears by your comment will just be a little placeholder symbol and your efforts will be wasted to an extent.

Now you need to make sure boxes are ticked (or unticked) in two places and then do one final but very important process.

1. Set up Track Changes options

First, set up your Track Changes options to show pictures.

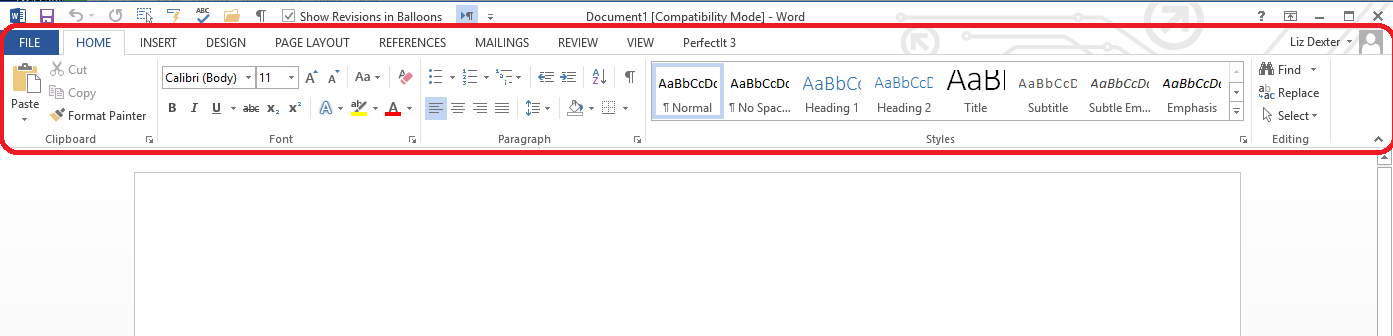
In the Review tab, find the Track Changes area and click on the arrow in the bottom right corner:

track changes options to add pictures to comments

When you’ve clicked on the arrow, this dialogue box will appear: make sure that Pictures by Comments is either ticked or unticked, depending on whether you want to see the pictures or not:

add pictures by comments in word

Click OK and the first part of the process is done.

2. Check your Word Options are appropriate

Now you need to go into Word Options and make sure that your picture displays whether or not you are logged in to your Microsoft account (you should be logged in when you do this)

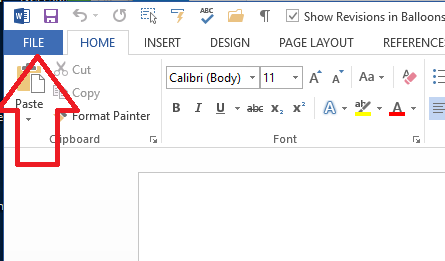
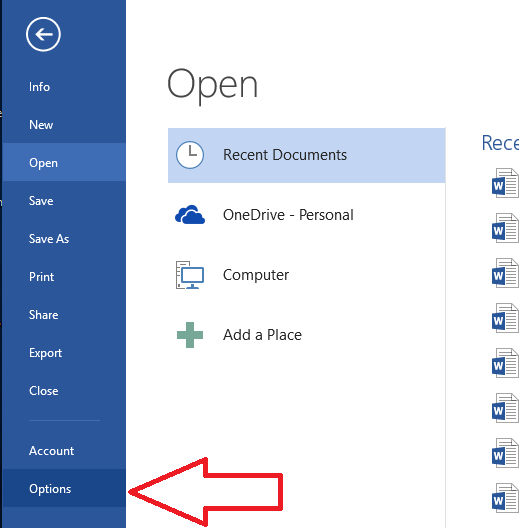
Go into Word Options using the File tab …

access word options to display picture in word comments

… and then choosing Options

access word options to display picture in word comments

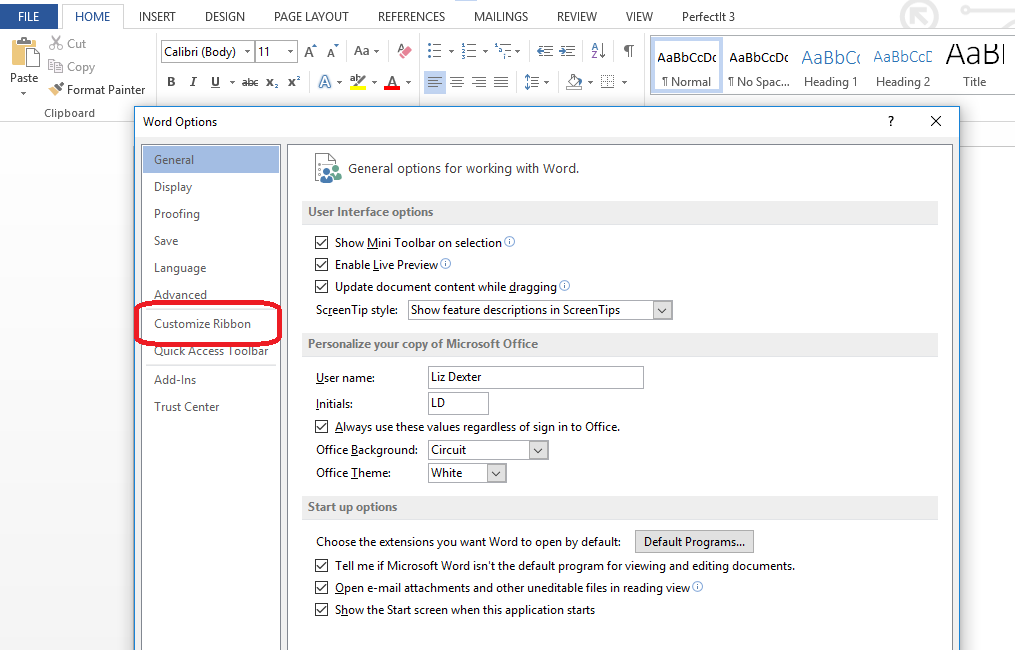
The Word Options dialogue box will appear. Make sure that Always use these values regardless of sign in to Office is NOT ticked (even though this seems counter-intuitive):

access word options to display picture in word comments

Click on OK and process 2 is complete.

3. Restart your computer (do not ignore this one)

After an amount of correspondence on this topic, my original comment poster noted that they hadn’t fully restarted their computer. It’s not enough to restart Word – you need to restart Windows.

So, restart your computer and now your picture should appear or not appear as you wish.


This article has told you what to do if your picture does not appear next to your comments in Word 2013 or you want to add or remove your picture from Word comments.

Please do click the share buttons or comment if you’ve found this article interesting and/or useful.

Other relevant articles on this blog

Customising comment boxes in Word

What to do if your comment boxes go tiny in Word

What to do if your comment boxes start running from right to left

Changing the language in your comment balloons

Customising Track Changes

 
13 Comments

Posted by on June 15, 2017 in Word


Tags: , ,

Copy-typing hints and tips 1: what it is, what it looks like and how to charge

Copy-typing hints and tips 1: what it is, what it looks like and how to charge

In this article I’m going to share my learning points from a job I’ve recently done, copy-typing a manuscript which had originally been typewritten. In this case, it had the added complications of having hand-written alterations and corrections made to the typescript, all of which had to be taken into account. Here’s what I learned, but first a quick round-up of what copy-typing actually is.

What is copy-typing?

Copy-typing means creating a Word document (usually) out of a document which is not editable in Word. This might be handwritten notes in a notebook, notes made during meetings on large sheets of paper, typescripts or PDFs that it’s not possible to convert using Optical Character Recognition.

What format do copy-typing jobs come in?

The copy-typing jobs that I have done have come in PDF format or sets of images. I’ve worked with photographed hand-written notes and in the latest case, a set of pages that had originally been typed out on a typewriter, then amended by hand, then, a long time afterwards, scanned and put into one big PDF.

You might also copy-type hand-written or typed documents on their original paper (if this is the case, do invest in a document stand). You could also receive a scanned or printed copy of a word-processed document where the original has been lost and only the printed pages are available!

It is possible to convert PDFs of type-written or word-processed script into Word documents using Optical Character recognition.

Why is this not used instead of paying someone to type out every sheet by hand?

  1. Even if you have the document converted, some errors are bound to creep in (ever read a Kindle book that’s been scanned in and notice weird spellings or gaps in words?). So someone will still need to proof-read the resulting text to check it is the same as the original.
  2. Some PDFs are simply not suitable for conversion – the pages may have copied dark, there may be all sorts of annotations and scribblings on the typescript which will confuse the convertor, there might be speckles, blotches and rings of coffee on the typescript, or the type itself might be fuzzy and indistinct.

How do you charge for copy-typing?

It’s difficult to charge a per-word rate for copy-typing because you cannot know how many words the original has.An hourly rate often works well, as this can also take into account any indistinct pages or sections, adding in annotations, etc. none of which would be covered by a per-word rate.

I tend to charge for copy-typing on an hourly basis, although this does have the disadvantage that you don’t know exactly how long the job is going to take so how much it will cost.

In order to quote either a fair (to you and the client) per-word rate or to estimate how many hours a job will take, I recommend doing a test copy-type.

When doing a test copy-type, I will typically spend an hour on a representative sample of pages from the document (usually the most complex and wordy pages, so I over-estimate how long it will take, rather than under-estimating). I will see how many pages I can type out during that hour, then divide the total number of pages by that number to see how long it will take (for example, with my last job, I managed four pages in the hour, so if the document had 60 pages, I knew it would take me around 15 hours. This gave me a ball-park figure of 40 hours for the whole job. I did it in 39 and felt quite smug).

Of course, as with all jobs, if it looks like you are going to go significantly over your original estimate, work out why (had the client only sent you a few pages, and the others had more text or alterations?) and warn your client in good time.


In this article we’ve reminded ourselves what professional copy-typing is, looked at what formats copy-typing jobs can come in and discussed why sometimes conversion from PDF to Word isn’t a viable option. I’ve also given some suggestions on how to price copy-typing. In the next article, you’ll find hints and tips for the actual process.

Other relevant articles on this blog

What is copy-typing?

Copy-typing hints and tips 2: how do I do the actual work?


6 Comments

Posted by on May 10, 2017 in Copy-typing, Word


Tags: ,

How to start a new line, paragraph or page or indent a paragraph in Word 2007, 2010, 2013 or 2016

How to start a new line, paragraph or page or indent a paragraph in Word 2007, 2010, 2013 or 2016

This is a quick reference round-up how to and how not to covering how to stat a new line, how to start a new paragraph, how to start a new page and how to indent a paragraph in Word for Windows.

I have covered all of these in detail in various longer articles which I’ll link to as we go along.

Why all the fuss? Why can’t I do it my way?

If you are formatting a document to be used by someone else, edited and changed or, especially, printed, it’s vital that you use the standard ways to lay out your document to prevent it getting into a mess or someone else having to reformat it (which could be expensive if you’re paying them). In addition, certain methods, especially using Enter to start a new line, can make your document messy as soon as you enter extra text before that line break (see the relevant article for details and examples).

How to start a new line in Word

Don’t use the space bar to move the cursor along until it finally gets to the next line

Do use a soft line return or a hard paragraph return:

  • Pressing the shift key and enter key at the same time at the end of your line will move the cursor to the next line without any paragraph breaks, spaces between the lines, etc. (this is very useful if you’re creating two-line captions)
  • Pressing the enter key at the end of your line will move the cursor to the start of the new line (this will give you a space between the two lines if you have your paragraphs set up like that

How to start a new paragraph in Word

Don’t use the space bar to move the cursor to a new line, then create a new line of spaces

Do use a hard paragraph return: hit the Enter key on your keyboard

How to put a space between paragraphs in Word

Don’t use the Enter key to add a line of white space

Do use the Line Space icon in your Home tab or the Paragraph menu to add a space after each paragraph

How to indent a paragraph in Word

Really don’t use the space key to line up the paragraphs

Don’t use the Tab key to indent the paragraph

Do either highlight the whole text and set the rulers at the top of the page OR set the Normal style to have an indent at the start of a paragraph

How to start a new page in Word

Don’t use the Enter key to move the cursor down to the next page

Do use the Enter and Control keys at the same time to force a page break


This article has summarised how to start a new line, paragraph and page and indent a paragraph correctly in Word.

Related articles in this blog

Line space icon

Paragraph menu

Indenting paragraphs

Page breaks


2 Comments

Posted by on April 19, 2017 in Errors, Word, Writing


Tags: , , , , , ,

How do I assign a shortcut key in Word 2010, 2013 and 2016?

In this article we will learn about assigning shortcut keys or keyboard shortcuts or short-cuts in Word 2010, 2013 and 2016 for PC. Please note that these instructions are for these versions of Word and might not work in the same way on a Mac or in an older version of Word.

What is a keyboard shortcut or shortcut key?

A keyboard shortcut allows you to use the keys on your keyboard to do tasks that you might normally need to use your mouse for, or which are buried deep in layers of menus. Click a couple of buttons and you have done what you wanted to do.

What is the purpose of assigning shortcut keys?

The clue is in the word “shortcut”. Assigning a keystroke or two to carry out common tasks will save time and is also used by people who need to use the mouse less, for example if they suffer from or are prone to RSI.

Are some actions in Word covered by shortcut keys anyway?

Yes, some actions in Word are already doable by using keyboard shortcuts. For example, you can copy text by pressing Control and C at the same time, or paste it somewhere using Control and V. You can also look for text pretty well anywhere there’s text by using Control and F together.

What we’re talking about here is assigning a new shortcut key to an activity that doesn’t already have one – or assigning a new key to a different shortcut.

How do I assign or change keyboard shortcuts?

To assign or change keyboard shortcuts or shortcut keys, you need to access the Customize Ribbon menu.

In brief, you can use one of these two paths:

  • File – Word Options – Customize Ribbon
  • Right-click on the tabs in the Ribbon – select Customize Ribbon

See this article for screenshots and more detail.

Once you’ve followed the trail to the Customize Ribbon dialogue box, you should be here:

customize ribbon and short cut keys

Now click on Keyboard shortcuts: Customize.

The Customize Keyboard menu

This looks a bit weird at first. Basically, in the left-hand box you will find all of the tabs (and a few more) that you see in your Word ribbon. In the right-hand box, you will find all of the commands or actions associated with that tab. So when you first go into this menu, you’ll see the File Tab and a load of things you probably don’t normally do:

customize keyboard

However, if you move to the Home Tab (by clicking on it) you will see some more familiar items – and note that they’re in alphabetical order.

Here you can see under Current keys that Bold has the shortcut keys Ctrl+B and Ctrl+Shift+B, which means that you can hold down Control and the b key at the same time, or Control and Shift and the b at the same time to make the text that’s highlighted or the next text you type bold. You might have known how to do that already: here is where that shortcut can be set, removed or changed.

customize key strokes

If you scroll down the list of tabs, headed Categories, you will find one called Commands Not in the Ribbon which is a useful list.

Let’s say I wanted to change the shortcut for AllCaps (i.e. to change the highlighted text or next text I type to be ALL IN CAPITALS).

I click on the AllCaps Command and then press the new shortcut key I want to assign to that – in this case I’ve chosen Ctrl+C – so I hit those keys and Ctrl+C gets added into the box under Press new shortcut key:

assign a new keystroke

What if the shortcut key I want to use has already been assigned?

Here we can see that Ctrl+C is already assigned to EditCopy. If I assign Ctrl+C to AllCaps, it will then move over from EditCopy to AllCaps and will no longer be available for EditCopy.

keystroke already assigned

Of course, this might not matter, if the other command is one you don’t use anyway. If you want to assign this shortcut, go ahead and press Assign. The shortcut will move into the Current keys section.

How do I remove or cancel a keyboard shortcut?

If you want to remove the keyboard shortcut you’ve just created, or one that you keep hitting by accident, highlight the one you want to remove and press the Remove button beneath it. Note: if you’ve reassigned a shortcut key and want to put it back to how it was, you will need to find its original command and add it back in there.

assign and remove shortcuts

How do I save my keyboard shortcuts?

When you’ve assigned your shortcuts, press the Close button on the Customize Keyboard menu and the OK button on the Customize Ribbon menu.

Note: you can save changes in a new template, if you want to keep your standard Word template as it is. Drop down the Save changes in: list to do that.


In this article I’ve explained how to assign and remove keyboard shortcuts or shortcut keys to give a short cut that will save your mouse hand. If you’ve enjoyed this article and found it useful, please share using the sharing buttons below, or comment if you’ve searched for it and used it and I’ve helped you. Thank you!

Related articles on this blog

How to customise the Quick Access Toolbar

How do I customise the Word Ribbon?

 
2 Comments

Posted by on April 13, 2017 in Word


Tags: , , ,

How do I access the Customize Ribbon menu in Word 2010, 2013 and 2016?

This article explains how to access the Customize Ribbon menu, from where you can customise your ribbon. This will link in to posts on customising the ribbon and assigning keyboard short-cuts.

This information applies to Word 2010, 2013 and 2016 for PC.

What is the ribbon in Word?

The ribbon is the set of menus found at the top of your screen in Word which allow you to do all sorts of things, from changing the font to merging documents and adding tables. You can use short-cut keys for some commands, and I’ll explain that in another article. You might call it a toolbar, too. Here it is:

word ribbon

Why would I want to customise the ribbon in Word?

The ribbon in Word is filled with things Microsoft thinks you will want to use, in places it thinks you will look for them. But you might well want to customise it to add your own favourite short-cuts and commands. Or you might want to remove a particular tab altogether, and Word allows you to do this.

How do I find the customize ribbon menu?

There are (of course) two ways to get to the dialogue box where you customise the ribbon.

The first way uses the File tab, the second uses a right-click.

Using the file tab:

use file tab to get to customise ribbon menu

Navigate to the Word Options menu:

word options to customise ribbon

And once in Options, select Customize Ribbon:

customize ribbon from file menu

The alternative way is to right-click anywhere on the tabs in the ribbon and then select Customize Ribbon:

right click to customise ribbon

How do I customise the Word ribbon?

Following either of the routes described above, you should come to this menu:

customise ribbon menu and dialogue box

On the left-hand side, you can see a list of commands, and on the right-hand side you can see a representation of the tabs you have in Word at the moment.

Here are some things you can do:

add an item to the word ribbon

  • Add an item to the Word ribbon (see above) – highlight the item you want to add, highlight where you want it to go, and click the Add button in the middle
  • Remove an item from the Word ribbon – find the item you want to remove by expanding all the menus on the left, highlight it and click the Remove button
  • Create a new tab – maybe you want to make a tab that only contains commands you use a lot – you can use the New Tab button on the left to create a new tab, then add items to it (an item can be in more than one tab)
  • Rename your tabs – rename them to whatever you want!

Don’t forget to click OK before you exit from this menu – or Cancel if you don’t want to change anything after all.

In practice, I wonder how many people do much customisation – do let me know in the comments if you’ve either customised your ribbon already or have followed these instructions to do so.


This article has shown you how to find the customize ribbon menu, why you might want to customise the ribbon in Word, and how to do it.

Related articles on this blog

How to customise the Quick Access Toolbar

 
3 Comments

Posted by on March 29, 2017 in New skills, Short cuts, Word


Tags: , ,

What are the types of transcription?

What are the types of transcription?

There are many different types of transcription, and when you work as a transcriber, you might be asked to do any or all of them. Later in your transcription career, you may choose to specialise in one, and this can be useful for your career. It’s important to know about the kinds of transcription so that you can provide the best possible transcript for your client – if it’s important to them to include everything everyone says and you do an intelligent transcription, your transcription might not even be any use to them!

The different kinds of transcription

These are the main types of transcription. Be careful, however: some clients might describe these different types in different ways, using different language or explaining what they want rather than using a particular term.

Phonetic / linguistic transcription 

Phonetic or linguistic transcription is a highly specialised form of transcription which records not only the words used but the tone taken by the speakers and the exact overlap when two people speak. It is used when the client need to record what is said and how it’s said, because they need to analyse speech acts by a speaker or the exact nature of the interaction between two or more people.

I have encountered this kind of transcription being requested by linguists or clinical psychologists. In fact, I’ve also seen it in books and academic works about speech and interaction.

In phonetic transcription, you record the pronunciation of the words and the rise and fall of the sentence, overlapping utterances, etc., using specialised notation. Linguistic transcription does everything except the phonetic aspect.

For both kinds of highly specialised transcription (which is so highly specialised that I don’t offer it), you will be expected to use a range of symbols and probably a special template.

Time and pricing This is the most time-consuming type of transcription by far – expect to take twice as long as your normal speed, if not more. However, as a highly specialised type of work, the rate per audio minute is higher.

Video / descriptive transcription / captioning

If you’re doing video transcription of a film which is not simply of one or two people speaking, you may be asked to provide descriptive information or take down the text that appears on the screen. The purpose can be either to provide captions on the film in the same language, or to provide a script for translators to translate into another language.

This can involve two different aspects:

  1. Recording the wording in any information that appears on the screen: this could be marketing information, information about the speaker’s job and company, wording on diagrams, etc. This is usually requested when you’re producing text that will be translated.
  2. Recording the movements of people and other noises than speech, e.g. slamming doors, a car pulling up outside. This will usually be requested when your client is captioning the film.

Captioning itself is a specialised art and I refer any true captioning jobs over to a friend and colleague who is experienced with it.

Time and pricing: This again is specialised work and takes extra time to do; for example, the words on the screen might appear at the same time a voiceover is saying something else, so you might need to go over the same tape twice. Therefore there’s an argument that you can charge a little more. Captioning is a specialised art and commands higher rates, but you really need to know what you’re doing.

Verbatim transcription

When we do a verbatim transcription, we record every single the speakers say, but using standard typing and symbols.

This is used by, for example, legal clients, researchers and marketing companies and anyone who wants to get the full flavour of how the person was speaking. Many of my ghost-writing clients also want verbatim transcription so that they can catch the exact way the subject speaks and capture that to write their book to sound as if it’s written by the subject.

Time and pricing: I use standard pricing for these three kinds of transcription from here onwards, as they actually take around the same length of time to do: the time typing errs and ums and repetitions can be used up by thinking about how to rewrite someone’s words!

Edited transcription

An edited transcription is a slightly tidied up version of a verbatim transcription. It is usually requested by general interviewers and journalists, and also some academic researchers and writers. Ghost-writers might ask for a small amount of editing just to limit the number of ums they have to remove before they can write up their book.

So the editing can have various levels, but usually means removing ums, ers, and repetitions, as well as any “speech tics” such as repeatedly adding “you know” or “d’you know what I mean”.

You do the editing as you type, as it would be far too time-consuming to type out a verbatim transcription and then go back and edit it. Once you’re used to it, it’s quite quick and easy to do.

Intelligent / smoothed transcription

In this type of transcription, you will typically turn non-standard or non-native English into standard English. You are likely to be altering grammar and even wording, as well as doing the activities involved in an edited transcription.

I have two types of client who ask for this kind of transcription:

  1. Companies that produce conference or meeting reports – they want standard English throughout, and any speaker who is a non-native English speaker or even one that is a native English speaker but has a very idiosyncratic way of speaking will be smoothed out and standardised.
  2. Marketing companies that are doing research on a client’s product with its customers, for example. All they want is what the client thinks, straight and simple, to report back to their client, and may well ask me for an intelligent transcription.

Time and pricing: This is quite a specialised variety of transcription, as you need to be very confident in your own ability to write a good, grammatical sentence, to understand what someone has said and rephrase it. As a by-product of the kind of speaker whose words you are smoothing out, you need to be good at understanding non-native English accents. Not everyone is skilled at this, but if you are, it’s really fun to do, as it involves more thought than the other standard varieties of transcription. It does take a little longer than verbatim and edited transcription if the speaker is hard to understand, and I may charge a little more on that basis.

How do I find out what type of transcription my client wants?

If a client wants captioning or linguistic transcription, they will usually know this and provide templates and instructions: they will also check you know how to do this (don’t try to guess if you don’t have any training in this: it won’t work and it will end in tears!) and might give you a test.

To find out whether my client wants verbatim, edited or intelligent transcription, I include this question in my initial questions to the client:

“Do you want the transcription to have a complete record of all ums and ers / to be tidied up of ums and ers and repetitions / to be tidied into standard English and complete sentences where possible?”

This will usually get them to confirm what they want, even if they don’t use the specific terminology.


This article has explained what the types of transcription are and when they might be used, as well as examples of what they look like and some information on their particular challenges. You now know about linguistic transcription, film transcription and captioning, verbatim, edited and intelligent transcription.

If you’ve found this article useful, please do comment below – I always love to hear from my readers! There are sharing buttons there, too, so you can share this on whatever social media platforms you use. Thank you!

Other useful articles on this blog

How do you start a career in transcription? – are you suited for it?

The professional transcriber – the technology you need

10 top tips for transcribers – what every new transcriber needs to know

Why do you need human transcribers, anyway? – I explain why!

Keyboards, ergonomics and RSI – the risks and keeping safe

Transcribing multiple voices – hints to make it easier

Why do transcribers charge by the audio minute? – explains it all

How long does transcription take?

My book, Quick Guide to your Career in Transcription is available in print and online

 
7 Comments

Posted by on March 22, 2017 in Business, Transcription, Word


Tags: , ,

What is verbatim transcription?

What is verbatim transcription?

Transcription clients often want different levels of detail and accuracy in their transcriptions. They sometimes ask for a verbatim transcription. This article explains what verbatim transcription is.

What is verbatim transcription?

The dictionary definition of verbatim is “In exactly the same words as were used originally” (Concise Oxford Dictionary) and this really explains what verbatim transcription is.

In verbatim transcription, the transcriber types out EXACTLY what is said, including any pauses, mistakes, repetitions, stumbles, fillers (er, um, you know what I mean) – everything.

Why would a client request verbatim transcription?

The three reasons I find for a client requesting a verbatim transcription are:

  • A researcher looking at the way people talk about a particular subject might need to know exactly what was said and how it was said
  • A market research company might need to drill down to the specific way in which people talk about their product, including stumbling over the product name or searching for ways to describe it
  • A legal transcription will usually need to be a highly accurate description of what was said and how

How is verbatim transcription different from other kinds of transcription?

Verbatim description is quite different from other kinds of transcription. A journalist interviewing a subject, someone doing general research or a company producing conference reports will not want every single false start, um and er recorded. They might even need you to smooth out the transcription for them so that it reads more clearly.

Here are the main types of transcription in order of their accuracy or match to what was actually said, going from most exact match to loosest match.

  • phonetic / linguistic transcription – this is a very specialised form of transcription used by, for example, linguists or clinical psychologists. In phonetic transcription, you would record the pronunciation of the words and the rise and fall of the sentence, overlapping utterances, etc., using specialised notation. Linguistic transcription does everything except the phonetic aspect.
  • verbatim transcription – as discussed above, this records everything the speakers say, but using standard typing and symbols.
  • edited transcription – this can have various levels, but usually means removing ums, ers, and repetitions, as well as any “speech tics” such as repeatedly adding “you know” or “d’you know what I mean” as you type.
  • intelligent / smoothed transcription – in this type of transcription, you will typically turn non-standard or non-native English into standard English, altering grammar and even wording as well as doing the activities involved in an edited transcription.

All of these can be complicated and take extra time and effort, and you may find that you’re better at one kind than another. Personally, I really enjoy doing Intelligent Transcription, but do all of the types except the highly specialised Phonetic/Linguistic Transcription.

How do I know if my client requires verbatim transcription?

Many clients will tell you up-front if they require verbatim transcription. If they don’t specify, then do ask. I have a standard set of questions I ask all new clients to get their preferences – this includes asking if they want me to transcribe the recording absolutely accurately, or smooth out the ums and ers, etc.

More to come! Watch this space for more details on the types of transcription, with examples!


This article has explained what verbatim transcription is and why you might be asked to do it.

If you’ve found this article useful, please do comment below – I always love to hear from my readers! There are sharing buttons there, too, so you can share this on whatever social media platforms you use. Thank you!

Other useful articles on this blog

How do you start a career in transcription? – are you suited for it?

The professional transcriber – the technology you need

10 top tips for transcribers – what every new transcriber needs to know

Why do you need human transcribers, anyway? – I explain why!

Keyboards, ergonomics and RSI – the risks and keeping safe

Transcribing multiple voices – hints to make it easier

Why do transcribers charge by the audio minute? – explains it all

How long does transcription take?

My book, Quick Guide to your Career in Transcription is available in print and online

 
Leave a comment

Posted by on March 8, 2017 in Business, Transcription, Word


Tags: , ,

How do I add or remove auto captions in Word 2010, 2013 and 2016?

The impetus for this post came from Ana Chavez, who emailed me to ask how to remove automatic captions that were appearing whenever she inserted a Table into Word. I couldn’t work out what was going on, and she kindly messaged me when she found out. Thank you, Ana, for your kindness in getting back to me!

This post covers Word 2010, 2013 and 2016 for PC and the images are from Word 2013. The solution may differ with Word for Mac.

What is auto captioning in Word?

Automatic captioning or auto captioning is a feature which adds a caption to any table (or other item) you insert into your Word document. It looks like this:

automatic caption on table

Here, I have inserted a table and the beginning of a caption has already appeared.

This is actually very useful, as it will remind you to add your captions and also sort out the numbering for you as you go along (you can make choices just as you do when inserting a caption manually – see this post for full information on that). However, my original question was about removing these – so this article covers both removing and adding auto captions.

How do I add / remove automatic table captions?

You can find the caption options in the Reference tab, in the captions section:

caption menu word

To access Auto Captions, first click on Insert Caption. This will give you the standard dialogue box allowing you to insert a caption:

auto caption menu in word

At the bottom of this dialogue box is the AutoCaption button. Press this to access AutoCaption options:

autocaption options

If you have found this article because you want to stop Word auto captioning, you will probably find one of these boxes ticked, and it’s probably Add caption when inserting … Microsoft Word Table. However, you can see from this screenshot that you can automatically add a caption to pretty much anything.

You can also see that you can automate the label, position and numbering system just like you can in the Insert Caption dialogue box when you’re doing it manually. However, doing it this way will automate the whole process. Your caption will appear automatically, as we saw in the first picture, and you just have to type in your caption text.

Once you have chosen your options, click OK and your AutoCaptioning will work as you want until you turn it off again.

How do I remove AutoCaption?

If you want to remove automatic captioning, un-tick whichever box is ticked:

no autocaption in word

Now press OK, and you will have removed automatic captioning.


This article has explained how to add or remove auto captioning in Word 2010, Word 2013 and Word 2016. If you’ve found it helpful, please comment below or use the sharing buttons to share it!

Related articles on this blog

Table of figures and table of tables

How to create a two-line figure caption and a one-line entry in the table of figures

 
2 Comments

Posted by on February 18, 2017 in Word, Writing


Tags: , , ,

How long does transcription take?

How long does transcription take?

As a busy professional transcriber, I get a large number of queries from potential clients. They often want to know how long it will take for a transcriber to do their tape, how quickly a transcriber works. So, how long does transcription take? I’ll share a few details to make it easier for people to understand the parameters.

How long does it take to transcribe a tape?

I did a quick poll among other transcribers I know, and the answer does vary, but on average, it takes 30 minutes to transcribe 10 minutes of tape. So if you have an hour-long tape, it will take me around 3 hours to transcribe it (if you try it yourself, and you’re not a professional transcriber, it’s likely to take a lot longer. If it doesn’t, consider a career change!).

What factors affect how long it takes for a tape to be transcribed?

There are various factors that will make the tape take a longer (or shorter) time to transcribe.

It takes less time to transcribe an audio file if …

  • The speakers speak really slowly and clearly
  • It’s an interview and I’m asked to only take notes on what the interviewer says

It takes more time to transcribe an audio file if …

  • There are more than two speakers
  • The speakers have strong accents
  • The tape quality is bad (muffled / quiet / picking up the background noise too much)
  • The speakers are speaking really quickly
  • There are a lot of technical terms or other details which I need to look up
  • I’ve been asked to use a complicated template or put in more than the standard number of time stamps

That’s why I and other transcribers tend to charge extra for additional speakers, extra time stamps and ‘difficult’ tapes

How long does it REALLY take a transcriber to type out an audio file?

What people sometimes forget – both transcribers when quoting for work and clients when asking for quotations, is the need for rest. Typing for hours at a time can be quite brutal on the hands / shoulders / back / ears / eyes. Transcribers need to take breaks. There’s also the time for checking at the end – listening right through or at least running a spell check.

So an hour-long tape is not likely to take me exactly 3 hours; I’d say more like 3.5 to 4 hours. I try not to type for more than 7 hours a day, and I prefer not to do it late at night (though I do do it early in the morning instead).

Your transcriber might also have other projects which need to be completed before they can start yours.

All of these factors mean that you shouldn’t be surprised if you ask about an hour-long tape and find out it will take a day or 24 hours to return to you. I’m sure my fellow-transcribers like to be flexible, as I do, but there are limits to human endurance!


Hopefully this article has clarified the amount of time it might take your transcriber to transcribe your tape. Typing speed is one thing, transcription speed is another, and remember that your transcriber is human (that’s why they’re good at what they do) and needs to look after themselves.

If you’ve found this article useful, please do comment below – I always love to hear from my readers! There are sharing buttons there, too, so you can share this on whatever social media platforms you use. Thank you!

Other useful articles on this blog

How do you start a career in transcription? – are you suited for it?

The professional transcriber – the technology you need

10 top tips for transcribers – what every new transcriber needs to know

Why do you need human transcribers, anyway? – I explain why!

Keyboards, ergonomics and RSI – the risks and keeping safe

Transcribing multiple voices – hints to make it easier

Why do transcribers charge by the audio minute? – explains it all

My book, Quick Guide to your Career in Transcription is available in print and online

 
6 Comments

Posted by on November 17, 2016 in Business, Transcription, Word


Tags: , ,